
При подключении к рабочему столу удаленного компьютера с помощью встроенного RDP клиента (mstsc.exe) может появится ошибка:
Произошла ошибка проверки подлинности.
Указанная функция не поддерживается.
An authentication error has occurred.
 The function requested is not supported.
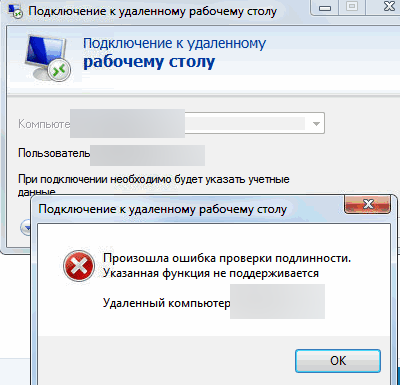
Данная ошибка связана с тем, что Windows по-умолчанию блокирует RDP подключения к удаленным компьютерам, на которых используется уязвимая версия протокола CredSSP (CVE-2018-0886). Протокол CredSSP (Credential Security Support Provider) используется для пре-аутентификации пользователей, когда для RDP доступа включен протокол NLA (Network Level Authentication / Проверка подлинности на уровне сети). Microsoft выпустило обновление для уязвимости CredSSP в 2018 г (https://support.microsoft.com/en-us/topic/credssp-updates-for-cve-2018-0886-5cbf9e5f-dc6d-744f-9e97-7ba400d6d3ea), но какой-то причине это обновление не установлено на удаленном хосте, к которому вы пытаетесь подключиться.
Как исправить ошибку проверки подлинности RDP?
Что нужно сделать, чтобы исправить ошибку и подключиться к вашему RDP/RDS серверу?
-
- (Рекомендованный способ) Самый правильный способ решения проблемы – установить последние кумулятивные обновлений безопасности Windows на удаленном компьютере/сервере, к которому вы подключаетесь по RDP. Скорее всего этот компьютер был недавно развернут из старого образа, или на нем отключено служба обновлений Windows. Проверьте последнюю дату установки обновлений Windows с помощью модуля PSWindowsUpdate или командой:
gwmi win32_quickfixengineering |sort installedon -desc

Обновления можно получить автоматически через Windows Update, или вы можете скачать и установить обновления Windows вручную. Нужно установить любое кумулятивное обновления для вашей версии Windows, выпущенное после 2019 года;
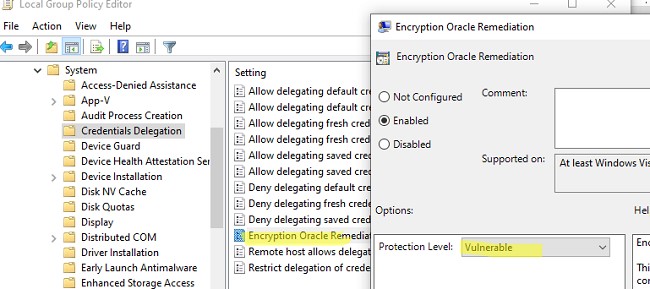
- (Не рекомендуется) Временный способ 1. Вы временно разрешить подключение к RDP серверам с небезопасной версией CredSSP на своем компьютере (клиенте). Для этого нужно изменить ключ реестра AllowEncryptionOracle командой:
REG ADD
HKLM\SOFTWARE\Microsoft\Windows\CurrentVersion\Policies\System\CredSSP\Parameters /v AllowEncryptionOracle /t REG_DWORD /d 2
или можно изменить настройки локальной политики Encryption Oracle Remediation / Исправление уязвимости шифрующего оракула), установив ее значение = Vulnerable / Оставить уязвимость (см. описание в статье Ошибка RDP подключения: CredSSP encryption oracle remediation).
Это позволит вам подключиться к удаленному серверу по RDP и установить последние обновления безопасности (способ 1). После обновления сервера отключите политику или измените значение ключа AllowEncryptionOracle на 0 :
REG ADD HKLM\SOFTWARE\Microsoft\Windows\CurrentVersion\Policies\System\CredSSP\Parameters /v AllowEncryptionOracle /t REG_DWORD /d 0
- (Не рекомендуется) Временный способ 2. Можно отключить проверку подлинности на уровне сети (NLA) на стороне RDP сервера (описано ниже).
- (Рекомендованный способ) Самый правильный способ решения проблемы – установить последние кумулятивные обновлений безопасности Windows на удаленном компьютере/сервере, к которому вы подключаетесь по RDP. Скорее всего этот компьютер был недавно развернут из старого образа, или на нем отключено служба обновлений Windows. Проверьте последнюю дату установки обновлений Windows с помощью модуля PSWindowsUpdate или командой:

Отключить проверку подлинности уровня сети (NLA) для RDP в Windows
Если на стороне RDP сервера, которому вы подключаетесь, включен NLA, это означает что для преаутентификации RDP пользователей используется протокол CredSPP.
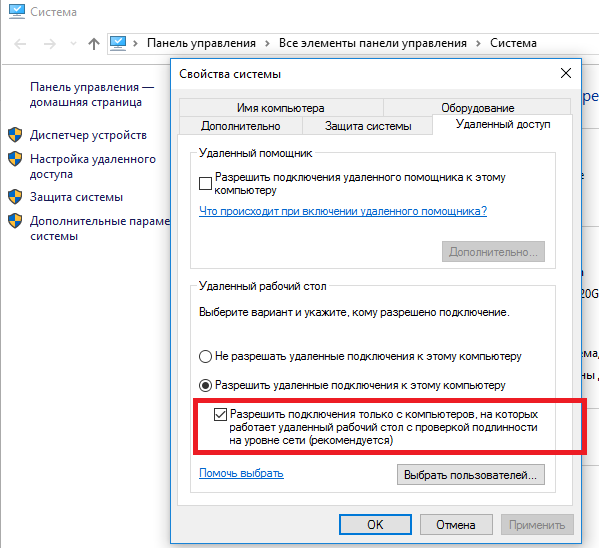
Вы можете отключить Network Level Authentication в свойствах системы (SystemPropertiesRemote.exe) на вкладке Удаленный доступ (Remote), сняв галку «Разрешить подключения только с компьютеров, на которых работает удаленный рабочий стол с проверкой подлинности на уровне сети / Allow connection only from computers running Remote Desktop with Network Level Authentication (recommended)».
В Windows 7 эта опция называется по-другому. На вкладке Удаленный доступ нужно выбрать опцию «Разрешить подключения от компьютеров с любой версией удаленного рабочего стола (опасный) / Allow connections from computers running any version of Remote Desktop (less secure)».
Также можно отключить проверку подлинности на уровне сети (NLA) с помощью редактора локальной групповой политики.
Для этого перейдите в разделе Конфигурация компьютера –> Административные шаблоны –> Компоненты Windows –> Службы удаленных рабочих столов – Узел сеансов удаленных рабочих столов –> Безопасность (Computer Configuration –> Administrative Templates –> Windows Components –> Remote Desktop Services – Remote Desktop Session Host –> Security), отключите политику Требовать проверку подлинности пользователя для удаленных подключений путем проверки подлинности на уровне сети (Require user authentication for remote connections by using Network Level Authentication).

Также нужно в политике «Требовать использования специального уровня безопасности для удаленных подключений по протоколу RDP» (Require use of specific security layer for remote (RDP) connections) выбрать уровень безопасности (Security Layer) — RDP.
Для применения новых настроек RDP нужно обновить настройки групповых политик (
gpupdate /force
) или перезагрузить компьютер. После этого вы должны успешно подключиться к удаленному рабочему столу сервера.
Network Level Authentication (NLA) is a security feature from Microsoft that makes the Remote Desktop Protocol (RDP) safer. NLA checks who you are before connecting to the RDP server. Sometimes, you might need to turn it off if it’s not working correctly with older computers or certain network setups.
In this guide, we’ll show you how to turn off Network Level Authentication in Windows 11 and 10. Before you start, know that turning off NLA can make your computer less safe from unwanted remote access. So, be careful and make sure you have other security steps in place.
What you’ll need
Below is what you need to know before you start:
- Make sure you have admin rights on the computer. You need these to change settings for Network Level Authentication.
- Your computer should have at least “Remote Desktop Connection 6.0”.
- It should also run on Windows 10 or Windows 11 which support the Credential Security Support Provider (CredSSP) protocol.
- Turning off NLA can make your computer open to unauthorized access.
- Have another way to get into your system, like a local account, other remote software, or just being able to physically access the computer.
Also see: How to Remote Desktop Over The Internet in Windows 11
What’s so good about Network Level Authentication?
Before you turn off NLA, you should at least know what it does and why it’s sometimes important.
- NLA uses fewer resources when you first connect, instead of starting a full remote desktop connection right away.
- It also helps keep your system safe from attacks by making it hard for unauthorized users to mess with your system.
Linked issue: Windows 11 Remote Desktop “An authentication error has occurred”
How to disable Network Level Authentication
The following are the steps to turn off NLA on your Windows PC.
Step 1: Open System Properties
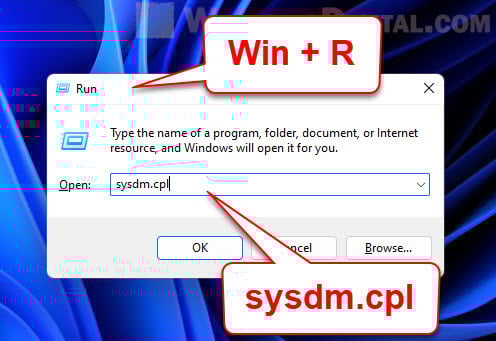
- Press “Windows + R” on your keyboard to open the “Run” dialog box.
- Type “sysdm.cpl” and press Enter to open the “System Properties” window.

- Go to the “Remote” tab at the top of the window.
Step 2: Disable NLA via Remote Desktop settings
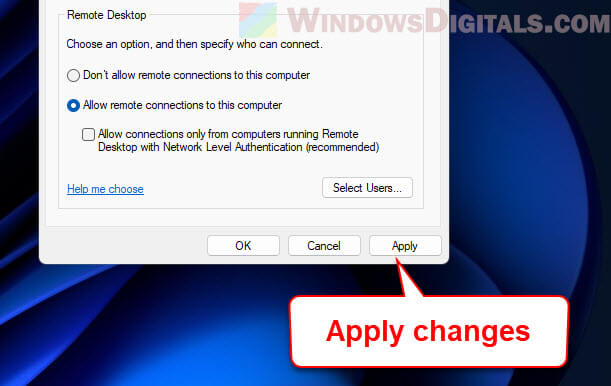
- In the “Remote” tab, find the section “Remote Desktop”. Check the box that says “Allow remote connections to this computer”.
- Beneath that, there’s a checkbox labeled “Allow connections only from computers running Remote Desktop with Network Level Authentication”. Uncheck this to turn off NLA.


Useful tip: How to Open an RDP Connection via CMD in Windows 11
Step 3: Apply changes
- Click the “Apply” button at the bottom of the “System Properties” window.

- Then click “OK” to confirm the changes and close the window.
Step 4: Restart Remote Desktop Service (optional)
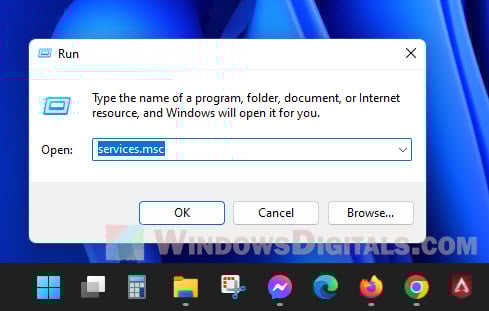
- Press “Windows + R” again, type “services.msc” into the “Run” dialog, and press Enter.

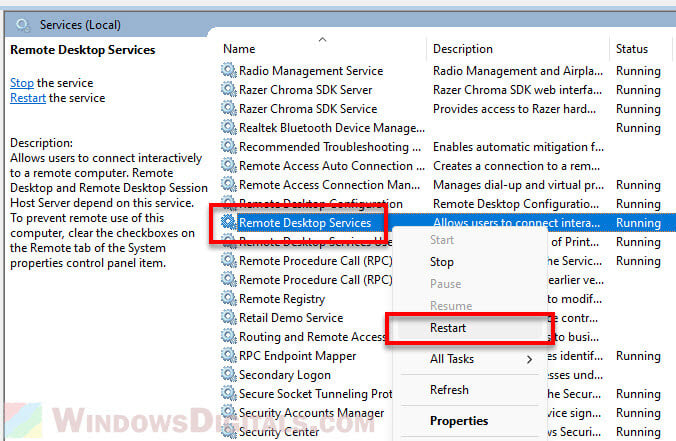
- Find “Remote Desktop Services” in the list, right-click on it, and choose “Restart”. Give it a moment to restart.

Now, Network Level Authentication should be off on your Windows 11 or 10 system. Make sure you have other security steps in place when you turn off features like this, especially if your computer can be accessed from far away.
Related resource: How to Open an RDP Connection via CMD in Windows 11
Things to consider after disabling NLA in Windows
After you turn off Network Level Authentication, below are some things to keep an eye on.
Make sure you have good security measures
- Use strong passwords for all accounts, especially those that can be accessed remotely.
- Check your firewall settings to block unwanted connections.
- Keep your software, including Windows, updated to protect against security holes.

Keep an eye on remote access
- Check your Remote Desktop connection logs now and then for any strange activity.
- If you can, limit how many people can access your system from afar.
Maybe think about turning NLA back on later
Even if you need to turn off NLA now, think about turning it back on later. Things change, and what’s a problem today might not be one later.
How to Disable NLA in Windows 10
Disabling Network Level Authentication (NLA) in Windows 10 is pretty straightforward. By following a few simple steps, you can turn off NLA, allowing users to connect remotely without needing advanced user authentication. Here’s a brief guide on what you’ll need to do: First, access the system properties, navigate to the Remote tab, and uncheck the box that enables NLA. Simple as that!
In this section, we’ll dive into the exact steps you’ll need to follow to disable NLA in Windows 10. This will help ensure that remote connections can be made without requiring Network Level Authentication.
Step 1: Open the System Properties
First, press the Windows key and the Pause/Break key simultaneously to open the System Properties window.
This window provides an overview of your system’s basic information, such as the operating system, processor, and memory. You can also access various system settings from here.
Step 2: Navigate to the Remote Settings
Next, click on the «Remote settings» link on the left-hand side of the System Properties window.
This will open up the Remote tab in the System Properties window, where you can configure remote desktop connections among other settings.
Step 3: Uncheck the NLA Box
Now, in the Remote tab, look for the section labeled «Remote Desktop.» Uncheck the box that says, «Allow connections only from computers running Remote Desktop with Network Level Authentication (recommended).»
By unchecking this box, you’re allowing remote connections that do not require Network Level Authentication, thus making it easier for users to connect remotely.
Step 4: Apply and Save Changes
Finally, click on the «Apply» button, then hit «OK» to save your changes.
Confirming these changes ensures that your system now allows remote connections without NLA, making it more accessible for remote users.
Once you’ve completed these steps, your system will no longer require Network Level Authentication for remote desktop connections, making it easier for users to connect remotely.
Tips for Disabling NLA in Windows 10
- Always create a backup of your system settings before making changes.
- Make sure you’re aware of the security implications of disabling NLA.
- Consider using strong passwords and other security measures to protect your system.
- Regularly update your system to ensure all security patches are applied.
- If you’re part of a larger network, consult your IT department before making these changes.
Frequently Asked Questions
What is Network Level Authentication (NLA)?
NLA is a security feature that requires the user to authenticate before establishing a remote desktop connection.
Why would I want to disable NLA?
You might want to disable NLA to make it easier for users to connect remotely, especially if they’re having trouble with the authentication process.
Is it safe to disable NLA?
While it makes remote access easier, disabling NLA can make your system more vulnerable. Make sure to implement other security measures.
Can I enable NLA later?
Yes, you can easily enable NLA again by checking the box in the Remote tab in System Properties.
What happens if I don’t have administrative rights?
You’ll need administrative rights to make these changes. Contact your system administrator for assistance.
Summary
- Open the System Properties.
- Navigate to the Remote Settings.
- Uncheck the NLA box.
- Apply and save changes.
Conclusion
Disabling NLA in Windows 10 can be a quick and effective way to allow remote connections without the need for advanced user authentication. While this can be useful in many scenarios, it’s essential to understand the security implications associated with disabling NLA. By following the simple steps outlined above, you can easily disable NLA and make your system more accessible for remote users.
However, don’t forget to consider other security measures to keep your system safe. Using strong passwords, enabling firewalls, and keeping your system updated are just a few ways to protect your computer. Additionally, if you’re part of a larger network or organization, always consult your IT department before making such changes to ensure compliance with security policies.
If you found this guide helpful, be sure to share it with others who might benefit from learning how to disable NLA in Windows 10. For more detailed guides and tutorials on Windows 10 and other tech topics, keep an eye on our future posts!
Kermit Matthews is a freelance writer based in Philadelphia, Pennsylvania with more than a decade of experience writing technology guides. He has a Bachelor’s and Master’s degree in Computer Science and has spent much of his professional career in IT management.
He specializes in writing content about iPhones, Android devices, Microsoft Office, and many other popular applications and devices.
Read his full bio here.
This guide describes how to disable Network Level Authentication on various versions Windows Server with or without RD Session Host Role.
Windows 10 or Windows Server 2016 and Windows 8 or Windows Server 2012 without RD Session Host Role
Note: These steps do not apply to Windows Server 2012 and 2016 with the RD Session host role.
-
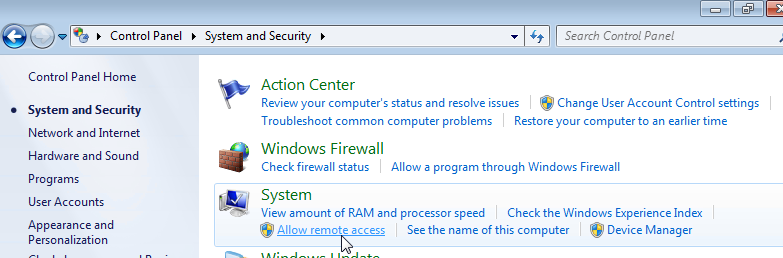
Open the Control Panel. Ensure that the control panel is showing items by Category. Click on System and Security and under System click on Allow remote access.

-
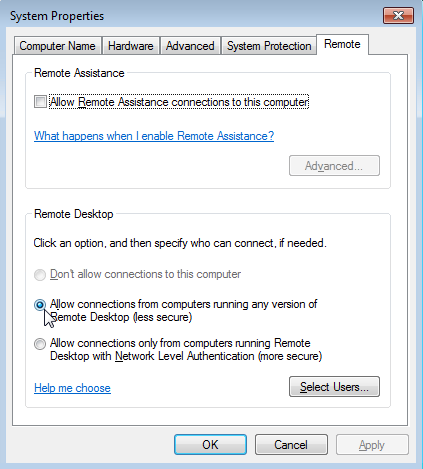
Under the Remote Desktop group un-tick the checkbox Allow connections only from computers running Remote Desktop with Network Level Authentication (recommended).
- Click OK.


Windows Vista or Windows 7 and Windows Server 2008 or Windows Server 2008 R2 without RD Session Host Role.
Note: These steps do not apply to Windows 2008 and Windows 2008 R2 with the RD Session host role.
-
Open the Control Panel. Ensure that the Control Panel is showing items by Category (i.e. not in Classic View). Click on System and Security and under System click on Allow remote access
-
Under the Remote Desktop group choose Allow connections from computers running any version of Remote Desktop (less secure).
- Click OK.
Windows Server 2016 and Windows Server 2012 with RD Session Host role
- On the RD Session Host server, open the Server Manager.
-
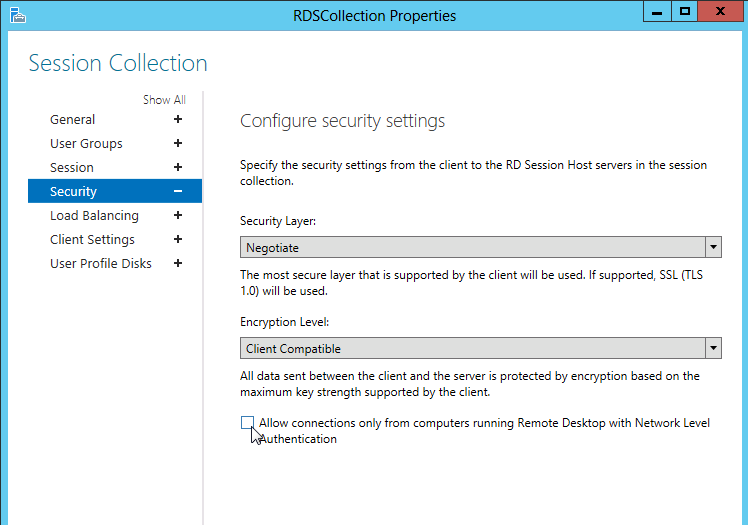
Click on Remote Desktop Services, then under Collections click on the name of the session collection name that you want to modify. Click on Tasks and select Edit Properties.
-
Under the Security tab un-tick the option Allow connections only from computers running Remote Desktop with Network Level Authentication. (For maximum compatibility ensure that Security Layer is set to Negotiate).
- If the Allow connections only from computers running Remote Desktop with Network Level Authentication check box is selected and is not enabled, the Require user authentication for remote connections by using Network Level Authentication Group Policy setting has been enabled and has been applied to the RD Session Host server.
- Click OK.

Windows 2008 and Windows 2008 R2 with RD Session Host Role
- On the RD Session Host server, open Remote Desktop Session Host Configuration. To open Remote Desktop Session Host Configuration, click Start, point to Administrative Tools, point to Remote Desktop Services, and then click Remote Desktop Session Host Configuration.
- Under Connections, right-click the name of the connection, and then click Properties.
-
In the General tab, un-tick the Allow connections only from computers running Remote Desktop with Network Level Authentication check box. (For maximum compatibility ensure that Security Layers are set to Negotiate).
- If the Allow connections only from computers running Remote Desktop with Network Level Authentication check box is selected and is not enabled, the Require user authentication for remote connections by using Network Level Authentication Group Policy setting has been enabled and has been applied to the RD Session Host server.
- Click OK.

Using Group Policies
Configure policies on Terminal Server:
-
Open gpedit.msc applet.
-
Navigate to Computer Configuration -> Administrative Templates -> Windows Components -> Remote Desktop Services -> Remote Desktop Session Host -> Security.
- Enable Require use of specific security layer for remote (RDP) connections and select RDP as Security Layer.
- Disable Require user authentication for remote connections by using Network Level Authentication policy.
- Reboot Terminal server.
-
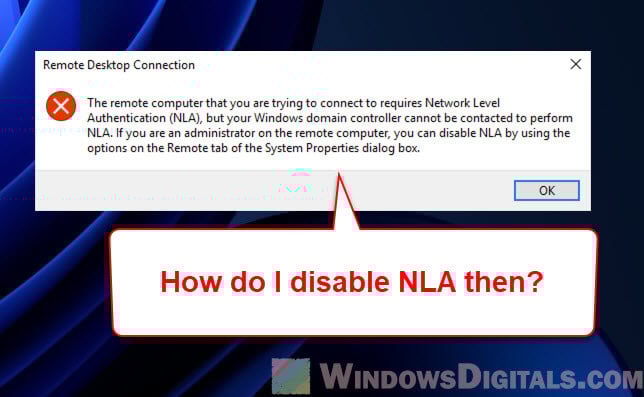
Network Level Authentication (NLA) is a Remote Desktop Service security feature that requires the client to be authenticated before an RDP session is established. NLA is enabled by default in all supported versions of Windows. When performing NLA authentication in an Active Directory domain environment, domain controllers are used to validate user credentials.
If the RDP host can’t access DC, a user authentication will fail:
The remote computer that you are trying to connect to requires Network Level Authentication but your Windows domain controller cannot be contacted to perform NLA. If you are an administrator on the remote computer, you can disable NLA by using the options on the Remote tab of the System Properties dialog box.

In this case, NLA cannot be performed because:
- Remote computer (Remote Desktop Host) cannot contact domain controller;
- The DC used as the logon server is unhealthy or down;
- RD host cannot establish a security channel with a DC;
- The RDS host IP address is specified in RDP client prompt instead of FQDN.
To check DC connectivity and troubleshoot the underlying problem, you should log in locally to the RD host. Use one of the following methods:
- Log on to the RDP host remotely using the local administrator account (instead of the domain account).
- Login to RD host from a local console (e.g. VM console, HPE iLO, Dell iDRAC, etc.).
If neither of these methods work, you can temporarily disable the NLA requirement on the Remote Desktop host as a workaround.
Note. For security reasons, it is not recommended to completely disable NLA in most cases. But if you are using an alternative RDP client (for example, on Linux or macOS) that doesn’t support NLA, these are the only ways to fix the connection problem.
How to Disable Network Level Authentication (NLA) on Windows
Disabling NLA in Windows depends on whether you can logon RD host locally or remotely.
Method 1. Disable NLA via System Properties
If you can logon to the RD host locally, you can disable NLA in the system settings.
- Run the sysdm.cpl command and go to the Remote tab;
- Disable the option Allow connections only from computer running Remote Desktop with Network Level Authentication (recommended).

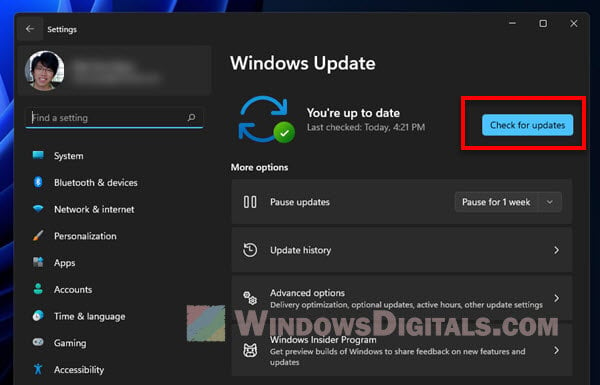
On Windows 11, you can disable NLA from Settings > System > Remote Desktop. Disable the option Require devices to use Network Level Authentication to connect.

Method 2. Disable NLA using Group Policy
Network Level Authentication can be disabled in Windows via Group Policy.
- Open the Local Group Policy Editor console (gpedit.msc);
- Go to Computer configuration > Administrative Templates > Windows Components > Remote Desktop Services > Remote Desktop Session Host > Security;
- Open the option Require user authentication for remote connections by using Network Level Authentication and set it to Disabled;
, but your windows domain controller cannot be contacted to perform nla. if you are an administrator on the remote computer, you can disable nla by using the options on the remote tab of the system properties dialog box.")
- Run the gpupdate /force command to update the local Group Policy settings.
, but your windows domain controller cannot be contacted to perform nla. if you are an administrator on the remote computer, you can disable nla by using the options on the remote tab of the system properties dialog box.")
Method 3. Disabling RDP Network Level Authentication (NLA) remotely
In case you cannot sign Remote Desktop host, you can disable NLA remotely via the Registry Editor or with PowerShell:
- Open the Registry Editor (regedit.exe) on a domain-joined computer and select File > Connect Network Registry.
- Enter the RD hostname where you want to disable NLA.
- Navigate to the registry key RDS1\HKLM\SYSTEM\CurrentControlSet\Control\Terminal Server\WinStations\RDP-Tcp
- Change the value of the UserAuthenticationRequired parameter from 1 to 0.
- This will disable NLA on the remote host.


Also, you can check the NLA status on the remote computer using PowerShell:
$Computer = 'wks12lk22'

(Get-WmiObject -class "Win32_TSGeneralSetting" -Namespace root\cimv2\terminalservices -ComputerName $Computer -Filter "TerminalName='RDP-tcp'").UserAuthenticationRequired
NLA is enabled if the return value is 1.
To remotely disable Network Level Auth on the host, run the command:
(Get-WmiObject -class "Win32_TSGeneralSetting" -Namespace root\cimv2\terminalservices -ComputerName $Computer -Filter "TerminalName='RDP-tcp'").SetUserAuthenticationRequired(0)
If you are using Azure VM, you can disable NLA using the built-in script in Azure Portal.
- Sign in to Azure Portal;
- Select your VM > go to Run command;
- Find the DisableNLA script and click Run.

Once NLA has been enabled, you can log in to the target host via RDP and attempt to resolve connectivity issues that may be preventing access to the DC when performing NLA.
Fix the DC Connectivity Issue That Prevents NLA
Check whether the RD host can connect to a DC. Ping the DC by its name and check that the client can discover the DC in a domain:
ping dc1.theitbros.loc

nltest /dsgetdc:theitbros.loc
If the DC is not reachable, check the network configuration and the DC health (also check How to fix Active Directory Domain Controller could not be contacted problem).
Make sure that the client is able to establish a security channel with a domain controller. Check the trust relationship between a workstation and a domain using the PowerShell command
Test-ComputerSecureChannel -verbose
If this command returns False, you can repair the security channel with the command:
Test-ComputerSecureChannel -Repair -Credential corp\domain_adm
Note. A domain unjoin and rejoin operation is required in some cases to resolve this issue.
Check the assigned network connection profile both on a DC and a client:
Get-NetConnectionProfile
If it returns Public or Private instead of DomainAuthenticated, try disabling and enabling the NIC.
Be sure to enable NLA on the RD host after resolving the DC connectivity issue. Leaving it disabled is a security breach.
Cyril Kardashevsky
I enjoy technology and developing websites. Since 2012 I’m running a few of my own websites, and share useful content on gadgets, PC administration and website promotion.