
В этой пошаговой инструкции подробно о том, как включить классическое контекстное меню в Windows 11 средствами системы или с помощью бесплатной сторонней программы. Также может быть полезным: создание своих пунктов нового контекстного меню Windows 11.
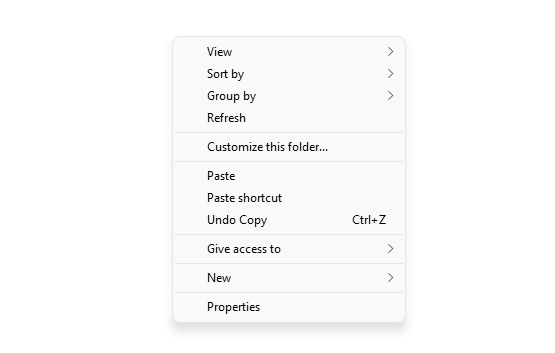
В Windows 11 контекстные меню при нажатии правой кнопкой мыши по файлам или папкам приобрели новый дизайн и другой набор доступных действий. Отображение старого контекстного меню осталось доступным по нажатию на пункт «Показать дополнительные параметры» или сочетанию клавиш Shift+F10. Однако, вы можете включить старое контекстное меню, таким образом, чтобы оно всегда открывалось по умолчанию по правому клику на элементе рабочего стола или проводника.
Включение старого контекстного меню Windows 11 с помощью редактора реестра
Первый способ сделать отключить новое контекстное меню и оставить только «классическое» — использовать редактор реестра. Для этого выполните следующие шаги:
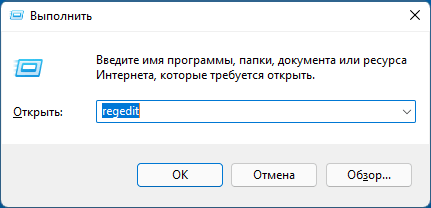
- Нажмите клавиши Win+R или нажмите правой кнопкой мыши по кнопке Пуск и выберите пункт «Выполнить», введите regedit и нажмите Enter.

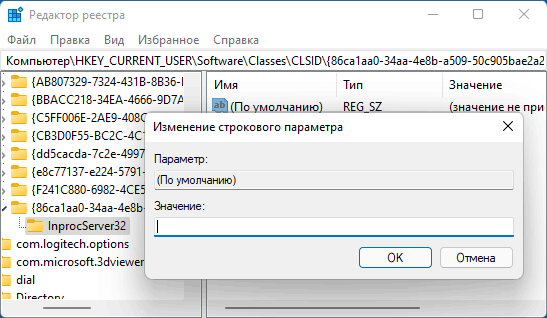
- В открывшемся редакторе реестра перейдите к разделу
HKEY_CURRENT_USER\Software\Classes\CLSID
- Проверьте, присутствует ли в этом разделе подраздел с именем
{86ca1aa0-34aa-4e8b-a509-50c905bae2a2}Если нет — создайте его: нажатие правой кнопкой мыши по разделу CLSID — Создать — Раздел и задайте указанное имя.
- Внутри созданного раздела создайте ещё один подраздел с именем InprocServer32
- Перейдите в созданный раздел InprocServer32 (выберите его в левой панели редактора реестра), дважды нажмите по значению «По умолчанию», а затем, не изменяя значения, нажмите «Ок».

- Готово, с этого момента при правом клике мышью на элементы проводника и рабочего стола Windows 11 будут открываться старые контекстные меню. Если этого не произошло автоматически, перезапустите проводник (можно сделать через диспетчер задач), либо перезагрузите компьютер.


Вместо редактирования реестра вручную вы можете создать reg-файл со следующим содержимым и добавить его в реестр:
Windows Registry Editor Version 5.00

[HKEY_CURRENT_USER\Software\Classes\CLSID\{86ca1aa0-34aa-4e8b-a509-50c905bae2a2}\InprocServer32]
@=""
Ещё один вариант — использовать командную строку, запущенную от имени администратора и команду:
reg.exe add "HKCU\Software\Classes\CLSID\{86ca1aa0-34aa-4e8b-a509-50c905bae2a2}\InprocServer32" /f
Если в дальнейшем вы захотите вернуть обычное контекстное меню Windows 11, просто удалите раздел реестра {86ca1aa0-34aa-4e8b-a509-50c905bae2a2} в разделе
HKEY_CURRENT_USER\Software\Classes\CLSID
Внимание: при использовании описанных методов возможен сброс обоев рабочего стола и изменение расстояния между значками рабочего стола, обычно проблему решает простая перезагрузка компьютера.
Бесплатная программа Windows 11 Classic Context Menu
Ещё одна простая возможность быстро вернуть стандартное контекстное меню в Windows 11 — бесплатная утилита Windows 11 Classic Context Menu:
- Скачайте утилиту с официального сайта разработчик (кнопка для загрузки находится внизу страницы), распакуйте архив и запустите программу.
- При срабатывании фильтра SmartScreen нажмите «Подробнее», а затем — «Выполнить в любом случае».
- Нажмите «Enable Win11 Classic Context Menu Style» в программе.

- Когда окно станет зелёным (классическое контекстное меню включено), нажмите «Restart Explorer» для перезапуска проводника.
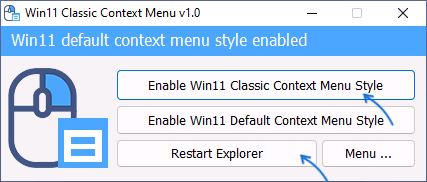
В результате контекстные меню Windows 11 приобретут классический вид. В дальнейшем вы сможете вернуть исходный вариант отображения с помощью этой же программы и кнопки «Enable Win11 Default Context Menu Style».
-
Home
-
News
- How to Disable/Enable the New Context Menu in Windows 11?
By Stella | Follow |
Last Updated
Do you get used to the new context menu in Windows 11? Perhaps, you don’t and you even want to revert File Explorer to the Windows 10 look. Fortunately, Windows allows you to disable the new context menu and go back to the old one. Now, in this post, MiniTool Software will show you how to disable the new context menu in Windows 11.
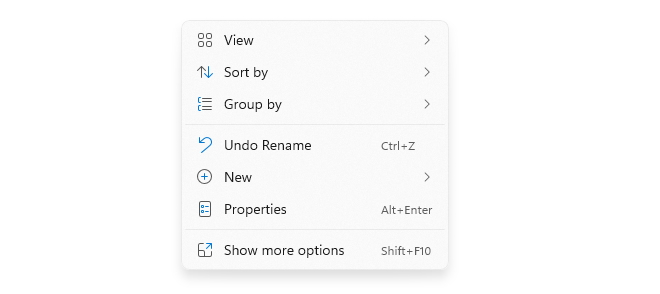
Windows 11 comes with a new UI look. For example, Microsoft centralizes the taskbar and the Start menu. With deeper use, you will find more appearances different from Windows 10. When you open File Explorer in Windows 11, you will see a new context menu.
In the beginning, you may feel fresh. But when you begin to use it, this new context menu may confuse you and even make you feel difficult to use. Some options are not where they should be. In File Explorer, the top toolbar also gets changed. These changes may make you feel uncomfortable or you even want to go back to the old context menu in Windows 11.
The good news is that you can turn off the new context menu in Windows 11 and restore the old look like in Windows 10. We will show you a guide in this post.
This instruction shows you how to restore to the old context menu in Windows 11 (to make it go back to Windows 10’s look):
- Press Win+E to open File Explorer.
- Click the 3-dot icon from the top toolbar.
- Select Options from the drop-down menu.
- The Folder Options interface will pop up. Then, switch to the View tab.
- Scroll down to find Launch folder windows in a separate process (this option is not selected by default) and check it.
- Click Apply.
- Click OK.
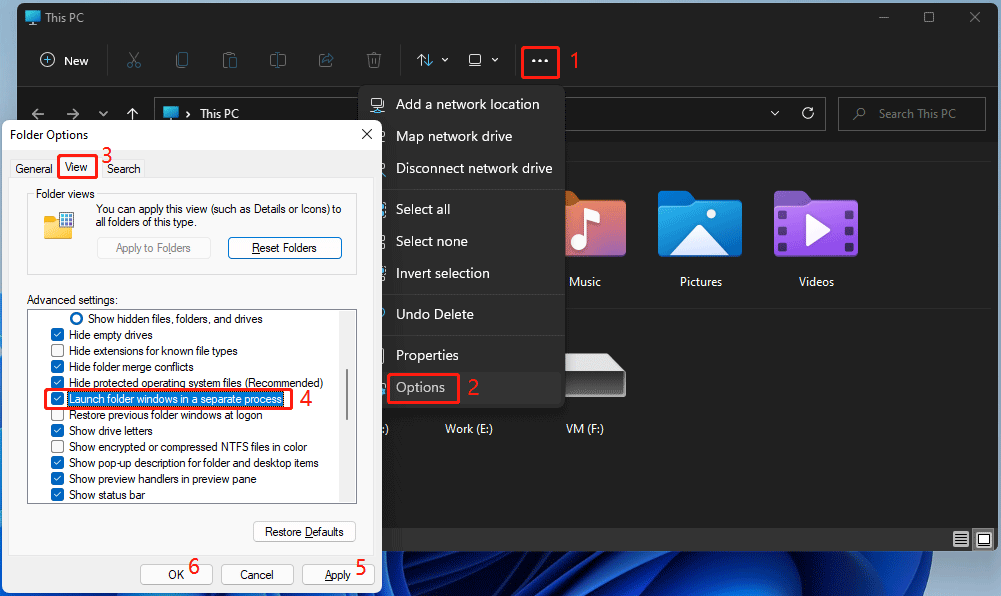
After these steps, File Explorer will automatically close and launch again. Then, you can see the traditional Windows 10 context menu comes back.

If you want to re-use this new context menu, you can get it back. Here is how to turn on the new context menu in Windows 11:
1. Press Win+E to open File Explorer.
2. Click View on the top menu bar.
3. Click Options and select Change folder and search options.
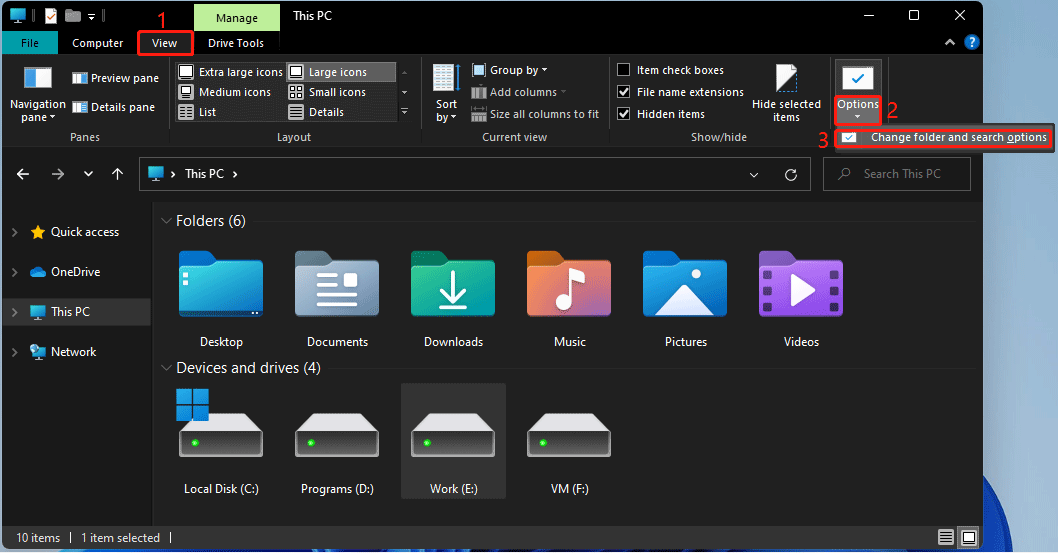
4. Switch to the View section on the Folder Options interface.
5. Scroll down to find Launch folder windows in a separate process and uncheck it.
6. Click Apply.
7. Click OK.
After these steps, the Windows 11 new context menu will be back.
The simplification of the context menu of Windows 11 will make it easier to use, but now you are not used to it. Now, let’s look at how to operate this new context menu.
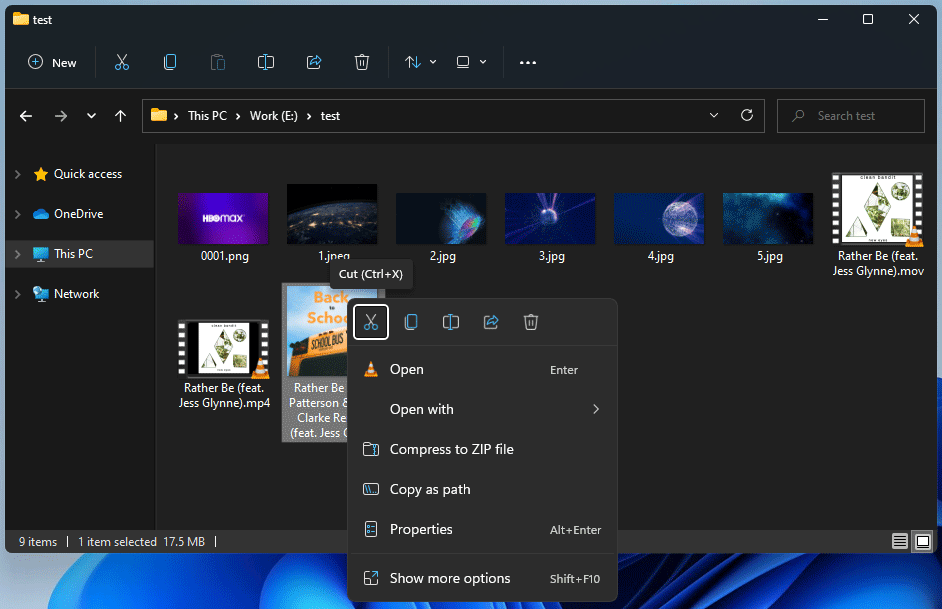
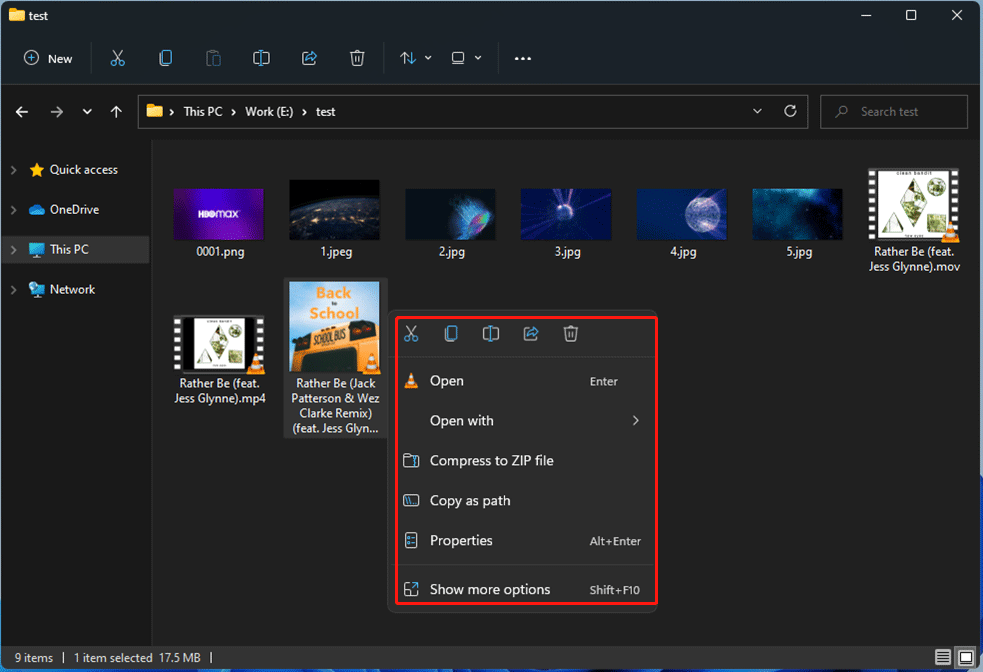
After right-clicking one file, you will see a very simple context menu. On the top, they are the common functions you use, including cut, copy, rename, share, and delete. The rest are some other options you may use, including open, open with, compress to ZIP file, etc.
How to See to Old Context Menu in Windows 11?
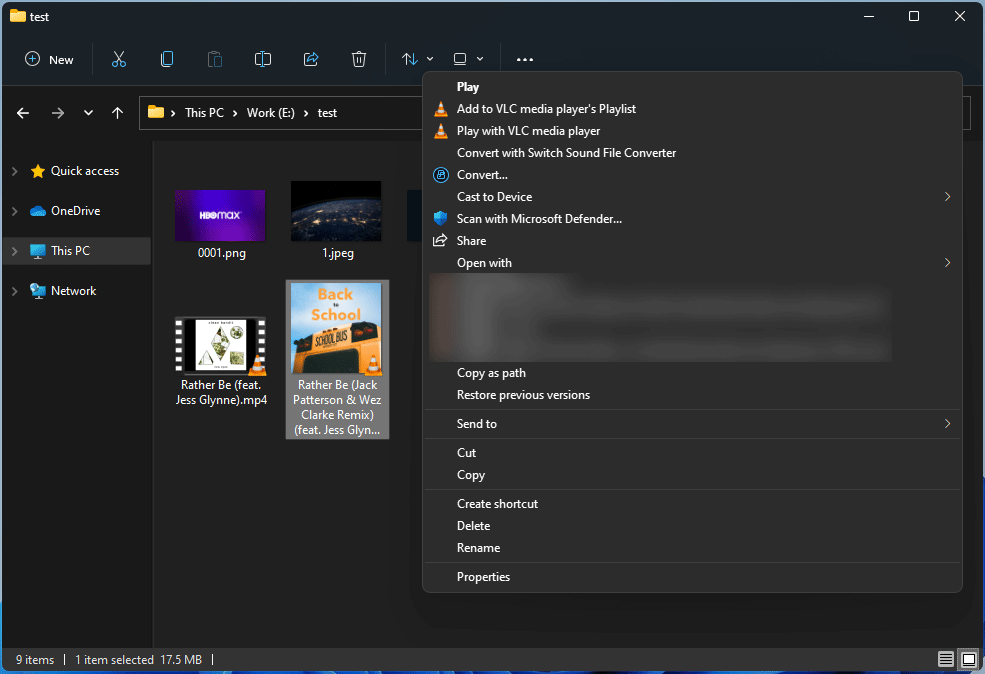
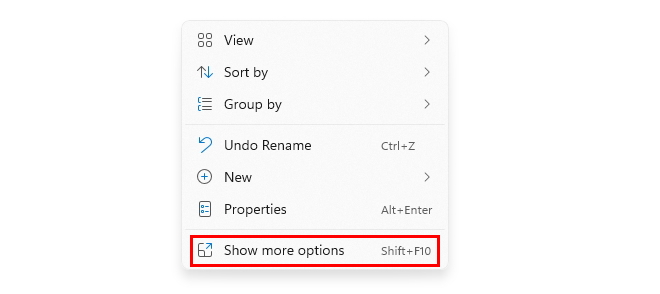
You will see there is a Show more options option at the bottom of the context menu. When you click it, a context menu with more options will pop up. This context menu is just the same as the Windows 10 context menu.
All in all, the commonly-used options will be firstly display in the new context menu. This gives you quick access to the function you want to use. As you get used to this new menu, you will like it.
About The Author
Position: Columnist
Stella has been working in MiniTool Software as an English Editor for more than 8 years. Her articles mainly cover the fields of data recovery including storage media data recovery, phone data recovery, and photo recovery, videos download, partition management, and video & audio format conversions.
Readers help support Windows Report. We may get a commission if you buy through our links.
Read our disclosure page to find out how can you help Windows Report sustain the editorial team. Read more
Windows 11 OS has great features and an interesting design. It also brought different context menus, but although they seem to be better, they confused a lot of users.
That’s why many want to disable the new context menu and revert to the old one from Windows 10.
We have written a full Windows 11 build review so you can read all about these changes, but now, let’s see how we can get back the menus we’re used to.
1. Revert File Explorer to the old look
- Press the Windows + R to open Run, type regedit in the text field, and click OK.
- Click Yes in the UAC prompt.
- Navigate to the following path in Registry Editor:
HKEY_LOCAL_MACHINE\SOFTWARE\Microsoft\Windows\CurrentVersion\Shell Extensions
- Right-click the Shell Extensions key, then select New and choose Key.

- Name the new key Blocked and navigate to it.

- Right-click an empty space, select New, and choose String value.

- Enter this exact value: {e2bf9676-5f8f-435c-97eb-11607a5bedf7} and press Enter.
- Restart your PC for the changes to take effect.
- If you followed the steps correctly, File Explorer should be just like before in Windows 10.


Of course, if you change your mind and want to have the new File Explorer, all you need to do is to get back into the Registry Editor and delete the key you’ve created.
You can also use Registry Editor to remove apps from the context menu as well, to know how to remove apps like Clipchamp, Photos, and Paint 3D.
2. Show more options
As we’ve noticed from a lot of other features, Microsoft kept all the menus from Windows 10 either dormant or accessible. It goes the same for the old context menus, which are still present, without you needing to do much work.
You need to select the Show more options feature in any context menu, and it will bring the old menu back.
If you want to activate this feature quickly, you can also use the Shift + F10 shortcut used earlier to open the Windows 11 classic context menu. So, if you do not wish to turn off the context menus altogether, you can make them look like the old ones.
Also, if you want to have Windows 11 Show more options by default, there’s currently no quick setting.
-
1. Press Windows + R to open Run, type gpedit.msc, and hit Enter.

-
2. Under the User Configuration tab, expand Administrative Templates, and select Windows Components.

-
3. Select File Explorer from the left, and then click on the Remove File Explorer’s default context menu policy.

-
4. Select Disabled, and click on OK to save the changes.

-
5. If these don’t reflect right away, restart the computer.
Users who want to completely disable the new context menu can do so using the Local Group Policy Editor. It’s not available in the Home edition of the OS, but users can easily install the Group Policy Editor in Windows.


As you can see, the new context menus are much less cluttered and easier to work with because they are simpler.
Only the fact that the Cut, Copy, Rename, and Delete options have been transformed into small icons that sit at the top of the context menu makes things a lot cleaner.
However, we can also understand users who say they are too small and should be transformed into bigger targets to click on for more efficiency.
We hope you managed to get the context menus sorted out and you’re happy with your decision, whatever that would be.
If you want to customize your experience further, don’t hesitate to take a closer look at our guide to change Windows 11 to classic view or our article on how to restore the old right-click menu in Windows 11.
Besides, if you were wondering how do I change the Start Menu view in Windows 11, several customizations are available in Windows Settings, including pinned apps, adding or removing folders, and recommendations, amongst others.
Speaking of the context menu, did you know that there is a way to remove Windows Media Player from the context menu? We have an entire article dedicated to it, so don’t miss it.
What do you think about the new context menus? Tell us all about that in the comments section below.
Claudiu Andone
Windows Toubleshooting Expert
Oldtimer in the tech and science press, Claudiu is focused on whatever comes new from Microsoft.
His abrupt interest in computers started when he saw the first Home Computer as a kid. However, his passion for Windows and everything related became obvious when he became a sys admin in a computer science high school.
With 14 years of experience in writing about everything there is to know about science and technology, Claudiu also likes rock music, chilling in the garden, and Star Wars. May the force be with you, always!
Windows will show a list of shortcut menus called context menu when right-clicking. You can right-click on empty area of desktop/File Explorer or on a file/folder to see a list of quick action items. Though many users can’t work on a PC without this context menu, sometimes it will be disturbing and revealing unnecessary information. For example, a third-party app may add a link in the menu and you have no easy way to remove it. If you want to disable right-click context menu in Windows 11, here are the two options available for you.
Here is how the default right-click menu will look like on desktop and File Explorer. Disabling the menu will work only on desktop / File Explorer and right-clicking will not show any options. However, it will still work as normal inside apps like Word/Excel and on the taskbar.
1. Using Local Group Policy Editor
Local Group Policy Editor app comes default with Windows Pro, Students and Enterprise editions. Though it does not come with Home edition, you can follow the instructions in this article to enable the app in Windows Home edition. You can configure the policies in this app to disable right-click context menu.
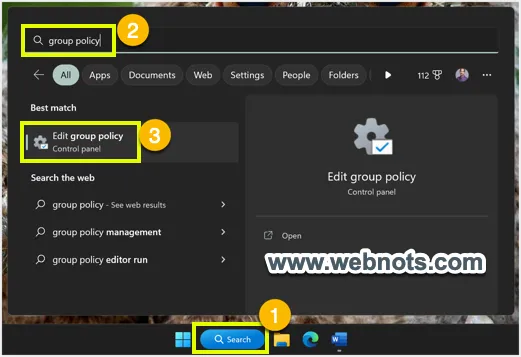
- Press “Windows Logo + S” keys to open the search.
- Type “group policy” and open Edit Group Policy option from the list.
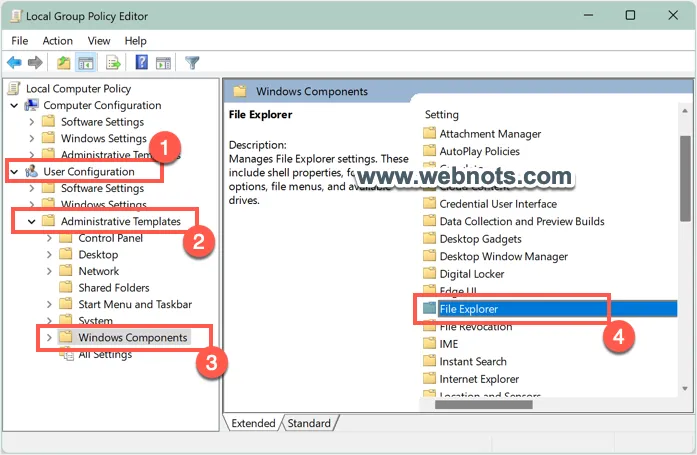
- When you are in Local Group Policy Editor app, navigate to “User Configuration > Administrative Templates > Windows Components” section. Double click on “File Explorer” folder to open the policies for controlling File Explorer’s behavior.
- Scroll down in the policy list and find “Remove File Explorer’s default context menu”. Select that item and you will see the description as the policy will remove shortcut menus from desktop and File Explorer when right-clicking.

- Double click on that policy and select “Enabled” option. Remember, enabling this policy will disable right-click context menu.
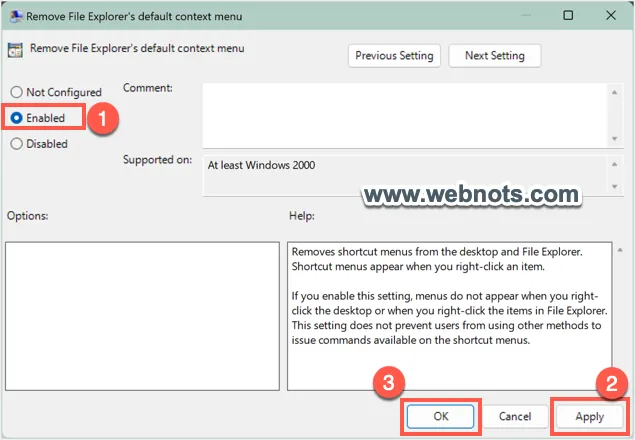
- Click “Apply” and then “OK” button to apply your changes.
- Now, go to desktop or File Explorer and right click on empty area or on any item. You will not see the right-click menu anymore. If you still see the menu items appear, restart your computer, and then check.
2. Disable Right Click Menu from Registry Editor
If you are not able to use Local Group Policy Editor, then follow this method using Registry Editor. It is a good idea to take a backup of your registry before doing any changes.
- Right-click on the Start menu icon and select Run option.
- Type regedit and press enter to open Registry Editor.
- Copy paste the following path in Registry Editor’s address bar and press enter.
HKEY_CURRENT_USER\Software\Microsoft\Windows\CurrentVersion\Policies\Explorer
- Go to “Edit > New” menu and select “DWORD (32-bit) Value” option.

- Rename the newly creates DWORD as NoViewContextMenu.
- Double click NoViewContextMenu DWORD and change the “Value Data” to 1.
- Click “OK” button and close the Registry Editor.

Restart your system and check the right-click context menu in disabled.
Final Words
Anytime you can go back to policy editor and set change the policy to “Not Configured” to revert the action. Likewise, you can also delete the registry DWORD to bring the right-click context menu back.
0
Disable Windows 11 Modern Context Menu
Table of Contents
The new Windows 11 includes a lot of design improvements. The context menu (or right-click menu) is one of the most noticeable design changes that you will experience after switching from older version of Windows to Windows 11. The following image shows how the modern context menu looks like in Windows 11 by default.
If you want to see the detailed context menu, you need to click on Show more options. While most of the people will appreciate the new context menu, there are still a lot of folks who would rather want to have this menus disabled. If you’re the one looking to disable the modern content menus of Windows 11, this article is for you.
In this article, I’ll show how you can disable Windows 11’s modern context menu and enable the legacy context menu. You can do it either using Windows PowerShell or Command prompt.
PowerShell Method
If you like doing things using PowerShell, use the steps mentioned in this section to disable or enable Windows 11’s modern context menu. If you’re comfortable in working with command prompt or batch files, you can directly jump to command prompt section.
Disabling Context Menus via PowerShell
To disable Windows 11’s context menus using PowerShell, follow these steps:
- Open notepad or your favorite text editor.
- Copy and paste the following code and save the file with a name like
Disable-Win11ContextMenu.ps1. Any name will work as long as you keep theps1file extension. It is important.<# .SYNOPSIS Disables the modern context menus in Windows 11 .NOTES Author : Surender Kumar Author URI : https://www.techtutsonline.com/staff/surender-kumar/ Version : 1.0 Purpose : Disabling the modern context menus in Windows 11 #> $regPath = 'HKCU:\Software\Classes\CLSID\{86ca1aa0-34aa-4e8b-a509-50c905bae2a2}' $regItem = 'InprocServer32' if(!(Test-Path $regPath\$regItem)){ Write-Output "Creating the registry key..." New-Item -Path "$regPath\" -Name $regItem –Force | Out-Null Set-ItemProperty -Path $regPath\$regItem -Name '(Default)' -Value $null -Type String -Force | Out-Null Write-Output "Restarting Windows explorer..." Get-Process explorer | Stop-Process -Force; Start-Process explorer } else { Write-Output "The registry key already exists! Exiting..." } - Now open the “RUN” dialog, paste the following command and hit enter to execute the PowerShell script you just created:
powershell.exe -file "D:\MyScripts\Disable-Win11ContextMenu.ps1" -ExecutionPolicy BypassI am assuming the script is saved in
"D:\MyScripts\Disable-Win11ContextMenu.ps1". You need to adjust the path and name of script as per your system. - If the script runs successfully, it will create a Registry key and restart your Windows explorer. Once this is done, you will see the modern context menu is gone and legacy menu options are enabled.

At any time, if you want to re-enable the Windows 11 context menus, just follow the steps mentioned in next section. If you don’t see the legacy context menu enabled, it probably means you did something wrong. To learn about how to create and run PowerShell scripts, you can read our Writing and Running PowerShell Scripts article. If PowerShell way doesn’t work, you can jump to the command prompt section to do it using a batch file.
Enabling Context Menus via PowerShell
To enable Windows 11’s context menus again using PowerShell, follow these steps:
- Open notepad or your favorite text editor.
- Copy and paste the following code and save the file with a name like
Enable-Win11ContextMenu.ps1.<# .SYNOPSIS Enables the modern context menus in Windows 11 .NOTES Author : Surender Kumar Author URI : https://www.techtutsonline.com/staff/surender-kumar/ Version : 1.0 Purpose : Enabling the modern context menus in Windows 11 #> $regPath = 'HKCU:\Software\Classes\CLSID\{86ca1aa0-34aa-4e8b-a509-50c905bae2a2}' if((Test-Path $regPath)){ Write-Output "Removing the registry key..." Remove-Item $regPath -Recurse –Force -Verbose Write-Output "Restarting Windows explorer..." Get-Process explorer | Stop-Process -Force; Start-Process explorer } else { Write-Output "The registry key doesn't exist! Exiting..." } - Now open the “RUN” dialog, paste the following command and hit enter to execute the PowerShell script you just created:
powershell.exe -ExecutionPolicy Bypass -file "D:\MyScripts\Enable-Win11ContextMenu.ps1"
Of course, you need to adjust the path and name of script as per your system. To save time, you can download Disable-Win11ContextMenu.ps1 and Enable-Win11ContextMenu.ps1 scripts that I’ve created.
- If the script runs successfully, it will delete the Registry key and restart your Windows explorer. Once this is done, you will see the modern context menu is re-enabled.
If the above method does not work for you due to any reason, you can follow the command prompt method section to do the same thing using command prompt or a batch file.
Command Prompt Method
If you like doing things using command prompt or batch scripts, use the steps mentioned in this section to disable or enable the modern context menus of Windows 11.
Disabling Context Menus via Batch File
To disable Windows 11’s context menus using a batch file, follow these steps:
- Open notepad or your favorite text editor.
- Copy and paste the following code and save the file with a name like
Disable-Win11ContextMenu.bat. Any name will work as long as you keep thebatfile extension. It is important.@echo off reg.exe add "HKCU\Software\Classes\CLSID\{86ca1aa0-34aa-4e8b-a509-50c905bae2a2}\InprocServer32" /f /ve taskkill /f /im explorer.exe && start explorer.exe - Now open the file explorer, navigate to the location where you saved your batch file, and double click the file to run it. By the way, you could also copy and run the above lines of code directly in “cmd.exe”.
- If the script runs successfully, it will create a Registry key and restart your Windows explorer. Once this is done, you will see the modern context menu is gone and legacy menu options are enabled.
At any time, if you want to re-enable the Windows 11 context menus, just follow the steps mentioned in next section.
Enabling Context Menus via Batch File
To enable Windows 11’s context menus again using a batch file, follow these steps:
- Open notepad or your favorite text editor.
- Copy and paste the following code and save the file with a name like
Enable-Win11ContextMenu.bat.@echo off reg.exe delete "HKCU\Software\Classes\CLSID\{86ca1aa0-34aa-4e8b-a509-50c905bae2a2}" /f taskkill /f /im explorer.exe && start explorer.exe - Now open the file explorer, navigate to the location where you saved your batch file, and double click the file to run it. To save time, you can Disable_Win11ContextMenu.bat and Enable_Win11ContextMenu.bat scripts that I’ve created.
- If the script runs successfully, it will delete the Registry key and restart your Windows explorer. Once this is done, you will see the modern context menu is re-enabled.
That was all for this tutorial. If you run into any issues while following this guide, please leave a comment below and I will try to respond as soon I can.