
If you are not fond of Windows 10’s metro interface, you can turn it off. Although it had many cool features, it has now been removed from the default version of the operating system. The metro interface was designed by Microsoft for touchscreen-enabled smart phones. Microsoft added the interface to Windows 8.1 after it was successful with touch screens. However, many people do not like it, and prefer a more traditional desktop interface.
If you’re unhappy with the Metro UI, you can disable it in Windows 10 using the start menu. Then, you can use the Windows Search Bar to group your desktop apps. The main drawback to the Metro UI is its slow response time, which can make it difficult to use some applications. You can also disable Metro UI with a third-party tool. While there are countless hacks available, Microsoft recommends the official way.
To remove the Metro desktop, you can use a registry tweak to change its settings. First, open the Registry Editor. Locate the “RPEnabled” value in the right pane. Change it to zero if you’d like to disable the Metro UI. You can also try changing the value back to 1.
If you are looking for an easy way to turn off the Metro UI, you can follow these steps. Start the registry by typing “regedit” in the Start menu. Now, select the RPEnabled key, and change it from “0” to “1”. Now, you should see the start menu and all desktop applications grouped together. That’s it! Now, you can turn off Metro UI and enjoy a smoother experience.
Now, you’ll want to change the RPEnabled value from 0 to 1. This value contains the string ‘Windows’. Change it back to 1 to enable the Metro interface again. This will make all windows and apps appear like before. If you’d like to keep the Metro UI completely, go back to Windows 7.
To disable the Metro UI, launch the “Windows 8 Metro UI Switcher” utility. Then, type “regedit” to launch the windows registry editor. Next, locate the value “RPEnabled” in the right pane. Change it from 1 to 0 to turn off the Metro interface. That’s all it takes! If you’re looking for an easy way to turn off the Metro UI in Windows 10, you’ve come to the right place.
Does Windows 10 Use Metro UI?
Does Windows 10 use the new Metro UI? This user interface was introduced in the Windows 8 OS and was highly praised by users. The new UI has been made compatible with touchscreen devices and will work with these. However, you can disable the Metro UI in some circumstances. In such cases, you may not see it at startup. To enable it, go to the Start settings and right-click the Taskbar. You can also change the settings for your Start menu. You may have to reboot your computer in order for the Metro UI to show up.
The start menu is one of the most prominent features in the new operating system. You can customize its appearance by clicking on the “start” option. You can change the font size by going to the “personalization” setting in the Start menu. You can also change the background color, which will be different from your normal desktop. For example, the start menu in Windows 10 will appear in a light grey background if you turn the “full screen” option on.
What are Metro Apps in Windows 10?
If you want to delete a Metro app, you need to know how to do this. First, you have to open the command prompt in PowerShell. Make sure you are running it as an administrator, and enter your User Account Control password. This will open a blue command window. Enter the command “remove” to remove the app. Click OK. Your PC will now have more space. You can now remove any Metro app that isn’t working on your PC.
Modern metro apps save their data in a folder named %userprofile%AppDataLocalPackages. You can open the directory directly from Explore by typing “%userprofile%AppDataLocalPackages”.
How Do I Change the UI in Windows 10?
If you’re wondering how to disable Metro Ui in Windows 10, the answer is to use regedit. This program can be found in the Start screen, so open it there. Once there, open the RPEnabled key and change it from 1 to 0. Now, when you’re ready to enable Metro, you need to switch it back to 1.
To enable metro UI, right-click on the start menu or task bar and select properties. From there, choose the navigation tab. This will show you the start screen. Check the box to switch back to desktop when you sign in. Once you’ve done that, you can boot straight to the desktop. Once you’ve done this, you’re good to go. You can also disable Metro UI completely if you’re not a fan of the start screen.
To disable Metro UI in Windows 10, you can change the value of the RPEnabled key in the registry. This is a 32-bit value. The value of this value is zero by default. To enable Metro UI, you have to change it to a value of 1.
How Do I Get Rid of the Metro PCS Logo?
If you’ve ever wondered how to get rid of the Metro PCS logo on your Windows 10 desktop, it’s relatively easy. All you have to do is follow these steps. After installing the latest version of the Metro PCS client, you will need to run EasyBCD. This will display a dual boot entry by default. But if you want to change it to another OS, you need to check the box for the “Use Metro bootloader”. Then, choose Count down from the top left corner and set 30 seconds. Then, close EasyBCD and restart your PC. During the restart, you should be able to see a dual boot option in the Start menu.
How Do I Uninstall Metro PCS Apps?
If you want to uninstall the Metro apps on your Windows 10 computer, you can do this in two ways. The first way is similar to Windows 8 and 11, and requires no special knowledge of the operating system. The second way requires some knowledge of the PowerShell command line. To use this method, you must be the owner of an Enterprise edition of Windows 10.
If you have an ARM-based device, you should not use the Metro apps. This is because Windows RT apps are only compatible with touch-screen devices. Windows 10 devices, however, support touchscreens and are compatible with touchscreens. Although Metro PCS apps aren’t natively supported by Windows RT devices, they can still be used on those devices. This makes them a better option for those looking for apps.
To remove multiple Metro PCS apps, you can use the Windows PowerShell command. Run PowerShell as an administrator to get this command. To do this, right-click PowerShell and choose the ‘Run as Administrator’ option. The PowerShell command responds to specific commands for removing apps. To uninstall Metro PCS apps on Windows 10, use the Get-AppxPackage and Remove-AppxPackage commands. To delete a single app, you must provide the package name.
How Do I Remove Metro From Windows?
If you are wondering how to disable Metro UI on Windows 10, you have come to the right place. You can turn off the Metro UI completely, but first, you need to disable it. There are two ways to do this. The first method involves changing the RPEnabled key from “1” to “0,” which will turn off the Metro UI for the rest of your PC. But you will need to change it back to “1” to enable it again.
In the “Settings” window, choose “Appearance” and then click on the tab “Metro UI” at the top of the window. The next step involves unchecking the box and selecting “Apply.” Once you’ve completed this, the notification will open to notify you that you can turn off the Metro UI. Now, you can go back to the start menu and use it instead.
Learn More Here:
1.) Windows Help Center
2.) Windows – Wikipedia
3.) Windows Blog
4.) Windows Central
I think we were all relieved when Microsoft agreed to put the Start Button back in Windows 8.1… Of course, it led to the Start Screen instead of a menu, but it was a start. So when they announced that Windows 10 would have the actual Start Menu back, there was a general sigh of relief. Everyone saw the pictures, and those of us who joined the pre-release were thrilled when it was put in.
So when I upgraded to the final bits yesterday I didn’t like what I saw… I clicked the Windows icon in the corner and got a full screen ‘Metro’-esque Start Menu. What the…?

Okay calm down… they haven’t changed their minds. All you have to do is turn off the Start full screen option. Do this:
1) Click on the Windows icon (Start Menu), click on the menu icon at the top to bring up the options.
2) Click on Settings.
3) In the Settings screen click Personalization.

4) In the Personalization screen click the Start option in the left pane, then disable Use Start full screen.

5) Close the Settings window, and then click Start again.

There it is! We have our fully customizable Start Menu back. Just like you asked for
Windows 10 is going to take us all some getting used to… but if you stick with it, you’ll get the hang of it
One of the most interesting and impressive features introduced in Microsoft’s latest OS Windows 8 is the new boot loader. Previous Windows versions used to contain a boot loader without a GUI. It was similar to Command Prompt screen where you could use the arrow keys present in your keyboard to select the desired OS to boot.
Microsoft replaced this classic boot loader with a brand new boot loader in Windows 8 which is now called “Boot Options Menu“. It comes with a GUI and allows you to interact with your mouse as well. It provides various useful options such as troubleshoot PC startup problems, reset or repair Windows 8, restore Windows, disable device driver signature check, access Safe Mode and much more.
You can read more info about this new boot loader in following article:
How to Access and Use Windows 8 Metro Boot Loader and Advanced Boot Options?

But there is one problem with this new boot loader which occurs when you dual boot between Windows 8 and any other previous Windows version such as Windows Vista or 7.
If you have set Windows 8 as default boot entry in your system, first Windows 8 boots and the new Metro boot loader to select installed OS is shown after Windows 8 boot screen. It might become quite annoying if you want to boot into other Windows version. First you’ll have to watch Windows 8 boot screen and then you’ll be able to select previous Windows OS from new Metro boot loader.
On the other hand in previous boot loader, no installed OS boots until you select it from the OS list in boot loader. It saves lots of time.
Today in this article, we are going to tell you how to disable new Metro boot loader and bring back Windows Vista and 7 style boot loader in Windows 8.

So if you also want to get Windows Vista and Windows 7 style classic boot loader back in Windows 8, follow these simple steps:
1. To disable new Metro boot loader we’ll need to execute a command in Command Prompt. So first open Command Prompt as Administrator using following tutorial:
[Guide] Different Ways to Open Command Prompt as Administrator in Windows
2. Now type following command and press Enter:
bcdedit /set {default} bootmenupolicy legacy
You’ll get a message “The operation completed successfully”.

That’s it. Restart your system and you’ll see classic Windows Vista and 7 style boot loader in Windows 8.
3. In case you want to re-enable Windows 8 Metro boot loader in future, simply execute following command in Command Prompt:
bcdedit /set {default} bootmenupolicy standard
Again you’ll get a message “The operation completed successfully”. Restart and you’ll get the new Metro boot loader back in Windows 8.
BONUS TIP:
You can also try following special commands to tweak and customize Windows 8 Boot Screen and Boot Loader:
To enable advanced options in Windows 8 boot menu:
bcdedit /set {globalsettings} advancedoptions true
To enable editing of kernel parameters at startup:
bcdedit /set {globalsettings} optionsedit true
To disable Windows 8 logo in boot screen:
bcdedit /set {globalsettings} custom:16000067 true
To disable text messages in boot screen:
bcdedit /set {globalsettings} custom:16000068 true
To disable circle animation in boot screen:
bcdedit /set {globalsettings} custom:16000069 true
If you want to restore default settings, simply replace true with false in above mentioned commands and then execute the commands.
You are here: Home » Troubleshooting Guides » How to Disable New Metro Boot Loader and Restore Classic Boot Loader in Windows 8 and Windows 10
В этом руководстве мы расскажем, как полностью избавиться от интерфейса Metro в операционной системе Windows, используя различные методы и утилиты. Следуйте нашим советам для достижения наилучшего результата.
Используйте классическую Панель управления для отключения Metro через настройки интерфейса.
Удаляем из Windows все лишнее! Выпилим хлам, повысим стабильность и скорость загрузки.

Скачайте и установите стороннюю утилиту, например Classic Shell, для изменения интерфейса Windows.

Как полностью удалить программу с пк #как #windows #программа
Отключите плитки Metro через редактор групповой политики, если у вас профессиональная версия Windows.
Как удалить встроенные UWP (metro) приложения в Windows 11?
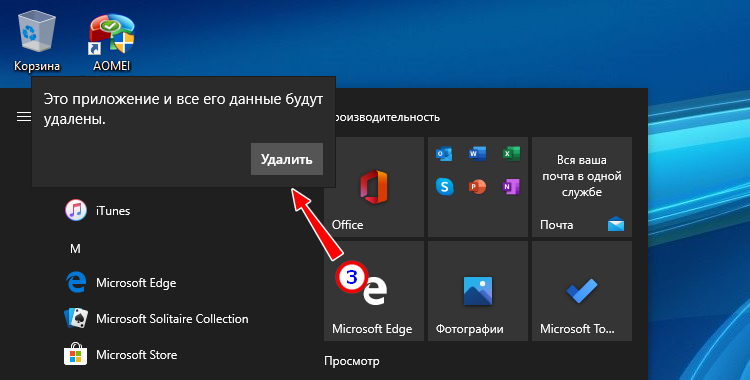
Используйте реестр Windows для удаления всех элементов интерфейса Metro. Будьте осторожны при редактировании реестра.
Очистка компьютера. Как освободить место на диске C.
Создайте резервную копию системы перед внесением значительных изменений, чтобы можно было восстановить систему в случае ошибки.

Как удалить игру с компьютера полностью

Проверьте совместимость всех установленных программ и драйверов с новым интерфейсом после удаления Metro.
Как удалить встроенные приложения Windows 11 / 10?

Перезагрузите компьютер после каждого шага, чтобы изменения вступили в силу.


Используйте командную строку для выполнения некоторых задач по удалению Metro, если вы уверены в своих силах.

Как удалить программу со всеми следами ее присутствия. Чистый реестр после удаления программы.

Как полностью удалить игру с компьютера в 2023

Поиск в интернете может помочь найти дополнительные методы и утилиты для удаления Metro.

ПОЛНОЕ УДАЛЕНИЯ ПРОГРАММЫ и всех следов с ПК без проблем

В случае возникновения проблем обратитесь к специалисту по IT для помощи в удалении Metro и настройки системы.

Windows Registry Editor Version 5.00

[HKEY_LOCAL_MACHINE\SOFTWARE\Microsoft\Windows Photo Viewer\Capabilities\FileAssociations]
".jpg"="PhotoViewer.FileAssoc.Jpeg"
".wdp"="PhotoViewer.FileAssoc.Wdp"
".jfif"="PhotoViewer.FileAssoc.JFIF"
".dib"="PhotoViewer.FileAssoc.Bitmap"
".png"="PhotoViewer.FileAssoc.Png"
".jxr"="PhotoViewer.FileAssoc.Wdp"
".bmp"="PhotoViewer.FileAssoc.Bitmap"
".jpe"="PhotoViewer.FileAssoc.Jpeg"
".jpeg"="PhotoViewer.FileAssoc.Jpeg"
".gif"="PhotoViewer.FileAssoc.Gif"

[HKEY_CLASSES_ROOT\PhotoViewer.FileAssoc.Bitmap]
"ImageOptionFlags"=dword:00000001
"FriendlyTypeName"=hex(2):40,00,25,00,50,00,72,00,6f,00,67,00,72,00,61,00,6d,\
  00,46,00,69,00,6c,00,65,00,73,00,25,00,5c,00,57,00,69,00,6e,00,64,00,6f,00,\
  77,00,73,00,20,00,50,00,68,00,6f,00,74,00,6f,00,20,00,56,00,69,00,65,00,77,\
  00,65,00,72,00,5c,00,50,00,68,00,6f,00,74,00,6f,00,56,00,69,00,65,00,77,00,\
  65,00,72,00,2e,00,64,00,6c,00,6c,00,2c,00,2d,00,33,00,30,00,35,00,36,00,00,\
  00

[HKEY_CLASSES_ROOT\PhotoViewer.FileAssoc.Bitmap\DefaultIcon]
@="%SystemRoot%\\System32\\imageres.dll,-70"

[HKEY_CLASSES_ROOT\PhotoViewer.FileAssoc.Bitmap\shell]

[HKEY_CLASSES_ROOT\PhotoViewer.FileAssoc.Bitmap\shell\open]

[HKEY_CLASSES_ROOT\PhotoViewer.FileAssoc.Bitmap\shell\open\command]
@=hex(2):25,00,53,00,79,00,73,00,74,00,65,00,6d,00,52,00,6f,00,6f,00,74,00,25,\
  00,5c,00,53,00,79,00,73,00,74,00,65,00,6d,00,33,00,32,00,5c,00,72,00,75,00,\
  6e,00,64,00,6c,00,6c,00,33,00,32,00,2e,00,65,00,78,00,65,00,20,00,22,00,25,\
  00,50,00,72,00,6f,00,67,00,72,00,61,00,6d,00,46,00,69,00,6c,00,65,00,73,00,\
  25,00,5c,00,57,00,69,00,6e,00,64,00,6f,00,77,00,73,00,20,00,50,00,68,00,6f,\
  00,74,00,6f,00,20,00,56,00,69,00,65,00,77,00,65,00,72,00,5c,00,50,00,68,00,\
  6f,00,74,00,6f,00,56,00,69,00,65,00,77,00,65,00,72,00,2e,00,64,00,6c,00,6c,\
  00,22,00,2c,00,20,00,49,00,6d,00,61,00,67,00,65,00,56,00,69,00,65,00,77,00,\
  5f,00,46,00,75,00,6c,00,6c,00,73,00,63,00,72,00,65,00,65,00,6e,00,20,00,25,\
  00,31,00,00,00

[HKEY_CLASSES_ROOT\PhotoViewer.FileAssoc.Bitmap\shell\open\DropTarget]
"Clsid"="{FFE2A43C-56B9-4bf5-9A79-CC6D4285608A}"

[HKEY_CLASSES_ROOT\PhotoViewer.FileAssoc.JFIF]
"EditFlags"=dword:00010000
"ImageOptionFlags"=dword:00000001
"FriendlyTypeName"=hex(2):40,00,25,00,50,00,72,00,6f,00,67,00,72,00,61,00,6d,\
  00,46,00,69,00,6c,00,65,00,73,00,25,00,5c,00,57,00,69,00,6e,00,64,00,6f,00,\
  77,00,73,00,20,00,50,00,68,00,6f,00,74,00,6f,00,20,00,56,00,69,00,65,00,77,\
  00,65,00,72,00,5c,00,50,00,68,00,6f,00,74,00,6f,00,56,00,69,00,65,00,77,00,\
  65,00,72,00,2e,00,64,00,6c,00,6c,00,2c,00,2d,00,33,00,30,00,35,00,35,00,00,\
  00

[HKEY_CLASSES_ROOT\PhotoViewer.FileAssoc.JFIF\DefaultIcon]
@="%SystemRoot%\\System32\\imageres.dll,-72"

[HKEY_CLASSES_ROOT\PhotoViewer.FileAssoc.JFIF\shell]

[HKEY_CLASSES_ROOT\PhotoViewer.FileAssoc.JFIF\shell\open]
"MuiVerb"=hex(2):40,00,25,00,50,00,72,00,6f,00,67,00,72,00,61,00,6d,00,46,00,\
  69,00,6c,00,65,00,73,00,25,00,5c,00,57,00,69,00,6e,00,64,00,6f,00,77,00,73,\
  00,20,00,50,00,68,00,6f,00,74,00,6f,00,20,00,56,00,69,00,65,00,77,00,65,00,\
  72,00,5c,00,70,00,68,00,6f,00,74,00,6f,00,76,00,69,00,65,00,77,00,65,00,72,\
  00,2e,00,64,00,6c,00,6c,00,2c,00,2d,00,33,00,30,00,34,00,33,00,00,00

[HKEY_CLASSES_ROOT\PhotoViewer.FileAssoc.JFIF\shell\open\command]
@=hex(2):25,00,53,00,79,00,73,00,74,00,65,00,6d,00,52,00,6f,00,6f,00,74,00,25,\
  00,5c,00,53,00,79,00,73,00,74,00,65,00,6d,00,33,00,32,00,5c,00,72,00,75,00,\
  6e,00,64,00,6c,00,6c,00,33,00,32,00,2e,00,65,00,78,00,65,00,20,00,22,00,25,\
  00,50,00,72,00,6f,00,67,00,72,00,61,00,6d,00,46,00,69,00,6c,00,65,00,73,00,\
  25,00,5c,00,57,00,69,00,6e,00,64,00,6f,00,77,00,73,00,20,00,50,00,68,00,6f,\
  00,74,00,6f,00,20,00,56,00,69,00,65,00,77,00,65,00,72,00,5c,00,50,00,68,00,\
  6f,00,74,00,6f,00,56,00,69,00,65,00,77,00,65,00,72,00,2e,00,64,00,6c,00,6c,\
  00,22,00,2c,00,20,00,49,00,6d,00,61,00,67,00,65,00,56,00,69,00,65,00,77,00,\
  5f,00,46,00,75,00,6c,00,6c,00,73,00,63,00,72,00,65,00,65,00,6e,00,20,00,25,\
  00,31,00,00,00

[HKEY_CLASSES_ROOT\PhotoViewer.FileAssoc.JFIF\shell\open\DropTarget]
"Clsid"="{FFE2A43C-56B9-4bf5-9A79-CC6D4285608A}"

[HKEY_CLASSES_ROOT\PhotoViewer.FileAssoc.Jpeg]
"EditFlags"=dword:00010000
"ImageOptionFlags"=dword:00000001
"FriendlyTypeName"=hex(2):40,00,25,00,50,00,72,00,6f,00,67,00,72,00,61,00,6d,\
  00,46,00,69,00,6c,00,65,00,73,00,25,00,5c,00,57,00,69,00,6e,00,64,00,6f,00,\
  77,00,73,00,20,00,50,00,68,00,6f,00,74,00,6f,00,20,00,56,00,69,00,65,00,77,\
  00,65,00,72,00,5c,00,50,00,68,00,6f,00,74,00,6f,00,56,00,69,00,65,00,77,00,\
  65,00,72,00,2e,00,64,00,6c,00,6c,00,2c,00,2d,00,33,00,30,00,35,00,35,00,00,\
  00

[HKEY_CLASSES_ROOT\PhotoViewer.FileAssoc.Jpeg\DefaultIcon]
@="%SystemRoot%\\System32\\imageres.dll,-72"

[HKEY_CLASSES_ROOT\PhotoViewer.FileAssoc.Jpeg\shell]

[HKEY_CLASSES_ROOT\PhotoViewer.FileAssoc.Jpeg\shell\open]
"MuiVerb"=hex(2):40,00,25,00,50,00,72,00,6f,00,67,00,72,00,61,00,6d,00,46,00,\
  69,00,6c,00,65,00,73,00,25,00,5c,00,57,00,69,00,6e,00,64,00,6f,00,77,00,73,\
  00,20,00,50,00,68,00,6f,00,74,00,6f,00,20,00,56,00,69,00,65,00,77,00,65,00,\
  72,00,5c,00,70,00,68,00,6f,00,74,00,6f,00,76,00,69,00,65,00,77,00,65,00,72,\
  00,2e,00,64,00,6c,00,6c,00,2c,00,2d,00,33,00,30,00,34,00,33,00,00,00

[HKEY_CLASSES_ROOT\PhotoViewer.FileAssoc.Jpeg\shell\open\command]
@=hex(2):25,00,53,00,79,00,73,00,74,00,65,00,6d,00,52,00,6f,00,6f,00,74,00,25,\
  00,5c,00,53,00,79,00,73,00,74,00,65,00,6d,00,33,00,32,00,5c,00,72,00,75,00,\
  6e,00,64,00,6c,00,6c,00,33,00,32,00,2e,00,65,00,78,00,65,00,20,00,22,00,25,\
  00,50,00,72,00,6f,00,67,00,72,00,61,00,6d,00,46,00,69,00,6c,00,65,00,73,00,\
  25,00,5c,00,57,00,69,00,6e,00,64,00,6f,00,77,00,73,00,20,00,50,00,68,00,6f,\
  00,74,00,6f,00,20,00,56,00,69,00,65,00,77,00,65,00,72,00,5c,00,50,00,68,00,\
  6f,00,74,00,6f,00,56,00,69,00,65,00,77,00,65,00,72,00,2e,00,64,00,6c,00,6c,\
  00,22,00,2c,00,20,00,49,00,6d,00,61,00,67,00,65,00,56,00,69,00,65,00,77,00,\
  5f,00,46,00,75,00,6c,00,6c,00,73,00,63,00,72,00,65,00,65,00,6e,00,20,00,25,\
  00,31,00,00,00

[HKEY_CLASSES_ROOT\PhotoViewer.FileAssoc.Jpeg\shell\open\DropTarget]
"Clsid"="{FFE2A43C-56B9-4bf5-9A79-CC6D4285608A}"

[HKEY_CLASSES_ROOT\PhotoViewer.FileAssoc.Gif]
"ImageOptionFlags"=dword:00000001
"FriendlyTypeName"=hex(2):40,00,25,00,50,00,72,00,6f,00,67,00,72,00,61,00,6d,\
  00,46,00,69,00,6c,00,65,00,73,00,25,00,5c,00,57,00,69,00,6e,00,64,00,6f,00,\
  77,00,73,00,20,00,50,00,68,00,6f,00,74,00,6f,00,20,00,56,00,69,00,65,00,77,\
  00,65,00,72,00,5c,00,50,00,68,00,6f,00,74,00,6f,00,56,00,69,00,65,00,77,00,\
  65,00,72,00,2e,00,64,00,6c,00,6c,00,2c,00,2d,00,33,00,30,00,35,00,37,00,00,\
  00

[HKEY_CLASSES_ROOT\PhotoViewer.FileAssoc.Gif\DefaultIcon]
@="%SystemRoot%\\System32\\imageres.dll,-83"

[HKEY_CLASSES_ROOT\PhotoViewer.FileAssoc.Gif\shell]

[HKEY_CLASSES_ROOT\PhotoViewer.FileAssoc.Gif\shell\open]

[HKEY_CLASSES_ROOT\PhotoViewer.FileAssoc.Gif\shell\open\command]
@=hex(2):25,00,53,00,79,00,73,00,74,00,65,00,6d,00,52,00,6f,00,6f,00,74,00,25,\
  00,5c,00,53,00,79,00,73,00,74,00,65,00,6d,00,33,00,32,00,5c,00,72,00,75,00,\
  6e,00,64,00,6c,00,6c,00,33,00,32,00,2e,00,65,00,78,00,65,00,20,00,22,00,25,\
  00,50,00,72,00,6f,00,67,00,72,00,61,00,6d,00,46,00,69,00,6c,00,65,00,73,00,\
  25,00,5c,00,57,00,69,00,6e,00,64,00,6f,00,77,00,73,00,20,00,50,00,68,00,6f,\
  00,74,00,6f,00,20,00,56,00,69,00,65,00,77,00,65,00,72,00,5c,00,50,00,68,00,\
  6f,00,74,00,6f,00,56,00,69,00,65,00,77,00,65,00,72,00,2e,00,64,00,6c,00,6c,\
  00,22,00,2c,00,20,00,49,00,6d,00,61,00,67,00,65,00,56,00,69,00,65,00,77,00,\
  5f,00,46,00,75,00,6c,00,6c,00,73,00,63,00,72,00,65,00,65,00,6e,00,20,00,25,\
  00,31,00,00,00

[HKEY_CLASSES_ROOT\PhotoViewer.FileAssoc.Gif\shell\open\DropTarget]
"Clsid"="{FFE2A43C-56B9-4bf5-9A79-CC6D4285608A}"

[HKEY_CLASSES_ROOT\PhotoViewer.FileAssoc.Png]
"ImageOptionFlags"=dword:00000001
"FriendlyTypeName"=hex(2):40,00,25,00,50,00,72,00,6f,00,67,00,72,00,61,00,6d,\
  00,46,00,69,00,6c,00,65,00,73,00,25,00,5c,00,57,00,69,00,6e,00,64,00,6f,00,\
  77,00,73,00,20,00,50,00,68,00,6f,00,74,00,6f,00,20,00,56,00,69,00,65,00,77,\
  00,65,00,72,00,5c,00,50,00,68,00,6f,00,74,00,6f,00,56,00,69,00,65,00,77,00,\
  65,00,72,00,2e,00,64,00,6c,00,6c,00,2c,00,2d,00,33,00,30,00,35,00,37,00,00,\
  00

[HKEY_CLASSES_ROOT\PhotoViewer.FileAssoc.Png\DefaultIcon]
@="%SystemRoot%\\System32\\imageres.dll,-71"

[HKEY_CLASSES_ROOT\PhotoViewer.FileAssoc.Png\shell]

[HKEY_CLASSES_ROOT\PhotoViewer.FileAssoc.Png\shell\open]

[HKEY_CLASSES_ROOT\PhotoViewer.FileAssoc.Png\shell\open\command]
@=hex(2):25,00,53,00,79,00,73,00,74,00,65,00,6d,00,52,00,6f,00,6f,00,74,00,25,\
  00,5c,00,53,00,79,00,73,00,74,00,65,00,6d,00,33,00,32,00,5c,00,72,00,75,00,\
  6e,00,64,00,6c,00,6c,00,33,00,32,00,2e,00,65,00,78,00,65,00,20,00,22,00,25,\
  00,50,00,72,00,6f,00,67,00,72,00,61,00,6d,00,46,00,69,00,6c,00,65,00,73,00,\
  25,00,5c,00,57,00,69,00,6e,00,64,00,6f,00,77,00,73,00,20,00,50,00,68,00,6f,\
  00,74,00,6f,00,20,00,56,00,69,00,65,00,77,00,65,00,72,00,5c,00,50,00,68,00,\
  6f,00,74,00,6f,00,56,00,69,00,65,00,77,00,65,00,72,00,2e,00,64,00,6c,00,6c,\
  00,22,00,2c,00,20,00,49,00,6d,00,61,00,67,00,65,00,56,00,69,00,65,00,77,00,\
  5f,00,46,00,75,00,6c,00,6c,00,73,00,63,00,72,00,65,00,65,00,6e,00,20,00,25,\
  00,31,00,00,00

[HKEY_CLASSES_ROOT\PhotoViewer.FileAssoc.Png\shell\open\DropTarget]
"Clsid"="{FFE2A43C-56B9-4bf5-9A79-CC6D4285608A}"

[HKEY_CLASSES_ROOT\PhotoViewer.FileAssoc.Wdp]
"EditFlags"=dword:00010000
"ImageOptionFlags"=dword:00000001

[HKEY_CLASSES_ROOT\PhotoViewer.FileAssoc.Wdp\DefaultIcon]
@="%SystemRoot%\\System32\\wmphoto.dll,-400"

[HKEY_CLASSES_ROOT\PhotoViewer.FileAssoc.Wdp\shell]

[HKEY_CLASSES_ROOT\PhotoViewer.FileAssoc.Wdp\shell\open]
"MuiVerb"=hex(2):40,00,25,00,50,00,72,00,6f,00,67,00,72,00,61,00,6d,00,46,00,\
  69,00,6c,00,65,00,73,00,25,00,5c,00,57,00,69,00,6e,00,64,00,6f,00,77,00,73,\
  00,20,00,50,00,68,00,6f,00,74,00,6f,00,20,00,56,00,69,00,65,00,77,00,65,00,\
  72,00,5c,00,70,00,68,00,6f,00,74,00,6f,00,76,00,69,00,65,00,77,00,65,00,72,\
  00,2e,00,64,00,6c,00,6c,00,2c,00,2d,00,33,00,30,00,34,00,33,00,00,00

[HKEY_CLASSES_ROOT\PhotoViewer.FileAssoc.Wdp\shell\open\command]
@=hex(2):25,00,53,00,79,00,73,00,74,00,65,00,6d,00,52,00,6f,00,6f,00,74,00,25,\
  00,5c,00,53,00,79,00,73,00,74,00,65,00,6d,00,33,00,32,00,5c,00,72,00,75,00,\
  6e,00,64,00,6c,00,6c,00,33,00,32,00,2e,00,65,00,78,00,65,00,20,00,22,00,25,\
  00,50,00,72,00,6f,00,67,00,72,00,61,00,6d,00,46,00,69,00,6c,00,65,00,73,00,\
  25,00,5c,00,57,00,69,00,6e,00,64,00,6f,00,77,00,73,00,20,00,50,00,68,00,6f,\
  00,74,00,6f,00,20,00,56,00,69,00,65,00,77,00,65,00,72,00,5c,00,50,00,68,00,\
  6f,00,74,00,6f,00,56,00,69,00,65,00,77,00,65,00,72,00,2e,00,64,00,6c,00,6c,\
  00,22,00,2c,00,20,00,49,00,6d,00,61,00,67,00,65,00,56,00,69,00,65,00,77,00,\
  5f,00,46,00,75,00,6c,00,6c,00,73,00,63,00,72,00,65,00,65,00,6e,00,20,00,25,\
  00,31,00,00,00

[HKEY_CLASSES_ROOT\PhotoViewer.FileAssoc.Wdp\shell\open\DropTarget]
"Clsid"="{FFE2A43C-56B9-4bf5-9A79-CC6D4285608A}"

[HKEY_LOCAL_MACHINE\SOFTWARE\Microsoft\Windows Photo Viewer]

[HKEY_LOCAL_MACHINE\SOFTWARE\Microsoft\Windows Photo Viewer\Capabilities]
"ApplicationDescription"="@%ProgramFiles%\\Windows Photo Viewer\\photoviewer.dll,-3069"
"ApplicationName"="@%ProgramFiles%\\Windows Photo Viewer\\photoviewer.dll,-3009"