
- Forums
- Windows Hosting
- How To Disable IIS In A Windows Server From Loading During Boot
This Tutorial Will Show You How You Can Disable IIs From Running When You Server First Start. I will show you the steps for disabling in your windows server using pictures of the configuration settings. [1604], Last Updated: Mon Jun 24, 2024
Webune Tutorials
Tue Dec 08, 2009
17 Comments
3796 Visits
Welcome to Webune Support Forums
We provide Windows Dedicated Server — If you are interested in a secured Windows 2008 server, please contact our sales team
the purpose of this tutorial is to show you how you can disable IIS (Internet Information Services) on your Microsoft Windows Server.
sometimes its helpful because you want to disable it by default because you may have another web server running on your server like apache for example. and you may want to stop IIS from running when you first start your server. With these steps, you can still start your server, because you are not going to be uninstalling it rather, you are just going to stop it from starting at startup of your server.
I will show you how its done by using a windows 7 Computer i have.
first go to the control panel and select Administrative tools
in the administrative tools panel, double click on Services
now scroll down to the World Wide Web Publishing Service and right click on World Wide Web Publishing Service and select properties:
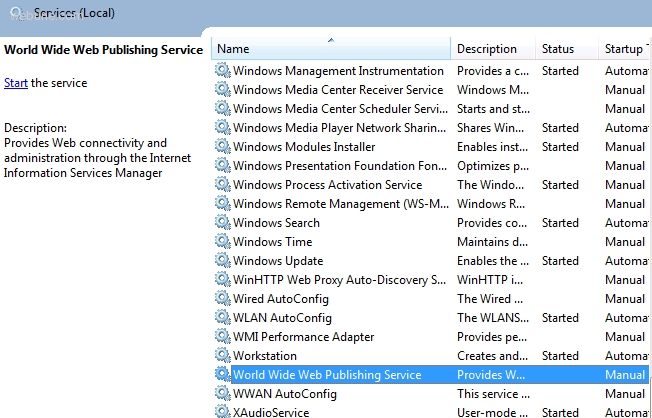
under the General tab, in Startup Type — select Manual

click OK, now when you restart your computer, IIS will not start by default. if you want to start it, you can start it manually.
IIS is an extensible web server developed by Microsoft. Below are some of the features of the IIS web server.
- HTTP/2: HTTP/2 requests are now faster than ever. This feature is active by default with IIS 10.0 on Windows Server 2016 and Windows 10.
- IIS on Nano Server: IIS is easy and quick to install on Nano Server. You can manage IIS remotely with PowerShell or the IIS Manager console. Nano Server is much faster and consumes less memory and disk space that the full-fledged Windows Server. Rebooting is also faster so that you can manage time effectively.
- Wildcard Host Headers: IIS 10.0 support the subdomain feature for your parent domain name. This will really help you manage more subdomains with the same primary domain name.
- PowerShell 5 cmdlets: IIS 10.0 adds a new, simplified PowerShell module for quick and easy management. You can use PowerShell to access server-management features remotely. It also supports existing WebAdministration cmdlets.
- FTP: FTP is a simple protocol for transferring files. This system can transfer files inside your company LAN and WAN using the default port, 21. IIS 10.0 includes an FTP server that is easy to configure and manage.
- FTPS: FTPS is the same as FTP, with the only difference that it is secure. FTPS transfers data with SSL. We are going to use HTTPS port 443. For this, we need to create and install an SSL certificate that encrypts and decrypts data securely. SSL ensures that all data passed between web server and browser remains private and consistent during upload and download over private or public networks.
- Multi-web hosting: IIS 10.0 allows you to create multiple websites and multiple applications on the same server. You can easily manage and create a new virtual directory located in the default location or a custom location.
- Virtual directories: IIS 10.0 makes it easy to manage and create the virtual directories you require.
Open the Command prompt, press Windows key + R and type “cmd”, the Command Prompt window opens displaying and waiting,
type the following commands,
To Stop IIS : iisreset /stop
To Start IIS : iisreset /start
To Restart IIS : iisreset /restart

Check IIS Service Status by Command Line
Check Status:
Note: If you may getting an error when restart error “Restart Attempt Failed” again type the command.
Skip to content
Search For
- Read our Blog
- Network Status
- Support Tickets
-
Support
-
Servers
-
Managed Servers
-
How do I stop IIS via command prompt?
-
Support
-
Servers
-
Managed Servers
-
Windows
-
How do I stop IIS via command prompt?
-
Support
-
Servers
-
How do I stop IIS via command prompt?
Categories
-
Website Builder
-
Online Compliance
-
SEO
-
WordPress Hosting
-
Email
-
WebMail
-
Legacy
-
Microsoft 365
-
Domains
-
Hosting
-
Servers
-
Security
-
Account & Billing
Tags: IISWindowsXSW
RDP on to the server
To stop IIS using the IISReset command-line utility
- From the Start menu, click Run.
- In the Open box, type cmd, and click OK.
- At the command prompt, type
iisreset /stop
- IIS attempts to stop all services.
Was this article helpful?
Yes
No
Related guides
Managed VPS Platform migration FAQ
What are the supported PHP versions on new AlmaLinux 8 server?Alma Linux 8 with Plesk supports PHP 5.6 – 8.3+….
Tags: XSW
Dedicated Server Elevation FAQ
Questions on CentOS7 Alma Linux 8 migration: What are the supported PHP versions on new Alma Linux 8 server? Alma…
Tags: XSW
Backups & Snapshots
Simply put, a backup is a copy of the content on your VPS that has been taken at a specific…
Tags: PureSSD VPSVPSXSW
Changing your root password on a CentOS server
You can change your root password on your CentOS server via SSH, with some simple commands by completing the following…
Tags: CentOSPureSSD VPSSelf ManagedVPSXSW
No more need for Windows Server IIS? Want to remove IIS completely from Windows Server using PowerShell? Start your PowerShell console as admin, and issue the following command in PowerShell:
Uninstall-WindowsFeature -Remove Web-Server
This will completely remove Internet Information Services (IIS) and its configuration! If you want to remove IIS web server, and be able to reinstall it later on, don’t use the -Remove parameter:
Uninstall-WindowsFeature Web-Server
Uninstalls specified Windows Server roles, role services, and features from a computer that is running Windows Server 2012 R2. By adding the Remove parameter, also deletes feature files, or payload, from a computer. This cmdlet replaces Remove-WindowsFeature, the cmdlet that was used to uninstall roles, role services, and features in Windows Server 2008 R2.
Uninstall-WindowsFeature
If the Uninstall-WindowsFeature fails you can always resort to DISM’s Disable-WindowsOptionalFeature. To remove or disable IIS-Webserver and its parent role IIS-WebServerRole execute the following command:
Disable-WindowsOptionalFeature -Online -NoRestart -FeatureName IIS-WebServerRole, IIS-WebServer
Before removing IIS from your server, don’t forget to backup IIS and its configuration.
This guide intends to teach you 2 Methods to Enable and Disable IIS on Windows 11. You can use Windows features GUI or PowerShell Command-Line to enable IIS. IIS provides different web server functions. You can easily follow the steps below provided by the Orcacore team to Enable and Disable IIS on Windows 11.
Table of Contents
At this point, you can log in to your Windows Client and use one of the following methods to Enable and Disable Microsoft IIS on Windows 11:
- From Windows GUI
- From PowerShell Command Line
You can also visit the Video Tutorial Here:
Method 1 – Enable IIS in Windows 11 From GUI
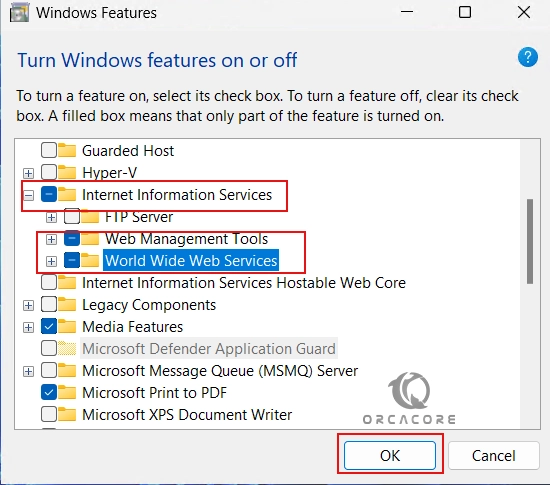
In this step, you need to open your Windows features. To do this, from your search bar, search for features and click on “Turn Windows features on or off“.
From there, check the boxes next to “Internet Information Services, Web Management Tools and World Wide Web Services”. This will also enable the IIS Management Console including Application features, Common HTTP Features, Health Diagnosis, Performance, and Security Features. Then, click OK.
Wait until your installation is completed.
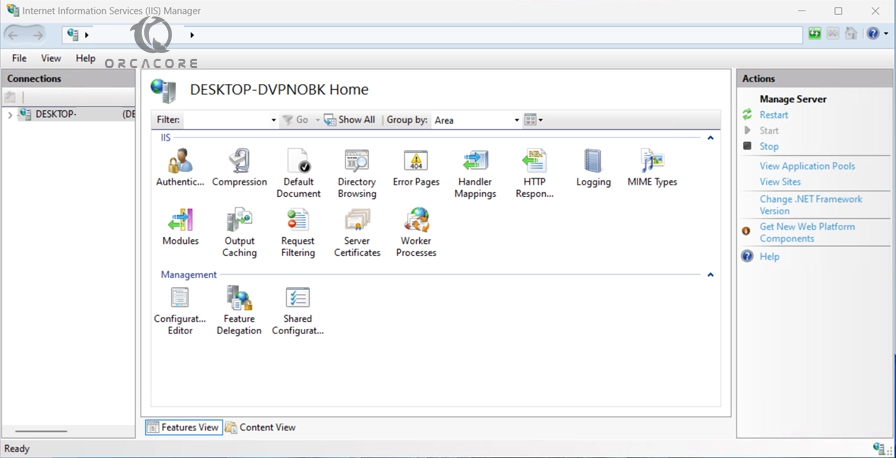
Run IIS Manager in Windows 11
Now you can run your IIS manager. From your Search bar, search for IIS and click on “Internet Information Services (IIS) Manager”.
Now you can see your IIS manager in Windows 11.
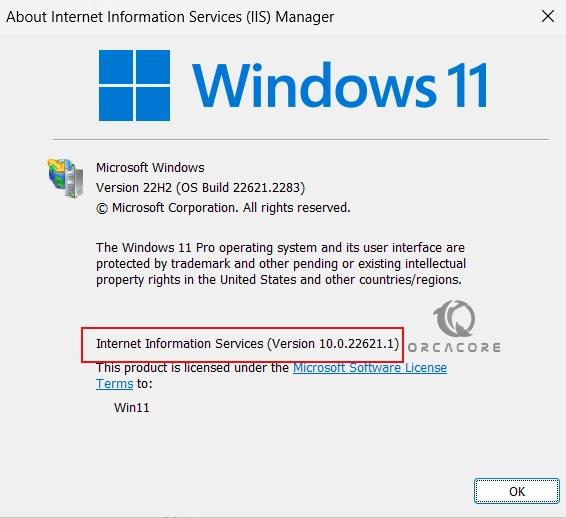
Check the IIS Version
To verify your IIS version, you can click on the Help tab and click on About Internet Information Service“.
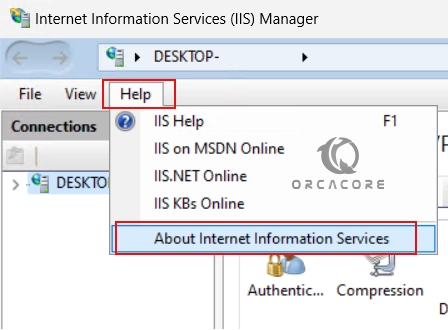
Then, you will have your IIS version installed on your Windows 11.
Disable IIS Manager in Windows 11 from GUI
If you plan to disable the IIS manager, you can simply, search for features again and click on “Turn Windows features on or off“. From there, uncheck the boxes next to “Internet Information Services, Web Management Tools and World Wide Web Services”. Then, click OK.
Finally, restart your system to apply the changes. With this option, you will disable your IIS manager in Windows 11.
Method 2 – Enable IIS from PowerShell in Windows 11
\Those who prefer to use the command line interface instead of using GUI can use PowerShell to enable the IIS manager. To do this, open PowerShell as an administrator and run the following command:
Enable-WindowsOptionalFeature -Online -FeatureName IIS-WebServerRole, IIS-WebServer, IIS-CommonHttpFeatures, IIS-ManagementConsole, IIS-HttpErrors, IIS-HttpRedirect, IIS-WindowsAuthentication, IIS-StaticContent, IIS-DefaultDocument, IIS-HttpCompressionStatic, IIS-DirectoryBrowsingWait until your IIS installation is completed.

In your output, you will see:

In this way, you can simply turn on IIS on Windows 11 from PowerShell.
Disable IIS Manager From PowerShell
If you plan to disable IIS from PowerShell, you can run the command below:
Disable-WindowsOptionalFeature -Online -FeatureName IIS-WebServerRole, IIS-WebServer
Wait until the process is completed. Then, you will need to restart your system. Press Y to continue.

That’s it, you are done.
Conclusion
At this point, you have learned to Enable and Disable IIS on Windows 11 from GUI and PowerShell Command-Line. Hope you enjoy it. Also, you may like to read the following articles:
2 Ways To Test Hard Disk Speed in Windows
Enable Network Discovery and File Sharing on Windows
FAQs
How do I enable IIS on Windows 11?
You can enable IIS by navigating to the “Turn Windows features on or off” menu, checking the box next to “Internet Information Services,” and clicking OK. IIS will then install and be enabled.
Can I install IIS via PowerShell on Windows 11?
Yes, you can install IIS using PowerShell by following the guide steps above (Enable and Disable IIS on Windows 11).
How do I verify that IIS is installed and running on Windows 11?
You can verify IIS installation by opening a web browser and typing http://localhost in the address bar. If IIS is running, you’ll see the default IIS welcome page.