
Изоляция ядра — одна из функций защиты устройства Windows на основе виртуализации (Hypervisor-protected Code Integrity или HVCI), изолирующая сторонние процессы от процессов Windows, призванная повысить защиту от угроз, направленных на ядро Windows. Несмотря на пользу, в некоторых случаях её отключение может повысить производительность системы в играх и сторонних приложениях.
В этой пошаговой инструкции подробно о способах отключить изоляцию ядра в Windows 11 и Windows 10, а также дополнительная информация на тему, которая может оказаться полезной.
Отключение изоляции ядра в «Безопасность Windows»
Базовый способ — использование соответствующей настройки в окне «Безопасность Windows». Шаги для отключения изоляции ядра будут следующими:
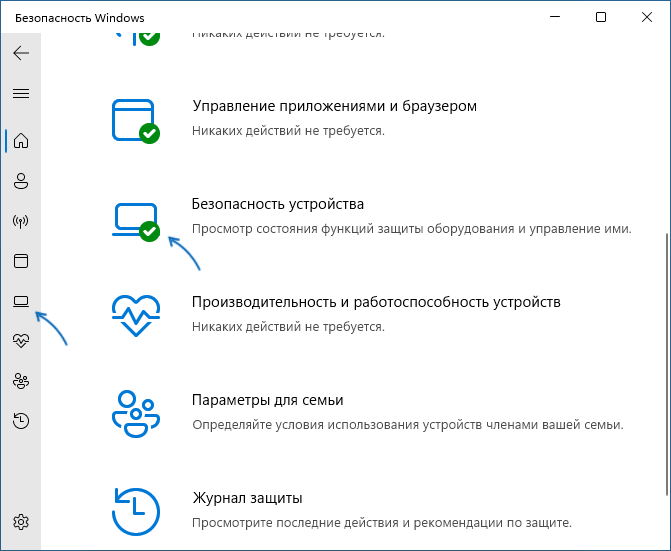
- Откройте окно «Безопасность Windows», используя значок в области уведомлений или поиск в панели задач.
- В открывшемся окне «Безопасность Windows» перейдите в раздел «Безопасность устройства».

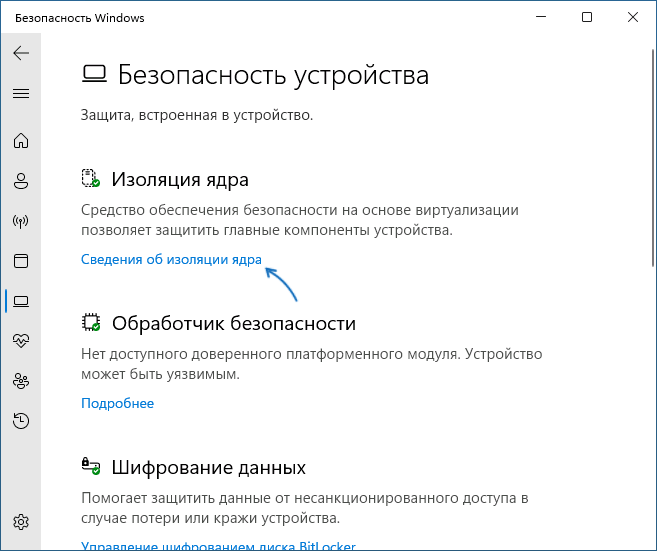
- В пункте «Изоляция ядра» нажмите «Сведения об изоляции ядра».

- Отключите пункты «Целостность памяти». При появлении запроса контроля учетных записей подтвердите действие.

- В случае, если отключение производится из-за невозможности работы какого-либо драйвера, также отключите пункт «Список заблокированных уязвимых драйверов».
- Появится уведомление о необходимости перезагрузки. Перезагрузите компьютер для применения сделанных настроек.
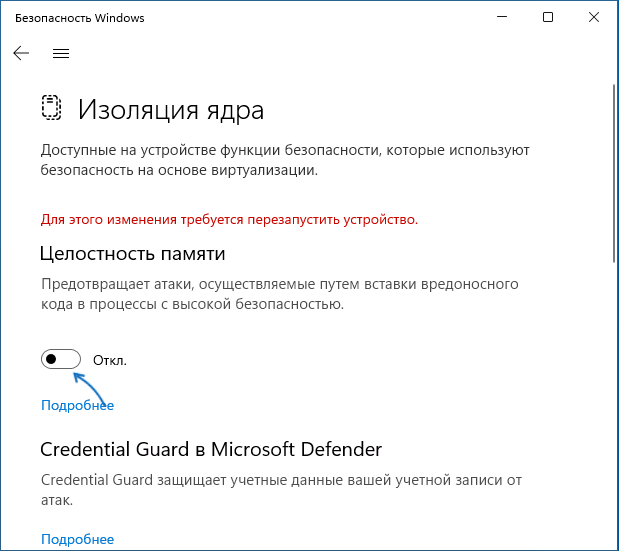
В результате изоляция ядра и основная её составляющая — «Целостность памяти» будут отключены.
Примечание: открыть «Безопасность Windows» вы можете через «Параметры»:
- В Windows 11 — Параметры — Конфиденциальность и защита — Безопасность Windows
- В Windows 10 — Параметры — Обновление и безопасность — Безопасность Windows
Отключение в редакторе реестра
Вы можете полностью отключить функции изоляции ядра HVCI, используя редактор реестра. Для этого:
- Нажмите правой кнопкой мыши по кнопке «Пуск», выберите пункт «Выполнить», введите regedit и нажмите Enter.
- Перейдите к разделу реестра
HKEY_LOCAL_MACHINE\SYSTEM\CurrentControlSet\Control\DeviceGuard\Scenarios\HypervisorEnforcedCodeIntegrity
При отсутствии такого раздела, создайте его.
- В правой панели редактора реестра дважды нажмите по параметру DWORD с именем «Enabled» и измените его значение на 0.

- Примените настройки и перезагрузите компьютер.

В результате изоляция ядра и сопутствующие функции HVCI будут отключены на компьютере.
Вместо ручного редактирования реестра вы можете создать reg-файл со следующим содержимым:
Windows Registry Editor Version 5.00

[HKEY_LOCAL_MACHINE\SYSTEM\CurrentControlSet\Control\DeviceGuard\Scenarios\HypervisorEnforcedCodeIntegrity]
"Enabled"=dword:00000000
Либо использовать команду в командной строке, запущенной от имени Администратора:
reg add "HKLM\SYSTEM\CurrentControlSet\Control\DeviceGuard\Scenarios\HypervisorEnforcedCodeIntegrity" /v "Enabled" /t REG_DWORD /d 0 /f
Настройка HVCI в редакторе локальной групповой политики
Если на вашем компьютере установлена Windows 11/10 Pro или Enterprise, вы можете использовать редактор локальной групповой политики для отключения изоляции ядра и других функций HVCI:
- Нажмите клавиши Win+R на клавиатуре, введите gpedit.msc и нажмите Enter.
- Перейдите в раздел Конфигурация компьютера — Административные шаблоны — Система — Device Guard.
- Дважды нажмите по политике «Включить средство обеспечения безопасности на основе виртуализации».

- Установите значение «Отключено».

- Примените настройки и перезагрузите компьютер.


В результате функции изоляции ядра Windows будут полностью отключены.
Проверка статуса изоляции ядра
Проверить текущий статус функций безопасности на основе виртуализации можно с помощью команды PowerShell (Терминала Windows):
Get-CimInstance -ClassName Win32_DeviceGuard –Namespace root\Microsoft\Windows\DeviceGuard

На скриншоте видно, что все функции HVCI отключены (SecurityServicesRunning и VirtualisationBasedSecurityStatus равны 0).
Еще один способ проверить, включена ли изоляция ядра — в редакторе реестра открыть раздел
HKLM\System\CurrentControlSet\Control\CI\State
Если раздел отсутствует или параметр HVCIEnabled в нём равен 0, изоляция ядра отключена. При значении HVCIEnabled равном 1 — включена.

После отключения изоляции ядра безопасность Windows будет сигнализировать о проблемах в части «Безопасность устройства», а на значке в области уведомлений будет отображаться восклицательный знак. Чтобы этого не происходило, зайдите в раздел «Безопасность устройства» и нажмите «Закрыть» или «Закрыть все».

Насколько безопасно отключать изоляцию ядра Windows? Точного ответа о степени риска дать не получится. В общем случае, при отсутствии каких-либо проблем с производительностью и работой необходимых драйверов лучше оставлять встроенные функции безопасности Windows 11/10 включенными. Но, как отмечалось, иногда отключение изоляции ядра и целостности памяти позволяет повысить производительность в играх, что отмечала и Майкрософт.
Учитывайте, что не на всех устройствах изоляция ядра включена по умолчанию. Если она отключена, чаще всего причина — в неподдерживаемых драйверах устройств, список которых будет отображаться в «Безопасность Windows». Вторая возможная причина — отсутствие необходимых для работы HVCI функций виртуализации.
Disabling HVCI and KMCI on Windows 11 involves turning off specific security features that protect against malicious software. These features, known as Hypervisor-Enforced Code Integrity (HVCI) and Kernel Mode Code Integrity (KMCI), are part of Windows 11’s built-in security measures. While necessary for some advanced operations or software compatibility, turning them off can expose your computer to potential threats, so proceed with caution. To disable HVCI and KMCI, you’ll need to access system settings and make changes through the Windows Security app and Group Policy Editor.
In this section, we’re going to explore the steps needed to disable HVCI and KMCI on your Windows 11 device. This process involves navigating through system settings to turn off these security features, which may be necessary for certain applications to run properly or to troubleshoot issues with software compatibility.
Step 1: Open Windows Security
First, access the Windows Security app through the Start menu.
Once you’re in the Start menu, just type “Windows Security” into the search bar and hit enter. This app is your hub for managing all security features on your device, so it’s the first stop for any changes you need to make regarding system protection.
Step 2: Navigate to Device Security
Next, click on the “Device Security” section located in Windows Security.
Inside the Windows Security app, you’ll find various sections on the left sidebar. “Device Security” is where you’ll find options related to core isolation, an area important for HVCI settings.
Step 3: Access Core Isolation Details
Now, click on “Core isolation details” under Device Security.
This area contains settings for memory integrity and other security features. By clicking here, you’ll be able to adjust settings related to the integrity checks that HVCI and KMCI perform.
Step 4: Turn Off Memory Integrity
Then, toggle the “Memory Integrity” switch to off.
Disabling this feature will turn off the HVCI. You might get a prompt asking if you’re sure; confirm your choice. This feature prevents untrusted code from running in Windows, so make sure you really need to deactivate it before proceeding.
Step 5: Use Group Policy Editor for KMCI
Finally, open the Group Policy Editor by typing “gpedit.msc” into the Run dialog (Win + R) and navigate to Computer Configuration > Administrative Templates > System > Device Guard, then disable “Turn On Virtualization Based Security.”
Here, you’ll find a setting that directly controls KMCI. By disabling this policy, you’re effectively turning off the restrictions that KMCI places on your system. Remember, this step is crucial if you need to ensure that all kernel-mode drivers work without the integrity check.
After you’ve followed these steps, your computer will no longer enforce HVCI and KMCI, which means you might notice a change in how some applications run. This can solve compatibility issues or allow certain advanced operations that were previously restricted. However, be aware that turning these off reduces your computer’s security, leaving it potentially vulnerable to threats.
Tips for Disabling HVCI and KMCI on Windows 11
- Consider re-enabling HVCI and KMCI once your task is complete for added security.
- Always back up your data before making system changes that affect security settings.
- Verify that your device doesn’t require these features for essential apps before disabling them.
- Explore alternatives to disabling, such as updating incompatible software, first.
- Stay informed about potential risks related to disabling security features.
Frequently Asked Questions
Why should I disable HVCI and KMCI?
Disabling these features might be necessary for certain applications to run or for troubleshooting compatibility issues with older software.
Is it safe to disable HVCI and KMCI?
While it’s not recommended due to security risks, it can be safe if you understand the implications and take precautions with your device’s security.
Can I re-enable these features later?
Yes, you can easily re-enable HVCI and KMCI by reversing the steps outlined above.
Will disabling HVCI improve my computer’s performance?
In some cases, it might reduce the processing overhead and improve performance, but this is not guaranteed.
What are the risks of disabling these security features?
Disabling HVCI and KMCI can leave your computer vulnerable to malware and other security threats, so it’s crucial to proceed with caution.
Summary
- Open Windows Security.
- Navigate to Device Security.
- Access Core Isolation Details.
- Turn Off Memory Integrity.
- Use Group Policy Editor for KMCI.
Conclusion
Now that you’ve navigated through the process of disabling HVCI and KMCI on Windows 11, you should have a clearer understanding of both the potential benefits and risks involved. These security features are essential components of Windows 11’s defense system, designed to keep your device safe from malicious threats. However, the ever-evolving landscape of software and personal computing sometimes necessitates tweaks and changes for compatibility and performance reasons.
If you decide to keep these features disabled, it’s crucial to bolster your device’s security through other means, such as installing reputable antivirus software, keeping your operating system up to date, and being cautious with downloads and email attachments. On the other hand, if your specific task or compatibility issue is resolved, consider re-enabling HVCI and KMCI to restore full security protection.
For further reading, consider exploring Microsoft’s documentation on Windows 11 security features or forums where tech enthusiasts share their experiences and solutions. If you’re ever unsure or uneasy about making these changes yourself, consulting with a tech professional can provide peace of mind and ensure your system remains protected.
Matthew Burleigh has been writing tech tutorials since 2008. His writing has appeared on dozens of different websites and been read over 50 million times.
After receiving his Bachelor’s and Master’s degrees in Computer Science he spent several years working in IT management for small businesses. However, he now works full time writing content online and creating websites.
His main writing topics include iPhones, Microsoft Office, Google Apps, Android, and Photoshop, but he has also written about many other tech topics as well.
Read his full bio here.
Disabling Hypervisor-Protected Code Integrity (HVCI) and Kernel Mode Code Integrity (KMCI) in Windows 11 might sound complex, but it’s simple when you know the steps. First, head to the Windows Security app, navigate to Device Security, and disable memory integrity. Then, use Group Policy Editor or PowerShell to turn off HVCI. Finally, restart your computer to apply these changes. Let’s dive into the detailed steps:
Disabling HVCI and KMCI can help you run older drivers or software not compatible with these security features. Follow these steps to turn them off.
Step 1: Open Windows Security
Open the Windows Security app from the Start menu.
Windows Security is your go-to app for managing your computer’s security settings. Simply type “Windows Security” in the Start menu search bar and click on the app that appears.
Step 2: Navigate to Device Security
Click on “Device Security” in the left-hand menu.
In the Windows Security app, the Device Security section contains essential settings for securing your device. It’s located in the menu on the left side of the app window.
Step 3: Open Core Isolation Details
Click on “Core isolation details” under the Device Security section.
Core isolation provides virtualization-based security features in Windows 11. Clicking on “Core isolation details” will lead you to the settings you need to adjust.
Step 4: Disable Memory Integrity
Turn off the toggle switch for memory integrity.
Memory integrity helps prevent attacks from inserting malicious code into high-security processes. Disabling it allows less restrictive driver and software installations.
Step 5: Use Group Policy Editor to Disable HVCI
Open Group Policy Editor by typing “gpedit.msc” in the Run dialog (Win + R), then navigate to Computer Configuration > Administrative Templates > System > Device Guard, and disable the «Turn on Virtualization Based Security» setting.
Group Policy Editor lets you manage system policies. Disabling the “Turn on Virtualization Based Security” setting will turn off HVCI.
Step 6: Use PowerShell to Disable HVCI
Open PowerShell as an administrator and enter the command: bcdedit /set hypervisorlaunchtype off.
PowerShell is a powerful scripting tool in Windows. Running this command disables the Hypervisor, effectively turning off HVCI.
Step 7: Restart Your Computer
Reboot your system to apply these changes.
A system restart is required for the changes to take effect. Save any work before restarting.
After completing these steps, HVCI and KMCI will be disabled, allowing you to run older or incompatible drivers and software. Your system might be less secure, so be cautious about the software you install.
Tips for Disabling HVCI and KMCI in Windows 11
- Ensure you have administrative privileges before starting.
- Create a system restore point before making changes, just in case something goes wrong.
- Be aware that disabling these features can reduce your system’s security.
- Regularly update your drivers and software to the latest versions.
- Use caution when downloading and installing older drivers or software from untrusted sources.
Frequently Asked Questions
What is HVCI in Windows 11?
Hypervisor-Protected Code Integrity (HVCI) is a security feature that uses virtualization to ensure only trusted code runs in kernel mode.
Why would I want to disable HVCI and KMCI?
You might disable them to run older drivers or software that are not compatible with these security features.
Are there risks to disabling HVCI and KMCI?
Yes, disabling these features can reduce your system’s security by allowing potentially malicious code to run in kernel mode.
Can I re-enable HVCI and KMCI later?
Yes, you can re-enable them by reversing the steps outlined in this guide.
Will disabling HVCI and KMCI improve my computer’s performance?
Disabling these features might marginally improve performance, but the primary benefit is compatibility with older software and drivers.
Summary
- Open Windows Security.
- Navigate to Device Security.
- Open Core Isolation Details.
- Disable Memory Integrity.
- Use Group Policy Editor to disable HVCI.
- Use PowerShell to disable HVCI.
- Restart your computer.
Conclusion
Disabling HVCI and KMCI in Windows 11 is a straightforward process that can help you run older software and drivers. While it might make your system less secure, following the steps outlined in this guide ensures you can quickly adjust these settings as needed. Always remember to create a restore point before making changes and be cautious with the software you install afterward.
If you’re interested in further enhancing your Windows 11 experience, consider researching more about system optimization and security. And if you ever need to re-enable HVCI and KMCI, simply follow the reverse of the steps provided. Happy computing!
Matt Jacobs has been working as an IT consultant for small businesses since receiving his Master’s degree in 2003. While he still does some consulting work, his primary focus now is on creating technology support content for SupportYourTech.com.
His work can be found on many websites and focuses on topics such as Microsoft Office, Apple devices, Android devices, Photoshop, and more.

Безопасность на основе виртуализации, также известная как VBS, позволяет Windows 11 создавать защищенный анклав памяти, изолированный от небезопасного кода. Другая встроенная функция, называемая целостностью кода с применением гипервизора (HVCI), использует возможности VBS для предотвращения попадания неподписанных или сомнительных драйверов и программного обеспечения в память. Вместе VBS и HVCI добавляют уровень защиты, который ограничивает ущерб, который вредоносное ПО может нанести, даже если оно пройдет мимо вашего антивирусного ПО.
К сожалению, VBS и HVCI требуют значительных затрат на производительность, особенно когда дело касается игр. В тестах обнаружили, что игры работали на 5 процентов медленнее с этими настройками, чем с выключенными. Другие тестировщики увидели еще большое снижение производительности; на сайте PC Gamer отметили падение производительности на 25 процентов, хотя они тестировали процессоры Intel 10-го поколения, когда Microsoft рекомендует не менее 11-го поколения.
Простое обновление до Windows 11 не включит VBS, если вы не включили его в Windows 10, где он не использовался по умолчанию в течение нескольких лет. Так что на данный момент это проблема, с которой сталкиваются немногие.
Однако, если вы выполняете чистую установку Windows 11 или покупаете новый ноутбук или настольный компьютер с Windows 11, по умолчанию у вас может быть включен VBS / HVCI. Microsoft рекомендует включить его в OEMS по умолчанию, но отмечает, что «некоторые устройства, которые особенно чувствительны к производительности (например, игровые ПК), могут поставляться с отключенным HVCI». И уже известно, по крайней мере, об одном OEM, который утверждает, что они будут поставлять свои системы с отключенным VBS.
Если вы используете Windows 11, и производительность, особенно в играх, имеет для вас наибольшее значение, ниже будет показано, как проверить, включен ли VBS / HVCI и как его отключить. Однако, если вы не играете, вы можете оставить защиту на месте.
Как проверить, включен ли VBS в Windows 11
Прежде чем вы начнете думать об отключении VBS, вам нужно выяснить, включен ли он вообще.
1. Откройте системную информацию. Самый простой способ сделать это — выполнить поиск «системной информации» в поиске Windows и щелкнуть верхний результат.

2. Прокрутите вниз и найдите строку «Безопасность на основе виртуализации». Если написано «работает», значит VBS включен. Но если написано «не включено», значит ничего больше делать не надо.

Как отключить VBS / HVCI в Windows 11
1. Найдите Core Isolation в поиске Windows и щелкните верхний результат .

2. Нажмите «Безопасность Windows» и «ОК», если вас спросят, какое приложение использовать. Откроется подменю.

3. Выключите целостность памяти, если она была включена. Если уже выключена, переходите к шагу 6.

4. Перезагрузите компьютер, как будет предложено.

5. Еще раз проверьте информацию о системе, чтобы убедиться, что безопасность на основе виртуализации выключена. Если да, то все готово. Если нет, перейдите к шагу 6, где вы отключите VBS в реестре.

6. Откройте regedit. Самый простой способ — нажать Windows + R, ввести regedit в текстовое поле и нажать ОК.

7. Перейдите к HKEY_LOCAL_MACHINE\System\CurrentControlSet\Control\DeviceGuard.

8. Откройте EnableVirtualizationBasedSecurity и установите для него значение 0.

9. Закройте regedit и перезагрузите компьютер .
На этом этапе вы должны увидеть, что VBS отключен в приложении с системной информацией.
Telegram-канал @overclockers_news — теперь в новом формате. Подписывайся, чтобы быть в курсе всех новостей!
Disabling HVCI and KMCI on Windows 11
If you’re trying to disable Hypervisor-Enforced Code Integrity (HVCI) and Kernel Mode Code Integrity (KMCI) on Windows 11, you probably know it’s not just a quick flip of a switch. These features are there to keep the bad stuff out, but sometimes they get in the way—like when an old app just won’t run correctly. Kind of annoying, right? Just remember that turning these off could open your system up to nastier threats, so proceed with caution.
Getting into Windows Security
First things first, you’ve gotta access Windows Security. Just hit the Start menu or press the Windows key, then start typing “Windows Security.” Click on it when it pops up. This is where the fun begins. You’ll see all sorts of security settings, including what you need to tweak, like device security settings—just don’t get overwhelmed.
Core Isolation Settings
Once you’re in, look for Device Security on the left sidebar. Click that, and then find the Core isolation section. Here’s where you can play with things like Memory Integrity, which is linked with HVCI. If you’re feeling adventurous, you can get there even faster:
- Hit Win + R to bring up the Run dialog.
- Type
msconfigand press Enter. - Head over to the Boot tab, and then click on Advanced options.
- Feel free to check or uncheck Disable driver signature enforcement—that’s also kind of related.
Turning Off Memory Integrity (HVCI)
Look for the toggle called Memory Integrity in the Core isolation settings. Flip that switch off. You’ll likely get a prompt—just confirm and you’re on your way. There’s another method if you prefer the techy route:
Set-ItemProperty -Path "HKLM:\System\CurrentControlSet\Control\DeviceGuard" -Name "EnableVirtualizationBasedSecurity" -Value 0Just a heads-up, after making changes, sometimes a restart is needed for everything to kick in.
Keep in mind, disabling this is a bit of a gamble against harmful code, so unless you really need to, it might be best to leave it alone.
Disabling KMCI with Group Policy Editor
To tackle KMCI, you’ll need to dive into the Group Policy Editor. Press Win + R, type gpedit.msc, and hit Enter. Navigate through: Computer Configuration > Administrative Templates > System > Device Guard. There you’ll find the setting labeled Turn On Virtualization Based Security. Disable it by setting it to Not Configured or Disabled.
If command lines are more your thing, you can use:
dism /Online /Disable-Feature /FeatureName:VirtualizationBasedSecurity /Remove /NoRestartAnd reboot after.
Impact of Disabling
So, turning off these protections means your device won’t enforce HVCI and KMCI anymore. This could lead to better compatibility for certain drivers or legacy software, which may have been throwing fits before. But remember, ignoring these protections can let malware slip in pretty easily. Always re-enable them when done, if you want to play it safe.
Quick Tips for HVCI and KMCI Management
Before making any changes, back up your important data. Seriously, messing with core security features could lead to a disaster. If you have to disable them, weigh the risks. And don’t forget to check if the apps or drivers have updates that make disabling unnecessary. Keeping an eye on security advisories is just smart—who wants to be the next headline?
Common Questions About Disabling HVCI and KMCI
Why disable these security features?
Usually, it’s about software compatibility. Some older programs or drivers just won’t work right with these features active. Sometimes developers recommend turning them off while they’re troubleshooting too.
Is it risky to turn them off?
Yeah, definitely. Disabling those protections leaves you open to malware and other threats, so tread carefully. Only do it if you’ve exhausted all other options.
Can I turn them back on later?
For sure. Just follow the same steps to re-enable them. If you need to reactivate Memory Integrity, just toggle it back in Windows Security > Device Security > Core isolation. Or use:
Set-ItemProperty -Path "HKLM:\System\CurrentControlSet\Control\DeviceGuard" -Name "EnableVirtualizationBasedSecurity" -Value 1Does turning off HVCI improve performance?
Sometimes, especially on older systems, you might see a slight bump in speed. But honestly, the trade-off in security usually isn’t worth it.
What risks come with disabling?
You’re basically inviting malware and exploits in by turning off these features. Just know the stakes and make sure you’re protected with other security measures.
Handy Recap of Disabling
- Open the Windows Security app.
- Go to Device Security.
- Disable Memory Integrity in Core Isolation.
- Use the Group Policy Editor or
dismcommand to handle KMCI.
Messing with these security settings can be a tricky game. They’re vital for keeping Windows 11 secure, so if you choose to disable them, just stay sharp and be ready to reactivate once you’ve completed your tasks. Keep an antivirus handy, update stuff regularly, and practice safe browsing. It’s all about striking that balance between security and getting things done. If any of this helps streamline setups for a few folks out there, mission accomplished.