
Updated May 2025: Stop error messages and fix your computer problem with this tool. Get it now at this link
- Download and install the software.
- It will scan your computer for problems.
- The tool will then fix the issues that were found.
Windows 10 includes automatic updates that are designed to keep your computer up to date with security patches and bug fixes. However, sometimes those updates fail.
The error code 0x8007001A occurs when Windows cannot download some updates. You might receive this error while downloading updates for Microsoft Office programs, Adobe Reader, Java Runtime Environment, Internet Explorer, Windows Media Player, Windows Defender, and others.
If you are unable to install the update due to this error, follow the steps below to resolve it.
#1. Restart Your Computer
Restarting your computer will usually clear out temporary files and restart the process. After you reboot, check whether the update is installed successfully.
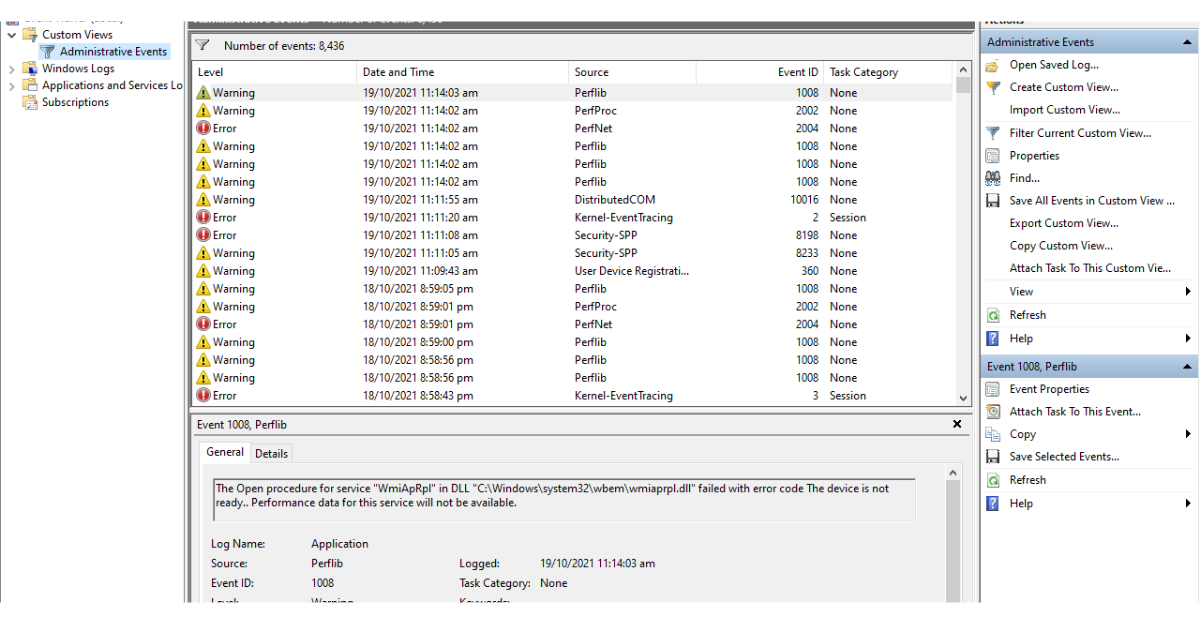
#2. Check For Errors In Windows Event Viewer
Check the event log viewer in the Control Panel. If there are errors related to the update, look for them here.
What Causes Error 0x800700c1
Network connection problems, corrupted or missing file systems, improper shutdown, malware infection, and other common causes for error messages
Update installation services failing to start properly, improper installation of software, or incorrect shutdown are all possible reasons for error messages like “Error 0xc”.
Malware infections cause error messages such as “Error 0x800700c0.”
How to Solve Error 0x800700c1
Error code 800700C1 is one of those cryptic errors that doesn’t really tell us much about what went wrong. If it happens frequently, however, we can narrow down our troubleshooting efforts. Here are some common causes of error code 800700C1.
If you’re getting this error while installing Windows 10, try restarting your PC. This usually fixes the problem.
Check your Internet connection. If you’re trying to download something big like a game update, make sure your Internet connection isn’t slow or interrupted.
Try updating your drivers. Sometimes a driver update solves problems with error code 800700C. To do this, open Device Manager and look for yellow exclamation marks next to device icons. Right-click each icon and select Update Driver Software.
Reboot your computer. Restarting your PC clears out temporary files and programs that could cause issues.
Restore your system to a previous state. If you’ve been working on a project recently, you might want to restore your system to a previous version. You can use System Restore to go back to a date prior to the last time you had trouble with your computer.
Use Safe Mode. In Safe Mode, your computer boots into a special mode where certain features aren’t enabled. This lets you test whether a particular program or feature is causing problems.
Windows Update Troubleshooter
There are many ways to launch Microsoft’s Windows Update troubleshooter. Here are some of the most common methods:
1. Type “windowsupdate” into the start menu search box
2. Right-click the taskbar icon for Windows Update and select “Troubleshoot problems”.
3. Click the arrow next to “Update Driver Software”, expand the list, and choose “Show update history”.
4. Select “View installed updates” under “Summary” and scroll down to see what’s been updated recently.
Repair System File Corruption
System file corruption occurs when Windows encounters a problem while trying to read or write data to a file. This error could cause programs to crash or slow down. When you encounter this issue, it might seem like nothing happens. However, there are steps you can take to fix the problem.
Use the System File Checker Tool
The System File Checker tool scans your computer for errors in system files. You can use this tool to scan for corruptions in system files, such as those related to the operating system, hardware, device drivers, and applications. Type sfc /scannow into the command prompt window. Press Enter. If a problem exists, the tool will display the name of the affected file. Click OK to continue scanning.
Deployment Image Servicing & Maintenance Tool
If you cannot access the System File Checker utility, you can download the Deployment Image Servicing and Management tool from Microsoft. Download the tool here. After downloading the tool, extract the contents of the ZIP archive and double-click the.exe file to start the program. Follow the prompts to install the tool. Once installed, launch the tool and follow the instructions.
Reset Windows Update Components
If you are facing problems while updating Windows 10, it might be due to outdated Windows Update components. In such cases, you must perform a reset of Windows Update components. You can do this manually or automatically. If you want to reset Windows Update components manually, follow the steps given here. However, if you want to reset Windows update components automatically, use Wi-Fi connection.
Scan for Malware
Malicious programs are everywhere. They can come in all shapes and sizes – some are designed to steal personal information, while others try to infect computers with dangerous diseases like ransomware. But most of us aren’t experts when it comes to spotting malicious code. And even if we do spot something suspicious, there’s no guarantee we’ll know what to do about it.
That’s why it’s important to regularly scan your computer for malware. If you’re worried about keeping your data secure, here’s everything you need to know about scanning your PC for viruses.
– An antivirus program scans files on your computer looking for known threats.
– Some free antivirus solutions include AVG Free, Avira AntiVir Personal, Bitdefender Total Security Premium, ESET NOD32 Internet Security, Kaspersky Internet Security, Microsoft Windows Defender, Norton 360, Panda Cloud Security, Symantec Norton Security, Trend Micro Smart Protection Network, Webroot SecureAnywhere AntiVirus Plus, ZoneAlarm Free Edition, and Zoner Enterprise.
– Other paid options include McAfee LiveSafe, Sophos Home Premium, and Symantec Endpoint Protection Standard.
Updated: May 2025
We highly recommend that you use this tool for your error. Furthermore, this tool detects and removes common computer errors, protects you from loss of files, malware, and hardware failures, and optimizes your device for maximum performance. This software will help you fix your PC problems and prevent others from happening again:
- Step 1 : Install PC Repair & Optimizer Tool (Windows 11, 10, 8, 7, XP, Vista).
- Step 2 : Click Start Scan to find out what issues are causing PC problems.
- Step 3 : Click on Repair All to correct all issues.
Temporarily Disable Third-Party Antivirus & Firewall
Microsoft recently released a patch for Windows 10 that caused problems for some people. One of those issues is a bug that prevents users from installing Microsoft Security Essentials (MSE), another antivirus solution, because it conflicts with the newest version of Windows Defender. While the fix is simple enough, it does require a little work to make sure everything works properly. If you want to try out the workaround, here are the steps to follow.
To disable Windows Defender temporarily, open Control Panel, select Programs and Features, and click Uninstall a program. Scroll down to find Windows Defender and uncheck it. You can reenable it later by opening Control Panel, selecting Programs and Features, clicking Add/Remove programs, and searching for Windows Defender.
If you don’t want to use MSE, you can just uninstall it yourself. Click Change settings under “Choose how updates are delivered,” and select Download and Install. Select Turn off automatic updating, and click OK. Then go back to the main window, and check for updates again. When you’re finished, you’ll notice there aren’t any updates left. Now you can safely reinstall MSE.
Install Update With Media Creation
To install updates with media creation on Windows 7 or later versions, follow these steps:
1. Go to the Microsoft download website.
2. Click Create Windows 10 installation media. You can find it under the heading Install Updates.
3. Select Upgrade this PC now to begin installing the latest updates.
4. Choose Accept to agree with Microsoft’s license terms.
5. When you finish upgrading, restart your computer.
6. If you want to keep your files and settings, choose Keep my files and apps. Otherwise, choose Reset this PC to return everything to factory defaults.
7. Wait while your computer restarts.
8. After your computer finishes rebooting, open Windows Update again to check for additional updates.
9. Restart your computer one final time to complete the process.
10. Enjoy your shiny new operating system!
Perform System Restore
The best way to restore your system is to perform a full backup. You can do this by running Disk Cleanup. Then, select “Back up files and settings.” This will take about 30 minutes. When it finishes, open the folder where you saved the backup file and copy everything into another location. Now, you’ll want to reinstall the operating system. To do this, boot from the installation disk and follow the instructions to install the OS. Once the system is installed, reboot again and use the same steps to restore your data.
If you don’t have access to a CD/DVD burner, you can download a free trial version of Acronis True Image 2018. This software allows you to make backups online. However, it won’t allow you to restore your data. For example, if you accidentally delete a document while saving, you cannot recover it with this program.
You could also try downloading a tool called Recuva. Run this program and select the option to scan for lost files. You might have to restart your computer several times during the process.
Related Questions
Running SFC displays an error about Windows Resource Protection could
not perform the requested operation. This error happens if there’s
something wrong with Windows Module Installers or Windows Resource
Protection. A quick way to check if the problem is caused by
Windows Module Installer or by WRP is to run sfc/scannow.
RECOMMENATION: Click here for help with Windows errors.
Frequently Asked Questions
How do I fix errors caused by Windows Update?
Windows Update Errors are common among PC users. They occur due to several reasons such as outdated drivers, missing files, corrupted registry entries etc. These errors can cause serious damage to your system and it might even lead to data loss. So, how do you fix Windows Update errors? Here we have listed some useful methods to troubleshoot Windows Update errors.
1. Check Your Internet Connection Speed
If you are facing slow internet speed issue while downloading or updating your operating system, try checking your connection speed. You can use different tools like Ping Test, SpeedTest, iPerf, etc. to test your internet connectivity. In case you find that your internet connection is faulty, you can easily resolve this problem by changing your network interface card.
2. Uninstall Software Installed On Your Computer
Unwanted software can sometimes cause Windows Update error messages. Remove all unnecessary programs from your machine. This includes old games, unused applications, toolbars, browser extensions, etc. Also, make sure that you don’t install any third party application without verifying its authenticity.
3. Scan For Malware Infection
Malicious software can often interfere with Windows Update process. Therefore, it is recommended to scan your entire device for malware infections. Use anti-malware software to detect malicious threats present on your computer.
How do I reset the parts of Windows Update?
If you are facing problems while installing applications or software that change the system settings, it could be due to the fact that some of the components of Windows Update are corrupt. If there are no errors during installation, you might want to check whether the components are corrupted. You can use the following method to fix this issue.
To reset the Windows Update components:
1. Open Start menu and type “Windows update”.
2. Click on Settings option.
3. 4. In the window that opens up, select View installed updates.
5. Uncheck the boxes next to the items that you don’t want to download.
Download Windows Speedup Tool to fix errors and make PC run faster
If you are receiving the Windows Update error code 0x800700c1 while updating your Windows 11 or Windows 10 computer, the suggestions in this post might help you fix the issue. This error mainly occurs when you try to install a Feature update to Windows 11/10. The entire error message goes like this:
There were problems installing some updates, but we’ll try again later. If you keep seeing this and want to search the web or contact support for information, this may help. Feature update to Windows – Error 0x800700c1.

There are many reasons for which Windows 11/10 throws update error messages, like the corrupted files, corrupted update components, etc. We have added some useful options that might help. But before you begin, we suggest you try some quick fixes:
- Restart your Windows computer and see if it helps
- Sometimes, your antivirus tool can create trouble during a Windows Update. Therefore, you should temporarily disable your antivirus tool and try to update your system. Don’t forget to enable the antivirus again, as it protects your system from malware and other security attacks
- Run SFC scan and DISM scan to repair the corrupted Windows system image and components.
If these quick fixes do not solve your issue, try the solutions described below:
- Run Windows Update troubleshooter
- Delete the temporary Windows Update files from the SoftwareDistribution folder
- Change the startup type of the Windows Installer service to Automatic.
- Install Windows Update via Media Creation tool
Let’s check these solutions one by one.
1] Run Windows Update troubleshooter

Windows comes with different types of built-in troubleshooters that are helpful to fix various kinds of problems. When you encounter Windows Update error problems, the first thing that you should do is run the Windows Update troubleshooter. For this, follow these steps:
- Open Settings app using Win+I hotkey
- Access Update & Security category
- Access Troubleshoot page using the left section
- Click on the Additional troubleshooters option available on the right section
- Click on the Windows Update option
- Press the Run the troubleshooter button.
Let the troubleshooting process complete and this might solve your problem.
2] Delete the temporary Windows Update files from the SoftwareDistribution folder

The SoftwareDistribution folder temporarily store Windows Update files. If any of those files are corrupted, you may experience this Windows Update error 0x800700c1 issue. Hence, one option to fix this error is to delete all the temporary Windows Update items present in the Downloads folder located inside the SoftwareDistribution folder.
To delete the contents of the Software Distribution folder, in Windows 11/10, from the WinX Menu, open Command Prompt (Admin). Type the following one after the other and hit Enter:
net stop wuauserv
net stop bits
This will stop the Windows Update Service and the Background Intelligent Transfer Service.
Now browse to the C:\Windows\SoftwareDistribution folder and delete all the files and folders inside.
You may press Ctrl+A to Select All and then click on Delete.
Now restart your PC and then try.
This might help you download and install the Windows Update.
3] Change the startup type of the Windows Installer service to Automatic
Change the startup type of the Windows Installer service to Automatic and see if it helps. We have listed the instructions for the same below:
- Type services in the Search box
- Press the Enter key to open the Services app
- Scroll down the list of services available in the Services app to find the Windows Installer service
- Double-click on Windows Installer service and its properties window will open
- Press the Start button if the service is stopped
- Select Automatic option available in the Startup type drop-down menu (if the option is not greyed out)
- Click on the OK button.
4] Install Windows Update via Media Creation tool
You can also try to upgrade your computer using the Media Creation tool. It is a powerful tool developed by Microsoft Corporation that users can use to upgrade their computers to the latest available version or create installation media for Windows 11/10.
I hope this helps.
How do I fix Windows Update errors?
As we have mentioned earlier in this article, Windows Update errors occur due to many causes. Sometimes, updates also fail due to weak or fluctuating WiFi signals. Whatever the cause is, you can try some general methods to fix Windows Update errors.
How do I reset Windows Update components?
Windows Update components are the essential part of Windows Update. When these components get corrupted (for any reason), you may receive many errors while trying to update Windows. In such a case, you can fix the Windows Update errors by resetting the Windows Update components to default.
Laxman has done Bachelor’s in Computer Science, followed by an MBA. Writing about Windows OS and the free software and services that are available for the Windows operating system is what excites him.
Are you fed up with the continuous Windows update error 800700c1? This bothersome problem might prevent your system from receiving critical updates, leaving your computer susceptible to security attacks and lacking key performance advancements. But don’t worry, we’re here to walk you through various simple solutions. This issue might appear due to a variety of causes, including an unstable internet connection, damaged system files, or even a malware infestation hiding in the shadows of your computer.
In this blog, we will present you with practical solutions to clear out this error as we will walk you through troubleshooting Windows Update, repairing corrupted system files, ensuring your update-related services are operational, and protecting your system from viruses. With these methods at your disposal, you can eliminate error 800700c1 from your PC, assuring speedier Windows updates and a more enjoyable computing experience. See: How to Fix Windows Update Error 80246013 (Solved!). Now follow the ways to solve this issue:
Windows update error 800700c1
Here is how to fix Windows update error 800700c1:
Run the Troubleshooter for Windows Updates
You must have heard about Windows Update Troubleshooter this incredible fix-it tool may act as a foolproof solution for quickly addressing the recurring Windows update issue 800700c1. This tool is the ideal solution to all of your update-related issues.
With a few simple clicks, this tool can correctly detect and simply solve any issues that may be causing the concerned bothersome update errors. Follow these steps:
- Click Start and type Troubleshoot.
- Hit the Enter to open Troubleshoot Settings.
- Select Other troubleshooters. (In Windows 10, click “Additional troubleshooters”).
- Go to Windows Update and click Run.
- Wait for diagnosis and follow if any instructions are given.
- Finally, restart your system.
Guide: Use Common Windows Update Troubleshooter on Windows 11, 10, 8.1, 7
Reset the Windows Update Components
If you have come this far, it seems you have yet to find the remedy for the 800700c1 error, how about resetting the Windows Update Components? These components are essential to obtaining and installing a patch or build. Thus, resetting these components can often be the key to resolving this issue.
- Open the elevated Command Prompt.
- Copy and paste the following commands, then press Enter for each:
net stop bits
net stop wuauserv
net stop appidsvc
net stop cryptsvc
Del “%ALLUSERSPROFILE%\Application Data\Microsoft\Network\Downloader\*.*”
rmdir %systemroot%\SoftwareDistribution /S /Q
rmdir %systemroot%\system32\catroot2 /S /Q
regsvr32.exe /s atl.dll
regsvr32.exe /s urlmon.dll
regsvr32.exe /s mshtml.dll
netsh winsock reset
netsh winsock reset proxy
net start bits
net start wuauserv
net start appidsvc
net start cryptsvc- Reboot the computer.
Reference: How to Reset Windows Update to Default in Windows 10
Temporarily Disable Third-party Antivirus
Various users who have been battling with the Windows update error 800700c1 have mentioned that temporarily disabling their antivirus software has done wonders for them and quite seamlessly has solved this issue. So, do follow the steps here:
- Right-click the antivirus icon.
- Choose Pause, Disable, or Turn off.
- Confirm if prompted.
- Run Windows update.
- Re-enable antivirus after the update.
Look out for Internet Connection
One of the easiest ways to fix the 800700c1 Windows update error code is by reviewing your Internet connection. Though it may sound like an easy hack, trust us, it has proved to be one of the most effective solutions.
- Switch off the modem and leave it for at least 10 seconds.
- Power on the device, connect to the internet again, and then check for updates.
If the internet is faulty or causing problems then reset it:
- Press Win + I.
- Select “Network & Internet” from the left-hand side of the Settings app.
- Go to the right panel, scroll down, and click on “Advanced network settings”.
- Then, click on Network reset.
- From the next page, click on Reset now.
- A confirmation dialog will be displayed; select Yes.
- Once resetting is completed, try to install the update once again.
Run SFC and DISM Commands
Let’s try to delve into this solution that we believe will work like magic to repair the annoying Windows update error. In these kinds of cases, the SFC (System File Checker) and DISM (Deployment Image Service and Management Tool) tools have been found to work well.
For example, when you run SFC, your system will look for broken or lost files and replace them with healthy ones.
On the other hand, DISM will not only look for problems with files, but it will also fix problems with Windows’ picture files. Here are the steps you need to take:
- Click on Windows search and type cmd.exe.
- Select “Run as administrator”.
- Click on Yes to open the elevated Command Prompt.
- Type the command and press Enter:
SFC /SCANNOW - When you notice
- Navigate to Settings > Windows Update and click on Check for updates.
- If the Windows update error 800700c1 still continues to occur then again open command prompt as administrator.
- Run the following command lines sequentially.
DISM /Online /Cleanup-Image /CheckHealth
DISM /Online /Cleanup-Image /ScanHealth
DISM /Online /Cleanup-Image /RestoreHealth- Wait for the operation to finish.
- Restart your system.
Read: SFC /Scannow, DISM.Exe, CHKDSK Windows 11 or 10
Configure Windows Installer Service
If you are yet to find a potential workaround for the concerned update error then, it’s time you start setting the Windows Installer Service. This crucial step ensures that your system’s installer runs well, allowing for seamless upgrades.
- Right click on Start and select Run.
- Then, type regedit and click on OK to access the Registry Editor.
- Navigate to:
HKEY_LOCAL_MACHINE\SYSTEM\CurrentControlSet\Services\msiserver- Find Start in the right panel, then right-click it to select Modify.
- After that, change the Value data to 2.
- Click OK to save.
Employ System Restore
How about trying another Windows built-in tool? This time we suggest you use system restore it will allow you to restore the system files and settings on your computer to a prior point in time.
Moreover, it may act as a perfect way to cope with the concerned Windows update issue. So, here are the steps to check out:
- Press the Windows button.
- Type recovery in the Search box and press “Enter”.
- Click Open System Restore.
- Click Next in the pop-up window.
- Choose a restore point, then click Next and Finish.
Reset your PC
Another probable way of settling out the error code 800700c1 is to reset your computer as it will give your system a fresh start.
- Click on Start.
- Select Settings.
- Choose System from the left pane.
- On the right, click on Recovery.
- Select Reset PC.
- Follow the on-screen instructions to complete the process. This will help you: Select 3 ways to Reset Windows 11 PC to Factory settings
3 ways to Reset Windows 11 PC to Factory settings.
Initiate a Clean System Boot
To sort out the mentioned Windows update error performing or initiating a clean boot seems logical. By using this method, you may reduce the likelihood of system-crashing program conflicts and interruptions during such updates.
- Close all ongoing programs and save your documents.
- Type msconfig in Windows search and press Enter.
- In System Configuration, check Selective Startup.
- Then, uncheck Load startup items.
- On the Boot tab, uncheck Hide all Microsoft services.
- Click Disable All.
- In the Startup tab, open Task Manager.
- Right-click each program in the list and select Disable.
- Return to System Configuration, click Apply, then OK.
- Select Restart from the popup.
- Now, try to install the update.
Perform an In-pace Upgrade
With this option, you will push your existing Windows version to the latest and hopefully, will be able to resolve this error code quite swiftly:
- Go to the official website and select Download.
- Scroll down to the dropdown under the heading “Download Windows 11 Disk Image (ISO)” and click on it.
- Select the option: Windows 11 (multi-edition ISO for x64 devices).
- Click the button that says Download Now.
- Once the validation is confirmed, click on Choose one in the Product language drop-down.
- Click on the button Confirm.
- Then, click on “64-bit Download”.
- Launch File Explorer (Windows + E) and go to the Downloads folder.
- Right-click the ISO file and select “Mount”.
- Select Open on the “Open file security warning” dialog.
- Then, right-click Setup.exe and select “Yes”.
- Click Next in the Windows 11 Setup wizard.
- Accept the notices and license terms and follow the onscreen directions.
Methods:
Run the Troubleshooter for Windows Updates
Reset the Windows Update Components
Temporarily Disable Third-party Antivirus
Look out for Internet Connection
Run SFC and DISM Commands
Configure Windows Installer Service
Employ System Restore
Reset your PC
Initiate a Clean System Boot
Perform an In-pace Upgrade
That’s all!!.
Windows 10 Anniversary update is not going perfectly for all. People have actually mentioned that the update keeps failing with the Error 0x800700c1. We are going to explain a number of methods that assist to repair Error Code 0x800700c1 while running Windows 10 Anniversary Update. Actually, there is nothing much to say about this error as it’s basically the like the others.
The exact error message on the screen is “Feature update to Windows 10, version ****- Error 0x800700c1”.
We know how frustrating it is not to obtain the update efficiently. Thankfully, it’s not that difficult to work around this problem.
Cause of Error 0x800700c1
- Internet connectivity issue.
- Issue with the antivirus software.
Fixing Windows 10 Update Error 0x800700c1
Method 1: Disable Anti-virus
There are numerous users who were experiencing error code 0x800700c1 while trying Windows 10 Anniversary update, were able to complete the update by disabling Antivirus software on their computers.
- Locate the antivirus software icon in the Windows Notification Area.
- Right-Click on the icon. You should see the option Disable, Stop, Turn off or something similar. Select the option to stop the antivirus security.
Method 2: Updated Outdated Drivers in Windows
- Open the system and go to the start menu.
- Then enter the control panel from the search box and open it.
- Here we go to system and security after that click on system.
- Open the new window and click on advanced system settings.
- Then open the system properties window and open the hardware and click on device installation setting.
- Finally, open the new window and click on related option and press save changes.
Method 3: Reinstall Windows Update
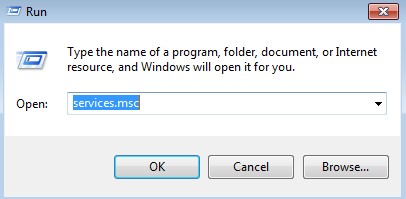
- Press Windows + R to open the Run
- Then enter the services.msc in the command box and press ok.
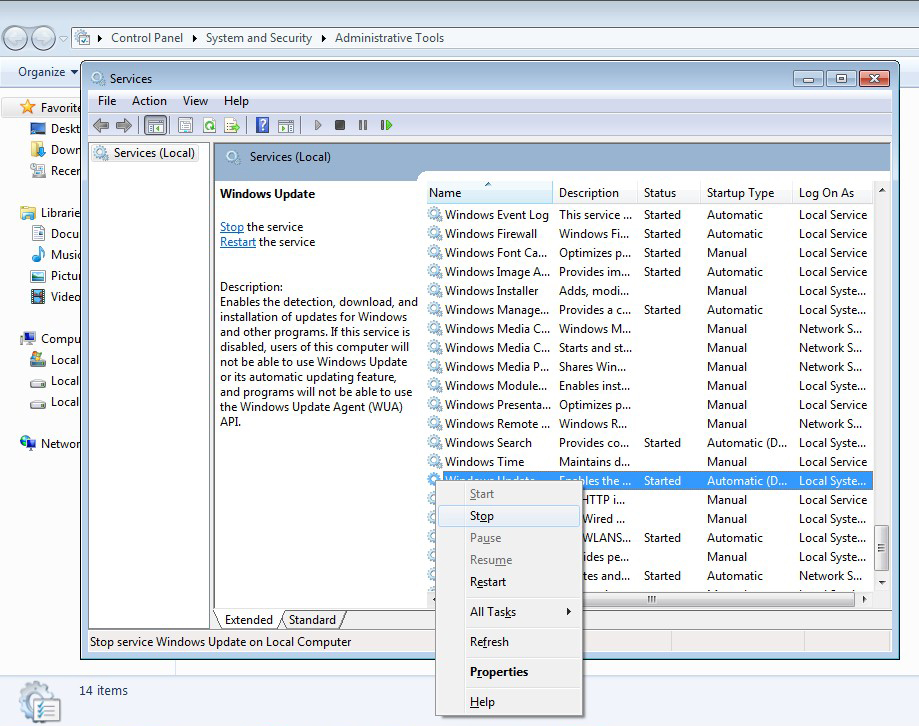
- Right-click Windows Update in the Services management console, and then select Stop. If you are running Windows, right-click Automatic Updates, and then select Stop.
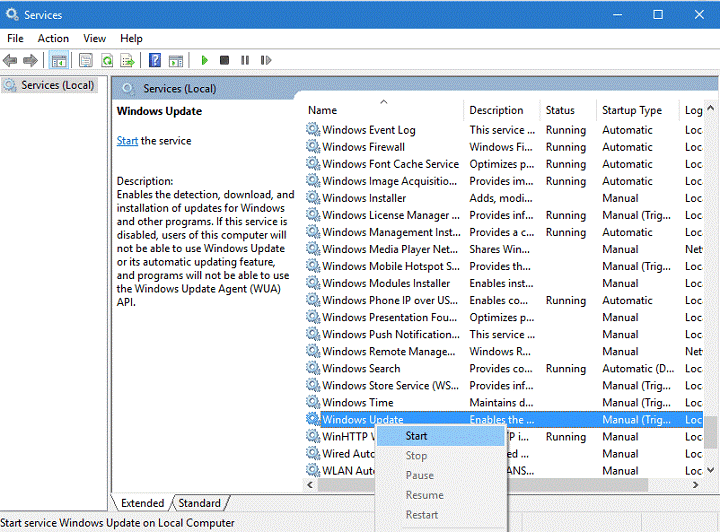
- After Windows Update stops, right-click Windows Update, and then select Start. If you are running Windows, right-click Automatic Updates, and then select Start.
Method 4: Download Media Creation Tool
Navigate to the official Microsoft’s website and search for Media Creation Tool there.
- Click on the Download Tool option and then perform the following steps.
- When the ISO file is downloaded, right-click on it and select Run as Administrator.
- On the first page, click Accept to proceed.
- After that, select Upgrade this PC now and click Next.
- If you are upgrading for the first time, you will have to enter the Product License Key.
- Once the setup is ready, you will receive a “sum up” of what options you’ve chosen.
- Now you have to click on Change option to indicate what data you want to keep on your machine (Keep personal files and apps, Keep personal files only, or Nothing).
- Finally, select Install.
Loading…
By Dr. Joseph H Volker
|
On August 8, 2018
The update error 0x800700c1 occurs when your system downloads the required update files but fails to install them. There is likely corrupted data in the update files, or the Windows services that help in this installation are not running.
However, this issue is easy to manage. Troubleshooting Windows Update or resetting the Update Components will fix this issue in most cases. Worst case, you’ll have to reset your PC or make a clean install, which is still not that bad of a solution.
What Causes Error 0x800700c1
Here are some of the causes for your system failing to install update files:
- Network connection issues
- Corrupted or missing system files
- Update installation services failing to start
- Improper shutdown
- Improper installation of software or updates
- Malware infection
How to Solve Error 0x800700c1
The first thing you can do is to reboot your PC. If you have a habit of hibernating your PC instead of a proper shutdown, your system won’t apply any installed updates. It can possibly cause many update errors. So, properly restart or shut down and turn on your PC.
Also, make sure to check your internet connection as any connectivity issues may also cause this error.
Then, move on to the solutions below if the issue remains unresolved.
Windows Update Troubleshooter
Windows includes an Update Troubleshooter that checks and fixes most update errors. It is better to launch this feature before trying any advanced solutions. Here’s how you can use this Troubleshooter to fix update errors:
- Launch Settings (press Windows + I) and click on Update & Security.

- Select Troubleshooter from the left sidebar.
- If you see the troubleshooting options, scroll down and click on Windows Update Troubleshooter.
- If not, select Additional troubleshooters. Then, search for and click on Windows Update.
- Hit Run the troubleshooter.


If the Troubleshooter from your system fails to solve this issue, you can try out this Windows Update Troubleshooter for Windows 10.
Repair System File Corruption
You can solve many system issues, including update errors, by simply repairing system file corruption. Please use the System File Checker (SFC) and the Deployment Image Servicing and Management (DISM) for this task. Follow the directions below to do so:
- Search for Command Prompt in the search bar. Then, right-click on it and select Run as administrator.
- Paste the commands below and press enter after each to execute them.
dism /online /cleanup-image /restorehealth
sfc /scannow
Finally, reboot your PC and check if the error persists. If it does, try running these commands in safe mode. To boot your PC in safe mode,
- Go to Start > Power.
- Click Restart while pressing the Shift key. It will direct you to Windows Recovery Environment.
- Go to Troubleshoot > Advanced options > Startup Settings > Restart.
- Press 4 or F4 to boot in safe mode.


Then, follow the above steps to run DISM and SFC.
Reset Windows Update Components
This is the most common solution for several Windows Update errors. In this method, we perform the following processes:
- Resetting Windows Update services.
- Deleting the files downloaded for the update.
- Restoring Windows Update cache files.
- Registering some Windows Update libraries
Here’s the step-by-step method to execute these processes:
- First, click on the Wi-Fi icon on the notification bar and select Airplane Mode.
- Then, launch Command Prompt as Administrator.
- Type the following commands and press Enter after each to execute them:
net stop bits
net stop wuauserv
net stop cryptsvc
net stop msiserver
net stop appidsvc
del "%ALLUSERSPROFILE%\Application Data\Microsoft\Network\Downloader\qmgr*.dat"
ren C:\Windows\SoftwareDistribution SoftwareDistribution.bak
ren C:\Windows\System32\catroot2 catroot2.bak
regsvr32 /s wuapi.dll
regsvr32 /s wuaueng.dll
regsvr32 /s wucltui.dll
netsh winsock reset
net start bits
net start wuauserv
net start appidsvc
net start cryptsvc
net start msiserver
For more information, please browse through the Microsoft documentation for resetting Windows Update components.
Scan for Malware
A few malware programs exist that prevent the system from accessing update services. We recommend using reliable antivirus programs and enabling real-time protection to prevent such issues.
Please scan your computer if you encounter this error. The method differs between different antivirus software. It’s also best to enable cloud-based protection on your antivirus programs.
To scan your computer with the Virus & Threat Protection,
- Click on the Windows Security icon (Shield icon) from the notification tray.
- Click the triple-lines and select Virus & threat protection.

- Click on Scan options under Current threats.
- Check on Full scan and click Scan now.
- Wait for the process to complete. It will take a while.


Temporarily Disable Third-Party Antivirus & Firewall
You can try temporarily disabling any third-party antivirus or firewall when you encounter this error. Some antivirus programs may stop installing updates if they falsely recognize them as threats to your system.
Install Update With Media Creation
Microsoft regularly updates the Windows installation media, so you can use this to install the updates on your PC manually. This method may also repair your system, thereby, fixing any precious errors.
You can also use the Windows Update Assistant as an alternative way to install updates. However, it might not fix the update error.
To install the update with media creation,
- Go to the Microsoft download website and click on your Windows version.
- Under Create Windows 10 installation media, click on Download tool now.
- Launch the installation file.
- Select Accept to agree with the License terms.
- Then, choose Upgrade this PC now and click Next.

- Follow the on-screen instructions.

Perform System Restore
System Restore allows you to revert to a previously created restore point. Any errors encountered after the restore point will likely be resolved after performing a system restore.
Follow the steps below to perform a system restore:
- Type
systempropertiesprotectionin the Run command and press Enter. It opens the System Protection tab in System Properties. - Click on System Restore to initiate the process.

- Follow the on-screen instructions. You can select any restore point you want.
- There is also an option to check for affected programs. You’ll need to reinstall them after executing the system restore.

Reset Your PC
If you don’t have an appropriate restore point or all previous methods prove ineffective, the last option is to reset your OS.
We recommend you backup all your necessary files before resetting your PC. Follow these instructions to perform a system reset:
- Launch Settings and go to Update and Security.
- Select Recovery from the left sidebar.
- Under Reset this PC, click on Get started.
- Choose Keep my files when prompted and click Ok.

- Follow the on-screen instructions.


It’s best to delete your old partition and perform a clean install of Windows if the error still reoccurs.
Related Questions
Running SFC Displayed Windows Resource Protection Could Not Perform the Requested Operation.
This error occurs due to problems with Windows Module Installer. We have a dedicated article that tackles this issue. Please visit it to resolve the issue.
There may also be cases when Windows Resource Protection found problems with integrity of system files but couldn’t fix them. We also have a detailed article on this particular issue: Windows Resource Protection Found Corrupt Files.