
Все способы:
- Способ 1: «Панель управления»
- Способ 2: «Редактор реестра»
- Отключение режима гибернации
- Вопросы и ответы: 2
Способ 1: «Панель управления»
Быстрый запуск нужен далеко не всем. Во-первых, в нем нет необходимости владельцам SSD, так как ощутимого прироста к скорости рассматриваемая функция не дает. Во-вторых, он требует наличия специального файла, который хранится на системном разделе накопителя и занимает место. В-третьих, на многих конфигурациях быстрый запуск работает некорректно, из-за чего в работе Windows 11 возникают ошибки и сбои самого разного характера. Отключение ускорения запуска быстрее всего происходит через раздел управления электропитанием ПК.
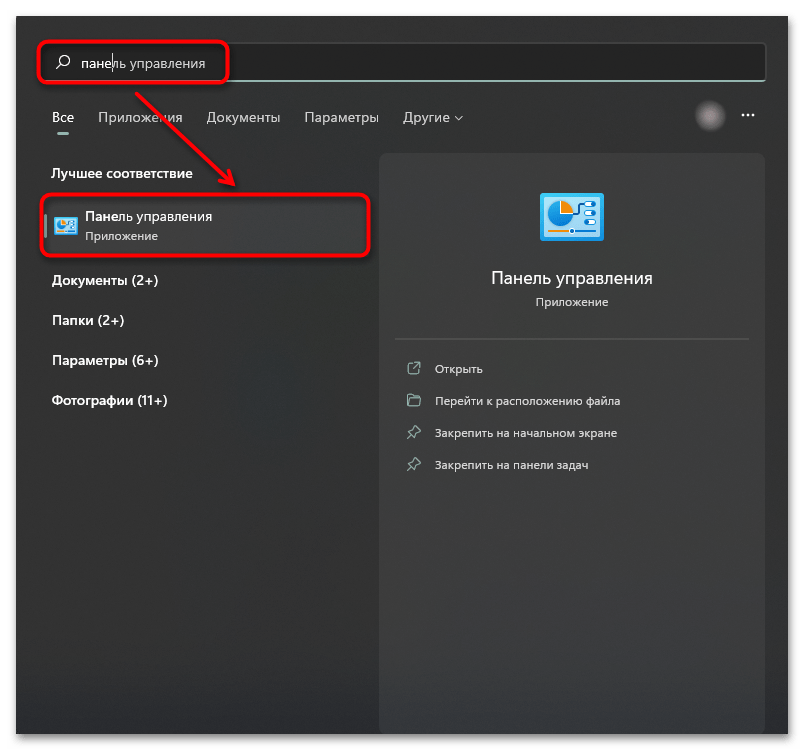
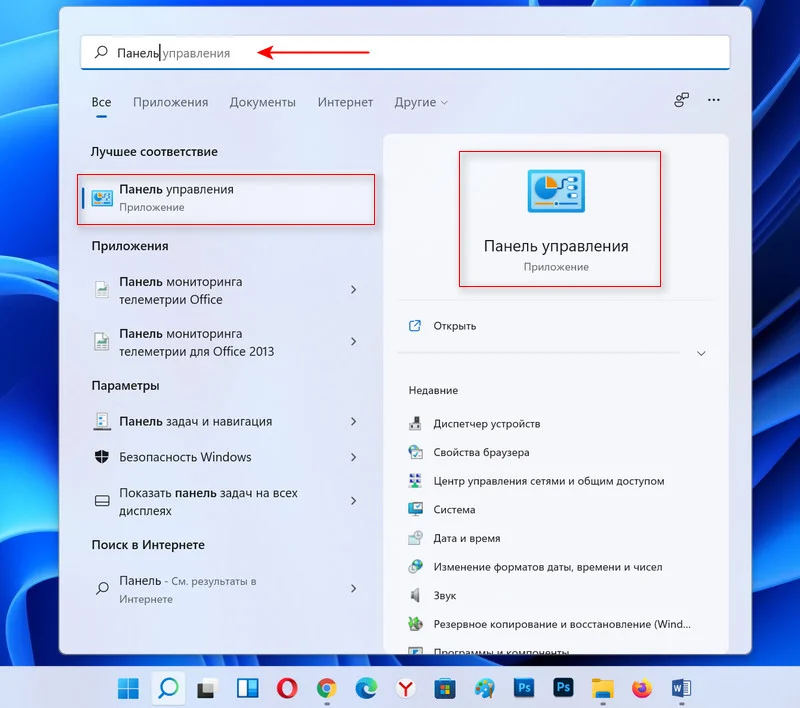
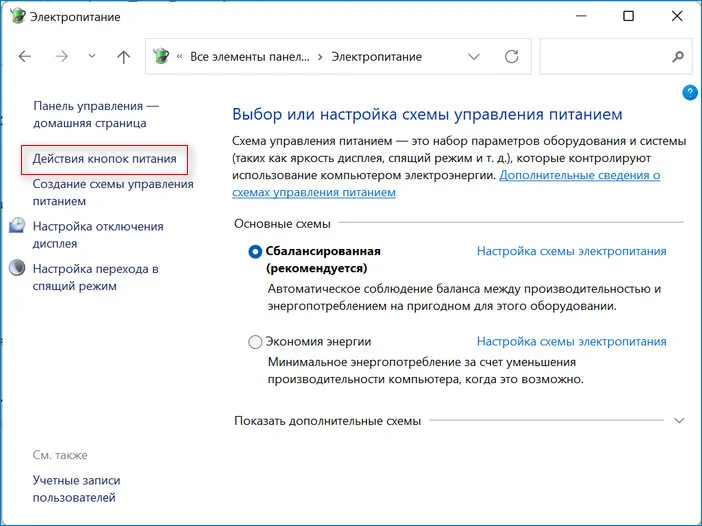
- Вызовите меню «Пуск» и найдите там «Панель управления», которую и запустите.
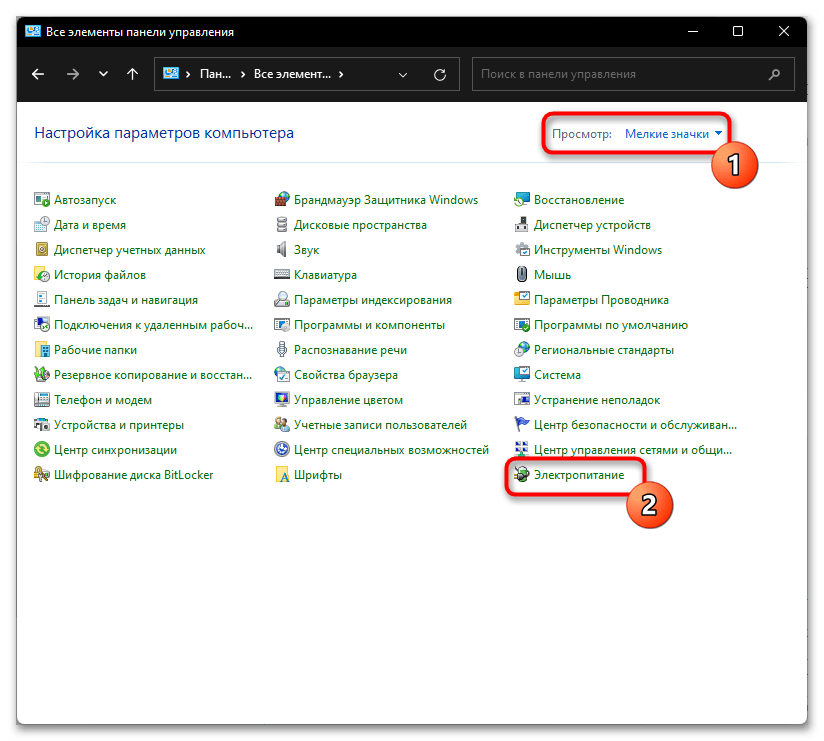
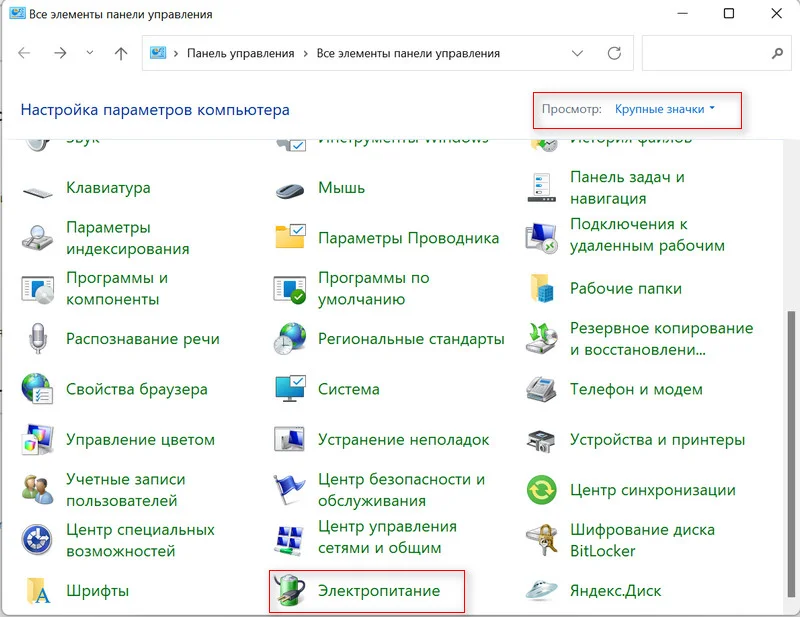
- Выставьте тип просмотра как крупные или мелкие значки, после чего найдите строчку «Электропитание» и кликните по ней.
- Через панель слева перейдите в подраздел «Действия кнопок питания».
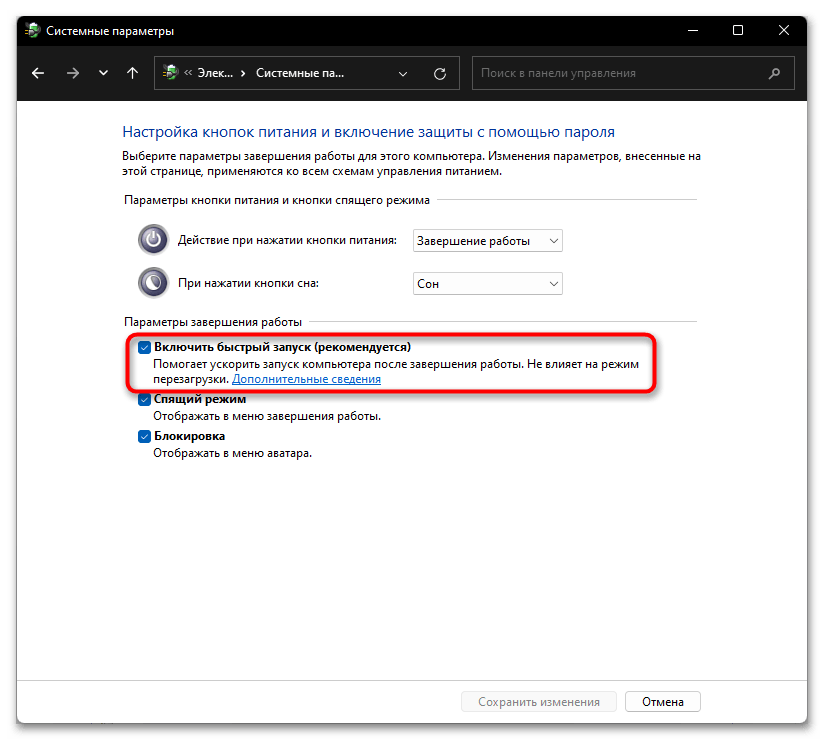
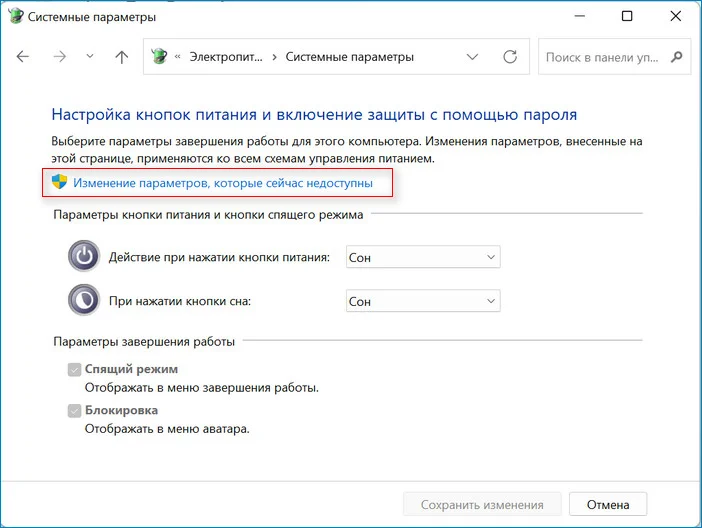
- Пока что нужные для редактирования возможности заблокированы. Чтобы это исправить, щелкните по ссылке «Изменение параметров, которые сейчас недоступны».
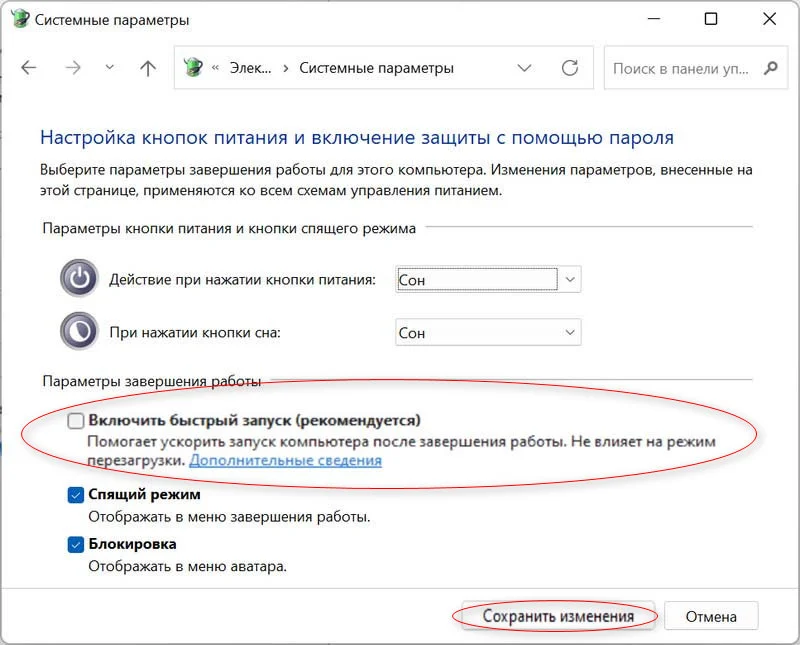
- Снимите галочку с пункта «Включить быстрый запуск (рекомендуется)» и подтвердите свое решение кнопкой «Сохранить изменения».


Способ 2: «Редактор реестра»
Альтернативный метод выполнения поставленной задачи заключается в редактировании реестра.
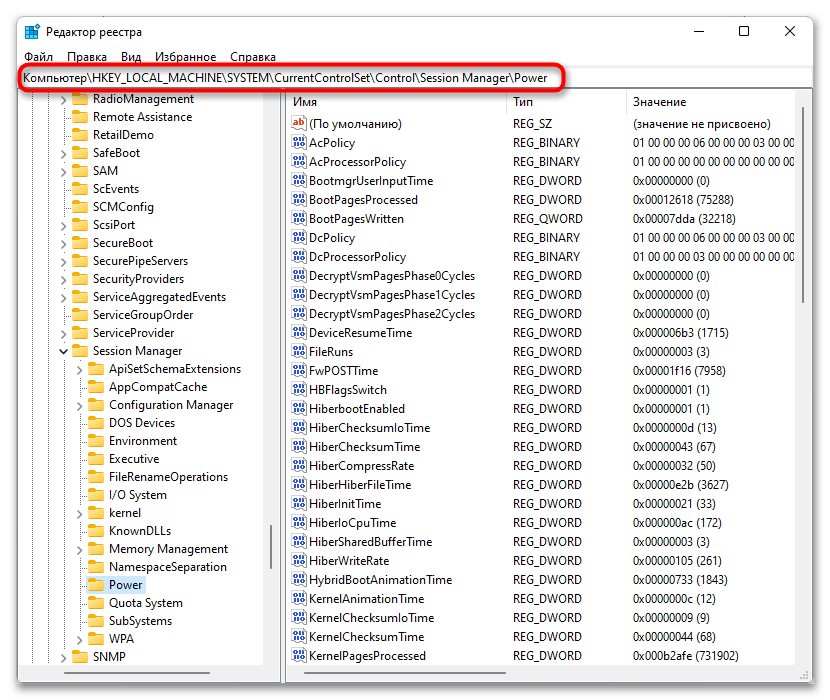
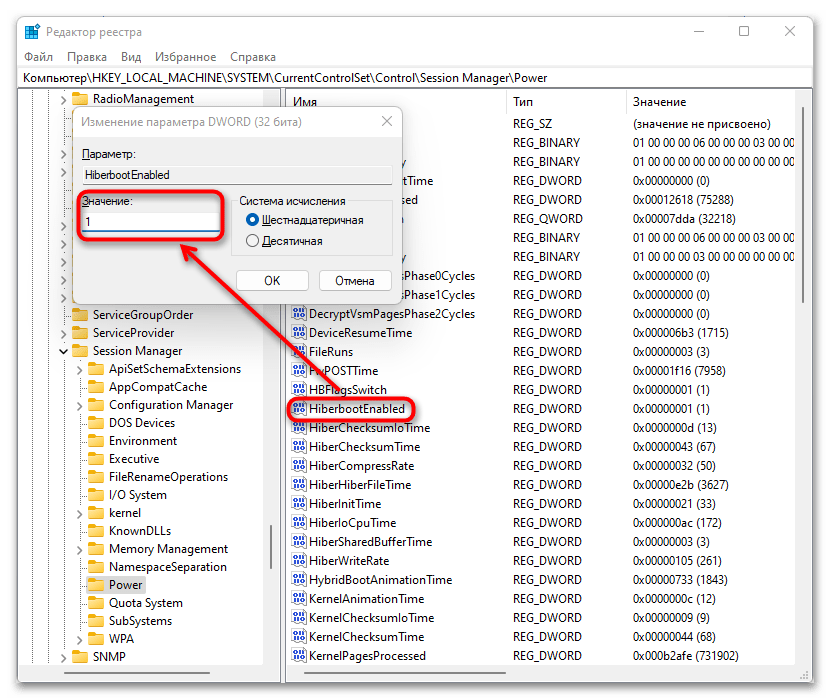
- Сочетанием клавиш Win + R вызовите окно «Выполнить», введите в нем команду
regeditи нажмите на Enter. - Скопируйте путь
HKEY_LOCAL_MACHINE\SYSTEM\CurrentControlSet\Control\Session Manager\Power, вставьте его в адресную строку окна и нажмите на Enter. - Среди параметров отыщите «HiberbootEnabled» и кликните по нему дважды ЛКМ, в результате чего откроется окно редактирования. Смените текущее значение на «0» и примените изменение кнопкой «ОК».

Отключение режима гибернации
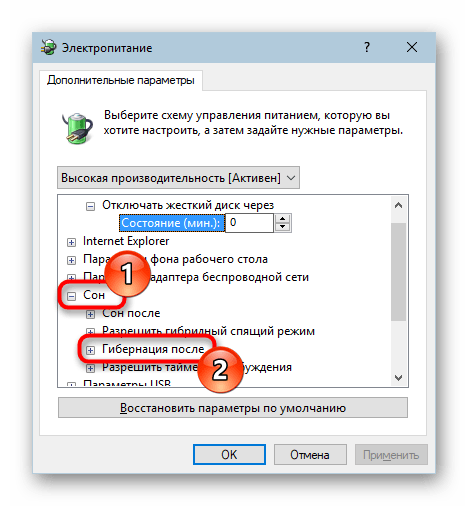
Также стоит отметить, что деактивация быстрого запуска не влияет на состояние режима гибернации. Другими словами, работа быстрого запуска нуждается во включенном режиме гибернации, и после отключения рассматриваемой в этой статье функции гибернация продолжает оставаться активированной. Данный режим резервирует в корне диска С место в виде файла «hiberfil.sys» (по умолчанию является скрытым, поэтому может быть вам не виден), занимающем несколько гигабайт свободного пространства. Если им вы пользоваться тоже не планируете, отключите сам режим. Сделать это можно методами, рассмотренными в статье по ссылке ниже.
Подробнее: Как отключить гибернацию в Windows 11
Наша группа в TelegramПолезные советы и помощь
Функция быстрого запуска Windows (Fast Startup) была представлена ещё в 2012 году вместе с системой восьмой редакции. Она является запущенной по стандарту как в Windows 10, так и в версии Windows 11.
Медленная загрузка Windows не нравилась и мешала многим, начиная, наверное, с самой первой редакции системы. Со временем появились новые методы ускорения работы ПК, такие как покупка SSD накопителя, отключение запускаемых приложений, включение всех ядер процессора при запуске системы и множество других. Microsoft в свою очередь создали функцию быстрого запуска, которая помимо ускорения загрузки приносила и некоторые минусы. Она объединяет процессы гибернации и выключения, чтобы ускорить загрузку. Из минусов мы можем отметить невозможность обновить систему, так как для установки обновлений требуется полная перезагрузка Windows, блокировка жёсткого диска, отказ устройств после отключения и т.д. Кроме того эффективность самой функции быстрого запуска могут оценить не все. Например, те у кого стоит в качестве системного диска SSD накопитель, прирост во времени запуска системы не заметят. А вот те пользователи, которые пользуются старым жёстким диском и не очень производительной оперативной памятью, могут по достоинству оценить значительный прирост. Таким образом появилась необходимость отключить быстрый запуск по тем или иным причинам. В этом материале рассмотрим каким образом это сделать.
{banner_google1}
1. Первым делом нужно зайти в старую добрую панель управления. Для этого заходим в поиск системы и вводим «Панель управления» или нажимаем «Win+R» и пишем «control».
2. Вверху выбираем «Крупные значки» и переходим в пункт «Электропитание».
3. Выбираем «Действия кнопок питания».
4. Далее надо щёлкнуть «Изменение параметров, которые сейчас недоступны».
5. Убираем чекбокс «Включить быстрый запуск (рекомендуется)» и кликаем «Сохранить изменения».
1. Открываем редактор реестра. Вводим сочетание «Win+R» и пишем «regedit».
2. Проходим по маршруту
HKEY_LOCAL_MACHINE\SYSTEM\CurrentControlSet\Control\Session Manager\Power
3. Находим «HiberbootEnabled» и кликаем на него два раза.
4. В строке «Значение» пишем 0.
5. Перезапускаем ПК.

{banner_google1}
1. Нажимаем «Win+R» и прописываем «gpedit.msc».
2. Переходим в каталог
Конфигурация компьютера \ Административные шаблоны \ Система \ Завершение работы
3. Щелкаем по «Требовать использования быстрого запуска».
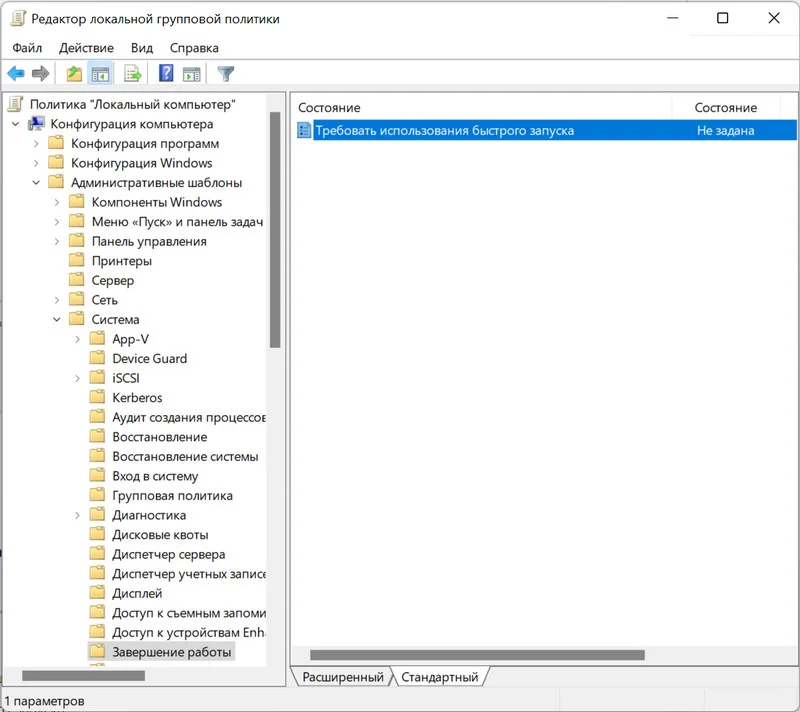
4. Ставим отметку на «Отключено».
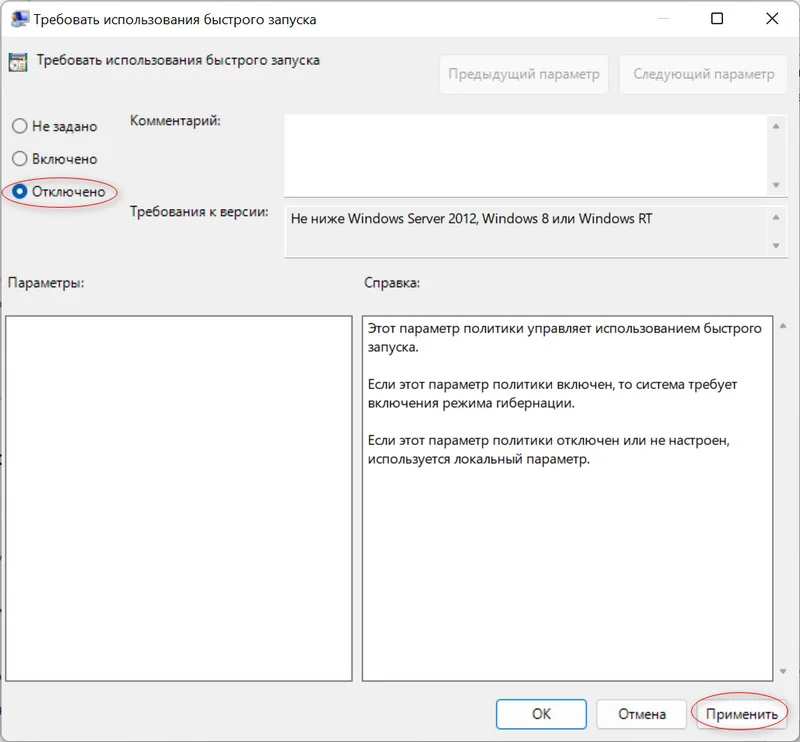
5. Кликаем ЛКМ по кнопке «Ок».
1. Заходим Пуск и запускаем PowerShell.
2. Пишем такую строчку
REG ADD «HKLM\SYSTEM\CurrentControlSet\Control\Session Manager\Power» /V HiberbootEnabled /T REG_dWORD /D 0 /F
3. Перезагружаем ПК.
Помимо методов деактивации такими путями, реально использовать просто выключение функции гибернации. При этом отключится и Fast Startup, так как эти два режима тесно связаны.
Теперь быстрый запуск не должен помешать нормальной работе вашего ПК.
Fast Boot is a feature in Windows 11 that allows for quick startup times by minimizing the time it takes for the operating system to boot. While this feature can be beneficial in terms of efficiency, there may be situations where you want to disable it. Disabling Fast Boot can be useful if you need to access the BIOS or UEFI settings, troubleshoot startup issues, or perform a clean boot. In this blog post, we will explore the reasons why you might need to disable Fast Boot on Windows 11 and provide step-by-step instructions on how to do so.
Video Tutorial:
Why You Need to Disable Fast Boot on Windows 11
Although Fast Boot can improve the startup time of your computer, there are several reasons why you might want to disable it:
1. Accessing BIOS or UEFI settings: Fast Boot can make it difficult to access the BIOS or UEFI settings on your computer. Disabling Fast Boot will allow you to enter the settings and make any necessary changes.
2. Troubleshooting startup issues: If you are experiencing issues with your computer’s startup, disabling Fast Boot can help in the troubleshooting process. By disabling Fast Boot, you can eliminate it as a potential cause of the problem.
3. Performing a clean boot: When troubleshooting software or driver-related issues, performing a clean boot can help identify the cause. Disabling Fast Boot is often a prerequisite for performing a clean boot on Windows 11.
Now that we understand why you might need to disable Fast Boot, let’s explore the methods to do so.
Method 1: Via the Power Options
Disabling Fast Boot via the Power options in Windows 11 is a straightforward process. Here’s how you can do it:
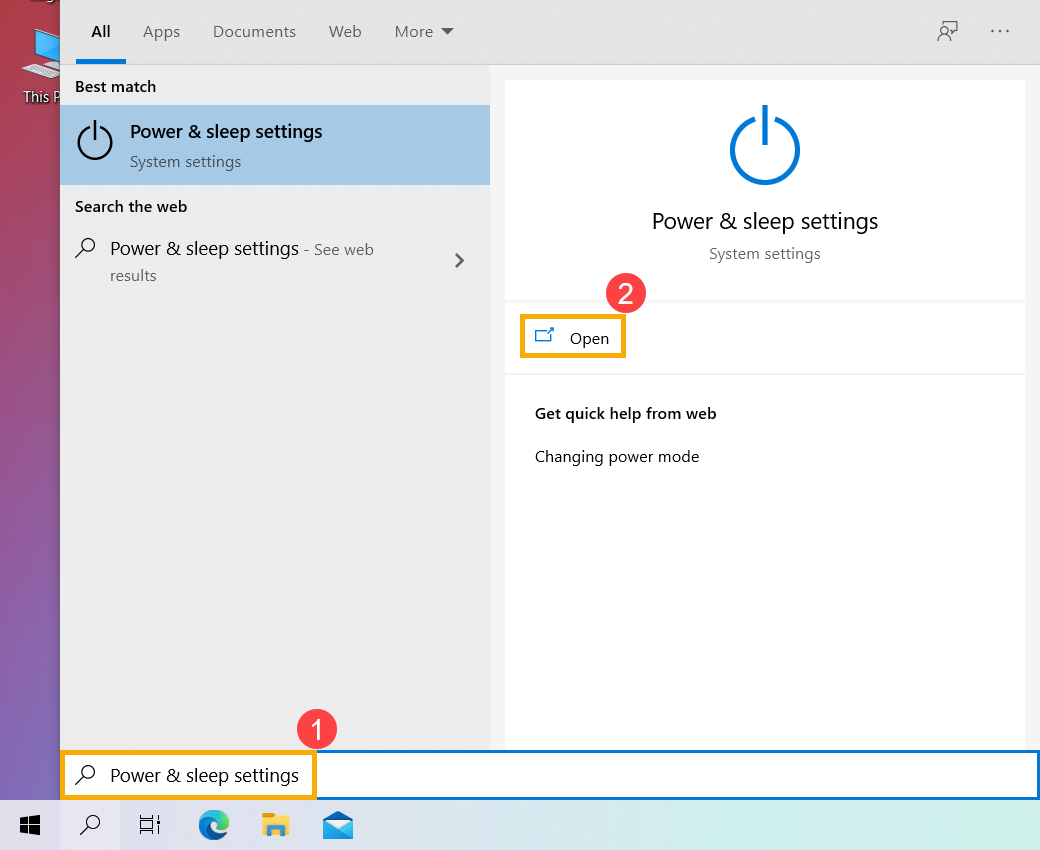
1. Open the Start Menu and click on the «Settings» icon (the gear-shaped icon).
2. In the Settings window, click on the «System» category.
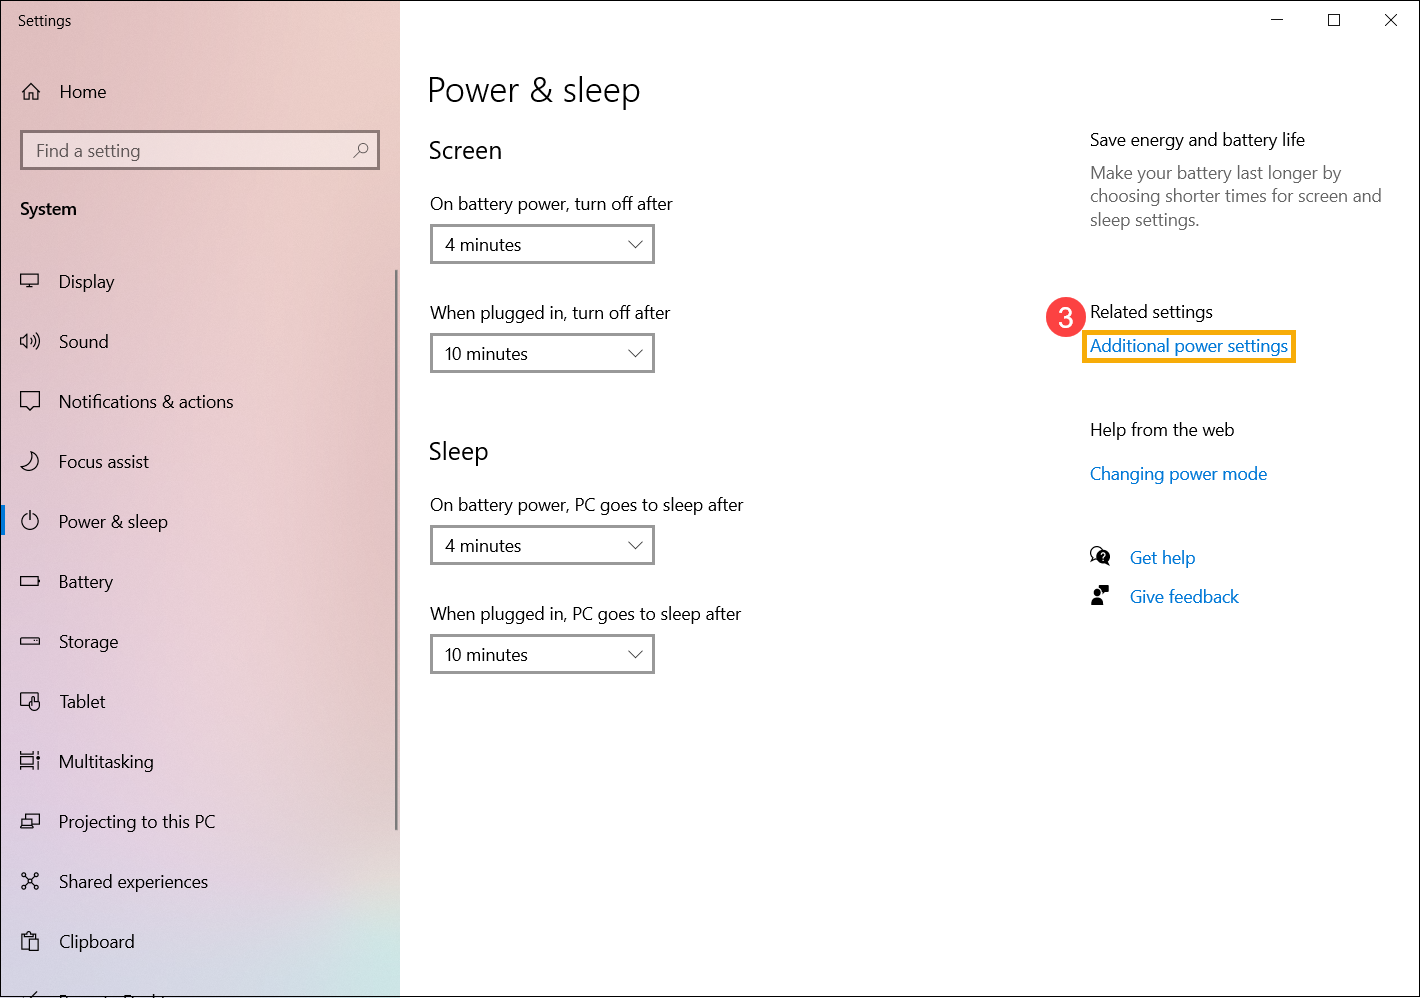
3. On the left sidebar, click on the «Power & sleep» option.
4. Scroll down to the «Additional power settings» section and click on the «Additional power settings» link.
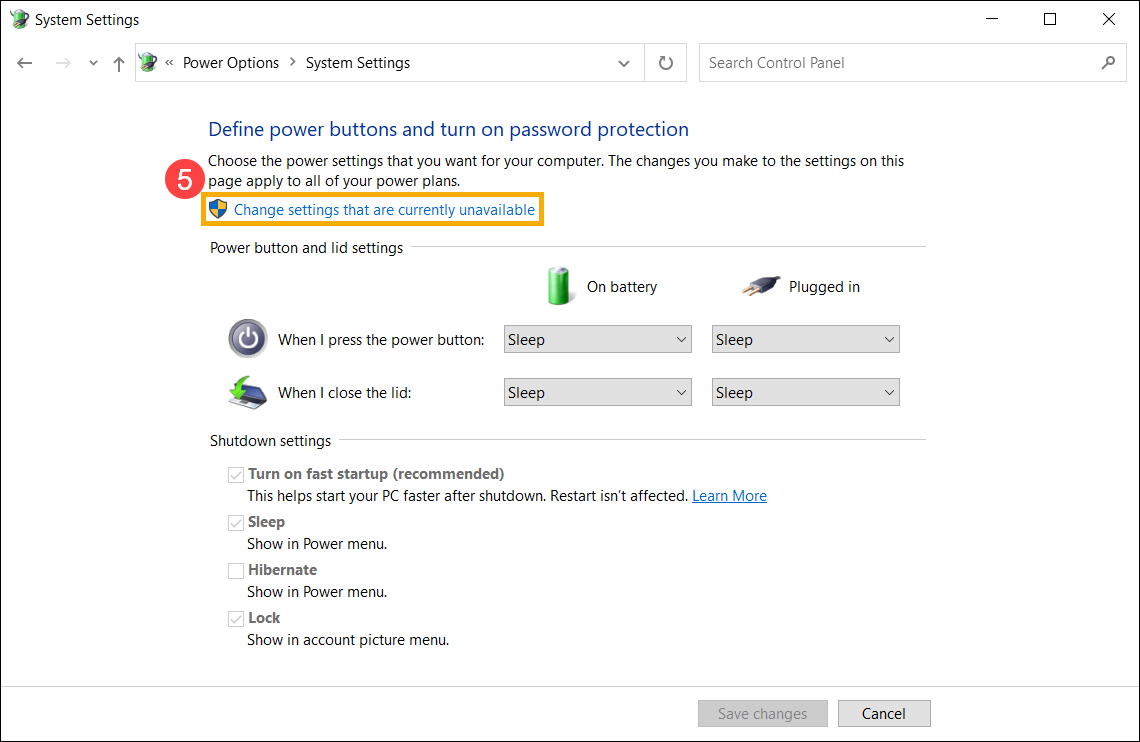
5. In the Power Options window, click on the «Choose what the power buttons do» link from the left sidebar.
6. Click on the «Change settings that are currently unavailable» link at the top of the window.
7. Scroll down to the «Shutdown settings» section and uncheck the «Turn on fast startup (recommended)» option.
8. Click on the «Save changes» button to apply the changes.
9. Restart your computer for the changes to take effect.
Pros:
1. Allows easy access to the Fast Boot setting.
2. Doesn’t require advanced technical knowledge.
3. Changes can be easily reversed if needed.
Cons:
1. Disabling Fast Boot via Power Options may not work on all systems.
2. Requires a restart for the changes to take effect.
Method 2: Via the BIOS or UEFI Settings
If you’re unable to disable Fast Boot through the Power Options, you can try disabling it via the BIOS or UEFI settings. Here are the steps to do so:
1. Restart your computer.
2. As the computer boots up, press the appropriate key to enter the BIOS or UEFI settings. The key may vary depending on your computer manufacturer (common keys include Del, F2, F12, or Esc).
3. Once in the BIOS or UEFI settings, look for an option related to Fast Boot or Quick Boot.
4. Disable the Fast Boot or Quick Boot option by selecting the appropriate setting.
5. Save the changes and exit the BIOS or UEFI settings.
6. Restart your computer for the changes to take effect.
Pros:
1. Provides direct control over the Fast Boot setting.
2. Works on most computers, regardless of the Windows version.
3. Allows customization of various BIOS or UEFI settings.
Cons:
1. Requires entering the BIOS or UEFI settings, which may be unfamiliar to some users.
2. Changes made in the BIOS or UEFI settings can affect the overall system functionality if not done carefully.
Method 3: Via the Power Shell
If the previous methods didn’t work for you, you can disable Fast Boot via the Power Shell. Here’s how:
1. Right-click on the Start button and select «Windows PowerShell (Admin)» from the context menu. Alternatively, you can search for «PowerShell» in the Start Menu and select «Run as administrator» under the search results.
2. In the PowerShell window, type or copy and paste the following command:
powercfg -h off
3. Press Enter to execute the command.
4. Close the PowerShell window.
5. Restart your computer for the changes to take effect.
Pros:
1. Disabling Fast Boot via the Power Shell is effective on most systems.
2. Provides an alternative method for users who prefer using command-line tools.
Cons:
1. Requires administrative privileges to run the Power Shell command.
2. Changes made through the Power Shell cannot be easily reverted without using the Power Shell itself.
Method 4: Via the Group Policy Editor
If you are using the Windows 11 Pro edition, you can disable Fast Boot via the Group Policy Editor. Here’s how:
1. Press Win + R to open the Run dialog box.
2. Type «gpedit.msc» and press Enter to open the Group Policy Editor.
3. In the Group Policy Editor window, navigate to «Computer Configuration» -> «Administrative Templates» -> «System» -> «Shutdown Options«.
4. Double-click on the «Require use of fast startup» policy setting.
5. In the policy settings window, select the «Disabled» option.
6. Click on the «Apply» button and then the «OK» button to save the changes.
7. Restart your computer for the changes to take effect.
Pros:
1. Allows fine-grained control over system policies, including the Fast Boot setting.
2. Works on Windows 11 Pro edition.
3. Changes made through the Group Policy Editor can be easily reverted.
Cons:
1. Requires Windows 11 Pro edition.
2. The Group Policy Editor is not available on Windows 11 Home edition.
What to Do If You Can’t Disable Fast Boot
If you’ve tried all the methods above and still can’t disable Fast Boot on Windows 11, here are some additional fixes you can try:
1. Update your system BIOS or UEFI firmware to the latest version. Manufacturers often release updates that fix compatibility issues or provide additional options for disabling Fast Boot.
2. Reset your BIOS or UEFI settings to their default values. This can help if there are any custom settings conflicting with the Fast Boot feature.
3. Contact the support team of your computer manufacturer for further assistance. They may provide specific instructions or suggest alternative solutions based on the make and model of your computer.
Bonus Tips
Here are three bonus tips to enhance your experience with disabling Fast Boot on Windows 11:
1. Test the startup time before and after disabling Fast Boot to gauge the impact on your system’s performance.
2. Keep your BIOS or UEFI firmware up to date to ensure compatibility with the latest Windows 11 updates.
3. Familiarize yourself with the BIOS or UEFI settings and their respective options for future troubleshooting purposes.
5 FAQs
Q1: Does disabling Fast Boot affect the overall startup time of my computer?
A: Disabling Fast Boot may slightly increase the startup time of your computer, as it eliminates the optimization that Fast Boot provides. However, the difference in startup time is usually minimal.
Q2: Can I enable Fast Boot again after disabling it?
A: Yes, you can enable Fast Boot again by following the same steps as disabling it. Reversing the process will restore Fast Boot functionality.
Q3: Does disabling Fast Boot have any impact on system performance?
A: Disabling Fast Boot does not have a significant impact on system performance during regular usage. The primary purpose of Fast Boot is to reduce the startup time of the computer.
Q4: Will disabling Fast Boot affect my computer’s ability to wake up from sleep mode?
A: No, disabling Fast Boot does not affect the ability of your computer to wake up from sleep mode. Sleep mode is a separate feature that is independent of Fast Boot.
Q5: Can I disable Fast Boot on Windows 10 using the same methods?
A: Yes, the same methods can be used to disable Fast Boot on Windows 10, with minor differences depending on the version of Windows 10.
Final Thoughts
Disabling Fast Boot on Windows 11 can be necessary for various reasons, such as accessing the BIOS or UEFI settings, troubleshooting startup issues, or performing a clean boot. By following the methods outlined in this blog post, you can easily disable Fast Boot and regain control over your system’s startup process. It’s important to keep in mind that disabling Fast Boot may slightly increase the startup time of your computer, but the benefits of troubleshooting and customization outweigh the minimal impact on performance.
FAQ
[Windows 11/10] Как отключить Fast Startup (Быстрый Запуск) в Windows
Применимые продукты: ноутбук, настольный компьютер, моноблок, игровой портативный компьютер, материнская плата, видеокарта, LCD монитор, мини-ПК.
Быстрый Запуск — это функция, предназначенная для ускорения процесса загрузки систем Windows после завершения работы. По умолчанию на устройствах Windows включен Быстрый Запуск. При выключении устройства Windows сохраняют некоторые системные данные на диске. После перезагрузки система использует эти сохраненные данные для возобновления работы устройства, а не для полной перезагрузки, тем самым увеличивая скорость загрузки системы. В каком-то смысле он работает аналогично спящему режиму.
Благодаря Быстрому Запуску (Fast Startup) устройства не отключаются полностью, что приводит к небольшому расходу заряда аккумулятора. Это считается нормальным. Если Вы хотите отключить Быстрый Запуск, выполните следующие действия.
Пожалуйста, перейдите к соответствующей инструкции в зависимости от текущей операционной системы Windows на Вашем устройстве:
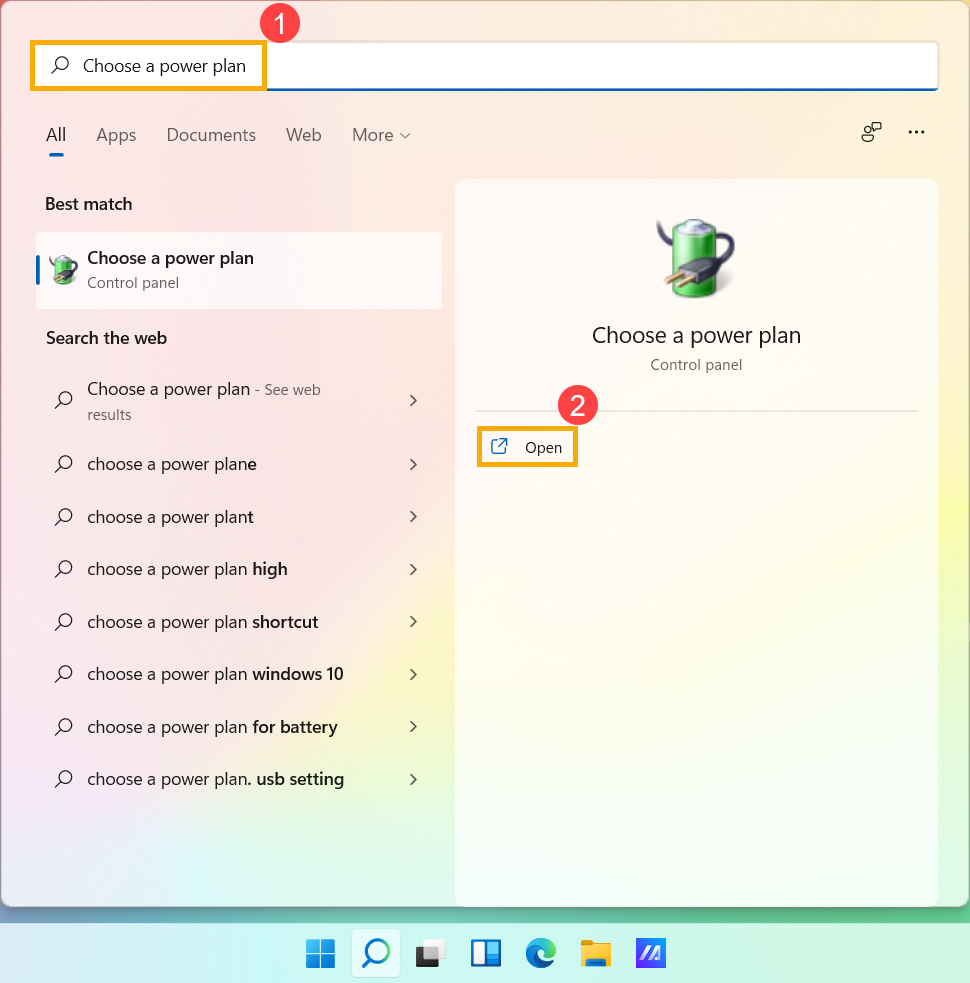
Операционная система Windows 11
- Введите и найдите [Выбрать схему электропитания] в строке поиска Windows ① , а затем нажмите [Открыть] ②.

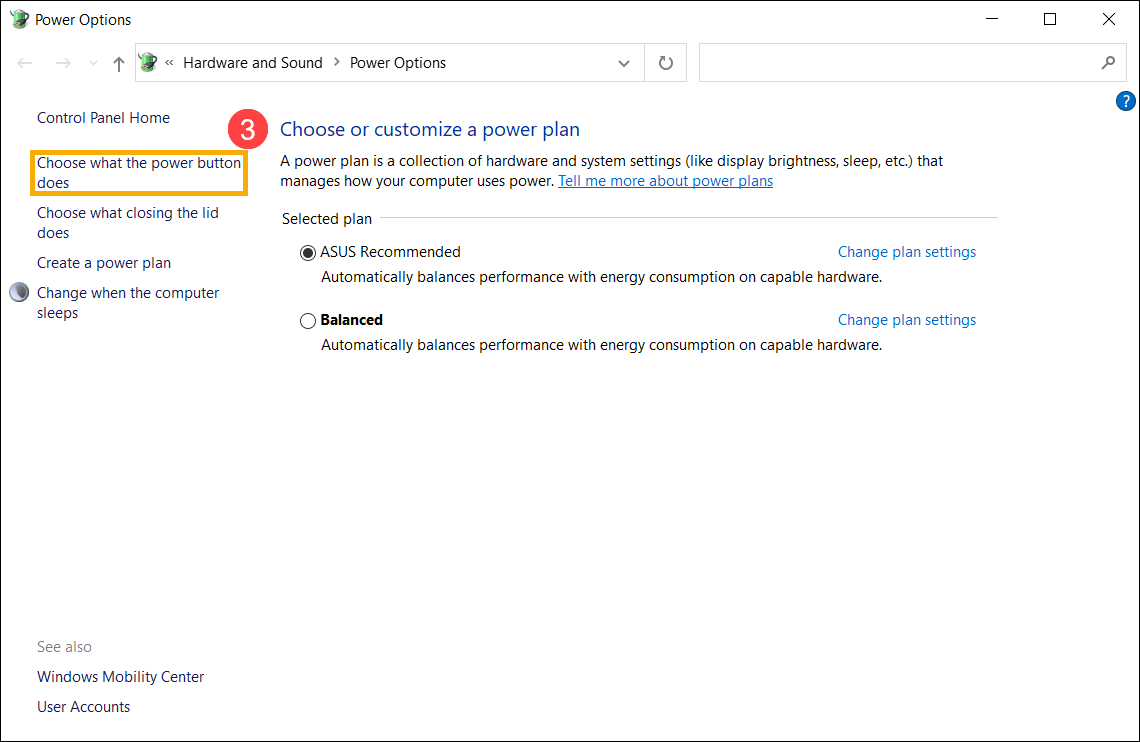
- Нажмите [Выберите действие кнопки питания] ③.
- Если опция Быстрого Запуска в настройках выключения неактивна, нажмите [Изменить настройки, которые в данный момент недоступны] ④.
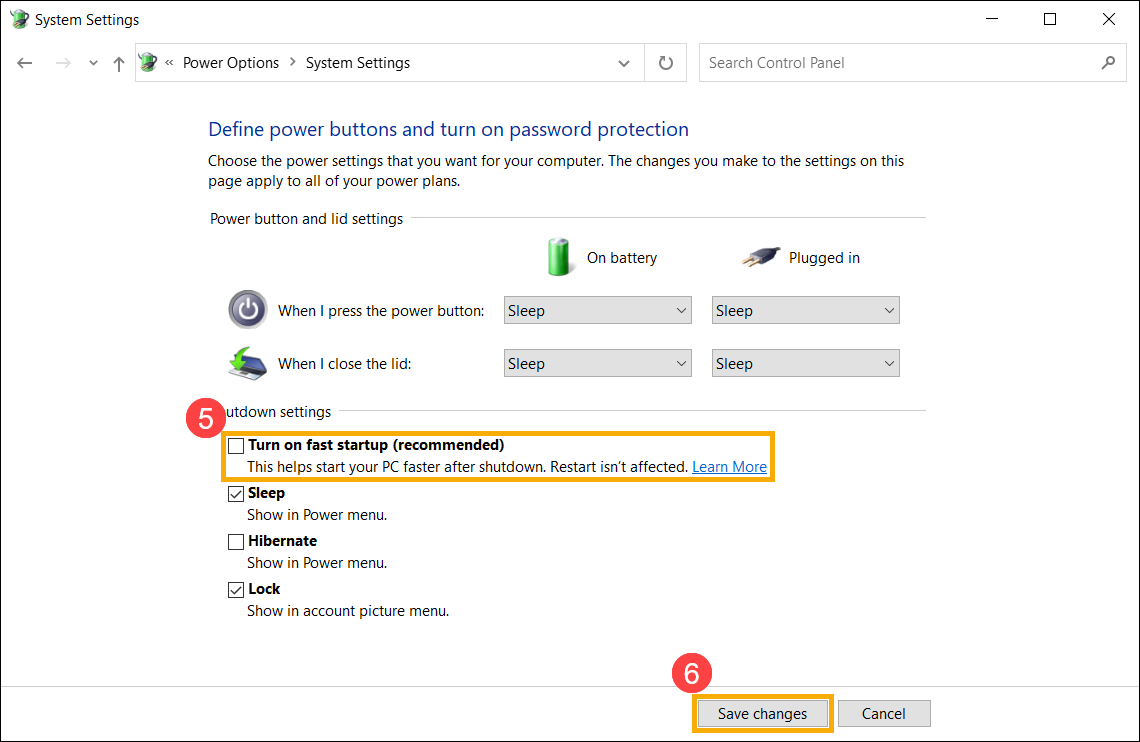
- Снимите флажок [Включить быстрый запуск] ⑤, а затем нажмите [Сохранить изменения] ⑥, Ваше устройство отключит функцию Быстрого Запуска в Windows.

Операционная система Windows 10
- Введите и найдите [Настройки питания и сна] в строке поиска Windows ① , а затем нажмите [Открыть] ②.
- Нажмите [Дополнительные настройки питания] ③.
- Нажмите [Выберите действие кнопки питания] ④.
- Если опция Быстрого Запуска в настройках выключения неактивна, нажмите [Изменить настройки, которые в данный момент недоступны] ⑤.
- Снимите флажок [Включить быстрый запуск] ⑥, а затем выберите [Сохранить изменения] ⑦, Ваше устройство отключит функцию Быстрого Запуска в Windows.


Эта информация была полезной?
Yes
No
- Приведенная выше информация может быть частично или полностью процитирована с внешних веб-сайтов или источников. Пожалуйста, обратитесь к информации на основе источника, который мы отметили. Пожалуйста, свяжитесь напрямую или спросите у источников, если есть какие-либо дополнительные вопросы, и обратите внимание, что ASUS не имеет отношения к данному контенту / услуге и не несет ответственности за него.
- Эта информация может не подходить для всех продуктов из той же категории / серии. Некоторые снимки экрана и операции могут отличаться от версий программного обеспечения.
- ASUS предоставляет вышеуказанную информацию только для справки. Если у вас есть какие-либо вопросы о содержании, пожалуйста, свяжитесь напрямую с поставщиком вышеуказанного продукта. Обратите внимание, что ASUS не несет ответственности за контент или услуги, предоставляемые вышеуказанным поставщиком продукта.
How to Disable Fast Boot in Windows 11
Windows 11, like its predecessor Windows 10, comes with several features designed to improve user experience and system performance. One of these features is Fast Boot, also known as Fast Startup. This feature, which combines elements of a cold boot and hibernation, can decrease the time it takes for your computer to boot up. However, while Fast Boot can be useful, it may cause problems in certain situations, such as issues with dual-boot setups, peripheral devices not being recognized, or problems with system updates.
If you’re experiencing these types of issues, or if you simply want to gain greater control over your boot process, disabling Fast Boot can be beneficial. In this article, we will discuss why you might want to disable Fast Boot, how it works, and the step-by-step methods for disabling it in Windows 11.
Understanding Fast Boot
Fast Boot is a feature designed to reduce the startup time of your computer. It works by saving the current system state to a hibernate file on the hard disk when you shut down your machine. When you power your computer back on, instead of performing a full hardware check, Windows loads the saved state, allowing for a quicker startup.
Pros of Fast Boot
- Speed: As the name suggests, Fast Boot significantly reduces the time it takes to get to the desktop.
- Convenience: Reduces the wait time for users, particularly those who frequently start and stop their machines.
- Power Efficiency: Combines hibernation and shutdown in a way that can save power compared to a full shutdown.
Cons of Fast Boot
- Device Compatibility Issues: Certain devices, especially USB peripherals, may not be recognized when Fast Boot is enabled.
- Dual Boot Problems: If you are running multiple operating systems, Fast Boot can cause issues with boot menus and OS recognition.
- Updates and Modifications: Fast Boot may prevent updates and modifications from being applied to your system, as it does not perform a full hardware initialization.
Understanding these points can help you decide whether to keep Fast Boot enabled or to disable it.
Before You Begin
Before we start with the steps to disable Fast Boot, it’s essential to ensure you have the latest Windows updates and drivers. Sometimes, these updates can resolve conflicts that might not require disabling such features.
Backup any important data as a precautionary measure, even though disabling Fast Boot primarily alters system settings rather than personal files.
Method 1: Disabling Fast Boot via Control Panel
The Control Panel is a staple of Windows operating systems and provides a graphical interface for changing system settings.
Step 1: Open Control Panel
- Press
Windows + Rkeys to open the Run dialog. - Type
controland press Enter. This opens the Control Panel.
Step 2: Navigate to Power Options
- Inside the Control Panel, find the “Hardware and Sound” section.
- Click on Power Options.
Step 3: Change What the Power Buttons Do
- On the left sidebar, click on “Choose what the power buttons do”.
- If you’re prompted for administrator access, provide the required permissions.
Step 4: Adjust Settings for Fast Boot
- Click on “Change settings that are currently unavailable”.
- Scroll down to the “Shutdown settings” section.
- Uncheck the option labeled Turn on fast startup (recommended).
Step 5: Save Changes
- Click on the Save changes button.
- Close the Control Panel.
This method effectively disables Fast Boot in Windows 11, returning you to a traditional boot process the next time you start your computer.
Method 2: Disabling Fast Boot via Windows Settings
While the Control Panel is an effective way to change system settings, Windows 11 has introduced a streamlined Settings app that can accomplish similar tasks.
Step 1: Open Settings
- Press
Windows + Ikeys to open the Settings app.
Step 2: Navigate to System
- In the Settings window, click on System on the left sidebar.
- Scroll down and select Power & battery.
Step 3: Additional Power Settings
- Under the Power section, look for the Related settings header.
- Click on Additional power settings. This action will redirect you to the Power Options in Control Panel.
Step 4: Adjust Power Button Settings
- Follow the same steps from Method 1 to disable Fast Boot as outlined from Step 2 onward.
This method is particularly useful for users who prefer the modern Windows interface.
Method 3: Disabling Fast Boot in BIOS/UEFI Settings
Disabling Fast Boot may not only require changes within the Windows environment but can also be handled at the firmware level via BIOS or UEFI settings.
Step 1: Access BIOS/UEFI
- Restart your computer.
- As it starts up, press the key required to enter BIOS/UEFI settings. This key could be F2, F10, Del, or Esc, depending on your manufacturer. You may need to check your PC’s documentation or the manufacturer’s website for the specific key.
Step 2: Navigate to Boot Options
- Use the arrow keys to navigate through the BIOS/UEFI menu.
- Look for a menu labeled something like Boot or Boot Options.
Step 3: Disable Fast Boot
- Within the Boot Options menu, look for a parameter labeled Fast Boot.
- Set it to Disabled.
Step 4: Save and Exit
- Press the appropriate function key (usually
F10) to save changes and exit. - Confirm any prompts to exit and restart the computer.
By disabling Fast Boot within the BIOS/UEFI, you ensure that even if Windows settings revert for any reason, the feature remains disabled at the hardware level.
Confirming Fast Boot is Disabled
After completing these methods, you might want to verify that Fast Boot is indeed disabled to ensure that your changes have taken effect.
Step 1: Shutdown and Restart
- Perform a complete shutdown of your computer instead of a restart. This helps ensure that all systems are turned off before turning them back on.
Step 2: Observe the Boot Process
- When powering on, observe the POST (Power-On Self-Test). If the boot process takes longer than usual, this might indicate that Fast Boot is disabled.
- Additionally, if USB devices are recognized correctly during this process, it further confirms that Fast Boot is indeed turned off.
Conclusion
Disabling Fast Boot in Windows 11 provides users with greater flexibility and control over the boot process. While this feature can enhance speed and efficiency, it can also lead to various issues for certain users, especially those involved in dual-boot configurations or who encounter hardware recognition problems.
By following the detailed methods outlined in this article—whether through the Control Panel, the Windows Settings app, or via BIOS/UEFI—you can easily disable Fast Boot and return to a full initialization process each time you power on your computer.
Being informed about this setting can help you troubleshoot issues and ensure your Windows 11 experience remains smooth and efficient. Remember always to consider your personal needs and the specific use cases of your system when deciding on whether to enable or disable features such as Fast Boot.