
Disabling Ethernet in Windows 11 can be helpful for various reasons. You might want to turn off Ethernet when you prefer to use WiFi exclusively, reduce interference with other connections, test network configurations, troubleshoot network issues, or enhance network security by preventing unauthorized access through a wired connection. In this tutorial, I’ll show you four methods to disable Ethernet in Windows 11: using the Settings app, Device Manager, Command Prompt, and PowerShell. Let’s get started!
Disable Ethernet in Windows 11 From Settings
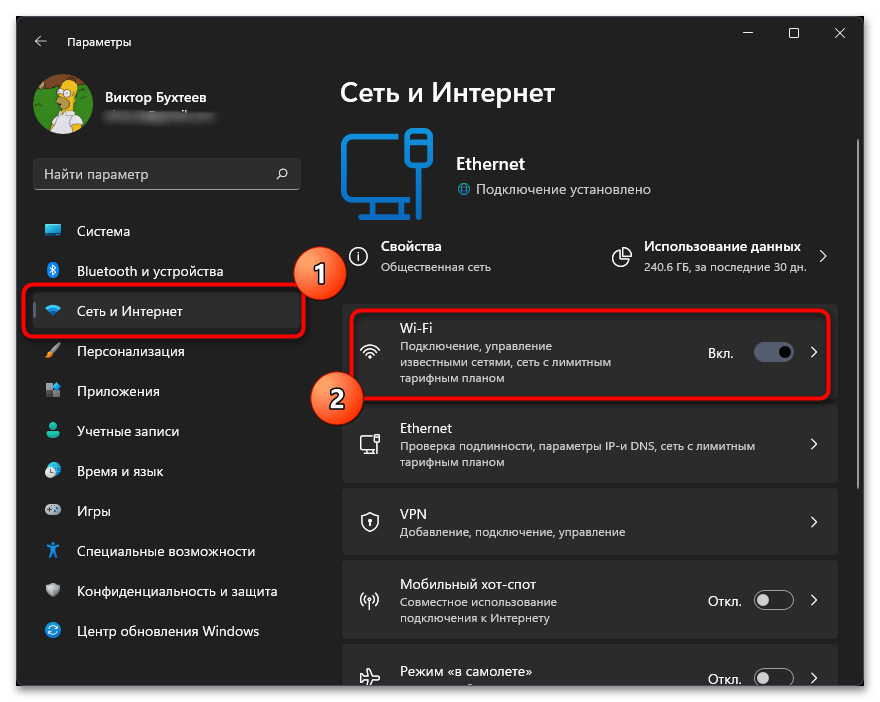
- Open the Settings window by pressing Windows key + I.
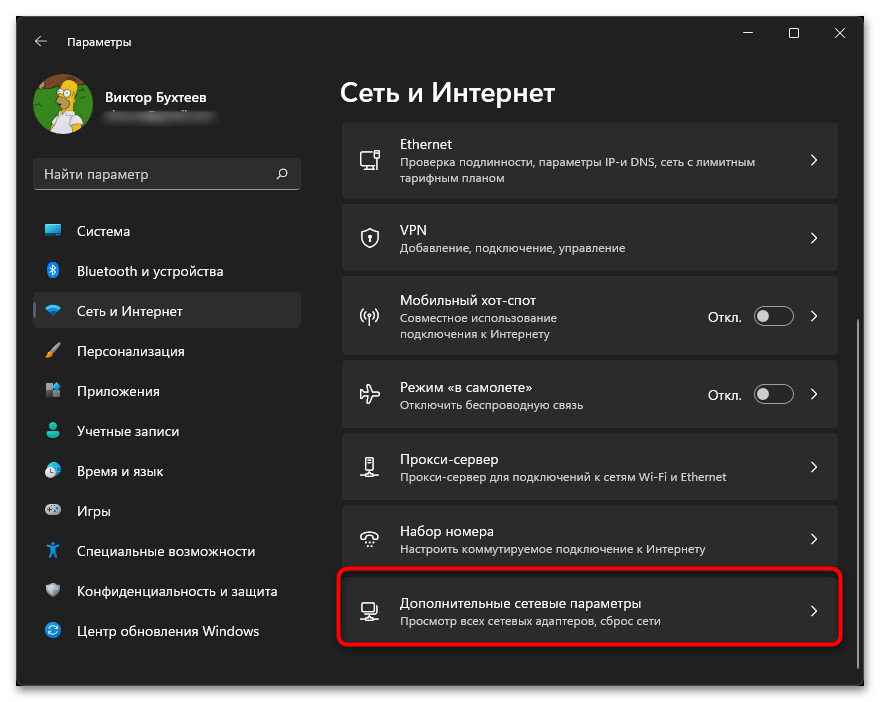
- Go to the Network & Internet tab.
- Click the Advanced Network Settings option.
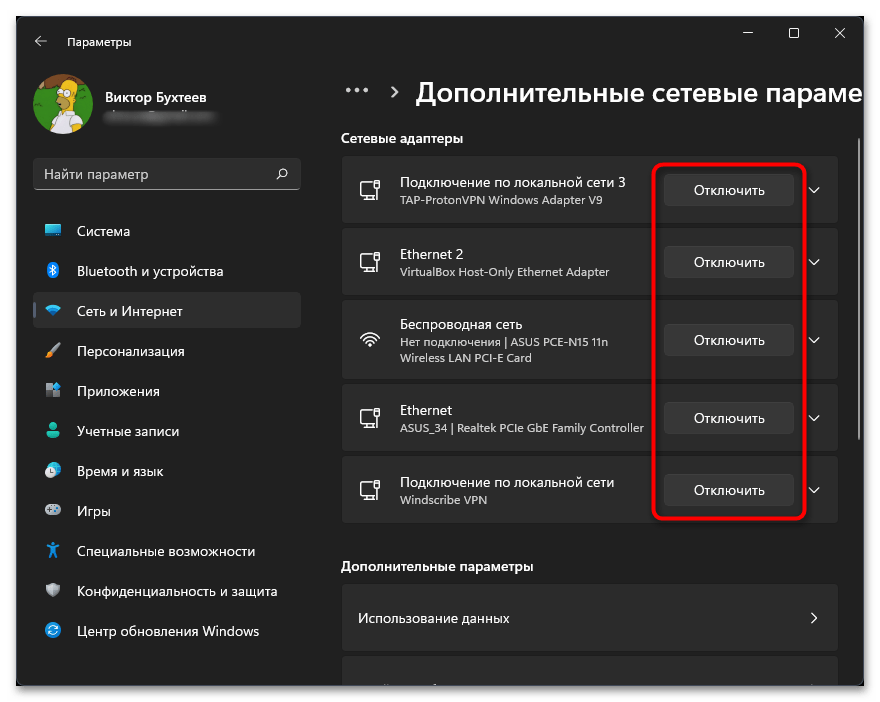
- Click the Disable button next to your Ethernet adapter.
- With that, the Ethernet is disabled in Windows 11.

Disable Ethernet in Windows 11 Using Device Manager
Important note: This method required administrator rights.
- Right-click on the Start button on the taskbar.
- Select the Device Manager option.
- Expand the Network Adapters tree.
- Right-click on your Ethernet adapter.
- Select the Disable Device option.
- Click Yes when prompted to disable Ethernet.

Turn Off Ethernet in Windows 11 via the Command Prompt
Important note: This method required administrator rights.
- Press the Start button.
- Search for Command Prompt.
- Click the Run as Administrator option.
- Run the following command to disable Ethernet in Windows 11.
netsh interface set interface "Ethernet" admin=disable
Note: If your ethernet adapter’s name is different, modify the “Ethernet” part of the command accordingly. You can find your ethernet adapter name from the “Settings > Network & Internet > Advanced Network Settings” page.

PowerShell Command to Disable Ethernet in Windows 11
Important note: This method required administrator rights.
- Right-click on the Start button on the taskbar.
- Select the Terminal (Admin) option.
- In the terminal window, run the following command.
Disable-NetAdapter -Name "Ethernet" - The above command will instantly disable Ethernet in Windows 11.
Note: If your ethernet adapter’s name is different, modify the “Ethernet” part of the command accordingly. You can find your ethernet adapter name from the “Settings > Network & Internet > Advanced Network Settings” page.

Wrapping Up
As you can see, you have multiple ways to turn off Ethernet in Windows 11. If your user account doesn’t have administrator rights, follow the method using the Settings app. On the other hand, if you have administrator rights and are looking for alternative methods, you can use Device Manager, Command Prompt, or PowerShell. Whichever method you choose, the Ethernet will be disabled instantly.
If you have any questions or need help, feel free to comment below. I’ll be happy to assist.
Disabling Ethernet on Windows 11 is a straightforward process that allows you to manage your network connections more efficiently. Whether you need to switch to Wi-Fi or troubleshoot connection issues, this guide will walk you through the steps to disable your Ethernet connection easily. By following the steps, you’ll be able to disconnect your wired internet connection with just a few clicks.
Disabling Ethernet on Windows 11 is simple and doesn’t take much time. You’ll go through a few settings in the system to disconnect your Ethernet connection. Let’s dive into the step-by-step guide.
Step 1: Open Settings
Click on the Start menu and select the Settings icon.
To begin with, you need to access the Settings menu. You can do this by clicking on the Start menu located at the bottom left corner of your screen. Once you find the gear icon, click it to enter the Settings.
Step 2: Access Network & Internet
In the Settings menu, select ‘Network & Internet.’
After opening the Settings, look for the ‘Network & Internet’ option. It’s usually on the left-hand side. Clicking this will take you to the next stage where you can manage your internet connections.
Step 3: Go to Ethernet Settings
Select the ‘Ethernet’ tab from the list.
From the ‘Network & Internet’ menu, choose the ‘Ethernet’ tab. This section holds all the details and settings related to your Ethernet connection.
Step 4: Disable the Ethernet Network
Click on the Ethernet connection you want to disable and toggle the switch to ‘Off.’
Once you are in the Ethernet section, you will see a list of available Ethernet networks. Click on the specific one you want to disable, and you’ll see a switch that you can toggle to ‘Off.’ This action will immediately disable the Ethernet connection.
Step 5: Confirm the Disconnection
Check to ensure your Ethernet connection is disabled.
After toggling the switch, make sure that it’s showing as ‘Off’ and that your computer no longer accesses the internet through the Ethernet connection. You should now see that your device is relying on other available networks like Wi-Fi.
Once you disable the Ethernet connection, your computer will no longer use it to access the internet. This change allows your device to automatically switch to any available wireless networks, such as Wi-Fi, or other preferred connections.
Tips for Disabling Ethernet on Windows 11
- Use Wi-Fi as a Backup: Make sure you have Wi-Fi enabled if you’re disabling Ethernet, so you don’t lose internet access.
- Check for Updates: Ensure your network drivers are up-to-date to avoid any connectivity issues after making changes.
- Know Your Network: Be aware of the exact Ethernet connection you are disabling, especially if you have multiple connections available.
- Save Your Work: Before disabling Ethernet, save any work you have open online to prevent data loss.
- Use Shortcuts: Use the Windows + I shortcut to quickly open the Settings menu.
Frequently Asked Questions
Why should I disable Ethernet on Windows 11?
Disabling Ethernet can help you switch to a different internet connection, like Wi-Fi, or troubleshoot connection problems.
Will disabling Ethernet affect my internet access?
Yes, you need another network like Wi-Fi to stay connected after disabling Ethernet.
Can I re-enable the Ethernet connection later?
Absolutely. You can follow the same steps and toggle the switch back to ‘On’ to re-enable your Ethernet connection.
What if I can’t find the Ethernet settings?
Ensure your Windows 11 is up to date, and try searching for ‘Ethernet’ using the search bar in Settings.
Are there any risks in disabling Ethernet?
No major risks, but ensure you have a backup internet connection to maintain access to the online world.
Summary
- Open Settings.
- Access Network & Internet.
- Go to Ethernet Settings.
- Disable the Ethernet Network.
- Confirm the Disconnection.
Conclusion
Disabling Ethernet on Windows 11 is a quick and easy task that anyone can do. Whether you need to switch to a Wi-Fi connection or fix a connectivity issue, you now have the steps to make it happen. Remember, managing your network settings can greatly enhance your internet experience and even help with troubleshooting. After following the guide, you should be confident in toggling your Ethernet connection on and off. If you run into any hiccups, refer back to these steps or check out additional resources online for more detailed guidance. With technology constantly changing, adapting and learning how to efficiently handle tasks like this keeps you ahead of the curve. So, give it a try, and enjoy the flexibility it brings to your internet connection management.
Matthew Burleigh has been writing tech tutorials since 2008. His writing has appeared on dozens of different websites and been read over 50 million times.
After receiving his Bachelor’s and Master’s degrees in Computer Science he spent several years working in IT management for small businesses. However, he now works full time writing content online and creating websites.
His main writing topics include iPhones, Microsoft Office, Google Apps, Android, and Photoshop, but he has also written about many other tech topics as well.
Read his full bio here.
Quick Tips
- Need a temporary break from the internet? Disabling your ethernet adapter is a quick way to disconnect and focus on offline tasks.
- Disable your ethernet adapter directly from Settings. Head to Network & internet > Advanced network settings, find your ethernet adapter and flip the toggle switch to Off.
- Device Manager lets you disable the ethernet adapter. Search for Device Manager > expand Network adapters > right-click your ethernet adapter, and choose Disable device.
Method 1: Using Settings
Step 1: Press the Windows key on your keyboard, type Settings, and press Open.
Step 2: Click on Network & internet from the sidebar.
Step 3: Scroll down and click on Advanced network settings.

Step 4: In Advanced network settings, under Network adapters, click on Disable for the adapter you want to disable.
Note: You can disable Ethernet, Wi-Fi, or Bluetooth.

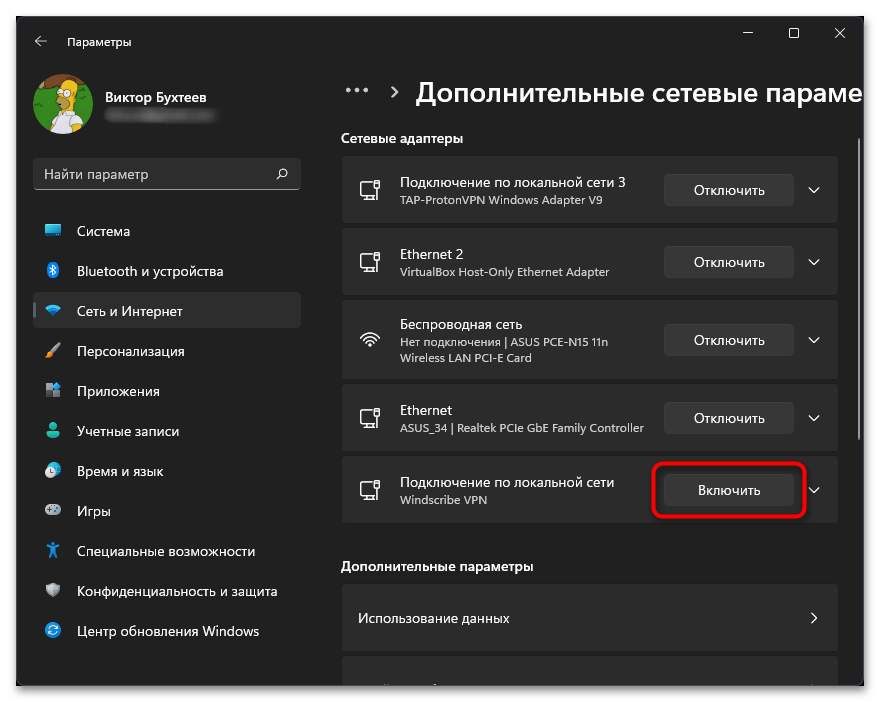
Once done, depending on which adapter you have disabled, the connection will go offline. You can click on Enable to establish the connection again. If you don’t want to do it through the Settings app, you can check out the old way in the next method.
Method 2: Using the Control Panel
Here’s how to disable your Windows 11 Ethernet or Wi-Fi network adapter using the network connection option.
Step 1: Press the Windows key on your keyboard > type View network connections > click Open.
Step 2: In the Network Connection window, right-click on the network adapter you want to disable and select Disable.

This will turn off the selected adapter, and the icon will turn grey. In the future, if you wish to enable the adapter you disabled, right-click on the adapter and select Enable.
Method 3: Using the Device Manager
Step 1: Press the Windows key on your keyboard > type Device Manager > click Open.
Step 2: Double-click the Network adapters to expand the section.
Step 3: Find and right-click the adapter you want to disable and select Disable device.
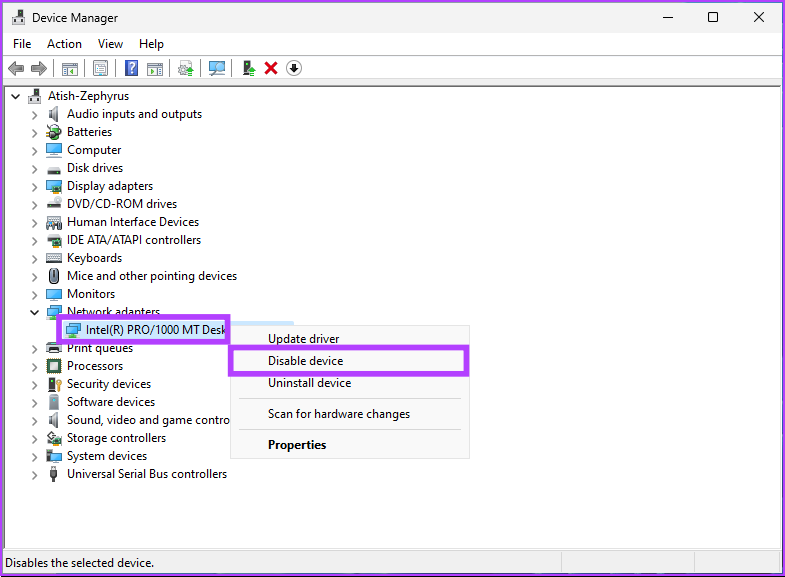
That’s it. You have successfully disabled the selected network adapter on your Windows 11 PC. You can confirm it by checking if the adapter has turned grey. If you want to do the same slightly untraditional way, move to the next method.
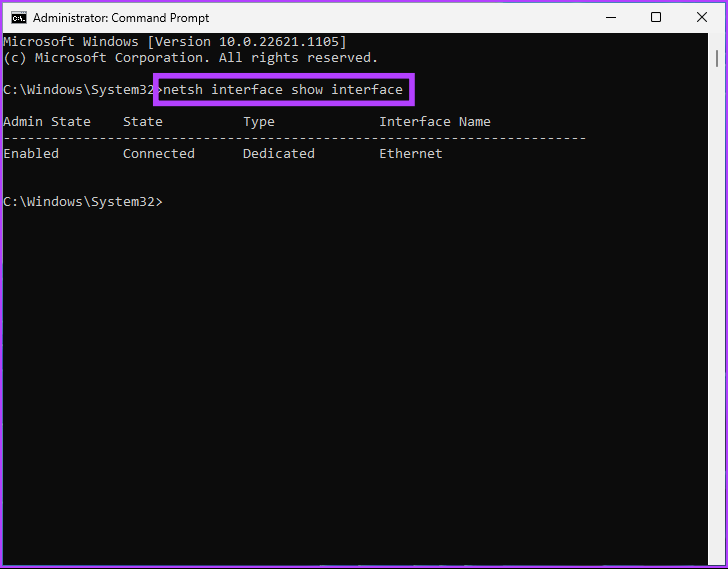
Method 4: Using Command Prompt
Step 1: Press the Windows key on your keyboard > type Command Prompt > click Run as administrator.
Step 2: Type the below command and hit the Enter key.
Netsh interface show interface
Note the Interface Name, which is the network adapter name you wish to disable.
Step 3: To disable the network adapter, type the following command and press Enter.
Note: Replace the Interface Name with the name you noted above.
Netsh interface set interface "Interface Name" disable
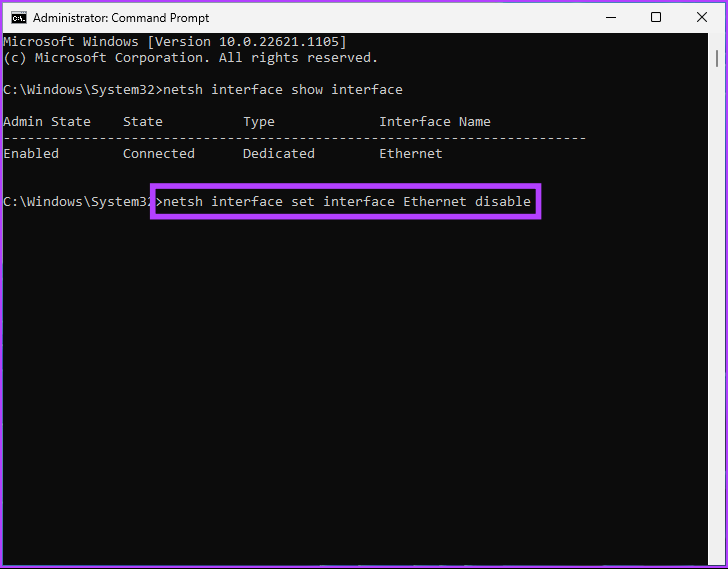
The network adapter you chose is disabled by the above command. If you wish to enable it, type the below command and hit Enter.
Netsh interface set interface "Interface Name" enable
Note: Replace the Interface Name with the appropriate name you noted earlier.
There you go. You have successfully disabled and enabled a network adapter on your Windows 11 PC with Command Prompt. If you don’t want to use Command Prompt, you can run it through PowerShell.
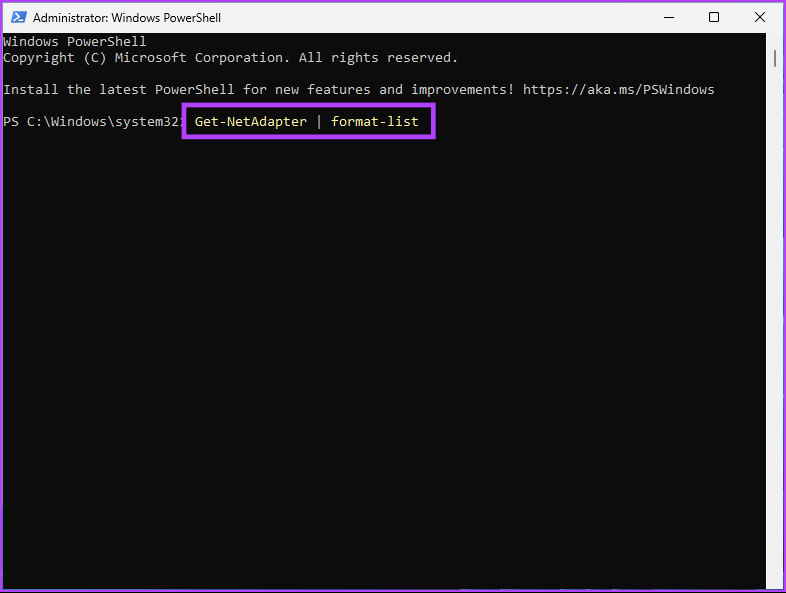
Method 5: Using PowerShell
Step 1: Press the Windows key on your keyboard, type Windows PowerShell, and click on Run as Administrator.
Step 2: Type the below command and hit Enter.
Get-NetAdapter | format-list
Note down the name of the device you want to disable.
Step 3: Type the command below to disable the desired adapter.
Note: Replace the ‘network adapter name’ with the actual network adapter name.
Disable-NetAdapter -Name "network adapter name" -Confirm:$false

There you go. You have successfully disabled the adapter on your Windows 11 PC. If you wish to enable it, type or copy the below command.
Enable-NetAdapter -Name "network adapter name" - Confirm:$false
Note: Replace the network adapter name with the actual network adapter name.
FAQs
1. Is it OK to reset the network adapter?
Resetting a network adapter can help solve a variety of problems, including connectivity problems, slow network speeds, or conflicts with other network equipment. A reset can also be helpful in case of configuration changes or software updates.
2. Which is faster: Wi-Fi or Ethernet?
Ethernet is generally faster than Wi-Fi. Ethernet connections, which use cables, can offer faster data transfer speeds and a more stable connection than Wi-Fi, which uses wireless technology. Although the speed of an Ethernet connection varies based on the quality of the cables and their length, the speed of a Wi-Fi connection will vary based on the distance between the devices and the quality of the wireless signal.
Also Read: How to fix the “Windows could not find a driver for your network adapter” error
Was this helpful?
Thanks for your feedback!
The article above may contain affiliate links which help support Guiding Tech. The content remains unbiased and authentic and will never affect our editorial integrity.
Все способы:
- Способ 1: Отключение от текущей сети (Только Wi-Fi)
- Способ 2: Отключение сетевого адаптера
- Способ 3: Полное отключение сетевого оборудования
- Способ 4: Применение сторонних программ
- Способ 5: Отключение интернета для конкретной программы
- Способ 6: Временное отключение интернета
- Вопросы и ответы: 1
Способ 1: Отключение от текущей сети (Только Wi-Fi)
Если у вас установлено беспроводное соединение на вашем компьютере или ноутбуке под управлением Windows 11, можно только отключиться от текущей сети Wi-Fi или выбрать другое соединение, если это будет нужно. Для выполнения данной операции понадобится обратиться к панели с быстрыми настройками, находящейся в правом нижнем углу экрана.
- Вызовите эту самую панель, нажав по значку текущего подключения на панели задач. Далее отыщите иконку с Wi-Fi и нажмите по стрелке вправо, чтобы открыть список всех подключений.
- Нажмите левой кнопкой мыши по названию текущей сети и щелкните по «Отключиться», чтобы разорвать с ней соединение.
- Вы можете снять галочку с пункта «Подключиться автоматически», если не хотите, чтобы после перезагрузки ноутбука или ПК соединение снова было установлено без вашего ведома.
Способ 2: Отключение сетевого адаптера
Отключиться от всех типов сетей, включая проводное по Ethernet, можно довольно радикальным путем — деактивацией выбранного сетевого адаптера через настройки Windows. Вам предстоит самостоятельно определить текущее подключение и нажать по специальной кнопке, которая и отключит сетевой адаптер до тех пор, пока он не будет вручную активирован этим же методом.
- Откройте меню «Пуск» и нажмите по значку с изображением шестеренки, чтобы перейти в «Параметры».
- Перейдите к разделу «Сеть и Интернет». На панели справа можете отключить адаптер Wi-Fi, перетащив переключатель в соответствующее положение. Вы не сможете выбрать ни одну из беспроводных сетей до тех пор, пока снова не включите Wi-Fi через этот же переключатель.
- Для управления всеми беспроводными адаптерами перейдите к категории «Дополнительные сетевые параметры».
- Вы увидите список всех существующих сетевых адаптеров, а также сможете отключить любой из них одним нажатием по кнопке.
- Если видите «Включить», значит, текущий адаптер уже отключен и не может использоваться для выхода в интернет.

Примерно те же самые действия можно выполнить через «Панель управления», если, помимо отключения, нужно получить больше информации о состоянии всех сетевых адаптеров и их текущем использовании. В этом случае задача решается следующим образом:
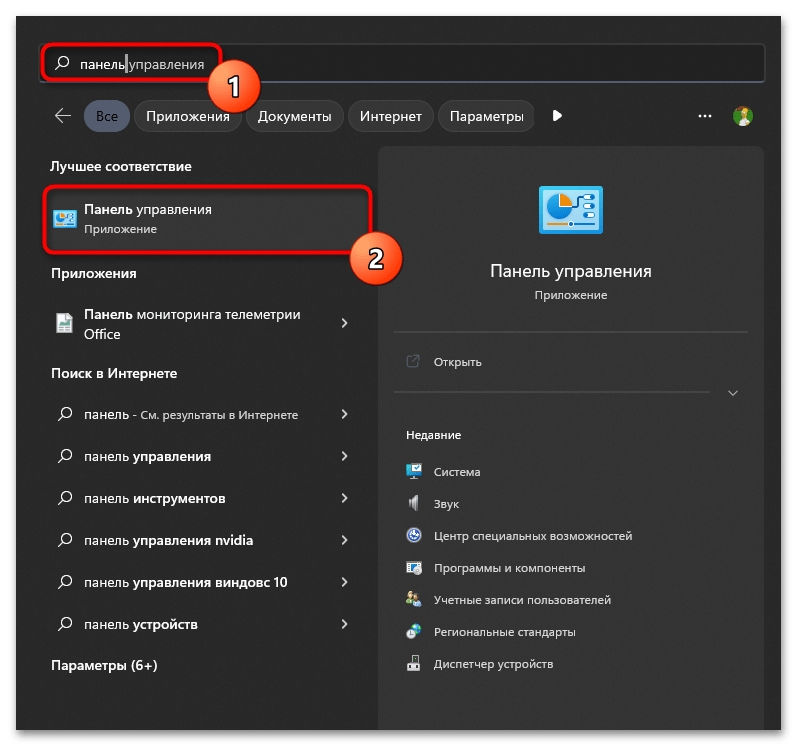
- Через поиск в меню «Пуск» отыщите приложение «Панель управления» и запустите его.
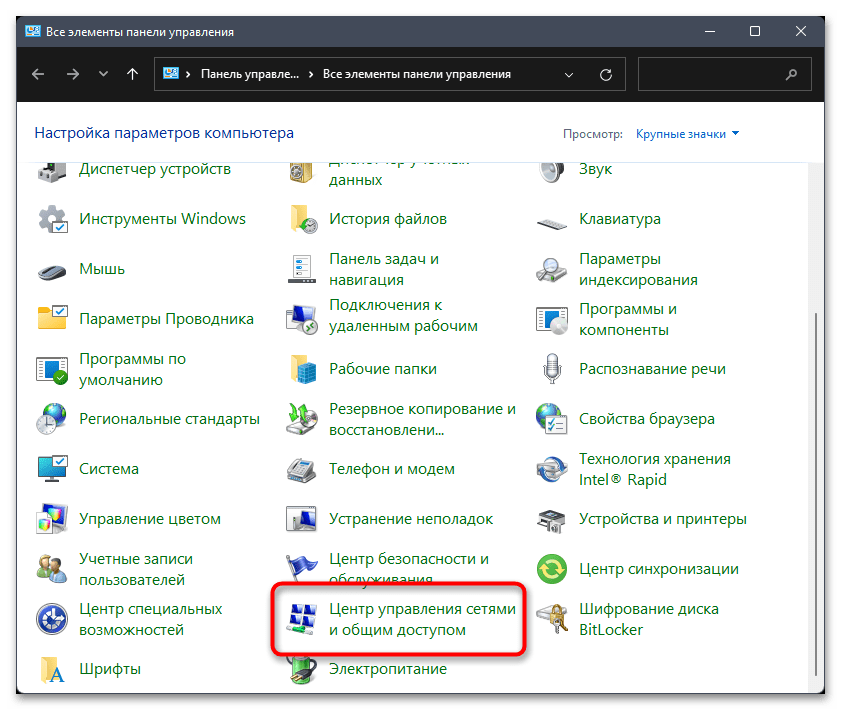
- В новом окне дважды щелкните левой кнопкой мыши по значку «Центр управления сетями и общим доступом».
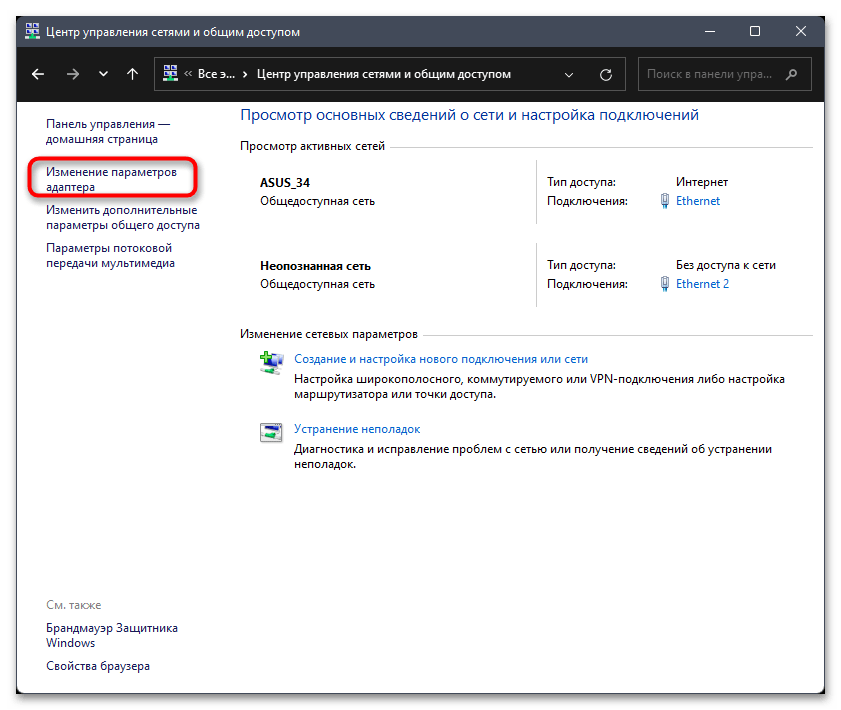
- На панели слева нажмите по ссылке «Изменение параметров адаптера».
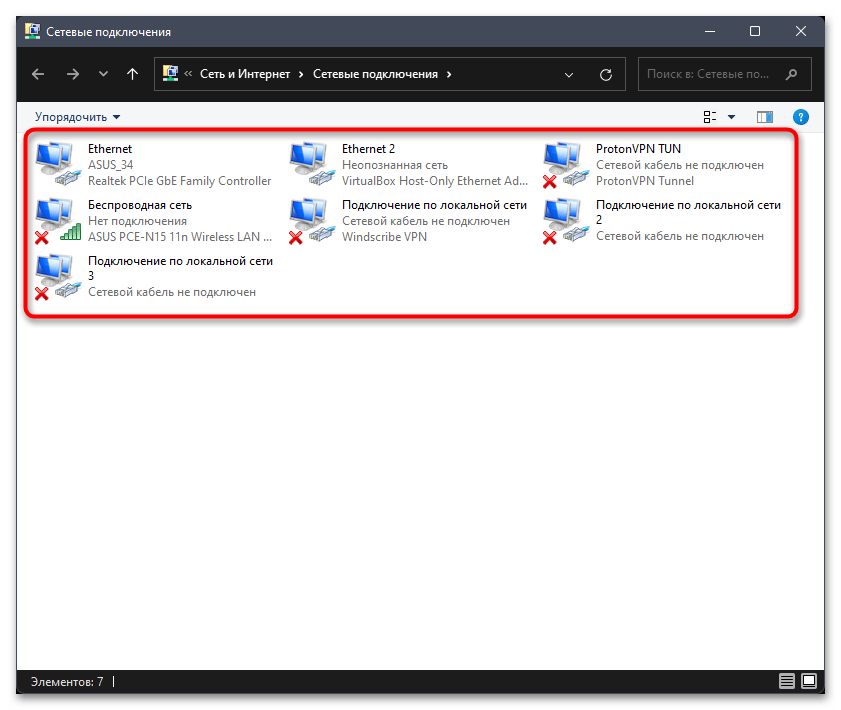
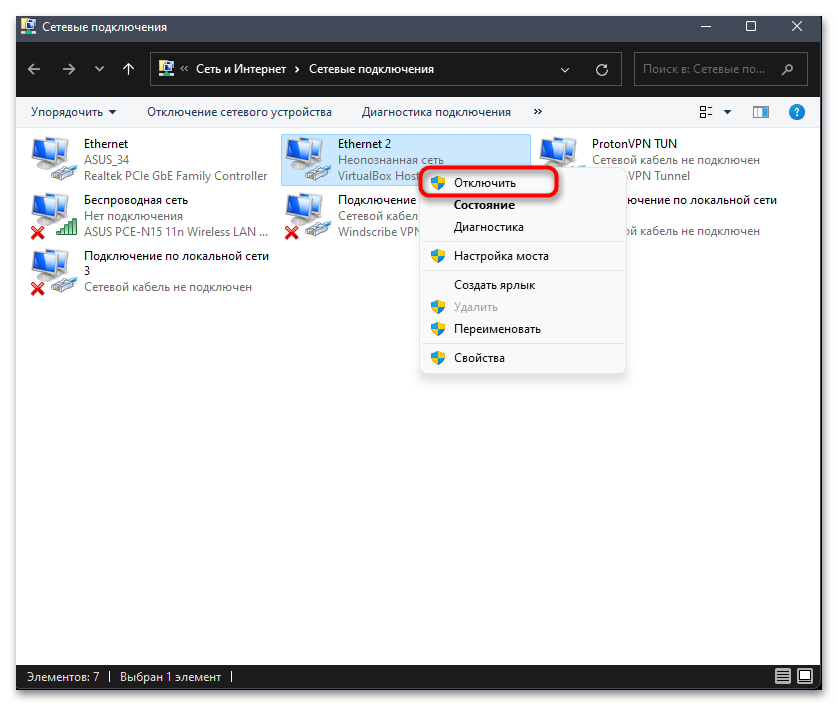
- Ознакомьтесь со списком присутствующих сетевых адаптеров и решите, какой из них стоит отключить для блокировки подключения к интернету.
- Щелкните правой кнопкой мыши по выбранному адаптеру и из контекстного меню выберите вариант «Отключить». На этом процесс настройки завершен, поэтому можете убедиться в отсутствии интернет-соединения и продолжать взаимодействие с компьютером.
Способ 3: Полное отключение сетевого оборудования
Существует вариант полного отключения конкретного сетевого адаптера или всех отображаемых на вашем компьютере. Происходит это через «Диспетчер устройств», а после отключения вы никак не сможете получить доступ к интернету или даже обнаружить доступные соединения, если предварительно снова не включите адаптер.
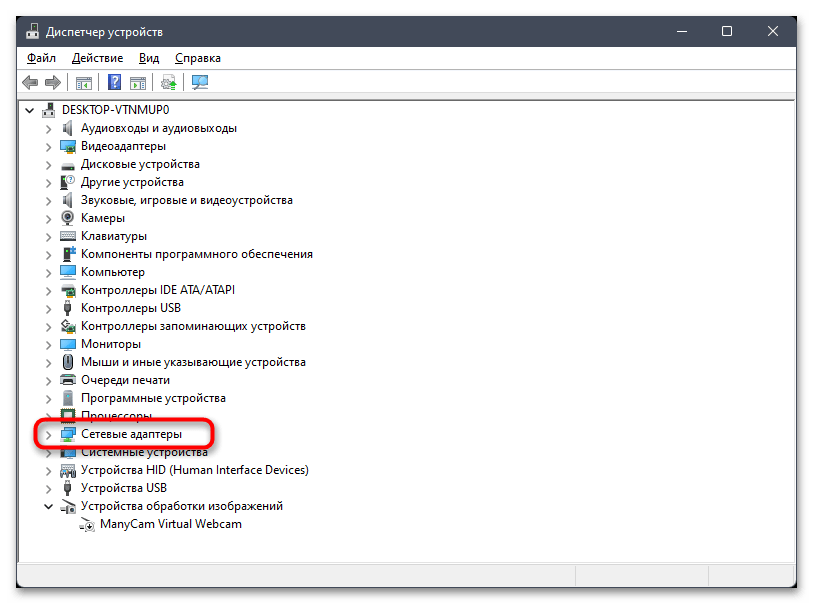
- Для управления оборудованием понадобится щелкнуть правой кнопкой мыши по меню «Пуск» и из появившегося контекстного меню выбрать пункт «Диспетчер устройств».
- В списке отыщите «Сетевые адаптеры» и разверните данную категорию.
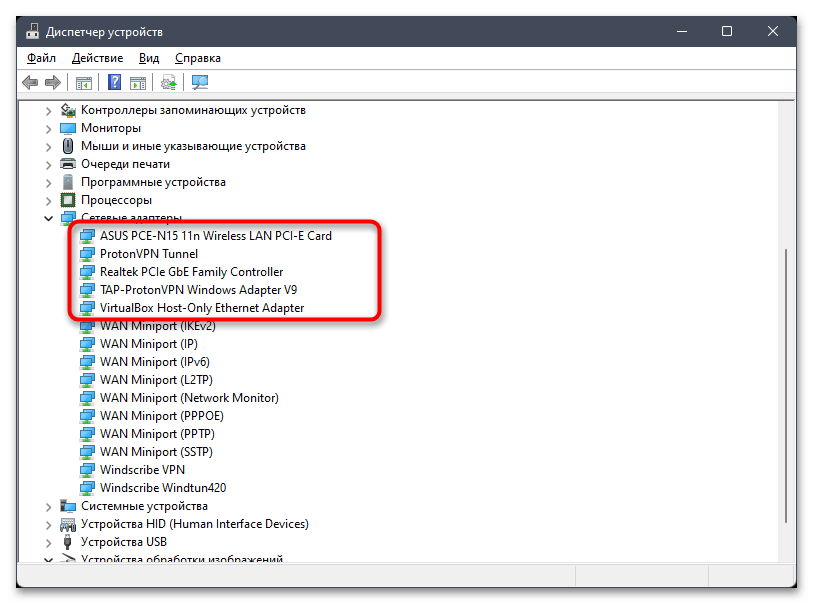
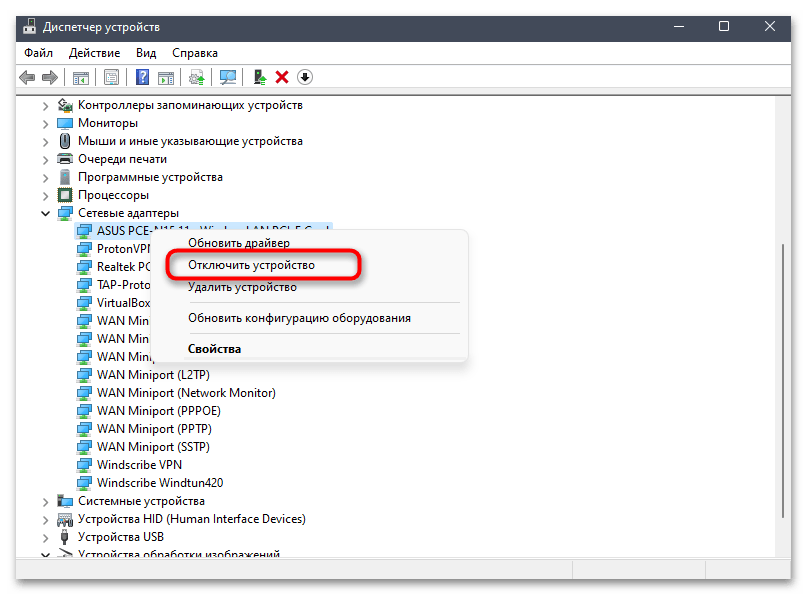
- Отыщите среди всего оборудования тот сетевой адаптер, который хотите отключить, затем щелкните по нему ПКМ.
- Выберите пункт «Отключить устройство», затем дождитесь обновления списка и переходите к проверке выполненных действий.
Способ 4: Применение сторонних программ
Есть ряд специализированных программ, которые позволяют частично или полностью ограничить доступ в интернет. Список функций зависит от конкретной программы. Некоторые отвечают за настройку родительского контроля, а другие управляют системными параметрами. В статье по следующей ссылке вы найдете список из таких решений, сможете сравнить функции каждой и выбрать ту, которая идеально подойдет конкретно под ваши требования.
Подробнее: Программы для ограничения доступа в интернет

Способ 5: Отключение интернета для конкретной программы
Если вы столкнулись с задачей, когда ограничить доступ к интернету нужно только для конкретной программы, чтобы она не имела связь с текущим подключением, понадобится самостоятельно создать правило в Брандмауэре Защитника Windows. Осуществляется настройка довольно легко и не требует от пользователя каких-то специфических навыков или установки дополнительных программ на ПК.
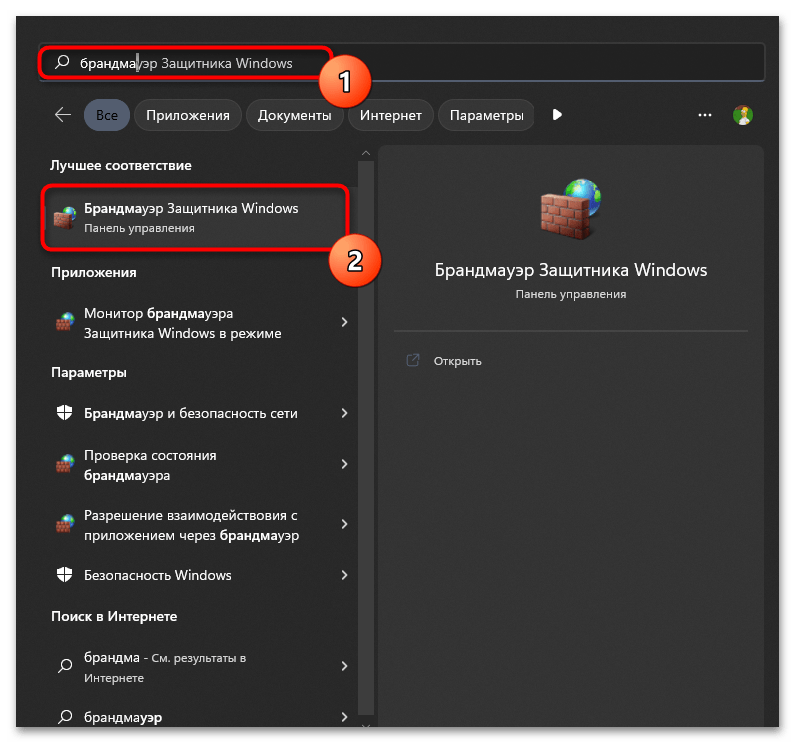
- Откройте меню «Пуск» и через поиск отыщите элемент «Панели управления» с названием «Брандмауэр Защитника Windows», после чего левой кнопкой мыши нажмите по появившемуся соответствию.
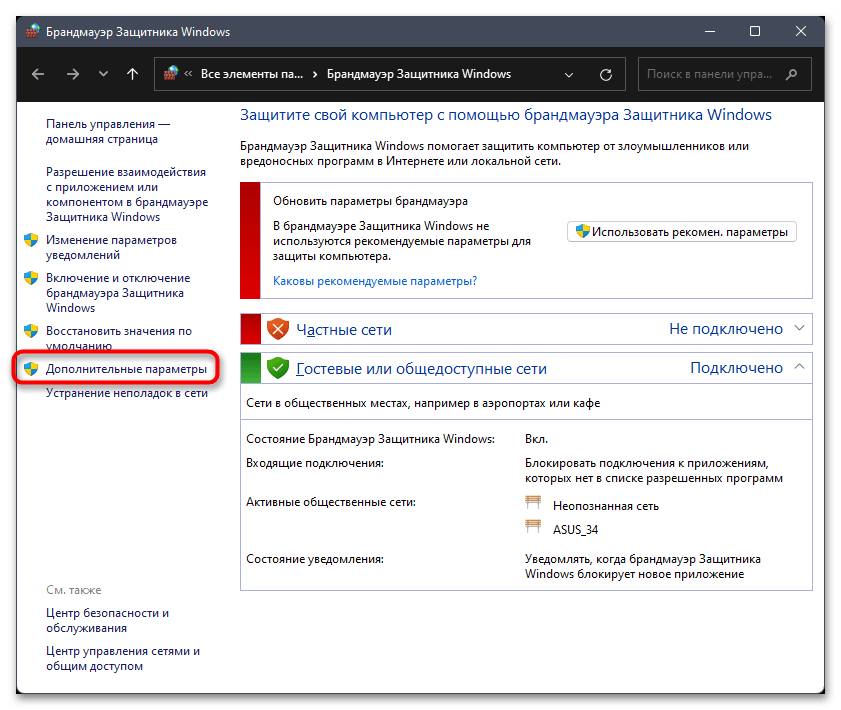
- В новом окне в блоке слева кликните по ссылке «Дополнительные параметры».
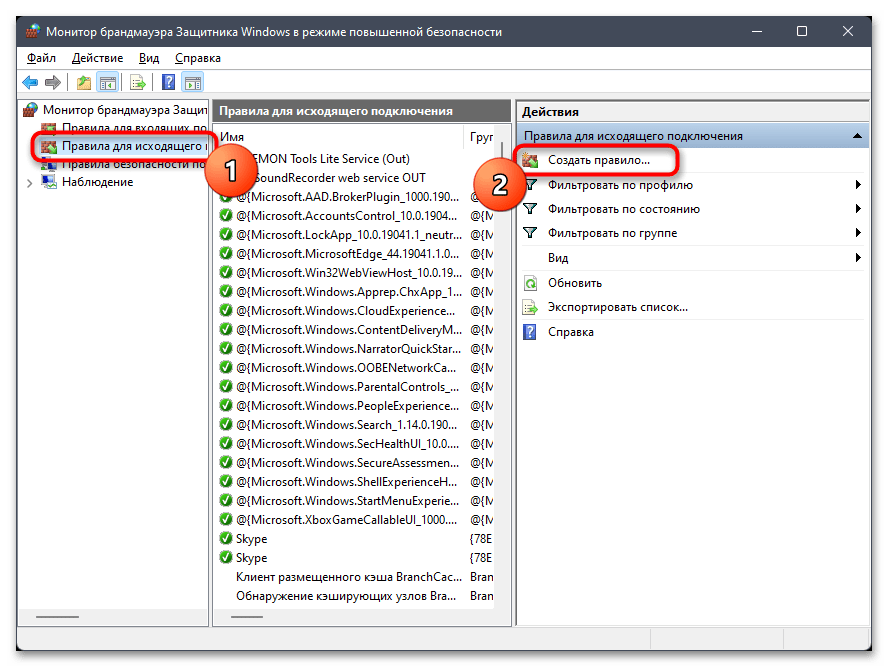
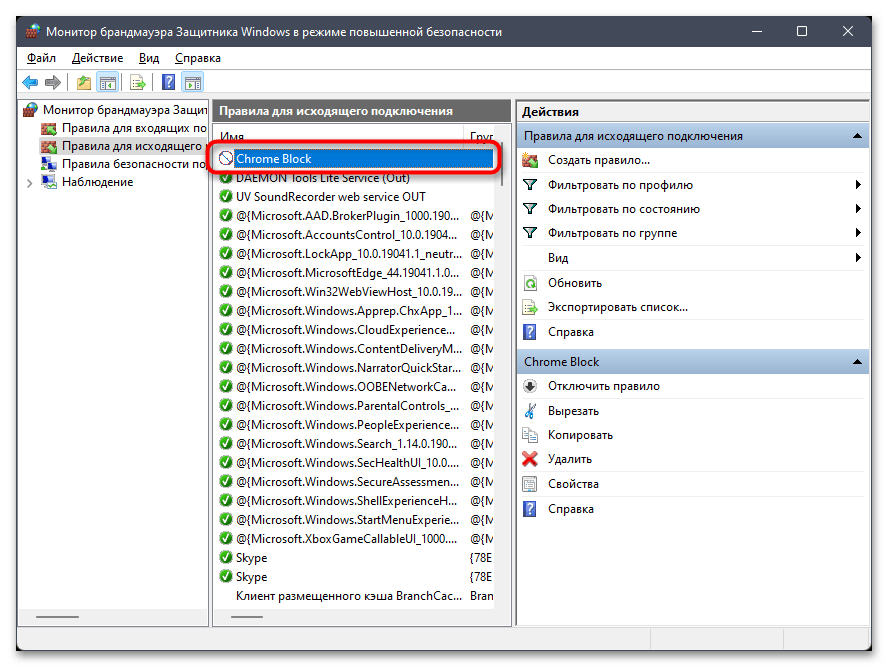
- Перейдите к разделу «Правила для исходящего подключения» и выберите действие «Создать правило».
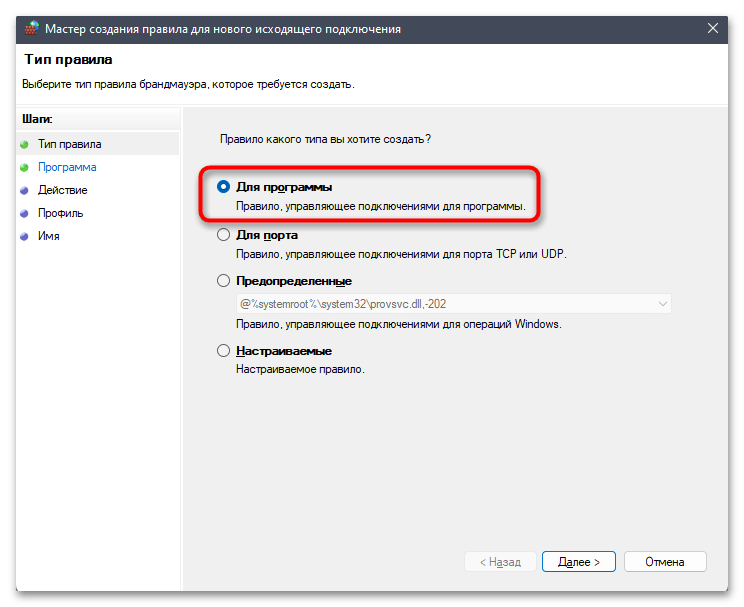
- Ограничивать доступ будем для конкретной программы, поэтому поставьте маркер возле соответствующего пункта и переходите к следующему шагу.
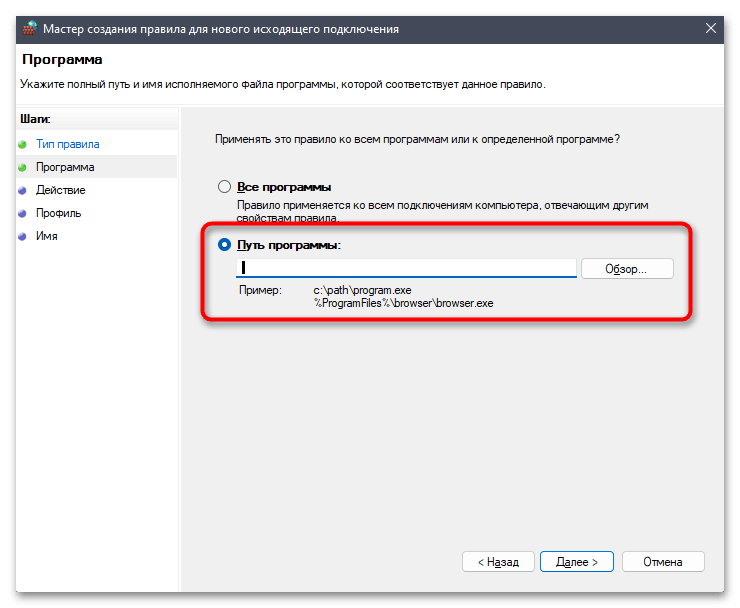
- Выберите вариант «Путь программы» и нажмите «Обзор», чтобы перейти к выбору софта.
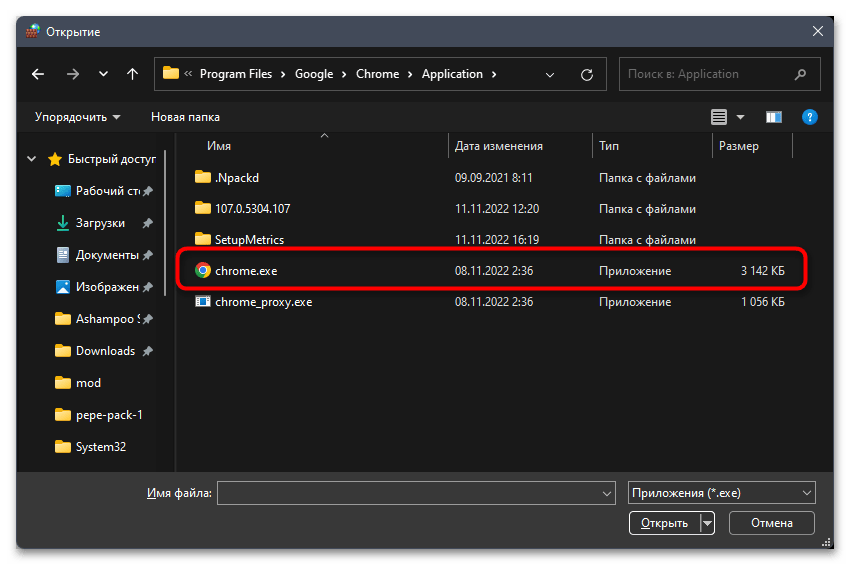
- Вы можете отключить интернет как для любого из браузеров, так и для приложений, требующих доступ к сети. Понадобится найти исполняемый файл цели и выбрать его.
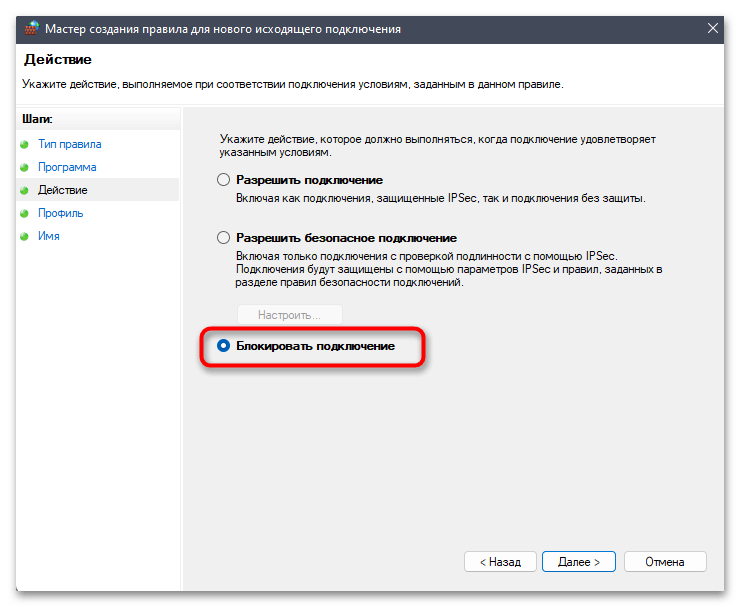
- Следующий этап — установка типа правила. Мы будем ограничивать доступ к сети, поэтому отметьте маркером «Блокировать подключение» и переходите далее.
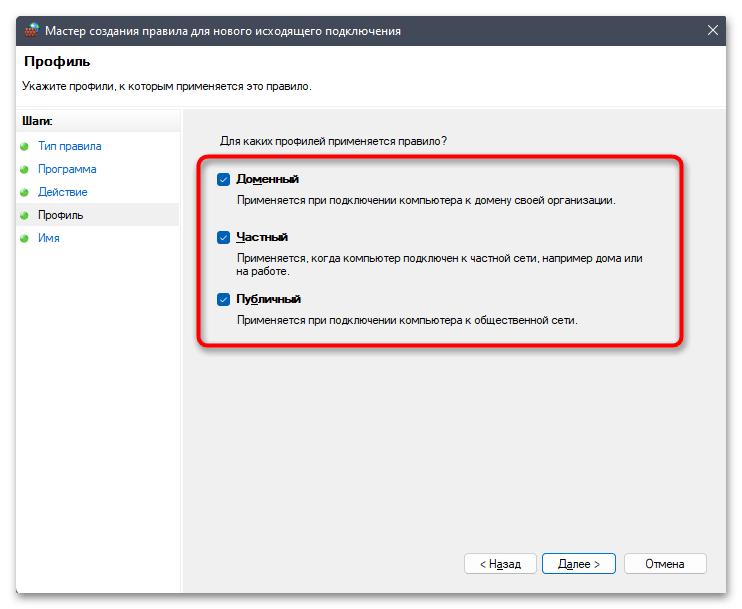
- Если вы не знаете, какой тип сети используете, или время от времени подключаетесь к разным, оставьте галочки возле всех пунктов.
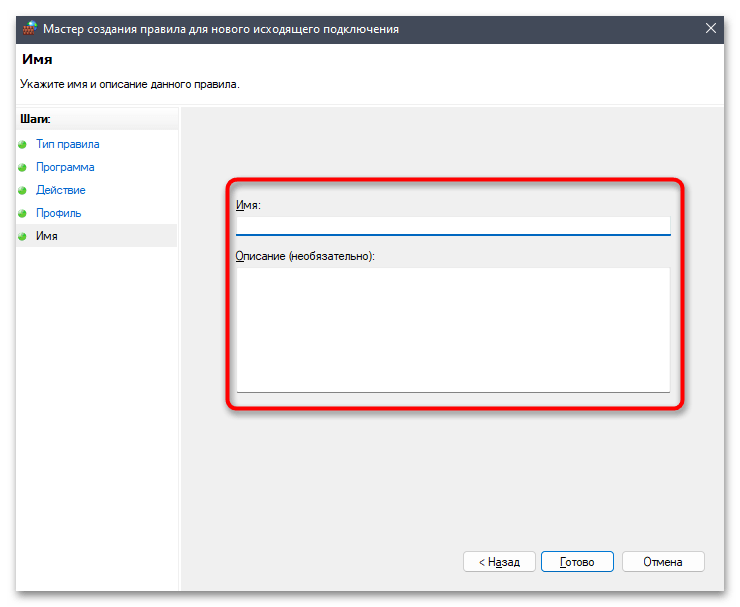
- Остается только указать имя для правила и задать описание. В качестве имени выберите название софта, для которого ограничиваете интернет, чтобы потом не запутаться в существующих правилах.
- В списке правил теперь появилось новое, которое сразу же вступает в силу. Попробуйте открыть браузер или другой софт, чтобы убедиться в отсутствии интернета. Создайте другие правила для остальных веб-обозревателей и приложений точно таким же методом, выбирая разные исполняемые файлы.
Способ 6: Временное отключение интернета
Завершающий метод нашего материала является вариативным, а выбор подхода для его реализации зависит исключительно от требований и возможностей пользователя. Временное отключение сети в Windows 11 доступно как путем настройки задачи в самой операционной системе, так и через родительский контроль в маршрутизаторе или создание VBS-скрипта.
Подробнее: Отключение интернета на компьютере на время
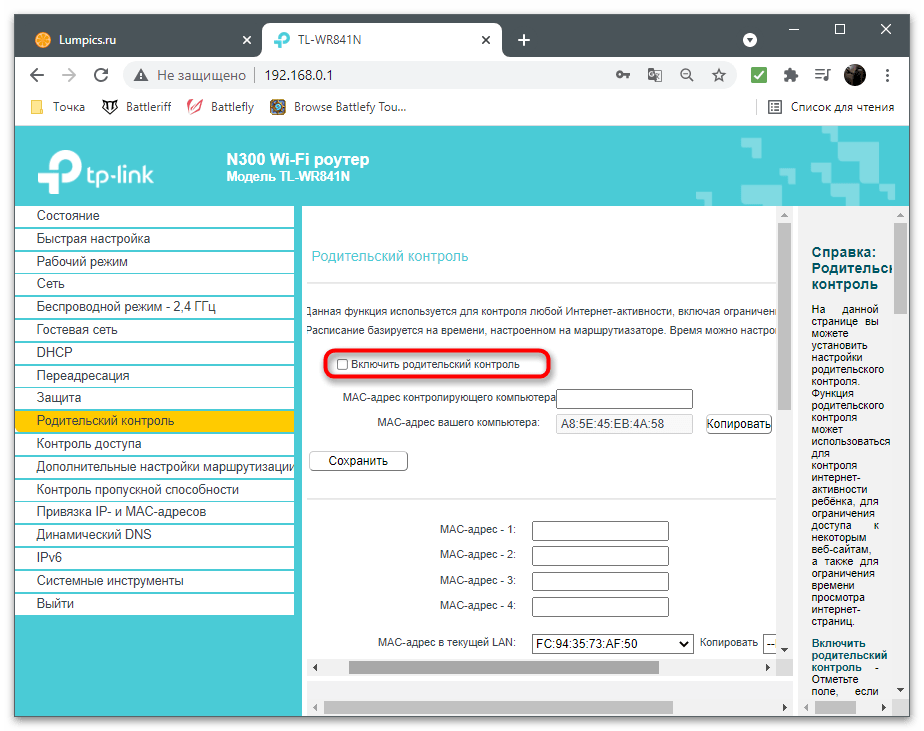
Каждый из трех вариантов направлен на разные категории пользователей и отличается по сложности выполнения. Впрочем, по ссылке выше вы найдете все инструкции и сможете подобрать оптимальный способ для себя, отталкиваясь от того, насколько и зачем хотите временно ограничить доступ к интернету на вашем компьютере.
Наша группа в TelegramПолезные советы и помощь
Windows 11 has introduced a modern interface and several enhanced features compared to its predecessors. While most users primarily rely on Wi-Fi for internet connectivity nowadays, there are situations where you might need to disable the Ethernet connection on your Windows 11 device. Whether you want to troubleshoot network issues, conserve bandwidth, or simply prefer using Wi-Fi, the process is straightforward. This guide will provide an in-depth look at how to disable Ethernet in Windows 11 and explain the reasons and methods behind doing so.
Reasons to Disable Ethernet Connection
There are a variety of reasons why you might want to disable your Ethernet connection. Here are a few scenarios:
-
Troubleshooting Network Issues: Disabling Ethernet can help diagnose connectivity issues. If you’re experiencing problems while connected via Ethernet, disabling it might allow you to switch to a different connection type (like Wi-Fi) to determine where the issue lies.
-
Resource Management: Sometimes, managing which connection is active can help optimize your device’s performance and reduce resource consumption. Disabling an unused Ethernet connection can free up system resources.
-
Security Concerns: If you’re using a public network, you may be concerned about unauthorized access to your machine. Disabling Ethernet can help reduce vulnerabilities.
-
Preference for Wi-Fi: Many users prefer wireless connections for their convenience. Disabling Ethernet allows you to ensure your device prioritizes Wi-Fi over the wired connection.
How to Disable Ethernet in Windows 11
Windows 11 provides several methods to manage your network adapters easily. Below, you will find detailed steps for each method to disable your Ethernet connection.
Method 1: Using Settings
The Settings app in Windows 11 provides a user-friendly interface for managing a wide range of system features, including network connections.
-
Open the Settings App: You can do this by clicking on the Start button and selecting the «Settings» icon (gear icon). Alternatively, you can press
Windows + Ion your keyboard. -
Navigate to Network & Internet: In the Settings window, click on «Network & Internet» from the left sidebar. This section allows you to manage your various network settings.
-
Select Ethernet: Under the «Network & Internet» section, you’ll see options such as Ethernet, Wi-Fi, and VPN. Click on “Ethernet.” This will open a new page with details about your Ethernet connection.
-
Disable Ethernet: You will see details related to your Ethernet network. Look for the option that has a toggle button or a button that says «Disconnect.» If it’s a toggle button, simply switch it off, and your Ethernet connection will be disabled.
-
Confirmation: After disabling it, the connection status may change to indicate that you are offline or disconnected. You may close the Settings window once you have confirmed the change.
Method 2: Using Control Panel
While the Control Panel is gradually being phased out, it still remains a powerful tool for advanced users to manage various system settings. Here’s how to disable Ethernet through the Control Panel.
-
Open Control Panel: Press
Windows + Rto open the Run dialog. Typecontroland hit Enter. This will open the Control Panel. -
Navigate to Network and Sharing Center: In the Control Panel, change the view to “Large icons” or “Small icons” if it’s not already set that way. Look for and click on «Network and Sharing Center.»
-
Change Adapter Settings: In the left sidebar, you will see an option that says «Change adapter settings.» Click on this to view all your network connections.
-
Find Ethernet Connection: You will now see a list of available network connections. You should see an option for Ethernet, which could be labeled as an Ethernet or Local Area Connection, depending on your system.
-
Disable Ethernet: Right-click on the Ethernet connection and select «Disable.» A confirmation pop-up may appear. Click “Yes” to confirm your action.
-
Check Connection Status: Once disabled, the network connection will be grayed out, indicating that it is inactive.
Method 3: Using Command Prompt
For those who appreciate working from the command line, disabling Ethernet via Command Prompt is a powerful yet simple option.
-
Open Command Prompt: Press
Windows + Sto open the search function. Type “cmd,” and when the Command Prompt shows up in the search results, right-click on it and select “Run as administrator.” -
List Network Adapters: In the Command Prompt window, type the following command and hit Enter:
netsh interface show interfaceThis command will list all network interfaces, including Ethernet.
-
Identify the Ethernet Name: From the list, identify the exact name of your Ethernet connection. It varies based on your system but usually follows a conventional name like «Ethernet.»
-
Disable the Ethernet Interface: Now, type the following command, replacing
Ethernetwith the exact name of your connection:netsh interface set interface name="Ethernet" admin=disabledPress Enter. If successful, you will see a message indicating the command was completed.
-
Verify: To check the status, you can execute the first command again to ensure that your Ethernet interface now shows as “Disabled.”
Method 4: Using Device Manager
If you prefer managing device drivers, the Device Manager can be a great alternative for disabling Ethernet.
-
Open Device Manager: Right-click on the Start menu or press
Windows + Xto open the Quick Access Menu. Click on “Device Manager.” -
Expand Network Adapters: In Device Manager, find and expand the “Network adapters” section. This will provide you with a list of all network-related devices on your system.
-
Locate Ethernet Adapt: Identify the Ethernet adapter; it might be labeled as «Ethernet,» «Local Area Connection,» or the name of the actual hardware vendor (e.g., Intel, Realtek).
-
Disable the Device: Right-click on the Ethernet adapter and select “Disable device.” Confirm the action when prompted.
-
Confirmation: Once disabled, the Ethernet adapter will be marked with a small down arrow, indicating that it is inactive.
Method 5: Using PowerShell
For those who prefer scripts and commands, PowerShell can be a powerful alternative to Control Panel and Command Prompt.
-
Open PowerShell: Right-click on the Start button and select “Windows Terminal (Admin)” or type “PowerShell” in the search bar, and select it with administrative privileges.
-
List Network Adapters: Type the following command to list all network adapters:
Get-NetAdapterThis command will provide a list of all available network adapters along with their statuses.
-
Disable Ethernet: Locate your Ethernet adapter name, and then type the following command, replacing
Ethernetwith the name of your adapter:Disable-NetAdapter -Name "Ethernet" -Confirm:$falsePress Enter. The adapter will be disabled, and you won’t be prompted for confirmation.
Verifying the Disable Status
Once you’ve followed the steps to disable your Ethernet connection through any of the methods mentioned, it’s important to confirm that the connection is indeed inactive. You can do this in several ways.
-
Network & Internet Settings: Go back to the Settings app, navigate to «Network & Internet,» and select «Ethernet.» You should see a disconnected status.
-
Network Icon: Check the network icon in the taskbar. If you hover over it, it should indicate that you are not connected to the network.
-
Device Manager: Open Device Manager and look at the Ethernet adapter under Network adapters. It should display a down arrow indicating it’s disabled.
Re-enabling the Ethernet Connection
If the need arises to re-enable your Ethernet connection, you can follow similar steps to the described methods:
-
Using Settings: Navigate back to the Ethernet settings in Windows 11 and toggle it back on, or use Control Panel.
-
Using Device Manager: In Device Manager, right-click the Ethernet adapter and choose “Enable device.”
-
Using Command Prompt: Utilize the command below in Command Prompt to enable it again:
netsh interface set interface name="Ethernet" admin=enabled -
Using PowerShell: Run the command:
Enable-NetAdapter -Name "Ethernet" -Confirm:$false
Conclusion
Disabling Ethernet in Windows 11 is a simple task that can be accomplished through multiple methods, depending on your preferences and technical expertise. Whether you are troubleshooting network issues, conserving resources, or simply managing your available connections, knowing how to disable and re-enable Ethernet is valuable for any Windows 11 user. With this guide, you have been equipped with all the necessary steps to manage your network connections effectively. Always remember that any changes made to your network settings can affect your internet connectivity; thus, ensure that you only disable interfaces when required and re-enable them when necessary. Enjoy your Windows 11 experience with more control over your network connections!