
При включении компьютера или ноутбука с Windows 11 первое, что вас встречает после загрузки — экран блокировки, в зависимости от настроек — с выбранным вами фоном или фотографиями от Майкрософт, а уже после нажатия какой-либо клавиши или кнопки мыши — экран выбора пользователя и ввода пароля. При желании экран блокировки можно убрать.
В этой пошаговой инструкции подробно о способах отключить экран блокировки в Windows 11. Учитывайте, что это не уберет ввод пароля или ПИН-кода, если вам требуется именно это, используйте отдельную инструкцию: Как убрать пароль и ПИН-код при входе в Windows 11.
Отключение экрана блокировки в редакторе реестра

Первый способ убрать экран блокировки Windows 11 — использовать редактор реестра. Для этого выполните следующие шаги:
- Нажмите правой кнопкой мыши по кнопке «Пуск», выберите пункт «Выполнить», введите regedit в диалоговое окно «Выполнить» и нажмите клавишу Enter.
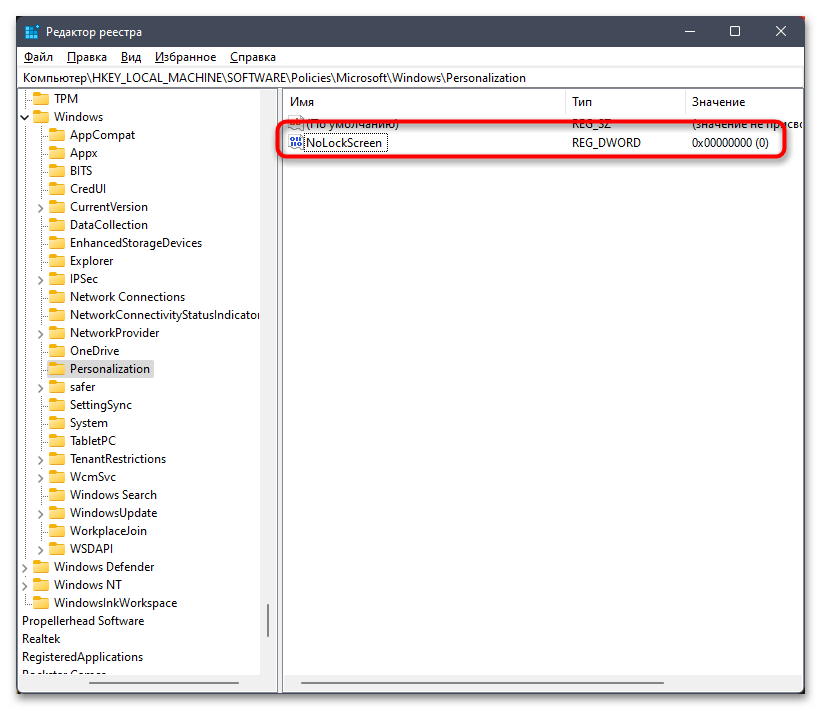
- В открывшемся редакторе реестра перейдите к разделу
HKEY_LOCAL_MACHINE\SOFTWARE\Policies\Microsoft\Windows
- Если в этом разделе есть подраздел Personalization, выберите его, иначе нажмите правой кнопкой мыши по выбранному разделу «Windows», выберите «Создать» — «Раздел» и создайте новый раздел с именем Personalization, а затем перейдите к нему.
- При выбранном разделе Personalization нажмите правой кнопкой мыши в правой панели редактора реестра и создайте новый параметр DWORD (32-бит, несмотря на x64 систему) и укажите имя NoLockScreen для него.
- Дважды нажмите по вновь созданному параметру и измените его значение на 1.

- Примените сделанные настройки и перезапустите проводник (это можно сделать в диспетчере задач) или перезагрузите компьютер.

Вместо ручного редактирования реестра, вы можете создать reg-файл со следующим кодом и «запустить» его, подтвердив импорт данных в реестр:
Windows Registry Editor Version 5.00

[HKEY_LOCAL_MACHINE\SOFTWARE\Policies\Microsoft\Windows\Personalization]
"NoLockScreen"=dword:00000001
В результате экран блокировки будет отключен и, при следующем включении или после перезагрузки вы будете сразу попадать на экран выбора пользователя и ввода пароля или ПИН-кода.
В редакторе локальной групповой политики
Этот способ отключения экрана блокировки подойдет только для Профессиональной и Корпоративной редакций Windows 11, шаги будут следующими:
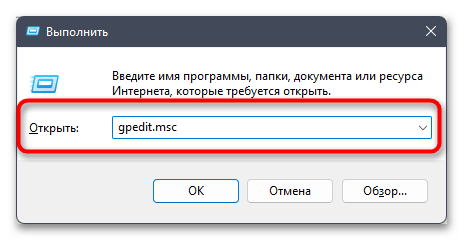
- Нажмите клавиши Win+R на клавиатуре, введите gpedit.msc и нажмите Enter.
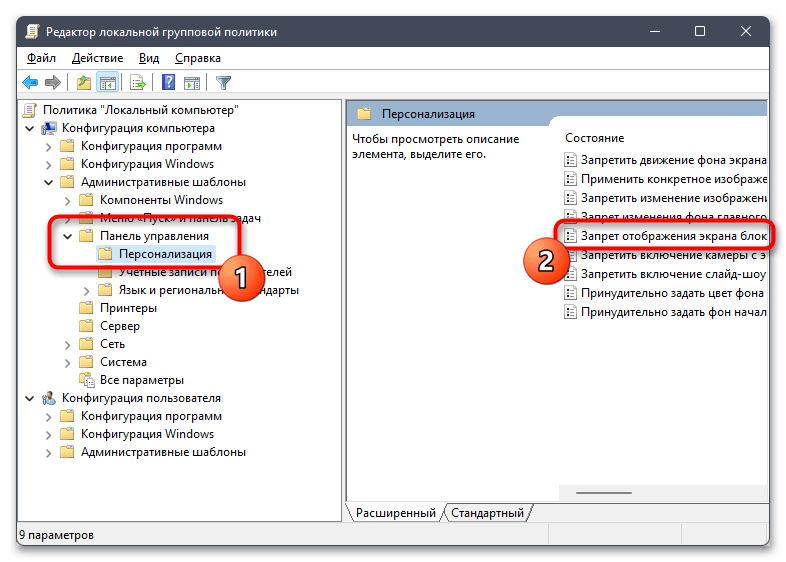
- В редакторе локальной групповой политики перейдите к разделу «Конфигурация компьютера» — «Административные шаблоны» — «Панель управления» — «Персонализация».
- Дважды нажмите по параметру «Запрет отображения экрана блокировки».

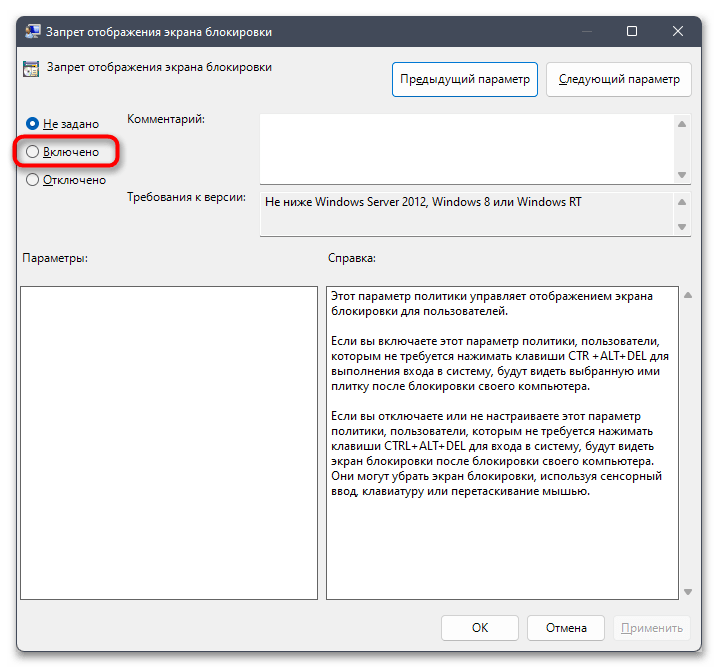
- Установите «Включено» для параметра (именно это значение отключит экран блокировки) и примените сделанные настройки.


Результат тот же, что и в предыдущем случае — экран блокировки не будет отображаться при включении или перезагрузке компьютера.
Сторонние программы для настройки Windows
Многие сторонние утилиты для настройки Windows также позволяют выключить экран блокировки. Среди них:
В завершение статьи одно примечание: если в вашей системе включена функция «Безопасный вход в систему», требующая нажимать Ctrl+Alt+Delete при входе в систему, экран блокировки не может быть отключен. Саму опцию можно настроить в Win+R — netplwiz на вкладке «Дополнительно».
Все способы:
- Способ 1: Редактирование реестра
- Способ 2: Изменение локальной групповой политики
- Способ 3: Переименование каталога
- Способ 4: Использование Winaero Tweaker
- Вопросы и ответы: 1
Способ 1: Редактирование реестра
Экран блокировки появляется при включении Windows 11 до самого экрана входа, где пользователь обычно вводит пароль или PIN-код. На этом экране отображается заставка, время и информация от выбранных приложений. Однако нужен он далеко не всегда и только может мешать быстрой авторизации. Чтобы его убрать, используются разные методы деактивации экрана блокировки, и самый простой из которых заключается в редактировании реестра.
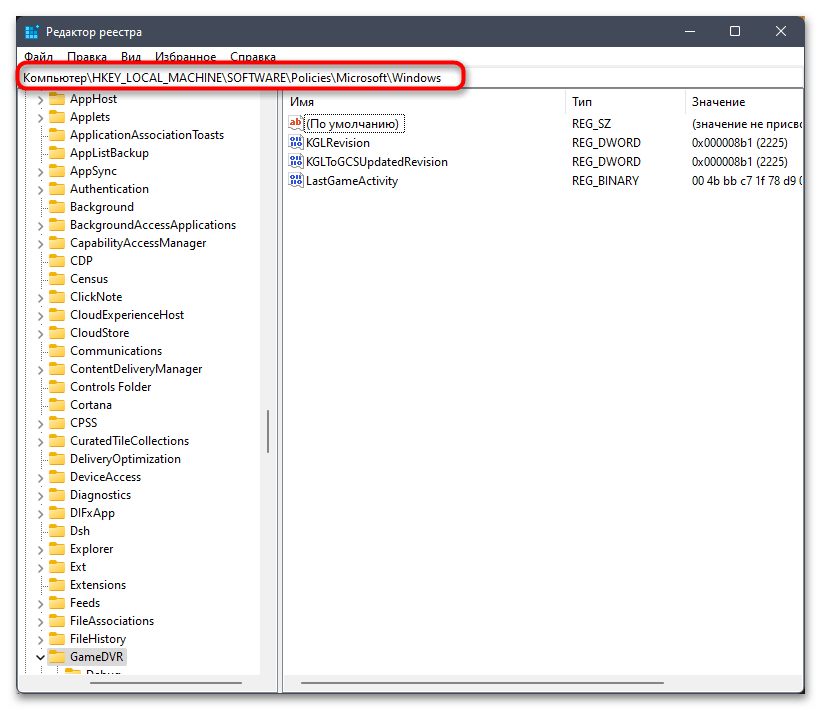
- Откройте меню «Пуск», отыщите классическое приложение «Редактор реестра» через поиск, затем запустите его.
- В самом реестре перейдите по пути
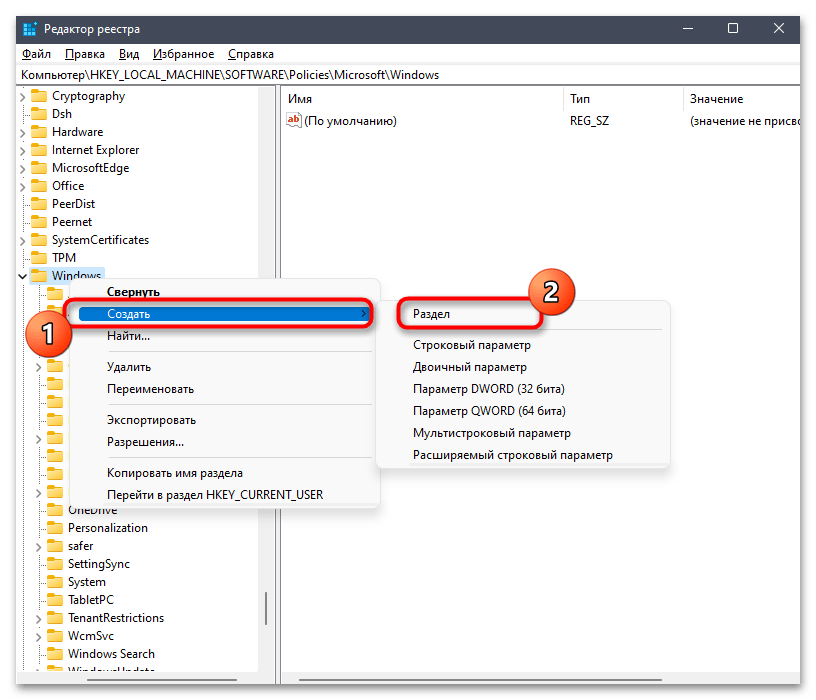
Компьютер\HKEY_LOCAL_MACHINE\SOFTWARE\Policies\Microsoft\Windows. Можете просто даже вставить данный путь в адресную строку сверху. - Если в папке «Windows» отсутствует каталог с названием «Personalization», его понадобится предварительно создать. Для этого кликните ПКМ по «Windows», наведите курсор на «Создать» и выберите пункт «Раздел».
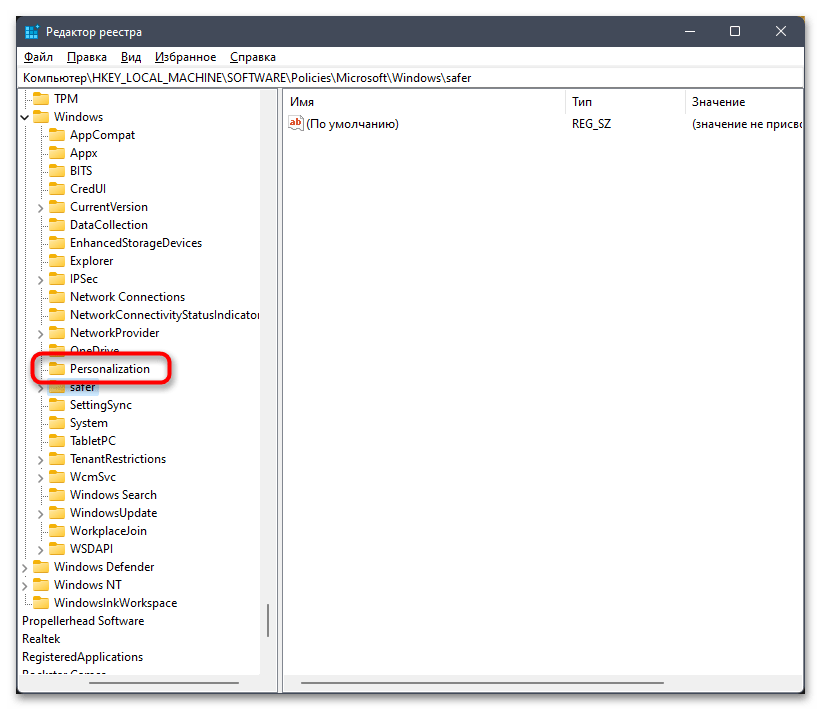
- Задайте для этого раздела название «Personalization» и выделите его левой кнопкой мыши, чтобы перейти.
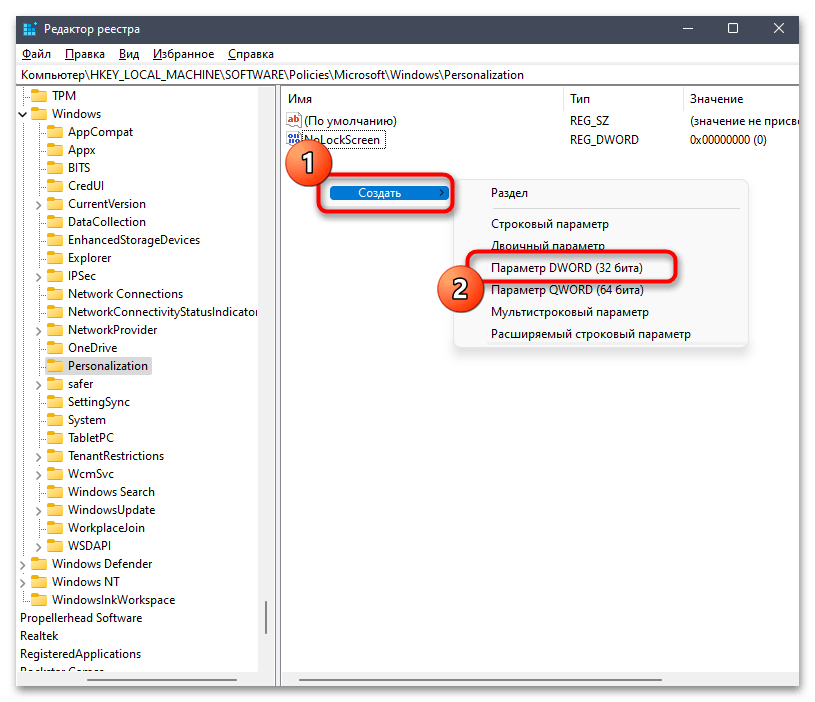
- В этом разделе пока нет нужного параметра, который бы отключил экран блокировки, поэтому понадобится создать его. Щелкните по пустому месту ПКМ, наведите курсор на «Создать» и выберите пункт «Параметр DWORD (32 бита)».
- Установите для него название «NoLockScreen».
- Дважды щелкните по данному параметру, чтобы открыть его «Свойства». По умолчанию значение будет установлено как «0», но его нужно поменять на «1», чтобы отключить экран блокировки. Сохраните изменения и перезагрузите компьютер, чтобы они вступили в силу.

Способ 2: Изменение локальной групповой политики
Следующая инструкция позволяет добиться такого же результата, но немного другим путем. Для этого нужно обратиться к «Редактору локальной групповой политики», однако доступен он только в Windows 11 Pro и Enterprise. Если у вас установлена другая редакция, обратитесь к одному из других методов этого материала.
- Если «Редактор локальной групповой политики» у вас доступен, приступайте к его запуску. Для этого откройте утилиту «Выполнить», используя стандартное сочетание клавиш Win + R. Введите команду
gpedit.mscи нажмите Enter для ее подтверждения. - В новом окне выберите раздел «Конфигурация компьютера» и перейдите в «Административные шаблоны».
- Откройте папку «Панель управления», в ней выберите «Персонализация», справа найдите список политик и дважды щелкните по «Запрет отображения экрана блокировки».
- Для этой политики установите значение «Включено», затем примените изменения. Отправьте компьютер на перезагрузку и проверьте, не будет ли отображаться экран блокировки при следующем включении.

Способ 3: Переименование каталога
В Windows 11 есть директория, в которой хранятся связанные с экраном блокировки файлы. К ним операционная система и обращается при запуске, позволяя отображаться заставке и дополнительным данным. Если эту папку переименовать, ОС не сможет найти путь к файлам и показать экран блокировки, поэтому он будет пропущен.
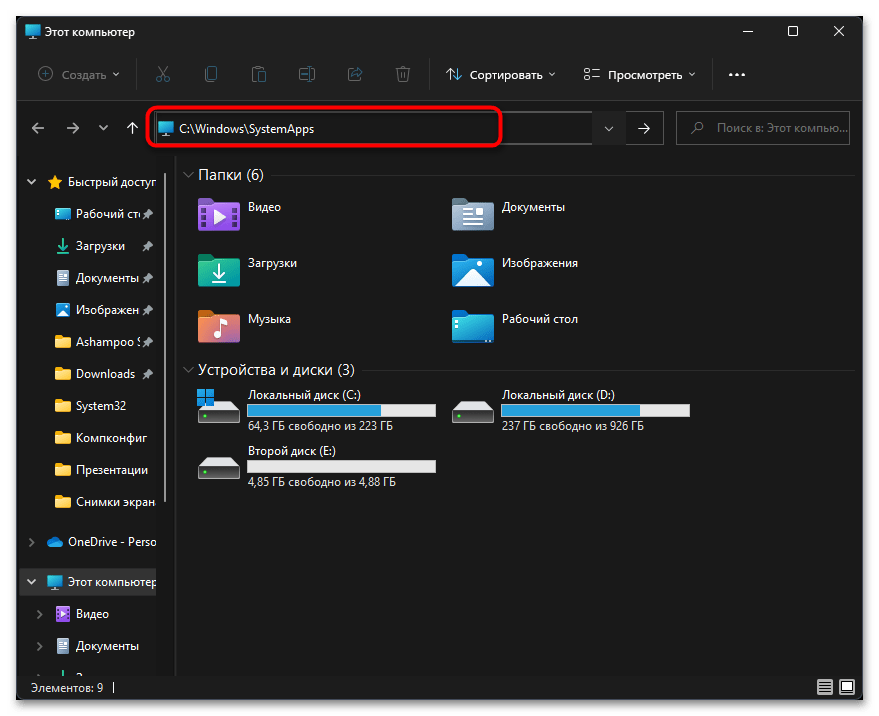
- Для выполнения задачи понадобится открыть «Проводник» и перейти в нем по пути
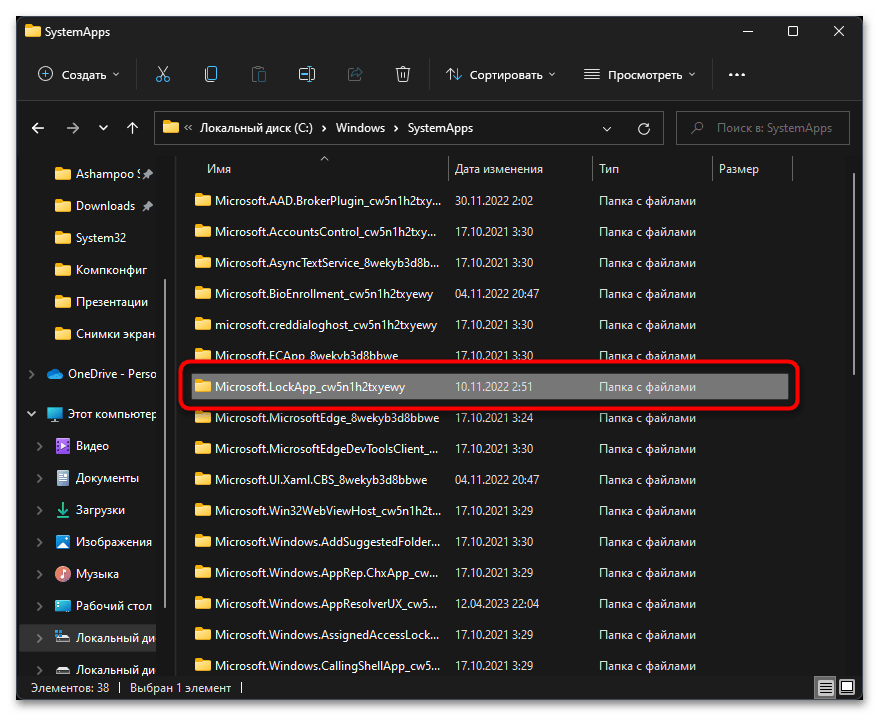
C:\Windows\SystemApps. - В нем найдите каталог с названием «Microsoft.LockApp_cw5n1h2txyewy» и щелкните по нему правой кнопкой мыши.
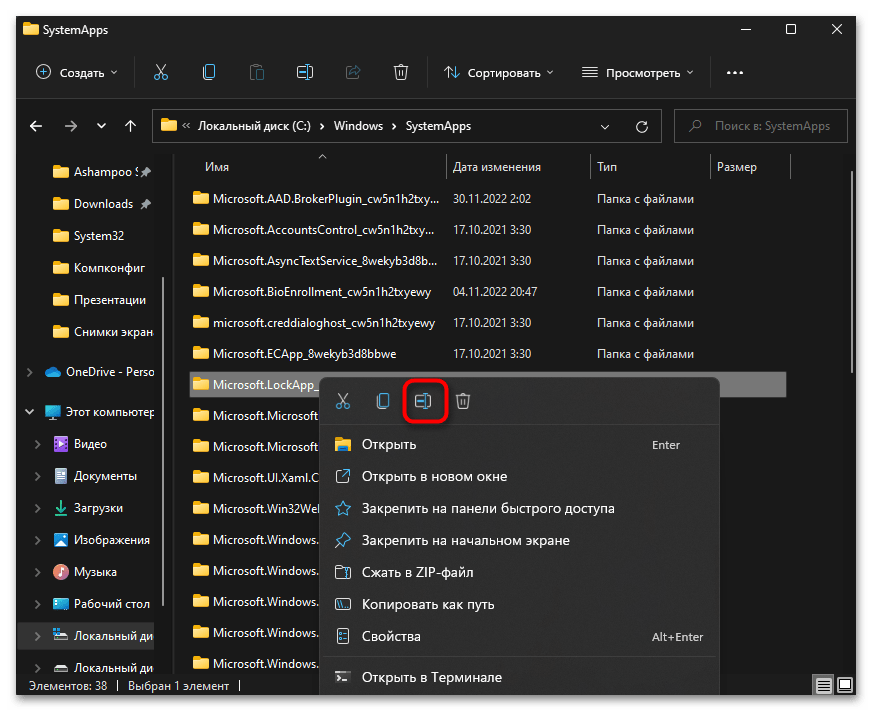
- Из контекстного меню выберите пункт, отвечающий за переименование папки.
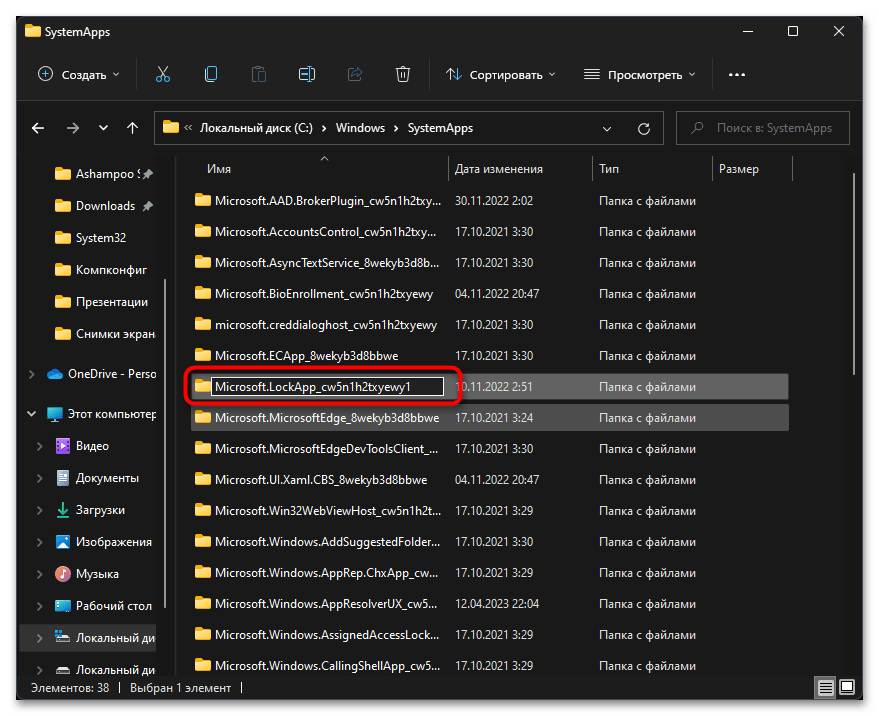
- Добавьте в конце любую букву или цифру, чего уже будет достаточно для переименования. На этом выполнение рассматриваемого способа завершено.
Способ 4: Использование Winaero Tweaker
Программное обеспечение Winaero Tweaker призвано упростить пользователю процесс детальной настройки операционной системы и даже позволяет изменять те параметры, которые по умолчанию недоступны. В рамках этого метода мы не будем разбирать всю функциональность данного софта, а только обратимся к одному из его инструментов, который и позволит отключить экран блокировки.
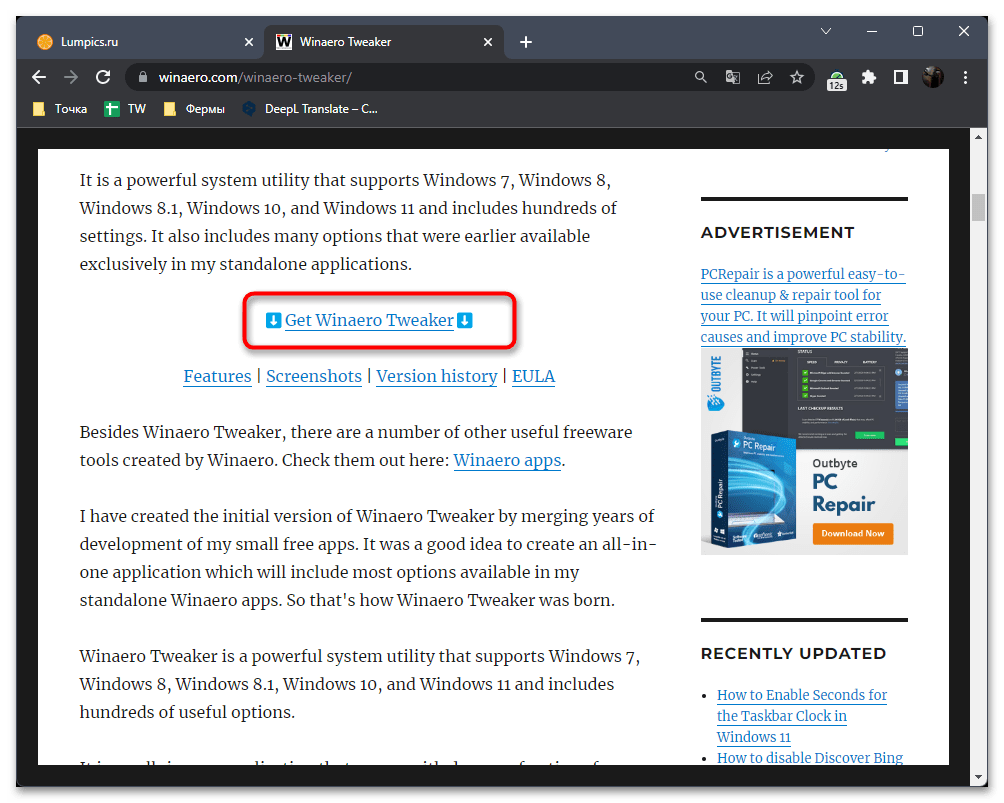
Скачать Winaero Tweaker с официального сайта
- Перейдите по ссылке выше и загрузите бесплатную версию Winaero Tweaker с официального сайта.
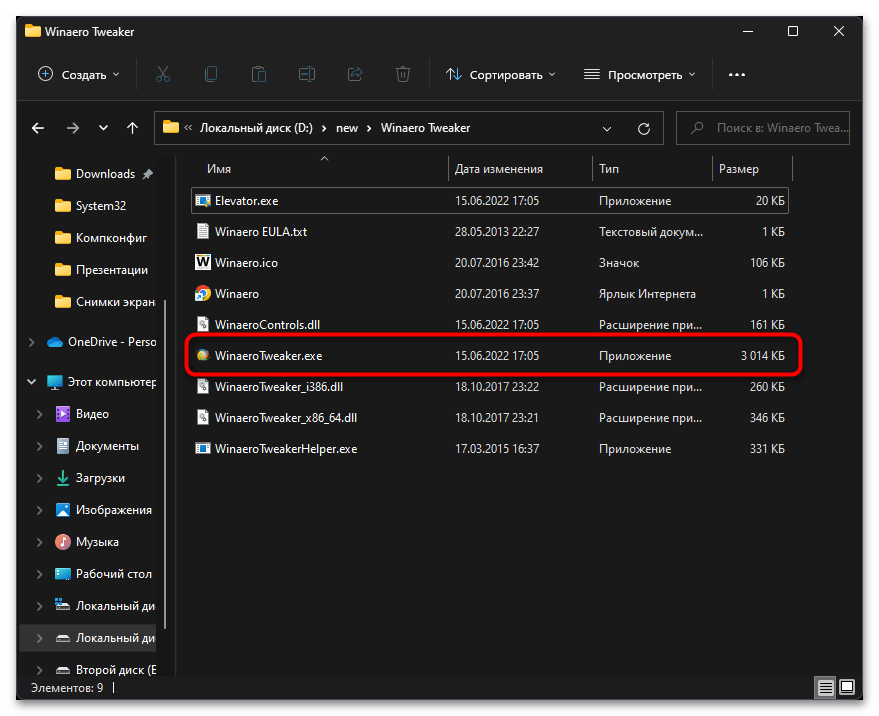
- Распакуйте полученный архив и используйте файл «WinaeroTweaker.exe» для запуска программы. Ее предварительная установка не требуется.
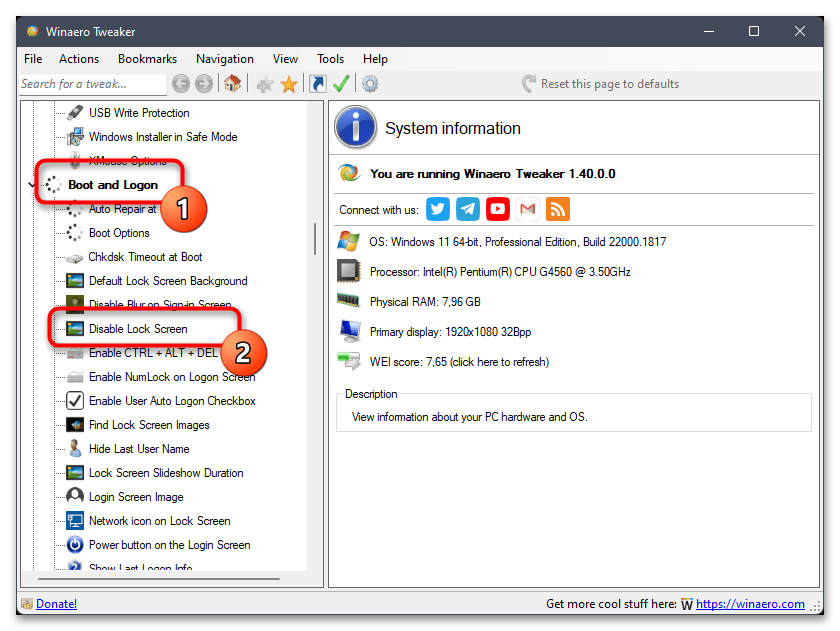
- Найдите раздел «Boot and Logon», а в нем параметр с названием «Disable Lock Screen», после чего выделите его левой кнопкой мыши.
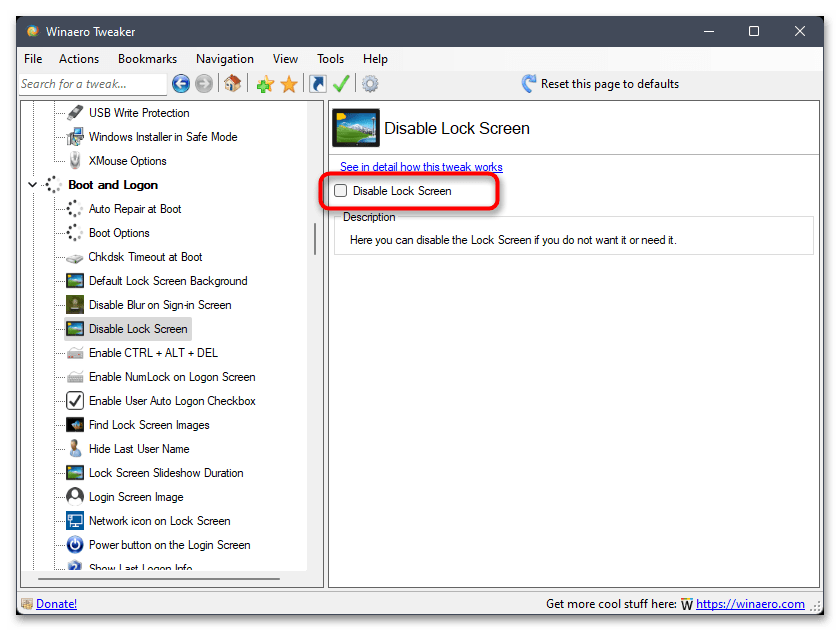
- В блоке справа поставьте галочку возле пункта «Disable Lock Screen». На экране должно появится предложение о перезагрузке ПК, которое нужно подтвердить для завершения настройки.
Наша группа в TelegramПолезные советы и помощь
,
In this tutorial we will show you several ways to disable the login screen prompt in Windows 10/11 in order to log in to your computer without having to enter a password or PIN.
With every new Windows operating system, Microsoft makes security improvements to keep your computer and sensitive data private and secure. Thus, in Windows 10/11, in addition to the classic way of login to Windows by using a password, there is the possibility of gaining access to your system using a PIN or through your biometric data if your computer has a fingerprint reader.
Although using the above options to sign in to Windows helps maintain your privacy and the security of your device, some users, especially older people or those who don’t need to share their computer with others, find it inconvenient to type the password or PIN every time they start their computer.
If you belong to one of the above categories of users, or for any other reason you want to bypass the login screen and log in automatically to Windows 10, below we will show you how you can turn off the login screen and log in straight to Windows without having to enter your password or PIN.
How to Remove Login Password/PIN prompt in Windows 11/10.
Method 1: Disable Login Screen in Windows 10 (GUI).
The most straightforward method to disable the login screen is to stop Windows 10 to require a username and a password to sign-in. To do that, follow the steps below:
Step 1. Disable the username and password requirement in the account options.
1. Press the Windows + R keys to launch the Run command window.
2. Type netplwiz and hit Enter, to open the User Accounts window.
3a. In User Accounts window, uncheck the Users must enter a user name and password to use this computer checkbox and click Apply. *
* Note: If the ‘Users must enter a user name and password to use this computer’ option is missing see the instructions on this article.

3b. Now, you will be asked to enter the password for the selected account. Type the password (twice) and click OK.

4. Close the User Accounts options and continue to step-2.
Step 2. Disable Login screen after your absence.
Now, proceed and turn off the login screen prompt after you are away from the computer.
1. From the Start menu, click Settings and select Accounts.

2. Select Sign-in options tab on the left pane and at the right side, find the Require sign-in setting and set it to Never.

Method 2: Bypass Login Screen prompt in Registry.
The second method to bypass (remove) the login screen and password requirement in Windows 10, is by using the registry editor. To do that:
* Important: Since making changes to Registry settings is risky because even a small mistake can lead to system damage, it is important to back up the registry before modifying it and to create a System Restore point.
1. Open Registry Editor. To do that:
1. Simultaneously press the Win + R keys to open the run command box.
2. Type regedit and press Enter to open Registry Editor.
2. Navigate to this key at left pane:
- HKEY_LOCAL_MACHINE\SOFTWARE\Microsoft\Windows NT\CurrentVersion\Winlogon

3. Now, at the right pane, make the following changes:
a. Double-click on the AutoAdminLogon REG_SZ value,* change its value data from 0 to 1 and click OK
* Note: If you don’t find the ‘AutoAdminLogon’ value, right-click on Winlogon key and select New -> String Value. Name the new value as AutoAdminLogon and press Enter.

b. Next, double-click on the DefaultUserName REG_SZ value, and type in the value data box your username. (e.g. «John» at this example). *
* Note: If you don’t find the ‘DefaultUserName’ value, right-click on Winlogon key and select New -> String Value. Name the new value as DefaultUserName and press Enter.

4a. Now, right-click on the Winlogon key on the left, and select New -> String Value.

4b. Name the new string as DefaultPassword and press Enter.
4c. Finally double-click to open the DefaultPassword string, type in the Value data box the user’s password and then click OK.

5. Close the Registry Editor and restart your PC to apply the change. *
* Note: To re-enable the login screen on Windows 10, set the AutoAdminLogon value from 1 to 0 and delete the DefaultUserName & DefaultPassword values.
That’s it! Which method worked for you?
Let me know if this guide has helped you by leaving your comment about your experience. Please like and share this guide to help others.
If this article was useful for you, please consider supporting us by making a donation. Even $1 can a make a huge difference for us in our effort to continue to help others while keeping this site free:
- Author
- Recent Posts
Konstantinos is the founder and administrator of Wintips.org. Since 1995 he works and provides IT support as a computer and network expert to individuals and large companies. He is specialized in solving problems related to Windows or other Microsoft products (Windows Server, Office, Microsoft 365, etc.).

If you want to know how to make Windows 11 disable welcome screen, read this post. Every time you update Windows 11, or installed applications, the system will display a screen highlighting the main news of the update and from time to time, the dialog will be redisplayed.
Knowing how to remove welcome screen on Windows 11 is very convenient for users who don’t want to be bothered with the list of what’s new, suggestions and tips for using system update and installed software.
In this post, we will guide you through the necessary steps to know how to unwelcome Windows 11 after installing updates.
How to Disable Windows 11 Welcome Screen
To eliminate the “Welcome to Windows 11” when starting the computer after the update, follow the steps below:
- Open Settings.
- Select System.
- Click on Notifications.

4. Click Additional Settings.

- Uncheck the Show the Windows welcome experience after updates and when signed in to show what’s new and suggested check box.
- Uncheck the Suggest ways to get the most out of Windows and finish setting up this device check box.
- Uncheck the Get tips and suggestions when using Windows check box.

After following the steps above, Windows 11 will stop displaying usage suggestions and program update details.
Summary
Learn how to hide the Windows 11 welcome screen after updating your system or installed apps.
So, follow the steps above and let us know in the comments if you managed to disable the Windows 11 welcome screen.
Apart from disabling typical account passwords, users can disable the login screen Windows 11 to get into the main screen faster. This guide is about how to disable login screen and password for Windows 11 in case some people who tired of entering password and login screen again and again. Here also teaches you how to add the login screen back when you want it.
Note: Disabling login screen doesn’t mean that you can go directly logon screen without password/pin code, that means you can enter the desktop with password/pin code without seeing the time, wallpaper or applications’ notification. If you want to login faster, then remove the password using UnlockGo for windows after disabling login screen.
Part 1. How to Disable Login Screen and Password Windows 11
To make any change in the Windows settings, you need to have the account password to login to the computer. Only an authorized person can make the changes, but sometimes the users don’t have the account password for Windows 11. In this situation, there are different methods to overcome the problem of disabling the login screen and password for Windows 11.
Section 1: Disable Login Screen Password when Locked out of Windows 11
When the system is locked with password protection and you don’t have the password, UnlockGo – Windows Password Recovery can help you to bypass and remove the password. Here are simple steps that you need to follow to remove the Windows password first:
🔑 Step 1: Install UnlockGo – Windows Password Recovery Tool to Create Windows Password Reset Disk.
Users can install the tool on any other laptop or computer that is easily accessible. The installation process is quite easy and straightforward. And click Start to burn it.

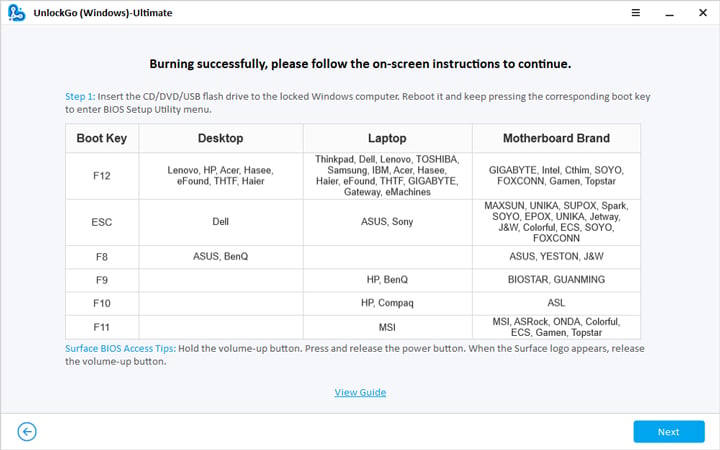
🔑 Step 2: Insert Burn Disk into Locked Windows 11 and Enter BIOS Menu.
Insert that USB or disk into the locked computer, press F12 or ESC for most computer to enter boot menu, choose the boot tab using arrow key, then select the boot device priority, click F10 save and exit.
🔑 Step 3: Choose Target Account to Reset/Remove Login Password.
After the reboot, you will see the interface of the tool on the locked computer and choose you windows version and then you can choose the target windows account to remove account password. Choose ‘Remove Account Password’ and click next, and you can choose other options as well.
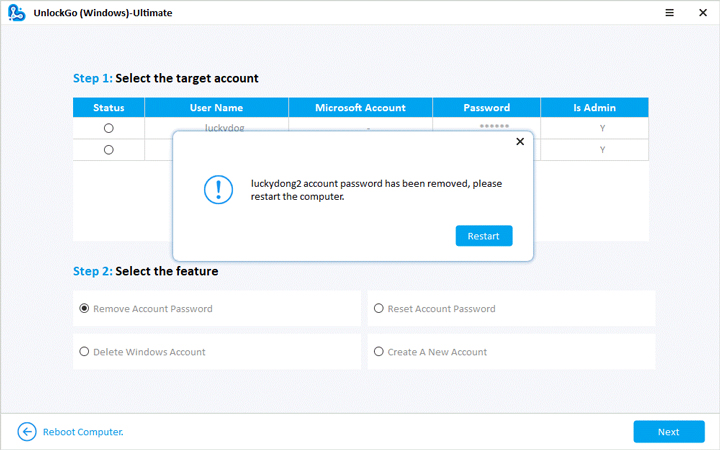
Then you can get into your device without password even if you forgot it.
Section 2: Disable Login Screen Windows 11 after Logging In
The other condition is to disable the login screen after logging into the system, and this method is quite simple as you don’t need to bypass the system’s security. Still, users got two different options to make this happen. Let’s have a look at both options and methods in detail.
Way 1: Windows 11 lock screen group policy
You might have already used the registry editor for some other tasks, and this login screen removal process via group policy editor is quite similar to that one. Here are steps that will allow you to remove the lock screen by using the group policy editor.
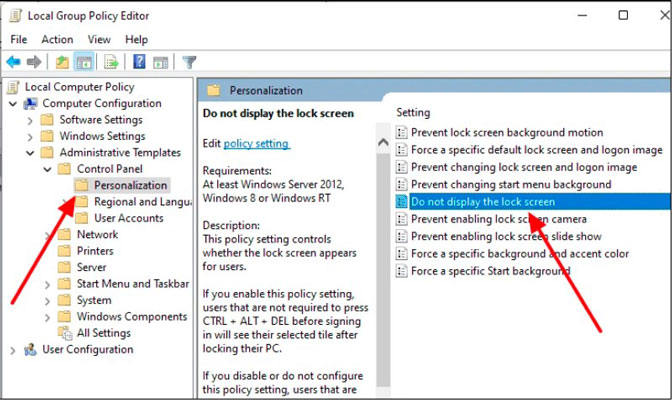
- Go to the start menu and search for ‘Edit Group Policy’, and choose ‘Computer Configuration’ from the newly opened window.
- Now, keep following the further items appearing on the left pan: Computer Configuration>> Administrative Templates>>Control Panel>> Personalization.
- Upon clicking the Personalization option, you will be displayed different options in the right pan.
- Choose the ‘Do not display the lock screen’ option and click on the enabled button, and press ok.
Way 2: Windows 11 lock screen registry editor
This method is like a manual way to disable the lock screen, and it will allow the user to get the same thing done with different steps. First of all, an open the Run window by pressing the Windows button plus R.
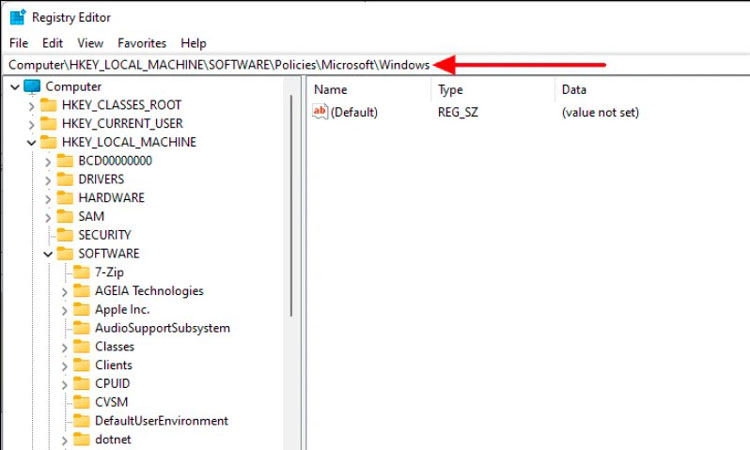
- Type ‘regedit’ in the Run bar and press enter.
- Once the new window has opened, paste the given path in the search bar of this new window.
Computer\HKEY_LOCAL_MACHINE\SOFTWARE\Policies\Microsoft\Windows
- Now, click on Windows>>New>>Key from the expanded menu.
- Assign ‘Personalization’ title to newly created key.
- Create a new string by clicking in the right panel: New>> ‘DWORD (32-bit) Value’ from the expanded menu.
- Change the name of this key to ‘NoLockScreen’ and enter 1 after clicking this key and click ok.
After this process, all changes will be saved for windows 11, and you will not get any login screen password next time. As for disabling windows 10 admin/lock screen password, check this one, you will know everything.
Part 2. How to Add Login Screen Windows 11 Back
Are you not satisfied with turning the lock screen off and want to have it back to enjoy the multiple interfaces of your computer. Well, there are some ways to get the login screen back.
Way 1: Shortcut: Ctrl + Alt + Delete combinations
This method involves using some key combinations, but you can make it work to get the login screen back:
- Click anywhere on the lock screen, and it will take you to the next window.
- Press the combination of Ctrl +Alt +Delete, and this will take you to the login screen where you can enter your password.
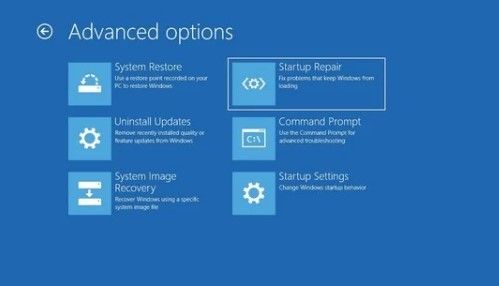
Way 2: Run Startup Repair
If the option is turned off due to some technical reason, repairing Windows may solve the issue. Here is how to resolve to disable password windows 11:
- Turn off PC.
- Turn the PC and then turn it off by pressing the power button and repeat the process two times and you will see the ‘Preparing Automatic Repair’ message.
- Choose advanced option message and choose troubleshoot>> Advanced Options>> Startup Repair.
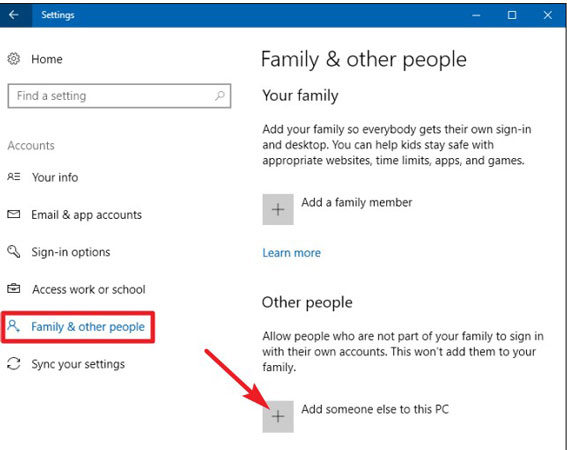
Way 3: Create a new user account
There is something wrong with the previous user account; you can create a new one, and here is how to do it.
- Boot safe mode and press the Windows button, and I key at the same time.
- Click accounts>>other people>>add someone else on this pc.
- Set a new user account on the computer and now restart the pc, and the lock screen will show you the login screen.
Bonus Tips for Login Screen Windows 11
Here are some practical tips that can make the whole process a lot easier for you. Follow these tips:
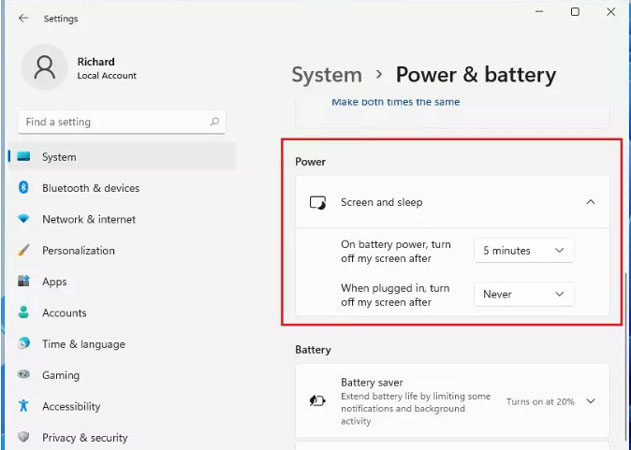
❓ 1. Windows 11 Lock Screen Timeout
The easiest way is to make changes through the control panel. Here is the path: control panel>>power options>>change plan settings>>change advance power settings>>console lock display off timeout>>set the time for the lock screen.

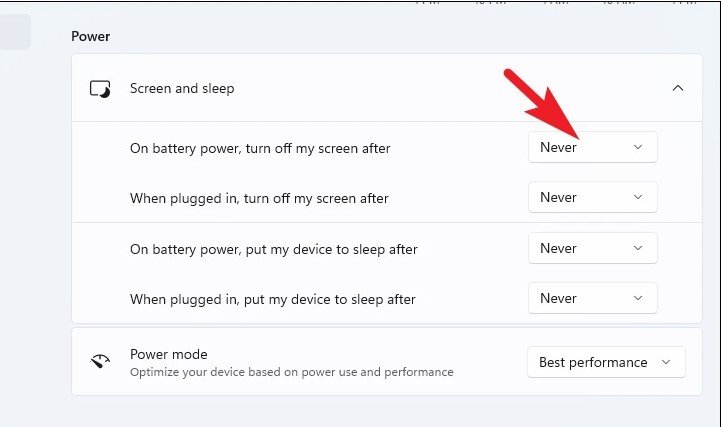
❓ 2. Windows 11 Auto Lock Screen
Just like the process mentioned before, you can make changes in the advanced power settings where you can set the ‘turn off my screen’ option to never and the laptop will not automatically lock the screen.
❓ 3. Windows 11 Disable Lock Screen after Sleep
In the advanced power settings, you can change the lock screen setting after sleep. Go to the after sleep option and make the desired changes that you want to apply after putting your laptop to sleep.
Conclusion
All of these methods to disable the login screen Windows 11 work differently for different situations. The problem here is to make changes without having a password, and UnlockGo – Windows Password Recovery has the right solution for that problem too. If you are ever locked out of your computer or forgot your Windows password, UnlockGo can save your day.
UnlockGo (Windows)
- Reset/Remove Windows Local, Admin, Microsoft, Domain account passwords without Current Passwords.
- Create a Password Reset Disk with One Click.
- It Supports All Windows Versions from the Latest to the Oldest.