
DirectX 11 is a set of APIs (Application Programming Interfaces) that allow software developers to create games and multimedia applications for Windows operating systems. It provides advanced graphics and audio capabilities, enhancing the overall performance of gaming experiences. However, there may be situations where you need to uninstall DirectX 11 on Windows 10. This blog post will guide you through the process, providing different methods and additional tips to successfully remove DirectX 11 from your system.
Video Tutorial:
The Challenge of Uninstalling DirectX 11 on Windows 10
Uninstalling DirectX 11 on Windows 10 can be a bit tricky due to its deep integration within the operating system. DirectX 11 is an essential component for many games and multimedia applications, so removing it without causing any issues requires careful execution. It’s important to note that uninstalling DirectX 11 may affect the functionality of certain programs if they rely on this API.
Things You Should Prepare for
Before proceeding with the uninstallation process, there are a few things you should prepare to ensure a smooth experience:
1. Backup important files: Before making any changes to your system, it’s always a good idea to backup any important files or data. This will help prevent any accidental loss of information.
2. Create a system restore point: Creating a system restore point allows you to revert back to a previous state in case anything goes wrong during the uninstallation process. This is an extra precautionary measure to ensure the safety of your system.
3. Check for alternative solutions: Some games or applications may have built-in options to switch between different versions of DirectX. Before uninstalling DirectX 11, check if the specific software you’re concerned about allows you to switch to an earlier version.
With these preparations in place, let’s move on to the methods for uninstalling DirectX 11 on Windows 10.
Method 1: Uninstall via Control Panel
Uninstalling DirectX 11 via the Control Panel is the simplest method. Here’s how to do it:
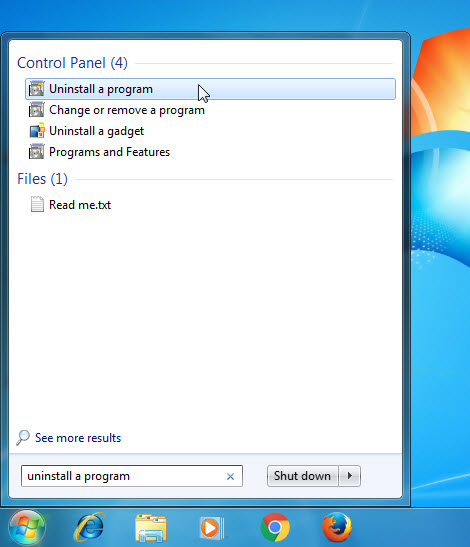
1. Open the Control Panel by searching for it in the Windows search bar.
2. In the Control Panel, select «Programs» followed by «Programs and Features.«
3. In the list of installed programs, locate and click on «DirectX 11.«
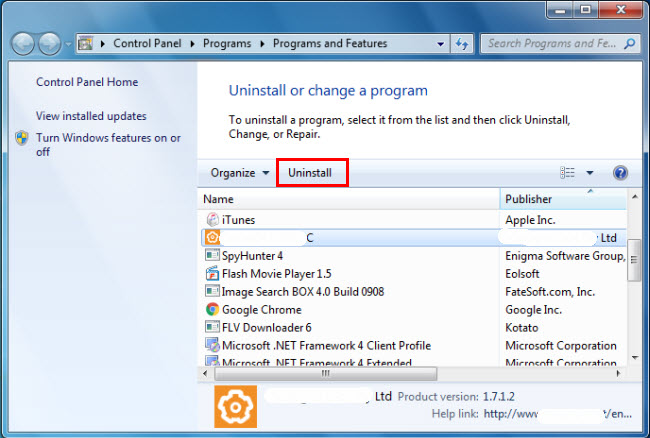
4. Click on the «Uninstall» button at the top of the window.
5. Follow the on-screen prompts to complete the uninstallation process.
Pros:
1. Easy and straightforward process.
2. Does not require any technical knowledge.
3. Can be done via a familiar interface.
Cons:
1. May not completely remove all files related to DirectX 11.
2. Can result in broken registry entries.
3. May affect the functionality of DirectX 11-dependent programs.
Method 2: Using DirectX Control Panel
The DirectX Control Panel is a tool provided by Microsoft specifically for managing and configuring DirectX settings. While it doesn’t offer a direct uninstall option, it can be used to disable DirectX 11. Here’s how:
1. Press the Windows key + R to open the Run dialog box.
2. Type «dxdiag» and press Enter to open the DirectX Diagnostic Tool.
3. In the DirectX Diagnostic Tool, navigate to the «Display» tab.
4. Under the «DirectX Features» section, locate and click on «Disable» next to «Direct3D Acceleration.«
5. Click «OK» to confirm the changes.
Pros:
1. Allows you to disable DirectX 11 without completely removing it.
2. Provides granular control over DirectX settings.
3. Can be useful in troubleshooting DirectX-related issues.
Cons:
1. Disabling DirectX 11 may cause compatibility issues with some games and applications.
2. Doesn’t completely remove DirectX 11 from the system.
3. May not be effective in resolving all DirectX-related problems.
Method 3: Using Command Prompt
Uninstalling DirectX 11 through Command Prompt provides a more direct and comprehensive approach. Here’s how to do it:
1. Press the Windows key + X and select «Command Prompt (Admin)» to open Command Prompt with administrative privileges.
2. In the Command Prompt window, type the following command and press Enter:
wusa /uninstall /kb:971512 /quiet /norestart
Pros:
1. Allows for a more thorough removal of DirectX 11.
2. Can be done via a powerful command-line interface.
3. Provides greater control over the uninstallation process.
Cons:
1. Requires advanced knowledge of Command Prompt.
2. Incorrect execution of commands can potentially harm the system.
3. Uninstalling DirectX 11 may cause compatibility issues with certain programs.
Method 4: Via Third-Party Uninstaller
Using a third-party uninstaller tool can provide a more comprehensive and automated approach to removing DirectX 11 on Windows 10. These tools are specifically designed to uninstall programs cleanly and efficiently. Here’s a general overview of the process:
1. Research and choose a reputable third-party uninstaller tool. Examples include Revo Uninstaller, IObit Uninstaller, and Geek Uninstaller.
2. Download and install the chosen uninstaller tool.
3. Open the tool and locate the entry for DirectX 11 in the list of installed programs.
4. Select DirectX 11 and choose the uninstall option provided by the tool.
5. Follow the on-screen prompts to complete the uninstallation process.
Pros:
1. Provides a comprehensive and automated uninstallation process.
2. Removes leftover files and registry entries related to DirectX 11.
3. Offers additional features for managing installed programs.
Cons:
1. Requires the installation of third-party software.
2. Some uninstaller tools may come with additional bundled software.
3. Not all third-party uninstallers are free.
Why Can’t I Uninstall DirectX 11
There can be multiple reasons why you may encounter difficulties when trying to uninstall DirectX 11 on Windows 10. Here are a few common scenarios and their possible fixes:
1. Conflict with other software: Certain programs may have dependencies on specific versions of DirectX. In such cases, you may need to uninstall or update the conflicting software before attempting to uninstall DirectX 11.
2. Restricted user permissions: If you’re logged in as a standard user, you may not have sufficient permissions to uninstall DirectX 11. Try logging in as an administrator or contact your system administrator for assistance.
3. Corrupted DirectX installation: If your DirectX installation is corrupted, it may cause issues during the uninstallation process. Consider reinstalling DirectX 11, then try uninstalling it again.
Additional Tips
Here are some additional tips to keep in mind when uninstalling DirectX 11 on Windows 10:
1. Restart your computer: After uninstalling DirectX 11, it’s always a good idea to restart your computer to ensure any changes take effect.
2. Update graphics drivers: Updating your graphics drivers to the latest version can help resolve compatibility issues and ensure optimal performance after uninstalling DirectX 11.
3. Reinstall DirectX 11: If you encounter any issues with DirectX-dependent programs after uninstalling DirectX 11, you can always reinstall it using the official Microsoft DirectX End-User Runtime Web Installer.
5 FAQs about Uninstalling DirectX 11 on Windows 10
Q1: Is it safe to uninstall DirectX 11 on Windows 10?
A1: Uninstalling DirectX 11 can be safe as long as you follow the proper procedures and consider the potential impact on DirectX-dependent programs. It’s recommended to backup important files and create a system restore point before proceeding.
Q2: Will uninstalling DirectX 11 affect my games?
A2: Uninstalling DirectX 11 may affect the functionality of games and applications that rely on this API. Some games may have built-in options to switch to an earlier version of DirectX, while others may require DirectX 11 for optimal performance.
Q3: Can I reinstall DirectX 11 after uninstalling it?
A3: Yes, you can reinstall DirectX 11 by downloading and running the official Microsoft DirectX End-User Runtime Web Installer.
Q4: Is it necessary to uninstall DirectX 11 for troubleshooting purposes?
A4: Uninstalling DirectX 11 is not typically necessary for troubleshooting purposes. It’s recommended to explore other options, such as updating graphics drivers, verifying game files, or contacting technical support before resorting to uninstallation.
Q5: Can I use System Restore to revert back if something goes wrong during the uninstallation process?
A5: Yes, if you have created a system restore point before uninstalling DirectX 11, you can use System Restore to revert back to a previous state and undo any changes made during the process.
In Conclusion
Uninstalling DirectX 11 on Windows 10 requires careful consideration and preparation. The methods outlined above provide different approaches, each with its own set of pros and cons. It’s important to weigh these factors and choose the method that best suits your needs and technical expertise. Remember to backup important files, create a system restore point, and proceed with caution. If you encounter any issues or have specific concerns, it’s recommended to seek assistance from technical support or the respective software developers.
DirectX 11 is a graphics technology application created by Microsoft for use with the Windows operating systems. DirectX 11 is designed to improve gaming technology. For example, DirectX 11 improves graphic details and creates faster frame rates for games. DirectX 11 is installed automatically by Microsoft and cannot be uninstalled through the «Windows Uninstall or Change a Program» feature. Fortunately, you can uninstall DirectX 11 using the Windows Registry Editor. Note that the steps described apply to Windows Vista and 7.
Step 1
Click «Start,» right-click «Computer» and select «Properties.» The System Properties window opens.
Step 2
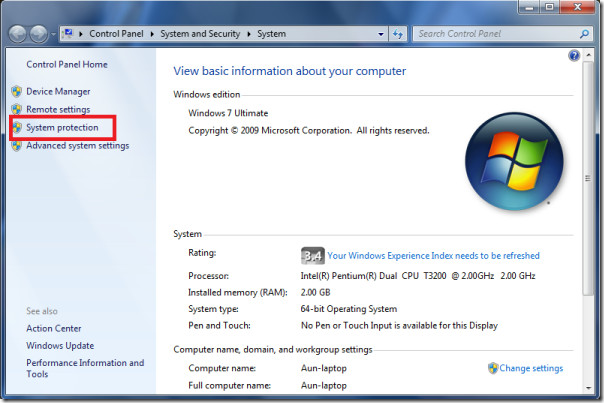
Click «System Protection» in the left pane of the System Properties window.
Step 3
Click «C:Drive» under Protection Settings, and then click «Configure.»
Step 4
Click «Turn Off System Protection,» then click «OK,» and then click «OK» again. This will prevent Windows from reinstalling DirectX automatically once you reboot after you uninstall it.
Step 5
Click «Start,» type «regedit» into the «Search» box, and press «Enter.» The Registry Editor opens.
Step 6
Click the «Arrow» next to «HKEY_LOCAL_MACHINE» in the left pane of the Registry Editor. A list of folders appears.
Step 7
Click the «Arrow» next to the «Software» folder in the left pane of the Registry Editor. A new list of folders appears.
Step 8
Click the «Arrow» next to the «Microsoft» folder in the left pane of the Registry Editor. A new list of folders appears.
Step 9
Right-click the «DirectX» folder and select «Delete.»
Step 10
Close the Registry Editor and restart your computer.
Tips & Warnings
- Uninstalling DirectX 11 is not recommended. Doing so may cause errors or reduced system performance.
Цитата:
Эдвард Кенуэй
Кто хочет поменять DX попробуйте:
— Идем по пути C:\Users\Имя пользователя\AppData\Local\4A Games\Metro LL\140000000000000
— Открываем user.cfg и меняем строчку r_api на нужную вам:
r_api 0 = directx 9
r_api 1 = directx 10
r_api 2 = directx 11
- пожаловаться
- скопировать ссылку
Strelok574
потому что эти болваны с движком намудрили,игра стала менее четкая в графике,но тормозит больше,что ваще за такое?
- пожаловаться
- скопировать ссылку
потому что эти болваны с движком намудрили,игра стала менее четкая в графике,но тормозит больше,что ваще за такое?
я думаю в игре багов много будет. Но большинство из них от того что все в основном на пиратках гоняют. С лицухами проблем меньше должно быть думаю
- пожаловаться
- скопировать ссылку
HARDCORE GAMER [ минусую школоту ]
Эмм , 560ti , играю на очень высоких + улучшенный физикс + высокая тесселяция . Без видимых проседаний фпс .
- пожаловаться
- скопировать ссылку
lkarambosl
при разрешении 800 х 600 ?!
- пожаловаться
- скопировать ссылку
- пожаловаться
- скопировать ссылку
intel core 2 duo e7200 3.9 Ghz 4gb ram GTX 470 @750\900\1500@ разогнаная чуть всё на вери вери физика текстуры кароче летает кукурудзис 3 хуже шол!!!!!!!!!
- пожаловаться
- скопировать ссылку
что не говори , но оптимизация не такая уж и хорошая как её все хвалят, на видюхах nvidia серии 500 и ниже вобще невозможно играть, даже на минималках
- пожаловаться
- скопировать ссылку
550TI играю на высоких, плюс сглаживание, тасселяция, оптимизация отличная, разрешение 1280х1024, тормозов не наблюдается.
- пожаловаться
- скопировать ссылку
SoldierElite
ну не знаю,у наших твоарищей у всех всегда игры забагованы даже на лицензии что прям огого!
- пожаловаться
- скопировать ссылку
Strelok574
у меня щас старый стоит проц AMD Athlon 64 X2 — наверно из-за него так fps проседает, раньше стоял intel, но он сгорел при разгоне:)
- пожаловаться
- скопировать ссылку
i5-3450 , GTX 580 , проц менее половины загружен, видяха по полной. Переключение directx никакого увеличения фпс не даёт, только картинка ухудшается.
Хорошо добавляет если SSAA, не отключить, а выставить 0,5Х
у меня сразу с 40 до 60 прыгнуло, но мутновато
- пожаловаться
- скопировать ссылку
Лагов немного меньше, и если начинаешь бой, то ФПС сразу начинает сильно падать, даже если ты спрячешься куда-нибудь, так что стараюсь обходить)
- пожаловаться
- скопировать ссылку
PlAyGrAuNd
абсолютно та же самая проблема,на базе фашистов особенно заметно:если обнаружат то фпс начинает просидать достаточно так заметно!
- пожаловаться
- скопировать ссылку

- пожаловаться
- скопировать ссылку
HARDCORE GAMER [ минусую школотуУ меня метро наверно из за процессара и тупит. Думал разогнать но что то передумал
- пожаловаться
- скопировать ссылку
Сейчас к игрухам надо как минимум 4 ядерные процы ставить. Я играл BF3 на 2 ядерном и ща на I5 — небо и земля
- пожаловаться
- скопировать ссылку
- пожаловаться
- скопировать ссылку
ну незнаю, на моей GTX 580 FPS прилично проседает
- пожаловаться
- скопировать ссылку
я играю на 1360 768 разришение моник такой просто!
- пожаловаться
- скопировать ссылку
HARDCORE GAMER [ минусую школоту ]
Какой у тебя процессор?
- пожаловаться
- скопировать ссылку
Вот моя карта старенькая ну надёжная все игры пока что тянет на Максимум кроме кукурудзиса 3 потому что ntel core 2 duo e7200 3.9Ghz разогнаный думаю иза цп цп у меня говно((((
- пожаловаться
- скопировать ссылку
Странно но я ваще не могу открыть конфиг
- пожаловаться
- скопировать ссылку
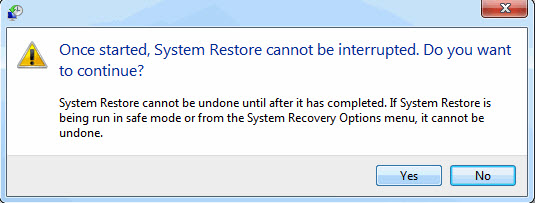
Запускаю игру выскакивает табличка типо ,,В прошлый раз игра была запущена неправильно запустить в безапасном рижиме» надо выбрать Да или Нет, но что бы я не выбрал появляется черное окно с надписью ,,Прекращена работа Metro Last Light Executable» что делать народ?????
- пожаловаться
- скопировать ссылку
S.T.ALK.E.R
Спасибо! Помог!!!
- пожаловаться
- скопировать ссылку
Are you in need of uninstalling directx 11 to fix some problems? Are you looking for an effective solution to completely uninstall it and thoroughly delete all of its files out of your PC? No worry! This page provides detailed instructions on how to completely uninstall directx 11.
Possible problems when you uninstall directx 11
* directx 11 is not listed in Programs and Features.
* You do not have sufficient access to uninstall directx 11.
* A file required for this uninstallation to complete could not be run.
* An error has occurred. Not all of the files were successfully uninstalled.
* Another process that is using the file stops directx 11 being uninstalled.
* Files and folders of directx 11 can be found in the hard disk after the uninstallation.
directx 11 cannot be uninstalled due to many other problems. An incomplete uninstallation of directx 11 may also cause many problems. So, it’s really important to completely uninstall directx 11 and remove all of its files.
How to Uninstall directx 11 Completley?
Method 1: Uninstall directx 11 via Programs and Features.
When a new piece of program is installed on your system, that program is added to the list in Programs and Features. When you want to uninstall the program, you can go to the Programs and Features to uninstall it. So when you want to uninstall directx 11, the first solution is to uninstall it via Programs and Features.
Steps:
a. Open Programs and Features.
Windows Vista and Windows 7
Click Start, type uninstall a program in the Search programs and files box and then click the result.
Windows 8, Windows 8.1 and Windows 10
Open WinX menu by holding Windows and X keys together, and then click Programs and Features.
b. Look for directx 11 in the list, click on it and then click Uninstall to initiate the uninstallation.
Method 2: Uninstall directx 11 with its uninstaller.exe.
Most of computer programs have an executable file named uninst000.exe or uninstall.exe or something along these lines. You can find this files in the installation folder of directx 11.
Steps:
a. Go to the installation folder of directx 11.
b. Find uninstall.exe or unins000.exe.
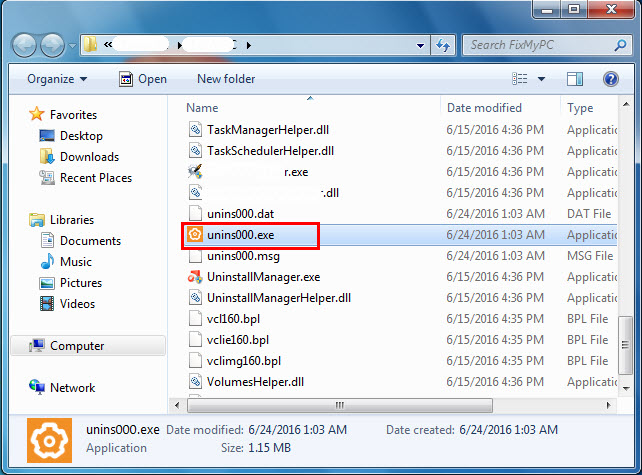
c. Double click on its uninstaller and follow the wizard to uninstall directx 11.
Method 3: Uninstall directx 11 via System Restore.
System Restore is a utility which comes with Windows operating systems and helps computer users restore the system to a previous state and remove programs interfering with the operation of the computer. If you have created a system restore point prior to installing a program, then you can use System Restore to restore your system and completely eradicate the unwanted programs like directx 11. You should backup your personal files and data before doing a System Restore.
Steps:
a. Close all files and programs that are open.
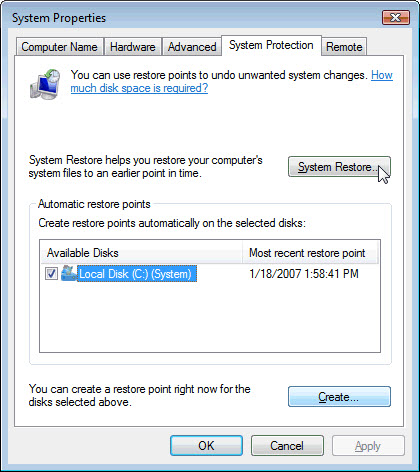
b. On the desktop, right click Computer and select Properties. The system window will display.
c. On the left side of the System window, click System protection. The System Properties window will display.
d. Click System Restore and the System Restore window will display.
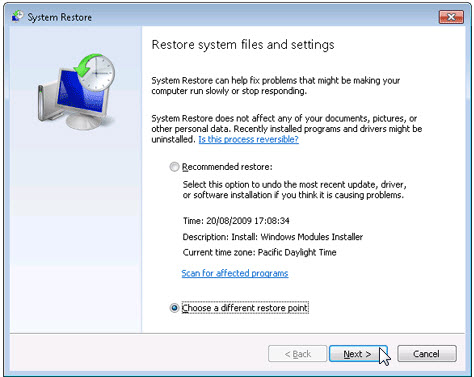
e. Select Choose a different restore point and click Next.
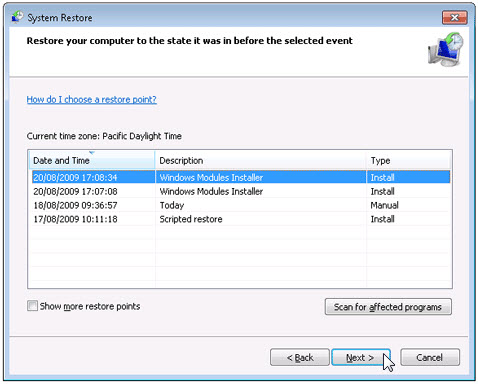
f. Select a date and time from the list and then click Next. You should know that all programs and drivers installed after the selected date and time may not work properly and may need to be re-installed.
g. Click Finish when the «Confirm your restore point» window appears.
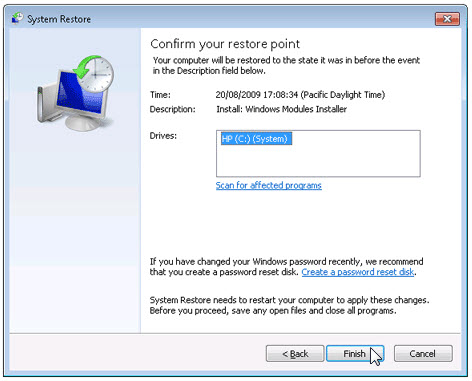
h. Click Yes to confirm again.
Method 4: Uninstall directx 11 with Antivirus.
Nowadays, computer malware appear like common computer applications but they are much more difficult to remove from the computer. Such malware get into the computer with the help of Trojans and spyware. Other computer malware like adware programs or potentially unwanted programs are also very difficult to remove. They usually get installed on your system by bundling with freeware software like video recording, games or PDF convertors. They can easily bypass the detection of the antivirus programs on your system. If you cannot remove directx 11 like other programs, then it’s worth checking whether it’s a malware or not.
Method 5: Reinstall directx 11 to Uninstall.
When the file required to uninstall directx 11 is corrupted or missing, it will not be able to uninstall the program. In such circumstance, reinstalling directx 11 may do the trick. Run the installer either in the original disk or the download file to reinstall the program again. Sometimes, the installer may allow you to repair or uninstall the program as well.
Method 6: Use the Uninstall Command Displayed in the Registry.
When a program is installed on the computer, Windows will save its settings and information in the registry, including the uninstall command to uninstall the program. You can try this method to uninstall directx 11. Please carefully edit the registry, because any mistake there may make your system crash.
Steps:
a. Hold Windows and R keys to open the Run command, type in regedit in the box and click OK.
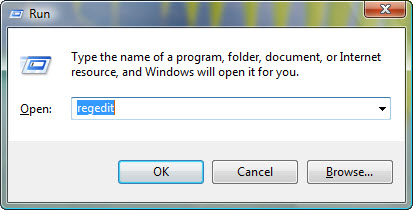
b. Navigate the following registry key and find the one of directx 11:
HKEY_LOCAL_MACHINE\SOFTWARE\Microsoft\Windows\CurrentVersion\Uninstall
c. Double click on the UninstallString value, and copy its Value Data.
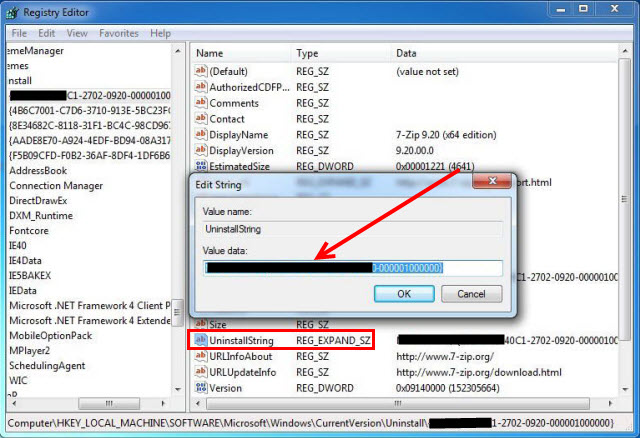
d. Hold Windows and R keys to open the Run command, paste the Value Data in the box and click OK.
e. Follow the wizard to uninstall directx 11.
Method 7: Uninstall directx 11 with Third-party Uninstaller.
The manual uninstallation of directx 11 requires computer know-how and patience to accomplish. And no one can promise the manual uninstallation will completely uninstall directx 11 and remove all of its files. And an incomplete uninstallation will many useless and invalid items in the registry and affect your computer performance in a bad way. Too many useless files also occupy the free space of your hard disk and slow down your PC speed. So, it’s recommended that you uninstall directx 11 with a trusted third-party uninstaller which can scan your system, identify all files of directx 11 and completely remove them. Download this powerful third-party uninstaller below.
Download Article
Delete DirectX from your computer and repair old versions
Download Article
- Performing a System Restore
- Repairing Your Current DirectX Files
- Video
- Q&A
|
|
|
DirectX is one of the core technologies behind running games and video programs on Windows. That means if it breaks, you’re probably going to run into some errors. You can try rolling back your system to before your last update, or you can try to repair your DirectX files. See Step 1 below to learn how.
How to Remove DirectX: Quick Guide
- Check the DirectX Diagnostics tool to locate the issue.
- Reinstall the DirectX files if they’re corrupted.
- Update your computer’s video driver.
- Run a system restore to an older point before DirectX was updated.
- Reinstall Windows if you have continued problems.
-

Performing a System Restore is the easiest way to uninstall a DirectX update, since there is no official way to uninstall DirectX. You will need to have a restore point from before DirectX is installed, which is typically created during the installation process. Using System Restore will uninstall and revert ANY changes that were made since the restore point was created, so it should be used very soon after installing the DirectX update.
- Windows 8 – Open the Start screen and type “recovery”. Select “Recovery” from the list of search results. This will open the Recovery window. From there, click the “Open System Restore” link.
- Windows 7 and Vista – Click Start and type “restore” into the Search box. Select “System Restore” from the top of the search results list.
- Windows XP – Click Start and then select All Programs → Accessories → System Tools. Click on System Restore.
-
You will be presented with a list of available restore points. Compare dates to find one that was created before DirectX was updated. Click the “Scan for affected programs” to ensure that DirectX will be rolled back.
- Remember, anything that was installed or updated between the point and now will be removed. Any programs that were installed then but are gone now will be reinstalled.
Advertisement
-
Once you’ve chosen your restore point, wait for the restore to be completed. The restore process can take a significant amount of time. The computer will restart during the restore process, and then Windows will load with a message confirming that the restore was successful.
-
Once Windows starts again, open the Run window by pressing Windows key + R, type in “dxdiag”, and press Enter. This will open the DXDiag tool, which will check your system and report the version of DirectX that is installed.
- The DirectX version will be listed at the bottom of the System Information section on the first tab.
- You must have some version of DirectX installed with Windows. Windows 7 and later cannot have anything less than DirectX 11 installed.[1]


Advertisement
-
Open the Run dialog by pressing Windows key + R and enter “dxdiag”. This will open the DirectX Diagnostic Tool. It will display an overview of your system. You can click each tab to see information on your display, sound, and inputs. A text box at the bottom of each tab will tell you if there are issues detected with that particular system.
-
If you’re having difficulties running programs and are receiving DirectX errors, you may have corrupt or missing DirectX files. The best way to try to fix this is by reinstalling the latest version of DirectX. The installer is available for free from Microsoft.
- If you are having issues, upgrading to the latest version may help much more than uninstalling.
-
The installer will scan your system and then install the necessary files to update your copy of DirectX to the latest version. Restart your computer after it’s finished and check to see if you receive the same errors.
-
Many times, updating your video card drivers will help fix DirectX errors for games and other video-centric programs. To update your driver, you’ll need to determine which video card you have, and then download the appropriate file from the manufacturer.
- To find your video card information, open the Run dialog (Windows key + R) and enter “dxdiag”. Click the Display tab, and note the Chip Type and Manufacturer from the Device section.
- Visit that manufacturer’s website. This will typically be NVidia or AMD. Search for your Chip Type on the website and download the latest driver files.
- Run the driver installer. Your old video card files will be overwritten with the latest version. You may notice your screen flickering during the installation process.
-
If nothing you do seems to be fixing your problem, it may be time to reinstall Windows. This will replace all of your DirectX files with the built-in files with your Windows installation. Reinstalling Windows will take an hour or so, not counting the time it takes to backup and restore your files and reinstall your programs. Follow one of the following guides for your version of Windows:
- Install Windows 10.
- Install Windows 8.
- Install Windows 7.
- Install Windows Vista.
- Install Windows XP.


Advertisement
Add New Question
-
Question
How do I check what version of DirectX I have installed?
Click «Start,» and then click «Run.» Type «dxdiag» (without the quotation marks) and then click «OK.» On the «System» tab, note the version of DirectX that is displayed on the «DirectX Version» line.
-
Question
What if I don’t have a system restore point?
Jarod Smith
Community Answer
If you do not have a system restore point and you want to un-install DirectX, then you will have to factory reset your device. It is wise before you do any major installations or before you do a major update to create a restore point. If you do, and something goes wrong, then you can simply restore to the point before the installation.
-
Question
How do I install an older directx version when I have the latest one (DirectX 12) to play older games?
Most likely, you will need to keep an older directx version. Old games often need old DirectX Installed. For example, a DX9 only game probably won’t work with DX10, DX11, and so on.
See more answers
Ask a Question
200 characters left
Include your email address to get a message when this question is answered.
Submit
Advertisement
Video
Thanks for submitting a tip for review!
About This Article
Article SummaryX
1. Open System Restore.
2. Select a restore point prior to the Direct X upgrade.
3. Click Next.
4. Click Finish.
Did this summary help you?
Thanks to all authors for creating a page that has been read 316,900 times.