
DHCP (Dynamic Host Configuration Protocol) is one of the network protocols that dynamically assigns IP addresses to every device in a network. This ensures that there is no IP address conflict between two or more devices and hence fewer chances of network errors.
However, if you have installed multiple routers, we highly recommend disabling DHCP in one of them. After that, it’s necessary to set a static IP address, subnet mask and default gateway.
Enabling and disabling DHCP on Windows is possible from the built-in Settings, Control Panel, terminal, or even your router’s configuration interface.
How Does DHCP Work?
Before diving into the DHCP configuration, let’s get a brief insight into its working.
When a computer or any other device wants to connect to a network, it generates a request, which is picked by a DHCP server. Now, the server assigns a dynamic IP address to it and keeps monitoring its use.
Once the device is inactive, the DHCP server pulls back the IP and stores it in a pool of addresses. This will be reassigned to another device when it tries connecting to the network.
Below are some of the technical terminologies to help you understand more about the working of DHCP:
- DHCP Discovery: Broadcast packet sent by a DHCP client to the DHCP server
- DHCP Offer: An information message sent by the server to the client confirming that it has received the DHCP Discovery
- DHCP Request: Request message sent by the client device to a DHCP server (from many servers, only one is accepted) to get the offered IP
- DHCP Acknowledgement: IP settings sent by the DHCP server acknowledging the DHCP Request
How to Enable or Disable DHCP in Windows 11
In most Windows-based PCs, the DHCP server is enabled by default. Hence, these devices obtain IP addresses automatically. But there can be times when you want to use static IP addresses for better DNS support, reliable communication, bypassing firewalls, etc. To achieve this, you’ll need to first disable the DHCP server.
From Windows Settings App
The in-built Settings app on Windows lets you set various configurations, like System, Network, Gaming, Accessibility, and many more. Likewise, enabling and disabling DHCP is also possible here.
Enable DHCP
Firstly, let’s learn how to enable DHCP from the Windows 11 Settings:
- Use Windows + I shortcut to open the application.
- Go to Network & internet and choose your connection (Wi-Fi or Ethernet).

- Move to [Your Connection] Properties.

- Now, expand the Properties section and scroll down to find IP Assignment. Here, press the Edit button.
- Once the Edit network IP Settings dialogue box pops up, select Automatic (DHCP) and hit Save.

- Again, click on the Edit button from the DNS server assignment field.
- Choose Automatic (DHCP) again and tap Save.


Disable DHCP
If you’re planning to set a static IP address on Windows, the first thing to do is turn off DHCP. Kindly follow the below instructions on how you can do just that:
- Press the IP Assignment’s Edit button in the network properties window.
- To disable DHCP, expand the drop-down and select Manual.
- Now, toggle on IPv4 or IPv6.
- Input the valid IP Address, Subnet Mask, Preferred DNS, and Alternate DNS. Then, hit Save.
- Repeat the same process with DNS server assignment.


Via Network Connections
Network Connections is a dedicated section in Control Panel that lets you configure and manage all the adapters (Ethernet, Wi-Fi, Bluetooth, Virtual Private Network, Virtual Machine, etc.). In this section, you will learn how to tweak IPv4 or IPv6 to enable/disable the DHCP server.
Enable DHCP
As we know, DHCP means automatically assigning the IP addresses on your computer. So, you can use the Network Connections utility to configure this in order to enable DHCP:
- Use Windows + R to launch the Run utility. Here, execute the
ncpa.cplcommand to open the Network Connections window. - Right-click on your network connection (Wi-Fi or ethernet) and choose Properties.

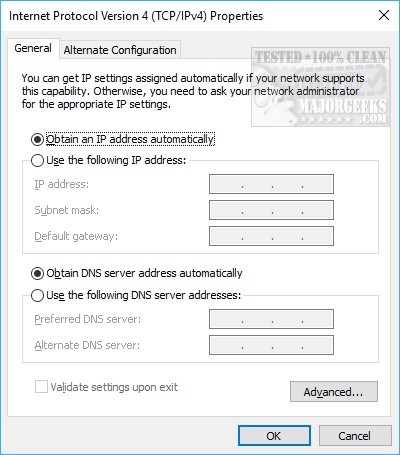
- In the Networking tab, double-click the Internet Protocol Version 4 (TCP/IPv4).

- Once a new dialogue box launches, choose the following options – Obtain an IP address automatically and Obtain DNS server address automatically.
- Press the Ok button to save the changes.
- Repeat the same for Internet Protocol Version 6 (TCP/IPv6), and once that’s done, press Ok.


Disable DHCP
To disable DHCP on Windows, you’ll need to set your custom IP address, Subnet Mask, and Default Gateway:
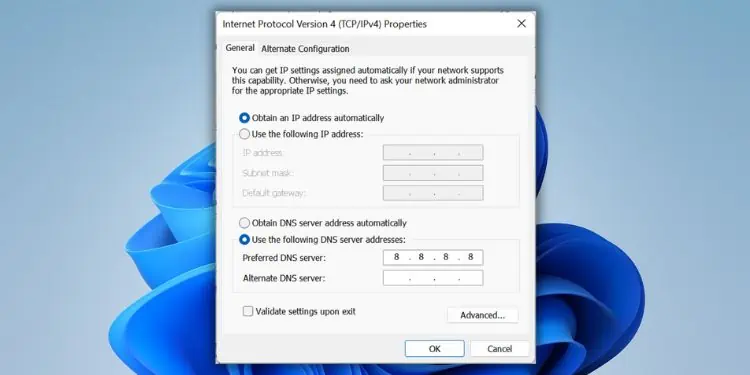
- Launch Internet Protocol Version 4 (TCP/IPv4) Properties from the network connection window.
- Select Use the following IP addresses. Then, set an appropriate IP address, Subnet Mask, and Default Gateway.
- Next, select Use the following DNS server addresses. Here, input preferred and alternate DNS servers.
- Hit the Ok buttons on both the properties windows.
- If you’ve set up IPv6, open Internet Protocol Version 6 (TCP/IPv6) Properties. Then, use static IP and DNS as shown below.


In Windows Terminal
Well, it’s possible to enable/disable DHCP via the Windows terminal if you prefer CLI over GUI. Before jumping into the dedicated command lines, we suggest checking whether this is turned on or off:
- Navigate to the start menu to search and launch Command Prompt or Powershell.
- Run the below command to list all the network adapters on your PC:
netsh interface ip show config
- Here, check the DHCP enabled field to identify if DHCP is turned on or off. For example, we are connected to the network via Wi-Fi. So, we will check the Wi-Fi adapter as shown below.


Enable DHCP
If the DHCP enabled field states No, here’s how you can enable it:
- In the terminal, execute the following command:
netsh interface ip set address "Wi-Fi” dhcp
- Now, run the below command and check the adapter to confirm that DHCP is now turned on:
netsh interface ip show config


Disable DHCP
If the DHCP enabled field shows Yes, here’s how you can disable it:
- Run the below command line in the terminal to set static IP addresses:
netsh interface ip set address "Wi-Fi" static [IP Address] [Subnet Mask] [Defaut Gateway]
- Then, execute the following to set the primary DNS server:
netsh interface ip set dnsserver "Wi-Fi" static [Static Address]
If you get the “The configured DNS server is incorrect or does not exist” error, copy and paste the below command to set it without DNS validation:
netsh interface ip set dnsserver "Wi-Fi" static 8.8.8.8 validate=no
- Finally, run the following command and check the adapter section to confirm that DHCP is now disabled:
netsh interface ip show config


From Router Settings
The final method to configure DHCP settings is from your router’s configuration page. Indeed, this is much more reliable and even applies to all the other devices on your network. Below are the involved steps that should help you enable/disable DHCP on any router:
- Open any web browser and run your router’s address to open the Router Configuration page.
- Now, input the username and password. If you’re unsure about this, contact your ISP.
- Once you’re logged in, navigate to DHCP > DHCP Settings or a relevant field. This can be distinct for different manufacturers.
- In the DHCP server, select the Enable option. Then, save this setting, and the DHCP should turn on.

- To disable the DHCP server, select Disable. Then, input both the Start and End IP addresses. Now, save the setting, and this should do your work.


By Timothy Tibbettson 06/15/2023 |
Dynamic Host Configuration Protocol (DHCP) is a client/server protocol that automatically provides an Internet Protocol (IP) host with its IP address and other related configuration information such as the subnet mask and default gateway. If you’re looking at advanced internet connection troubleshooting, you may need to enable or disable DHCP.
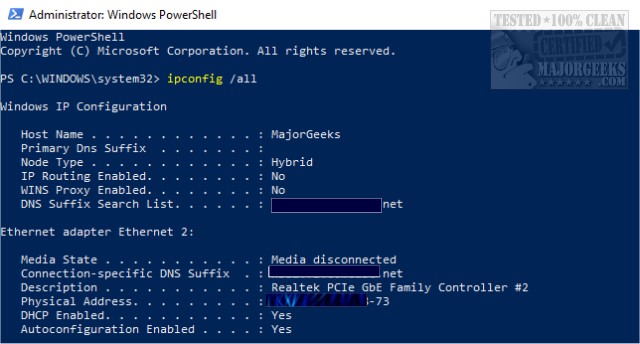
Before we get started, it’s quick and easy to find out if DHCP is enabled, so let’s save some time here. Open the Command-Prompt or PowerShell and type in ipconfig /all. Find your adapter and look for the Yes or No next to DHCP Enabled
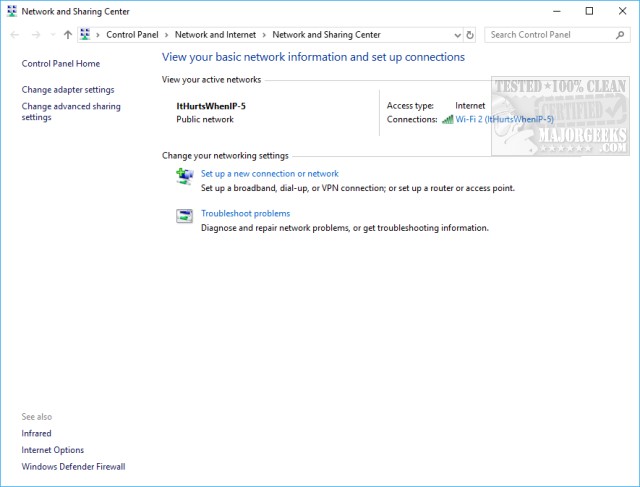
To enable or disable DHCP, we need to go to Control Panel, Network and Sharing Center. On the left, click on Change adapter settings. Now right-click on your internet connection (ethernet or wireless) and select Properties.
1: Enable DHCP
Double-click on Internet Protocol Version 4 (TCP/IPv4).
By default Obtain an IP address automatically and Obtain DNS server address automatically should both be checked. If they are checked, then DHCP is indeed on.
1: Disable DHCP
To disable DHCP, follow all of the above steps except you need to select Use the following IP address and Use the following DNS server addresses, and you’ll need to enter further details including IP address, Subnet mask, Default gateway, Preferred DNS server, and Alternate DNS server.
Every Internet Service Provider is different so you’ll need to find the paperwork they left behind, compare with another device, or call your ISP for these details.
comments powered by Disqus
On the Windows Server, you can remove DHCP role using two ways – Server Manager and PowerShell. I will cover both the methods to completely remove the DHCP role and management tools from Windows Server.
You can use this guide to remove the DHCP role from Windows Server 2019, Windows Server 2022. The guide should work on all the latest Windows Server operating systems.
You can remove the DHCP role from Windows Server using PowerShell or GUI (Server Manager). The PowerShell method is quick and easy while with Server Manager, you have to go through few steps for DHCP role removal.

First a small introduction about DHCP. Dynamic Host Configuration Protocol (DHCP) is a client/server protocol that automatically provides host with its IP address and other related configuration.
The other information includes the subnet mask and default gateway. DHCP allows hosts to obtain required TCP/IP configuration information from a DHCP server. DHCP can also update DNS records on behalf of its clients.
You shouldn’t install DHCP Server role on domain controllers. It is best to leave the domain controller server running without installing any other roles on it.
There is no advantage of running DHCP on domain controller. It is best to install and run the DHCP server services on a dedicated server or VM.
If you are new to the concept of DHCP, I recommend reading about the DHCP basics from Microsoft DHCP documentation. Learn how to manage DHCP servers by creating a device collection for DHCP servers in SCCM.
Remove DHCP Role using Windows Server GUI
To remove roles and features on Windows Server, you must also use Server Manager. Launch the Server Manager and click Manage > Remove Roles and Features.

On the Server Selection window, click Next.

On the Remove server roles page, uncheck the DHCP Server option.

When asked for Remove features that require DHCP server box, click Remove Features. Ensure the remove management tools option is checked. This means the DHCP management tools are also removed along with the DHCP role on the server.

On the Features page, don’t select anything. Click Next.

On the Confirmation window, click Remove.

The DHCP role removal on Windows Server begins now. On the Results page, wait for the feature removal to complete.
Removing the DHCP Server role, also removes the DHCP server service from the list of services.
After the DHCP role is removed from the Windows Server, the server requires a restart. To complete removing the DHCP features, restart the server.
Upon restart, you will notice that DHCP role and management tools are uninstalled from the server.

Tip – If you launch the event viewer on the Windows Server, you can see a list of events that indicate the DHCP role removal from Windows Server. This is optional, and you can use them to troubleshoot DHCP role removal issues.
Initiating changes to turn off update DHCPServer of package DhcpServerRole. Client id: DISM Package Manager Provider.
Initiating changes to turn off update DHCPServer-Tools of package DhcpServerToolsRole. Client id: DISM Package Manager Provider.
A reboot is necessary before the selectable update DHCPServer of package DhcpServerRole can be turned off.
A reboot is necessary before the selectable update DHCPServer-Tools of package DhcpServerToolsRole can be turned off.
Selectable update DHCPServer of package DhcpServerRole was successfully turned off.
Selectable update DHCPServer-Tools of package DhcpServerToolsRole was successfully turned off.
Remove DHCP Role using PowerShell on Windows Server
You can use PowerShell to remove DHCP role from Windows Server. This is an alternate method to uninstall DHCP role in case you want to avoid using the Server Manager.
Launch the PowerShell as administrator. There are two commands that you need to use to completely remove DHCP role and management tools from Server.
First, run the following PowerShell command to remove DHCP role from Windows Server.
Uninstall-WindowsFeature DHCP -Remove
When you run the above command, the DHCP role uninstalls from Windows Server. You must restart this server to finish the removal process. But wait, you can run the next command and then restart the server.

In the same PowerShell window, run another command to remove the DHCP console as well.
Uninstall-WindowsFeature RSAT-DHCP
To complete the removal of DHCP role, restart the Windows Server. The DHCP server services and DHCP console are uninstalled.

Still Need Help?
If you need further assistance on the above article or want to discuss other technical issues, check out some of these options.
This instruction is useful for ESXI virtual machines that have the IP address of the real machine.
A
situation is possible when the machine, after starting, automatically
receives an address from the 169. *. *. * This address ultimately
prevents the machine from connecting to the network, while the manually
set address is ignored. You can see this situation in the screenshot.
In order to correct this situation, it is necessary to disable DHCP address acquisition option on the server.
To do this, you need to start the command line and type the following command.
ipconfig /all
In the output, note the following lines:
Autoconfiguration IPv4 Address. . : 169.254.248.201(Preferred)
Subnet Mask . . . . . . . . . . . : 255.255.0.0
IPv4 Address. . . . . . . . . . . : 192.168.1.136(Duplicate)
As you can see, the preferred address is 169.254.248.201, with which the connection will fail.
Please, enter the following command:
netsh interface ipv4 show inter
The output will show a list of active system interfaces:
Idx Met MTU State Name

--- ---------- ---------- ------------ ---------------------------

1 75 4294967295 connected Loopback Pseudo-Interface 1

2 1 1500 disconnected VPN - VPN Client

12 25 1500 connected Ethernet 2
The latter is the index of the interface that is connected to the network. Further, we will indicate that index as a preferable one for the system.
netsh interface ipv4 set interface 12 dadtransmits=0 store=persistent
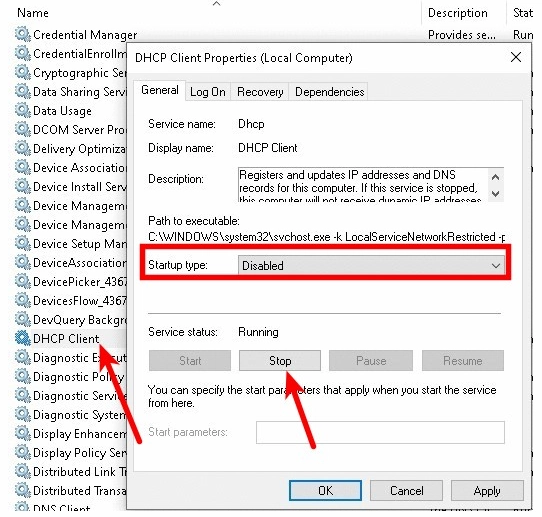
Instead of 12, you may have a different number. Next, go to «Control Panel — Administrative Tools — Services» and disable the autostart of the DHCP service.
В статье – Установка маршрутизатора pfSense в Hyper-V мы настроили маршрутизатор pfSense для работы в частной сети. Сегодня мы настроим Windows Server для работы в этой сети используя только командную строку PowerShell.
Мы отключим DHCP на интерфейсе, удалим все ip-адреса, сбросим маршруты и настройки DNS и всё это из командной строки! После этого настроим сетевой адаптер указав ему ip-адрес, шлюз и сервер DNS.
Запустим PowerShell из-под администратора.
Отключаем DHCP-клиент на интерфейсе через командную строку
Проверим каким образом сервер получает ip-адрес, в консоли запустим:
Get-NetIPConfiguration -DetailedComputerName : SD-SERVER-1
InterfaceAlias : Ethernet
InterfaceIndex : 12
InterfaceDescription : Сетевой адаптер Hyper-V (Майкрософт)
NetAdapter.LinkLayerAddress : 00-15-5D-01-28-02
NetAdapter.Status : Up
NetProfile.Name : soft.altuninvv.ru
NetProfile.NetworkCategory : DomainAuthenticated
NetProfile.IPv6Connectivity : NoTraffic
NetProfile.IPv4Connectivity : LocalNetwork
IPv4Address : 192.168.1.39
IPv4DefaultGateway : 192.168.1.1
NetIPv4Interface.NlMTU : 1500
NetIPv4Interface.DHCP : Enabled
DNSServer : 127.0.0.1Строка:
NetIPv4Interface.DHCP : EnabledУказывает что DHCP-клиент включен на интерфейсе.
Отключим DHCP, для этого нам нужен индекс интерфейса:
InterfaceIndex : 12Запустим:
Set-NetIPInterface -ifIndex 12 -Dhcp DisabledУдаляем все ip-адреса через командную строку
Очистим все уже установленные адреса, если они есть:
Remove-NetIPAddress -InterfaceIndex 12 -AsJobМаршруты:
Remove-NetRoute -AsJobУстановим DNS как локальный адрес:
Set-DnsClientServerAddress -InterfaceIndex 12 -ServerAddresses (127.0.0.1)Проверим:
ipconfig /allНастройка протокола IP для Windows
Имя компьютера . . . . . . . . . : sd-server-1
Основной DNS-суффикс . . . . . . : soft.altuninvv.ru
Тип узла. . . . . . . . . . . . . : Гибридный
IP-маршрутизация включена . . . . : Нет
WINS-прокси включен . . . . . . . : Нет
Порядок просмотра суффиксов DNS . : soft.altuninvv.ru
Ethernet adapter Ethernet:
DNS-суффикс подключения . . . . . :
Описание. . . . . . . . . . . . . : Сетевой адаптер Hyper-V (Майкрософт)
Физический адрес. . . . . . . . . : 00-15-5D-01-28-02
DHCP включен. . . . . . . . . . . : Нет
Автонастройка включена. . . . . . : Да
Автонастройка IPv4-адреса . . . . : 169.254.97.43(Основной)
Маска подсети . . . . . . . . . . : 255.255.0.0
Основной шлюз. . . . . . . . . :
DNS-серверы. . . . . . . . . . . : 127.0.0.1
NetBios через TCP/IP. . . . . . . . : Включен
Туннельный адаптер isatap.{0694B4DA-F8D3-456C-B0E2-2A1269DE1267}:
Состояние среды. . . . . . . . : Среда передачи недоступна.
DNS-суффикс подключения . . . . . :
Описание. . . . . . . . . . . . . : Адаптер Microsoft ISATAP
Физический адрес. . . . . . . . . : 00-00-00-00-00-00-00-E0
DHCP включен. . . . . . . . . . . : Нет
Автонастройка включена. . . . . . : ДаНастройки сети сброшены!
Отключаем IPv6 через командную строку
Проверим:
Get-NetAdapterBinding -ComponentID 'ms_tcpip6'Name DisplayName ComponentID Enabled
---- ----------- ----------- -------
Ethernet Протокол Интернета версии 6 (TCP/IPv6) ms_tcpip6 TrueОтключим:
Get-NetAdapterBinding -ComponentID ‘ms_tcpip6’ | Disable-NetAdapterBinding -ComponentID ‘ms_tcpip6’ -PassThruПроверим еще раз:
Get-NetAdapterBinding -ComponentID 'ms_tcpip6'Name DisplayName ComponentID Enabled
---- ----------- ----------- -------
Ethernet Протокол Интернета версии 6 (TCP/IPv6) ms_tcpip6 FalseIPv6 отключен на сервере.
Установка статического адреса
Выполним в консоли:
Get-NetAdapter -ifIndex 12 | New-NetIPAddress –IPAddress 172.16.0.1 -DefaultGateway 172.16.0.254 -PrefixLength 24Установим DNS:
Set-DnsClientServerAddress -InterfaceIndex 12 -ServerAddresses (172.16.0.254)Проверим настройки сети:
ipconfig /allНастройка протокола IP для Windows
Имя компьютера . . . . . . . . . : sd-server-1
Основной DNS-суффикс . . . . . . : soft.altuninvv.ru
Тип узла. . . . . . . . . . . . . : Гибридный
IP-маршрутизация включена . . . . : Нет
WINS-прокси включен . . . . . . . : Нет
Порядок просмотра суффиксов DNS . : soft.altuninvv.ru
Ethernet adapter Ethernet:
DNS-суффикс подключения . . . . . :
Описание. . . . . . . . . . . . . : Сетевой адаптер Hyper-V (Майкрософт)
Физический адрес. . . . . . . . . : 00-15-5D-01-28-02
DHCP включен. . . . . . . . . . . : Нет
Автонастройка включена. . . . . . : Да
IPv4-адрес. . . . . . . . . . . . : 172.16.0.1(Основной)
Маска подсети . . . . . . . . . . : 255.255.255.0
Основной шлюз. . . . . . . . . : 172.16.0.254
NetBios через TCP/IP. . . . . . . . : ВключенПроверим доступность шлюза:
ping 172.16.0.254Обмен пакетами с 172.16.0.254 по с 32 байтами данных:
Ответ от 172.16.0.254: число байт=32 время<1мс TTL=64
Ответ от 172.16.0.254: число байт=32 время<1мс TTL=64
Ответ от 172.16.0.254: число байт=32 время<1мс TTL=64
Ответ от 172.16.0.254: число байт=32 время<1мс TTL=64Шлюз доступен и сайты открываются.
Проверим настройки:
Заключение
Сегодня мы рассмотрели настройку локальной сети в Windows Server с использованием PowerSell:
Отключили получения адреса посредством DHCP;
Удалили все адреса с интерфейса;
Удалили все маршруты;
Установили адрес DNS для интерфейса как 127.0.0.1;
Отключили IPv6 на интерфейсе:
Установили статический адрес, шлюз и адрес DNS-сервера для интерфейса.
Проверили настройки и доступность сети Интернет.