
Все способы:
- Вариант 1: Функция «Ночной свет»
- Способ 1: Панель уведомлений
- Способ 2: Приложение «Параметры»
- Вариант 2: Темная тема
- Способ 1: Приложение «Параметры»
- Способ 2: «Редактор реестра»
- Вопросы и ответы: 0
Под ночным режимом в Windows 10 можно понимать как «Ночной свет», так и «Темную тему» – обе эти настройки служат для снижения нагрузки на зрение в темное время суток. Ниже рассмотрены оба варианта.
Вариант 1: Функция «Ночной свет»
Функция «Ночной свет» в Windows 10 позволяет уменьшать яркость экрана в автоматическом режиме в указанное пользователем время. При этом фон «Проводника» и приложения «Параметры» остается неизменным.
Способ 1: Панель уведомлений
Самый быстрый и простой способ отключить опцию «Ночной свет» в Windows 10. Позволяющая это сделать настройка доступна на «Панели уведомлений».
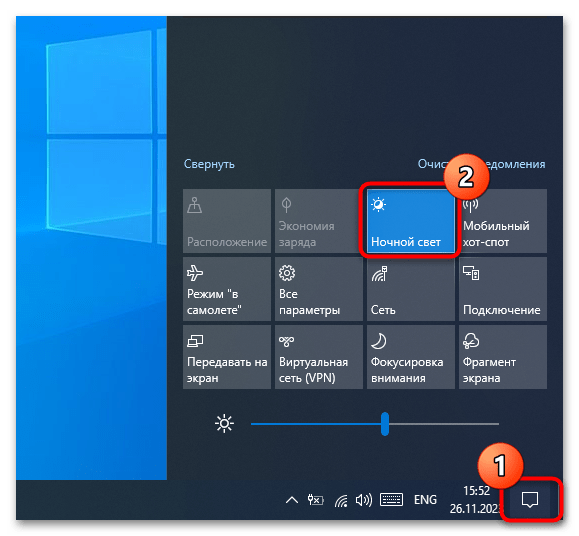
- Нажмите кнопку «Уведомления», расположенную в правой части системного лотка.
- В нижней части открывшейся «Панели уведомлений» нажмите плитку «Ночной свет». Подсвеченная плитка изменит цвет на серый, что станет означать, что функция ночного света отключена.
Способ 2: Приложение «Параметры»
Как и многие другие настройки, «Ночной свет» может быть отключен в приложении «Параметры».
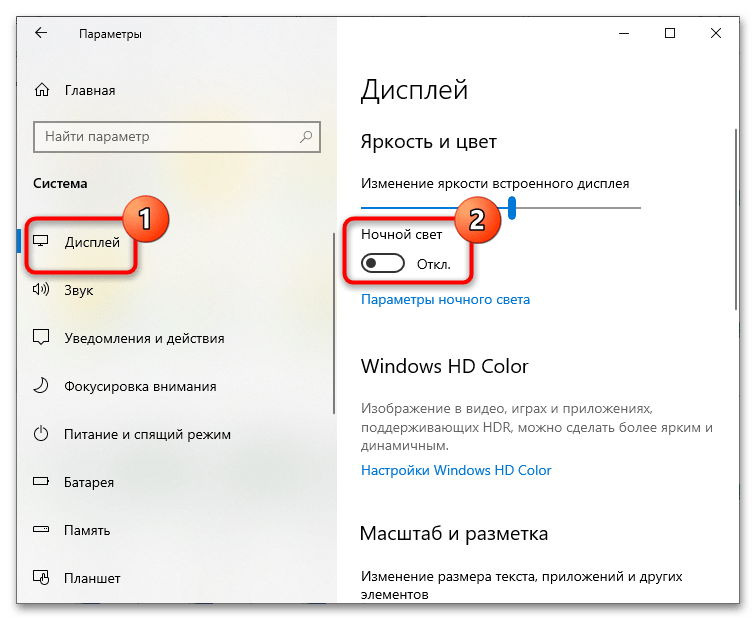
- Откройте приложение «Параметры» и перейдите в раздел «Система» → «Дисплей».
- Установите переключатель «Ночной свет» в положение «Откл.».
Вариант 2: Темная тема
В Windows 10 имеется встроенная темная тема, применяемая к «Проводнику» и приложению «Параметры», а также режим высокой контрастности – темный и светлый его варианты. Если они активны, отключите их.
Способ 1: Приложение «Параметры»
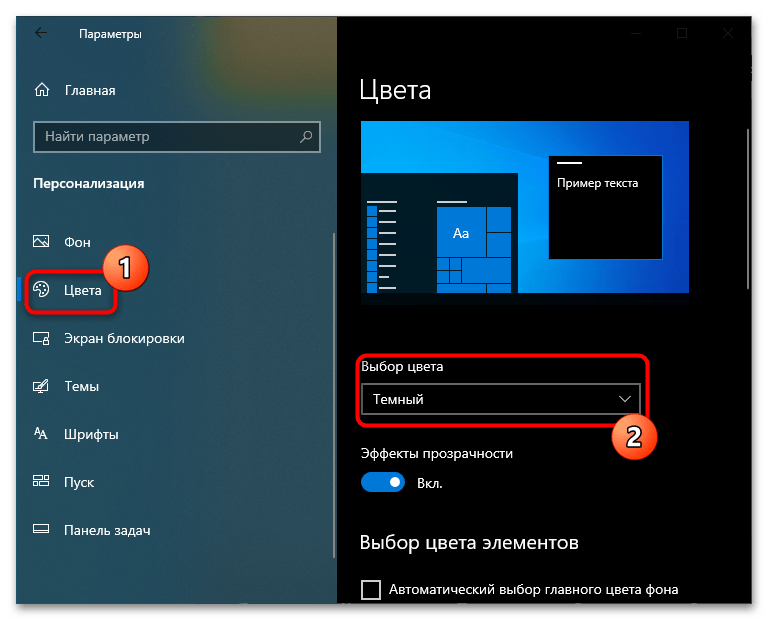
- Откройте приложение «Параметры», перейдите в раздел «Персонализация» → «Цвета» и откройте выпадающее меню «Выбор цвета».
- Выберите в списке режим «Светлый».
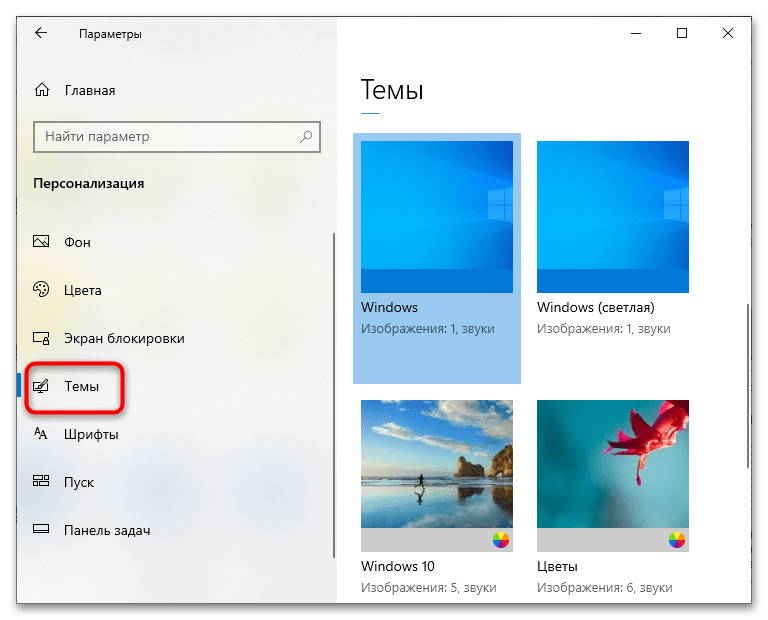
- Перейдите тут же в подраздел «Персонализация» и убедитесь, что используется нужная тема, поскольку в нем также могут присутствовать темные темы, скачанные из «Microsoft Store».

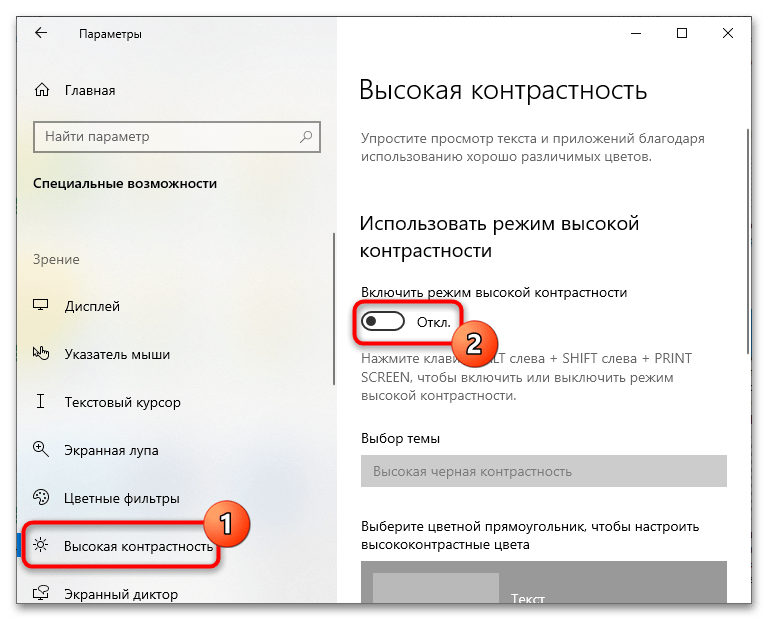
Если на компьютере используется темный вариант режима высокой контрастности, в приложении «Параметры» перейдите в раздел «Специальные возможности» → «Высокая контрастность» и установите переключатель «Включить режим высокой контрастности» в положение «Откл.».
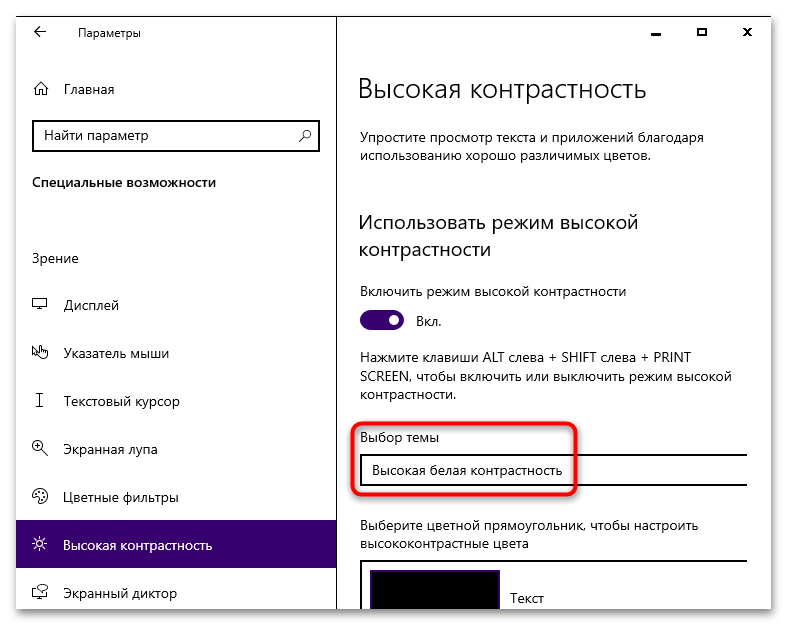
Когда режим контрастности нужен, из выпадающего списка «Выбор темы» выберите «Высокая белая контрастность».
Способ 2: «Редактор реестра»
Этот способ позволяет отключить темную тему оформления при недоступности соответствующих настроек в приложении «Параметры».
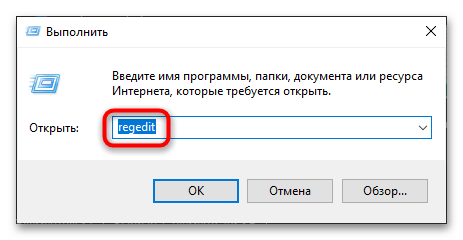
- Запустите «Редактор реестра», для чего вызовите нажатием клавиш Win + R диалоговое окошко «Выполнить», введите в него команду
regeditи нажмите клавишу Enter. - Разверните ключ
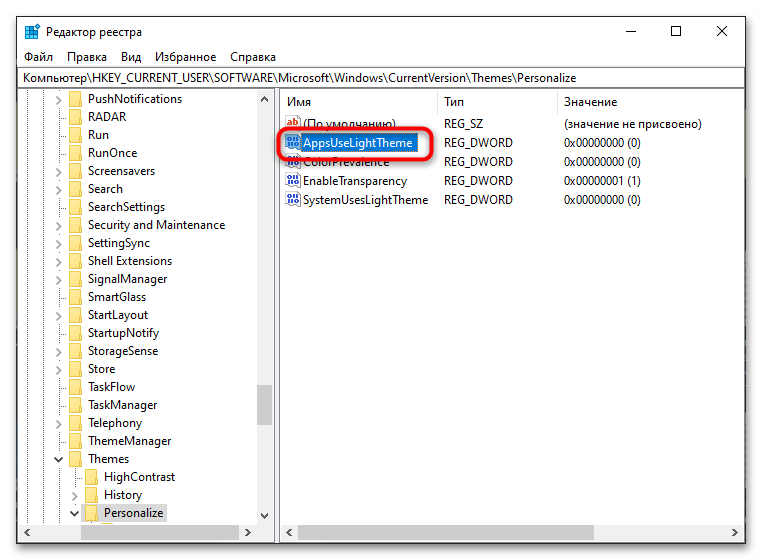
HKEY_CURRENT_USER\SOFTWARE\Microsoft\Windows\CurrentVersion\Themes\Personalize - Двойным кликом откройте окошко его редактирования и задайте в качестве его значения «1» вместо «0». Сохраните настройки.
и найдите в правой колонке параметр «AppsUseLightTheme».
Изменения вступят в силу сразу же, перезапуск «Проводника» не понадобится.
Наша группа в TelegramПолезные советы и помощь
While working on your Windows computer, the lighting conditions in your environment may change continuously. To ensure the screen display is readable at all times, you have the option to adjust the screen brightness in Windows. But the operating system offers another feature that ensures ideal legibility in dark working environments. Windows 10 dark mode displays windows and menu elements in dark colors. These display settings go easy on your eyes and save battery life, since energy consumption is reduced. What’s more, the black elements can look sleeker compared to the default white. We show you three ways to activate the Windows 10 dark theme.
Option 1: manage Windows 10 dark mode via the settings
The settings application is the quickest and easiest option for enabling and disabling Windows 10 dark mode. Here, you can define the main settings of Windows 10 in just a few clicks, including the display language, lock screen or sound effects. Follow our step-by-step guide and learn how to enable the Windows 10 dark mode in the personalization area.
This option is only available from Windows 10 Version 1607.
Step 1: open the settings app
To open the settings app, enter the corresponding term into the search field in the task bar. Select the right search result in the left area by clicking the left mouse button or click on the option “Open” on the right.

Open the settings app directly using the shortcut [Windows] + [i].
Step 2: access the “Colors” tab in the “Personalization” menu
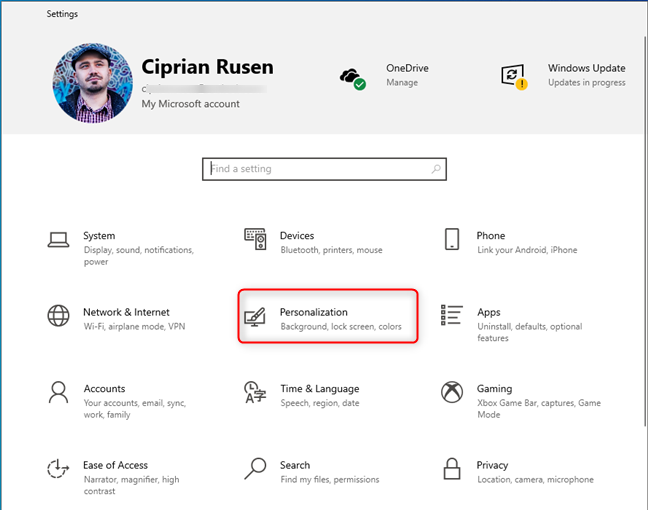
Next, select the option “Personalization” in the Windows settings using the left mouse button.

Alternatively, you can access this section by right-clicking on the desktop to launch the context menu and then selecting the option “Personalize”.
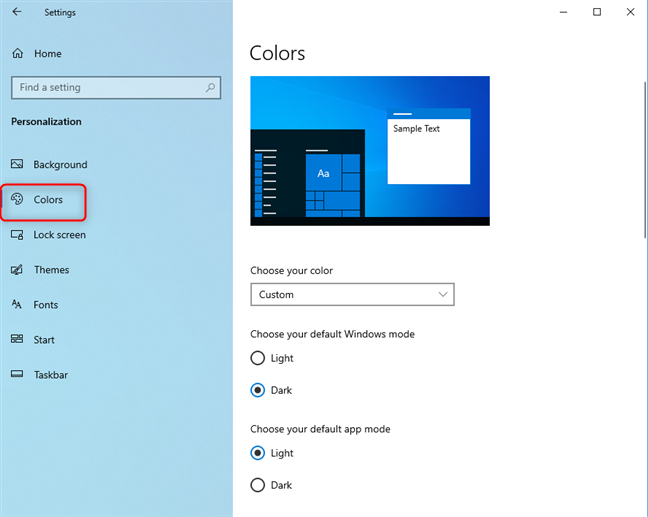
Select the “Colors” menu tab to access the settings for the color display of Windows 10.

Step 3: activate Windows 10 dark mode
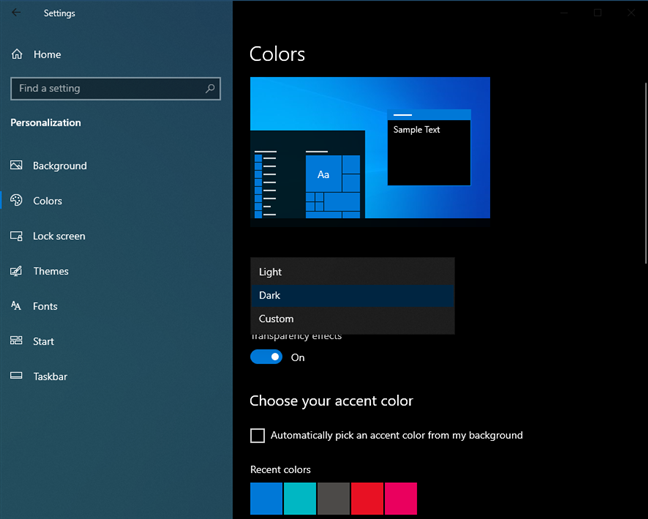
To activate the Windows 10 dark theme, click on the “Choose your color” drop-down menu and then select the option “Dark”. The operating system will immediately apply the setting and display the dark mode, with all elements in black or gray. If you want to deactivate the Windows 10 dark theme at a later time, select the option “Bright” here instead.

Step 4: Define other settings
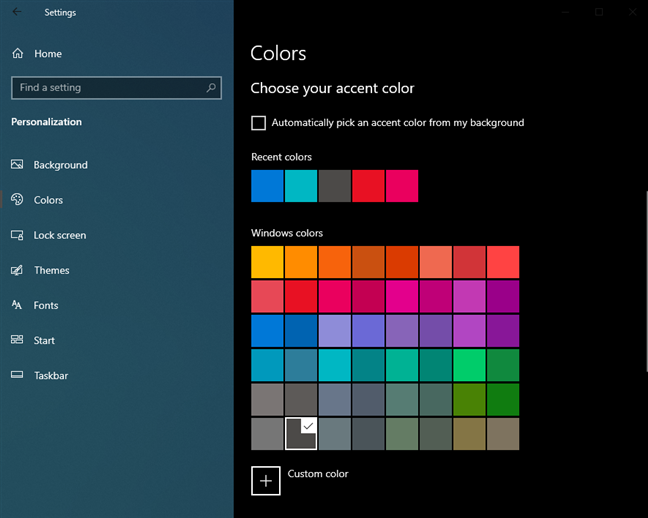
You also have the option to choose an accent color. If you personalize this setting, Windows will display certain elements in the selected color. Once you select an accent color, it will be shown with a checkmark in the top-right corner. Scroll down to define the color for other areas too, such as for the “Start” section, task bar or info center.

Option 2: enable/disable the Windows 10 dark theme via Windows Registry
If you’re working with an older Windows 10 version, the option to enable the Windows 10 dark theme is often not yet available in the settings app. In this case, you can activate and deactivate the dark mode in the registry. Simply use the default registry editor – also known as “Regedit”.
Step 1: open the “Run” dialog
Open the “Run” dialog via the Start menu or by using the key combination [Windows] + [R]. Next, enter the command “regedit” into the entry field and confirm with “OK”.

If the program asks for permission to make changes, confirm by pressing “OK”. The registry editor will launch.
Step 2: open the file path for Windows 10 dark mode
The Windows Registry is a configuration database. In the left area, Regedit gives you access to all content in this database – like how you may be used to with the Windows file manager. First select the drop-down menu “HKEY_Current_User”. Next, follow the file path below:
.\Software\Microsoft\Windows\CurrentVersion\Themes\PersonalizeCopy the path “Computer\HKEY_CURRENT_USER\Software\Microsoft\Windows\CurrentVersion\Themes\Personalize” using the key combination [Ctrl] + [C] and insert it into the address bar of the registry editor using [Ctrl] + [V] to gain direct access to the registry entry for the Windows 10 dark theme.

Step 3: activate the Windows 10 dark theme
After you have opened the entry, click on an empty space in the right area using the right mouse button. You will then see the drop-down menu “New”. Select the option “DWORD-Value (32-Bit)”.

After you have selected the option, a new value will appear in the list.

Next, rename the value to “AppsUseLightTheme”. Open it by double-clicking. Check whether the entered value equals “0”. This means “No” and deactivates the bright mode. If this is not the case, adjust the value accordingly and confirm with OK. This activates Windows 10 dark mode.

To deactivate the dark theme, change the value for the registry entry “AppsUseLightTheme” to “1”.
Option 3: use external software for dark mode management
If you often switch between Windows 10 dark mode and the standard bright settings, the process via the registry is rather cumbersome. When activating the dark mode via the system settings is not possible, it’s advisable to install suitable software. This way, you will also be able to switch between a bright and dark mode in older Windows versions. So you won’t need to go through the registry editor. Here are two free tools that are available.
Easy Dark Mode for Windows
The free tool Easy Dark Mode enables you to switch between both themes (“Bright” and “Dark”) with just a few clicks. The optional switch panel is size-adjustable and is shown before all other windows. Plus, you have the option to enable and disable the dark mode in Chrome (from Version 74) and in Firefox (from Version 63).
Windows 10 Dark Theme Activator
Another free option is the Windows 10 Dark Theme Activator. This tool also lets you conveniently activate and deactivate the Windows 10 dark theme. The disadvantage with this software is that you need to log in and out with your user account to switch between modes.
Was this article helpful?
Quick Tips
- All operating systems offer a Dark Mode toggle in their settings, allowing you to easily disable it if need be.
- You can even disable dark mode from Quick Settings or by using a voice assistant.
- On iOS, you can just say “Hey Siri, turn off dark mode”, and it’ll disappear
The system-level color scheme is customizable so that it can display darker tones on menus and backgrounds, making it easier on your eyes. Additionally, the dark theme applies to several apps, such as Microsoft Edge, Calendar, Mail, Store, Settings, Calculator, Alarms, and Clocks, to dark mode. That said, disabling Dark Mode or Dark Theme in Windows 11 is super simple.
Step 1: Press the Windows + I keys together on your keyboard to launch Settings. Here, navigate to Personalization, and then click on Colors.

Step 2: Inside the Colors settings, find the setting for ‘Choose your mode‘. Change this to Light.

And that’s it. Windows should switch to the light mode, making it easier to view, especially under direct sunlight.
Disable Dark Mode in macOS
Like Windows, Apple’s dark mode is a system-level setting in macOS that works with all the default apps. While Dark mode was introduced in macOS 10.14 Mojave, it isn’t enabled by default. Thankfully, turning it on is as easy as turning it off.
If your Mac runs macOS Mojave or later version, take the steps below to turn off the dark mode:
Step 1: Click the Apple Menu and select System Preferences.
Step 2: In the System Preferences screen, click General preference.
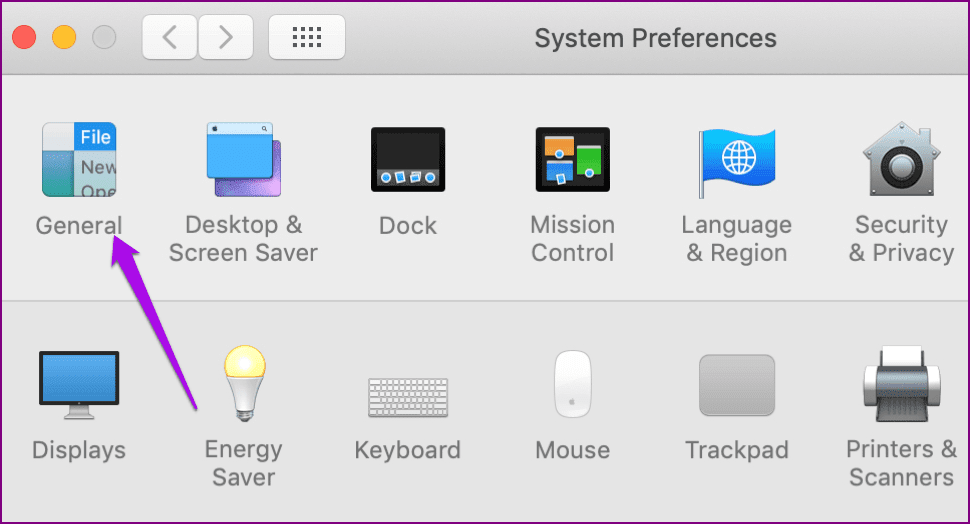
Step 3: Click the Light icon next to Appearance to return to Light Mode.

Alternatively, if you’re running El Capitan or OS X Yosemite, dark mode turns the background darker, and the fonts become white, and the effect is spread across the menu bar and its items, dock, and drop-down menu. You can disable it using the steps below:
Step 1: Click the Apple Menu and select System Preferences.
Step 2: In the System Preferences screen, click General.
Step 3: You’ll see a checkbox: Use dark menu bar and dock. Click to deselect it, and you’ll immediately see the light effect restored in the menu bar, menu bar items, and a transparent light gray background at the dock.

Disable Dark Mode on Android
Most Android phones come with a Dark Mode or a Dark Theme, which might have been enabled by you. Thankfully, switching to the Light Mode on Android is super easy. In fact, there are two simple ways to go about it.
Method 1: Using Settings
On your Android device, navigate to Settings > Display. Here, disable the toggle next to Dark Mode, or any other similar name depending on your Android skin.


Method 2: Using Quick Settings
Alternatively, you can swipe down from the Quick Settings tray and tap on the Night Mode (or Dark Mode) tile. This should immediately switch your Android to Light Mode.

Note: The Night Mode/Dark Mode quick settings tile might not be available on all Android skins.
Disable Dark Mode on iOS
iPhones and iPads also got the dark mode feature with the release of iOS 13 and iPadOS 13. For iPhones with OLED displays, the dark mode setting helps maximize battery life, though other models also experience some improvement. That being said, if you’re not a fan of the dark mode feature, you can disable it in three ways: from Settings, Control Center, or using Siri.
Method 1: Using Settings
On your iPhone or iPad, navigate to Settings > Display & Brightness. Here, you’ll see two options in the Appearance section: Light or Dark. Select Light to disable Dark Mode.


Method 2: Using Control Center
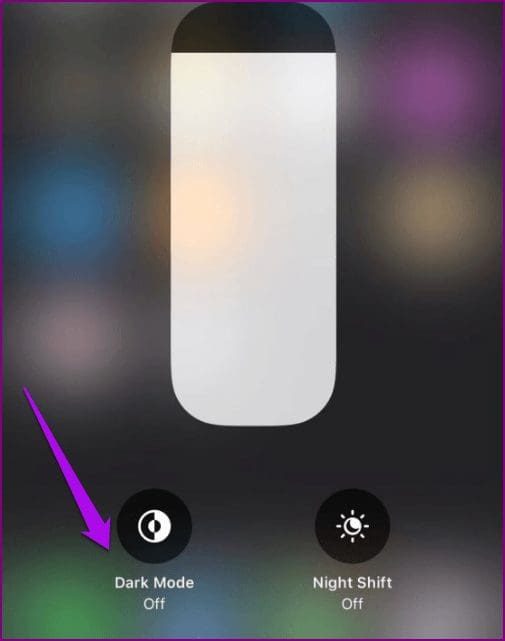
Step 1: Open Control Center on your iOS device. Touch and hold down the brightness control icon.
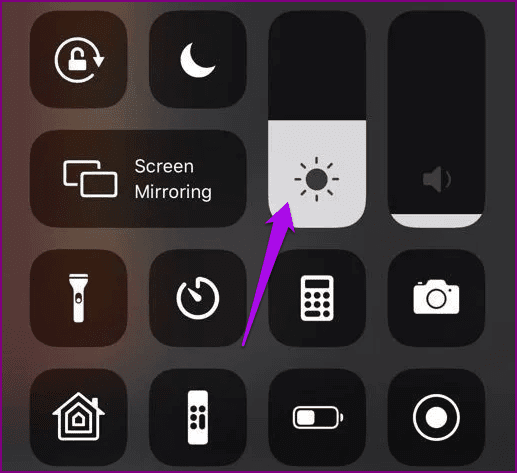
Step 2: Tap Dark Mode Off to leave Dark Mode.
That’s it. Simple, right?
Was this helpful?
Thanks for your feedback!
The article above may contain affiliate links which help support Guiding Tech. The content remains unbiased and authentic and will never affect our editorial integrity.
Windows 10 имеет темный режим. Эта функция не нова и со временем была улучшена. Сегодня он выглядит и работает лучше, чем когда он был впервые запущен еще в 2016 году. Когда он включен, Dark Mode меняет внешний вид интерфейса Windows 10 с белого на черный. Это может быть полезно в условиях низкой освещенности, например, при работе ночью, и может быть одинаково полезно для пользователей, которые предпочитают черный цвет вместо белого. Вот как получить Dark Mode в Windows 10, как включить Dark Mode и как отключить его, чтобы вернуться в обычный режим:
Что такое Dark Mode и как его получить в Windows 10
Темный режим впервые был представлен в Windows 10 в годовом обновлении от 2016 года. С тех пор он постепенно улучшается, и последняя версия Windows 10 — май 2020 года имеет лучший темный режим. Поэтому, если у вас нет Dark Mode на вашем компьютере или устройстве с Windows 10, все, что вам нужно сделать, это обновить Windows 10 до последней версии. Одним из способов сделать это является использование помощника по обновлению Windows 10.
Когда вы включаете темный режим в Windows 10, операционная система и многие ее приложения изменяют свои изображения на темные цвета. Наиболее очевидные изменения:
- Простой белый фон, используемый в приложениях, становится черным
- Белый цвет фона, используемый в меню, становится черным
- Светло-серые полосы прокрутки по умолчанию, используемые в приложениях, становятся темно-серыми
- Черный текст по умолчанию, отображаемый в приложениях, становится белым и т.д.

Как включить Dark Mode в Windows 10
Если вы хотите включить темный режим в Windows 10, сначала откройте «Настройки». Один из способов сделать это — нажать «Пуск», а затем «Настройки». Затем перейдите в раздел «Персонализация».
В столбце слева нажмите или коснитесь Цвета. Справа вы видите несколько настроек, связанных с цветами.
Есть два способа включить Dark Mode. Самый быстрый способ — щелкнуть раскрывающийся список «Выберите свой цвет» и затем выбрать «Темный». Когда вы делаете это, темный режим немедленно применяется к Windows 10 и приложениям, которые его поддерживают.
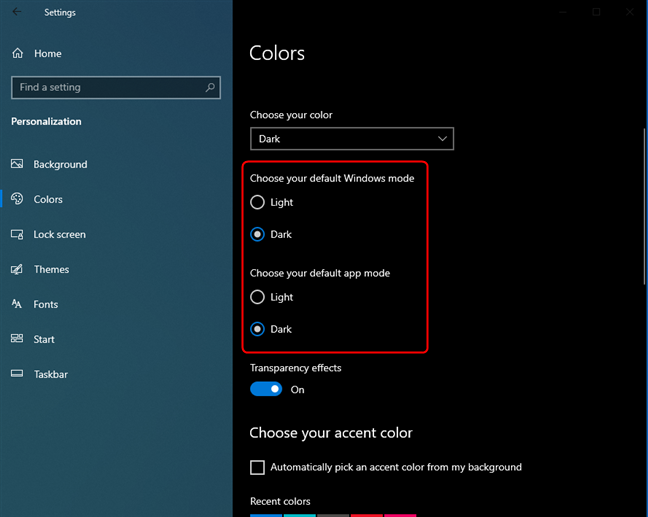
Другой способ включить темный режим — выбрать « Темный» для «Выберите режим Windows по умолчанию» и «Выберите режим приложения по умолчанию». Windows 10 предоставляет вам два независимых варианта для большей гибкости. Первый параметр включает темный режим только для Windows 10, а второй — только для приложений, поддерживающих темный режим.
После включения темного режима вы также можете установить, хотите ли вы эффекты прозрачности, включив или отключив их переключение. Если вы прокрутите немного вниз, вы также можете выбрать цвет акцента.
Ниже списка цветов Windows вы также можете решить, где применяется акцентный цвет:
- Пуск, панель задач и центр действий
- Строки заголовка и границы окна
Поэкспериментируйте с эффектами прозрачности и цветом акцента и установите их по своему желанию. Когда закончите, закройте « Настройки» и темный режим останется активным, используя ваши индивидуальные настройки персонализации.
Когда вам наскучил Темный режим , вы можете отключить его. Однако процесс не интуитивно понятен. Чтобы отключить темный режим в Windows 10, откройте «Настройки» и перейдите в «Персонализация». В левом столбце выберите «Цвета», а затем выберите следующие параметры:
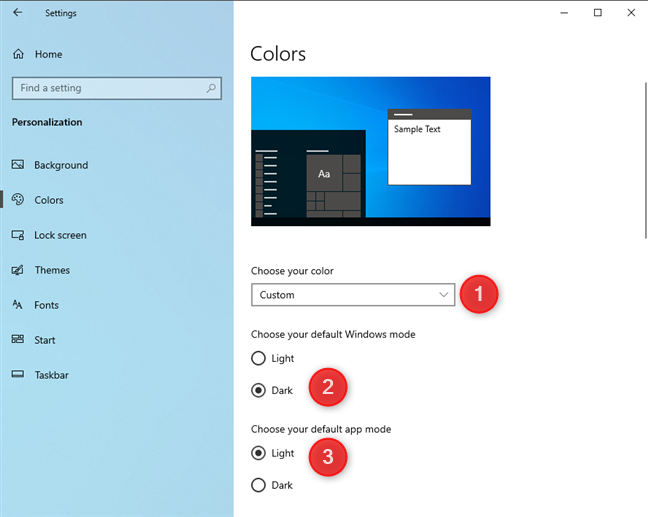
- В раскрывающемся списке «Выберите свой цвет» выберите «Пользовательский».
- В разделе «Выберите режим Windows по умолчанию» выберите «Темный».
- В разделе «Выберите режим приложения по умолчанию» установите флажок «Свет».

Прокрутите немного вниз и поэкспериментируйте с эффектами прозрачности и акцентными цветами, как описано в предыдущем разделе этого урока.
Какие приложения поддерживают Dark Mode в Windows 10?
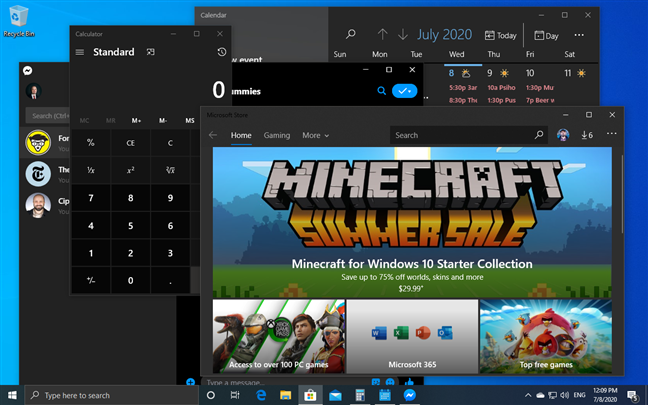
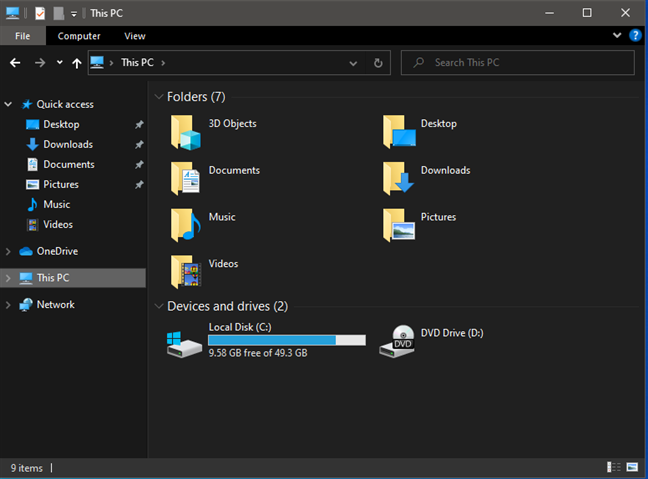
При включении « темный режим» применяется ко многим частям Windows 10: меню «Пуск», окну «Поиск», «Настройки», «Проводник» и многим приложениям Windows 10 (калькулятор, фотографии, почта и календарь, «Магазин Microsoft», Facebook Messenger). Количество приложений с поддержкой Dark Mode со временем растет, поскольку все больше разработчиков программного обеспечения реализуют его.
Мы заметили, что Microsoft Office также использует Dark Mode автоматически, когда вы устанавливаете его в Windows 10. Однако некоторые приложения, такие как Microsoft Edge , этого не делают, и вам придется включать его отдельно. Вот как включить или отключить Темный режим в Microsoft Edge.
ПРИМЕЧАНИЕ. Чтобы еще больше сбить с толку, мы заметили, что новый Microsoft Edge, основанный на том же движке, что и Google Chrome, учитывает настройки, установленные в Windows 10, и включает темный режим при его включении в приложении «Настройки».
Вам нравится Темный режим в Windows 10?
Режим Dark может быть хорошим способом использовать Windows , 10. Это может быть более удобным на ваши глазах, он может сделать приложение более удобным для чтения, и некоторые люди могут даже думать , что похорошел. Тем не менее, нам также нравится Light Mode, и мы переключаемся между режимами раз в пару недель. Прежде чем закрыть этот урок, сообщите нам, какой режим вам больше нравится и почему. Вы поклонник темной стороны? Или свет — единственный путь вперед? 🙂 Комментарий ниже и давайте обсудим.
Просмотров: 4 829