Check Disk, or more often known by its abbreviation CHKDSK, is a built-in tool in Microsoft Windows to scan hard disk drives for errors and bad sectors and repair them. This short tutorial will show you how to skip or disable disk checking on Windows 10 or Windows 11 so that it won’t run on startup again.
Why is disk checking forced to run on startup
If a disk check is automatically scheduled to run every time you turn on your laptop or desktop computer without your consent, it can indicates two possibilities:
- Windows has detected unusual shut down or restart behavior.
- Windows has detected issues on one of your hard disk drives.
If you attempt to interrupt and cancel the disk check by “pressing any key”, you can temporary cancel the disk check for the current session. However, the disk check operation will repeat on every startup until the process can be completed at least once and that the disk has no issue.
What are the proper things to do
Let’s not ignore the obvious. Repeated forced startup disk check is an indication of possible disk errors or even hardware failure. The proper action to be taken is to let the disk check run to completion.
The disk check process will automatically scan for errors and repair them. Once the errors are fixed, Windows will stop scheduling disk checking on startup if there is no other issue detected in any of your disk drives.
If the disk check finds any error that can’t be fixed, it will let you know in the scan reports at the end of the scan. If this is the case, it usually indicates that your hard drive has started to fail or has already failed. You may want to quickly backup any existing data on the disk if you don’t want to lose them later.
How to skip disk check on Windows 10/11
There are two methods to force cancel a scheduled startup disk check on Windows 11/10. If one doesn’t work, try the other.
Stop disk checking via “Command Prompt”
- On Windows 10/11 search bar, search for “cmd“. Right-click on Command Prompt from the search result and click “Run as administrator“.
Windows 10
Windows 11
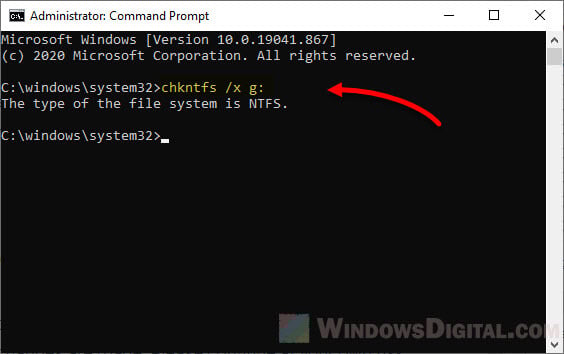
- Enter the following command:
chkntfs /x c:
- Note: Replace C: with the letter of the drive you wish to stop disk checking on Windows startup.
- The /x parameter is to disable auto check for the selected drives on startup.
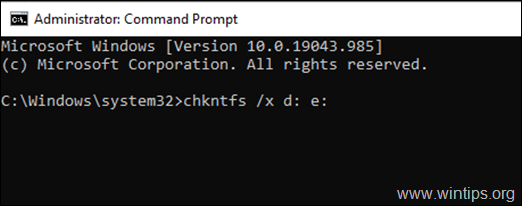
- To stop disk check for multiple drives, add the drive letters to the end of the command. For example:
chkntfs /x c: d: e:
Disable startup check disk scan via “Registry Editor”
Caution: Registry editing can cause serious problem and may potentially corrupt your operating system if incorrect changes are made. Please continue at your own risk.
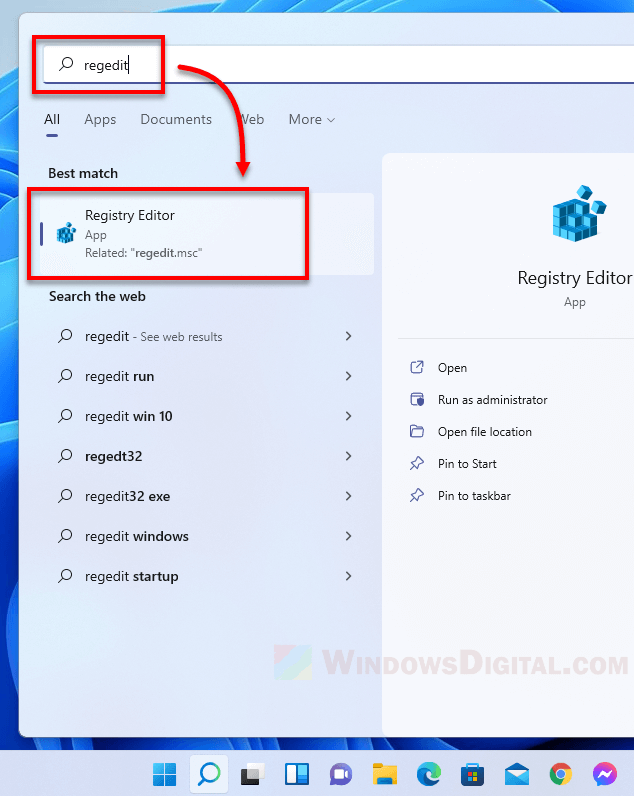
- On the Windows 10/11 start menu, search for and open “regedit” (Registry Editor).
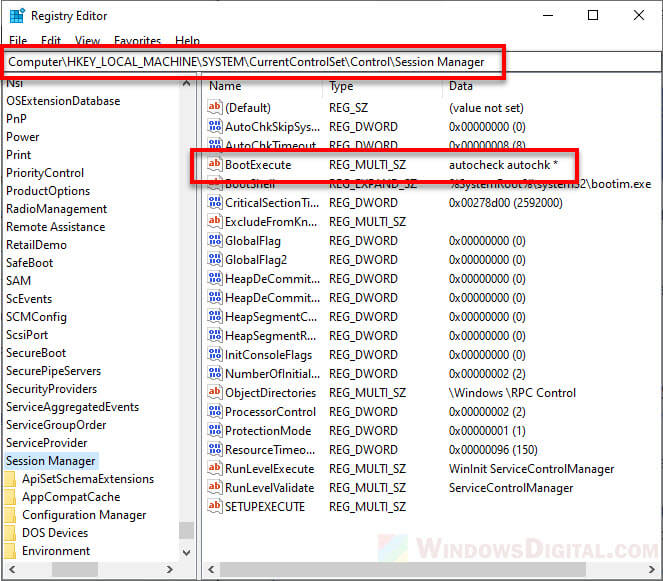
- In the Registry Editor window, navigate to the following path.
HKEY_LOCAL_MACHINE\SYSTEM\CurrentControlSet\Control\Session Manager
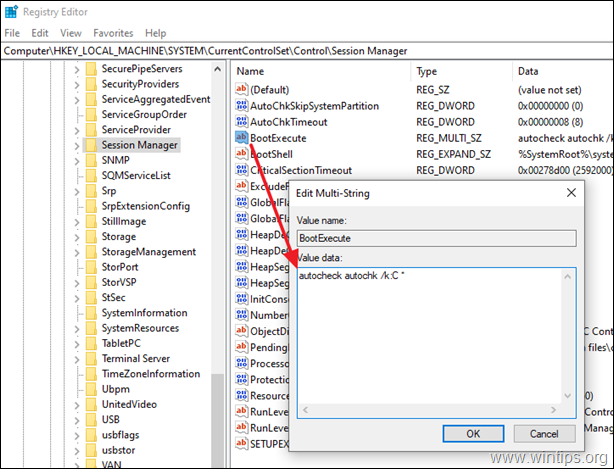
- Double-click on the “BootExecute” key in the right pane.
- In the “Value data” field, change the value to:
autocheck autochk /k:C *
- NOTE: Replace C with the letter of the drive you wish to disable disk checking on Windows startup.
- To disable disk checking for multiple drives, repeat the /k:x. For example:
autocheck autochk /k:C /k:D *
- The /k parameter is to tell autocheck to stop checking C: drive on Windows startup.
- Should you meet any unexpected result, you can change the key’s value back to its default:
autocheck autochk *
- Click OK to save changes.
Close Registry Editor and restart your PC. On the next Windows startup, the disk checking should not appear again.
If the disk checking persists on every startup
If the disk checking continues to run on every startup even after trying the methods above, you may want to seriously consider letting the disk check to complete the scan. If the scan finds any error that cannot be fixed, you may want to backup the existing data immediately before it’s too late, and replace the drive.
If you don’t care if the disk is faulty and that you might lose the data on the disk when it eventually fails, and just want to skip the disk checking on Windows startup, you can create a shortcut file to run the “chkntfs /x c:” (replace c: with the drive letter you wish to skip disk checking on startup) command and include the shortcut file as a startup program.
To create a shortcut file, right-click anywhere on your desktop, select New, then Shortcut. Enter the command as the shortcut path and follow the rest of the on-screen instruction to complete creating the shortcut.
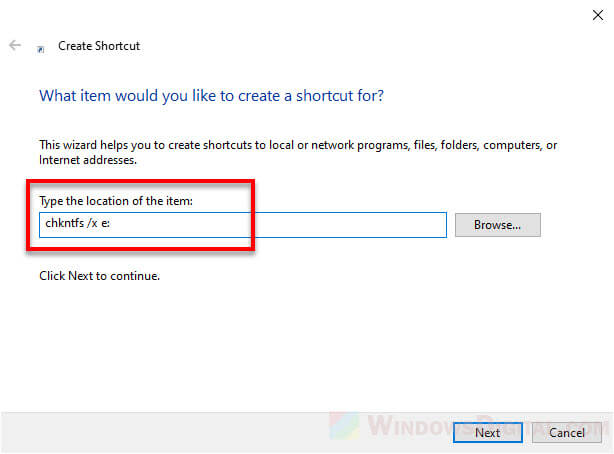
Note that the shortcut file has to be run as administrator for the command to be executed successfully. You can set it to always and automatically run as admin by right-clicking the shortcut file > Properties > Shortcut tab > Advanced > Run as administrator.
To set the shortcut file as a startup program, press Win + R keys to open Run window. In the Run window, type in “shell:startup” and press enter. This will open a folder where all startup programs’ shortcuts are placed. Move the shortcut you’ve created to the startup folder.
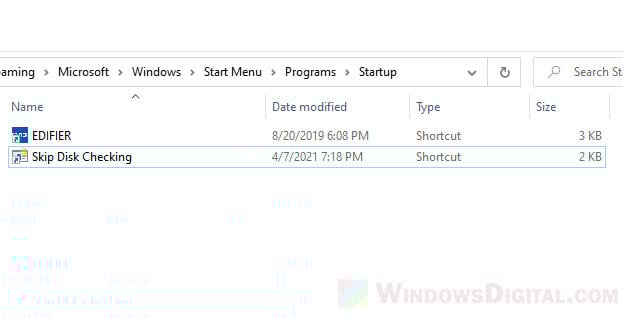
After doing so, the shortcut to execute the skip disk check command will automatically be run on every startup so that Windows will automatically skip the disk checking on the next startup.
,
If you looking for a way to disable CHKDSK from running at Windows Startup, continue reading this tutorial. As you know, if you shut down your computer improperly, Windows will perform a check disk (chkdsk) when you power on it again.
This is happens because Windows incorrectly «thinks» that the drive is having problems and needs to be scanned. But, this behavior is annoying, because the disk checking is not actually required and you will have to wait the scan to be complete if you missed to press a key within 10 sec to skip the disk checking.
Another case where you must stop check disk (chkdsk) from running at Windows Startup, is in dual boot systems running Windows 10 & Windows 7. And this must be done because every time you boot from one of the 2 operating systems, Windows checks and «repairs» the operating system of the other disk, thus corrupting its files or making the disk unreadable.
How to Stop Check Disk at Startup on Windows 10/8/7 OS.
Method 1. Disable CHKDSK at Windows Startup with a command.
The easiest way to stop the automatic disk checking when starting Windows is by using the chkntfs command:
1. Open command prompt as administrator. To do that:
1. In the Search box type: cmd or command prompt
2. Right click on the command prompt (result) and select Run as Administrator.
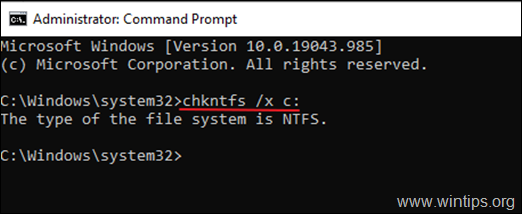
2. Type the chkntfs command in the following syntax:
- chkntfs /x DriveLetter:
* Note: Where DriveLetter is the drive that you want to exclude from disk checking.
Examples.
1. If you like to exclude disk C: from scanning at Windows Startup, type:
- chkntfs /x c:

2. If you want to disable the disk checking on two drives (e.g. the D: & E: drives) , type:
- chkntfs /x d: e:

3. That’s it. From now on the disk checking will stop on drives specified.
* Note: To re-enable chkdsk on the future, give this command with administrative privileges:
- chkntfs /d
Method 2. Stop CHKDSK at Startup using Registry.
The second method of disabling chkdsk when booting into Windows is for those familiar with Registry Editor:
1. Open the Registry Editor. To do that:
a. Simultaneously press the Windows + R keys to open run command box.
b. Type regedit and press Enter.
2. Navigate to the following key at the left pane:
- HKEY_LOCAL_MACHINE\SYSTEM\CurrentControlSet\Control\Session Manager
3. At the right pane, open the BootExecute (REG_MULTI_SZ) value and after autocheck autochk, type: «/k:DriveLetter *» (without quotes)
* Note: Where DriveLetter is the drive that you want to exclude from disk checking.
Examples.
1. If you like to prevent chkdsk at startup on drive C: modify the BootExecute data value, as follows:
- autocheck autochk /k:C *

2. If you want to disable the chkdsk on drives C: & D: , modify the BootExecute data value, as follows:
- autocheck autochk /k:C /k:D *
3. When done, click OK, close the Registry Editor and you’re ready! *
* Note: To restore the BootExecute key to its default value, type in the value data:
- autocheck autochk *
That’s it! Which method worked for you?
Let me know if this guide has helped you by leaving your comment about your experience. Please like and share this guide to help others.
If this article was useful for you, please consider supporting us by making a donation. Even $1 can a make a huge difference for us in our effort to continue to help others while keeping this site free:
- Author
- Recent Posts
Konstantinos is the founder and administrator of Wintips.org. Since 1995 he works and provides IT support as a computer and network expert to individuals and large companies. He is specialized in solving problems related to Windows or other Microsoft products (Windows Server, Office, Microsoft 365, etc.).
If you would like to cancel disk check on startup for Windows 10, please follow the steps below:
1. Click Start > File Explorer.
2. In the left pane, click This PC. In the right pane, find and double-click your hard drive (usually listed as Local Disk (C:)).
3. On the Properties tab, under Attributes, clear the check box for Read-only.
4. Click Apply > OK.
5. When you restart your computer, Disk Check will not run automatically on startup anymore.
How do I stop chkdsk from running at startup Windows 10?
How do I disable disk check on startup?
If you would like to disable the disk check on startup, you can follow the steps below:
1. Press the Windows + R keys on your keyboard to open the Run dialog box.
2. Type “gpedit.msc” in the Run dialog box and press Enter to open the Local Group Policy Editor window.
3. In the Local Group Policy Editor window, navigate to Computer Configuration > Administrative Templates > System > Troubleshooting and Diagnostics > Disk Diagnostics.
4. Double-click on “Configure Logging” in the right pane.
5. Select “Disabled” in Configure Logging Properties window and click OK to save changes.
Why is my computer checking the disk at every startup?
There are a few reasons why your computer might be checking the disk at startup. One possibility is that you have a virus or other malware on your system that is causing your computer to scan for malicious files. Another possibility is that you have a corrupt file or program on your system that is causing your computer to scan for errors. If you are not sure what is causing your computer to scan at startup, you should contact a qualified IT professional for assistance.
How do I disable scanning and repairing drive C in every time Windows 10 starts?
There are a few ways to disable scanning and repairing drive C in Windows 10. One way is to go into the Advanced System Settings and turn off the option for automatic scan and repair. Another way is to use the command prompt to enter the following commands:
DISM.exe /Online /Cleanup-image /Scanhealth
DISM.exe /Online /Cleanup-image /Restorehealth
These commands will scan and repair any corrupt files on your hard drive.
Can I shut off computer during chkdsk?
You can shut off your computer during chkdsk, but it is not recommended. If you do, chkdsk may not be able to finish repairing your system and could cause more problems.
What happens if you turn off computer during chkdsk?
If you turn off your computer during chkdsk, it may cause data loss or damage to your hard drive. It is therefore important to let chkdsk finish its scan before turning off your computer.
There is no way to cancel a disk check once it has started.
How do I stop chkdsk from running at startup Windows 11?
There are a few ways to stop chkdsk from running at startup on Windows 11. One way is to disable the automatic scheduled scan in the Task Scheduler. Another way is to use the Command Prompt or PowerShell to cancel any pending scans. You can also make a change in the registry to prevent chkdsk from running at startup.
How do you cancel a disk check?
If you need to cancel a disk check, you can do so by pressing Ctrl + C while the disk check is in progress. This will stop the disk check and allow you to continue using your computer.
How do I fix disk check?
There are a few things you can do to fix disk check errors:
-First, try running the built-in Windows tool to repair the disk. To do this, open the Command Prompt with admin privileges and type in ‘chkdsk C: /f’. This will scan your C drive for errors and attempt to fix them.
-If that doesn’t work, you can try using a third-party disk utility like SpinRite or DiskInternals Linux Reader to scan and repair your disk.
-If all else fails, you may need to format your hard drive and reinstall Windows.
Is it OK to stop a chkdsk?
If you are experiencing problems with your computer, it is generally ok to stop a chkdsk. However, if you are not experiencing any problems, it is best to let the chkdsk finish.
Can I cancel scanning and repairing drive?
If you need to cancel a scan or repair operation, open the Drive Manager window and click the Stop button next to the progress bar.
How long is chkdsk supposed to take?
How do I know chkdsk is complete?
After chkdsk has been initiated, you can check its progress by opening the Event Viewer and looking for entries under the Winlogon source. When chkdsk is finished, it will display a message that says “The scanning process was completed successfully.”
{“@context”:”https://schema.org”,”@type”:”FAQPage”,”mainEntity”:[{“@type”:”Question”,”name”:”How do I disable disk check on startup?”,”acceptedAnswer”:{“@type”:”Answer”,”text”:”nnIf you would like to disable the disk check on startup, you can follow the steps below: n1. Press the Windows + R keys on your keyboard to open the Run dialog box. n2. Type “gpedit.msc” in the Run dialog box and press Enter to open the Local Group Policy Editor window. n3. In the Local Group Policy Editor window, navigate to Computer Configuration > Administrative Templates > System > Troubleshooting and Diagnostics > Disk Diagnostics. n4. Double-click on “Configure Logging” in the right pane. n5. Select “Disabled” in Configure Logging Properties window and click OK to save changes.”}},{“@type”:”Question”,”name”:”Why is my computer checking the disk at every startup?”,”acceptedAnswer”:{“@type”:”Answer”,”text”:”nnThere are a few reasons why your computer might be checking the disk at startup. One possibility is that you have a virus or other malware on your system that is causing your computer to scan for malicious files. Another possibility is that you have a corrupt file or program on your system that is causing your computer to scan for errors. If you are not sure what is causing your computer to scan at startup, you should contact a qualified IT professional for assistance.”}},{“@type”:”Question”,”name”:”How do I disable scanning and repairing drive C in every time Windows 10 starts?”,”acceptedAnswer”:{“@type”:”Answer”,”text”:”nnThere are a few ways to disable scanning and repairing drive C in Windows 10. One way is to go into the Advanced System Settings and turn off the option for automatic scan and repair. Another way is to use the command prompt to enter the following commands: nnDISM.exe /Online /Cleanup-image /ScanhealthnDISM.exe /Online /Cleanup-image /RestorehealthnnThese commands will scan and repair any corrupt files on your hard drive.”}},{“@type”:”Question”,”name”:”Can I shut off computer during chkdsk?”,”acceptedAnswer”:{“@type”:”Answer”,”text”:”nnYou can shut off your computer during chkdsk, but it is not recommended. If you do, chkdsk may not be able to finish repairing your system and could cause more problems.”}},{“@type”:”Question”,”name”:”What happens if you turn off computer during chkdsk?”,”acceptedAnswer”:{“@type”:”Answer”,”text”:”nnIf you turn off your computer during chkdsk, it may cause data loss or damage to your hard drive. It is therefore important to let chkdsk finish its scan before turning off your computer.”}},{“@type”:”Question”,”name”:”How do I cancel a disk check?”,”acceptedAnswer”:{“@type”:”Answer”,”text”:”nnThere is no way to cancel a disk check once it has started.”}},{“@type”:”Question”,”name”:”How do I stop chkdsk from running at startup Windows 11?”,”acceptedAnswer”:{“@type”:”Answer”,”text”:”nnThere are a few ways to stop chkdsk from running at startup on Windows 11. One way is to disable the automatic scheduled scan in the Task Scheduler. Another way is to use the Command Prompt or PowerShell to cancel any pending scans. You can also make a change in the registry to prevent chkdsk from running at startup.”}},{“@type”:”Question”,”name”:”How do you cancel a disk check?”,”acceptedAnswer”:{“@type”:”Answer”,”text”:”nnIf you need to cancel a disk check, you can do so by pressing Ctrl + C while the disk check is in progress. This will stop the disk check and allow you to continue using your computer.”}},{“@type”:”Question”,”name”:”How do I fix disk check?”,”acceptedAnswer”:{“@type”:”Answer”,”text”:”nnThere are a few things you can do to fix disk check errors: nn-First, try running the built-in Windows tool to repair the disk. To do this, open the Command Prompt with admin privileges and type in ‘chkdsk C: /f’. This will scan your C drive for errors and attempt to fix them. n-If that doesn’t work, you can try using a third-party disk utility like SpinRite or DiskInternals Linux Reader to scan and repair your disk. n-If all else fails, you may need to format your hard drive and reinstall Windows.”}},{“@type”:”Question”,”name”:”Is it OK to stop a chkdsk?”,”acceptedAnswer”:{“@type”:”Answer”,”text”:”nnIf you are experiencing problems with your computer, it is generally ok to stop a chkdsk. However, if you are not experiencing any problems, it is best to let the chkdsk finish.”}},{“@type”:”Question”,”name”:”Can I cancel scanning and repairing drive?”,”acceptedAnswer”:{“@type”:”Answer”,”text”:”nnIf you need to cancel a scan or repair operation, open the Drive Manager window and click the Stop button next to the progress bar.”}},{“@type”:”Question”,”name”:”How long is chkdsk supposed to take?”,”acceptedAnswer”:{“@type”:”Answer”,”text”:null}},{“@type”:”Question”,”name”:”How do I know chkdsk is complete?”,”acceptedAnswer”:{“@type”:”Answer”,”text”:”nnAfter chkdsk has been initiated, you can check its progress by opening the Event Viewer and looking for entries under the Winlogon source. When chkdsk is finished, it will display a message that says “The scanning process was completed successfully.””}}]}
Chkdsk (Chkdsk.exe) представляет собой утилиту командной строки в Windows-системах, которая проверяет тома дисков на наличие проблем и ошибок с файловой системой. Этот инструмент также может попытаться исправить все найденные ошибки. Например, chkdsk может исправить проблемы, связанные с наличием плохих секторов, потерянных кластеров, а также потерянных файлов и каталогов. Кстати, я недавно писал про особенности работы c chkdsk в кластере Microsoft. Однако автоматическая проверка файловой системы утилитой chkdsk, при некорректной перезагрузке ПК, раздражает некоторых пользователей. И в принципе, такую проверку можно отключить (хотя и не рекомендуется – ведь вы теряете контроль за целостностью вашей файловой системы).
Чтобы отключить автоматическую проверку диска при загрузке Windows, перейдите в следующий раздел реестра:
HKEY_LOCAL_MACHINE\SYSTEM\CurrentControlSet\Control\Session Manager
В правой панели дважды щелкните по ключу BootExecute. Значение этого ключа по умолчанию —
autocheck autochk *
*
означает, что каждый диск проверяется на консистентность (целостность, согласованность). Просто добавьте параметр «/K:C» перед *. Параметр / K отключает автоматическую проверку диск C: при загрузке Windows. Итак, окончательное значение ключа реестра BootExecute должно выглядеть следующим образом:
autocheck autochk /k:C *
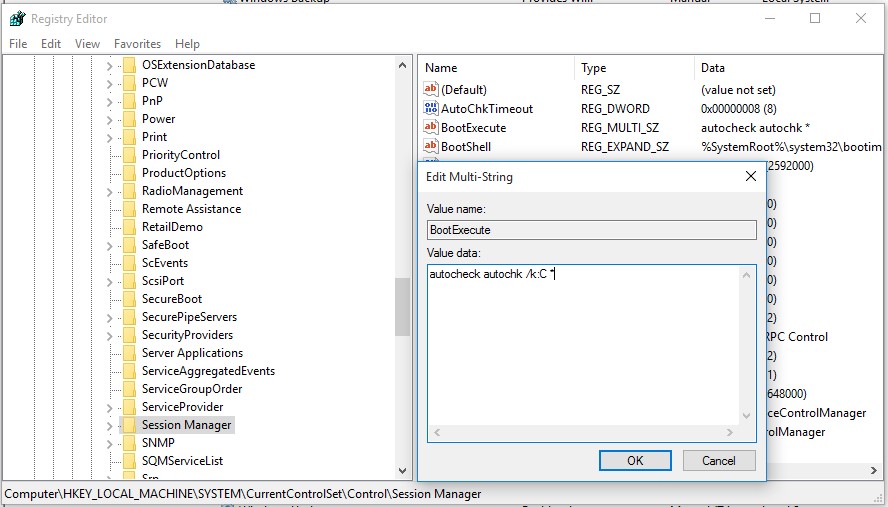
Если вы хотите отключить проверку и на других дисках (например на дисках C: и D: ), воспользуйтесь следующим ключом:
autocheck autochk /k:C /k:D *
Если вы захотите вернуть все обратно, просто замените значение параметра на:
autocheck autochk *
В том случае, если вы не нашли указанный ключ в реестре, отключить проверку диска при загрузке можно с помощью утилиты chkntfs (ключ /x). Для этого откройте командную строку с правами администратора и наберите команду:
chkntfs /x d: e:

После чего перезагрузите ПК. Указанная команда исключит диски D: и E: из процедуры автоматической проверки диска при загрузке. Если вам нужно исключить другие диски, просто измените команду, указав соответствующее имя диска.
Команда
chkntfs /d
возвращает исходные настройки (все диски системы проверяются при загрузке, а Chkdsk запускается только для дисков с ошибками).
В любом случае, при отключении проверки дисков при загрузке, необходимо периодически проверять их вручную. Проверить статус диска можно таким образом:
chkntfs E:
Сообщение F: is not dirty говорит о том, что на диске отсутствуют ошибки и в проверке он не нуждается.
This post introduces 4 ways to allow you to run CHKDSK on startup in Windows 10 to check and fix computer hard drive errors. It also explains how to stop CHKDSK from running at startup if you find that CHKDSK runs at every startup in Windows 10. Best free CHKDSK alternative and hard drive data recovery services from MiniTool are also offered.
If you’d like to run CHKDSK on startup in Windows 10 to scan and repair hard disk errors, you can check the solutions below. This post also includes ways to run Windows 10 disk check on startup when your PC or laptop won’t turn on.
Besides, if you feel troublesome that CHKDSK runs at every startup in Windows 10, you can also easily stop CHKDSK on startup in Windows 10 by following the operation below.
Hard disk errors often cause some data loss. So, MiniTool Software will also introduce professional data recovery software to help you recover your lost and deleted files in all versions of Windows.
Also read: Discover the essential steps for successful hard drive recovery in this informative article.
How to Run CHKDSK on Startup Windows 10 – 4 Ways
- Run CHKDSK on Startup from Command Prompt
- Run CHKDSK on Startup from Advanced Options Screen
- Run CHKDSK on Startup with Recovery Disk/USB
- Run CHKDSK on Startup with Installation Media
How to Run CHKDSK on Startup Windows 10 – 4 Ways
If your computer can boot and you want to scan the Windows system C drive (where the OS is installed) or other system related drives, you need to run CHKDSK in Windows 10 before boot since CHKDSK can’t run if the drive is in use. Check how to run CHKDSK before booting into Windows below.
1. How to Run CHKDSK on Startup from Command Prompt
- Press Windows + R, type cmd, press Ctrl + Shift + Enter to open elevated Command Prompt in Windows 10.
- In command Prompt, type this command: chkdsk C: /f /r /x, and press Enter. Replace “C” with the drive letter of the target drive. Please do not miss the spaces in this command.
- If you are trying to scan the system C drive, CHKDSK will pop up a message saying that cannot lock current drive, the volume is in use by another process, and asking you if you want to schedule this volume to be checked the next time the system restarts. You can type Y and press Enter.
- Restart your computer and Windows will automatically run CHKDSK on reboot to scan and fix hard drive errors.
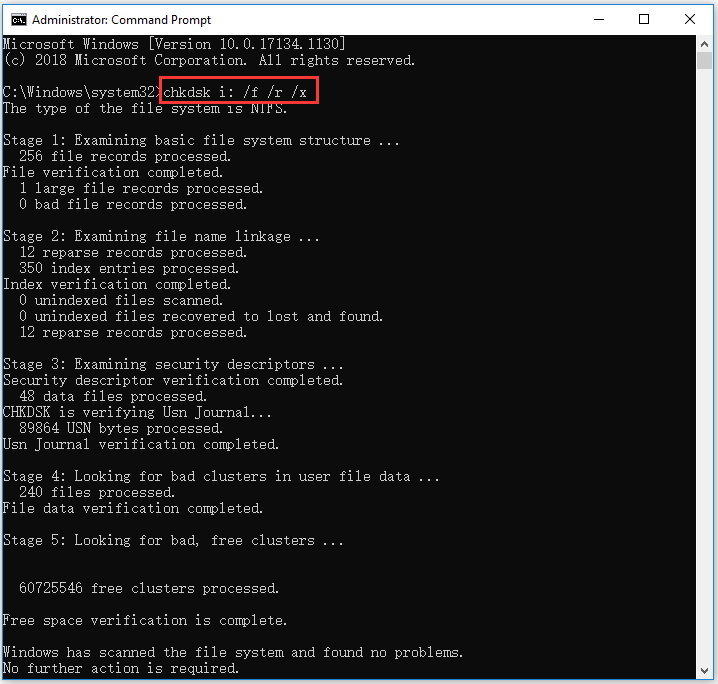
2. How to Run Windows 10 Disk Check on Startup from Advanced Options Screen
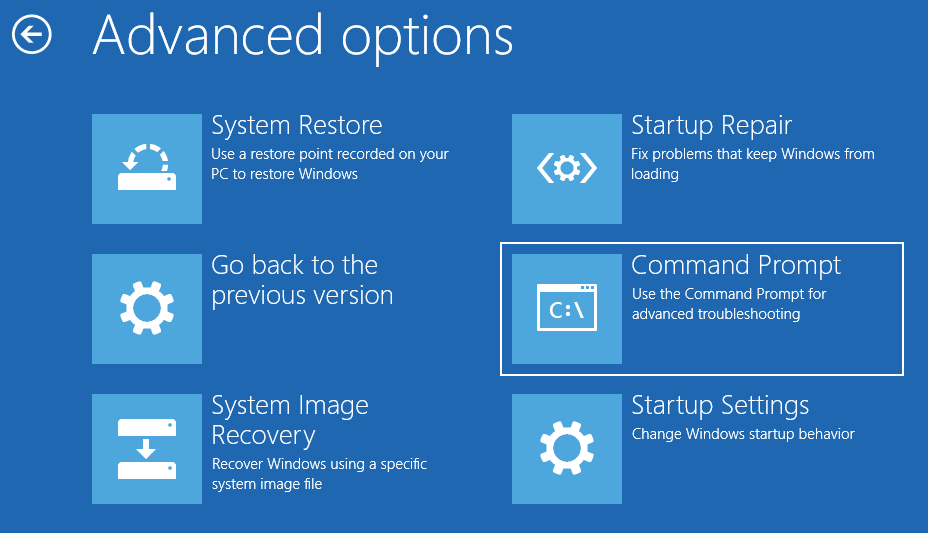
If you know how to access advanced startup options in Windows 10, you can select Command Prompt in Advanced options screen to boot your computer into Command Prompt window. And then you can run CHKDSK command in Command Prompt window to check and fix computer hard drive errors before booting into Windows.
3. How to Run CHKDSK on Startup with Recovery Disk/USB
If your Windows 10 computer can’t boot, but if you know how to create a Windows 10 recovery USB drive or disk, you can then use the recovery USB or disk drive to boot your Windows 10 computer into Windows Recovery Environment (Windows RE). Then you can click Troubleshoot -> Advanced options, click Command Prompt in the blue Advanced options screen and use it to run chkdsk /f /r command.
4. How to Run CHKDSK on Startup with Installation Media
If you don’t have a Windows 10 installation media at hand, you can check how to create an installation media with Windows 10 media creation tool. After you get the installation USB or disc, you can use it to boot your computer into WinRE and get into Advanced options screen to choose Command Prompt option. Then you can run CHKDSK command in Command Prompt to scan and fix disk errors.
Instead of struggling to run CHKDSK on startup, you can use third-party free disk check tool like MiniTool Partition Wizard to easily check and fix disk errors.
MiniTool Partition Wizard is an all-in-one disk partition manager for Windows. Aside from scanning and fixing disk errors and checking disk bad sectors, you can also use it to easily create/resize/format/delete/wipe partitions, copy disk, migrate OS, convert partition format, analyze disk space usage, test hard drive speed, etc.
Free download and install MiniTool Partition Wizard on your Windows computer, and check the guide below for how to use it to check and fix disk errors as well as how to detect bad sectors on hard drive.
MiniTool Partition Wizard FreeClick to Download100%Clean & Safe
Step 1. Launch MiniTool Partition Wizard and click Yes if it pops up the User Account Control window to enter into the main interface of the software. Locate the target hard drive and the target partition which you want to check disk errors.
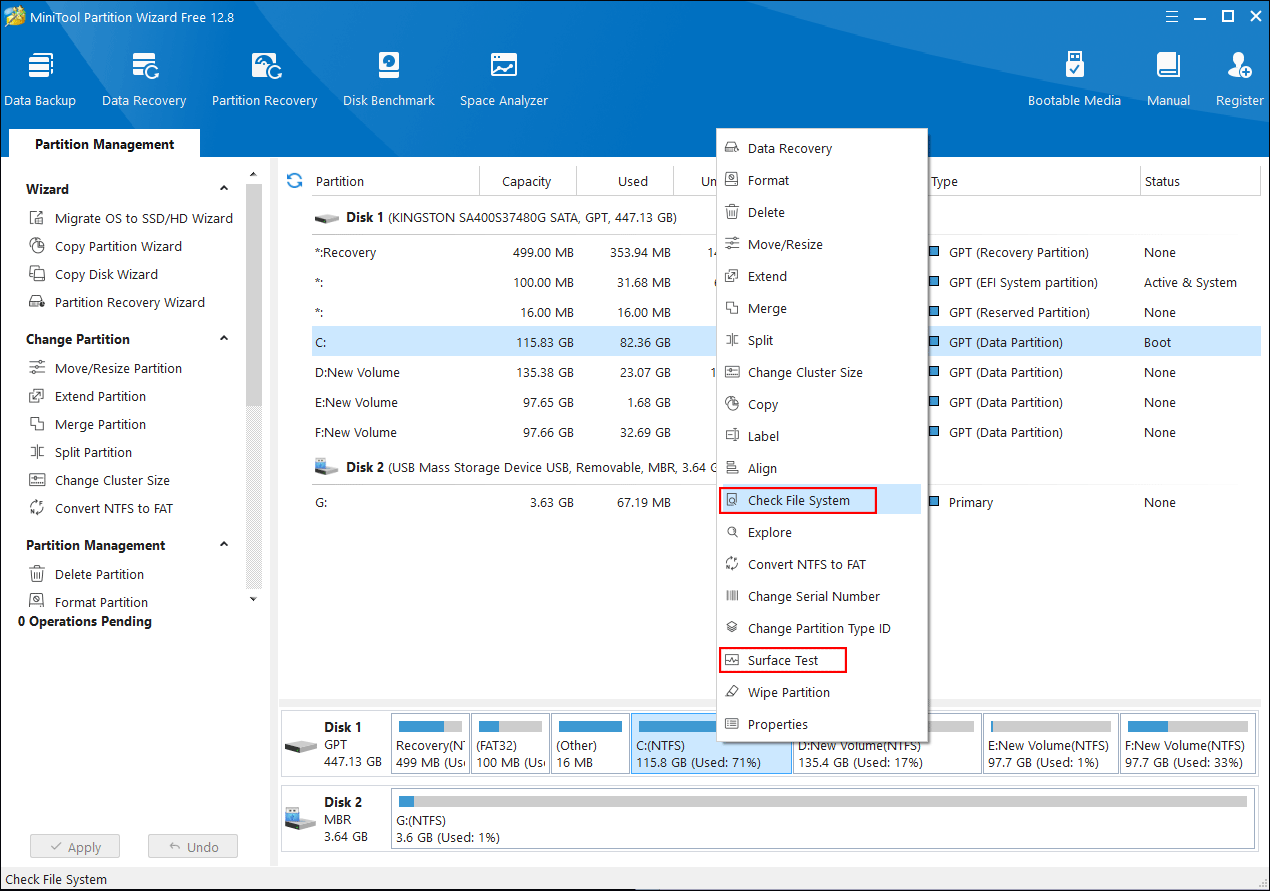
Step 2. Right-click the target partition and select Check File System option. In the new window, you can click check & fix file system error option, and click Start button. MiniTool Partition Wizard will automatically scan and fix detected file system errors on the disk.
Step 3. To diagnose if the hard drive has bad sectors, you can go back to the main interface, and right-click the target partition to choose Surface Test option. Click Start Now button to begin checking bad sectors on the disk.
Click to tweet
How to Stop CHKDSK on Startup Windows 10 – 3 Ways
- Press Any Key to Cancel the Disk Check
- Stop CHKDSK on Startup via Command Prompt
- Disable CHKDSK on Startup with Registry Editor
How to Stop CHKDSK on Startup Windows 10 – 3 Solutions
Some users have the problem that CHKDSK always runs at startup. CHKDSK scanning can be very time-consuming. If you want, you can stop CHKDSK from running at startup in Windows 10. Check the solutions below.
Solution 1. Press Any Key to Cancel the Disk Check
If your computer didn’t shut down properly, Window CHKDSK may automatically run when you start your computer next time. It will appear a message on booting saying that one of your disks needs to be checked for consistency. It advises you to conduct the disk check, but also gives an option to cancel the disk check by pressing any key within several seconds. You can press any key to stop CHKDSK on startup in Windows 10.
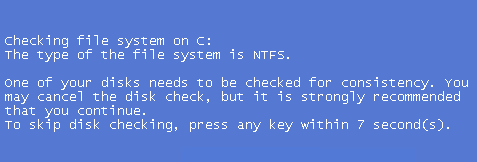
Solution 2. Stop CHKDSK on Startup via Command Prompt
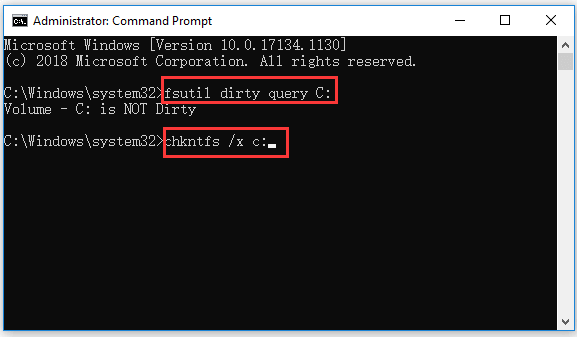
By using solution 1, you can skip the CHKDSK scanning for once. But if you restart your computer next time, CHKDSK may automatically run again since it thinks one of your computer hard drive still needs to be checked. If CHKDSK runs at startup in every restart, you can use Command Prompt to disable it if you want.
- Press Windows + R, type cmd, and press Ctrl + Shift + Enter to open elevated Command Prompt.
- Optional action: Type the command fsutil dirty query C: in Command Prompt, and press Enter to execute the command. This can help check if the drive has been marked with a dirty bit value, since CHKDSK will automatically check the disk that is marked as dirty.
- Next you can type chkntfs /x c: command, and press Enter to disable CHKDSK from scanning C drive on startup.
- If you want to stop CHKDSK on startup for several drives, you can add the drive letters in the command, e.g. chkntfs /x c: d: e:. Please do not forget the spaces in the command line.
Solution 3. Disable CHKDSK on Startup with Registry Editor
You can also stop check disk on startup by using Registry Editor.
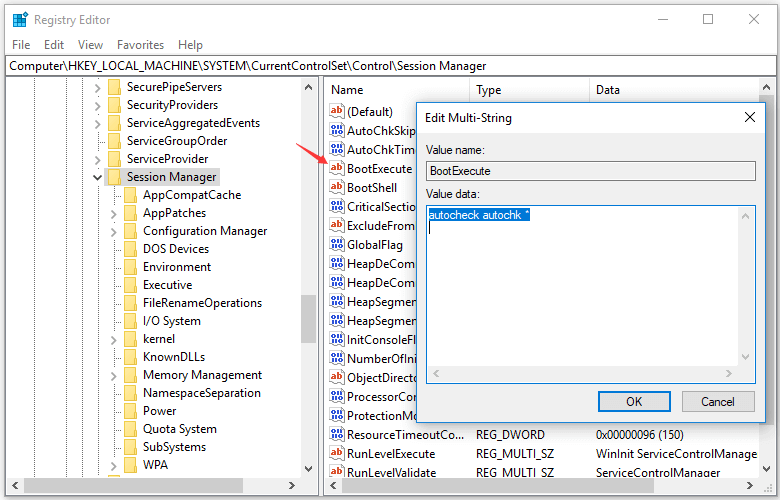
- Press Windows + R, type regedit in Run box, and press Enter to open Registry Editor in Windows 10.
- Navigate the following path in Registry Editor: HKEY_LOCAL_MACHINE\SYSTEM\CurrentControlSet\Control\Session Manager.
- Double-click BootExecute key in the right window. And delete all lines under Value data except autocheck autochk *.
- Close Registry Editor and restart your computer to check if CHKDSK runs at startup.
How to Recover Lost/Deleted Files from Windows 10 PC or Laptop
In case you lost some important data after CHKDSK scan or lost some important files due to hard drive failures or other reasons, here we introduce an easy and fast way to help you recover any lost or deleted files from Windows 10 computer and other storage devices.
MiniTool Power Data Recovery is best free data recovery software for Windows. You can use this tool to easily recover lost/deleted files from Windows PC or laptop, external hard drive, SSD, USB flash drive, SD memory card, etc. in simple steps. Various data loss situations are covered.
It delivers fast scan speed, high recovery result, and keeps original file. Extremely easy-to-use and 100% safe. Download and install MiniTool Power Data Recovery in your Windows 10 computer, and check how to recover data from Windows 10 computer below.
MiniTool Power Data Recovery FreeClick to Download100%Clean & Safe
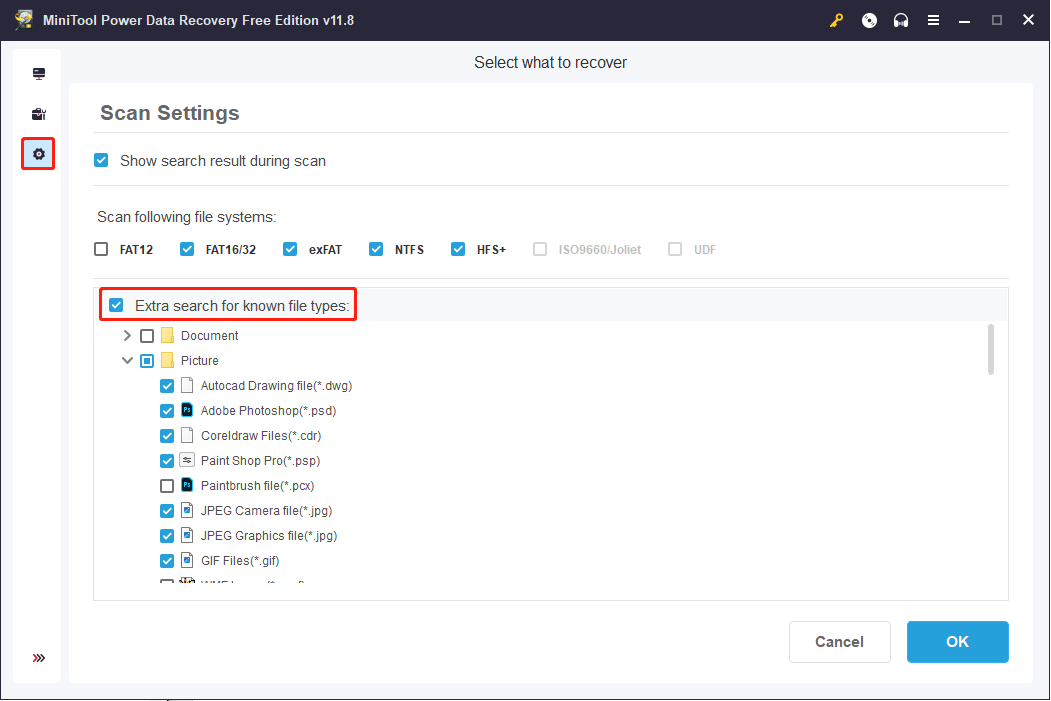
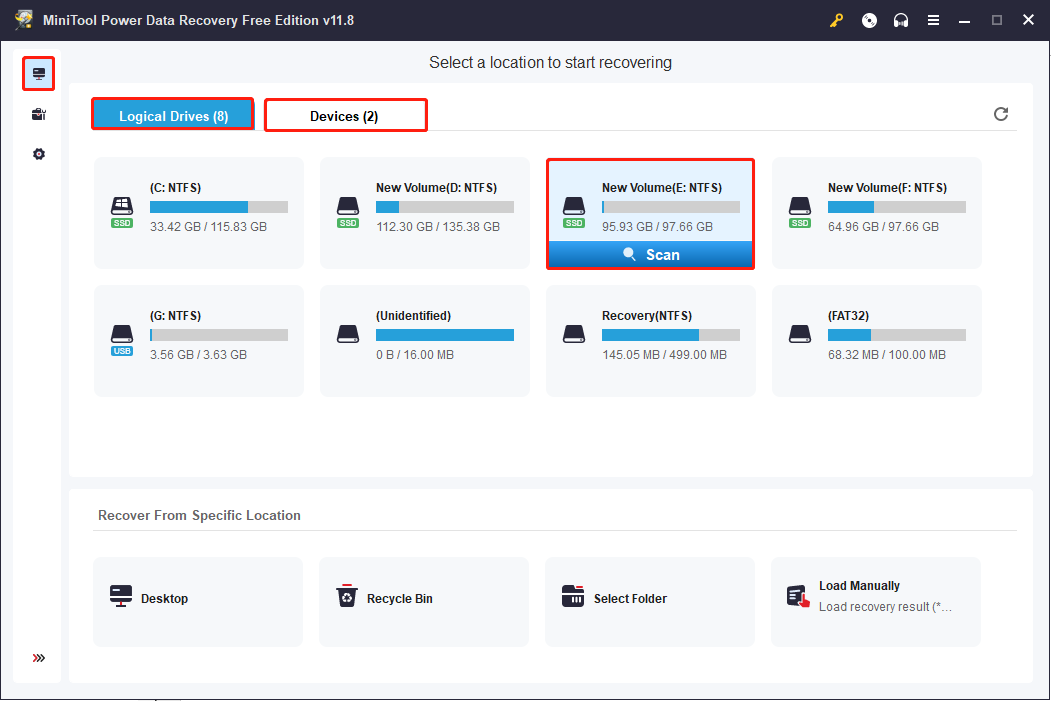
Step 1. Launch MiniTool Power Data Recovery. Optionally, before starting the scanning process, you can also click the Scan Settings button in the left menu bar to select specific file types and click OK to save the change.
Step 2: Return to This PC interface, choose the target partition that contains your lost/deleted files, and click the Scan button. If you want to select the whole disk to scan, you can click the Devices tab and choose the disk.
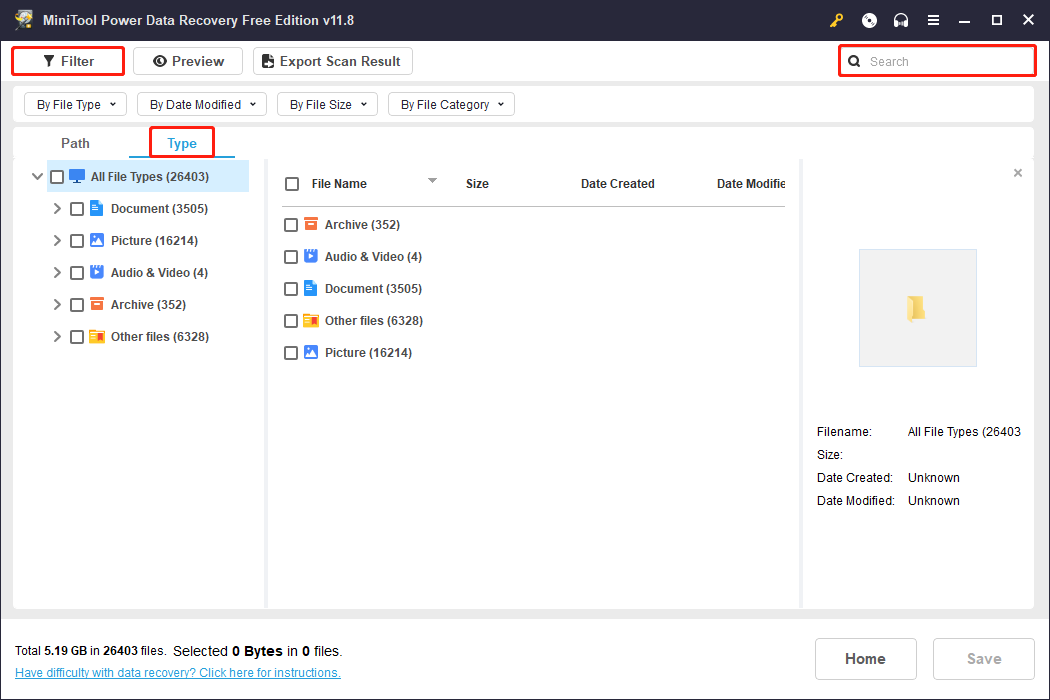
Step 3: The software will list files according to their paths on the result page. You can shift to the Type tab to discover wanted files by their types. To help you locate wanted files quickly, the Filter and Search features work significantly.
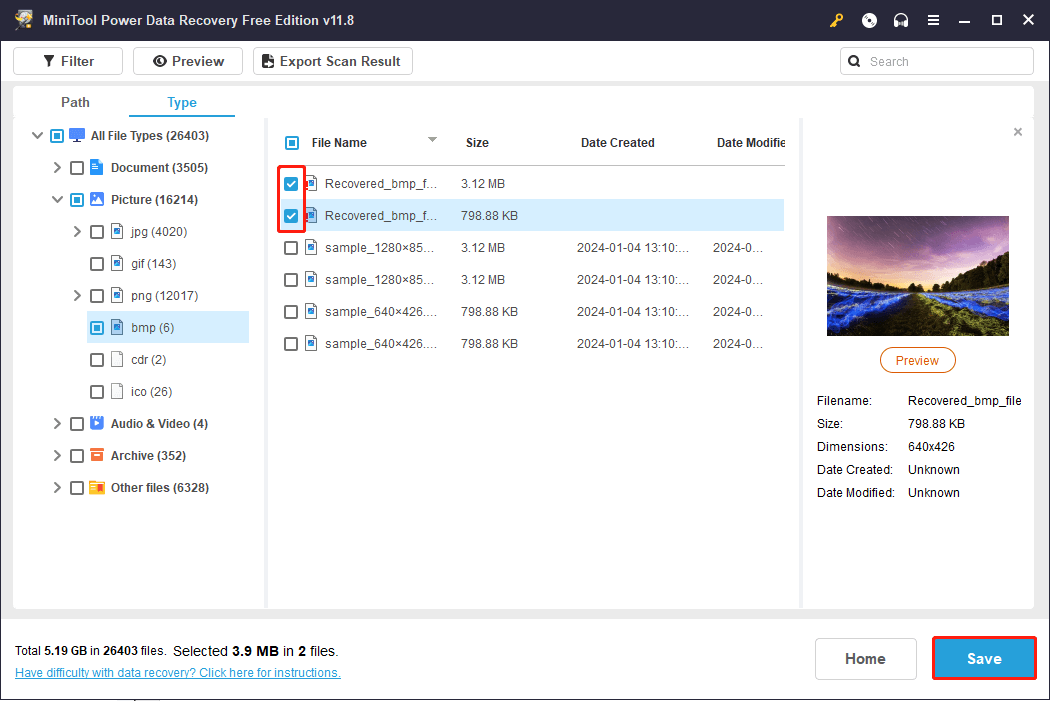
Step 4: Tick the needed files and click the Save button to choose a new destination path to store the recovered files.
Conclusion
This tutorial explains how to run or stop CHKDSK on startup in Windows 10. If you have other questions about how to use MiniTool Partition Wizard or MiniTool Power Data Recovery, please contact [email protected].
Click to tweet
Why does CHKDSK run on startup?
If your computer runs CHKDSK on startup, it might because of improper computer shutdown, hard drive failures, disk file system errors caused by malware/virus infection, etc. You can let CHKDSK perform the disk check and it may cost some time. You can also use one of the 3 solutions in this post to stop CHKDSK on startup in Windows 10 if you want.
How do I stop CHKDSK from running at startup Windows 10?
This tutorial explains 3 solutions to let you stop CHKDSK on startup in Windows 10. You can try one of them.
Is it safe to stop CHKDSK?
Generally you can’t stop CHKDSK process once it starts. It’s not safe to stop CHKDSK while it’s still scanning. It may cause file system corruption and data loss if you shut down the computer during the disk check process.
How to stop CHKDSK in progress Windows 10?
- Press Ctrl + Shift + Esc to open Task Manager.
- Find CHKDSK in Task Manager window, right-click it and click Details to find out PID of the CHKDSK task.
- Next you can press Windows + R, type cmd, and press Ctrl + Shift + Enter to open elevated Command Prompt.
- Then type the command taskkill /F PID PID number in Command Prompt window, and press Enter. Replace “PID number” with the PID of CHKDSK.
You may use this way to force stop CHKDSK if the scanning and repairing drive gets stuck in Windows 10. However, it’s not a good idea to force stop CHKDSK in progress after you manually run chkdsk /f /r command in Windows 10. It may cause damage to the hard disk and cause data loss. So it’s not recommended.

