
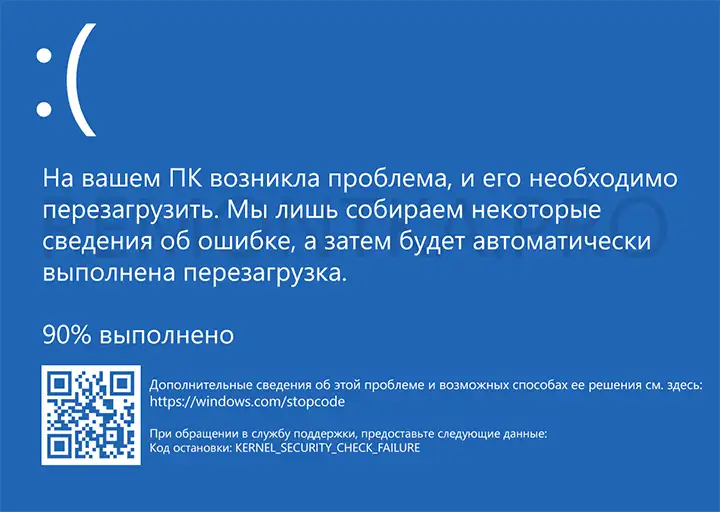
Синий экран с кодом KERNEL SECURITY CHECK FAILURE (0x00000139) в Windows 11 и Windows 10 может появляться при самых разных обстоятельствах: во время загрузки системы, при работе в браузере, подключении к Wi-Fi или подключении USB-устройства к компьютеру и точную причину бывает трудно установить, однако в некоторых случаях это возможно.
В этой инструкции подробно о возможных причинах ошибки KERNEL SECURITY CHECK FAILURE и способах её исправить в случае, если вы столкнулись с проблемой.
Диагностика причин синего экрана KERNEL SECURITY CHECK FAILURE
Вы можете попробовать выяснить какой модуль (драйвер) вызвал появление рассматриваемой ошибки. Лучше всего для этого использовать утилиту WinDbg от Microsoft. Конкретно для этой ошибки другая популярная утилита — BlueScreenView, не дает нужного объема информации.
Базовый вариант использования WinDbg для поиска причин ошибки KERNEL SECURITY CHECK FAILURE будет состоять из следующих шагов:
- Скачайте WinDbg из Microsoft Store или используя файл веб-установщика с сайта Майкрософт: https://aka.ms/windbg/download
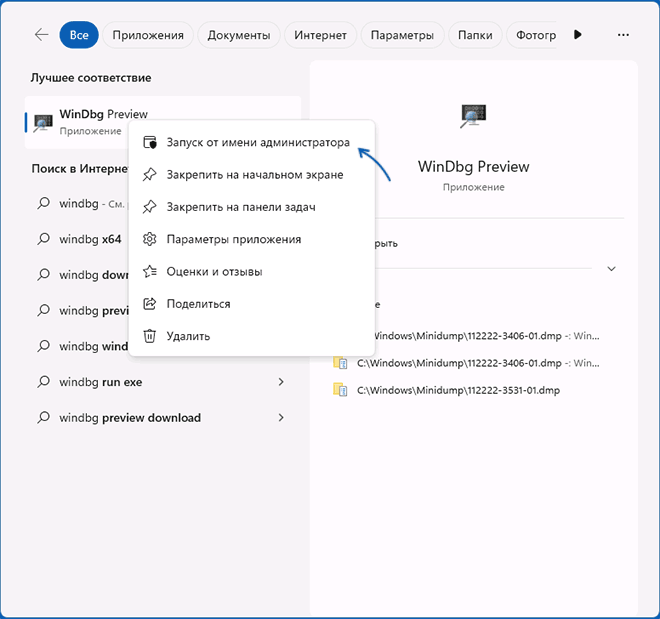
- Запустите программу, обязательно от имени администратора (правый клик по значку программы в меню Пуск или поиске на панели задач — «Запуск от имени администратора»).

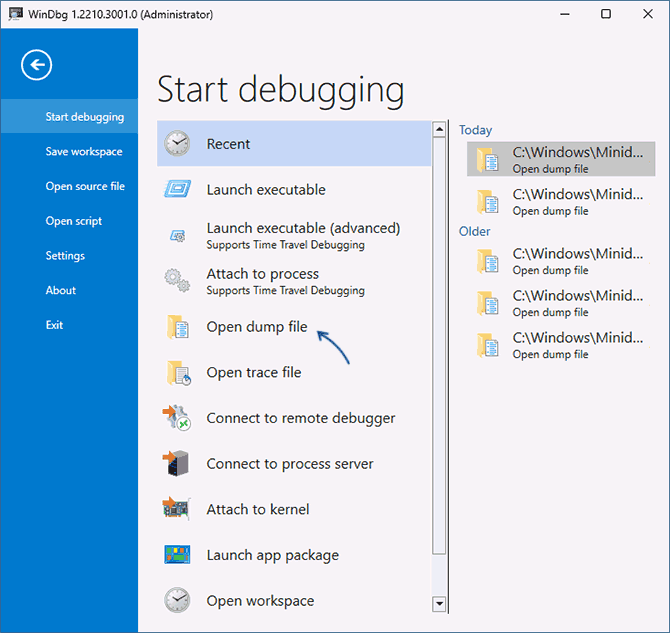
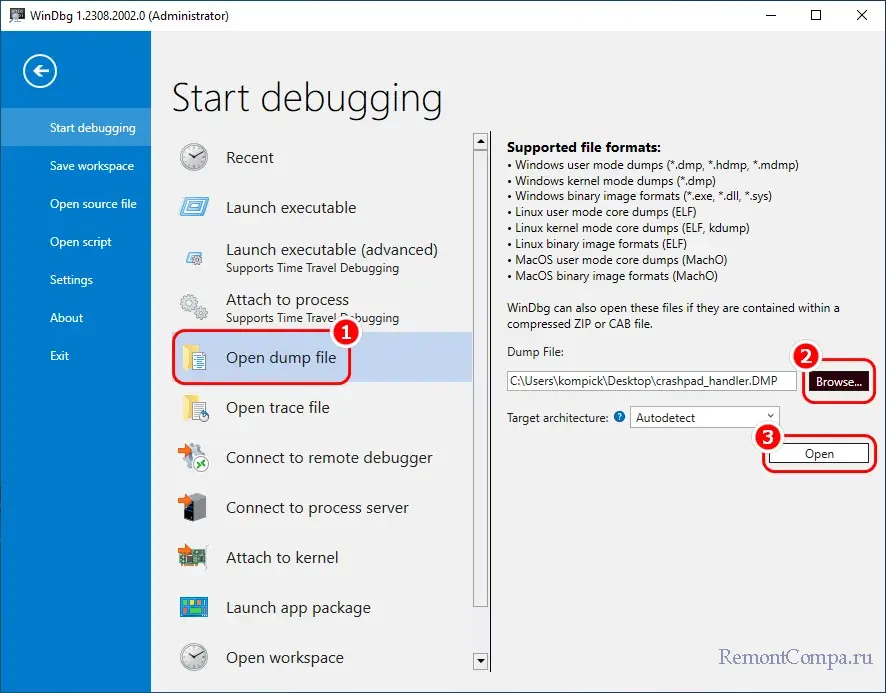
- В программе откройте меню «Файл» и выберите пункт «Open dump file» (Открыть файл дампа). Укажите путь к файлу дампа на нужную дату в папке C:\Windows\Minidump

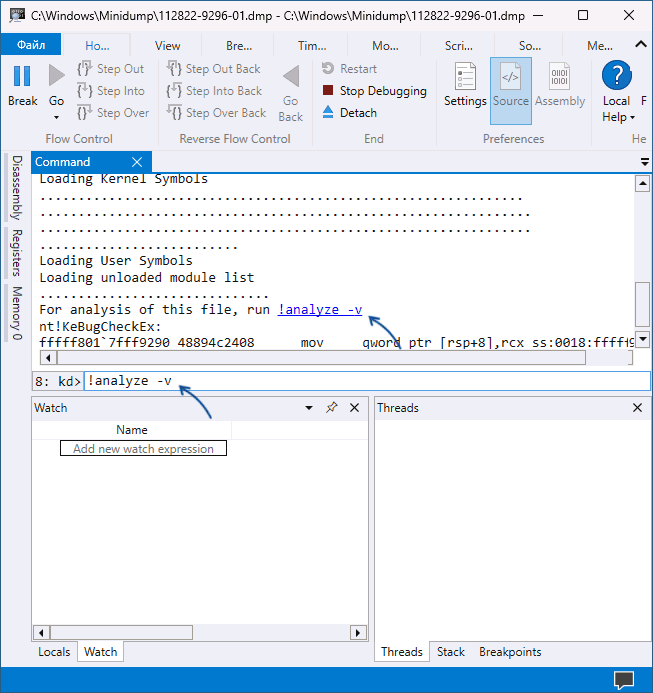
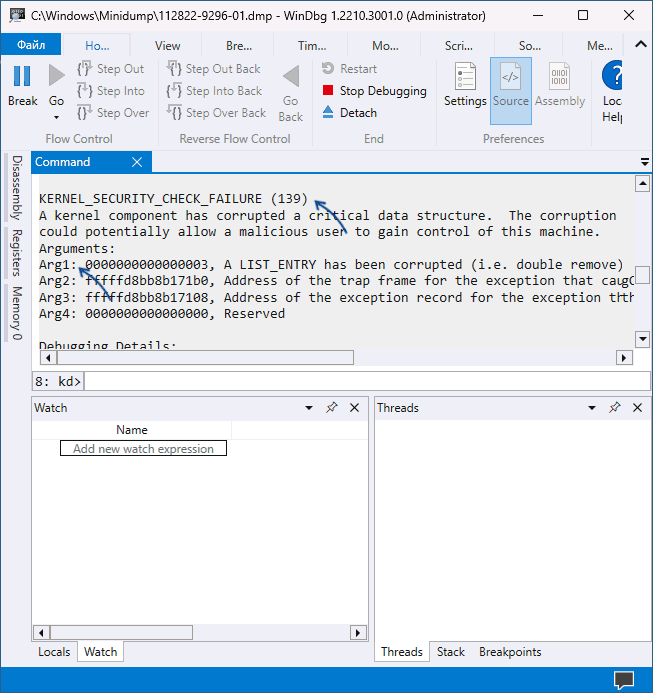
- После загрузки файла дампа введите
!analyze -v
в поле ввода команд и дождитесь завершения анализа, либо нажмите по ссылке с текстом команды в верхней панели.

- В результате вы получите отчет о результатах анализа дампа файла. В верхней части его будет представлен код ошибки KERNEL SECURITY CHECK FAILURE 0x00000139, а также список аргументов: в первом из них (Arg1) помимо числового значения будет указана конкретная причина ошибки, обычно сложная для понимания рядовыми пользователями, но потенциально полезная для разработчиков. В случае значения 3 «A LIST_ENTRY was corrupted» для первого аргумента, наиболее вероятная причина — неправильная работа драйвера (но то же самое возможно и при других значениях).
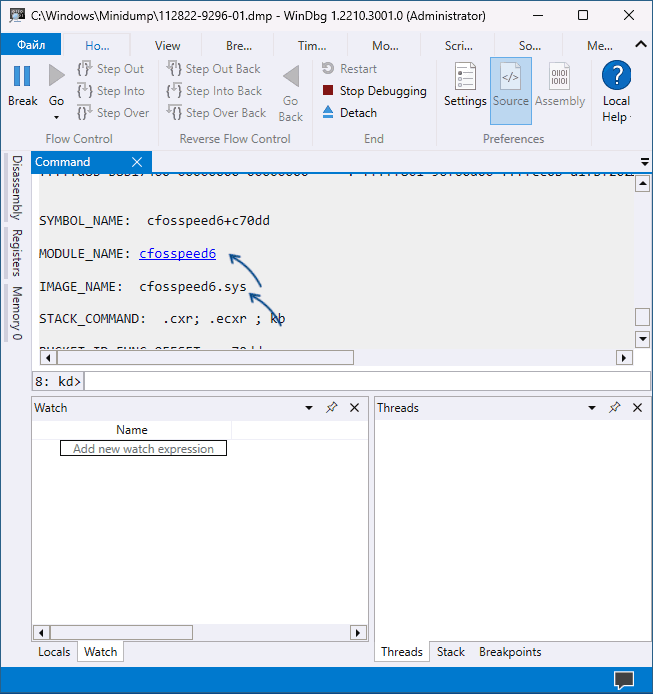
- Ниже в отчете вы сможете найти информацию о модуле, который вызвал сбой. Например, на скриншоте ниже — это файл драйвера .sys — если вы получили информацию об имени файла, её можно использовать на следующем шаге.

- Если выполнить поиск в Интернете по имени файла драйвера, можно найти что это за драйвер, к какому устройству или программе он относится (некоторые программы также устанавливают свои драйверы) и исходя из этого предпринять необходимые действия: удалить программу, заменить драйвер устройства на драйвер другой версии или от другого поставщика, удалить драйвер и отключить устройство, если оно не используется. Например, в примере на скриншотах сбой вызывал драйвер программного обеспечения для управления и оптимизации сетевых подключений, иногда поставляемого с материнскими картами MSI, но доступного для установки и на другие Windows-устройства.
Если модули, вызвавшие сбой постоянно меняются, либо относятся к системным файлам и драйверам Windows, есть большая вероятность, что причина синего экрана — сбои работы оперативной памяти, реже — ошибки обмена данными с диском, наличие вирусов (а иногда, наоборот — сторонних антивирусов). Об этих и других причинах и методах решения — в следующем разделе инструкции.
Быстрые способы исправить ошибку KERNEL SECURITY CHECK FAILURE
Если вы не готовы разбираться с конкретной причиной ошибки, а требуется быстрое и, возможно, рабочее решение, можно попробовать следующие варианты решения проблемы. Они «универсальны» для такого типа ошибок и часто один из них оказывается результативным.
Базовые способы исправить ошибку KERNEL SECURITY CHECK FAILURE и предотвратить появление синего экрана в дальнейшем включают в себя:
- Если к компьютеру в последнее время было подключено новое оборудование, проверьте, появляется ли синий экран вновь, если его отключить. Если в данном случае ошибка исчезает, попробуйте поэкспериментировать с драйверами устройства (установить другие версии драйверов с сайта производителя или сторонних источников).
- Если устанавливались новые модули памяти, проверьте, сохраняется ли ошибка, если их отключить и убедитесь, что материнская плата поддерживает текущую конфигурацию RAM (можно уточнить в официальном руководстве к вашей модели материнской платы). Также имеет смысл проверить оперативную память на ошибки.
- В случае, если в последнее время устанавливались новые драйверы, в том числе виртуальных программных устройств — попробуйте удалить их (или вернуть старую версию). Если выполнялась установка сторонних служб, например, при установке антивируса, попробуйте удалить программу, которая установила сторонние службы.
- Проверьте, нет ли в диспетчере устройств каких-либо устройств с ошибками (желтым восклицательным знаком). При наличии таких устройств, откройте свойства с описанием и кодом ошибки и попробуйте найти решение (в том числе с помощью поиска на этом сайте по коду ошибки). Если причина — отсутствие драйвера, установите его с официального сайта производителя материнской платы или ноутбука, даже если на официальном сайте доступен только драйвер для одной из предыдущих версий системы.
- Выполните проверку компьютера на вирусы, например с помощью Kaspersky Virus Removal Tool (не требует установки на компьютер). Ещё лучше использовать загрузочные антивирусные образы, то есть выполнять проверку с загрузочной флешки, например, таким инструментом как Dr.Web CureIt!
- При наличии точек восстановления системы на дату, когда ошибка не появлялась и при условии, что оборудование компьютера не менялось, попробуйте использовать их. Подробнее: Точки восстановления Windows 11 (подойдет и для Windows 10).
- Выполните проверку и восстановление целостности системных файлов Windows.
- Если ошибка возникает только при запуске определенной программы, попробуйте следующие варианты: добавление программы в исключения антивируса, установка другой версии программы или её скачивание и установку из другого источника.
- При появлении ошибки во время чистой установки Windows с флешки, попробуйте другой образ (желательно — оригинальный) и другой накопитель. Если это новый компьютер, также имеет смысл проверить оперативную память на ошибки, как это было указано во 2-м пункте, это можно сделать и с загрузочной флешки.
- Если ошибка появилась после переустановки Windows, установите оригинальные драйверы чипсета с сайта производителя материнской платы ПК или сайта вашего ноутбука, а также сопутствующие драйверы системного оборудования и управления электропитанием при их наличии (даже если на официальном сайте представлены только старые версии драйверов).
- В случае появления ошибки после установки обновлений Windows, попробуйте удалить их.
- Есть сообщения, что у некоторых пользователей проблему решает включение классического меню загрузки Windows. Чтобы попробовать, используйте команду
BCDEDIT /SET {DEFAULT} BOOTMENUPOLICY LEGACYв командной строке, запущенной от имени администратора.
- В редких случаях причиной проблемы могут оказаться ошибки чтения/записи HDD или SSD — из-за ошибок на диске (как проверить диск на ошибки), либо из-за проблем с его подключением, например, поврежденного SATA-кабеля.
Ещё один быстрый способ решения проблемы — исправление текущей установки Windows с помощью образа ISO, этот вариант срабатывает в большинстве случаев, если синий экран KERNEL SECURITY CHECK FAILURE стал появляться на уже установленной системе. Шаги будут следующими:
- Скачайте ISO образ с той же версией Windows (или более новой), которая у вас установлена и смонтируйте его в системе.
- Запустите файл setup.exe из подключенного образа и пройдите первые шаги в мастере установки.
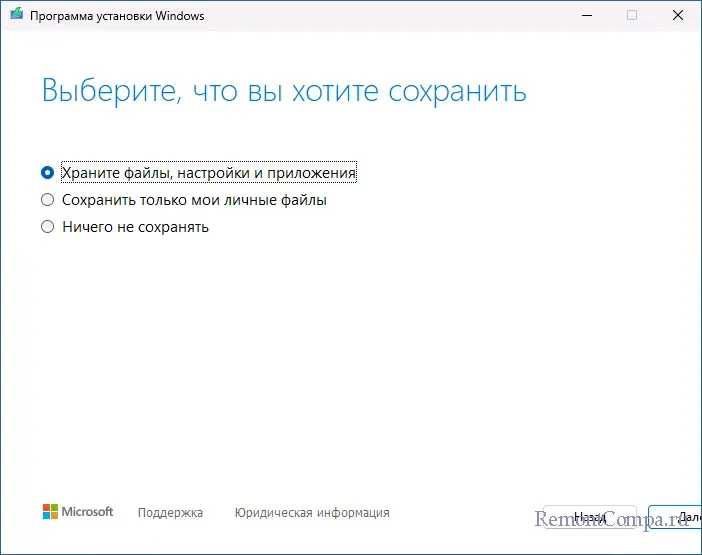
- Выберите один из вариантов переустановки — с сохранением файлов, настроек и приложений или с сохранением только личных файлов.

- Подтвердите установку и дождитесь её завершения.

Надеюсь, один из предложенных вариантов помог разобраться в причинах проблемы и решить её. Будет отлично, если вы сможете поделиться в комментариях своим опытом решения рассмотренной проблемы.
BSOD error messages are annoying and damaging for your computer, stopping you from conducting your typical PC activities. But you can still fix them without having to factory reset Windows.
KERNEL_SECURITY_CHECK_FAILURE is a Blue Screen of Death error message that halts all activities on your computer and prevents it from running properly.
It usually happens because a file compatibility verification failed, which means that the file should be repaired, updated, or replaced.
However, there could be various other causes why you receive the KERNEL SECURITY CHECK FAILURE stop code, such as outdated drivers, malware infection, memory issues, faulty security software, corrupt system files, or hard disk errors.
Stop Code Fix for KERNEL_SECURITY_CHECK_FAILURE
Since it’s a BSOD stop code, repairing KERNEL SECURITY CHECK FAILURE on Windows 10 and older Windows versions depends on whether it was triggered by software or hardware issues.
Software problems are easier to resolve. When it comes to troubleshooting hardware errors, though, you have to get your hands dirty.
Before attempting to make significant modifications to your computer and operating system, you should create a system restore point. It allows you to revert Windows to a stable state, if necessary.
Furthermore, if your system enters a reboot loop due to the KERNEL SECURITY CHECK FAILURE issue, you should boot Windows in safe mode.
1. Make sure your drivers are new and compatible
If your computer’s drivers aren’t working properly, it could be why your screen becomes blue and shows stop code KERNEL SECURITY CHECK FAILURE. Otherwise, you might have missing drivers, which you can easily fix.
Here’s how to reinstall drivers:
- Right-click the Start button on Windows 10 and select Device Manager
- Select and right-click a device, then click Uninstall device
- Proceed with the device removal and restart your computer. The driver will be reinstalled automatically
- Do this for all your devices
Here’s how to update drivers:
- Go to Device Manager, right-click a device, and select Update driver
- Click Search automatically for updated driver software
- If you get the The best drivers for your device are already installed message, click Search for updated drivers on Windows Update
Unfortunately, Windows often fails to find newer updates online, even when looking into Windows Update.
To solve this problem, you can manually identify your driver version and find a newer one on the manufacturer’s website, then download and install it. You can use a tool like DriverVerifier to detect your current drivers.
It’s a time-consuming process, however, especially if you need to update more than one driver. Instead, we suggest opting for driver updaters. These software applications are capable of updating multiple drivers at the same time.
2. Unplug all external hardware devices
If any of your peripheral devices are faulty or not compatible with your operating system and computer, it could cause various issues like the KERNEL SECURITY CHECK FAILURE error.
For instance, it’s a good idea to compare your hardware with the official Windows 10 specs to ensure that everything’s correct.
Or, there might be a problem with your USB ports, not the gear itself. To test this theory, simply connect your USB-enabled devices to different ports.
However, it that doesn’t solve the problem, then unplug everything. Confirm that you’re not receiving the BSOD message anymore and start replugging your gear one piece at a time to identify the guilty party.
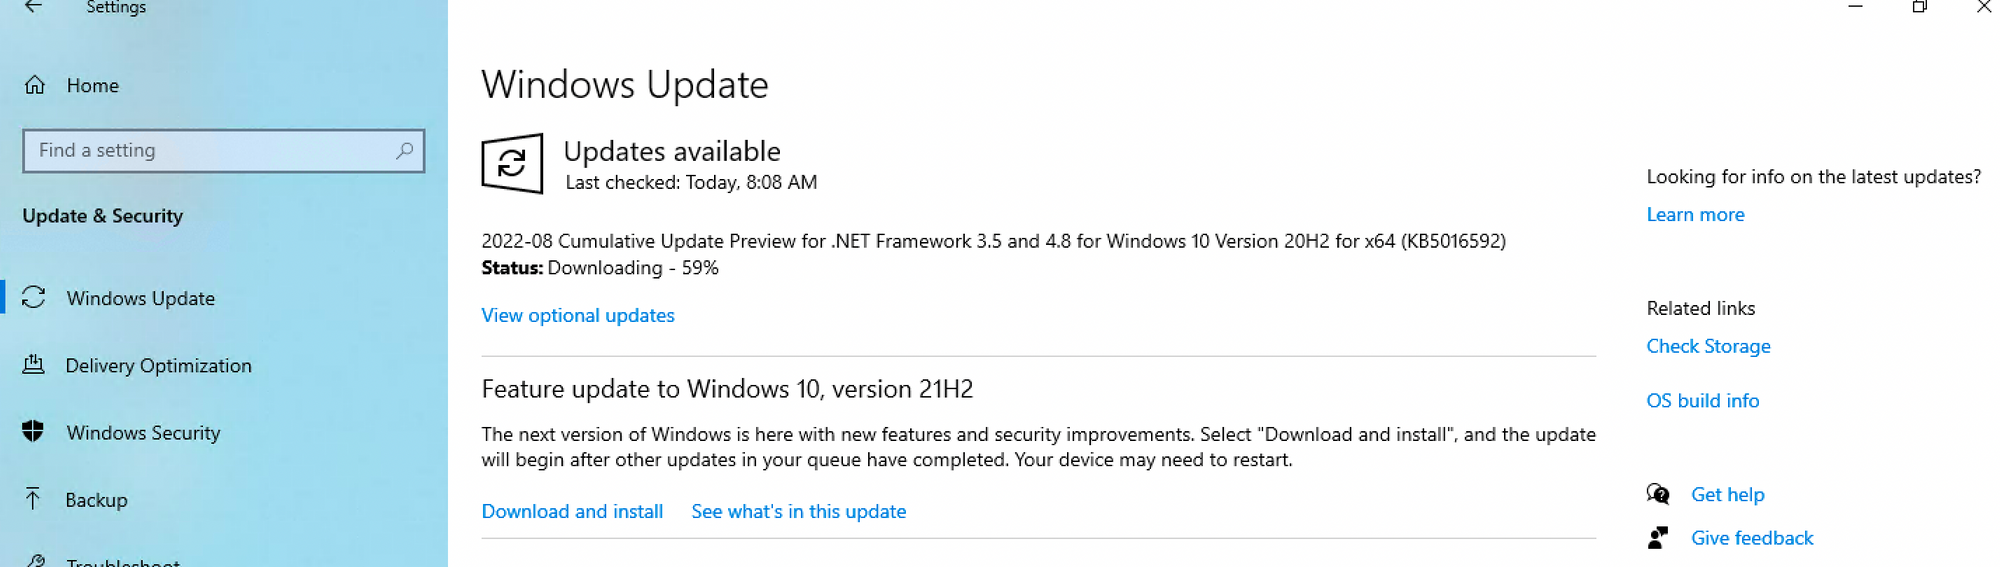
3. Get the newest Windows updates
Make sure to download and install the latest Windows updates on your computer. This way, you can take advantage of the newest features, improvements, and security patches.
- Open the Start menu, type Check for updates, and press Enter
- Wait until Windows looks for updates. If there’s anything pending, click Download
- Restart the computer once the updates are installed. You might have to do this several times
4. Disable your overclocking tools
Many gamers resort to overclocking utilities to get more power from their computer, in order to improve the system requirements for their favorite games.
Using an overclocking tool means modifying your RAM, CPU, and GPU settings. Regrettably, this could also lead to BSOD error messages like KERNEL SECURITY CHECK FAILURE.
To fix this, you have to deactivate your overclocking software and reset your clock settings to default.
5. Run a malware scan
If your computer was infected with dangerous malware agents, they could have hijacked your operating system and disabled your current processes.
As a result, you might experience system stability problems and BSOD errors like KERNEL SECURITY CHECK FAILURE.
Just fire up your antimalware application and run a scan to get rid of any infected files on your PC. If you don’t have a third-party tool installed, then you can use Windows Defender:
- Press the Win key, type Windows Security, and open this app
- Select Virus & threat protection

- Click Scan options
- Select Quick scan and click Scan now
- Once the scan is over, you can run a new one using the Windows Defender Offline scan option
6. Check your computer for errors
Hard disk and operating system errors are another reason why you could be seeing the KERNEL SECURITY CHECK FAILURE stop code on your screen. To verify and fix them, you need the command-line environment:
Start with CHKDSK (Check Disk):
- Make sure to quit all applications
- Press Win key + R, type cmd, then press Ctrl + Shift + Enter to open Command Prompt with elevation rights
- If you have Windows installed on the C: partition, then type
chkdsk c: /f. Otherwise, replacec:with the correct driver letter - Type y and press Enter when the tool asks to schedule the scan at the next Windows boot
- Restart your computer and wait until CHKDSK finishes its job
If your hard disk has errors, you can trust the Check Disk utility to solve them. However, if the KERNEL SECURITY CHECK FAILURE error persists, proceed to the next solution.
Continue with SFC (System File Checker):
- Run CMD with admin rights
- Type
sfc /scannowand hit Enter. Once the scan is complete, SFC will try to fix any corrupt system files it finds - Reboot your PC
System File Checker is great for fixing corrupt files that belong to Windows and which may trigger Blue Screen of Death errors. But, if it doesn’t work either, it’s time to bring out the big guns.
Finish with DISM (Deployment Image Servicing and Management):
- Open Command Prompt as admin
- Type
DISM /online /cleanup-image /scanhealthand press Enter - If there are any reported issues, write
DISM /online /cleanup-image /restorehealthto fix them - Reboot your PC, relaunch CMD as admin, write
sfc /scannowand press Enter - Restart your computer again
Deployment Image Servicing and Management checks for corrupt system files in the component store of the Windows image. If the KERNEL SECURITY CHECK FAILURE stop code on Windows 10 is caused by an event happening there, then DISM should take care of it.
7. Uninstall recent or unknown programs
Some applications may harm your computer and cause BSOD errors, especially if they make changes to your system registry as well as add new DLL files or mix with existing libraries.
Here’s how to uninstall recent software:
- Right-click the Start button on Windows 10 and select Apps and Features
- Set Sort by to Install date
- Pick the first program in the list, click Uninstall, and proceed with the removal instructions
- Reboot your PC
However, if the faulty program has already made changes to the system registry and DLL files, then using the Windows default uninstaller won’t help.
Instead, you can use using a third-party uninstaller that, besides removing a program from your PC, gets rid of any leftover files and registry entries.
8. Use System Recovery
Restoring your operating system to a previous checkpoint is a fast and easy way to eliminate the KERNEL SECURITY CHECK FAILURE error if it was caused by a software issue you can’t identify.
All you have to do is choose a checkpoint created before you started seeing the stop code.
- Make sure you’re logged in as the administrator
- Press Win key + R, type control panel, and press Enter
- Click Recovery
- Select Open System Restore
- Choose a checkpoint, click Next, and follow the on-screen instructions
- Reboot your computer
9. Check your RAM
If your computer is experiencing issues with the RAM, this could result in various BSOD error messages, including stop code KERNEL SECURITY CHECK FAILURE. You can check if your memory card is running correctly by running a Windows tool, without installing anything else:
- Make sure to close any running programs
- Press the Win key, search for Windows Memory Diagnostic, and open this app
- Click Restart now and check for problems
During the system reboot, Windows Memory Diagnostic scans your computer for memory errors. However, if you prefer a more advanced approach, you can check out MemTest.
10. Free up disk space
Insufficient disk space can cause a lot of problems on your computer, from applications that don’t work properly anymore, to BSOD errors like KERNEL SECURITY CHECK FAILURE.
However, there’s an easy solution to this problem: free up disk space. It means copying your valuable data to an external hard drive, uploading it to the cloud, and deleting junk files that unnecessarily take up your disk space.
There are numerous disk cleaners out there. However, if you don’t want to set up anything, you can use the Windows Disk Cleanup utility instead.
Here’s how to use Disk Cleanup:
- Make sure you’re logged in as the PC administrator
- Visit Recycle Bin and the Downloads folder to restore and copy any precious files
- Right-click the C: drive and open Properties
- Go to the General tab and click Disk Cleanup
- Select all items and click Clean up system files
- Once Windows finishes the scan, select all items again, click OK and Delete Files to confirm
11. Run a clean boot
Running a clean boot means loading Windows only with the required drivers and services while excluding everything else. It’s a good way to isolate the potentially guilty parties and safely troubleshoot the KERNEL SECURITY CHECK FAILURE error.
- Click the Start menu, type System Configuration, and open this app
- Go to the Services tab, deselect Hide all Microsoft services, and click Disable all
- Select the Startup tab and click Open Task Manager
- End all active tasks and restart your PC
12. Use Event Viewer
Immediately after you receive the KERNEL SECURITY CHECK FAILURE error, you should reboot your computer and fire up the Windows Event Viewer. If you’re lucky, you might get more information about the cause of the BSOD error.
Here’s how to use Event Viewer:
- Click Start, type event viewer, and press Enter
- Open the Windows Logs area on the left side and select System
- Click the first error on the list and check out its description
The error’s description could give you enough data, like a file name, to look up more information about the root of the problem that triggers the KERNEL SECURITY CHECK FAILURE stop code on Windows 10.
Conclusion: BSOD Kernel Security Check Failure
To sum up, you can fix the KERNEL_SECURITY_CHECK_FAILURE error by checking your drivers, detaching your hardware devices, and getting the latest Windows updates.
You should also disable your overclocking software, run a malware scan, check your system for errors, uninstall recent or unknown programs, and use System Recovery.
It’s also a good idea to check your system memory, free up disk space, run a clean boot, as well as use Event Viewer to get more details about the issue.
Did the solutions above work for you? We hope we didn’t miss any important steps. Let us know in the comment section below.

You’re here, so we’re assuming you ran into that horrible KERNEL_SECURITY_CHECK_FAILURE blue screen situation. Well, you’re at the right place. This BSOD issue could be caused by a range of activities, and computer components. However, the main cause of this situation is corrupted data structure, virus attack, low disk space, memory problems, and more.
Some other possible reasons for KERNEL SECURITY CHECK FAILURE could be missing system resources, DLL files, etc. And these issues occur because of some malware or accidental deletion of files or the presence of similar programs. Moreover, some system changes or faulty update installation could also be equally responsible for this. This particular Blue Screen of Death error has 0x00000139 as its bug-check value and following are the solutions to fix it up –
KERNEL_SECURITY_CHECK_FAILURE BSOD Windows 10 Solutions
Here is How to Fix KERNEL_SECURITY_CHECK_FAILURE BSOD Windows 10 –
1] Prevent Automatic Restart when PC runs into KERNEL_SECURITY_CHECK_FAILURE
This is not a fix, rather workaround to a situation caused by BSOD. Whenever your PC runs into some major errors, it would often end up in auto shut down or reboot. It is programmed this way in order to prevent damage to the system. Anyway, this can be quite frustrating for some users to have the Windows shut down without getting the chance to save anything they’ve been working on. So, the best call you have is simply stopping this automatic feature to prevent such situations if you’re confronting KERNEL_SECURITY_CHECK_FAILURE.
Step-1: As you have been facing BSOD issues frequently, so, prioritize saving your work before anything. After you save, close or minimize the running processes/ applications. Then head to the Desktop by pressing Win + D keys.
Step-2: On the desktop, right-click on This PC icon. Then, from the fly-out menu, select the Properties option.
Step-3: As you select the Properties option, the System window would appear. Then, choose “Advanced system settings” from the left pane.
Step-4: The System Properties window will appear now. There, beneath the Startup and Recovery section, there would be a Settings button on which you need to click.
Step-5: Another wizard will appear now separately for ‘Startup and recovery’. Here, navigate to the System failure section. You can see a box corresponding to “Automatically restart“. Uncheck it.
Step-6: Lastly, click on the OK button in order to save the changes.
With this, the OS will not reboot all by itself and you will get time to try other workarounds to resolve KERNEL SECURITY CHECK FAILURE.
2] Trigger the Blue Screen Troubleshooter
Troubleshooting is certainly one of the simplest yet practically helpful ways of dealing with any errors in your system. Moreover, Windows has got its own utility specially meant for dealing with BSOD issues. So, no need to look for any extra tool from the Store for this purpose. However, note that for the Blue screen troubleshooter feature to be present, your system needs to be on Windows 10 Fall Creators Update or later. Below given are the simple steps with which you can use to run this built-in troubleshooter –
- Enter “Win + I” hotkeys to open Windows Settings app. Then, navigate to the Update & Security tab.
- Choose the Troubleshoot subsection you see on the left of the following page.
- Now, scroll down to the Blue Screen option and click it.
- Click on the ‘Run the Troubleshooter’ button there. This will initiate the troubleshoot feature and would possibly diagnose and fix the root of KERNEL_SECURITY_CHECK_FAILURE in the device.
3] Dettach any connected External HDD or hardware and reconnect after resolving
There have been many instances of users facing the KERNEL_SECURITY_CHECK_FAILURE blue screen error due to problematic Hard Disk Drive or external hardware. Though these kinds of issues are quite frustrating, in this case, users would have an easy way out. This workaround is quite simple enough. All you need to do is disconnect that external hardware or HDD. It’s not even for long. There is no problem in reconnecting the same soon after the issue fixes. Here is all that you need to do –
- Just disconnect any connected external hardware from your computer.
- Now, Restart Windows 10 PC – by clicking on the power button on the start menu and selecting ‘Restart’. When the reboot completes, see if KERNEL_SECURITY_CHECK_FAILURE persists.
Once you get rid of the issue, go to the hardware’s manufacturer’s website and look-up for an update for its driver.
4] Get all the latest update patches
For a healthy, trouble-free, smoothly functioning computer, it is quite essential that you keep the system update with the latest cumulative updates that Microsoft offer for you every month. Why is that? Well, these latest ‘updates’ usually come with some added security and fixes against potential vulnerabilities as well as the bugs in the system causing various errors including the blue screen. Thus, by updating Windows, you can possibly avoid or fix many tricky situations with the computer.
Just note that, while you are downloading and installing the latest updates, connect to high-speed internet. This will prevent troubles like incomplete or partial installation etc. Check out the below steps for checking any pending updates and getting them –
- Get access to the Settings app.
- In the Settings homepage, click Update & Security. On the page that comes next, go to Windows Update subsection the left-hand side.
- On the right side, click on Check for updates. This will trigger a check for any due updates.
- If you see the lists of new patches available, just click on the Download button under them.
- Once installed, your system will prompt for a reboot to apply the update changes. Click on Restart.
This might resolve the KERNEL_SECURITY_CHECK_FAILURE issue for you.
5] Fix KERNEL_SECURITY_CHECK_FAILURE by Getting into Safe Mode
Another way to try fixing KERNEL SECURITY CHECK FAILURE BSOD error is by booting the OS in Safe Mode. By doing so, you will have an option to keep operation to minimal. This means the default and basic setting and only the important files will be available. Here is how you can do it –
- Open Run dialog box and you can do this with a joint press on “Win logo + R” shortcut keys.
- Type in msconfig in the text box and press Enter or click on the OK button. This will open the System Configuration window on the computer.
- Click on the ‘Boot’ tab.
- Perform a click on the checkbox corresponding to ‘Safe boot’. From the further boot options that appear, select Minimal.
- Click on OK button for saving the changes you made. Finally, close the application and restart your device.
- As your system reboots, press F8. Select the Safe boot choice from the ‘Advanced boot’ menu.
- Then, enter Safe Mode and see if the issue persists.
By entering minimal safe mode, only the basic settings and essential files would be there. So, in case the issue is no more, it would mean that the problem was probably with some of the changes in settings or system. You can either reset them or restore to a no-error point (steps for system restore is given in a later section.
6] Clean up any Malware in the system all in Windows Security
Malware is just about everywhere – the PC you borrowed from someone could have a virus, the non-secure site you downloaded movies from could have some threats. And, soon as any kind of virus or such malicious stuff enters into your computer, some sort of trouble follows. Therefore, it would be a good idea for computer users to frequently scan for any kind of threats in the system. Malicious software of some kinds can cause serious troubles to the functioning of the system. Furthermore, system/disk corruption from malware attacks is one of the basic causes of KERNEL_SECURITY_CHECK_FAILURE.
Well, we’re grateful that Microsoft’s operating systems now have its own security utility – Windows Security. You can easily scan and clean-out any malware-threats on the system with this security app.
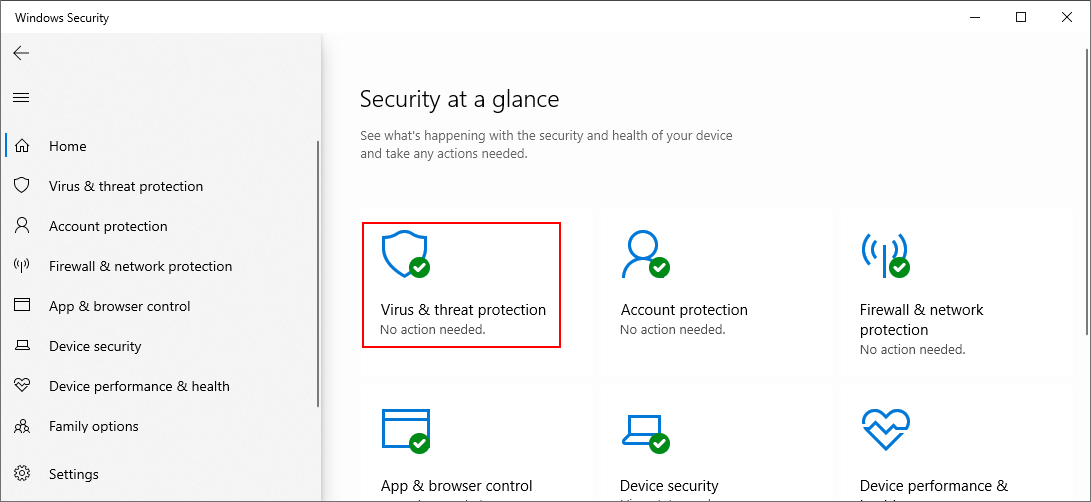
- Type ‘Security’ in the search box on the taskbar. Then, double-click and open Windows Security from the results that appear.
- Select the Virus & threat protection option in the main interface of the app. Click on the link Scan options on the adjacent side.
- Go ahead with the radio beside the Full scan option. To initiate the detection, hit the Scan now button at the bottom.
- Windows Security would start searching through every file in the system for defined viruses and system threats. The whole process may take a few many minutes.
- Once the process is over, you will see the scan results and diagnosed threats. In case any malware is found, click on the Clean threats button you see in the window.
- It would further lead you to a page where you will come across three more options, from which you must select Remove. Then, hit Start actions to eradicate all the virus components.
7] Update outdated drivers to resolve KERNEL_SECURITY_CHECK_FAILURE
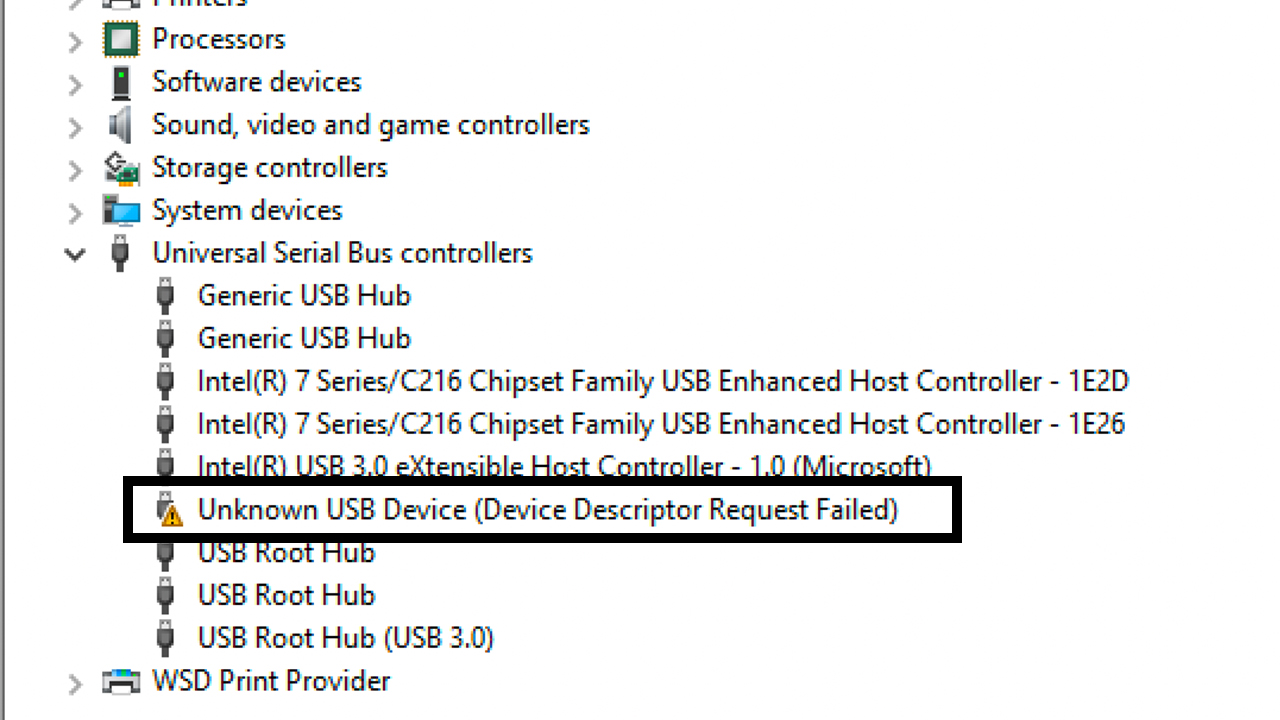
You should update any badly-functioning old driver. This itself can be a savior in the many types of errors and computer malfunctions scenarios. Outdated drivers can result in several errors including KERNEL SECURITY CHECK FAILURE. Well, you might have probably found the advice to keep device drivers up to date before too. You may check for old drivers and update then through the Device Manager. Here, the devices with outdated drivers will be indicated with a yellow mark. Therefore, finding the driver causing the problem wouldn’t be too hard. Here are the steps you must follow to update the drivers for fixing KERNEL_SECURITY_CHECK_FAILURE error –
- Get access to the Run dialog and type devmgmt.msc. Then press the Enter key or click on the OK button.
- In the Device Manager console, check through to see whether there is a yellow exclamation mark on any device. In case there is any, expand that device by clicking on it.
- Make a right-click on its drivers one at a time and from the fly-out menu click on the option Update driver. Then, just follow along with the on-screen instructions. The system itself will take care of the rest and will get the update for the chosen driver.
- Do this for every old device driver.
A quick note for non-pros: You shouldn’t tweak with every random driver. Also, be very careful while you update any drive- especially if you are a rookie computer user. In case something goes wrong, it can cause troubles for the associated devices. Roll back to the previous driver immediately in case something goes wrong while you were trying to update device drivers.
8] Delete Windows Update files whose installation wasn’t complete
Yet another cause of KERNEL_SECURITY_CHECK_FAILURE can be the termination of Windows updates before completion. Though patches install automatically, a bad network connection or other interruptions may cause the trouble.
So make it a point to delete any incomplete Windows updates or update files. This is how you can do it:
- Right-click on Start and click on Settings.
- Click on Update & Security. From the left section of the page, select Windows Update.
- Click on ‘View update history’ option.
- On the next page, you should be able to find the option Uninstall updates.
- Choose the latest patch and click the Uninstall button from the top ribbon.
9] Use sfc /scannow for getting any missing system files back in place
KERNEL_SECURITY_CHECK_FAILURE BSOD can also be due to missing system files and corrupted Windows components. Thankfully, Microsoft has a solution for this case as well. System File Checker aka SFC can help you recover the missing system files and fix the corrupted Windows system.
Follow the below steps to use the File checking utility –
- In the searchbox type ‘cmd‘. Right-click on Command Prompt and select “Run as administrator”.
- Allow the program to make changes when prompted by the User Account Control dialog.
- The Elevated Command Prompt window will open. Type the following command and press Enter –
Sfc /scannow - This command will kick start the check for corrupted elements and all system files. Now, this can take some time. The tool will hunt for the corrupted Windows components and fix them by itself. Also, any missing files will be replaced.
- Once the process is complete, reboot your system.
10] Uninstall Duplicate programs causing KERNEL SECURITY CHECK FAILURE BSOD
Presence of similar or duplicate applications may create conflict if their requests collide. Blue screen errors like KERNEL_SECURITY_CHECK_FAILURE can be kept away by making sure that you don’t have any duplicate or similar apps on your PC. You can find and then uninstall these apps very easily by following the given steps –
- Perform a right-click on Start and choose Run from the Win+X menu.
- In the text-box, type appwiz.cpl. Press Enter and you will see the Programs and Features window.
- Find and select the applications that are similar and may be causing the problem. Remove those by clicking on the Uninstall button you see on the top bar.
- When prompted, allow uninstalling. Then restart your PC.
11] Resolve the Memory issues with the system
Memory issues can be trouble. They can even lead to KERNEL SECURITY CHECK FAILURE as well as other blue screen errors. The Windows Memory Diagnostic utility in the OS is what you can try to manage the troubles with memory. Here is how you can use this utility –
- Firstly, open the Settings app in your PC.
- Type ‘memory’ in the search box of the application. From all the options that appear as results, choose “Diagnose your computer’s memory problems”.
- Finally, choose the “Restart now and check for problems (recommended)” option there.
Your device will restart. After the PC reboots, a blue screen will appear and scan for memory problems will start.
The system will restart again automatically after the scanning process completes. You must be able to find the results of the scan after it sign-in.
12] Delete the junk files and other temporary files
Piling up trash or junk files (cache and temporary files) in your computer system can be trouble. As work on or use the PC and internet, a good lot of useless junk and temporary files can gather up in the system storage unless you occasionally delete it. As these files load up, storage space and system efficiency shrink. This, in turn, would give way to errors.
To manage this situation, use the Disk Cleanup utility. This tool can help free up some space covered by the temporary and junk files. Cleaning up the junk files on the system is one of the proven ways to fix some BSOD issues. Let’s see the steps you need to follow for using the Disk Cleanup utility –
- In the search box type “cleanmgr”.
- From the results, double-click on the Disk Cleanup Desktop app to open it. The small popup window that appears would require you to select a Disk.
- Select the Disk Drive (e.g. C:) that you want to clean up.
- Your system will now calculate the total junk-occupied space in your system which you will be able to retrieve through clean up. Click Clean up system files button and it might take a few seconds.
- In case you have some important files in the Download folder (or any other important folder), uncheck it before clicking “OK”. A better alternative is to create a backup of the important files to another folder beforehand so that you can delete the rest of trash in those folders.
13] Uninstall the third Party Antivirus Tools
People use different third-party Antivirus tools in order to safeguard the system from malware. But now that you have Windows Security application (as discussed above), use it rather. More importantly, third-party anti-malware can sometimes cause conflicts (though they’re trusted). It may even give way to blue-screen errors like KERNEL_SECURITY_CHECK_FAILURE. So, try removing such third party programs to fix BSOD –
- Press “Win+X” and with this, the Power user menu will open.
- Select Apps and Features from the flyout menu.
- Select the third-party antivirus programs and then click on the Uninstall button which you can see in the extended pane.
- Confirm uninstall and follow any on-screen instructions to remove the program completely.
14] Run the Disk checking tool to detect and fix KERNEL_SECURITY_CHECK_FAILURE
Blue screen errors like KERNEL SECURITY CHECK FAILURE can also be the result of the system fatigue. Continuous use of the computer may tire it, resulting in many functional issues including BSOD errors. Disc Checking Utility is handy for this problem. Try the below steps, if you have been using your computer for a long time and facing some troubles –
Step#1: Go to the Search box and type the word ‘cmd‘ in it. In the search results, you will find Command Prompt.
Step#2: Right click on it and then click on “Run as an administrator”.
Step#3: The system will ask permission for allowing the program to make changes. Click on Yes to allow.
Step#4: The Elevated Command Prompt window will appear. There, type the following command –
chkdsk C: /f/r/x
Step#5: Press Enter. This command will trigger the Disc Checking Utility and the process will start. Wait till it completes and then r3estart your computer.
15] Roll back to a previously created restore point
At times some of your recent activity may give way to blue screen error but you might not be able to spot what. In such scenarios, the best alternative is restoring your system and undoing all the recent activities. This option may possibly resolve the problems your PC is facing by bringing your system back to error-free condition. However, the downside of going for ‘System Restore‘ is that it will also erase your recent work and files. So remember to take a backup of your recent works before you perform it. To reset or restore your system follow the below-given steps –
Note that you need to have a previously created restore point for this to work.
- In the Cortana box on the taskbar, search for System Restore.
- From the results, select System Restore and enter the password, if prompted.
- Then, just choose a restore point and reset the system by following the instructions displayed on the screen.
Methods:
1] Prevent Automatic Restart
2] Trigger the Blue Screen Troubleshooter
3] Dettach any connected External HDD or hardware
4] Get all the latest update patches
5] Get into Safe Mode
6] Clean up any Malware in the system all in Windows Security
7] Update outdated drivers
8] Delete Windows Update files whose installation wasn’t complete
9] Use sfc /scannow for getting any missing system files back in place
10] Uninstall Duplicate programs
11] Resolve the Memory issues with the system
12] Delete the junk files and other temporary files
13] Uninstall the third Party Antivirus Tools
14] Run the Disk checking tool
15] Roll back to a previously created restore point
That’s all!!
Устранение ошибок синего экрана может обернуться настоящей головной болью, особенно если ошибка с одним и тем же описанием может иметь разные причины. Как, к примеру, ошибка KERNEL SECURITY CHECK FAILURE, столкнуться с которой вы можете при самых разных обстоятельствах, она может быть вызвана неполадками оперативной памяти и других аппаратных компонентов, повреждением файлов операционной системы, действием вредоносного ПО, а в некоторых случаях и некорректными настройками Windows.
Но чаще всего она вызывается сбоями в работе драйверов, поэтому начать диагностику имеет смысл с поиска проблемного драйвера, впрочем, если вы не готовы к скрупулезному анализу дампов памяти или не располагаете таковыми, можно начать с общих и в целом достаточно эффективных решений.

Если незадолго до появления ошибки вы подключали новое или заменяли старое оборудования, восстановите прежнюю аппаратную конфигурацию и понаблюдайте за системой. Если ошибка не появится, скорее всего, причиной неполадки стала частичная несовместимость устройств, точнее, их драйверов. Установите оригинальные драйвера нового оборудования, также в таких случаях можно попробовать обновить драйвера других ключевых компонентов компьютера.
Примерно та же ситуация, что и в случае замены оборудования. Если ошибка появилась после установки новых драйверов, удалите их или откатитесь к предыдущей версии (в случае обновления). То же самое касается сторонних программ, работающих в режиме ядра или устанавливающих в систему фоновые службы. Если ошибка возникает при запуске конкретной программы, которая вам нужна, добавьте ее в исключения антивируса. Возможно, стоит попробовать установить ее другую версию.
Если ошибка KERNEL SECURITY CHECK FAILURE появилась после переустановки системы, скачайте и установите оригинальные драйвера для вашего «железа», прежде всего драйвера чипсета. Если же ошибка появляется именно в процессе установки, проверьте и перезапишите установочный носитель, при этом мы рекомендуем избегать использования сторонних сборок Windows, так как они могут содержать ошибки.
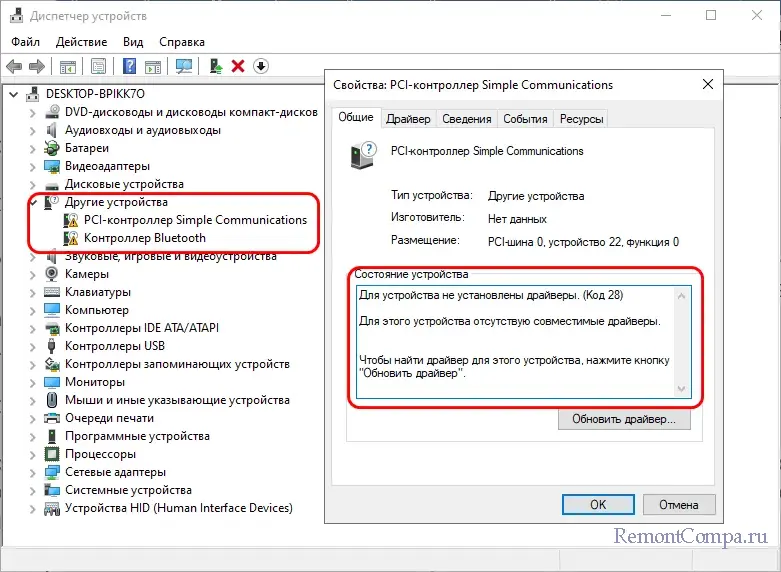
Загляните в Диспетчер устройств и убедитесь, что в нем нет компонентов, отмеченных желтым значком предупреждения – такой значок часто указывает на некорректную работу устройства. Установить причину неполадки в таких случаях можно по описанию и коду ошибки в свойствах устройства.
Проверьте на предмет неисправностей жесткий диск и оперативную память. Для проверки накопителя рекомендуем использовать программу Victoria, которой на нашем сайте посвящена отдельная статья, проверить ОЗУ можно средствами штатной утилиты mdsched или более функциональной сторонней программы memtest86+. Кстати, оба инструмента могут быть запущены в загрузочной среде.
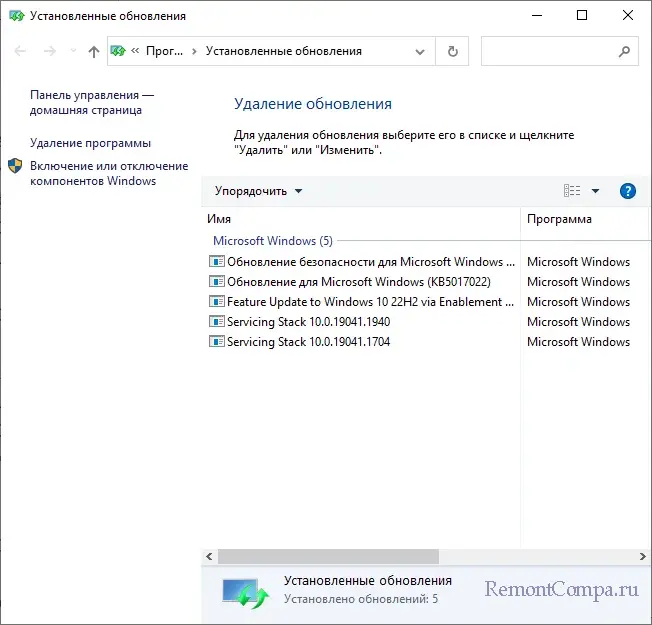
В случае появления ошибки после установки обновлений удалите последние через штатный «Центр обновлений» или классический апплет «Установка и удаление программ».
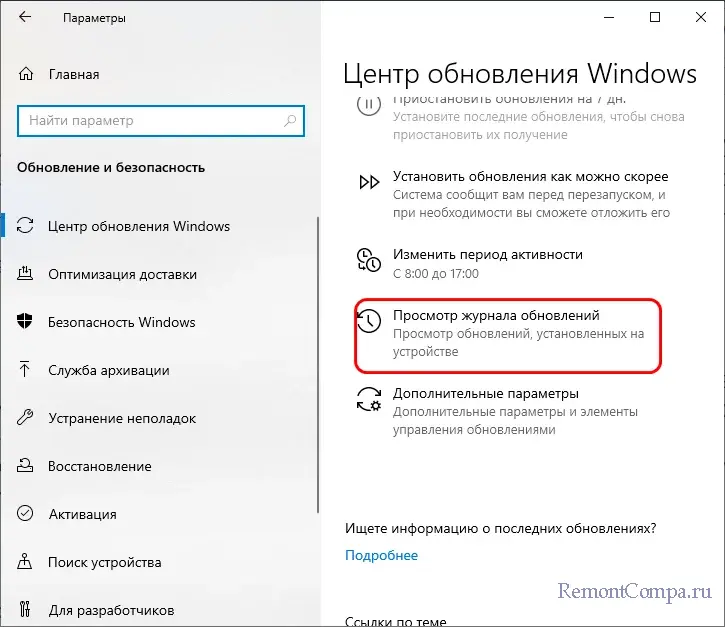
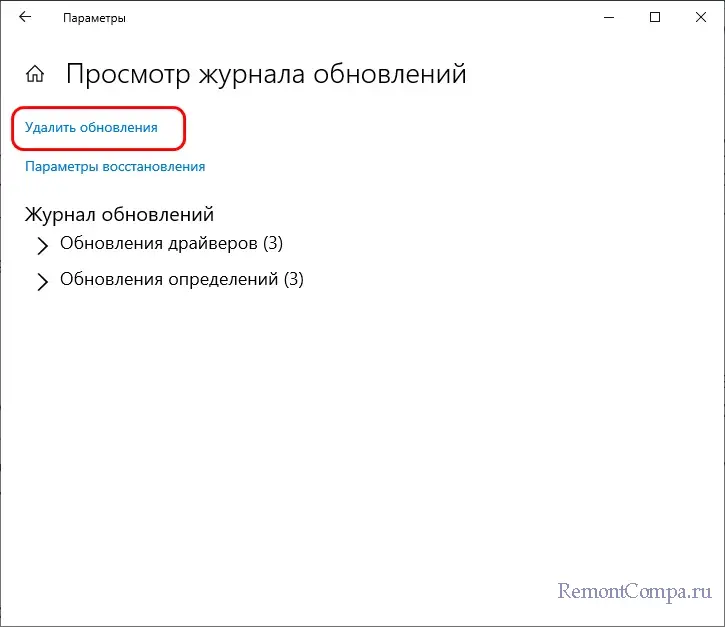
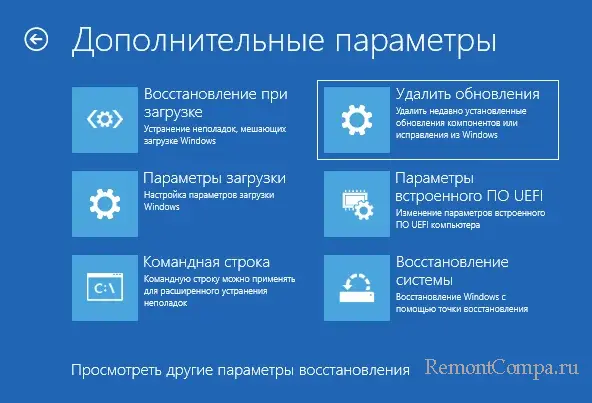
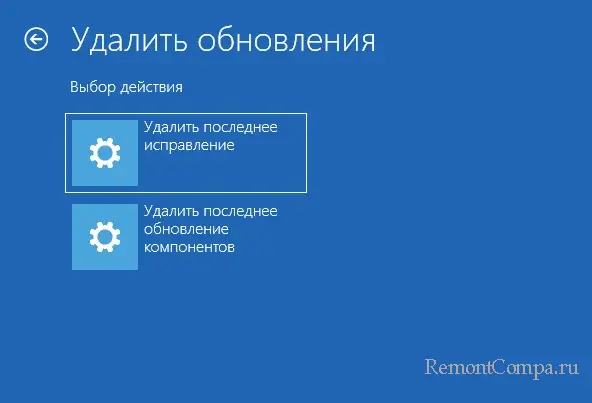
Если система не загружается, загрузитесь в среду восстановления (без использования установочного диска) и выполните удаление обновления из раздела «Поиск и устранение неисправностей» → «Дополнительные параметры».
Дополнительно можно проверить систему на предмет заражения вредоносным ПО. Проверку лучше всего проводить в загрузочной среде, используя такие инструменты как Dr.Web LiveDisk.
Если на ПК имеются точки восстановления, используйте их для отката системы в то состояние, в котором она находилась до появления ошибки. Это самый простой и доступный способ устранение самых разных неполадок, имеющих программные причины. Более жестким, но и более эффективным вариантом является восстановление Windows с использованием смонтированного в Проводнике установочного образа. По сути, это та же переустановка, но с возможностью сохранения файлов, настроек и приложений пользователя.
Те, у кого есть время и желание, могут попробовать определить источник ошибки более точно, воспользовавшись бесплатной утилитой для анализа дампов памяти WinDbg. Скачать ее можно из Microsoft Store либо с официального сайта Microsoft. Установив и запустив программу от имени администратора, нажмите кнопку «Файл», выберите пункт «Open dump file» и укажите путь к исследуемому файлу дампа DMP.
Основной файл дампа синего экрана сохраняется в папку C:\Windows, малые файлы дампов – в папку C:\Windows\Minidump. Вам нужен файл с последней датой и временем в качестве имени. Открыв файл, прокрутите содержимое окна WinDbg вниз и кликните по ссылке !analyze -v.
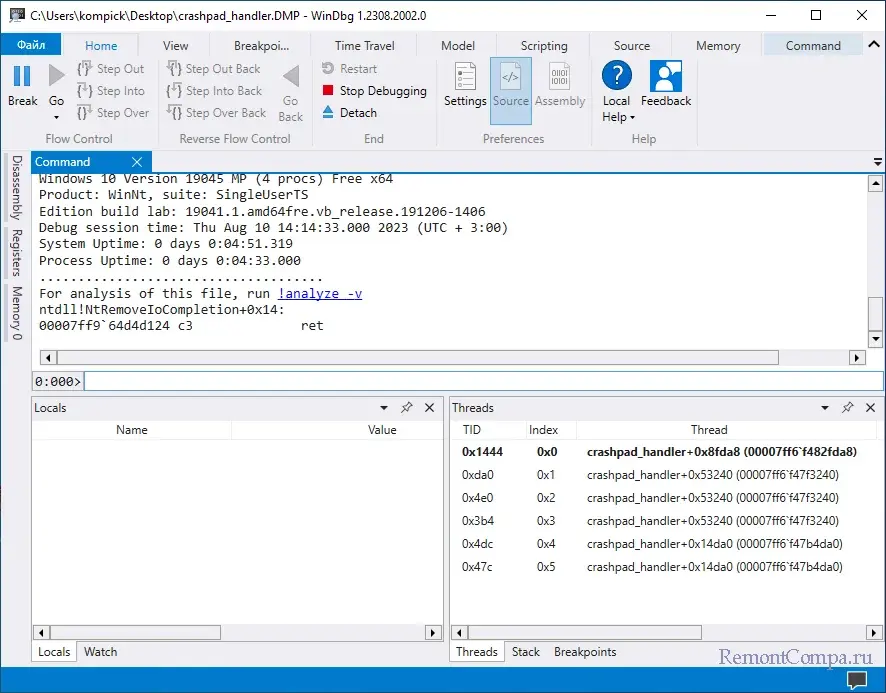
При этом будет запущена процедура анализа дампа, которая займет некоторое время. По ее завершении в поле «Command» будут выведены результаты – название и код ошибки, аргументы и прочие диагностические данные, среди которых будет указан файл с расширением EXE или SYS – драйвер, который вызвал критический сбой.
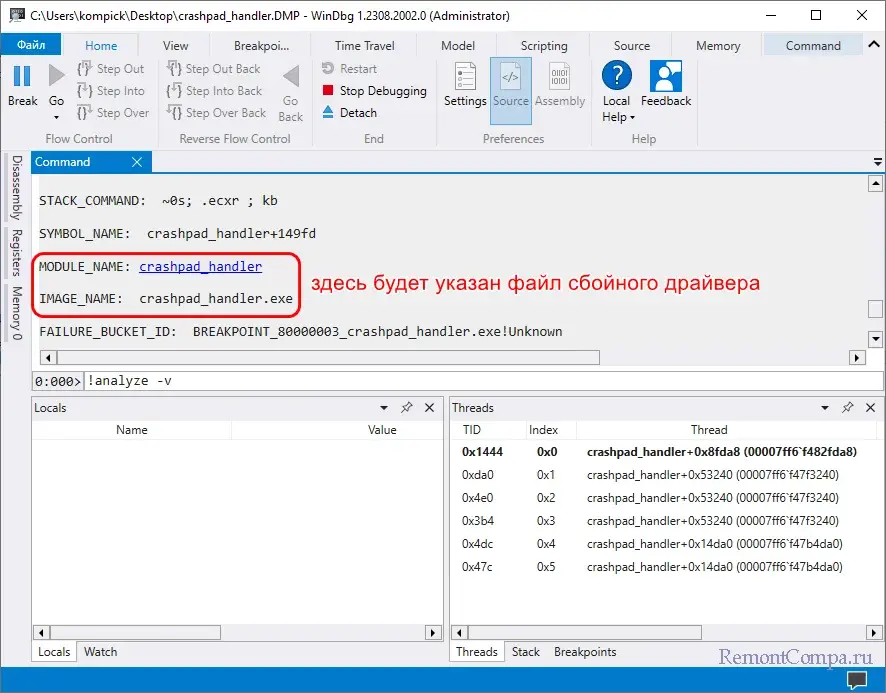
Зная же название драйвера, можно будет поискать о нем информацию в Интернете – какой программе или устройству он принадлежит и за что отвечает. Далее действуем по уже известной схеме – удаляем, обновляем или переустанавливаем проблемный драйвер, точечно устраняя таким образом причину ошибки KERNEL SECURITY CHECK FAILURE.

I’ve been a professional software engineer for many years, and I can testify that there are few things worse than getting the dreaded BSOD (Blue Screen of Death). Especially when you are about to write a piece of mind bending code at 2am to meet a looming deadline.
That’s just my perspective as a software engineer, but let’s face it – using a computer these days is absolutely essential for most professionals.
The point is the blue screen of death is about as welcome as a pigeon on a chessboard at a world champion chess tournament under almost any circumstances.
What You’ll Learn
In this article, we are going to look at one particularly pernicious cause of the BDOS, the dreaded «Kernel Security Check Failure» issue. We’ll also see how you can fix this, should you be faced with this abominable issue.
Common Causes for the BSOD
Common reasons you might get the «Kernel Security Check Failure» issue are corrupted system files, faulty hardware, or outdated drivers.
Corrupted system files
Malware is the most likely cause of corrupted system files. The nomenclature of ‘Malware’ is a contraction of the term ‘Malicious Software’. This is software deliberately designed to be intrusive and cause disruption when you’re working on your computer.
You have probably heard of terms like virus, trojan horse virus, worms, spyware, ransom ware, and so on. These are all examples of malicious software, Malware.
Faulty hardware
Faulty RAM (memory) or a corrupted or damaged hard disk drive could be the cause of the issue.
Outdated drivers
Out of all the possible causes of this «Kernel Security Check Failure» issue, the most likely cause is outdated drivers.
The outdated drivers issue may have arisen from upgrading from an older version of Windows to Windows 10. The relevant driver may have worked perfectly on the older version of Windows but may be incompatible with Windows 10.
What is the Blue Screen of Death?
Typically you become aware of the «Kernel Security Check Failure» issue during Windows startup. This is where Windows performs a check process. If, during this process, Windows detects corruption in any critical data structures, the Kernel_Security_check_failure error is thrown.
As you can see by the screenshot below there is very little detail about the error. Thankfully, the message does include a stop code (highlighted in yellow) to help identify why you’re presented with the dreaded BSOD.

Fortunately there are many potential fixes available to resolve the «Kernel Security Check Failure» issue.
To solve the issue, you can go through an investigation process in order to pinpoint the cause of the issue. Once you have learned the cause of the issue, you’ll know which of the fixes to apply.
But a quick fix which is the first item in the list of possible fixes provided in this article might be as simple as updating your system to the latest version of Windows 10.
You can see below a list of fixes discussed in this article. The subsequent sections contain step by step instructions for each potential fix in the list.
- Update to the Latest Released Version of Windows 10
- Update Drivers that Need to be Updated
- Check for Viruses
- Investigate Possible Corrupted Windows File System
- Test to see if Disabling Antivirus Software Fixes the Issue
- Investigate Possible Issues with RAM
- Investigate Possible Hard Disk Drive Issues
- Test to see if Disabling Antivirus Software Fixes the Issue
- Start PC in Safe Mode
Update to the Latest Released Version of Windows 10
This maybe the easiest way to fix the issue. To update Windows 10 to the latest version of Windows, you can take the following steps:
- Click Windows key + I to invoke the Settings App.
- Click the “Update & Security” tile.
- Click the “Check for Updates” button (status information will be presented on the screen regarding the download and installation progress)
- After the update is complete, check to see if the BSOD still occurs.
Update Drivers that Need to be Updated
One easy way to check for drivers with issues is by using Device Manager.
To invoke Device Manager, press the Windows key + X. In the dialog that will be presented to you, a tree structure is displayed.
If you expand all of the nodes in the tree structure it should be apparent as to which drivers need to be updated – you’ll see an exclamation mark with a yellow background colour next to the nodes that represent the drivers that need to be updated.
To update a driver, simply right click on the node that represents the relevant driver (that needs to be updated) and click the “Update driver” context menu item.
You’ll then see two options: you can either select the option whereby Windows 10 will search for the driver automatically, or you can choose the manual option and search your computer for the relevant new driver file that may already exist on your computer.
The next step is to allow the driver installation update to complete.
You can then continue to check for other problematic drivers by inspecting Device Manager for nodes that contain exclamation marks with yellow backgrounds. If you find any more, you can update those drivers until all the problematic drivers have been appropriately updated.
Then you just need to restart your computer so that the changes created by the new drivers are completed. Hopefully this eliminates your BSOD issue.
If the issue still occurs, your investigation must continue…
Check for Viruses
You must ensure that you have installed the latest Windows updates on your PC and use the antivirus software to check for viruses.
If one or more viruses are found, take the necessary action to remove the virus or viruses from your computer.
Investigate Possible Corrupted Windows File System
You can use the System File checker (SFC) tool to fix corrupt system files. Below are the steps that you can follow in order to run the System File checker tool.
- From the desktop, use the Windows + R key to open the “Run” box
- In the the “Run” box, type in “cmd” then press ctrl+shift+enter to launch the command prompt with administrative privileges.
- Click the «Yes» button on the «User Account Control»ss (UAC) prompt
- Type “SFC /scannow” in the command prompt window and press “Enter”.
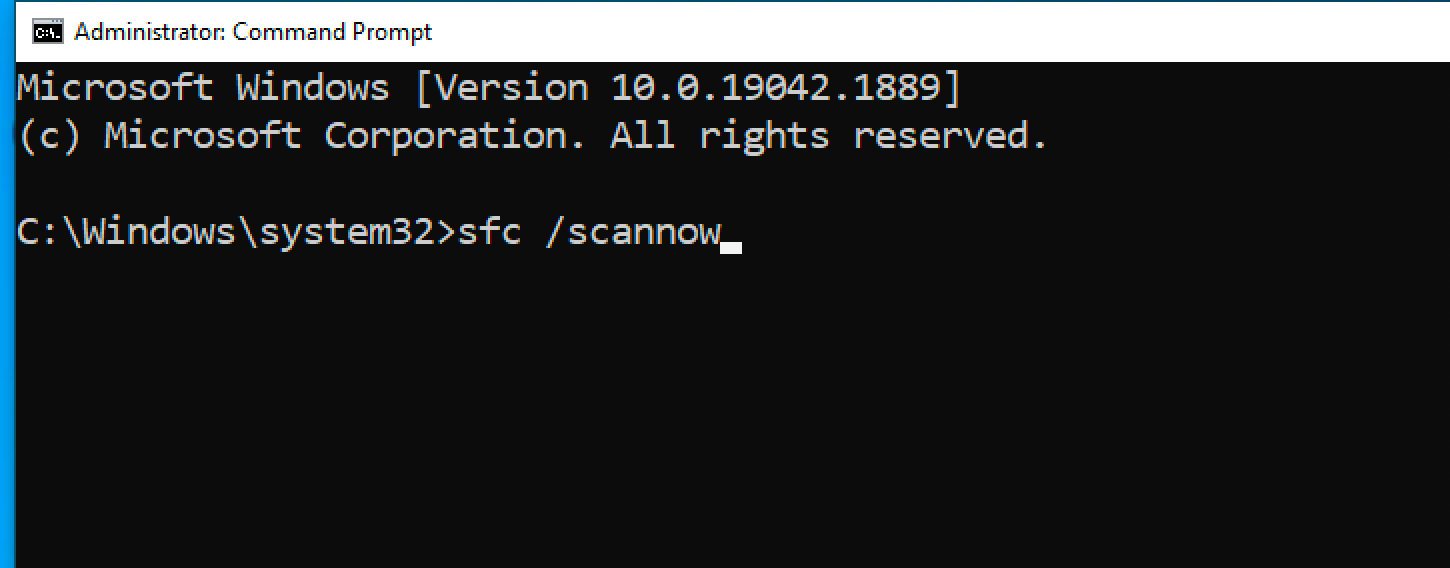
The System file checker utility will check the integrity of Windows system files and will perform appropriate repair operations if required.
Reboot your computer after the process is completed.
Test to see if Disabling Antivirus Software Fixes the Issue
Antivirus software, even though well-intentioned, can inadvertently block non-harmful services and apps from running correctly.
This method will tell you (as it were) that your antivirus software may be the cause of your issue – but please be aware that it is not recommended that you run your computer without the protection of appropriate antivirus software.
To temporarily disable your antivirus software, you can simply invoke the task manager window. You can do this by pressing ctrl+shift+escape on your keyboard.
If task manager loads in compact mode, click the “More details” option. Then select the «Startup» tab at the top of the «Task Manager» Window.
Find the name representing your antivirus application and click the relevant list item.
Then click the disable button that will be present in the right hand corner of the Task Manager window.
Finally, restart computer and see if the BSOD still appears.
Again, remember that even if this fixes the issue, you shouldn’t run your computer without antivirus software. So you’ll likely need to look into alternatives for protection.
Investigate Possible Issues with RAM
To identify RAM (memory) issues you can invoke the built-in Windows 10 scanner. To do this click on the search magnifying glass icon in the taskbar or press the Windows Key + S.
Type «Memory Diagnostics» in the search text box and run the first option presented in the search results.
In the popup dialog box that is presented, select “Restart now and check for problems (recommended)” option to kick off the diagnostic process.
During the boot process the memory diagnostic process will attempt to identify possible errors and issues regarding RAM. If issues are found, they will be reported to you.
Investigate Possible Hard Disk Drive Issues
You can scan your hard disks for any inconsistencies and errors using the check disk tool.
To run the check disk tool, make sure that you are logged onto windows with an administrator account. Then follow these steps:
- At the desktop, click Windows Key + R to launch the “Run” box.
- In the «Run» box, type in “cmd” then press ctrl+shift+enter to run the command prompt as administrator.
- Click the «Yes» button on the «User Account Control» (UAC) prompt.
- Type in “chkdsk c: /f” and press enter

The “/f” option will attempt to fix any found errors
You could also include the “/r” option and the “/x” option with this command. The “/r” option will locate bad sectors and recover any readable information, while the “/x” option forces the disk drive (about to be checked) to dismount before the utility begins a scan.
Start PC in Safe Mode
You can start your PCs in safe mode so that Windows 10 is booted with minimal files and drivers. To boot up Windows 10 in safe mode, you can follow these steps:
- Press Windows Key + I to invoke the Settings App.
- Under the «Update & Security» heading, select the «Recovery» tab.
- Under the «Advanced Startup» heading in the right pane, press the «Restart Now» button.
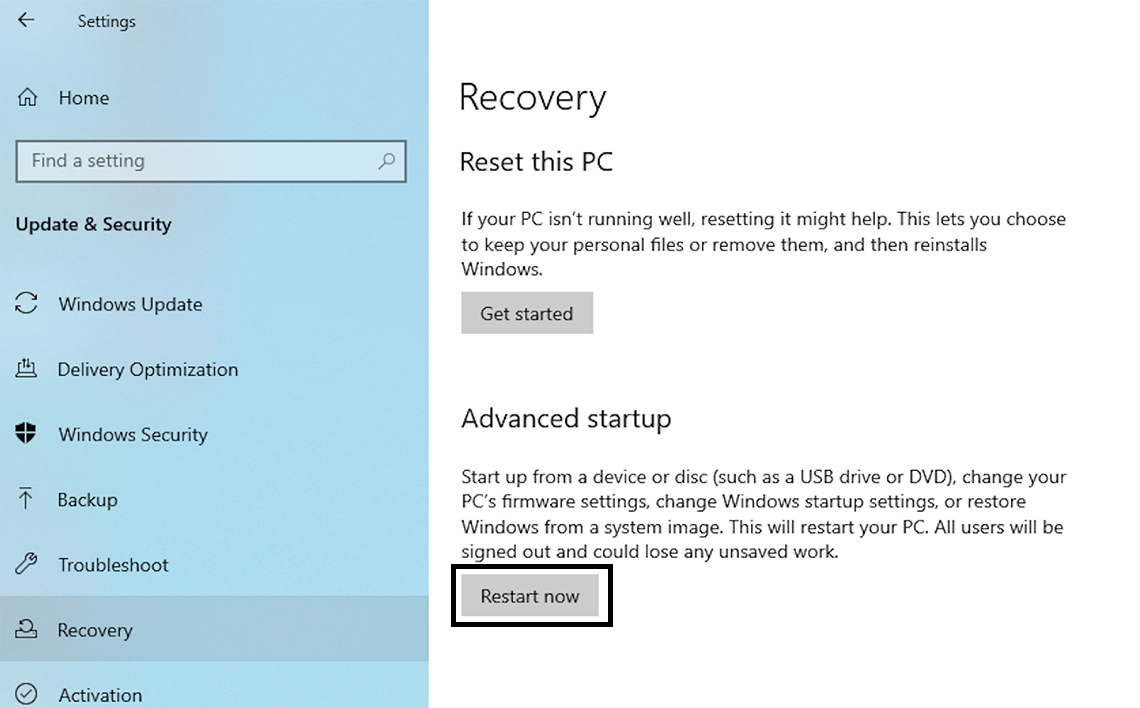
- After the PC restarts to the “Choose an option” screen, select Troubleshoot > Advanced options > Startup Settings > Restart.
After the PC restarts, you are presented with a list of options. Select “4” or press “F4” to start PC in Safe Mode. Or if you need to use the internet, you can select “5” or press “F5” for Safe Mode with Networking.
If the issue does not occur in safe mode, this means that the default settings and basic device drivers aren’t causing the issue.
Assuming the problem does not occur in safe mode, you now know that the issue must be caused by an additional driver or application that runs in normal mode.
Using a process of elimination, you can now focus on the relevant additional drivers and applications. You can systematically uninstall each of the relevant applications starting with the most recently installed ones and working your way from most recently installed to the least recently installed.
With each uninstall you can test for the problem. This will hopefully pinpoint the application or program that was the cause of the issue. Then you can uninstall the relevant software to hopefully get rid of the issue.
Conclusion
In conclusion, the Kernel Security Check Failure issue can be a huge inconvenience. But hopefully the steps provided in this article will help you fix the issue.
Learn to code for free. freeCodeCamp’s open source curriculum has helped more than 40,000 people get jobs as developers. Get started