
Protecting your Windows Server 2019 with a firewall is essential for maintaining security. However, there may be instances where you need to disable the firewall temporarily or permanently. Let’s explore how to disable the firewall in Windows Server 2019 to meet your specific requirements.
Disabling the firewall on your Windows Server 2019 can be done through the server’s Control Panel. By turning off the firewall, you can allow unrestricted access to your server, which might be necessary for certain applications or troubleshooting purposes. It is important to assess the risks and only disable the firewall when absolutely necessary, as leaving your server unprotected can expose it to potential threats.
To disable the firewall in Windows Server 2019, follow these steps:
- Click on the Start menu and open the Settings app.
- Select «Update & Security,» followed by «Windows Security.»
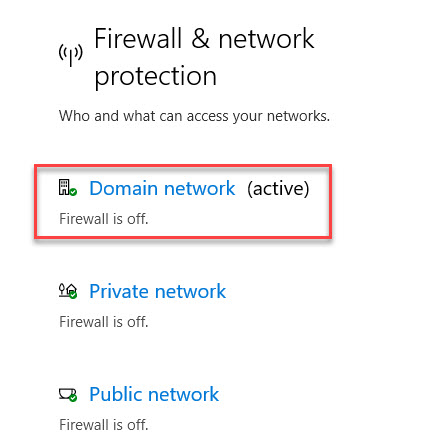
- Click on «Firewall & network protection.»
- Under «Active network,» click on the network you are currently connected to.
- Toggle the switch next to «Windows Defender Firewall» to turn it off.
Introduction: Understanding the Importance of Firewall in Windows Server 2019
Windows Server 2019 is a powerful operating system designed for businesses and organizations to handle their network and server infrastructure. One essential component of server security is the built-in Windows Firewall feature. The Firewall acts as a barrier between the server and external threats, blocking unauthorized access and protecting sensitive information. However, there are scenarios where you may need to temporarily disable the Windows Firewall in Windows Server 2019. In this article, we will explore the different ways to disable the Firewall and discuss the implications of doing so.
Method 1: Using the GUI Interface
Disabling the Windows Firewall in Windows Server 2019 can be done through the graphical user interface (GUI) provided by the operating system. Here are the steps to follow:
- Open the «Server Manager» application by clicking the Start button and typing «Server Manager» in the search box.
- In the Server Manager window, click on «Local Server» on the left-hand side.
- Locate the «Windows Firewall» section and click on the link labeled «On» next to it. This will open the Windows Firewall settings.
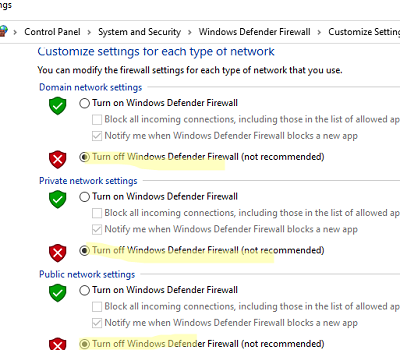
- In the Windows Firewall settings, select the «Turn Off Windows Firewall» option for both the «Domain network» and «Private network» categories.
- Click «OK» to save the changes.
By following these steps, you can disable the Windows Firewall using the GUI interface in Windows Server 2019.
Considerations When Disabling the Firewall
While disabling the firewall temporarily can be necessary in certain situations, it is important to consider the potential risks and implications it might have on your server’s security. Here are a few points to keep in mind:
- Disabling the firewall exposes your server to potential security threats from the network.
- It is recommended to only disable the firewall for a short period and to re-enable it as soon as the necessary tasks are completed.
- Make sure to monitor the server closely and implement other security measures to compensate for the temporary disabling of the firewall.
- Be aware of the specific requirements of any applications or services running on the server that may rely on the Windows Firewall for proper functioning.
Considering these factors will help maintain the overall security and stability of your Windows Server 2019 environment.
Method 2: Disabling Firewall Using PowerShell
An alternative method to disable the Windows Firewall in Windows Server 2019 is by using PowerShell, a powerful command-line tool. Here’s how you can do it:
- Open PowerShell as an administrator by right-clicking the Start button and selecting «Windows PowerShell (Admin)».
- Run the following command to disable the Windows Firewall:
Set-NetFirewallProfile -Profile Domain,Public,Private -Enabled False
- After executing the command, the Windows Firewall will be disabled on all network profiles (Domain, Public, and Private).
Using PowerShell provides a quick and efficient way to disable the firewall in Windows Server 2019.
Remember the Consequences
While PowerShell offers convenience and flexibility, it’s essential to understand the consequences of disabling the firewall:
- Disabling the firewall removes a crucial layer of protection for your server and makes it more vulnerable.
- Ensure that you have other security measures in place to compensate for the temporary removal of the firewall.
- Regularly monitor the server for any abnormal network activity and promptly re-enable the firewall when it is no longer required to reduce the risk to your server.
By being proactive and vigilant, you can maintain a secure environment even when temporarily disabling the firewall using PowerShell.
Exploring Additional Firewall Configuration Options
Windows Server 2019 offers various firewall configuration options beyond simply enabling or disabling it. Let’s explore a few additional aspects:
1. Creating Custom Firewall Rules
In addition to disabling or enabling the Windows Firewall, you can customize the rules to allow or block specific network traffic based on your requirements. This allows you to have more granular control over the communication between your server and the outside world.
You can create custom firewall rules through the Windows Firewall with Advanced Security interface or by using PowerShell commands. These rules can define various parameters, such as specific protocols, ports, IP addresses, and more.
Custom firewall rules can help you tailor the server’s network access to your specific needs, promoting both security and flexibility.
Example: Creating a Firewall Rule in PowerShell
Here’s an example of how you can create a custom firewall rule using PowerShell:
| Command | Description |
| New-NetFirewallRule -DisplayName «Allow HTTP Traffic» -Direction Inbound -Protocol TCP -LocalPort 80 -Action Allow | This command creates a new inbound firewall rule that allows TCP traffic on port 80 (HTTP). |
Using PowerShell, you can create highly specific firewall rules to meet your server’s unique requirements.
2. Using Group Policy to Manage Firewall Settings
In an enterprise environment with multiple Windows Server 2019 systems, it may be more efficient to manage firewall settings using Group Policy. Group Policy allows central management of firewall rules across multiple servers, ensuring consistency and easy deployment of configurations.
Group Policy provides a unified approach to manage firewall settings across multiple servers, saving administrators time and effort in maintaining a secure network infrastructure.
Using Group Policy Object (GPO) to Manage Firewall Rules
To manage firewall settings through Group Policy, you can follow these general steps:
- Create a new Group Policy Object (GPO) or use an existing one.
- Edit the GPO and navigate to «Computer Configuration» -> «Policies» -> «Windows Settings» -> «Security Settings» -> «Windows Firewall with Advanced Security».
- Configure the desired firewall rules and settings within the GPO.
- Link the GPO to the appropriate Organizational Unit (OU) or group of computers.
- Update the Group Policy on the target servers for the changes to take effect.
Using Group Policy to manage firewall settings provides a centralized and efficient way to maintain security and consistency across multiple Windows Server 2019 systems.
Conclusion
Disabling the Windows Firewall in Windows Server 2019 can be necessary in certain situations, but it’s crucial to understand the potential risks and consequences. Whether you choose to disable the Firewall temporarily using the GUI interface or PowerShell, it is essential to only do so when required and implement other security measures to compensate for the reduced protection.

Disabling Firewall in Windows Server 2019
If you are a professional seeking to disable the firewall in Windows Server 2019, please follow the steps below:
Via Windows Server Interface
1. Log in to your Windows Server 2019.
2. Click on the Start button and select «Windows Administrative Tools».
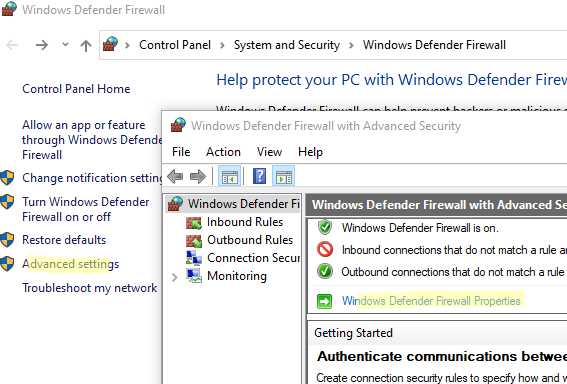
3. Open «Windows Defender Firewall with Advanced Security».
4. In the left-hand pane, click on «Inbound Rules».
5. Locate the rules that you want to disable and right-click on them.
6. Select «Disable Rule» from the context menu.
Disabling Firewall via Command Prompt
1. Press the «Windows» key + «R» to open the Run dialog box.
2. Type «cmd» and press Enter to open the Command Prompt.
3. To disable the firewall, type the following command and press Enter:
netsh advfirewall set allprofiles state off4. Verify that the firewall has been disabled by entering the following command:
netsh advfirewall show allprofilesRemember that disabling the firewall may leave your system vulnerable. It is recommended to only disable the firewall temporarily for a specific purpose and enable it again as soon as possible.
Key Takeaways — How to Disable Firewall in Windows Server 2019
- Disabling the firewall in Windows Server 2019 can be done through the Server Manager interface.
- Open Server Manager and click on «Tools» in the upper-right corner.
- Select «Windows Defender Firewall with Advanced Security» from the drop-down menu.
- Click on «Action» in the upper-left corner and choose «Properties».
- In the Properties window, select the «Domain Profile» tab.
Frequently Asked Questions
Here are some common questions regarding how to disable the firewall in Windows Server 2019:
1. Can I disable the firewall in Windows Server 2019?
Yes, it is possible to disable the firewall in Windows Server 2019. However, it is important to note that disabling the firewall can leave your server vulnerable to security threats. It is recommended to only disable the firewall temporarily for troubleshooting purposes.
To disable the firewall, you can follow these steps:
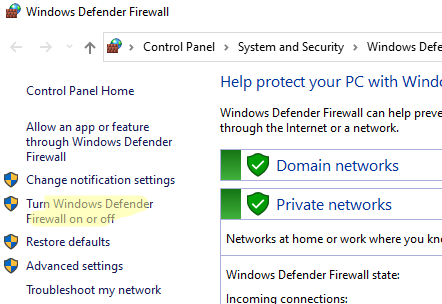
1. Open the «Windows Defender Firewall» app from the Start menu.
2. In the left pane, click on the «Turn Windows Defender Firewall on or off» option.
3. Select the «Turn off Windows Defender Firewall» option for both the «Private network settings» and «Public network settings».
4. Click the «OK» button to save the changes.
2. Are there any risks associated with disabling the firewall?
Disabling the firewall in Windows Server 2019 can pose significant security risks. The firewall acts as a protective barrier between your server and potential threats from the internet or local network. By disabling the firewall, you expose your server to unauthorized access, malware attacks, and data breaches.
If you must disable the firewall temporarily, make sure to re-enable it as soon as your troubleshooting is complete or implement alternative security measures.
3. Can I disable the firewall for specific applications or ports?
Yes, Windows Server 2019 allows you to configure firewall rules to control specific applications or ports while keeping the overall firewall enabled. This way, you can grant or restrict network access based on your specific requirements.
To configure firewall rules for specific applications or ports, you can follow these steps:
1. Open the «Windows Defender Firewall» app from the Start menu.
2. In the left pane, click on the «Advanced settings» option.
3. In the «Windows Defender Firewall with Advanced Security» window, click on «Inbound Rules».
4. Click on «New Rule» in the right pane to create a new inbound rule.
5. Follow the wizard to define the specific application or port for the rule, allowing or blocking the desired network access.
4. How can I re-enable the firewall in Windows Server 2019?
If you have temporarily disabled the firewall for troubleshooting purposes or other reasons, it is crucial to re-enable it promptly to ensure the security of your server. To re-enable the firewall, follow these steps:
1. Open the «Windows Defender Firewall» app from the Start menu.
2. In the left pane, click on the «Turn Windows Defender Firewall on or off» option.
3. Select the «Turn on Windows Defender Firewall» option for both the «Private network settings» and «Public network settings».
4. Click the «OK» button to save the changes.
5. Are there alternative security measures to consider instead of disabling the firewall?
Yes, instead of disabling the firewall, you can implement additional security measures to enhance protection for your Windows Server 2019. Some alternative security measures include:
1. Regularly updating the server operating system and installed applications to ensure you have the latest security patches.
2. Utilizing a reliable antivirus software that can complement the firewall in detecting and preventing malware infections.
3. Employing strong passwords and multi-factor authentication to prevent unauthorized access to the server.
Disabling the firewall in Windows Server 2019 is a straightforward process that can be done in a few simple steps. By following the instructions outlined in this article, you can effectively turn off the firewall and allow network traffic to flow freely on your server.
Remember, though, that disabling the firewall can expose your server to potential security risks. It is essential to assess the impact of this action on your network’s security and consider alternative solutions such as allowing specific ports or applications through the firewall.
Hello! The Firewall performs an essential security task on any version of Windows Server. In fact, it has the mission of preventing connections that could be attackers from accessing the server. In this way it avoids damage or loss of information. Additionally, the firewall allows you to manage the security of your computer by applying access and exit filters. Similarly, the use of rules allows or denies the traffic of information on the computer. However, for some administrative or support tasks it is necessary to deactivate it. Well, in this post we will see how to disable the firewall in Windows Server 2019/2016.
How to disable Windows Server 2019/ 2016 Firewall using PowerShell
A quick and safe way to disable the Windows Server Firewall. To do this from the Start menu, go to PowerShell.

Then run the following command to enable the firewall:
Get-NetFirewallProfile │select name, enabled

Then to disable the Firewall in Windows 10 we will run the following:
Set-NetFirewallProfile -Profile Domain,Public,Private -Enabled false
The false parameter indicates that the firewall is disabled in private, public and domain environments. Now, to re-enable the firewall on Windows Server, simply run the following command:
Set-NetFirewallProfile -Profile Domain,Public,Private -Enabled true

How to disable Windows Server 2019/2016 Firewall using GPO
It is also possible to disable the Firewall via GPO. If you want to know more about Group Policy Object, check out our post. With this in mind, from the Server Dashboard tools, enter the group management.

Once the editor is open, expand the domain and right click on Default Domain Policy and then on Edit.

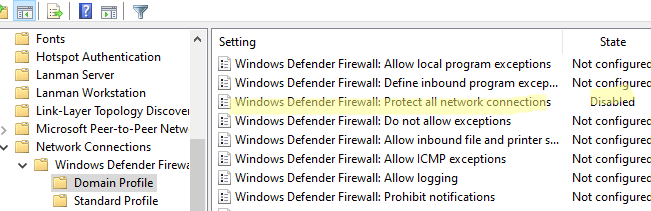
Then follow the next path: Windows Settings>Administrative Templates>Network>Network Connections>Windows Defender Firewall. Next, select Domain Profile and then double-click on: Windows Defender Firewall: Protect all network connections.

A window with the rule values is immediately displayed. Please select the Disabled value to configure the Firewall in this way. Then press OK to set the changes.

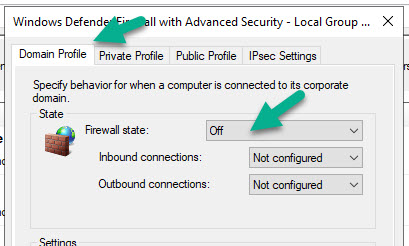
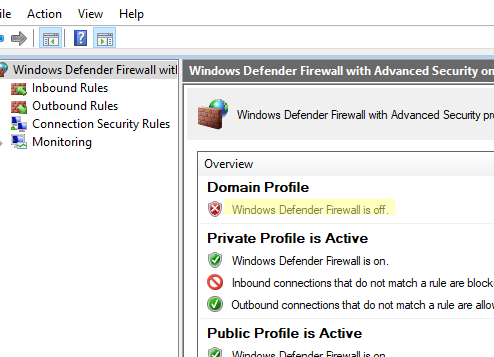
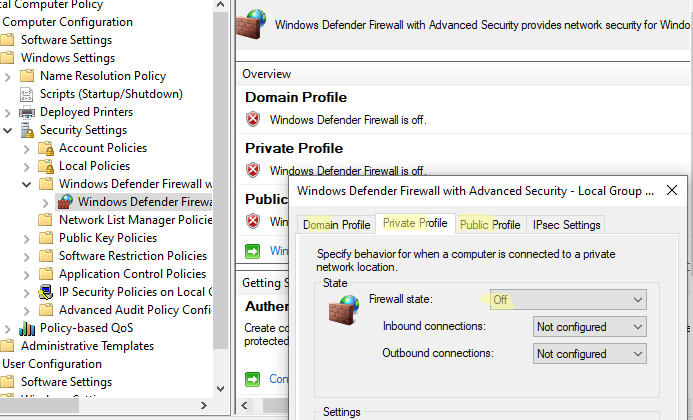
Now, please follow this path. Computer Settings>Windows Settings>Security Settings>Windows Defender Firewall with Advanced Security. On this last value, right click on the mouse and enter the Properties.

Consequently, a window will be displayed with the behavior of the Firewall in the different environments. Please click on the tabs corresponding to the domain profile, public profile and private profile. In each of them you must set the Firewall status to Off. Press OK and restart the system to set the changes.

We will now validate that the Firewall is indeed disabled. To do this, follow the next path. Control Panel>System and Security>Windows Defender Firewall. On the next screen you can see that the firewall is disabled in all environments.

Conclusion
At the end of the day we have seen how to disable the Firewall in Windows Server 2019/2016. Also, we saw two ways to do it. That is, using PowerShell and also GPO. As you can see, it’s a simple and safe process to do. Bye!
— Advertisement —
Everything Linux, A.I, IT News, DataOps, Open Source and more delivered right to you.
Subscribe
«The best Linux newsletter on the web»
If you need to install some third-party applications on Windows 2019 server, which require connectivity among other clients and servers, you need to check the status of the built-in firewall. In few cases, you can open/allow certain ports in the firewall policy, but in other cases, you need to disable the firewall to make the application work properly.
Disabling Windows firewall used to be an easy option on earlier Operating Systems by just switching off the ‘Windows Firewall’ service in computer management. Unfortunately, you will not find the same ‘Windows Firewall’ service in Windows 2019 server. Since Windows Defender manages the network firewall on Windows 2019 server, we can’t see a separate service to disable it.
That doesn’t mean we can’t disable the Windows firewall on the 2019 server. There are plenty of ways to do it from GUI, CMD and Powershell. I’m not going to cover those steps here. I’m mainly targeting the steps you may need to perform if the Windows firewall policy is managed by your administrator (via the Domain policy). In this case, whatever actions you perform on the local computer to disable the firewall will not work if the server is part of the domain network.
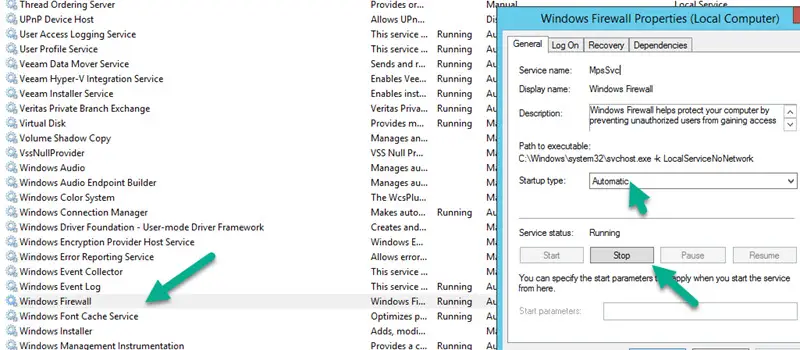
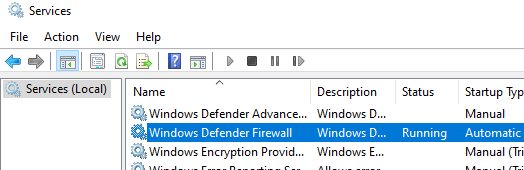
Windows Firewall Service in Windows 2019:
As shown below, it was replaced with Windows Defender Firewall, and we will not have the option to stop and change the state to Disable/Manual.
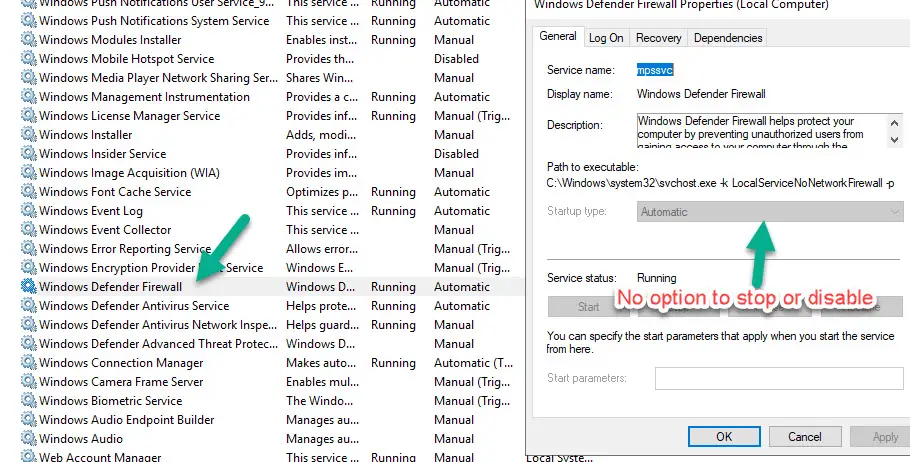
Meanwhile, here is the state from Windows 2012 R2 server where we can stop the service and disable it. So, the Windows firewall will be disabled permanently on the server for any type of network profile.
The Trick to Disable Firewall on Windows 2019 Server – When it is managed by your administrator
Let’s dive to the working steps.
Find out the correct network profile server connected.
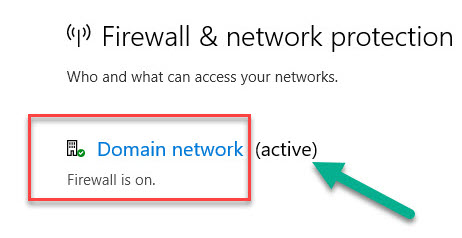
If you have joined the domain and domain policies are applied correctly, I’m sure your server network profile will be ‘Domain network’.
The real trick is to do a few registry modifications, but before doing that, you can try the below steps.
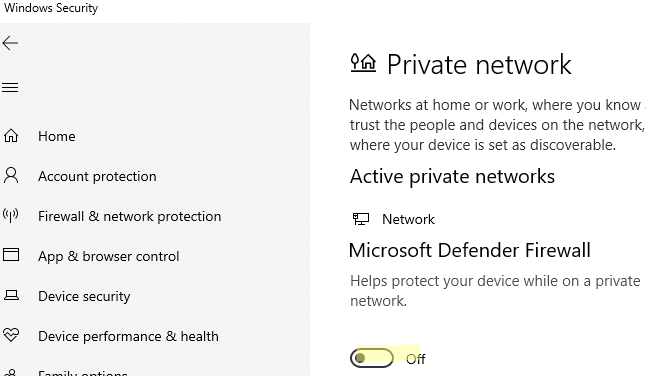
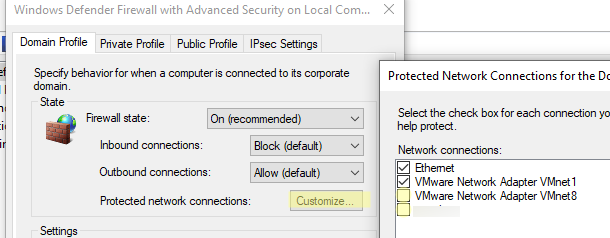
Open ‘Local Security Policy’ on the server and select the ‘Windows Defender Firewall…’ option as shown below. Then click on the properties of the settings.
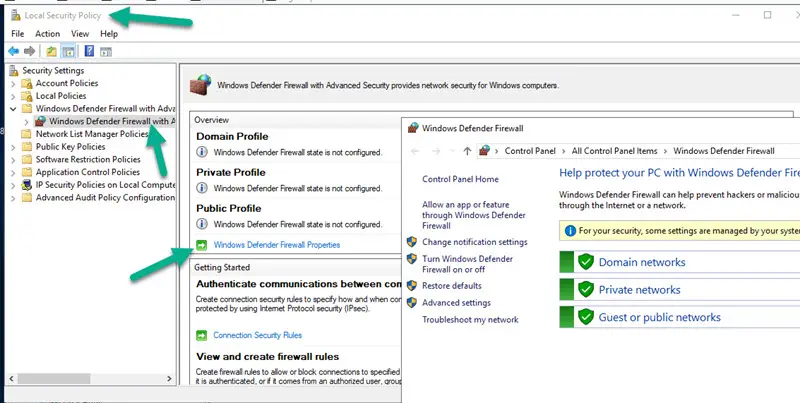
This will open a box where you should turn off the Firewall for ‘Domain Profile’ and optionally for Private and Public profiles.
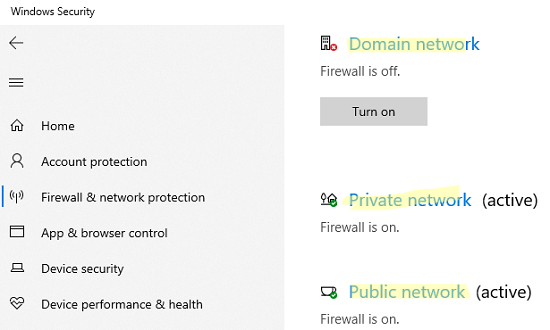
Once you make it off, it will show the status like below in Local Security Policy.
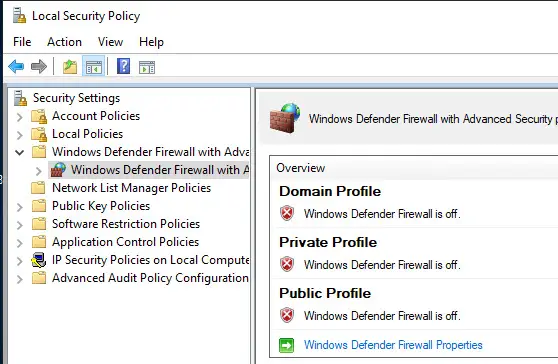
Even though this screen shows that the firewall is turned off for the domain profile, but it will not work.
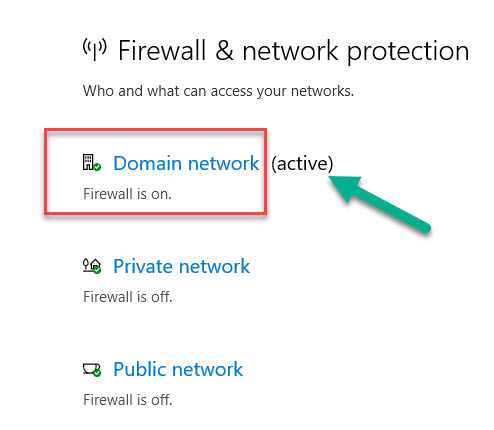
Still, the Windows defender will show that ‘Firewall is on’ for the domain network. By clicking the domain network in Windows Defender settings will not allow you to off the firewall because it was managed by the organization policy.
For your satisfaction, reboot the server and see if the above steps are useful. If not, let’s go to the final working solution.
Registry modification.
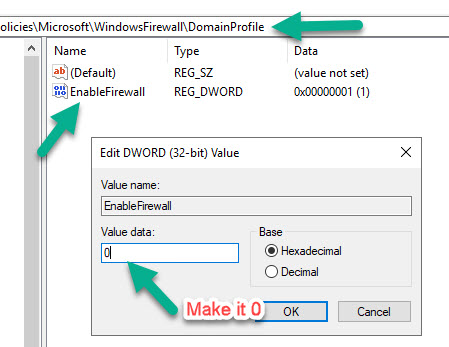
As mentioned earlier, this can be done by registry modification. Open the registry and access the below location.
Computer\HKEY_LOCAL_MACHINE\SOFTWARE\Policies\Microsoft\WindowsFirewall
Before proceeding with anything, it is recommended to export the registry settings.
We have two options to achieve our goal here (Do any of it only).
Click on ‘Domain Profile’ and change the value from 1 to 0 for ‘EnableFirewall’. Restart the server to take effect.
OR….
Select the ‘Domain Profile’ and delete the entry completely. Reboot the server.
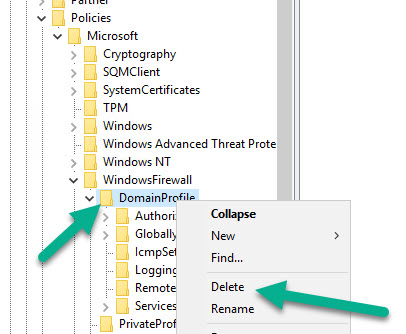
With the reboot, you will notice that the firewall for the domain network profile is completely off. And for whatever reason you wanted to disable the firewall, now those services will communicate to this Windows 2019 server.
This is the only simple and working method I found out to disable the Windows firewall on Windows 2019 server when managed by an organization/administrator in a domain environment. We do not need to modify the common group policy or give an exception for this server in policy that may require additional steps and implications at the domain level.
If any of the above solutions did not fix the Windows PC issues, we recommend downloading the below PC repair tool to identify and solve any PC Issues.
Dinesh is the founder of Sysprobs and written more than 400 articles. Enthusiast in Microsoft and cloud technologies with more than 15 years of IT experience.
Во все современные версии Windows встроен брандмауэр Windows Defender Firewall. Это встроенный программный межсетевой экран, который защищает Windows от несанкционированного внешнего доступа к компьютеру и запущенным на нем службам. По умолчанию брандмауэр Windows включен и защищает все сетевые интерфейсы компьютера. Брандмауэр блокирует все входящие подключения и разрешает все исходящие.
Содержание:
- Отключить/включить брандмауэр из панели управления Windows
- Отключить Windows Firewall через GPO
- Как отключить или включить брандмауэр Windows с помощью PowerShell?
В подавляющем большинстве случае Windows Firewall должен быть включен. Если вам нужно разрешить доступ к компьютеру для определенной службы или IP адреса, просто создайте разрешающее правило. Однако в некоторых ситуациях администратору нужно полностью отключить Windows Defender Firewall для проверки сетевых подключений. В этой статье мы покажем несколько способов, как отключить и включить встроенный брандмауэр Windows.
Отключить/включить брандмауэр из панели управления Windows
В современных версиях Windows 10 и 11 для управления брандмауэром используется панель Безопасность Windows (Windows Security).
Если панель Windows Security не открывается или повреждена, вы можете восстановить ее.
- Перейдите в меню Параметры (Settings -> Update & Security -> Windows Security) или выполните команду
windowsdefender://network/
; - Выберите раздел Firewall and network protection;

- По очереди щелкните по каждому из трех сетевых профилей (Domain, Private и Public) и отключите Microsoft Defender Firewall;
,
- Подтвердите отключение в окне User Account Control.
В Windows для каждого сетевого подключения используется один из трех сетевых профилей:
- Domain – применяется для компьютеров, которые добавлены в домен AD
- Private – для небольших офисных LAN, рабочих групп и домашней сети
- Public – для общественных сетей (кафе, аэропорты)
В зависимости от типа сети к сетевому интерфейсу применяются различные правила брандмауэра и настройки обнаружения Windows в сетевом окружении. Вы можете изменить профиль сети подключения как описано тут.
В предыдущих версиях Windows и в Windows Server 2012R2/2016/2019 можно отключить брандмауэр через классическую панель управления «Windows Firewall with Advanced Security«:
- Откройте консоль
firewall.cpl
; - Щелкните по Turn Windows Defender Firewall on or off;
- Отключите Windows Defender firewall для всех типов сетей.
Если на компьютере есть несколько сетевых интерфейсов, вы можете отключить файервол только для некоторых из них.
- Нажмите кнопку Advanced Settings -> Windows Defender Firewall properties;
- В настройках каждого сетевого профиля есть раздел Protected network connections. Нажмите кнопку Customize;
- Снимите галки с тех сетевых интерфейсов, для которых нужно отключить брандмауэр.
- Аналогичным образом отключите защиту сетевых интерфейсов брандмуэром в настройках других сетевых профилей.
Когда вы отключаете брандмауэр, в трее начнет отображаться соответствующее уведомление.
Чтобы скрыть это всплывающее уведомление, добавьте следующий параметр реестра:
reg add "HKLM\Software\Microsoft\Windows Defender Security Center\Notifications" /v "DisableNotifications" /t REG_DWORD /d "1" /f
Обратите внимание, что в Windows есть отдельная системная служба Windows Defender Firewall (
mpssvc
). Если вы отключите или приостановите эту службу, это не отключит брандмауэр до тех пор, пока вы сами не отключите защиту для сетевых профилей.
Однако через остановку служб вы можете отключить встроенный антивирус Защитник Windows.
Отключить Windows Firewall через GPO
Вы можете отключить Windows Firewall с помощью групповых политик.
На отдельном компьютере нужно использовать консоль редактора локальной групповой политики (
gpedit,msc
), а в доменной среде нужно создать новую GPO с помощью консоли управления GPMC.
- Откройте GPO и перейдите в раздел Computer Configuration -> Administrative Templates -> Network -> Network Connections -> Windows Firewall -> Domain Profile.
- Откройте параметр “Windows Firewall: Protect all network connections” и измените значение на Disabled;
- Аналогичным образом измените параметр в секции Standard Profile;
- Обновите настройки GPO на компьютере и проверьте, что брандмауэр для доменного профиля отключен;
- Если компьютер будет подключен к сети, отличной от доменной, Windows Firewall будет защищать такое подключение.
- Если вы хотите отключить брандмауэр для всех сетевых профилей, перейдите в раздел GPO Computer Configuration -> Windows Settings -> Security Settings -> Windows Firewall with Advanced Security. Отключите файервол на вкладках всех трех сетевых профилей.
После того, как вы отключили Windows Firewall через GPO, пользователь не сможет включить его вручную через панель управления.
Как отключить или включить брандмауэр Windows с помощью PowerShell?
Для управления Windows Firewall из командной строки можно использовать PowerShell.
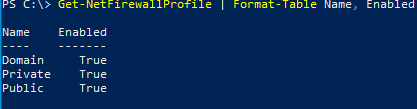
Проверьте, что брандмауэр включен для всех трех сетевых профилей:
Get-NetFirewallProfile | Format-Table Name, Enabled
Можно отключить брандмауэр только для одного сетевого профиля:
Set-NetFirewallProfile -Profile Domain -Enabled False
Или отключить firewall сразу для всех сетевых профилей:
Set-NetFirewallProfile -Profile Domain, Public, Private -Enabled False
Чтобы включить Windows Defender, выполните команду:
Set-NetFirewallProfile -Profile Domain, Public, Private -Enabled True
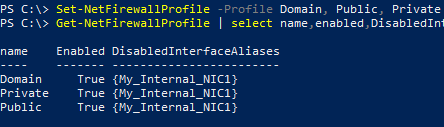
Вы можете отключить защиту брандмауэра для конкретного сетевого подключения. Чтобы узнать имя сетевого подключения, выведите их список:
Get-NetAdapter
Теперь можно отключить файервол для выбранного интерфейса:
Set-NetFirewallProfile -Profile Domain, Public, Private -DisabledInterfaceAliases "My_Internal_NIC1"
Вывести список сетевых адаптеров, которые исключены из файервола:
Get-NetFirewallProfile | select Name,Enabled,DisabledInterfaceAliases
Очистить список исключений:
Set-NetFirewallProfile -Profile Domain,Public,Private -DisabledInterfaceAliases @()
Windows Server 2019 is a powerful operating system that offers enhanced security features to protect your server and networked resources. One of the critical components of these security features is the Windows Firewall. While the firewall is essential for safeguarding your server from unauthorized access and various network threats, there may be instances where you need to temporarily disable it. This could be for troubleshooting reasons, to allow specific applications through without restrictions, or during certain maintenance tasks. However, disabling the firewall can expose your system to risks, so caution is advised.
In this detailed guide, we will walk you through the necessary steps to disable the Windows Firewall in Windows Server 2019, outline reasons you might want to do this, and the precautions you should take to ensure your server remains secure.
Understanding Windows Firewall
Before diving into the steps to disable the firewall, it’s important to have a basic understanding of what Windows Firewall does. The Windows Firewall is part of Microsoft’s Windows operating systems and provides a barrier between your server and the outside network. Its primary functions include:
- Traffic Monitoring: The firewall monitors traffic coming to and from your server and blocks or allows it depending on the established rules.
- Protection against Infiltration: By default, Windows Firewall helps protect your server against unauthorized access from malicious users or programs.
- Application Control: It can control access to specific applications, allowing only trusted software to communicate with the network.
When Might You Need to Disable the Firewall?
There are several specific scenarios in which you might consider disabling the Windows Firewall temporarily:
- Troubleshooting Network Issues: Sometimes, applications or services might not work as expected due to being blocked by the firewall. Disabling it can help identify if the firewall is at fault.
- Testing New Applications: Newly installed applications might require specific ports to be opened. If you suspect the firewall may be interfering, you might disable it to test functionality.
- Changing Configuration Settings: When changing firewall settings or implementing new rules, you might temporarily disable the firewall for convenience.
Important Considerations Before Disabling Windows Firewall
Disabling the firewall can expose your server to various threats, especially if it’s directly connected to the internet. Here are some precautions you should take:
- Ensure Safe Network Practices: Ensure your network is protected by other means—strong passwords, anti-virus solutions, and secured routers.
- Identify the Duration: If you plan to disable the firewall, make sure to schedule it for the briefest time possible, and re-enable it as soon as you’ve completed your tasks.
- Inform Stakeholders: Make sure that anyone relying on the server is aware of the potential risks involved and the timeframe in which the firewall will be disabled.
- Consider Alternative Solutions: Instead of entirely disabling the firewall, consider adjusting the rules to allow specific traffic. This is often a safer approach.
Steps To Disable Windows Firewall in Windows Server 2019
Now, let’s get into the nuts and bolts of how to disable the firewall. There are multiple methods you can utilize, including using the Windows GUI, PowerShell, and Command Prompt. Below, we will dive into each method.
Method 1: Disabling Windows Firewall Using the Control Panel
-
Open Control Panel:
- Click on the Start menu and type “Control Panel.”
- Click on the Control Panel app from the search results.
-
Navigate to Firewall Settings:
- In the Control Panel window, look for “System and Security” and click on it.
- Click on “Windows Defender Firewall.”
-
Turn Off Windows Defender Firewall:
- On the left sidebar, you’ll see an option to “Turn Windows Defender Firewall on or off.” Click on it.
- Depending on the profile you want to disable (Private or Public), select the radio button that says “Turn off Windows Defender Firewall (not recommended).”
- Click “OK” to confirm the changes.
Method 2: Disabling Windows Firewall Using PowerShell
If you prefer working with command-line tools, PowerShell is an efficient way to disable the firewall. Follow these steps:
-
Open PowerShell as Administrator:
- Right-click on the Start menu (Windows icon) and then select Windows PowerShell (Admin).
-
Execute the Command:
-
Type the following command and hit Enter:
Set-NetFirewallProfile -Profile Domain,Public,Private -Enabled False -
This command disables the firewall for all profiles: Domain, Public, and Private.
-
-
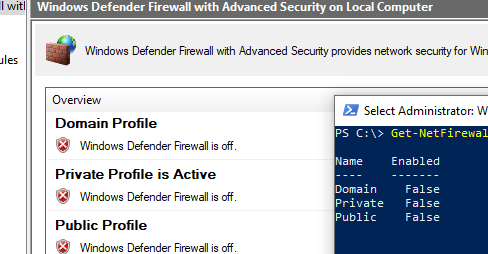
Verify the Change:
-
You can verify whether the firewall is disabled by executing:
Get-NetFirewallProfile -
Look for the «Enabled» field under each profile which should now display «False.»
-
Method 3: Disabling Windows Firewall Using Command Prompt
Another command-line method uses the Command Prompt. To disable the firewall:
-
Open Command Prompt as Administrator:
- Right-click on the Start menu and select «Command Prompt (Admin).»
-
Enter the Command:
- Type in the following command and press Enter:
netsh advfirewall set allprofiles state off
- Type in the following command and press Enter:
-
Check the Firewall Status:
-
You can confirm the status of the firewall by running:
netsh advfirewall show allprofiles -
This will display the current state of each profile.
-
Re-Enabling Windows Firewall
Once you’ve completed the task for which you needed to disable the firewall, it’s essential to re-enable it promptly to protect your system. You can follow similar methods to re-enable the firewall:
-
For the Control Panel method, go back to the same settings and select “Turn on Windows Defender Firewall” for the profiles you disabled.
-
For PowerShell, execute:
Set-NetFirewallProfile -Profile Domain,Public,Private -Enabled True -
For Command Prompt, run:
netsh advfirewall set allprofiles state on
Additional Firewall Configuration Scenarios
Rather than disabling the firewall entirely, you may want to configure it to allow specific traffic. This approach helps maintain a level of protective measure while permitting necessary communication.
Allowing an Application Through the Firewall
-
Open Control Panel:
- Go to Windows Defender Firewall through the Control Panel.
-
Allow an App or Feature:
- Click on “Allow an app or feature through Windows Defender Firewall” on the left panel.
- Click on the “Change settings” button. You might need administrative privileges to proceed.
- Locate the application you want to allow or click “Allow another app…” to add a new one.
- Make sure to check the boxes for both Private and Public, depending on your need.
-
Save Your Settings:
- Click “OK” to save your settings.
Adding a Firewall Rule
-
Open PowerShell as Administrator:
- Use the Start menu search or Right-click on the Start button to find PowerShell (Admin).
-
Add New Rule:
- Use the following command to add a new rule. For example, to allow TCP traffic on port 8080:
New-NetFirewallRule -DisplayName "Allow TCP Port 8080" -Direction Inbound -Protocol TCP -Action Allow -LocalPort 8080
- Use the following command to add a new rule. For example, to allow TCP traffic on port 8080:
-
Verify the Rule:
- Check if your rule has been created by running:
Get-NetFirewallRule | Where-Object {$_.DisplayName -eq "Allow TCP Port 8080"}
- Check if your rule has been created by running:
Conclusion
Disabling the Windows Firewall in Windows Server 2019 can be necessary under certain circumstances, especially for troubleshooting and testing new applications. However, it’s crucial to understand the implications of this action on your network security. Always consider alternative solutions like adjusting specific firewall rules rather than disabling the firewall entirely.
Following this guide, you should now be well-equipped to disable and re-enable Windows Firewall safely, as well as to configure it to allow specific applications through, thereby ensuring a more secure configuration while managing your server. Also, always ensure that after completing your tasks, you revert the firewall settings to maintain the integrity and security of your server.