
Applies ToWindows 11 Windows 10
Брандмауэр Windows помогает защитить устройство, фильтруя сетевой трафик и блокируя несанкционированный доступ. Он снижает риск угроз сетевой безопасности, ограничивая или разрешая трафик на основе различных свойств, таких как IP-адреса, порты или пути к программе.
Вы можете использовать приложение Безопасность Windows для просмотра состояния брандмауэра Windows и управления им. Вы можете включить или отключить брандмауэр, а также получить доступ к дополнительным параметрам для различных типов сетей, включая доменные (рабочие), частные (доверенные) и общедоступные (ненадежные) сети.
Частные и общедоступные сети
Можно указать, что определенная сеть, к которую подключается устройство, является частной или общедоступной. Ключевое различие заключается в том, разрешено ли другим устройствам в той же сети видеть ваше устройство и, возможно, подключаться к нему.
Ваша домашняя сеть может быть примером частной сети. Теоретически единственными устройствами в ней являются ваши устройства и устройства, принадлежащие вашей семье. Вы в порядке с другими устройствами, которые могут видеть ваши, потому что вы доверяете этим устройствам.
Однако Wi-Fi в вашем местном кафе является общедоступной сетью. Большинство других подключенных к нему устройств принадлежат незнакомым людям, и вы, вероятно, предпочитаете, чтобы они не могли видеть или подключаться к вашему устройству.
Как правило, вы будете иметь более строгие средства контроля безопасности в общедоступной сети, чем в частной сети, просто из-за уровня доверия к другим пользователям и устройствам в этой сети.
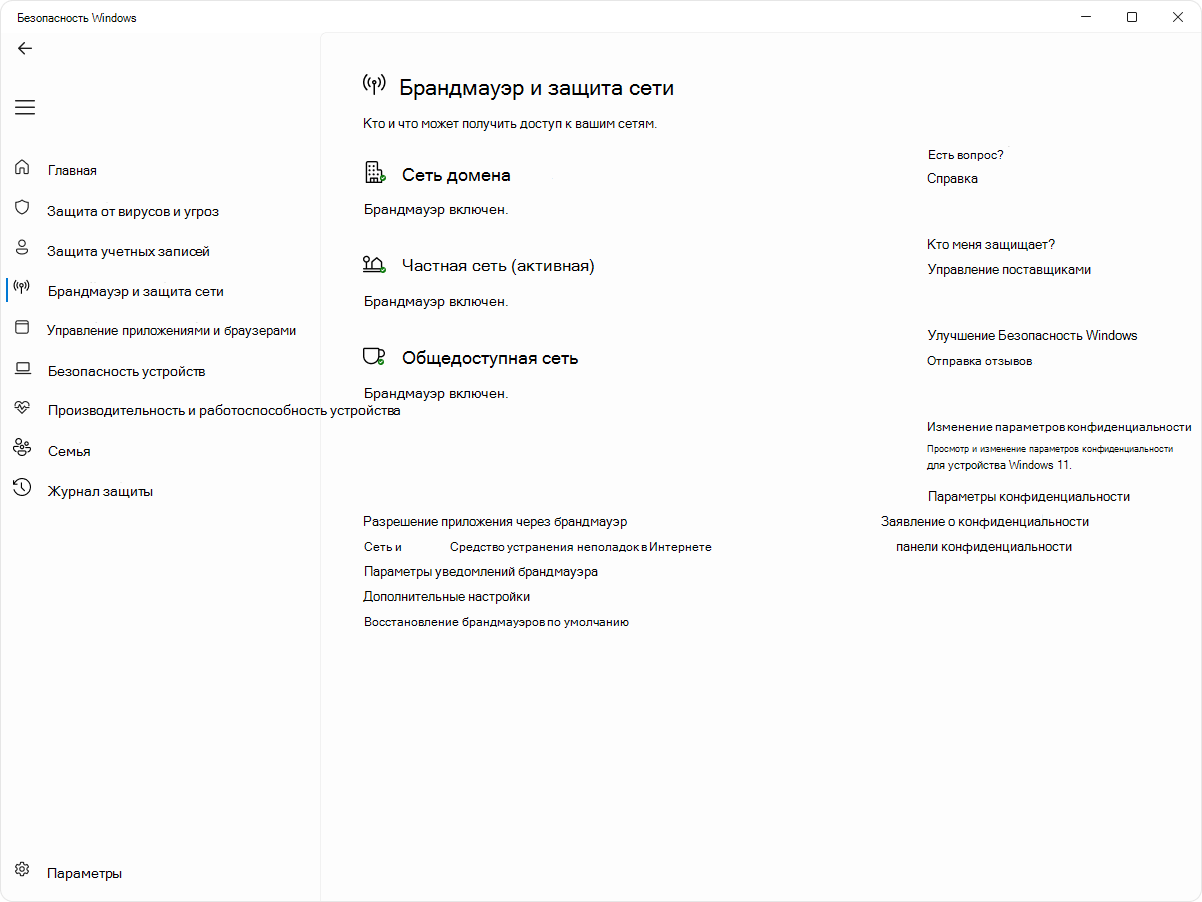
Настройка брандмауэра Windows в Безопасность Windows
-
В приложении «Безопасность Windows» на компьютере, выберите Брандмауэр & защиты сети или используйте следующий ярлык:
Брандмауэр & защиты сети
-
Безопасность Windows показывает, к какому типу сети вы подключены в данный момент. Как правило, устройство будет подключено только к одной сети за раз. Выберите профиль сети: Доменная сеть, Частная сеть или Общедоступная сеть
-
В разделеMicrosoft Defender Брандмауэр переключите параметр на Включено , чтобы включить брандмауэр Windows. Для выключения переключите этот параметр в положение Выкл. Отключение брандмауэра Windows может сделать ваше устройство более уязвимым для несанкционированного доступа. Если вам нужно использовать приложение, которое заблокировано, вы можете разрешить его через брандмауэр, а не выключать брандмауэр.
-
В разделе Входящие подключения установлен флажок Блокировать все входящие подключения, в том числе в списке разрешенных приложений. Установка этого флажка указывает брандмауэру Windows игнорировать список разрешенных приложений и блокировать все. Включение этого параметра повышает безопасность, но может привести к прекращению работы некоторых приложений.
Примечание: Если устройство управляется организацией, параметры политики могут препятствовать изменению конфигурации брандмауэра Windows. Для получения дополнительных сведений обратитесь к администратору.
Дополнительные параметры
Ниже приведен список дополнительных параметров, доступных на странице брандмауэра и защиты сети:
-
Разрешить приложению через брандмауэр
. Если брандмауэр блокирует нужное приложение, можно добавить исключение для этого приложения или открыть определенный порт. Дополнительные сведения об этом процессе (и о том, почему вы не захотите) см. в статье Риски, связанные с разрешением приложений через брандмауэр Windows. -
Средство устранения неполадок с сетью и Интернетом: Если у вас возникли общие проблемы с сетевым подключением, вы можете использовать это средство устранения неполадок, чтобы попытаться автоматически диагностировать и устранить их.
-
Параметры уведомлений брандмауэра: Хотите получать больше уведомлений, когда брандмауэр блокирует что-то? Меньше? Узнайте, как настроить уведомления
-
Дополнительные параметры: Откроется классический брандмауэр Защитника Windows, который позволяет создавать правила для входящего или исходящего трафика, правила безопасности подключения и просматривать журналы мониторинга брандмауэра. Большинство людей не хотят копаться в нем, что глубоко; неправильное добавление, изменение или удаление правил может привести к тому, что система станет более уязвимой или может привести к тому, что некоторые приложения не будут работать.
-
Восстановление брандмауэров по умолчанию . Если кто-то или что-то внес изменения в параметры брандмауэра Windows, что приводит к неправильной работе, вы просто в два щелчка от сброса параметров, как они были, когда вы впервые получили компьютер. Если ваша организация применила какие-либо политики для настройки брандмауэра, они будут применены повторно.
Нужна дополнительная помощь?
Нужны дополнительные параметры?
Изучите преимущества подписки, просмотрите учебные курсы, узнайте, как защитить свое устройство и т. д.
The Microsoft Defender Firewall is a security feature in Windows 10 that monitors all network traffic, both incoming and outgoing, and either allows or blocks it based on a set of rules designed to keep your system safe from hackers. Although it is advised that the firewall always be active, there are times when turning it off is necessary, such as if you need to test an app connection or if you wish to utilize a different firewall solution.
However, if you don’t know how to Turn Off Firewall Windows 10 and looking for a way to do it, you’ve come to the right spot. In this article, you’ll discover the finest ways to turn off Windows 10 firewalls. Let’s get going!

Method 1. Turn off The Firewall in Windows 10 using Control Panel
The first and the most direct method to turn off the firewall in Windows 10 is Control Panel. The Control Panel in Microsoft Windows is where you can modify the operating system’s settings. It’s a collection of software applications that enable you to install and uninstall programs, manage user accounts, change accessibility settings, and tweak your network configuration.
To turn off the firewalls on your Windows 10 PC using Control Panel, follow the steps below:
Step 1. In the Search menu, search Control Panel, and launch it by clicking on it.
Step 2. Now, click on the «System and Security» option, and go to Windows Defender Firewall
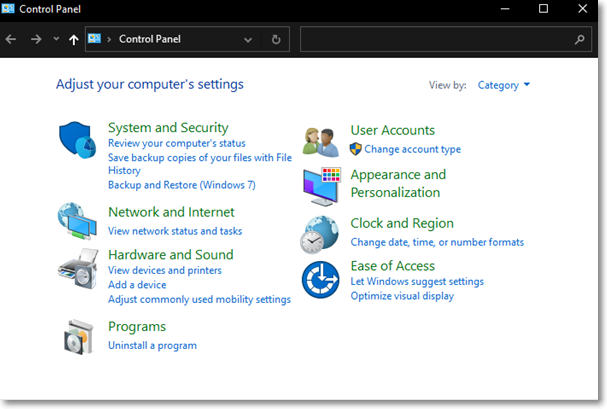
Step 3. Next, you’ll need to click the «Turn Windows Firewall on or off» option to proceed.

Step 4. To turn off the firewall for the private network, go to the Private network settings section, and check the Turn off Microsoft Defender Firewall checkbox. Moreover, to deactivate the firewall for the public network, check the Turn off Microsoft Defender Firewall checkbox that is located under the Public network settings section of the Customize Settings window.
Note: It is not necessary to disable both firewalls; you can select according to your needs.

Step 5. Once you’re done selecting the boxes, click «OK» to disable the firewall and apply the settings.
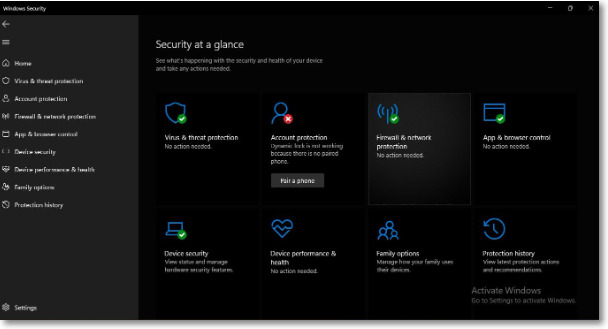
Method 2. Turn off The Firewall in Windows 10 with Windows Security
Another method for turning off the firewall of your Windows 10 PC is by using Windows Security. Windows 10 comes with Windows Security, an antivirus program that offers the most recent antivirus protection. When you start Windows, your device will be actively secured against potential threats because of Windows Security. It is integrated to perform routine scans to look for malware, viruses, and other potential security risks. In addition to this protection in real-time, updates will be downloaded automatically to assist in maintaining the security of your device and warding off any dangers with Windows Security.
To turn off Windows Firewall via Windows Security, follow the steps below:
Step 1. Go to the Search menu on your Windows 10, and type Windows Security. Click on it to open the tool.
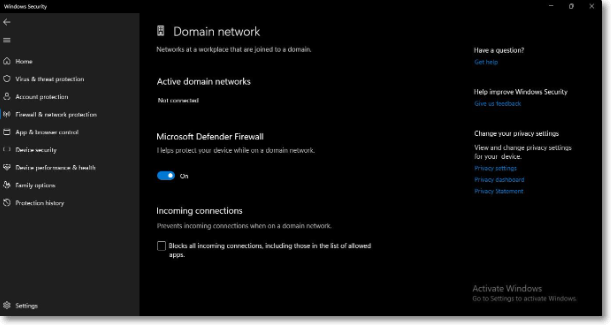
Step 2. Select Firewall & network protection either from the sidebar or the front menu.
Step 3. Now, you will see three different types of Windows firewalls, i.e. Domain network, Public network, and Private network.
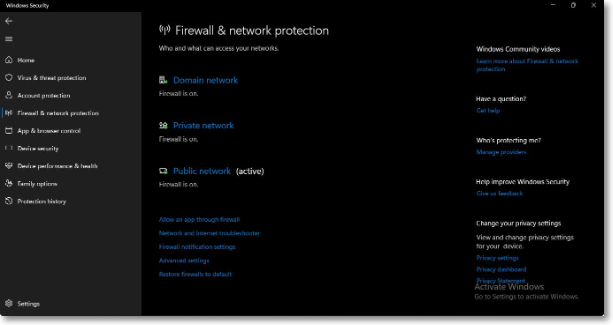
Step 4. Now, click on the firewall you wish to disable. After that, toggle the switch to OFF under the Microsoft Defender Firewall option. You can do it for any of the three types.
Note: if you wish to turn off the firewall from your Windows 10 PC completely, you need to turn off each of the three firewalls by following the above guideline.
Method 3. Turn off The Firewall in Windows 10 with The Command
The last and a little complicated method for people who are not tech-savvy to turn off the Windows 10 firewall is by using the Command Prompt. It’s a program included in Windows 10 that acts as an interpreter for commands. One uses it to get their commands carried out on Windows PC. Most of these commands automate routine work in Windows through scripts and batch files, carry out complex administrative tasks, or investigate and resolve certain Windows problems.
To turn off the Windows 10 firewall via Command Prompt, follow the steps below:
Step 1. Go to the Search menu, type either CMD or Command Prompt and launch this Windows terminal by clicking on it.
Step 2. Type netsh advfirewall set domainprofile state off on your Command Prompt, and press Enter to disable the Domain Network Firewall. You can run the same command by typing publicprofile or privateprofile instead of domainprofile to disable the Public or Private Network Firewall.
Step 3. You can turn off all the firewalls on Windows 10 at one go by typing netsh advfirewall set allprofiles state off and pressing Enter.

Conclusion
Microsoft integrated a firewall in Windows 10 to protect your system from viruses, third-party malware, and other security risks. Although it is not recommended that you turn off the firewall on Windows PC, there are situations when you need to. However, some people are unaware of it. To help them out, we provided three built-in methods to Turn Off Firewall Windows 10 in this article. So, disable your firewall today and start testing your network connections!
Steps on how to disable the firewall in Windows 10, 8, 7, Vista & XP
What to Know
- Windows 10, 8, 7: Go to Control Panel > System and Security > Windows Firewall > Turn Windows Firewall on or off.
- Select the bubble next to Turn off Windows Firewall (not recommended) and then select OK.
- To disable the firewall for private and public networks, select Turn off Windows Firewall (not recommended) in both sections.
The Windows Firewall is designed to keep unauthorized users from accessing files and resources on your computer. Still, the Windows Firewall can sometimes cause more harm than good, especially if there’s another paid or free firewall program installed. Disabling the Windows Firewall is easy and usually takes less than 10 minutes.
There are separate directions below for Windows 10, Windows 8, Windows 7, Windows Vista, and Windows XP. See our article What Version of Windows Do I Have? if you’re not sure which steps to follow along with.
How to Turn Off and Disable the Windows 11 Firewall
Disable the Firewall in Windows 10, 8, and 7
The steps for turning off the Windows Firewall in Windows 7, 8, and 10 is basically the same.
The screenshots in this section apply to Windows 10 only. Your screen will look slightly different if you’re using Windows 8 or Windows 7.
-
Open Control Panel.
You can do this a number of ways, but the easiest method is to search for it or select it from the Start menu in Windows 7.
-
Select System and Security.
That link is only visible if you have the «View by:» option set to «Category.» If you’re viewing the Control Panel applets in icon view, just skip down to the next step.
-
Choose Windows Firewall.
Depending on how your computer is set up, it might instead be called Windows Defender Firewall. If so, treat every instance of «Windows Firewall» below as if it read «Windows Defender Firewall.»
-
Select Turn Windows Firewall on or off on the left side of the screen.
A really quick way to get to this screen is via the control firewall.cpl command line command, which you can execute via the Command Prompt or the Run dialog box.
-
Select the bubble next to Turn off Windows Firewall (not recommended).
You can disable the Windows Firewall for private networks only, just for public networks, or for both. To disable it for both network types, you have to make sure to select Turn off Windows Firewall (not recommended) in both the private and the public section.
-
Select OK to save the changes.
Now that the firewall is disabled, repeat whatever steps caused your problem to see if disabling this option has fixed the issue.
Disable the Firewall in Windows Vista
The Windows Firewall can be turned off in Windows Vista through the Control Panel, similar to how it’s done in other versions of Windows.
-
Select Control Panel from the Start menu.
-
Choose Security from the category list.
If you’re in the «Classic View» of Control Panel, just skip down to the next step.
-
Select Windows Firewall.
-
Choose Turn Windows Firewall on or off on the left side of the window.
If a User Account Control window pops up, go ahead and click/tap through it by either entering an admin password or selecting Continue.
If you need to access this window again more quickly in the future, you can use the control firewall.cpl command in the Run dialog box.
-
Open the General tab and select the bubble next to Off (not recommended).
-
Select OK to apply the changes.
Disable the Firewall in Windows XP
Directions for turning off the Windows XP firewall is significantly different than it is in newer versions of Windows, but it’s still fairly simple.
-
Go to Start and then Control Panel.
-
Select Network and Internet Connections.
If you’re viewing the «Classic View» of Control Panel, open Network Connections and skip to Step 4.
-
Choose Network Connections under the or pick a Control Panel icon section.
-
Right-click or tap-and-hold your network connection and choose Properties.
If you have a «high speed» internet connection like Cable or DSL, or are on a network of some kind, your network connection will likely be titled Local Area Connection.
-
Open the Advanced tab and select Settings.
-
Choose the Off (not recommended) radio button.
Windows Firewall settings can also be opened with a simple shortcut via the Run dialog box or Command Prompt. Just enter this command: control firewall.cpl.
-
Select OK in this window and then OK again in the Properties window of your network connection. You can also close the Network Connections window.
FAQ
-
Right-click the Windows icon on the taskbar and select Settings > Privacy & security > Windows Security > Open Windows Security. Select Firewall & network protection > Public Network and turn off the switch under Microsoft Defender Firewall.
-
Select Start, search for and select Windows Defender Firewall. Select Allow an app or feature through Windows Defender Firewall. Select Change Settings. Under Allow apps to communicate through Windows Defender Firewall, check the box next to Minecraft.
-
From the Apple menu, select System Preferences > Security & Privacy. If your firewall is on, select Turn off Firewall or Firewall Options to manage more settings.
Thanks for letting us know!
Get the Latest Tech News Delivered Every Day
Subscribe
How to Disable Windows 10 Firewall: In today’s world, people are too much dependent on technology and they try to perform every task online. You need a device to access the internet such as PCs, phones, tablets, etc. But when you use PC to access the internet you connect to so many networks which might be harmful as some attackers make free WiFi connections and wait for people like you to connect to these networks in order to access the internet. Also, if you are working on some project with other people then you may be on a shared or common network which may be unsafe as anyone with access to this network can introduce malware or virus on your PC. But if that is the case then how should one protect their PC from these networks?

Don’t worry we will answer this question in this tutorial. Windows comes with built-in software or program which keeps the laptop or PC secure and safe from external traffic and also protect your PC from external attacks. This built-in program is called Windows Firewall which is a very important part of Windows since Windows XP.
What is the Windows Firewall?
Firewall: A Firewall is a Network Security system that monitors & controls the incoming and outgoing network traffic based on predetermined security rules. A firewall basically acts as a barrier between the incoming network and your computer network that allows only those networks to pass through which according to predetermined rules are considered to be trusted networks and block untrusted networks. The Windows Firewall also helps in keeping unauthorized users away from accessing resources or files of your computer by blocking them. So a Firewall is a very important feature for your computer and it is absolutely necessary if you want your PC to be safe & secure.
Windows Firewall is enabled by default, so you don’t need to do any changes on your PC. But sometimes Windows Firewall causes some issues with internet connectivity or blocks certain programs from running. And if you have any 3rd party Antivirus program installed then it will also enable the third party firewall, in which case you will need to disable your in-built Windows Firewall. So without wasting any time let’s see How to disable Windows 10 Firewall with the help of the below-listed guide.
Table of Contents
Make sure to create a restore point just in case something goes wrong.
Method 1 – Enable Firewall in Windows 10 Settings
To check if the firewall is enabled or disabled, follow the below steps:
1.Press Windows Key + I to open Settings then click on Update & Security.
2.Click on Windows Security from the left window panel.
3.Click on Open Windows Defender Security Center.

4.Below Windows Defender Security Center will open up.

5.Here you will see all the security settings which users have access to. Under Security at a glance, to check the status of the firewall, click on Firewall & network protection.

6.You will see three types of network there.
- Domain network
- Private network
- Public network
If your firewall is enabled, all the three network option would be enabled:

7.If the Firewall is disabled then click on the Private (discoverable) network or Public (non-discoverable) network to disable the firewall for the selected type of network.
8.On the next page, Enable the option Windows Firewall.
This is how you enable Windows 10 Firewall but if you need to disable it then you need to follow the below methods. Basically, there are two ways via which you can disable Firewall, one is using Control Panel and other is using Command Prompt.
Method 2 – Disable Windows Firewall using Control Panel
To disable the Windows Firewall using Control Panel follow the below steps:
1.Open Control Panel by searching it under Windows search.
Note: Press Windows Key + R then type control and hit Enter to open Control Panel.
2. Click on System and Security tab under Control Panel.

3.Under System and Security, click on Windows Defender Firewall.

4.From the left-window pane click on Turn Windows Defender Firewall on or off.

5.Below screen will open up which shows different radio buttons to either enable or disable Windows Defender Firewall for Private and Public network settings.

6.To turn off Windows Defender Firewall for Private network settings, click on the Radio button to checkmark it next to Turn off Windows Defender Firewall (not recommended) under Private network settings.

7.To turn off Windows Defender Firewall for Public network settings, checkmark “Turn off Windows Defender Firewall (not recommended)” under Public network settings.

Note: If you want to turn off Windows Defender Firewall for both Private and Public network settings, checkmark the radio button next to Turn off Windows Defender Firewall (not recommended) under both Private & Public network settings.
8.Once you have made your choices, click on the OK button to save the changes.
9.Finally, your Windows 10 Firewall will be disabled.
If in future, you need to enable it again then again follow the same step then checkmark “Turn on Windows Defender Firewall” under both Private & Public network settings.
Method 3 – Disable Windows 10 Firewall using Command Prompt
To disable the Windows Firewall using Command prompt follow the below steps:
1.Press Windows Key + X then select Command Prompt (Admin).
2.You can use the following commands to disable Windows 10 Firewall:
Disable Windows Firewall for all network types (profiles): netsh advfirewall set allprofiles state off
Disable Windows Firewall for the active profile only: netsh advfirewall set currentprofile state off
Disable Windows Firewall for the domain profile: netsh advfirewall set domainprofile state off
Disable Windows Firewall for the private profile: netsh advfirewall set privateprofile state off
Disable Windows Firewall for the public profile: netsh advfirewall set publicprofile state off
Note: To revert any of the above commands and re-enable Windows Firewall: netsh advfirewall set allprofiles state off
3.Alternatively, type the below command in the command prompt:
control firewall.cpl

4.Hit the enter button and below screen will open up.

5.Click on Turn Windows Defender Firewall on or off available under the left window pane.
6.To turn off Windows Defender Firewall for Private network settings, checkmark the Radio button next to Turn off Windows Defender Firewall (not recommended) under Private network settings.
7.To turn off Windows Defender Firewall for Public network settings, checkmark the Radio button next to Turn off Windows Defender Firewall (not recommended) under Public network settings.
Note: If you want to turn off Windows Defender Firewall for both Private and Public network settings, checkmark the radio button next to Turn off Windows Defender Firewall (not recommended) under both Private & Public network settings.
8.Once you have made your choices, click on the OK button to save the changes.
9.After completing the above steps, your Windows 10 Firewall is disabled.
You can enable Windows Firewall again anytime whenever you want, by simply clicking on the radio button next to “Turn on Windows Defender Firewall” for both Private and Public network settings and click on the Ok button to save the changes.
Recommended:
- Can’t Connect To WhatsApp Web? Fix WhatsApp Web Not Working!
- Windows 10 Tip: Save Space By Cleaning WinSxS Folder
- What Can I Do If I Forgot My Instagram Password?
- Fix Taskbar Search Not Working in Windows 10
I hope this article was helpful and you can now easily Disable Windows 10 Firewall, but if you still have any questions regarding this tutorial then feel free to ask them in the comment’s section.
Download Article
Quickly shut off your firewall with this comprehensive guide
Download Article
- Windows 10
- macOS
- Windows 7 & 8
- Windows Vista
- Windows XP
- Expert Interview
- Expert Q&A
- Tips
- Warnings
|
|
|
|
|
|
|
|
Your computer’s firewall is important for protecting against malware and hackers, but it can sometimes block access to apps or connections you want. You can temporarily disable it, but be aware that doing so puts you at risk of unauthorized access and attacks from hackers. This wikiHow article shows you how to disable your firewall.
How do you disable a firewall on your browser?
- Some firewalls may block access to an app or connection you need.
- Navigate to «Update & Security» in your settings, then «Windows Security». Use the toggle to turn off «Microsoft Defender Firewall».
- Disabling your firewall can increase your risk of unauthorized access to your computer.
-

The Windows Start menu is the button that has the Windows logo on it. By default, it is in the lower-left corner. Click this button to display the Windows Start menu.
-

It’s the icon that resembles a gear. It’s in the panel to the left of the Windows Start menu. This opens the Settings menu.
Advertisement
-

It has an icon that resembles two arching arrows forming a circle. It’s in the Windows Settings menu.
-

It’s next to an icon that resembles a shield. It’s in the panel to the left.
-

It’s the button at the top of the Windows Security page.
-

It’s next to an icon that resembles a radio tower. You can either click it in the panel to the left or the large icon in the center of the page.
-
Generally, your Wi-Fi or internet network is found under Public network. Private network is where you can control access to your local area network and other devices connected to your computer. Domain network is for a workspace network consisting of multiple computers on the same network.
-
This turns your firewall off. This could make your network more vulnerable to unauthorized access and outside attacks.
- If you don’t see a toggle switch below «Microsoft Defender Firewall,» check to see if there is a firewall controlled by a third-party app, such as an antivirus program listed above «Microsoft Defender Firewall.» If you see a third-party app listed, click Open app below the listed app. Locate the firewall settings in the third-party app and disable them.


Advertisement
-
It’s the apple-shaped icon that’s in the top-left corner of your Mac’s screen. Click this icon to display the Apple menu.
-
You’ll see this option near the top of the drop-down menu.
-

It has an icon that resembles a house with a combination lock on the front. Click this icon to open the Mac security settings.
- On older versions of Mac OS, this option may be Security instead.
-
It’s the third tab at the top of the Security & Privacy window.[1]
-
This icon is in the bottom-left corner of the Security & Privacy window. This displays a user login pop-up.
-
Administrator privileges are required to make changes to the Privacy & Security settings. Enter your administrative password to unlock the Privacy & Security settings.
-
It’s the button in the middle of the page. This disables your firewall. This could make your network more vulnerable to unauthorized access and outside attacks.
- If you see Turn On Firewall instead, your Mac’s firewall is already off.
-
Doing this will save and password-protect your changes.


Advertisement
-
To do this, you’ll either click the Windows logo in the bottom-left corner of the screen, or you’ll press the key with the Windows logo on your keyboard.
-
Doing so will search your computer for Windows Firewall.
-
It’s an image of a brick wall with a globe behind it; you’ll see this option at the top of the Start menu’s search window.
-
This link is on the left side of the page.
-
You can do this for both the «Private» and the «Public» network settings categories.
- You may first have to confirm that you wish to perform this action by clicking OK or Yes on a pop-up window.
- If you see a yellow bar at the top that says «These settings are being managed by vendor application [application name],» this means that your firewall settings are being managed by a third-party application such as an antivirus program. You will need to disable your firewall settings inside that app. Open the program mentioned in the yellow bar and locate the firewall settings. Disable the firewall settings inside the app.
-
It’s at the bottom of the page. Doing so will disable your computer’s firewall.


Advertisement
-
You can do so by either clicking the Windows logo in the bottom-left corner of the screen or pressing the key with the Windows logo on your keyboard.
-
You’ll likely find this option on the right side of the Start window, though you may first need to click All Programs.
-
This option resembles a multicolored shield; it’s on the left side of the window.
-
It’s in the top-left corner of the page.
-
You’ll see this option in the top-left corner of the page.
- You may be prompted to enter your Administrator password here.
-

It’s toward the bottom of the page.
- If you cannot turn off the firewall settings or indicates the firewall settings are being controlled by a third-party program or vendor, this means that your firewall is being controlled by a separate application, such as an antivirus program. Open the application that is controlling your antivirus settings and locate the firewall settings and disable them from inside the third-party app.
-
This will disable your Windows Vista computer’s firewall.


Advertisement
-
It’s in the bottom-left corner of the screen. Doing so will open the Start menu.
- You may first have to hover your mouse cursor over this corner to prompt the button to appear.
- You can also press the key with the Windows logo on your keyboard to open the Start menu.
-
This option is on the right side of the Windows Start pop-up window.
-
This command opens the firewall settings directly.
-
Doing so will run the above command and open your firewall’s settings.
-
It’s toward the bottom of the page.
- If you don’t see this option, first click the General tab at the top of the page.
- If you cannot turn off the firewall settings or indicates the firewall settings are being controlled by a third-party program or vendor, this means that your firewall is being controlled by a separate application, such as an antivirus program. Open the application that is controlling your antivirus settings and locate the firewall settings and disable them from inside the third-party app
-
This will save your changes and disable your computer’s firewall.


Advertisement
Add New Question
-
Question
How do I turn off my router’s firewall?
Michael Thompson-Brown is a Cybersecurity Expert based in Portland, Maine. He is the owner and founder of PCRescue!, a company that provides cybersecurity and data management solutions to small businesses and individuals. Michael has over 25 years of experience in the IT industry and is a certified ethical hacker. He is passionate about helping clients protect their data and systems from malicious attacks and helping them optimize their online presence and reach. He received a Master’s degree in Cybersecurity and Information Assurance from Western Governors University, and a Bachelor’s degree in Business Administration from the University of Phoenix.
Cybersecurity Expert
Expert Answer
To turn off the router’s firewall, access the gateway by opening a web browser and typing the router’s IP address into the address bar. Log in using the router’s administrator credentials, typically found on a sticker on the router or provided by the manufacturer. Once logged in, navigate to the firewall or security settings section and disable the firewall option. Be cautious when doing so, as it may leave your network vulnerable to external threats.
-
Question
Is it possible to disable the firewall on another computer remotely?
If you have PsTools installed on your computer, you can disable Windows Firewall on other computers on your network by using this command: psexec \\ComputerHostname netsh firewall set opmode disable
-
Question
How do I turn off the chromebook firewall?
Go to Settings, Advanced, then turn off the option «Protect you and your device from dangerous web sites.»
Ask a Question
200 characters left
Include your email address to get a message when this question is answered.
Submit
Advertisement
-
Instead of disabling your firewall, you can adjust your firewall settings in order to allow access from specific apps and devices.
-
Only disable your firewall if you are doing something with which the firewall interferes, such as sharing files from your computer. Turn the firewall back on when you are finished with these tasks so your computer remains protected.
-
If you’ve disabled your firewall but are still experiencing trouble sharing files or getting a certain program to work, you may need to disable any antivirus software you have as well since these programs often have their own firewall programs. Doing so can be risky since you’re already not using a firewall.
Show More Tips
Thanks for submitting a tip for review!
Advertisement
-
Disabling your firewall can significantly increase the risk of intruding software or users being able to access your information.
Advertisement
Thanks for reading our article! If you’d like to learn more about firewalls and viruses, check out our in-depth interview with Michael Thompson-Brown.
References
About This Article
Article SummaryX
1. Click the Windows Start menu.
2. Click the Settings icon.
3. Click Update & Security.
4. Click Windows Security.
5. Click Firewall & Network Protections.
6. Click Open Windows Security settings.
7. Click a network profile.
8. Click the toggle switch to disable Microsoft Defender Firewall or click the option to open the third-party firewall app and disable the firewall settings inside the app.
Did this summary help you?
Thanks to all authors for creating a page that has been read 501,516 times.