
Applies ToWindows 11 Windows 10
Брандмауэр Windows помогает защитить устройство, фильтруя сетевой трафик и блокируя несанкционированный доступ. Он снижает риск угроз сетевой безопасности, ограничивая или разрешая трафик на основе различных свойств, таких как IP-адреса, порты или пути к программе.
Вы можете использовать приложение Безопасность Windows для просмотра состояния брандмауэра Windows и управления им. Вы можете включить или отключить брандмауэр, а также получить доступ к дополнительным параметрам для различных типов сетей, включая доменные (рабочие), частные (доверенные) и общедоступные (ненадежные) сети.
Частные и общедоступные сети
Можно указать, что определенная сеть, к которую подключается устройство, является частной или общедоступной. Ключевое различие заключается в том, разрешено ли другим устройствам в той же сети видеть ваше устройство и, возможно, подключаться к нему.
Ваша домашняя сеть может быть примером частной сети. Теоретически единственными устройствами в ней являются ваши устройства и устройства, принадлежащие вашей семье. Вы в порядке с другими устройствами, которые могут видеть ваши, потому что вы доверяете этим устройствам.
Однако Wi-Fi в вашем местном кафе является общедоступной сетью. Большинство других подключенных к нему устройств принадлежат незнакомым людям, и вы, вероятно, предпочитаете, чтобы они не могли видеть или подключаться к вашему устройству.
Как правило, вы будете иметь более строгие средства контроля безопасности в общедоступной сети, чем в частной сети, просто из-за уровня доверия к другим пользователям и устройствам в этой сети.
Настройка брандмауэра Windows в Безопасность Windows
-
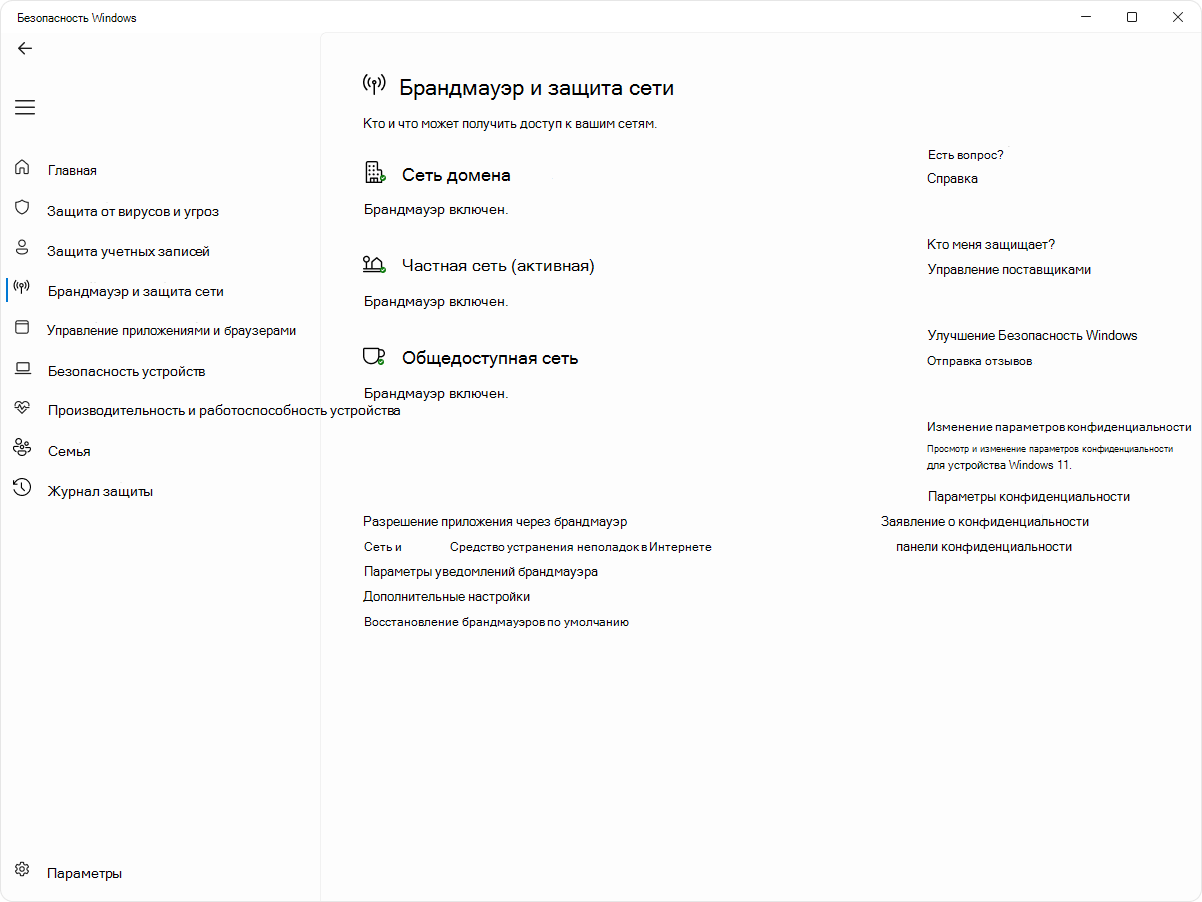
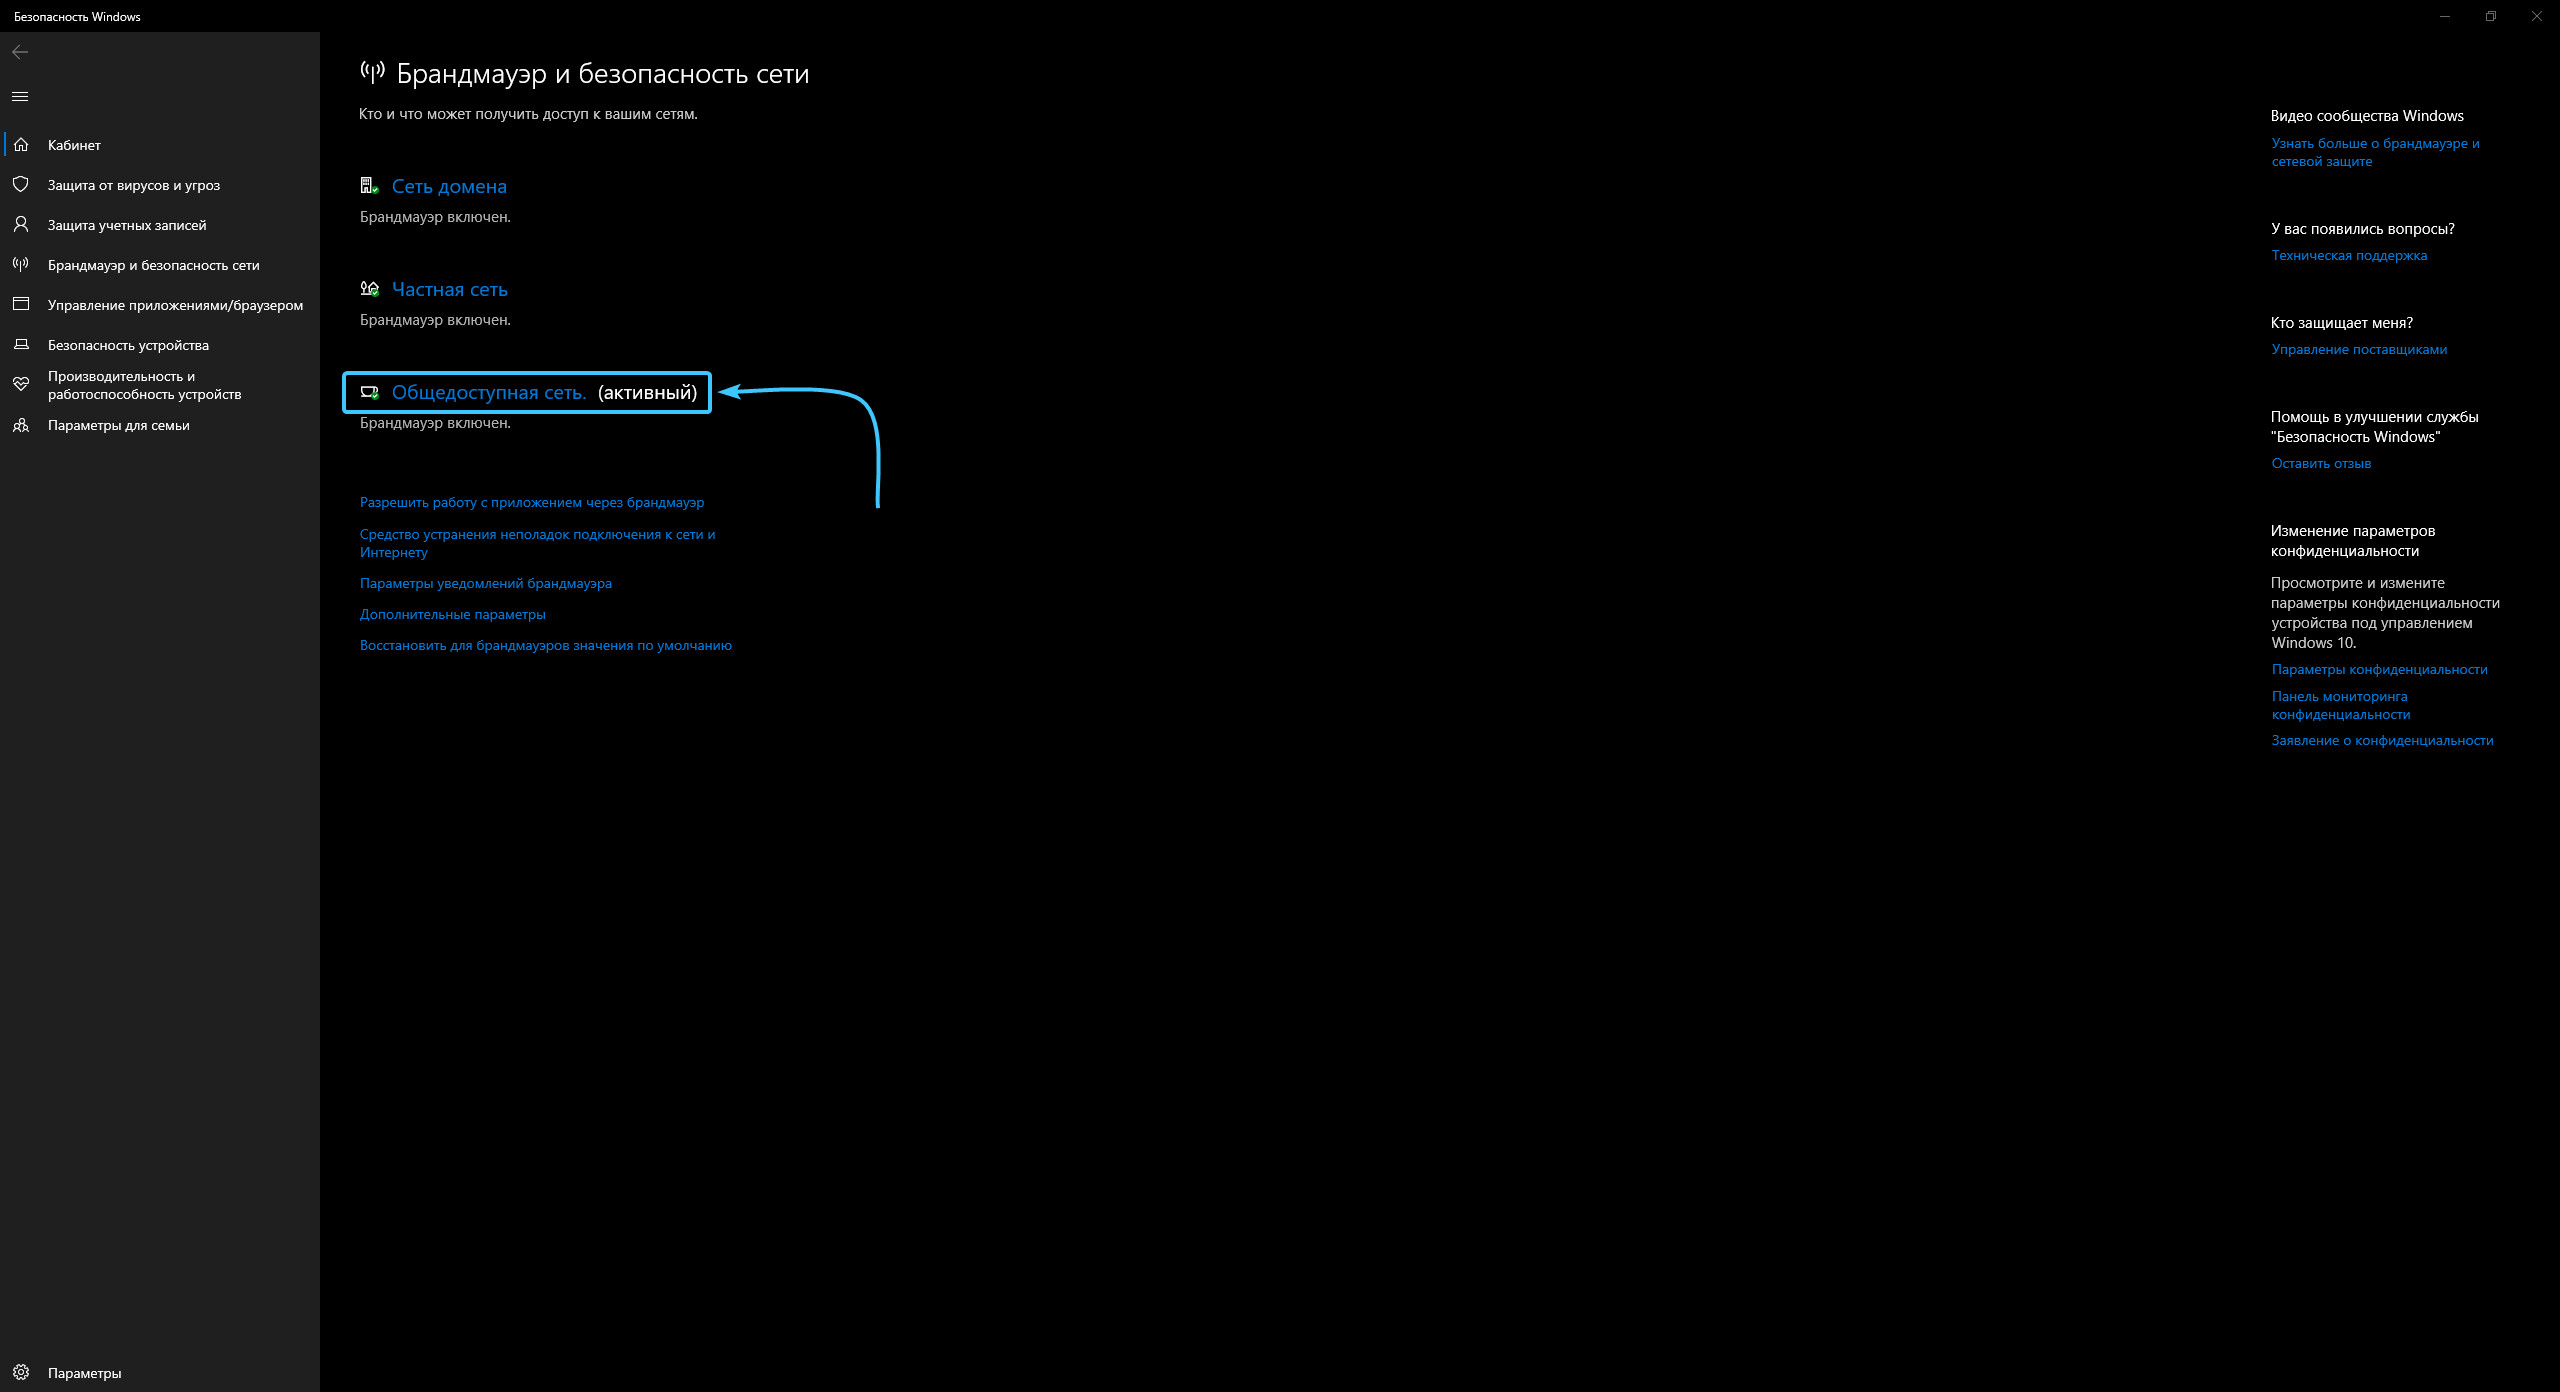
В приложении «Безопасность Windows» на компьютере, выберите Брандмауэр & защиты сети или используйте следующий ярлык:
Брандмауэр & защиты сети
-
Безопасность Windows показывает, к какому типу сети вы подключены в данный момент. Как правило, устройство будет подключено только к одной сети за раз. Выберите профиль сети: Доменная сеть, Частная сеть или Общедоступная сеть
-
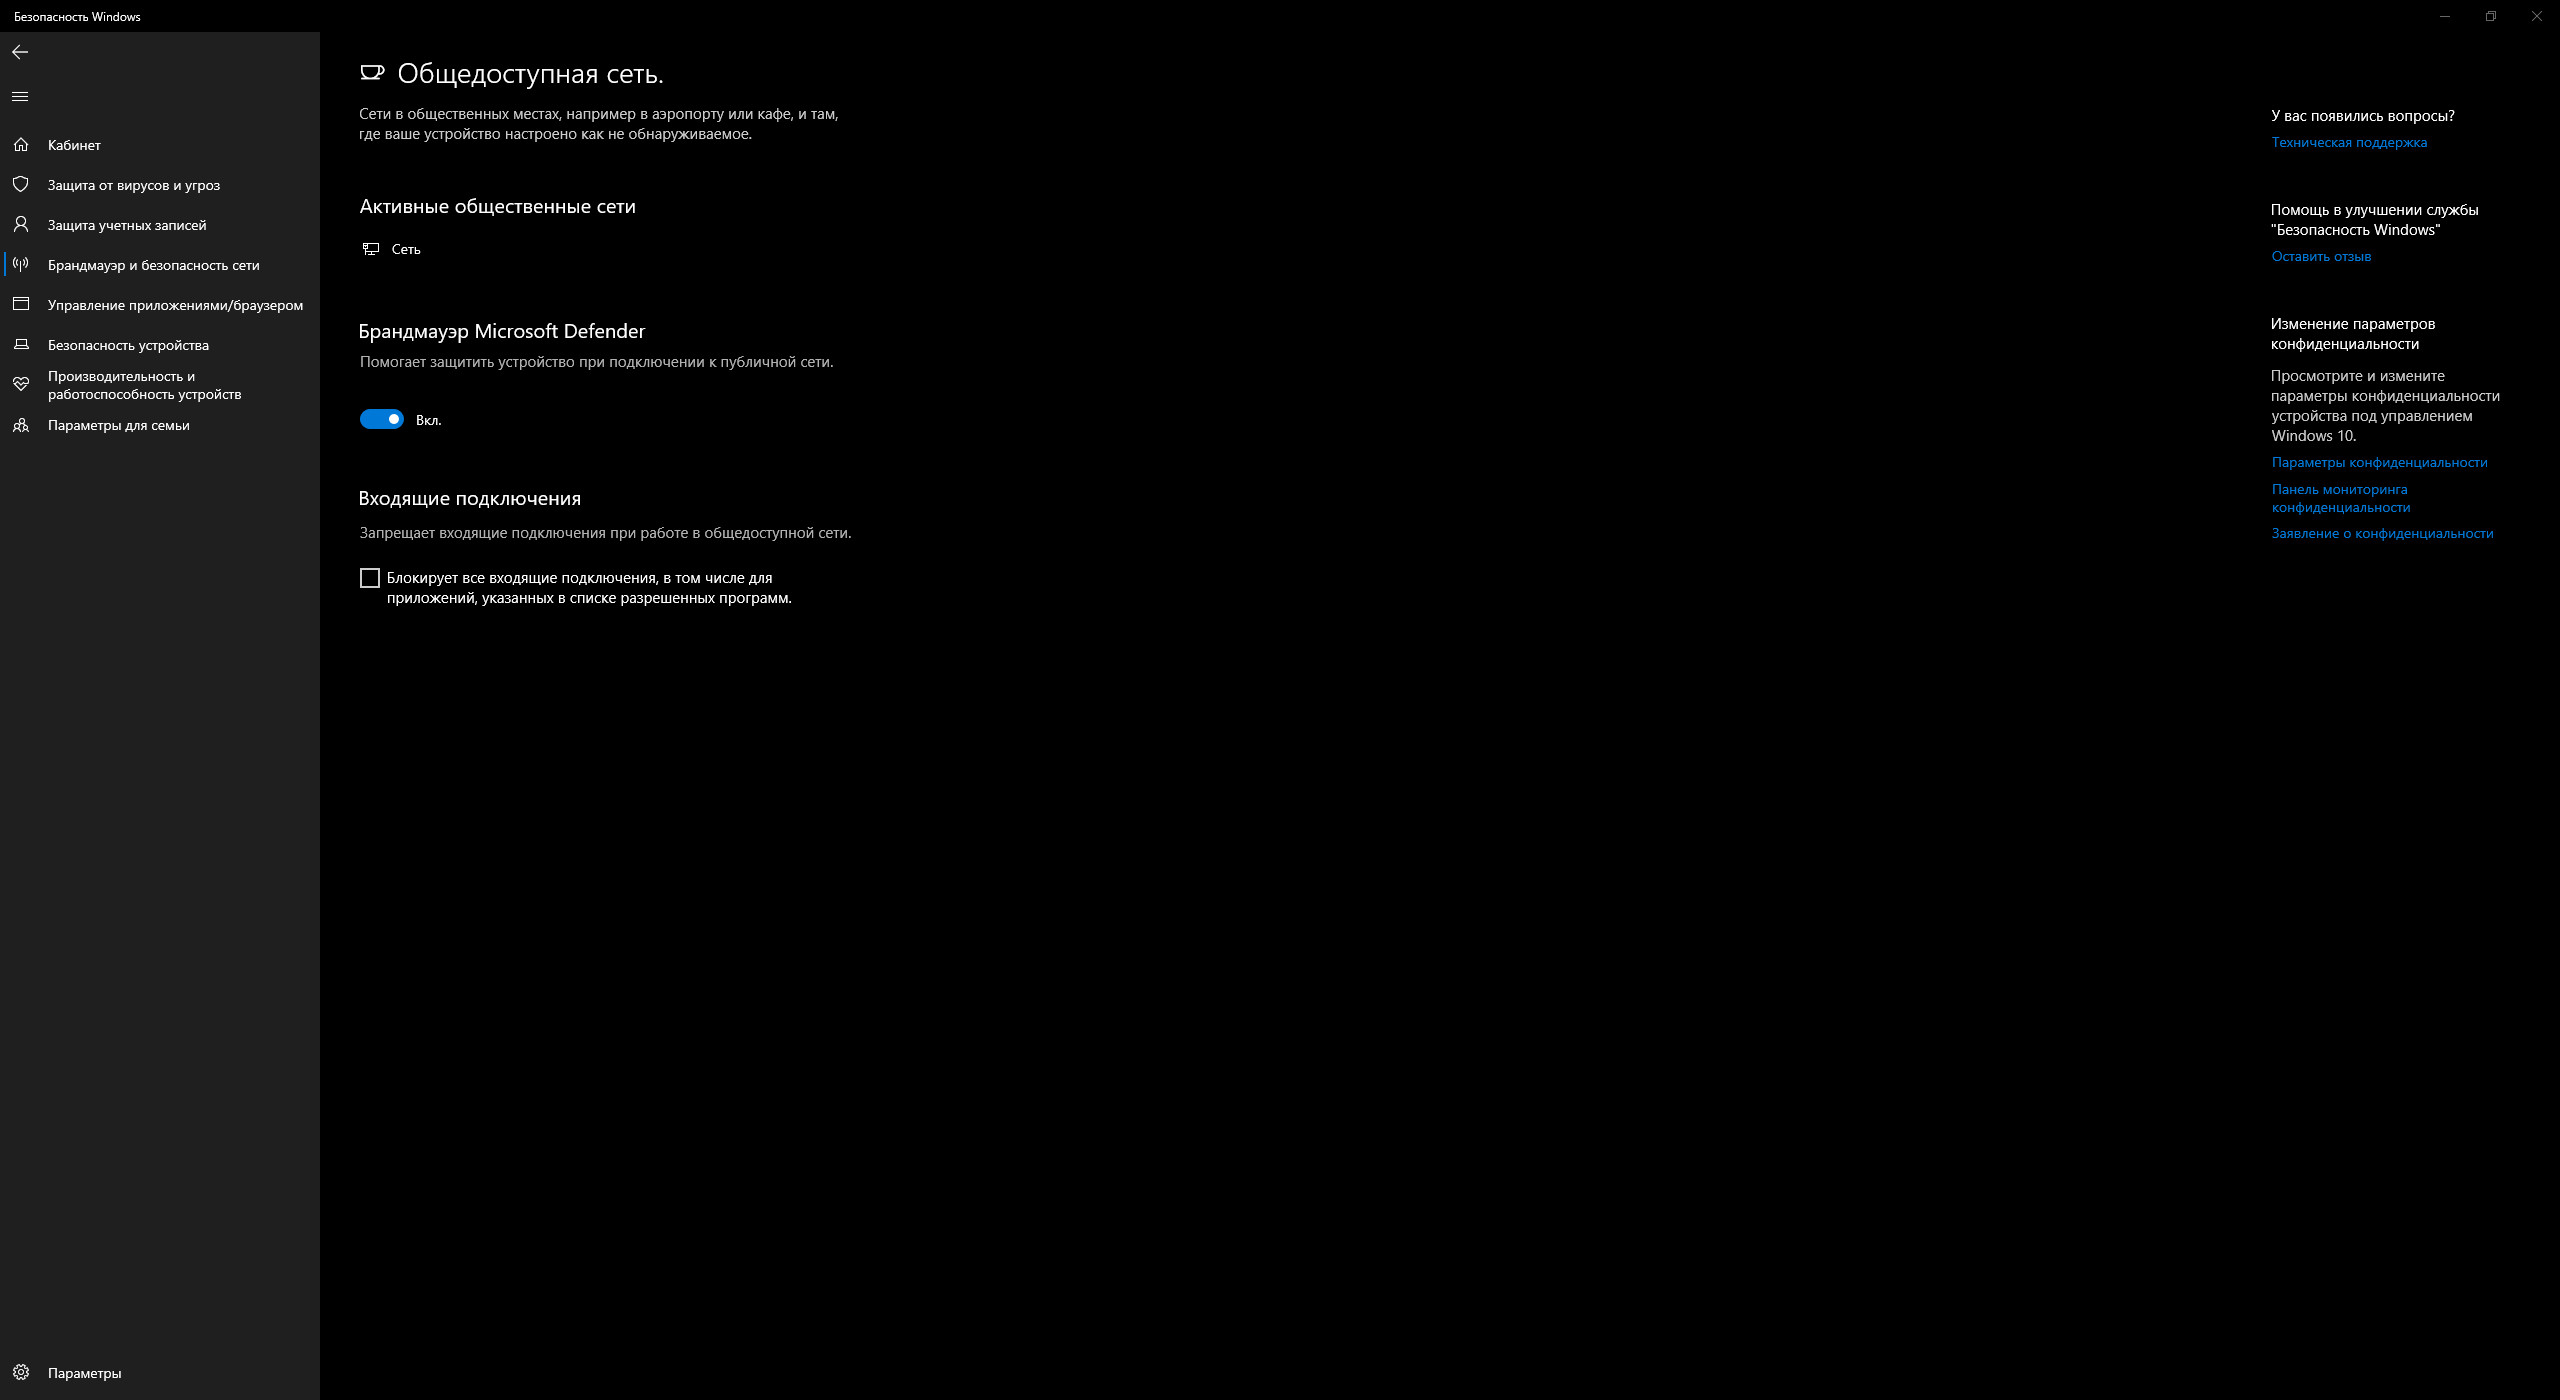
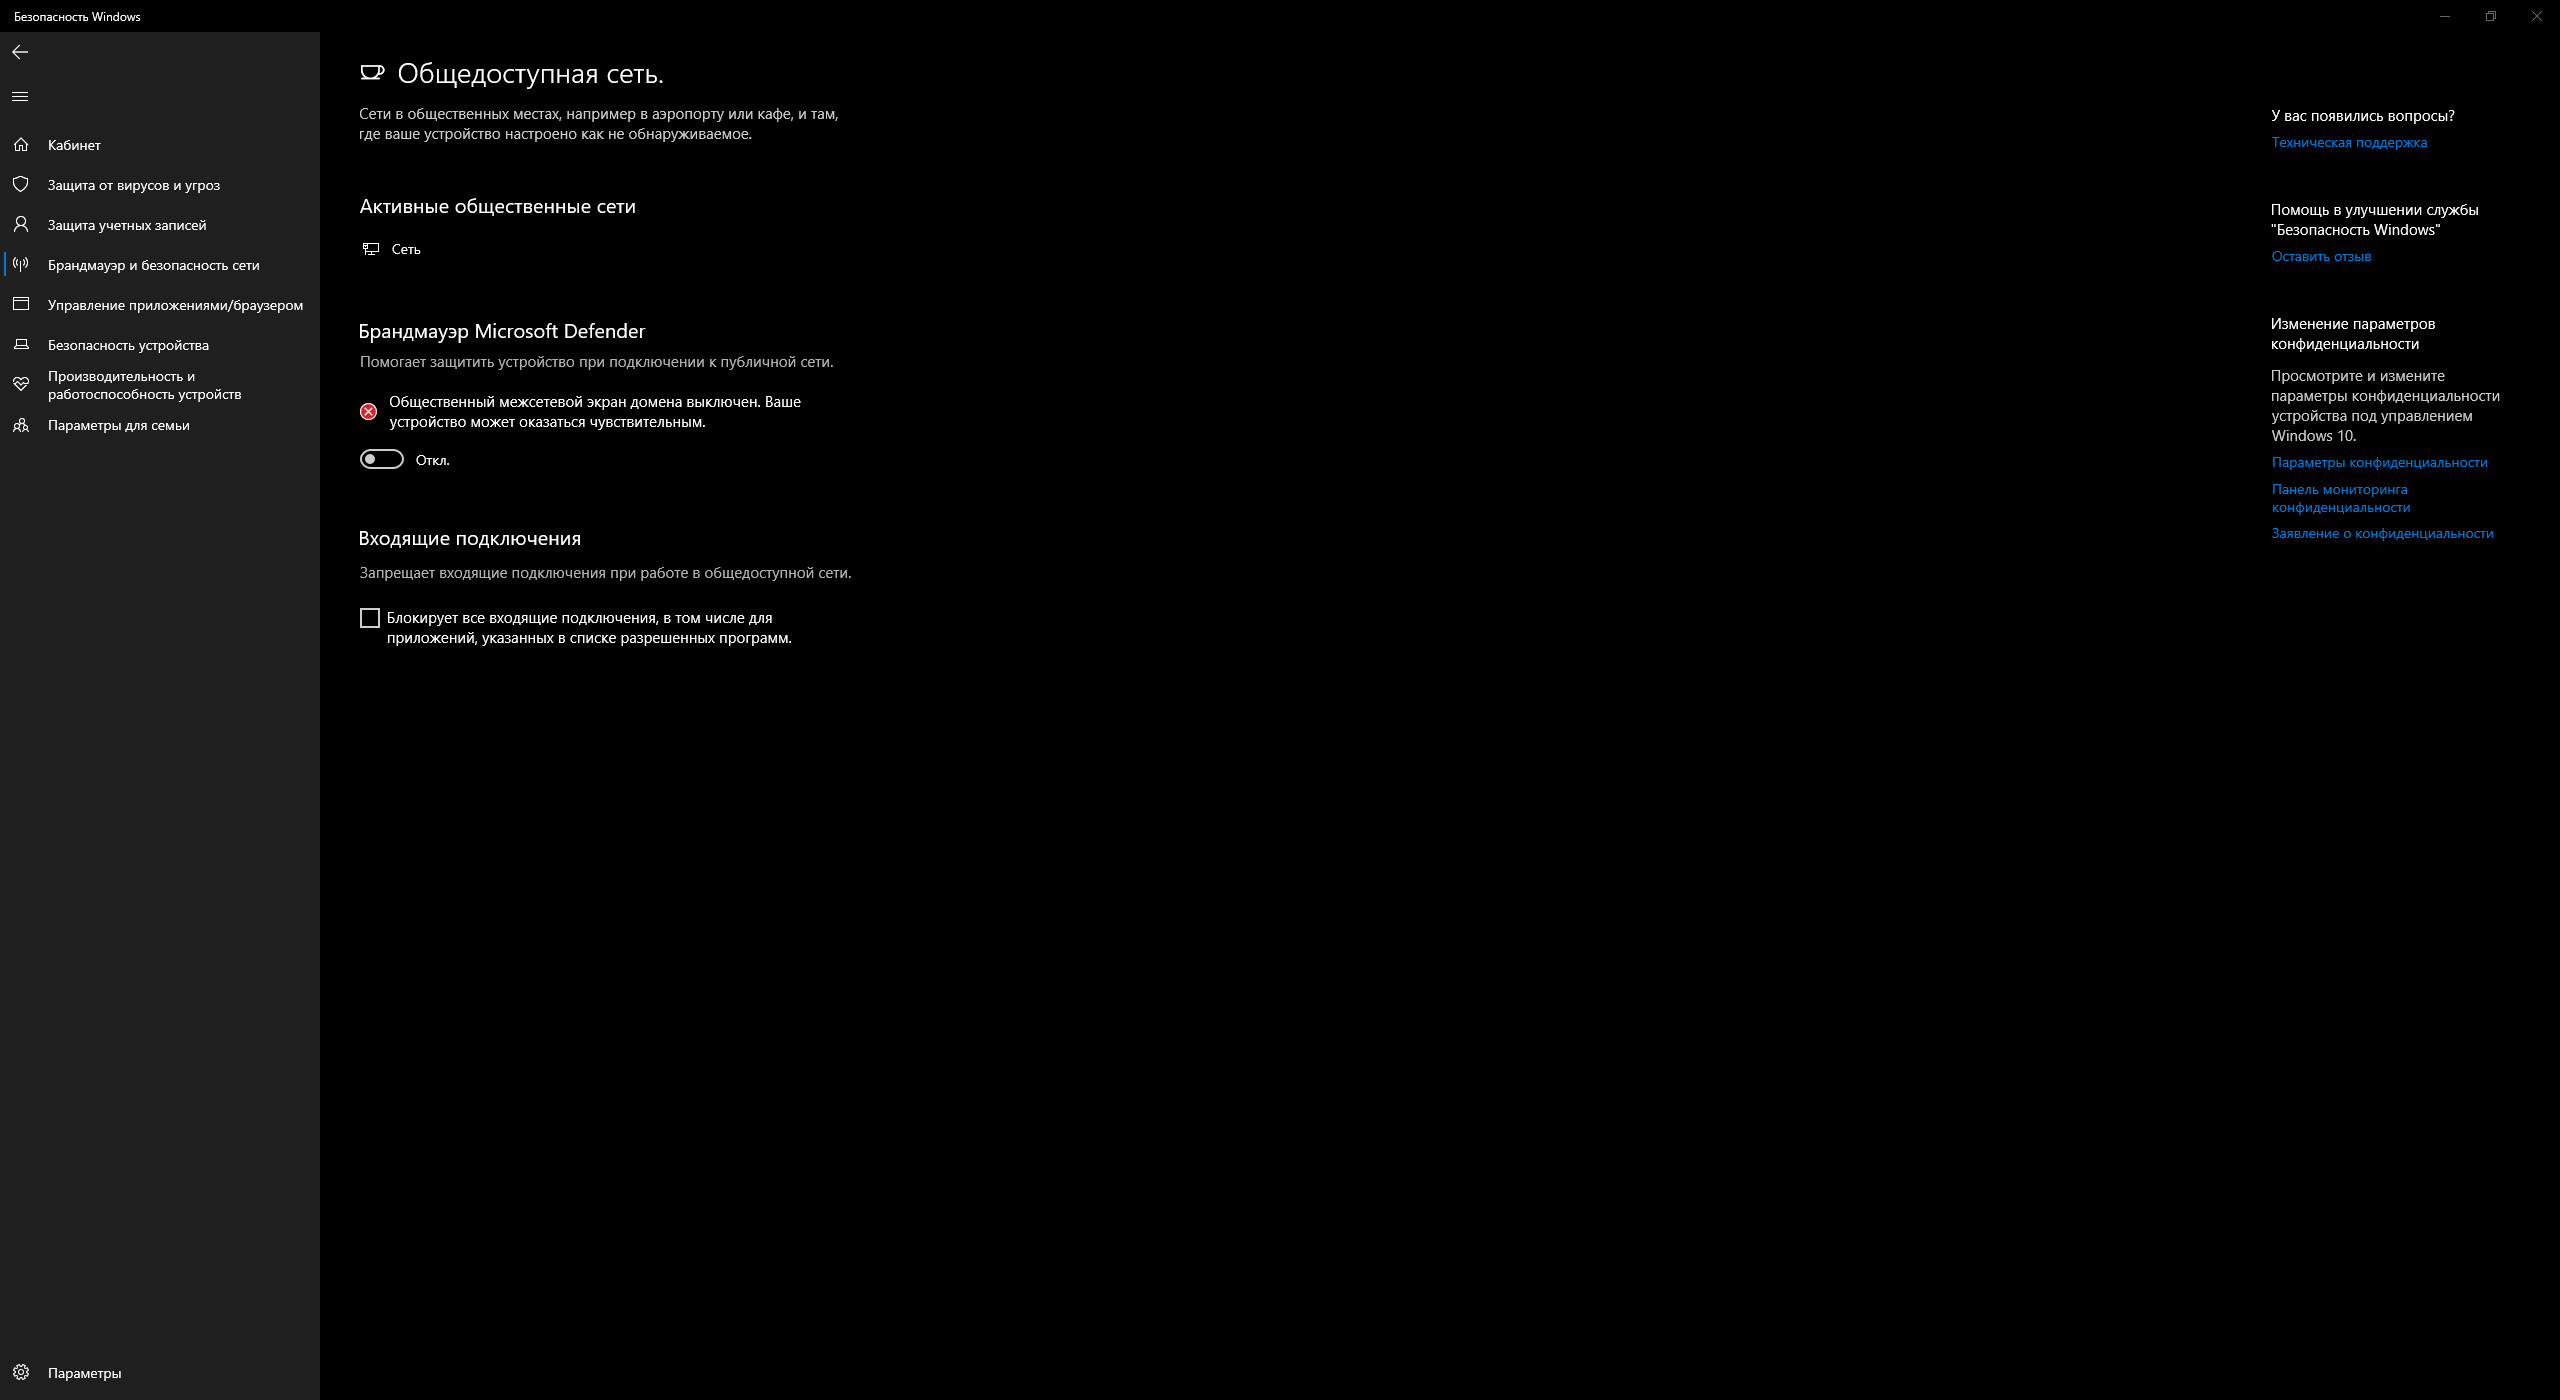
В разделеMicrosoft Defender Брандмауэр переключите параметр на Включено , чтобы включить брандмауэр Windows. Для выключения переключите этот параметр в положение Выкл. Отключение брандмауэра Windows может сделать ваше устройство более уязвимым для несанкционированного доступа. Если вам нужно использовать приложение, которое заблокировано, вы можете разрешить его через брандмауэр, а не выключать брандмауэр.
-
В разделе Входящие подключения установлен флажок Блокировать все входящие подключения, в том числе в списке разрешенных приложений. Установка этого флажка указывает брандмауэру Windows игнорировать список разрешенных приложений и блокировать все. Включение этого параметра повышает безопасность, но может привести к прекращению работы некоторых приложений.
Примечание: Если устройство управляется организацией, параметры политики могут препятствовать изменению конфигурации брандмауэра Windows. Для получения дополнительных сведений обратитесь к администратору.
Дополнительные параметры
Ниже приведен список дополнительных параметров, доступных на странице брандмауэра и защиты сети:
-
Разрешить приложению через брандмауэр
. Если брандмауэр блокирует нужное приложение, можно добавить исключение для этого приложения или открыть определенный порт. Дополнительные сведения об этом процессе (и о том, почему вы не захотите) см. в статье Риски, связанные с разрешением приложений через брандмауэр Windows. -
Средство устранения неполадок с сетью и Интернетом: Если у вас возникли общие проблемы с сетевым подключением, вы можете использовать это средство устранения неполадок, чтобы попытаться автоматически диагностировать и устранить их.
-
Параметры уведомлений брандмауэра: Хотите получать больше уведомлений, когда брандмауэр блокирует что-то? Меньше? Узнайте, как настроить уведомления
-
Дополнительные параметры: Откроется классический брандмауэр Защитника Windows, который позволяет создавать правила для входящего или исходящего трафика, правила безопасности подключения и просматривать журналы мониторинга брандмауэра. Большинство людей не хотят копаться в нем, что глубоко; неправильное добавление, изменение или удаление правил может привести к тому, что система станет более уязвимой или может привести к тому, что некоторые приложения не будут работать.
-
Восстановление брандмауэров по умолчанию . Если кто-то или что-то внес изменения в параметры брандмауэра Windows, что приводит к неправильной работе, вы просто в два щелчка от сброса параметров, как они были, когда вы впервые получили компьютер. Если ваша организация применила какие-либо политики для настройки брандмауэра, они будут применены повторно.
Нужна дополнительная помощь?
Нужны дополнительные параметры?
Изучите преимущества подписки, просмотрите учебные курсы, узнайте, как защитить свое устройство и т. д.
Отключение брандмауэра «Windows 11»
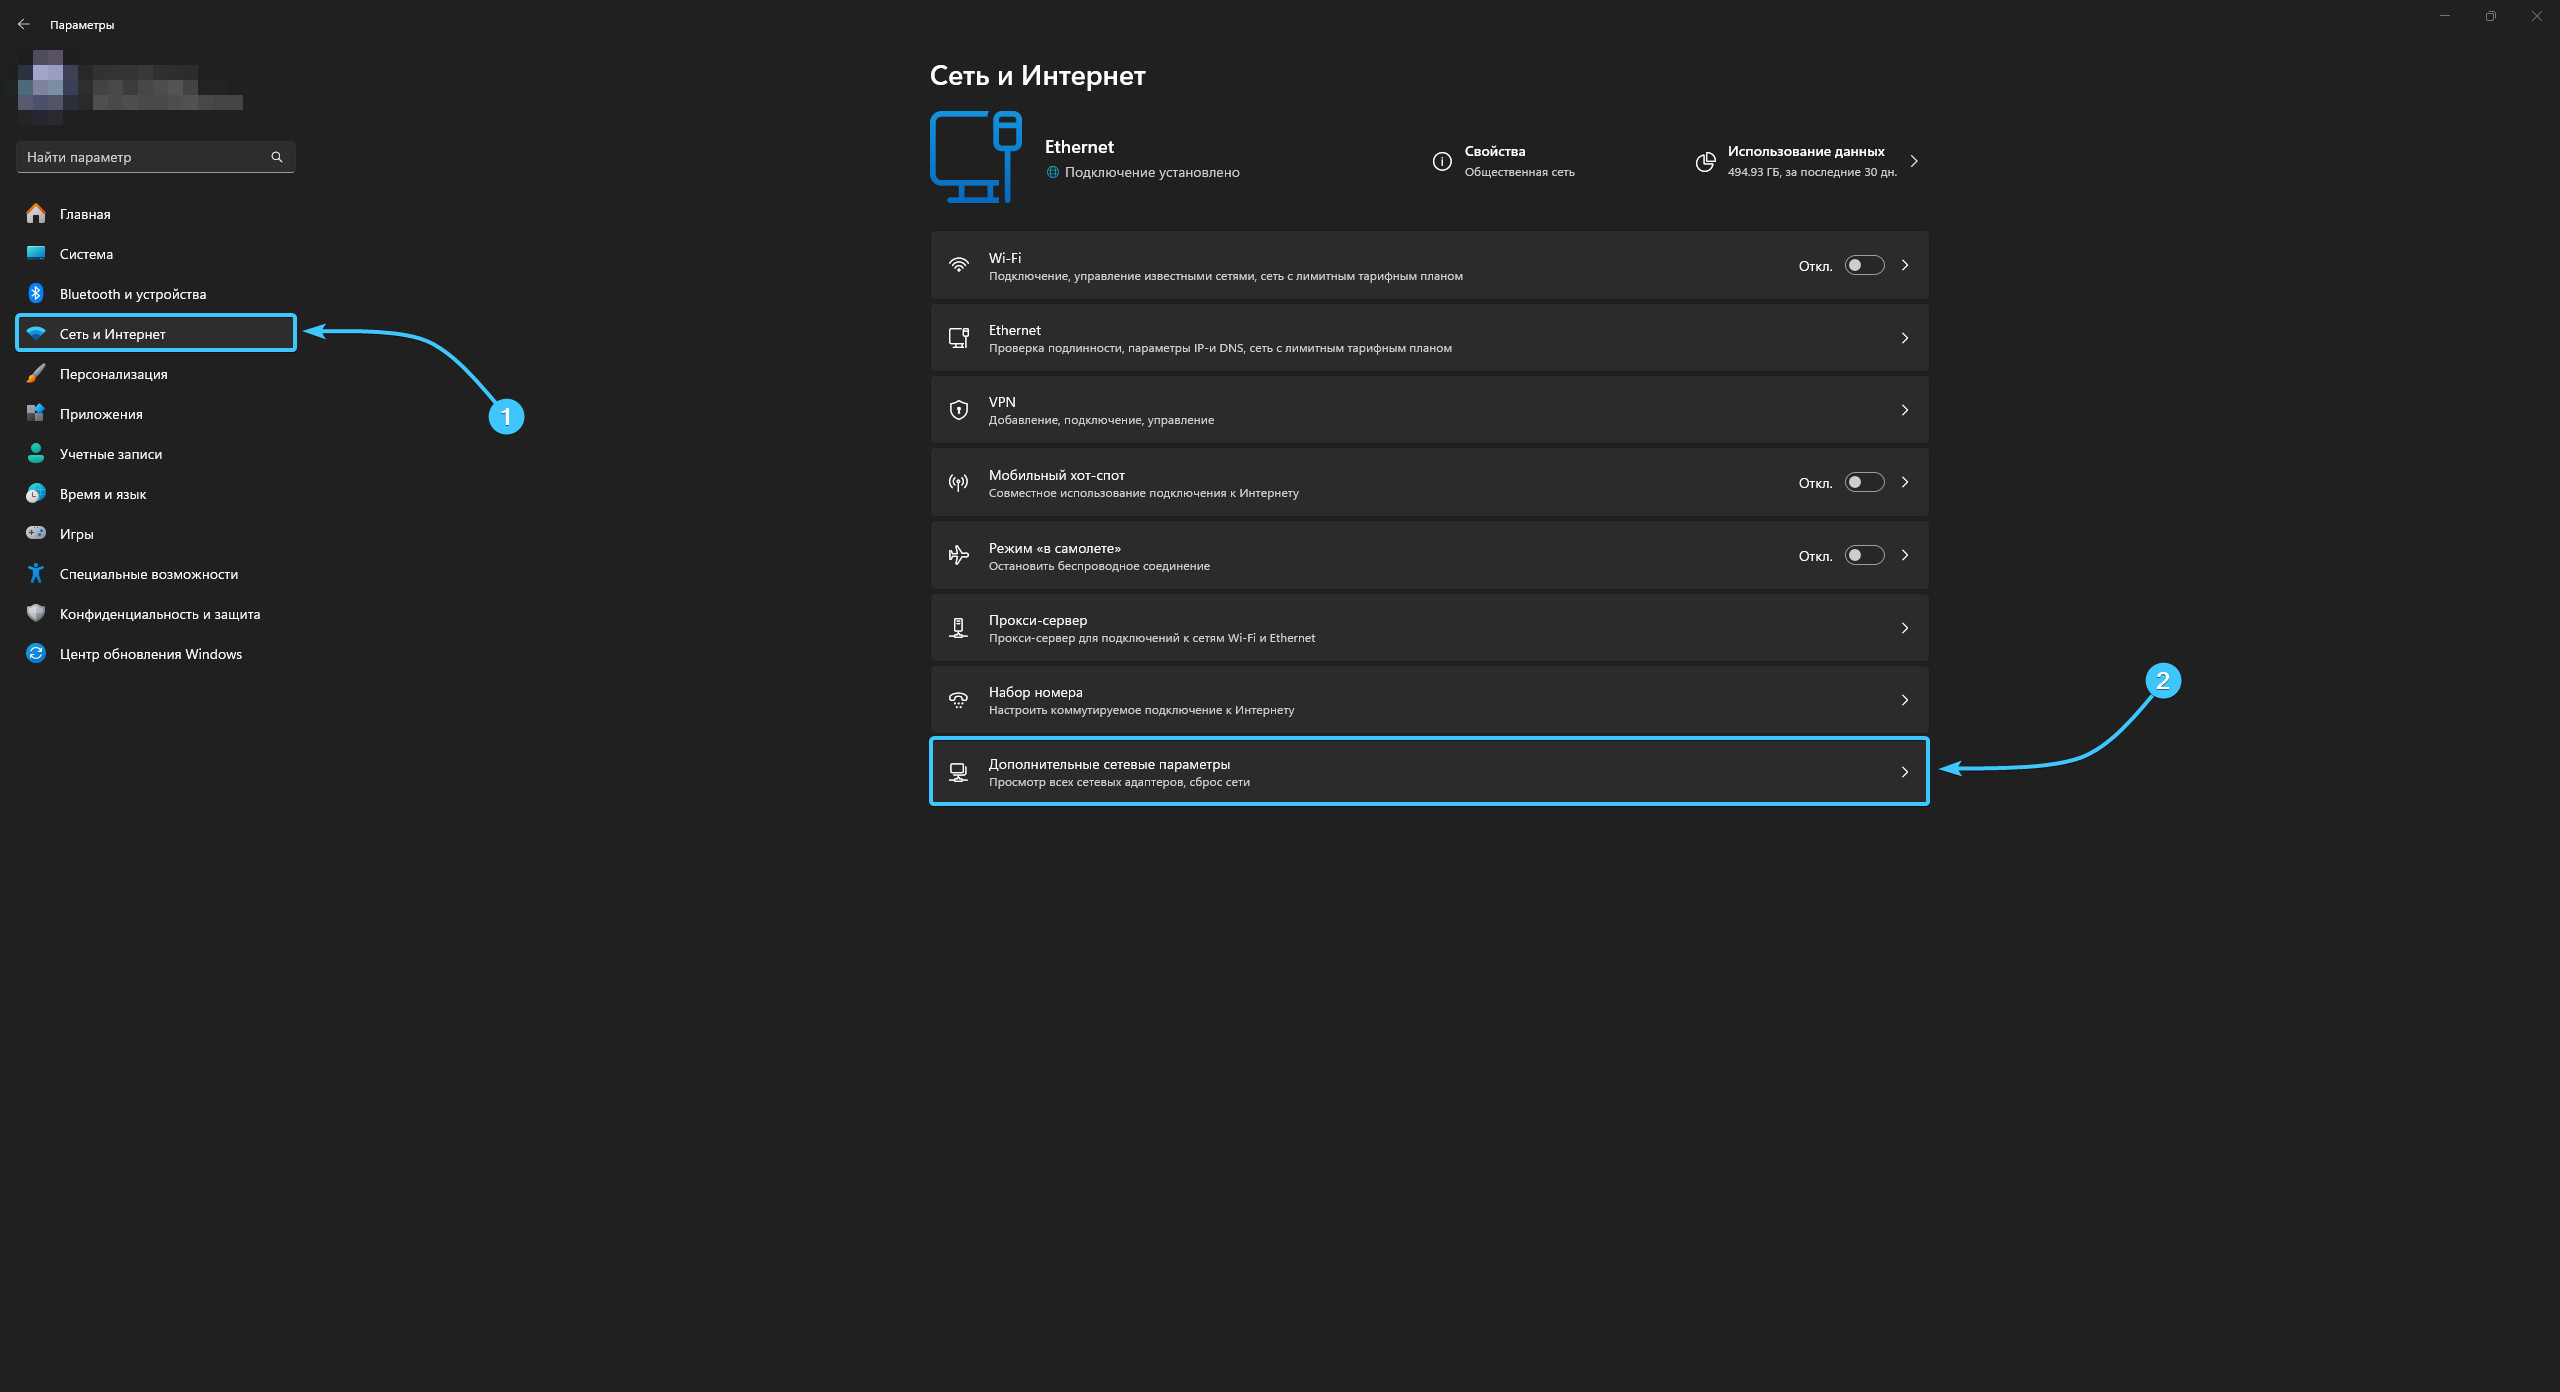
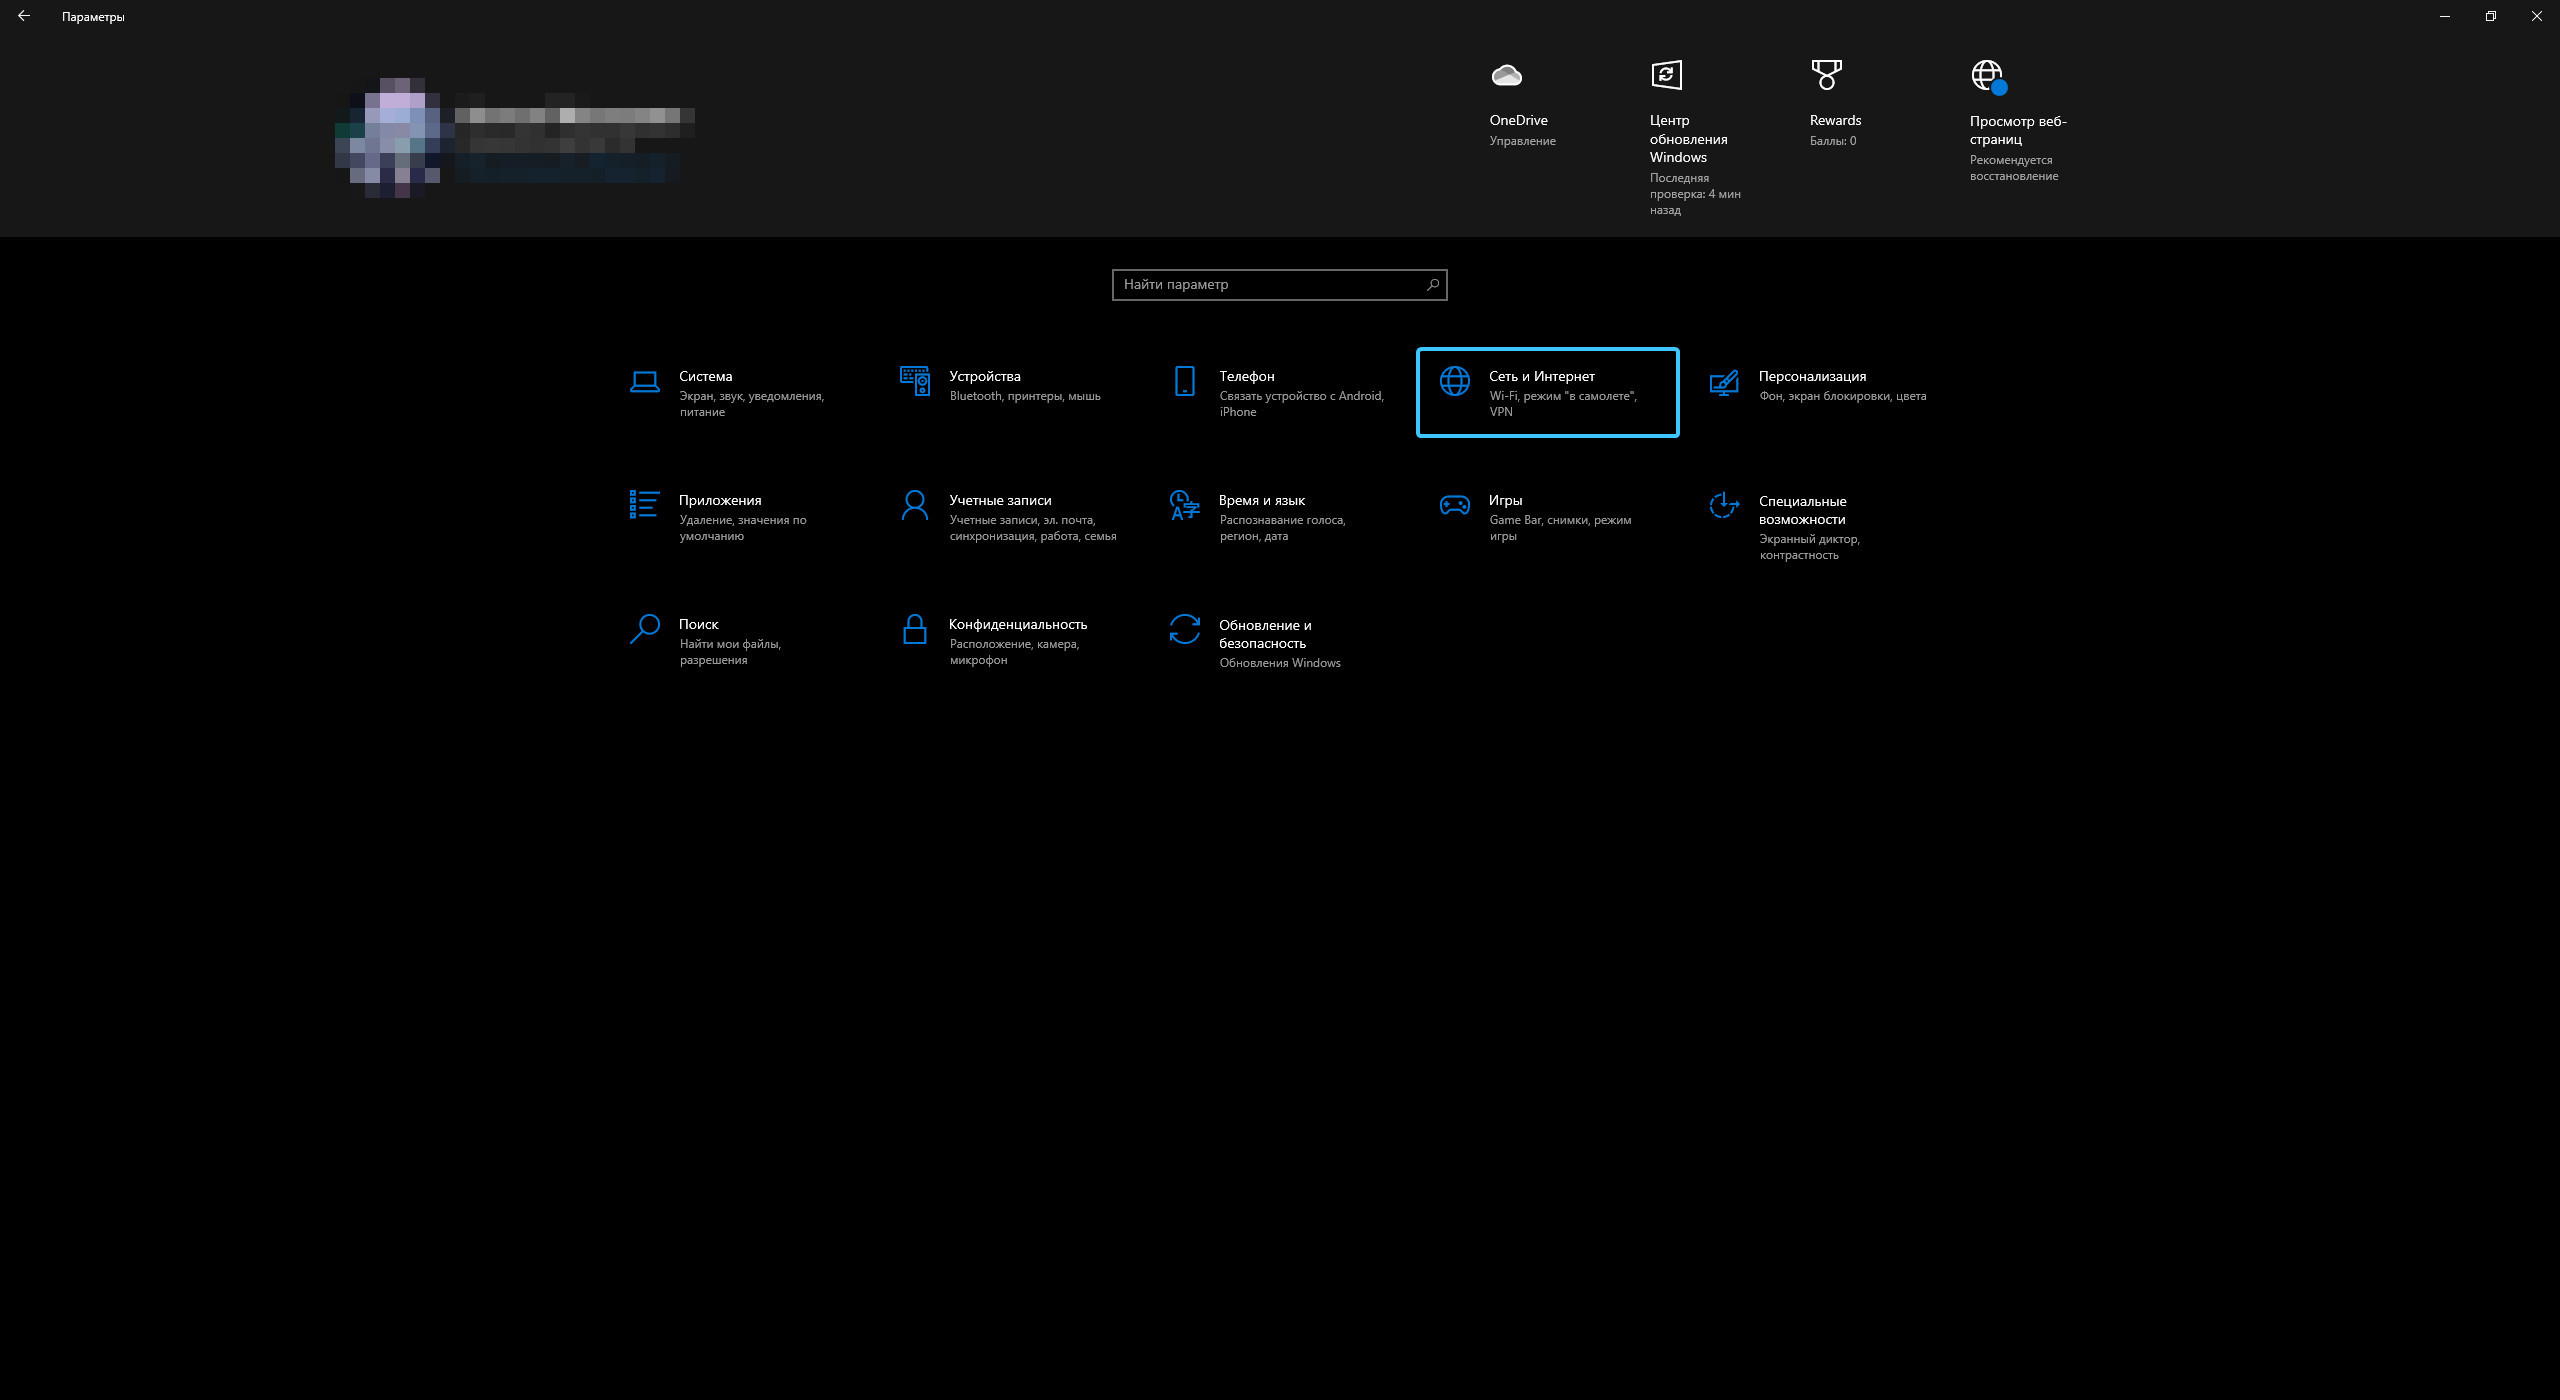
1. Откройте меню «Пуск» и перейдите в «Параметры» операционной системы «Windows 11».

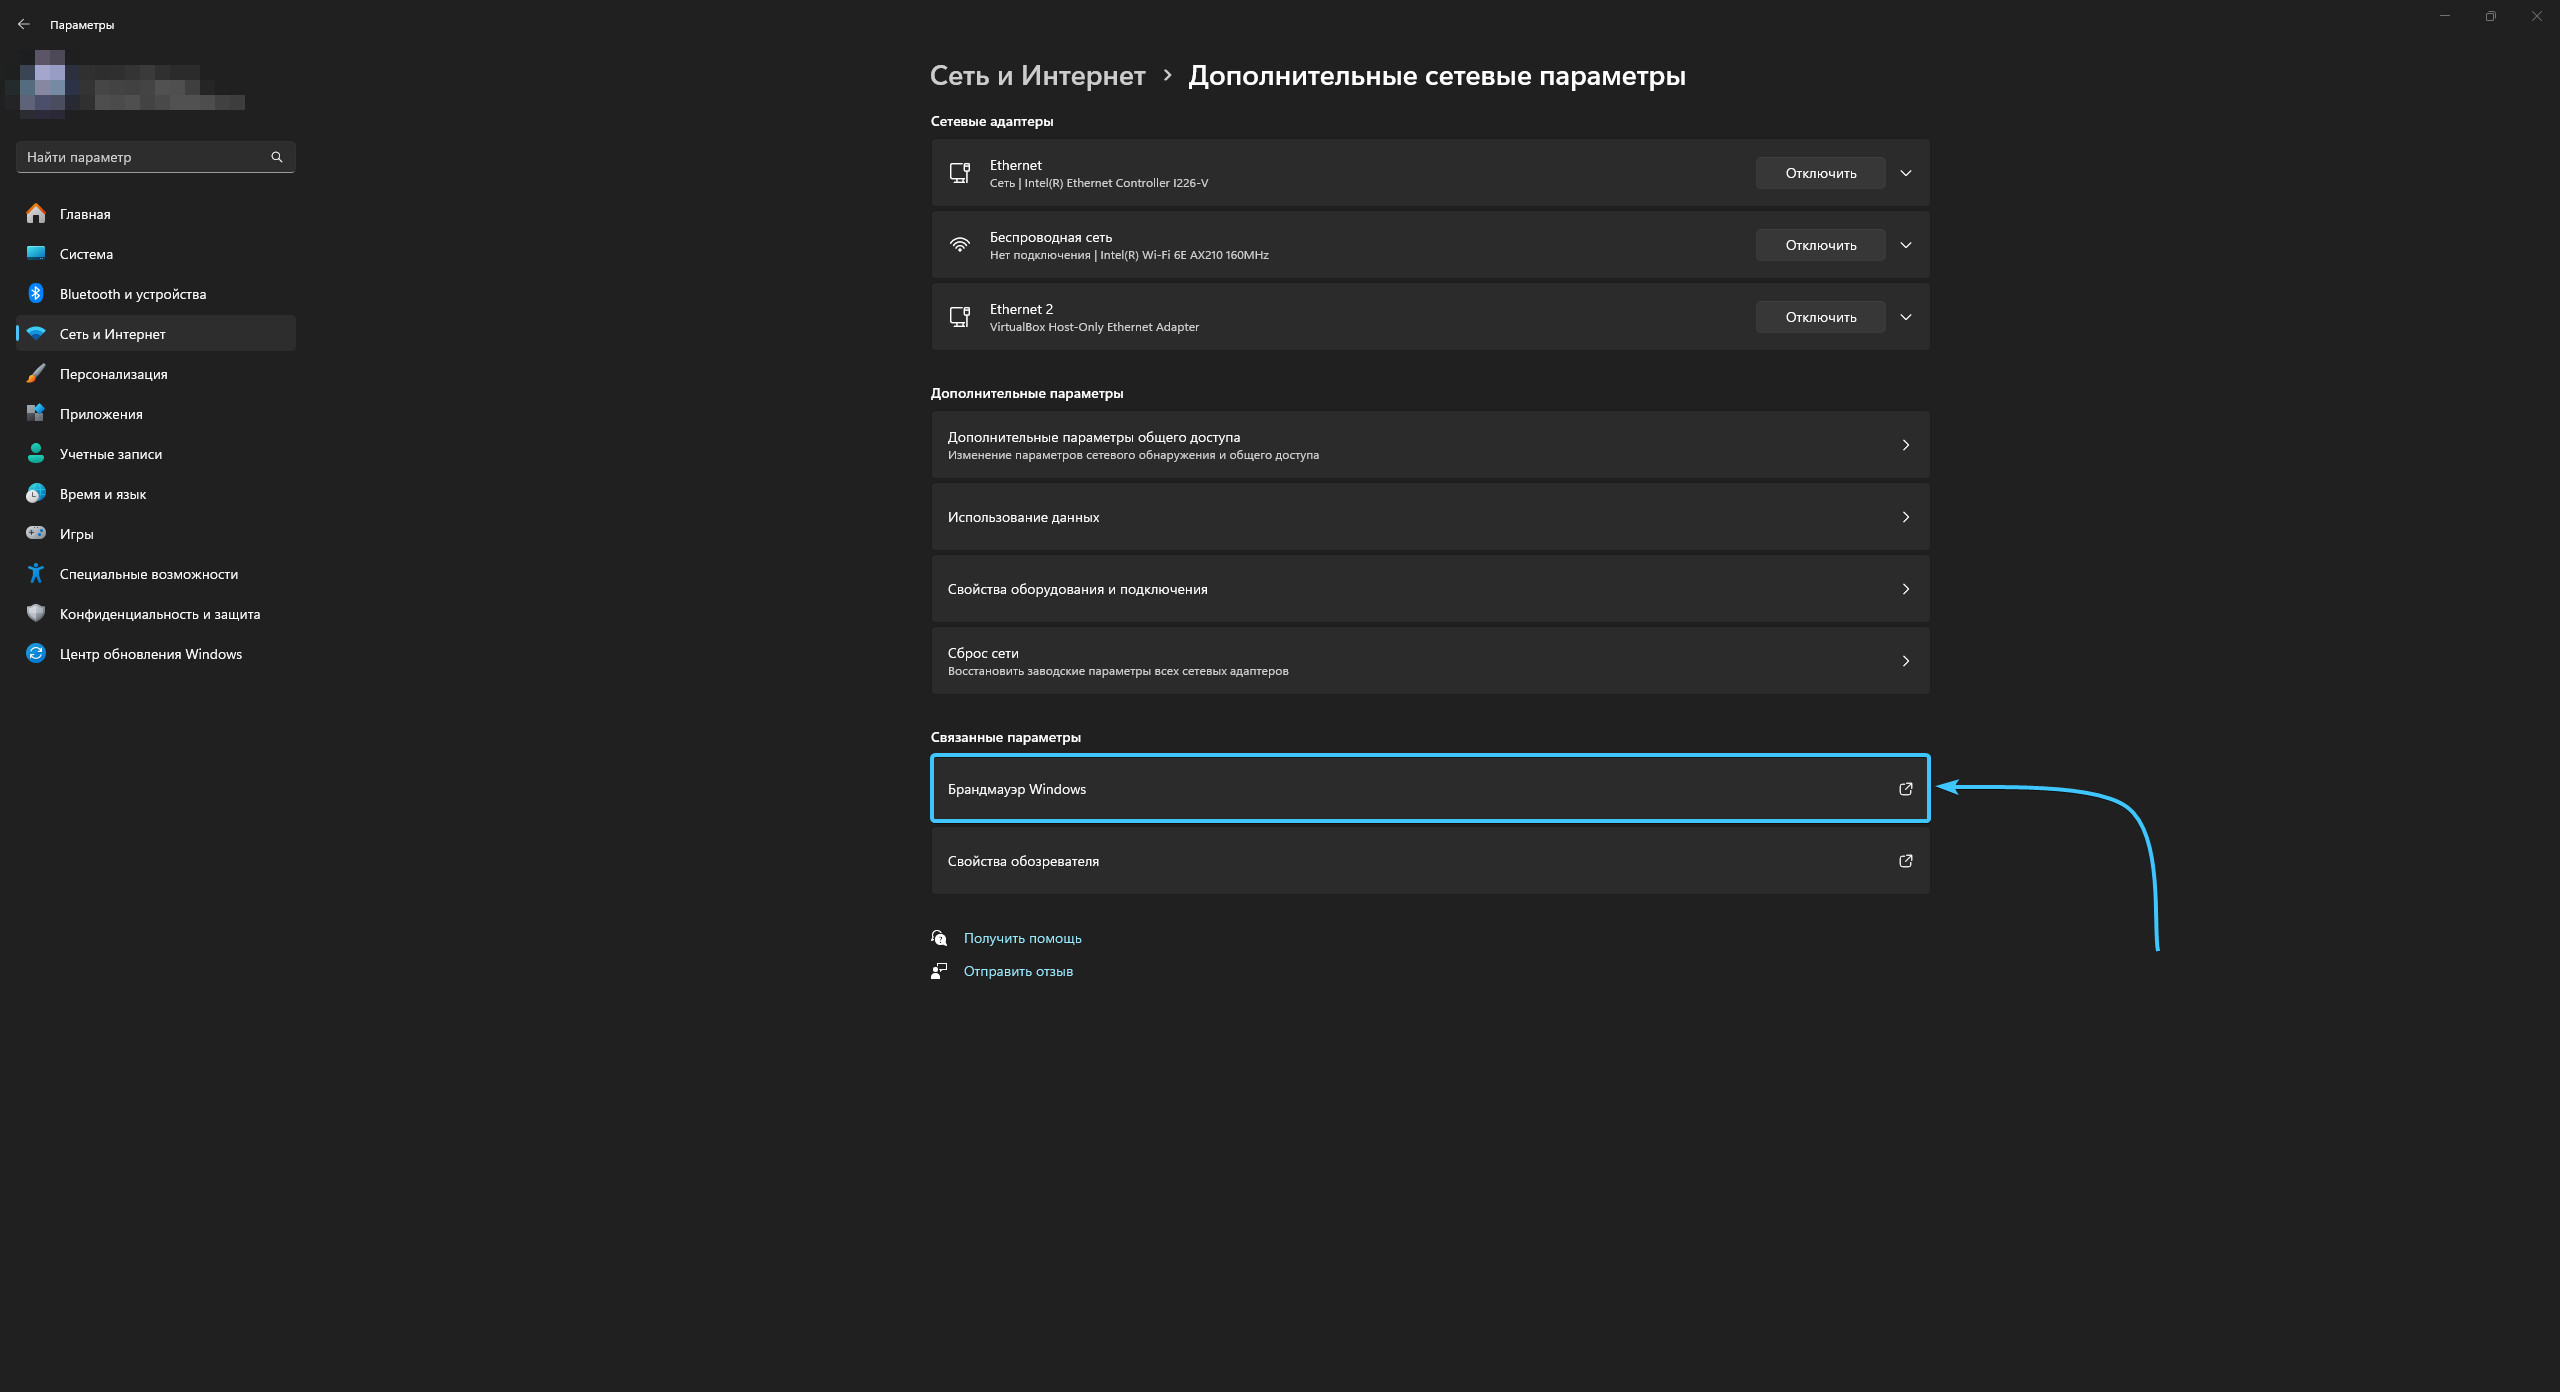
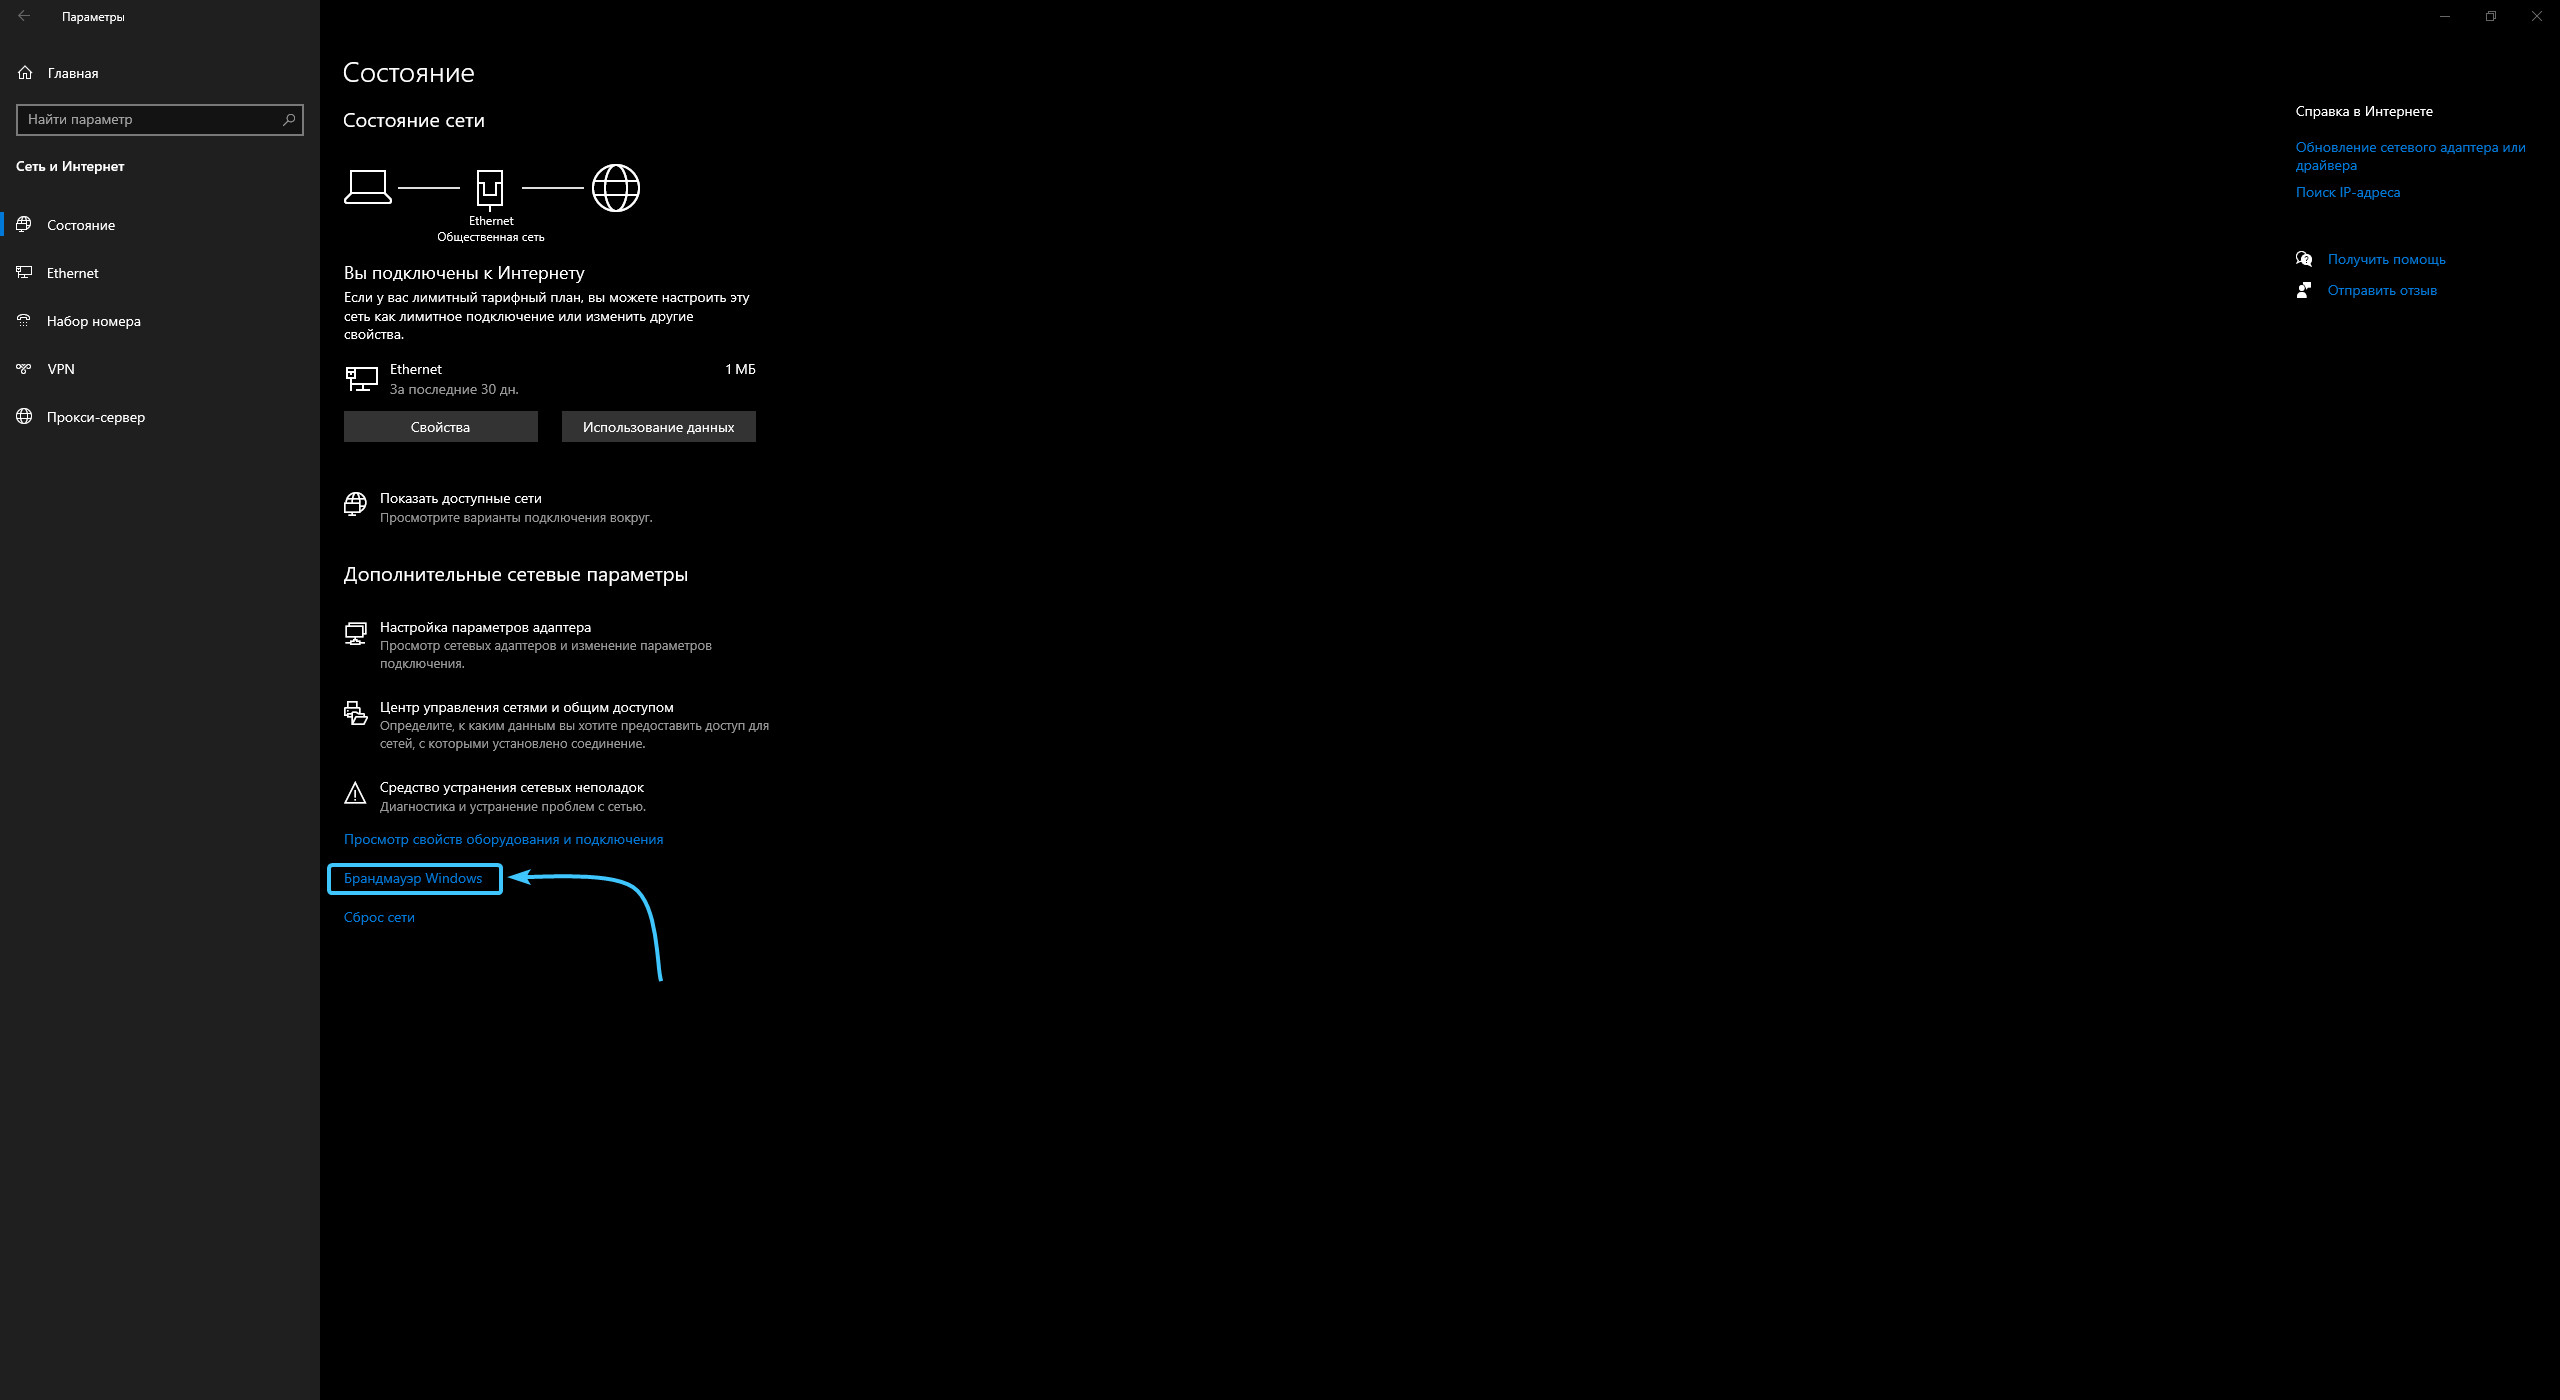
2. Откройте категорию «Сеть и интернет». Откройте раздел «Дополнительные сетевые параметры».
3. Нажмите кнопку «Брандмауэр Windows» для открытия страницы службы «Безопасность Windows».
4. Откройте тот раздел компонента «Брандмауэр Windows», который помечен статусом «Активный».
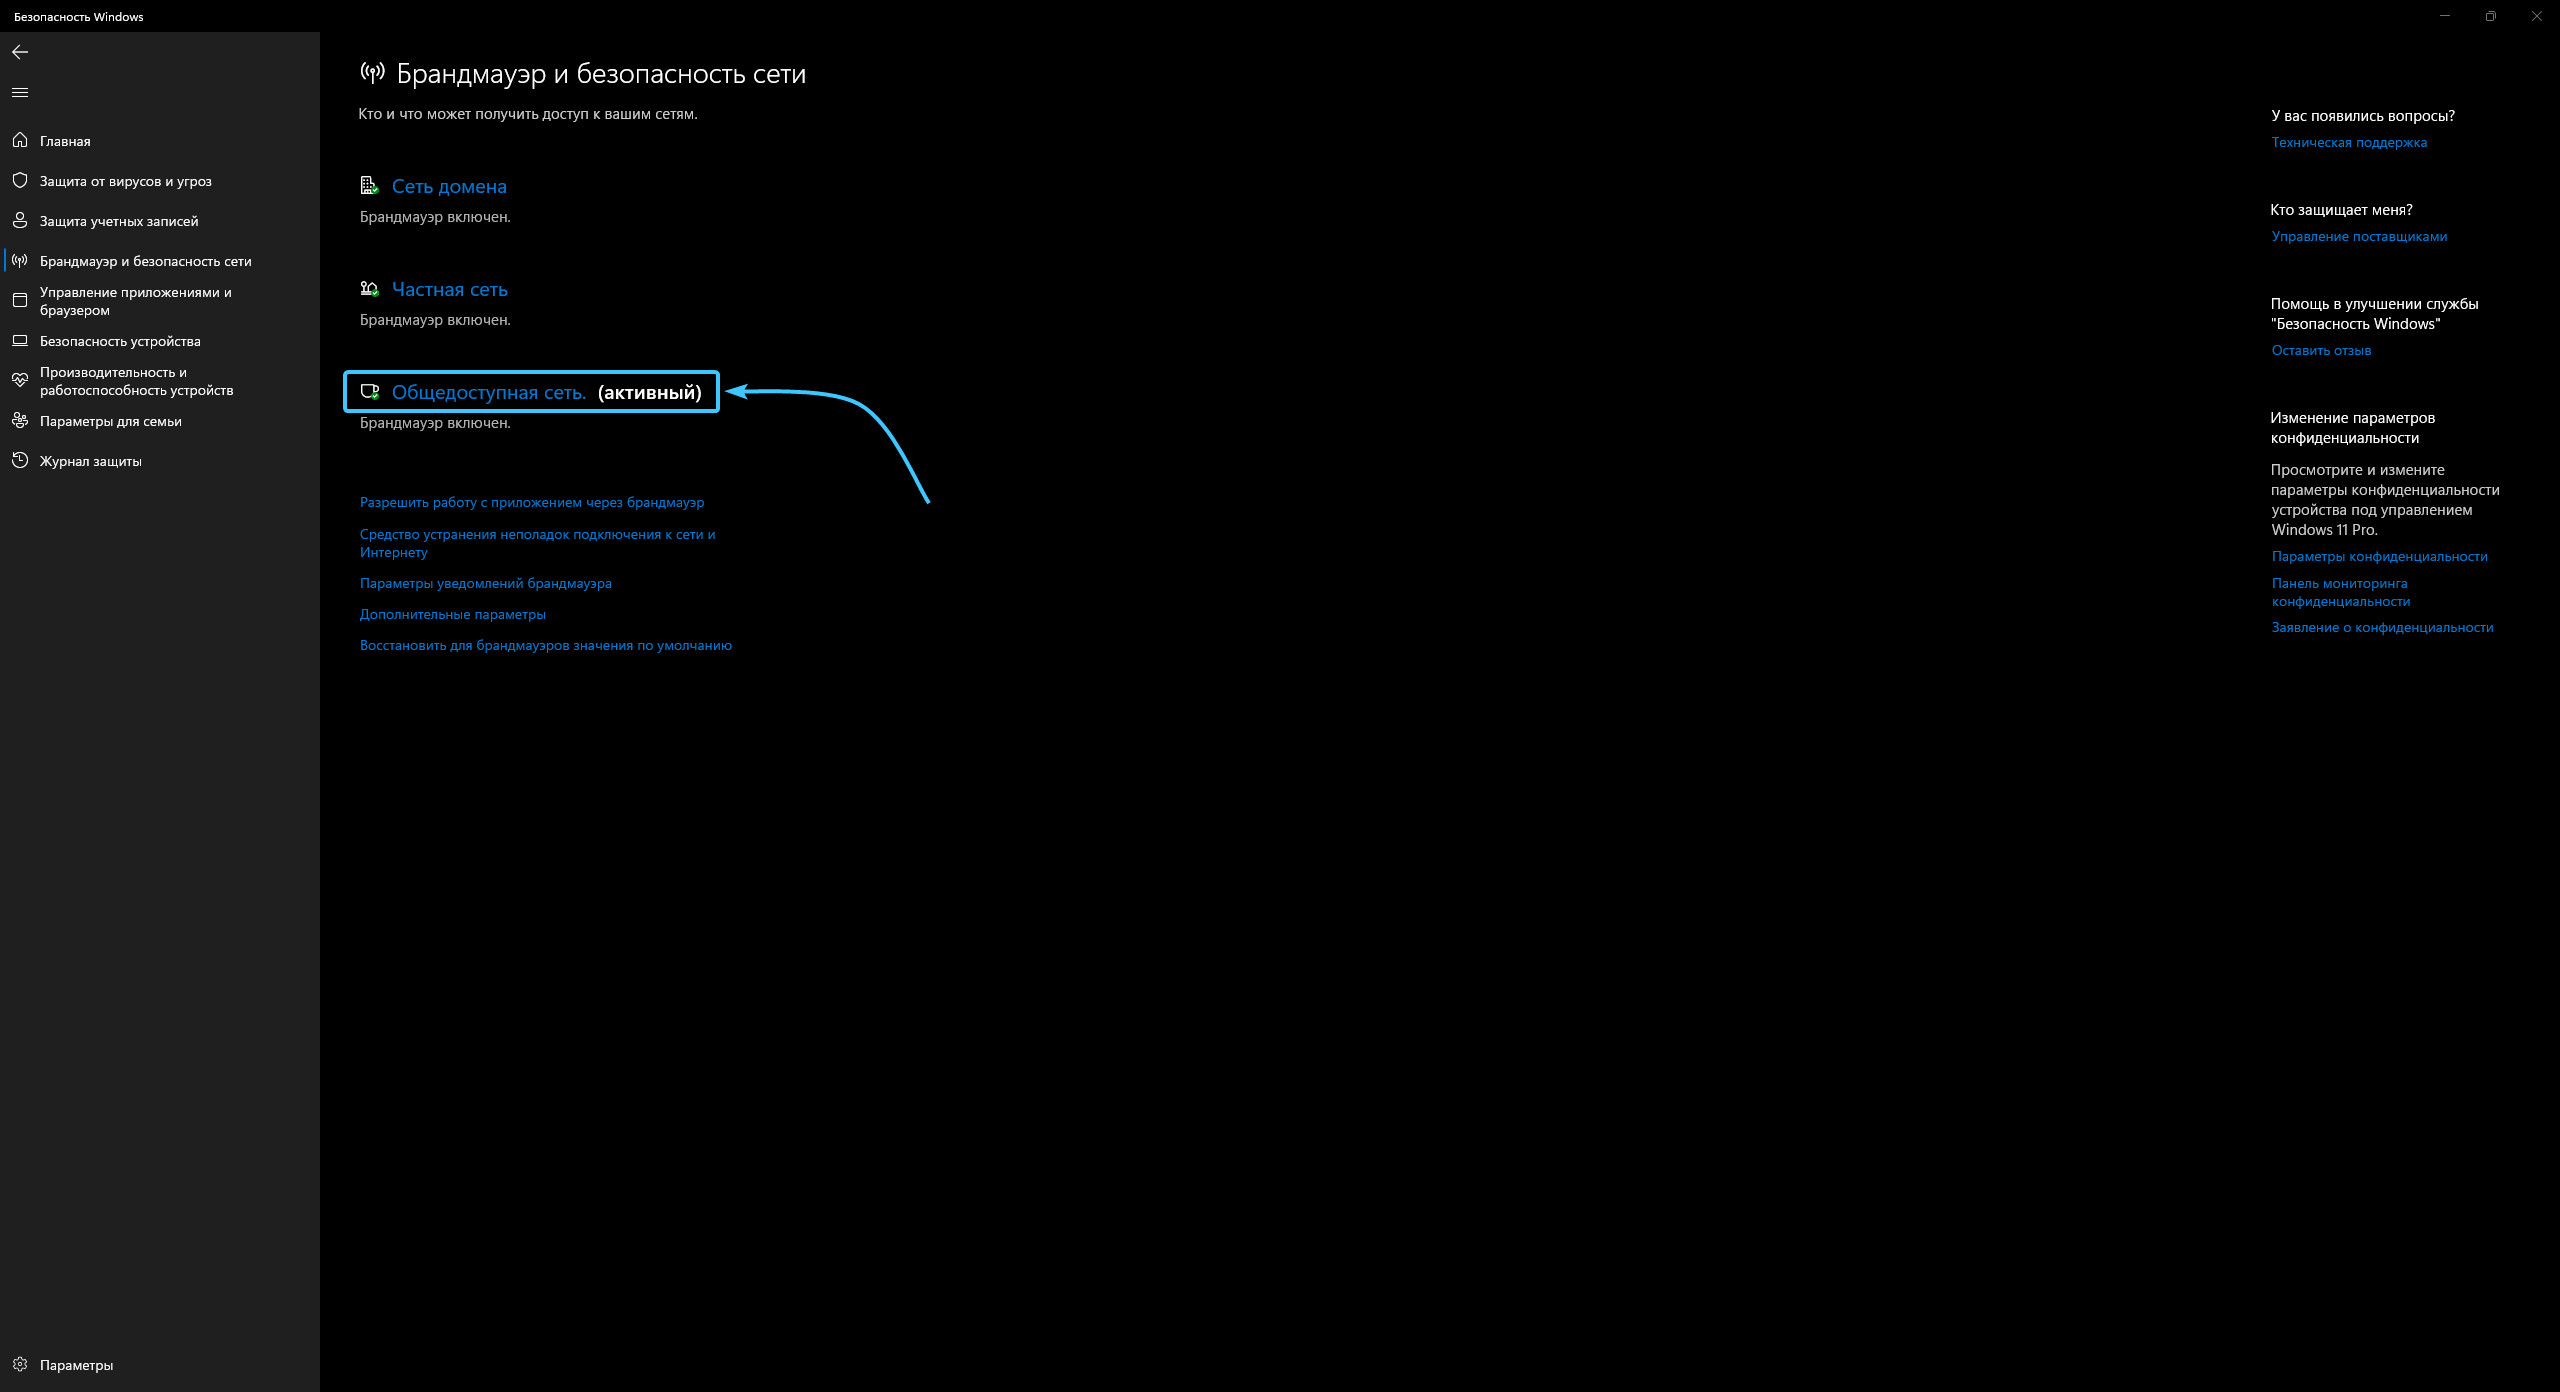
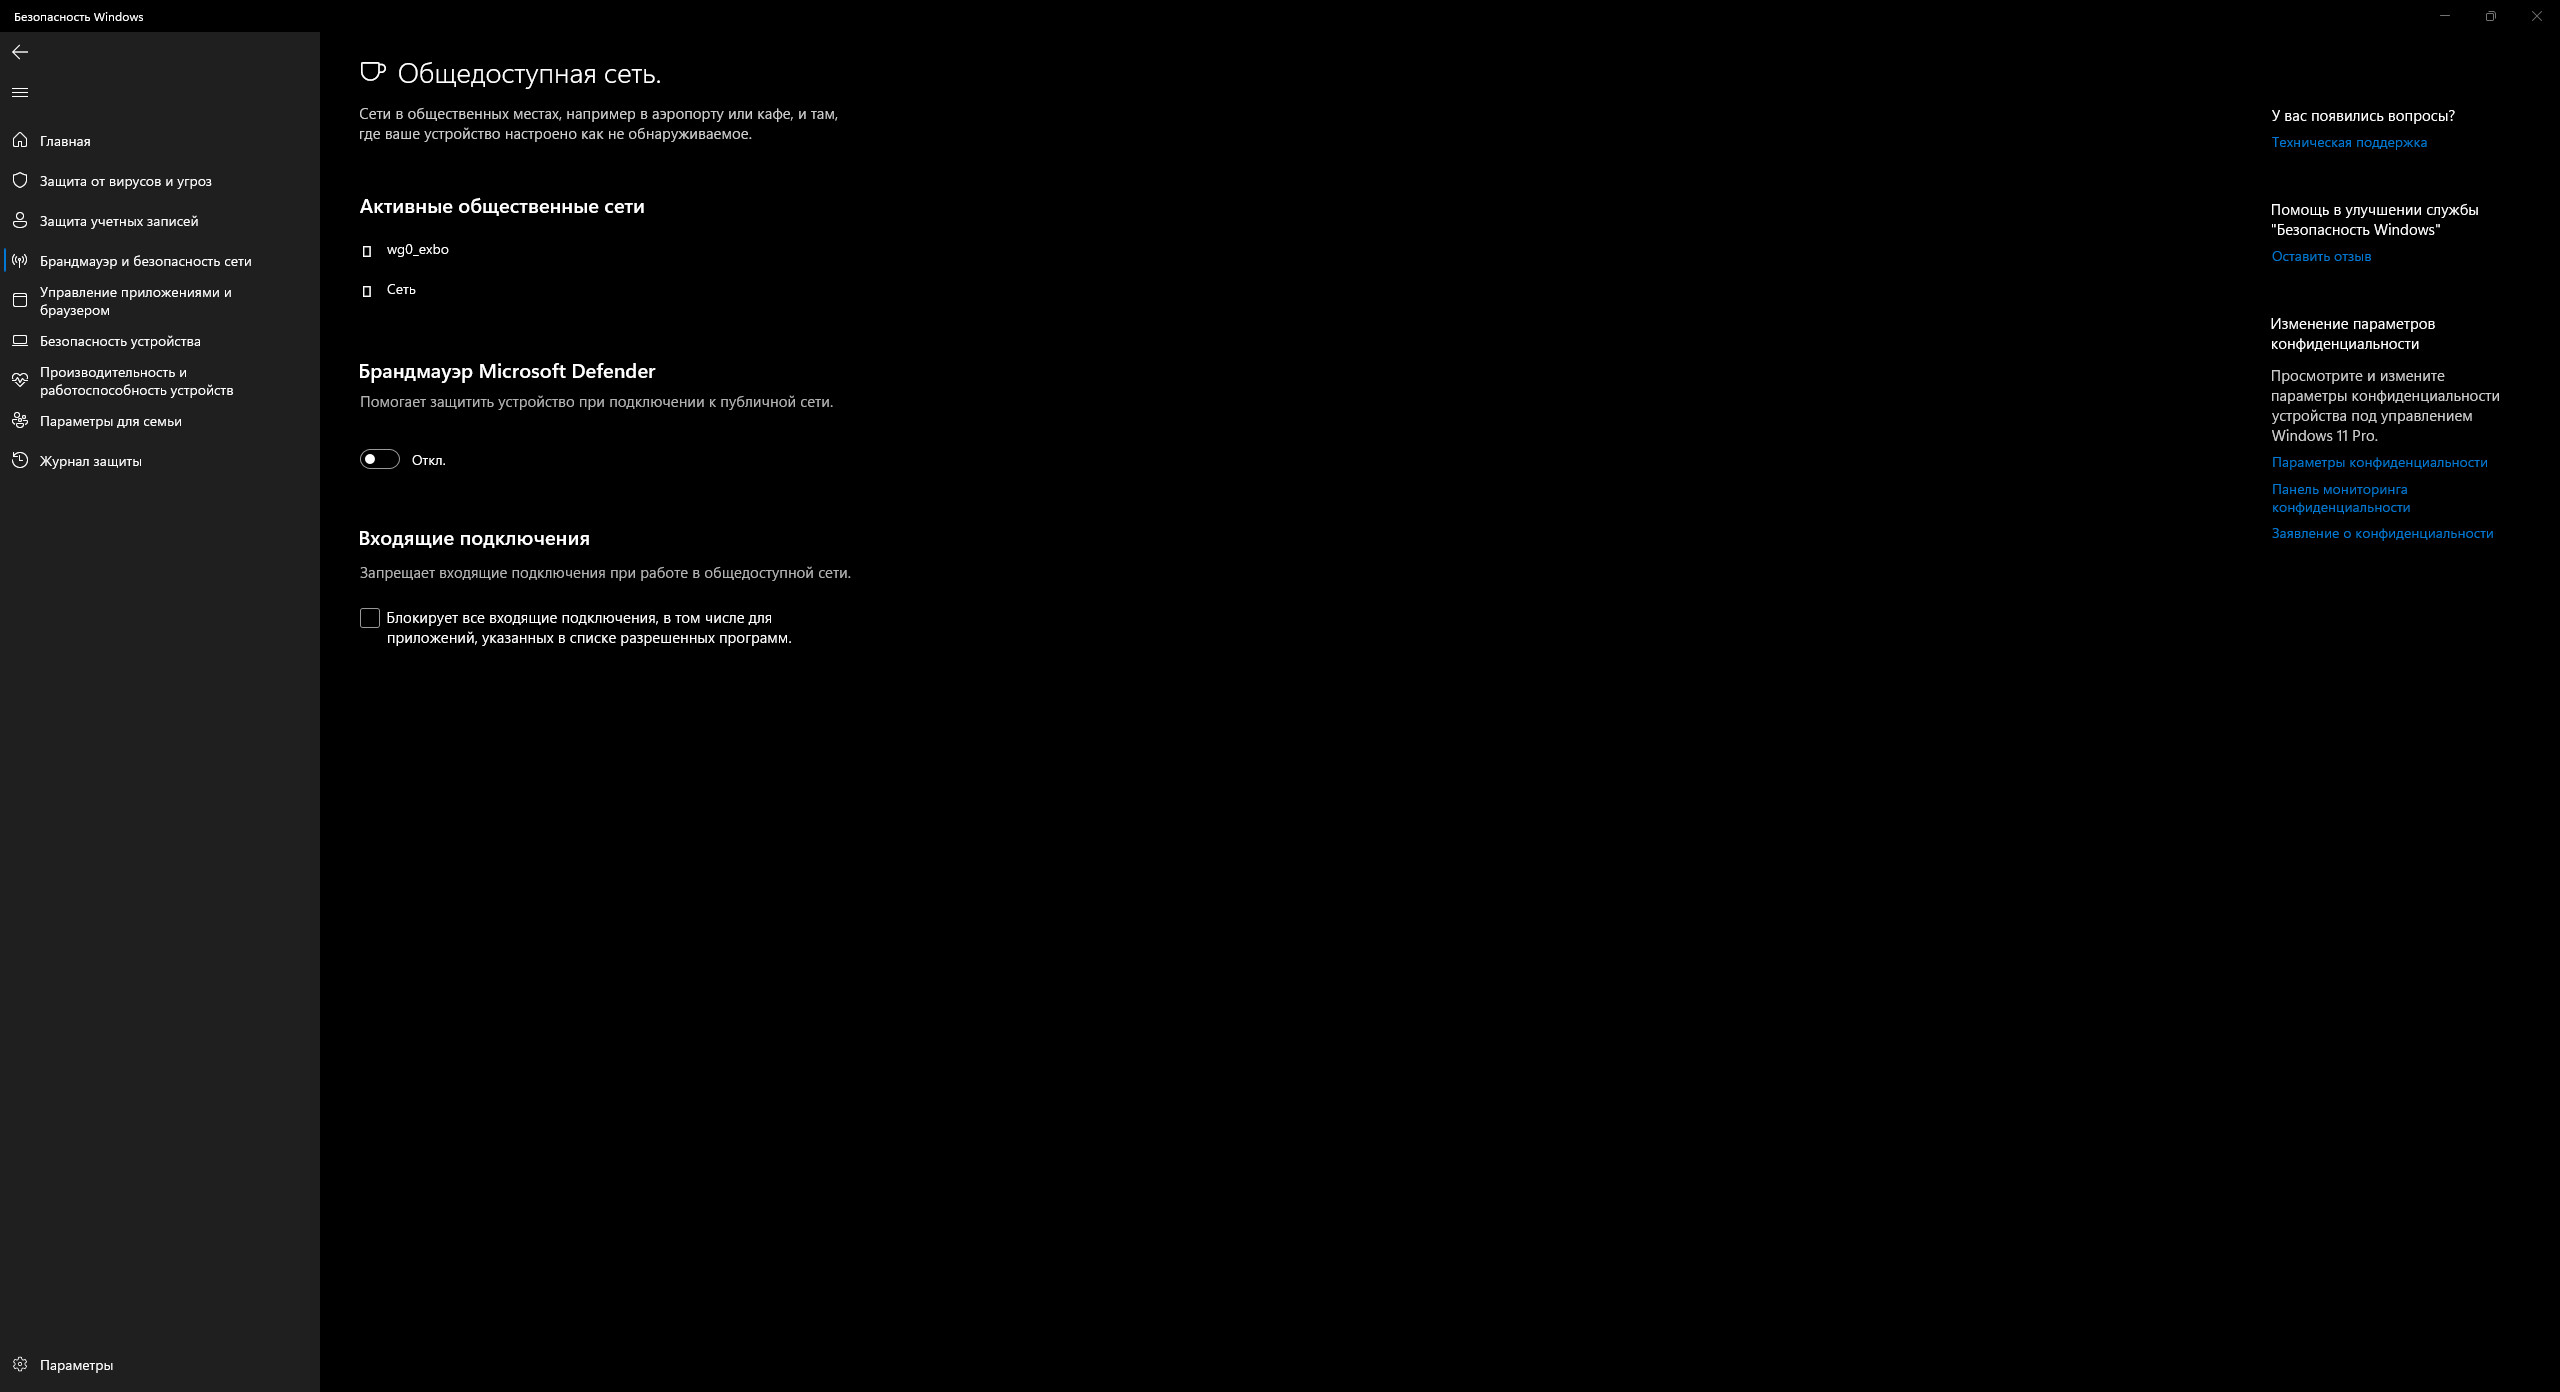
5. Переведите ползунок параметра «Брандмауэр Microsoft Defender» в положение «Выключено».
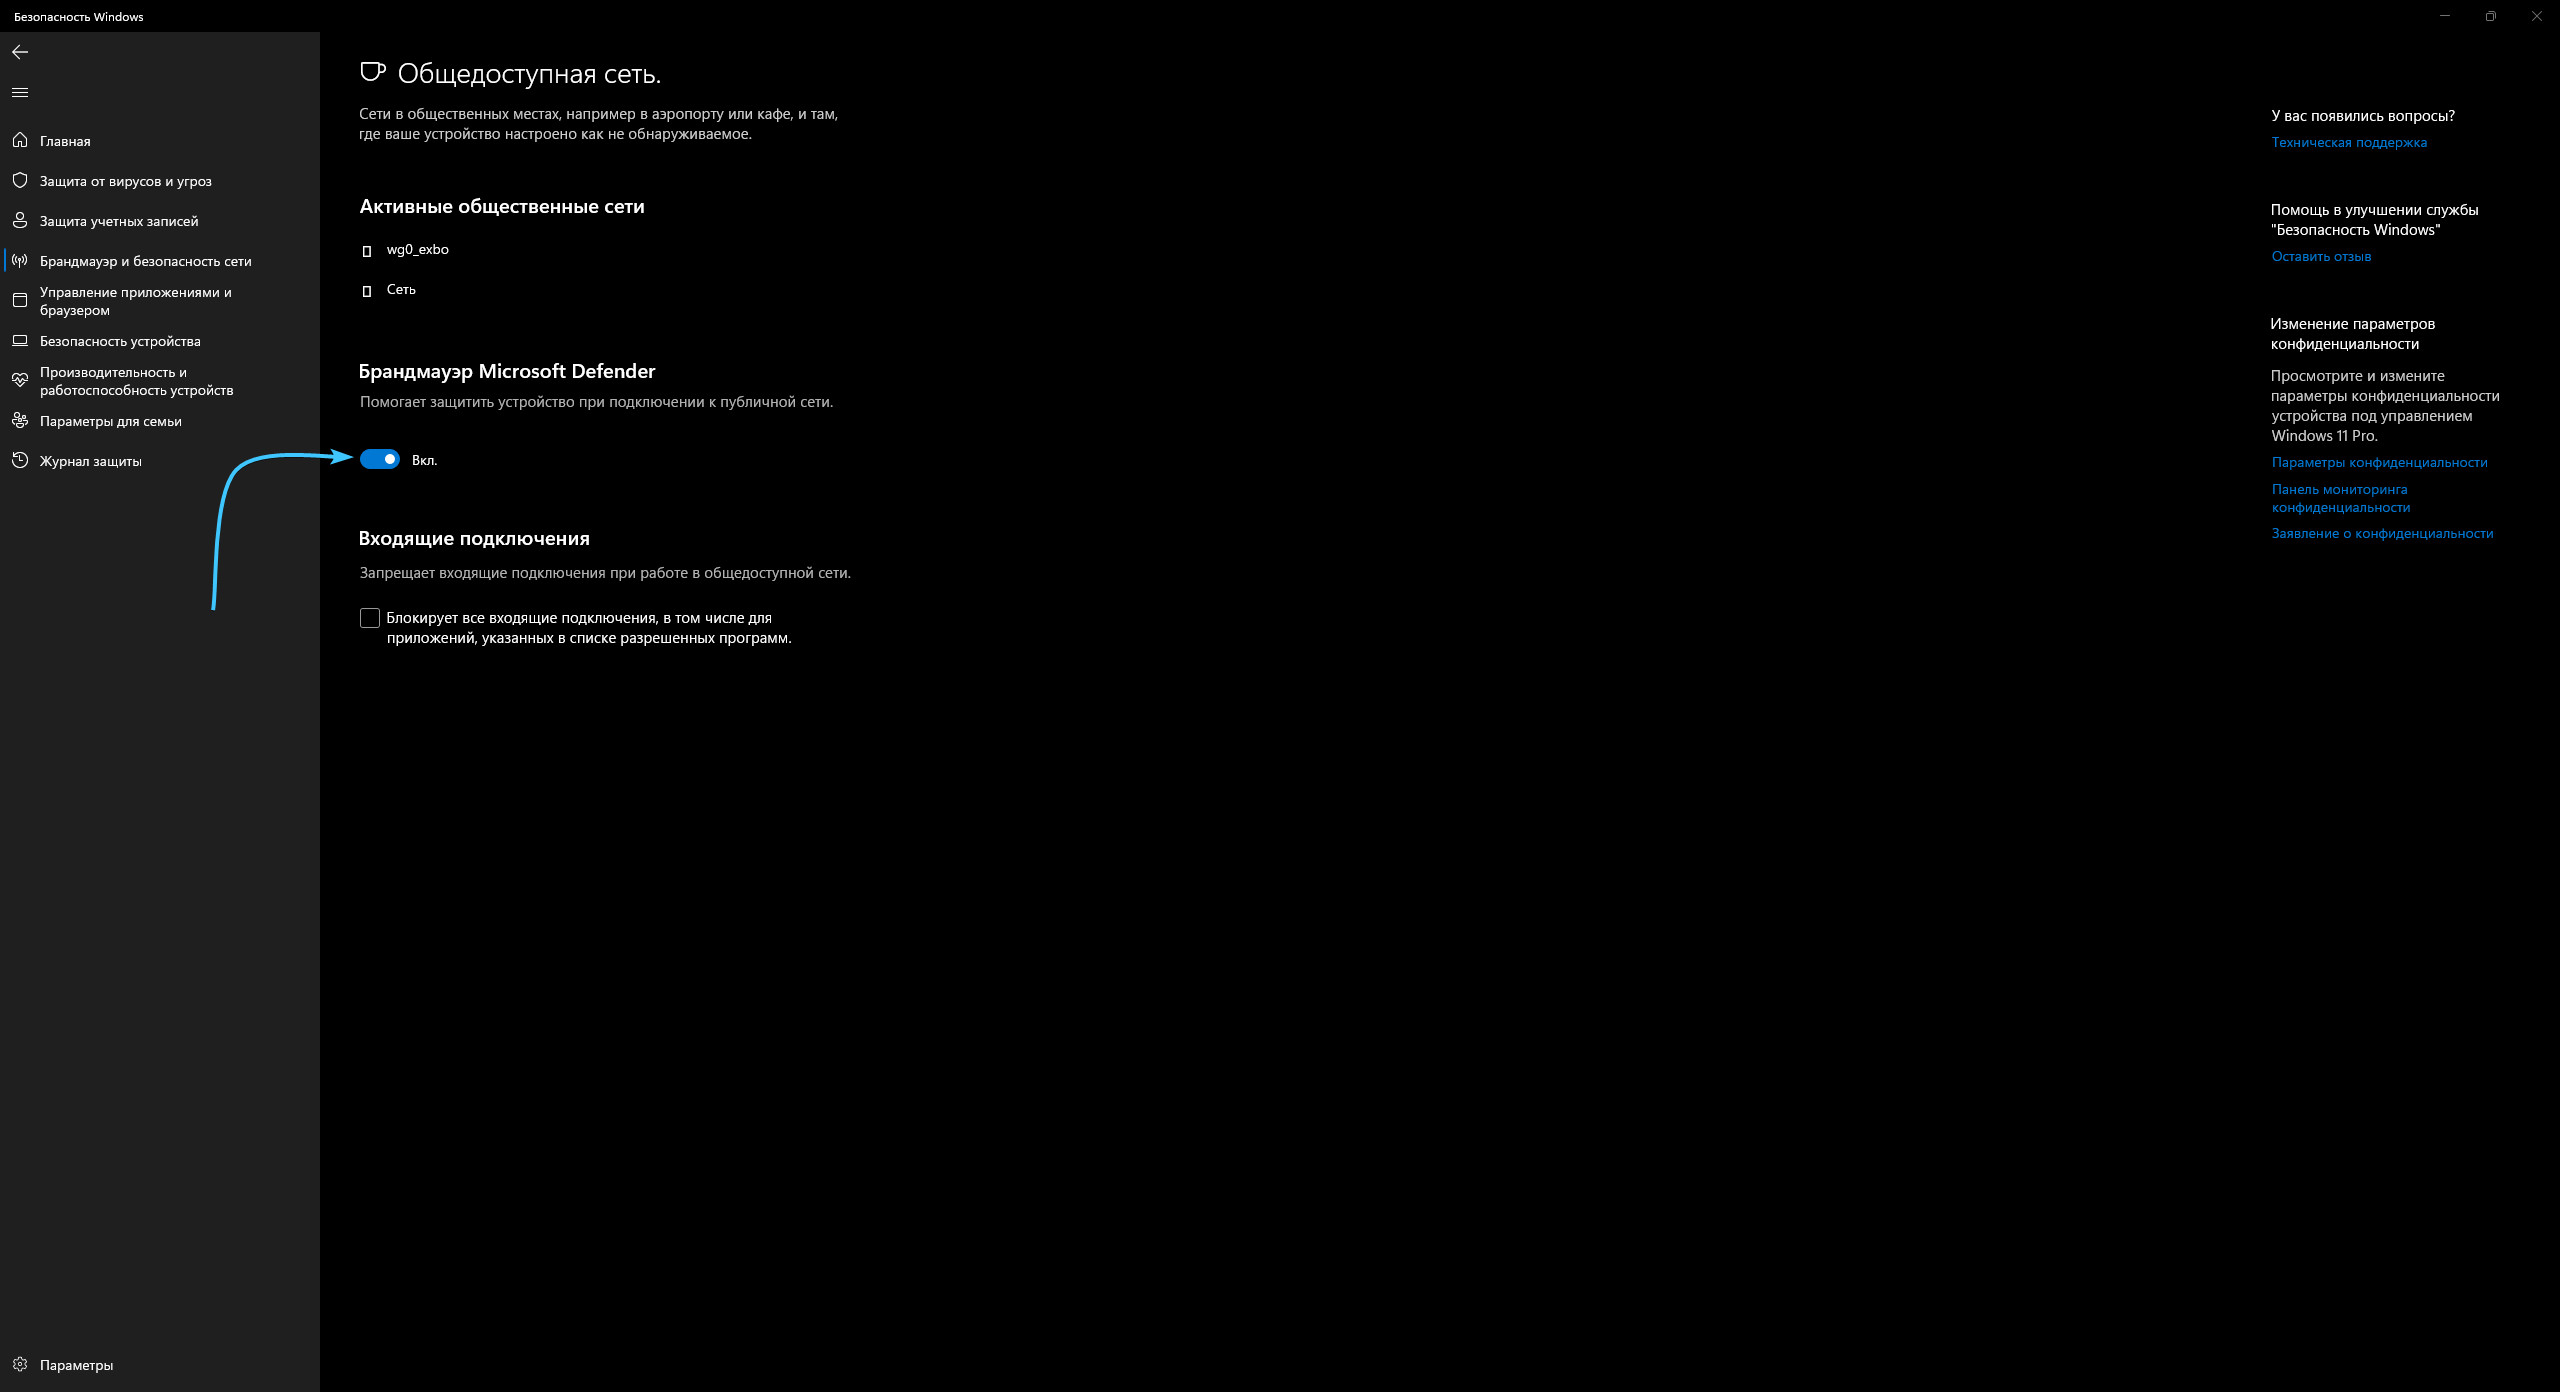
6. Перезагрузите устройство. После этого компонент «Брандмауэр Windows» будет успешно отключён.
Отключение брандмауэра «Windows 10»
1. Откройте меню «Пуск» и перейдите в «Параметры» операционной системы «Windows 10».

2. Откроется общий список категорий параметров. Откройте категорию «Сеть и Интернет».
3. Сразу откроется раздел «Состояние». В самом низу нажмите кнопку «Брандмауэр Windows».
4. Откройте тот раздел компонента «Брандмауэр Windows», который помечен статусом «Активный».
5. Переведите ползунок параметра «Брандмауэр Microsoft Defender» в положение «Выключено».
6. Перезагрузите устройство. После этого компонент «Брандмауэр Windows» будет успешно отключён.
Другие руководства
- Очистка «DNS-кэша» в «Windows»;
- Смена «DNS-сервера» в «Windows»;
- Сброс параметров сети в «Windows»;
- Настройка сервиса «Windscribe»;
- Настройка сервиса «Proton VPN»;
- Настройка сервиса «Cloudflare»;
- Расположение сетевых свойств;
- Отключение сторонних сетей;
- Включение проверки подлинности;
- Настройка сервиса «Planet VPN».
Windows Defender Firewall is the default antivirus and firewall on Windows 11 PC. This tool not only safeguards your PC against malware or malicious attacks but also restricts running unauthorized apps on your computer. Though this is all good most of the time, you may sometimes require to disable the Firewall in Windows 11.
This happens when you are troubleshooting some error codes, your system crashes every now and then, or when you have purchased a paid antivirus program.
Note: We strongly recommend not turning off the Firewall in Windows unless you are forced to do so under some unusual circumstances.
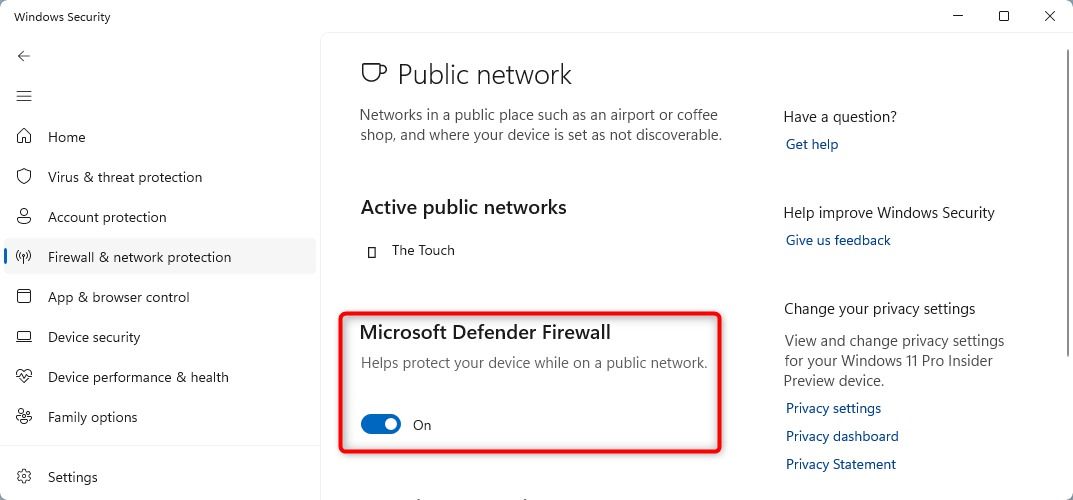
1] Using Windows Security
- Open Windows Security first.
- When this opens up, locate and click on “Firewall & network protection.”

- You will see three different networks out of which at least one is active.

- Click on your active network, and turn off the toggle switch under “Microsoft Defender Firewall.”

- Repeat the above steps if there are any additional active networks on your computer. Or else, close Windows Firewall, and restart your computer.
Note: To turn back On Windows Firewall, you have to undo the steps that you have recently followed on your PC.
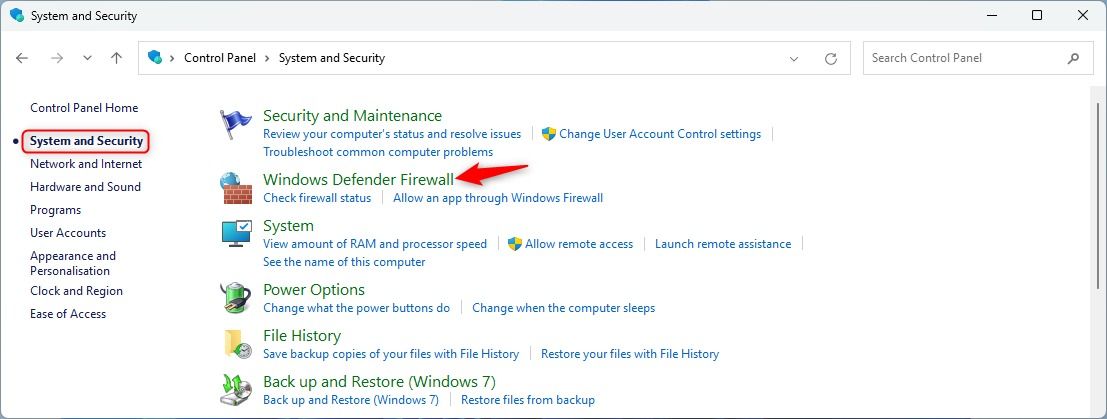
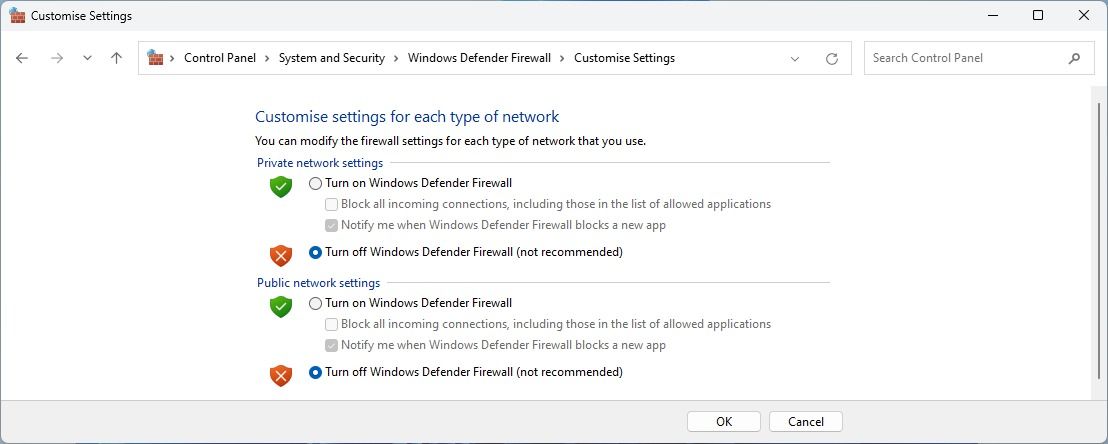
2] Using Control Panel
Here’s how to turn off Firewall in Windows 11 using Control Panel –
- Launch Control Panel first.
- Go to Windows Defender Firewall and click on it.
- When this opens up, select “Turn Windows Defender Firewall on or off” on the left pane.

- Select “Turn off Windows Defender Firewall (not recommended)” under both Private and Public networks.

- Click the OK button and the firewall disables on your Windows 11 PC.
Note: To re-enable the Firewall in Windows using Control Panel, re-open the “Turn Windows Defender Firewall on or off” setting from the left pane. This time, make sure to select the radio buttons left of “Turn off Windows Defender Firewall” under both Private and Public networks.
3] Through Command Prompt
To disable Windows Defender Firewall in Windows using CMD, follow these easy steps –
- Open Windows Search (Win + S), and type CMD in the text field.
- Right-click on the first result i.e. Command Prompt, and select Run as administrator.
- When the UAC window prompts, hit Yes.
- On the elevated console, type the following, and press Enter –
netsh advfirewall set allprofiles state off

Note: To turn back Windows Firewall On using Command Prompt, you need to execute this code over the elevated console – netsh advfirewall set allprofiles state on.
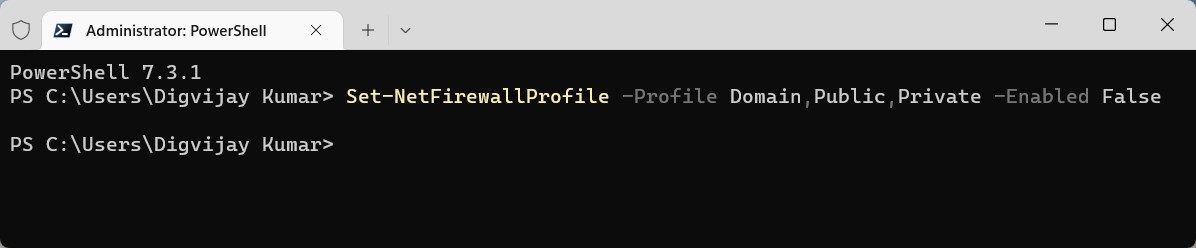
4] Via PowerShell
Follow these steps to turn off the Firewall in Windows 11 using PowerShell –
- Press Windows + X, and select Terminal (Admin).
- When the UAC window prompts, hit Yes.
- The terminal default lands into Windows PowerShell (Admin).
- On the elevated console, execute the following cmdlet –
Set-NetFirewallProfile -Profile Domain,Public,Private -Enabled False
- Close the terminal and restart your Windows PC.
From the next login, you will find Firewall disabled on your computer. If you want to re-enable this security feature, re-open Windows PowerShell as administrator, and execute the following command over it –
Set-NetFirewallProfile -Profile Domain,Public,Private -Enabled True
5] Using Group Policy
Follow these steps to disable Firewall in Windows 11 by tweaking the group policy –
- Press Windows + X, and select Run from the Power Menu.
- Type “
gpedit.msc” without quotes on it and hit OK. - When the group policy window opens up, navigate to the below path on it –
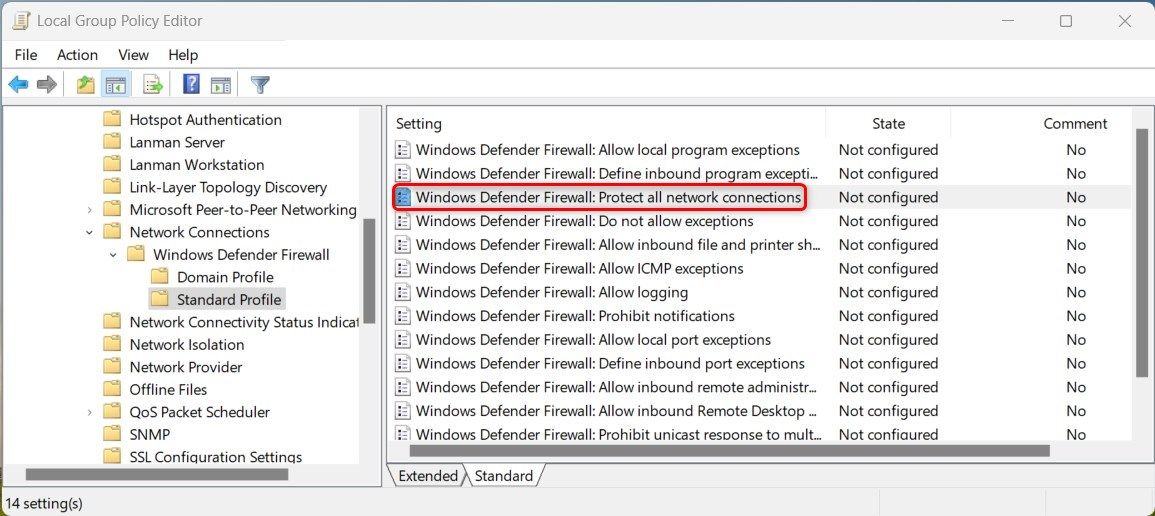
Computer Configuration > Administrative Templates > Network > Network Connections > Windows Defender Firewall > Standard Profile
- Head over to the right pane, and double-click on the “Windows Defender Firewall: Protect all network connections” policy.
- Check the “Not configured” radio button, and hit Apply > OK.
- Restart your computer next and this will restrict Windows Defender Firewall from starting.
Note: To re-enable Windows Defender Firewall on your computer, re-visit the above path. This time, check the Enabled radio button and hit Apply > OK.
6] Through the Registry Editor
Follow these steps to disable Firewall in Windows 11 using the registry –
- Press Windows + R to open the Run dialog.
- Type Regedit on it and hit OK.
- Click Yes on the UAC prompt to authorize opening the registry.
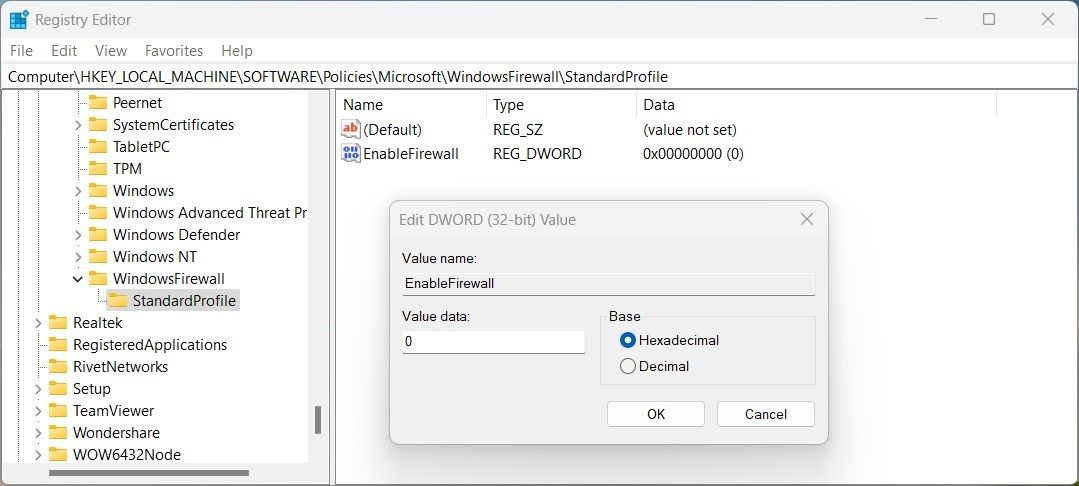
- When the registry launches, navigate to the below path inside it –
Computer\HKEY_LOCAL_MACHINE\SOFTWARE\Policies\Microsoft\WindowsFirewall\StandardProfile
- Right-click anywhere on the right pane and select New > DWORD (32-bit) Value.
- Rename this new entry as “EnableFirewall” and set its value to “0”.
- That’s it, close the registry window, and restart your Windows PC.
You will find Windows Defender Firewall disabled from the next login.
Note: If you ever want to turn on the Firewall on your PC, re-visit the above path, and change the value data field of the “EnableFirewall” entry back to “1”.
A firewall is an important tool that protects the device from any unwanted intrusion, malicious activity, or any external connection that tries to access your device without permission. Windows provides a built-in firewall app called Microsoft Defender Firewall, which protects your system fiercely. But there may be some instances in which a firewall can cause hindrance, and you might need to disable it. In this article, we will learn how to disable Windows 11 Firewall.

How to Disable Windows 11 Firewall
While a firewall is essential to protect your system from online threats, sometimes it can interrupt downloads and installations. In such circumstances, it becomes essential to disable the firewall. Here are some methods to disable Windows 11 Firewall.
Note: Turning Windows Firewall off may make your device vulnerable to various threats, and therefore, generally disabling Firewall is not recommended. User discretion is advised.
Method 1: Using Windows Security
One of the most straightforward methods to disable the Firewall on Windows 11 is by going to Windows Security options. You can follow the steps mentioned below to execute the method.
1. Go to the Search bar on the taskbar. Search for Windows Security. Click on Windows Security in the search results.
2. Click on the Firewall & network protection tab in the Navigation pane.
3. Select the active network option.

4. Turn off the Microsoft Defender Firewall toggle switch to disable the firewall.

The firewall will disable the active network profile.
Note: If you want to disable the firewall for all networks, turn off the security feature for all the profiles, including Domain network, Private network, and Public network.
Also Read: Allow or Block Apps through the Windows Firewall
Method 2: Using Control Panel
Another effective method to turn off Firewall is by going via Control Panel. You can follow these simple steps to disable Firewall from Control Panel.
1. Go to the Search bar on the taskbar. Search for Control Panel. Click on Control Panel in the search results.
2. Click on System and Security.

3. Click on Windows Defender Firewall.

4. Click Turn Windows Defender Firewall on and off on the left pane.

5. Select Turn off Windows Defender Firewall under the Private network settings section.
6. Select Turn off Windows Defender Firewall under the Public network settings section, and click OK.

Method 3: Using Command Prompt
You can also use the Command Prompt utility to disable Firewall on Windows 11 computers, follow these simple steps for the same.
1. Go to the Search bar on the taskbar. Search for Command Prompt. Right-click on Command Prompt in the search results, and on the side menu, click Run as administrator.
2. Type the following command to turn off the firewall for the current network profile and press Enter.
netsh advfirewall set currentprofile state off

3. Type in the following commands to turn off the firewall for a specific profile or all profiles and press Enter:
To disable the firewall for all network profiles:
netsh advfirewall set allprofiles state off
To disable the firewall for the domain network profile:
netsh advfirewall set domainprofile state off
To disable the firewall for the private network profile:
netsh advfirewall set privateprofile state off
To disable the firewall for the public network profile:
netsh advfirewall set publicprofile state off
After you complete the steps, the firewall will turn off in the network profiles you specified.
Also Read: How to Add Windows Firewall Rule
Method 4: Using PowerShell
Since Windows has replaced Command Prompt with PowerShell in newer updates, you can use this utility to turn Firewall off on your device. Follow these simple steps to do so.
1. Go to the Search and search for PowerShell.
2. Right-click on PowerShell, and click Run as administrator.
3. Type the following command to disable the current network profile and press Enter:
Set-NetFirewallProfile -Profile Domain,Public,Private -Enabled False

Note: If you want to disable the firewall for a specific profile, you can remove the other profile name from the command. For example:
Set-NetFirewallProfile -Profile Private -Enabled False.
Also Read: 18 Best Free Firewall for Windows
After reading the above methods, we hope that you now know how to disable Windows 11 firewall. Disabling a firewall is still very risky, so we suggest that you only do this when it is an absolute necessity. Let us know which method you prefer in the comment section. You can also ask any questions you might have in the comment section. For more tech-related tips, visit our site frequently.
While firewalls can protect you from malicious online threats, there may be times when it is necessary to disable them for certain tasks or applications. While it’s usually not a good idea to disable the firewall for long periods of time, doing so for a few seconds while you troubleshoot a problem is usually safe.
As such, let’s explore how to turn off or disable the Microsoft Defender firewall safely and securely in Windows 11.
How Important Is the Microsoft Defender Firewall?
A firewall acts as a shield against unwanted intrusions and prevents external connections from accessing your system without permission. When disabled, your computer becomes vulnerable, and you should take extra precautions while online.
To ensure maximum security while disabling your firewall, always make sure that other protective measures such as antivirus programs are running in the background. Once these have been taken care of, you can disable the firewall on your Windows 11 PC. Here’s how to do this:
1. How to Disable the Firewall Using Windows Security
The Windows Security program allows you to disable the firewall in Windows 11. It is the most straightforward way to disable Microsoft Defender Firewall and you don’t need to have any additional tools or software installed. Here’s how:
- Click on Start and search for “Windows Security”.
- Then select the result from the top of the list.
- Once you are in Windows Security, click on the Firewall & network protection option.
-
Select the Public network or Private network profile and turn off the firewall for that selection.

The UAC prompt will require you to accept it, so make sure your computer is set up as an admin account. If UAC prompts on the screen, click Yes to continue.
Now that you have completed the above steps, disable the firewall for each network profile using the same procedure.
2. How to Disable the Firewall Through Control Panel
If you are running an older version of Windows or prefer to use a more traditional method, you can disable your firewall through the Control Panel. This is a bit more technical than using Windows Security but still easy enough to do. Here’s how:
-
Open the Control Panel. If you need help with this, check out how to open the Control Panel in Windows 11.

- In the Control Panel, select System and Security and then click Windows Defender Firewall.
-
From the left pane, select Turn Windows Defender Firewall on or off.

- Then select Turn off Windows Defender Firewall (not recommended) for each network setting.
- Click OK to save your changes.
3. How to Disable the Firewall Using Command Prompt
If you are comfortable using the command line, then you can also disable your firewall through the Command Prompt. Here’s how:
Press Win + S on your keyboard to open the Windows search tool. Now type «cmd» in the search field and press Ctrl + Shift + Enter on your keyboard. This will open Command Prompt with admin rights.
Once you are in the Command Prompt, type in the following command and hit Enter:
netsh advfirewall set currentprofile state off
Running the above command will turn off the firewall for the current network profile.
If you wish to disable the firewall for the domain network profile, copy and paste the following command, and hit Enter:
netsh advfirewall set domainprofile state off
Similarly, you can disable the firewall for the private network profile. To do this, copy and paste the following command and hit Enter:
netsh advfirewall set privateprofile state off
For the public network profile, type the following command in the Command Prompt window and press Enter:
netsh advfirewall set publicprofile state off
Alternatively, you can disable the Defender Firewall for all network profiles, such as domain, private, and public, with just one command. To do this, copy and paste the below command and hit Enter:
netsh advfirewall set allprofiles state off
In this way, you can disable the firewall according to your selected network profiles.
4. How to Turn Off the Firewall via PowerShell
Windows PowerShell is an important tool that can be used to manage many aspects of the Windows operating system. You can also use it to disable the Microsoft Defender Firewall.
To do this, open a PowerShell window as an administrator and run the following commands:
Set-NetFirewallProfile -Profile Domain,Public,Private -Enabled False
After running the above command, the firewall will be disabled for all network profiles simultaneously.
5. How to Turn Off the Firewall Using Group Policy Editor
The Group Policy Editor is a powerful system resource that can be used to manage different settings on all Windows computers. With this tool, you can disable your firewall, but it only works with Windows Professional and Enterprise. If you are using Windows Home Edition, you need to activate the Group Policy Editor on Windows Home in order to access it.
To disable firewall settings using the Local group policy editor, follow these steps:
- Right-click on Start and select Run from the menu list.
- Type gpedit.msc in the dialog box and click OK or press Enter on your keyboard.
-
Inside the Group Policy Editor window, navigate to the following:
Computer Configuration > Administrative Templates > Network > Network Connections > Windows Defender Firewall > Standard Profile
-
On the right side of the window, double-click the policy called Windows Defender Firewall: Protect all network connections.

- Next, choose Disabled from the dialog box that appears.
- When you’re done making your changes, click Apply > OK.
- For the changes to take effect, restart your computer after completing the above steps.
6. How to Turn Off the Firewall Using Registry Editor
Windows also has a method for disabling the firewall that involves editing the registry. It is an advanced feature that should only be used by experienced computer users, as incorrect usage can cause serious damage to your computer.
When using the Registry Editor, it is important not to modify any other settings than those related directly to the firewall. Making unwanted changes could potentially lead to instability within your system, including a decrease in performance or even the complete failure of your operating system. If you’re ready to use this method, make sure you back up your Windows Registry and create a restore point on Windows 11 first.
- Open the Registry Editor (see how to open the Registry Editor for instructions).
-
Once you’re in, navigate to the following path:
Computer\HKEY_LOCAL_MACHINE\SOFTWARE\Policies\Microsoft\WindowsFirewall\StandardProfile
- Right-click StandardProfile and select New > DWORD (32-bit) Value.
- Specify EnableFirewall as the key name.
-
Double-click it and enter 0 in the Value data field.

- Once you have made the changes, click OK.
When you have completed all the steps above, close the Registry Editor and restart your computer.
Disable the Firewall With Ease on Windows
You may want to disable the firewall for testing, developing applications, or playing online games. However, disabling the firewall can have risks, and you should always exercise caution. In case you need to do it, this guide explains multiple ways to do it, such as via Windows Security, Control Panel, Command Prompt, and more.