
-
Home
-
News
- How to Turn on or Turn off Battery Saver on Windows 11?
By Stella | Follow |
Last Updated
Want to save power when using the battery on your Windows 11 laptop? You can turn on battery saver to meet your requirements. However, if you don’t want to miss any system update, you’d better turn off battery saver on Windows 11. If you don’t know how to turn on or turn off battery saver on your Windows 11 laptop, this post is helpful.
How to Turn on or Turn off Battery Saver on Windows 11?
Battery saver is a very useful feature on Windows to help you save power to extend your battery life. However, if it is enabled on your laptop, you might miss some important notifications, emails, and messages that are related to the system updates. Due to this, you may want to turn off battery saver on Windows. Well then. How to disable battery saver on Windows 11? There are 4 ways.
You can find battery saver in the Quick Settings and then you can turn it off or on there. You can also do this job in the Settings app. If you are an advanced user, you can also run a command in Windows Terminal to turn on or turn off battery saver on Windows 11.
In this post, MiniTool Software will introduce these four ways in detail.
Way 1: Use Quick Settings to Turn on or off Battery Saver on Windows 11
The Battery saver is available in the Quick Settings on Windows 11. So, the direct way to turn off or turn on battery saver on Windows 11 is to use Quick Settings.
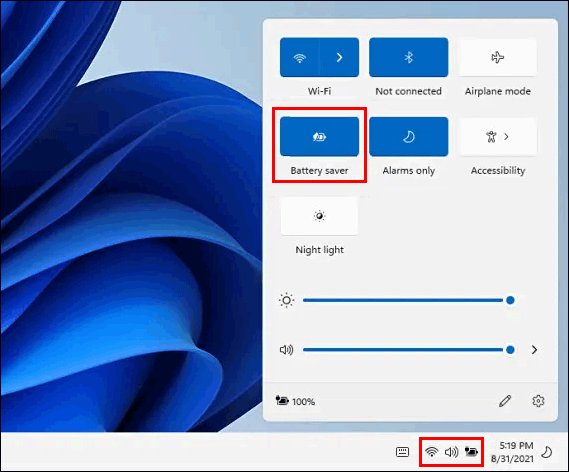
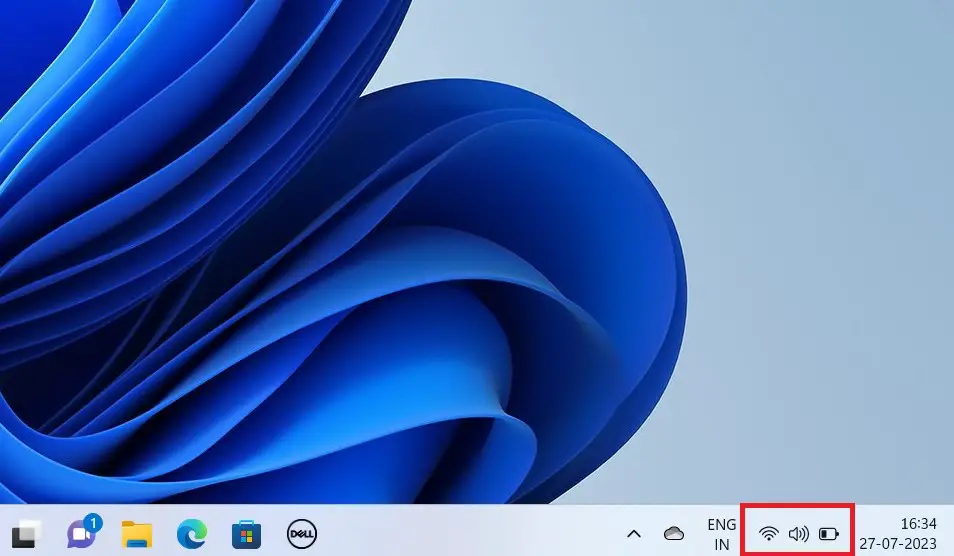
If you are using a laptop, Quick Settings is the combination of the icons of Wi-Fi connection, audio, and battery in the taskbar. You can just click that area, then click the Battery saver option to turn it on or off. If battery saver is enabled, the background is highlighted. If you want to turn off battery saver on Windows 11, you need to click it to cancel the highlight.
Way 2: Use the Settings App to Turn on or off Battery Saver on Windows 11
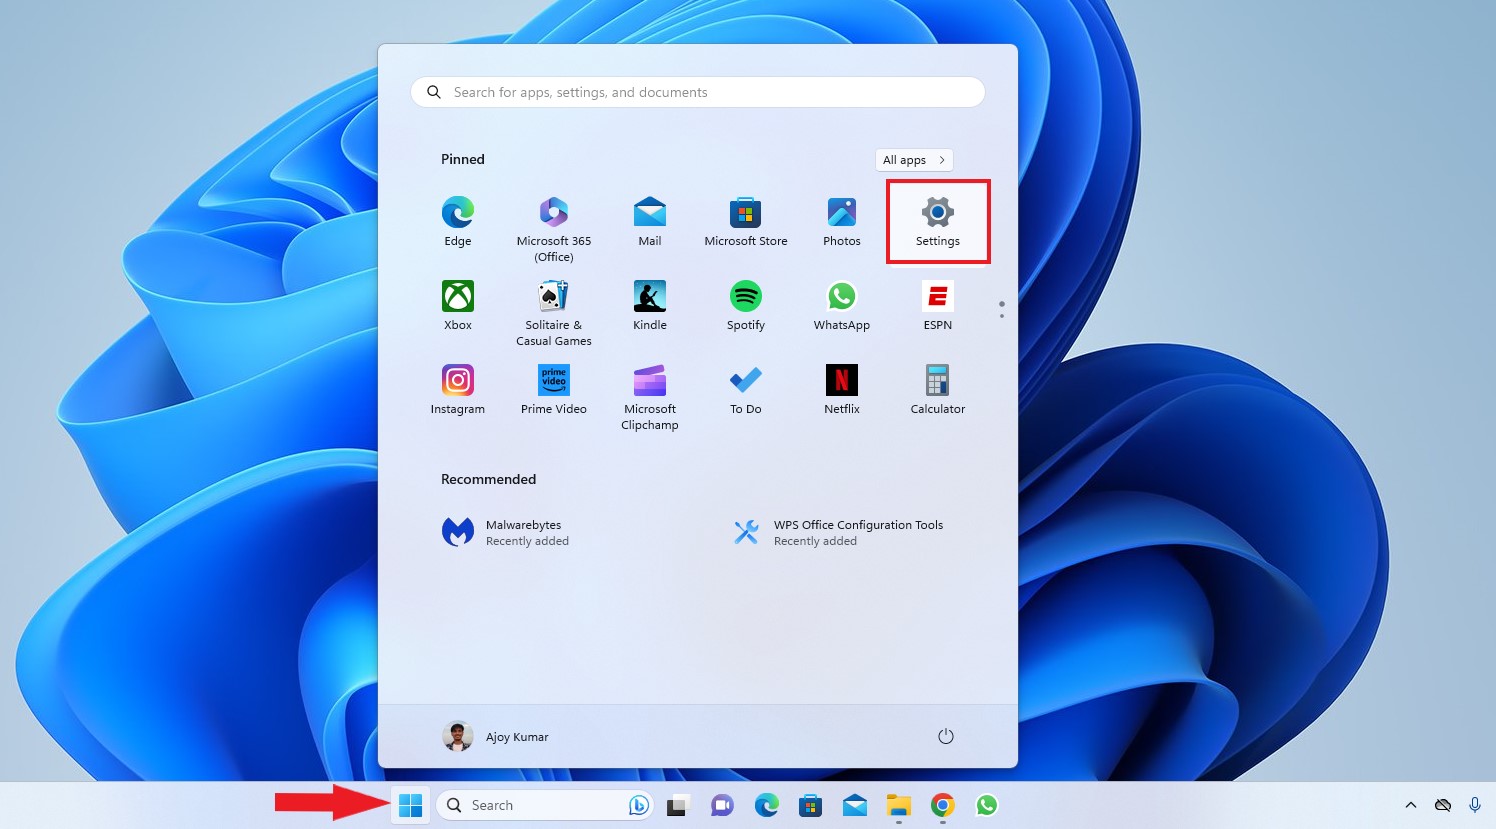
Step 1: Press Win + I to open the Settings app.
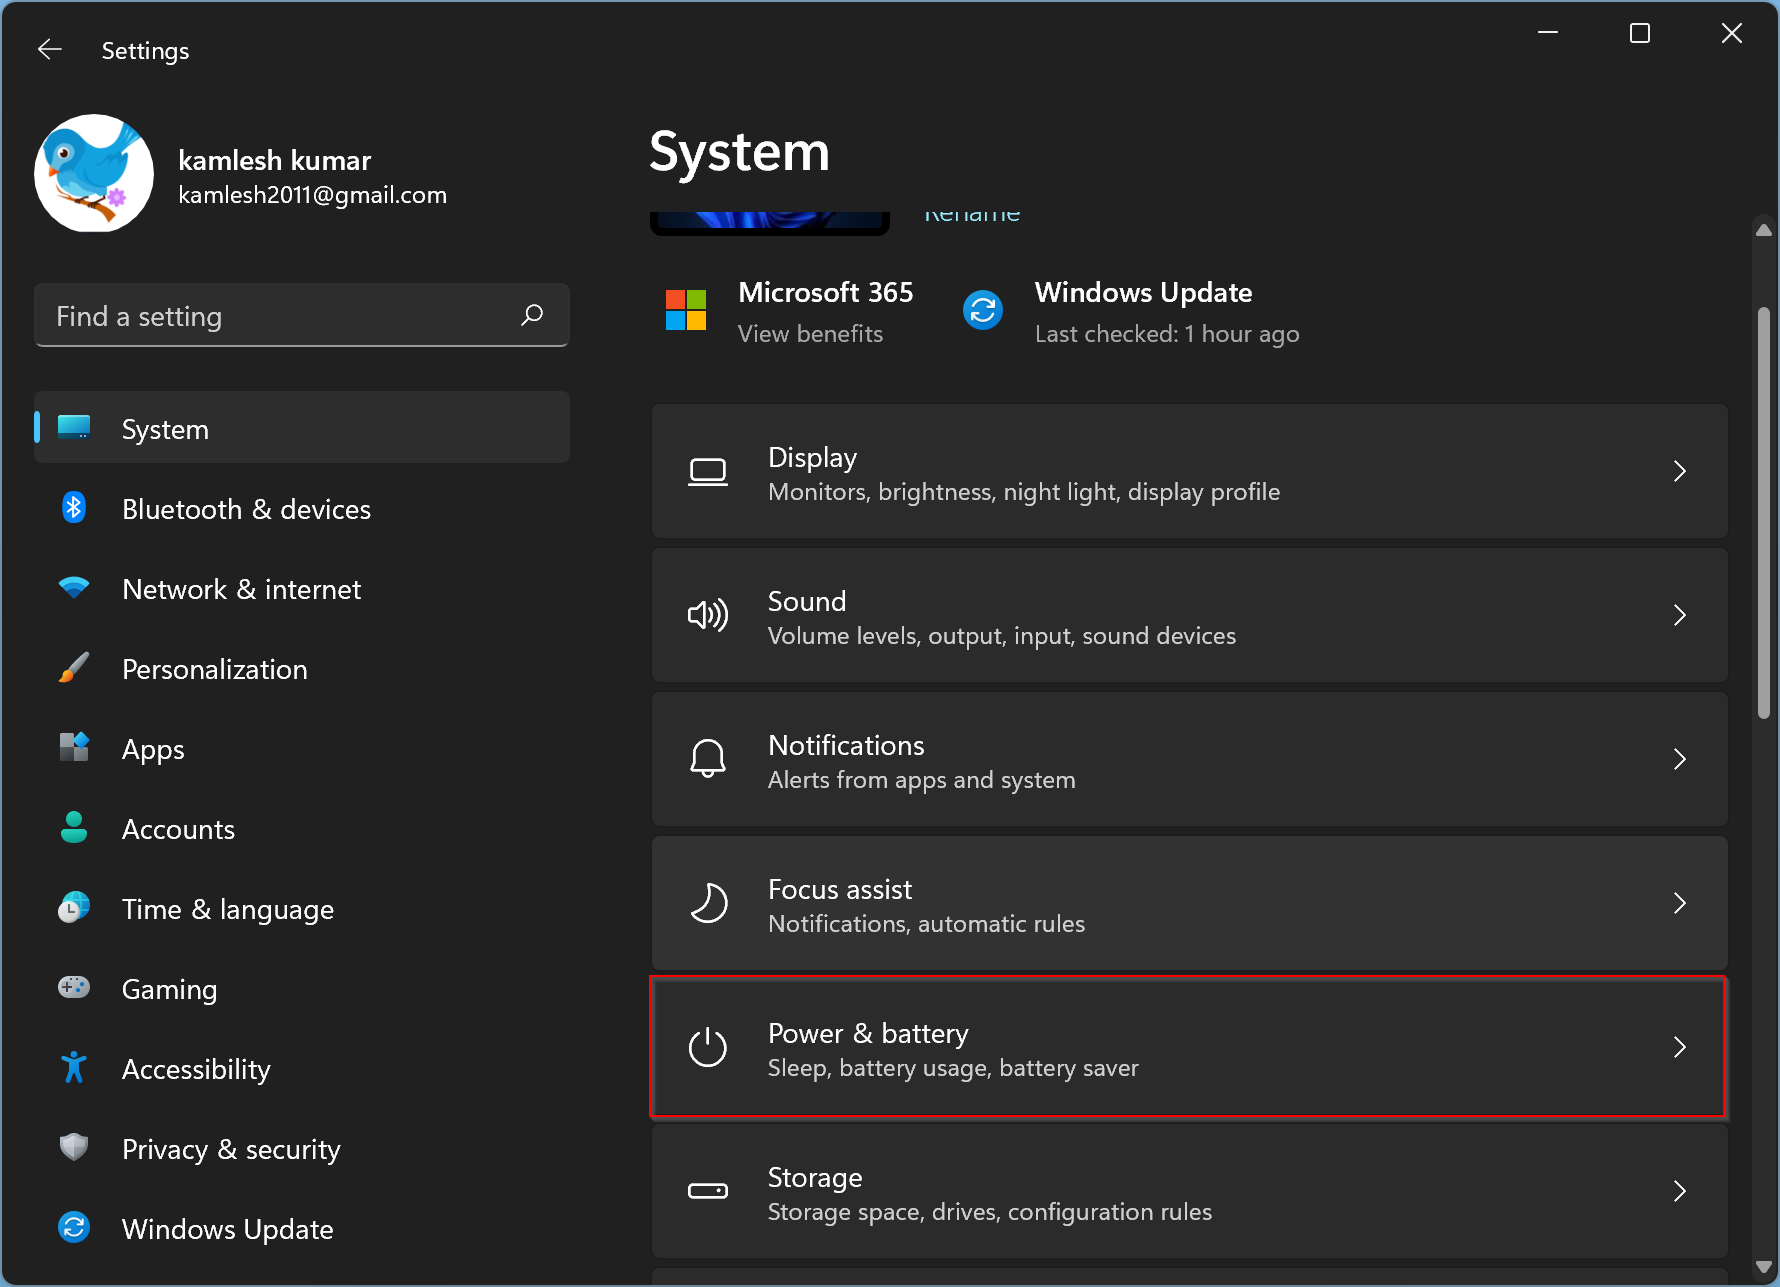
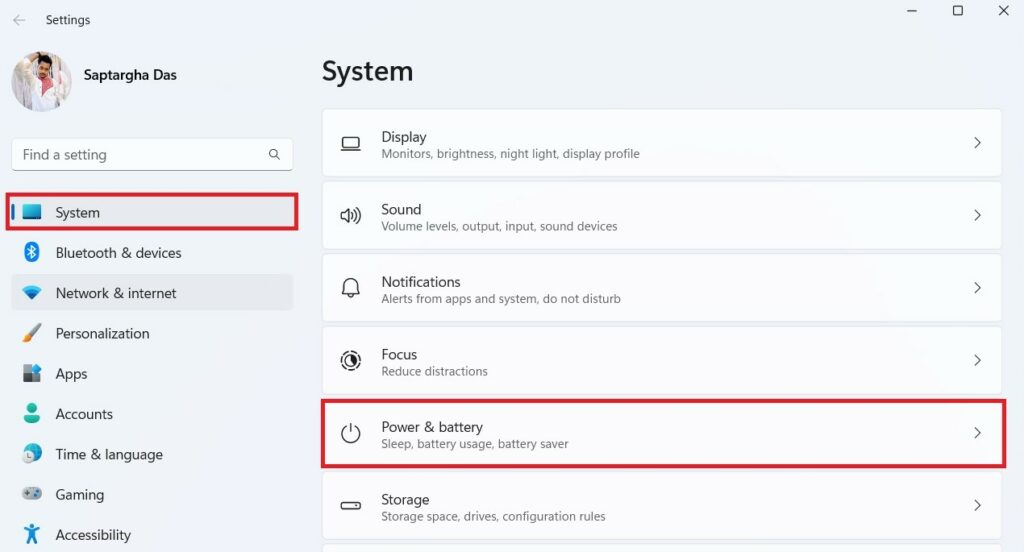
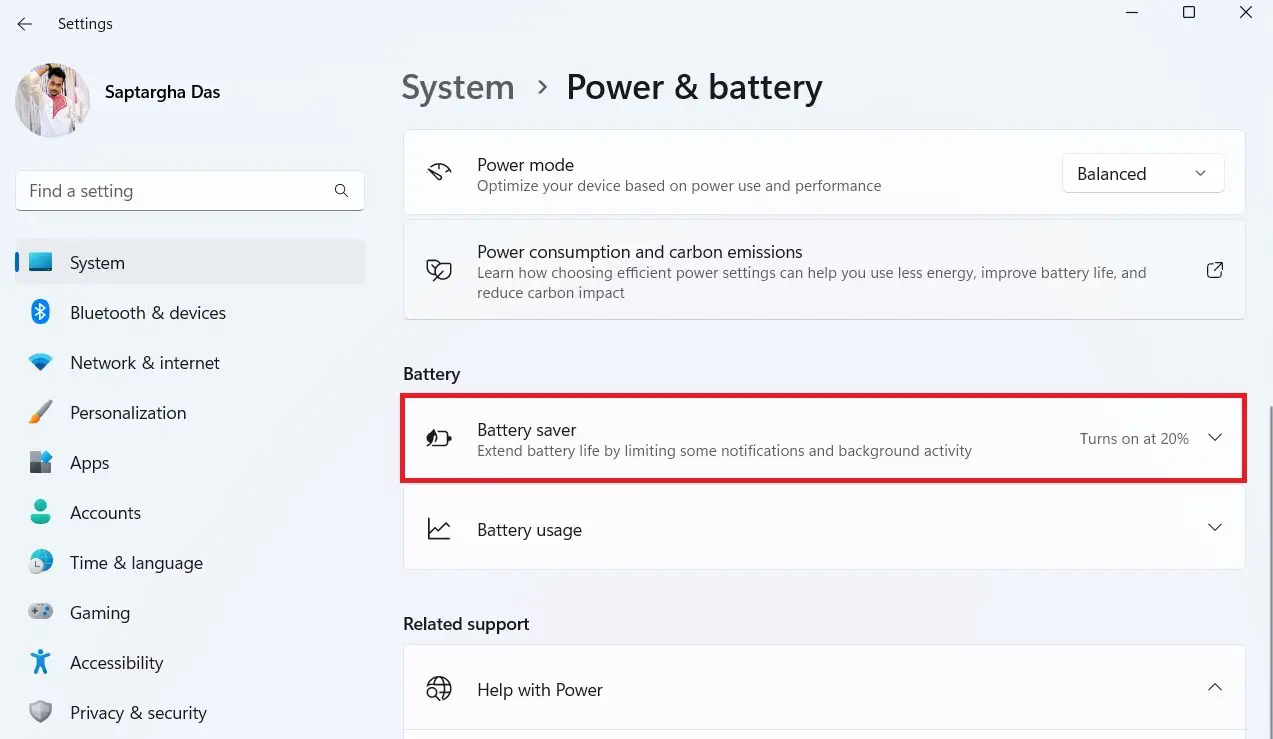
Step 2: Go to System > Power & battery.
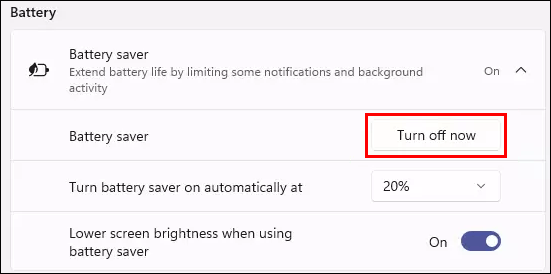
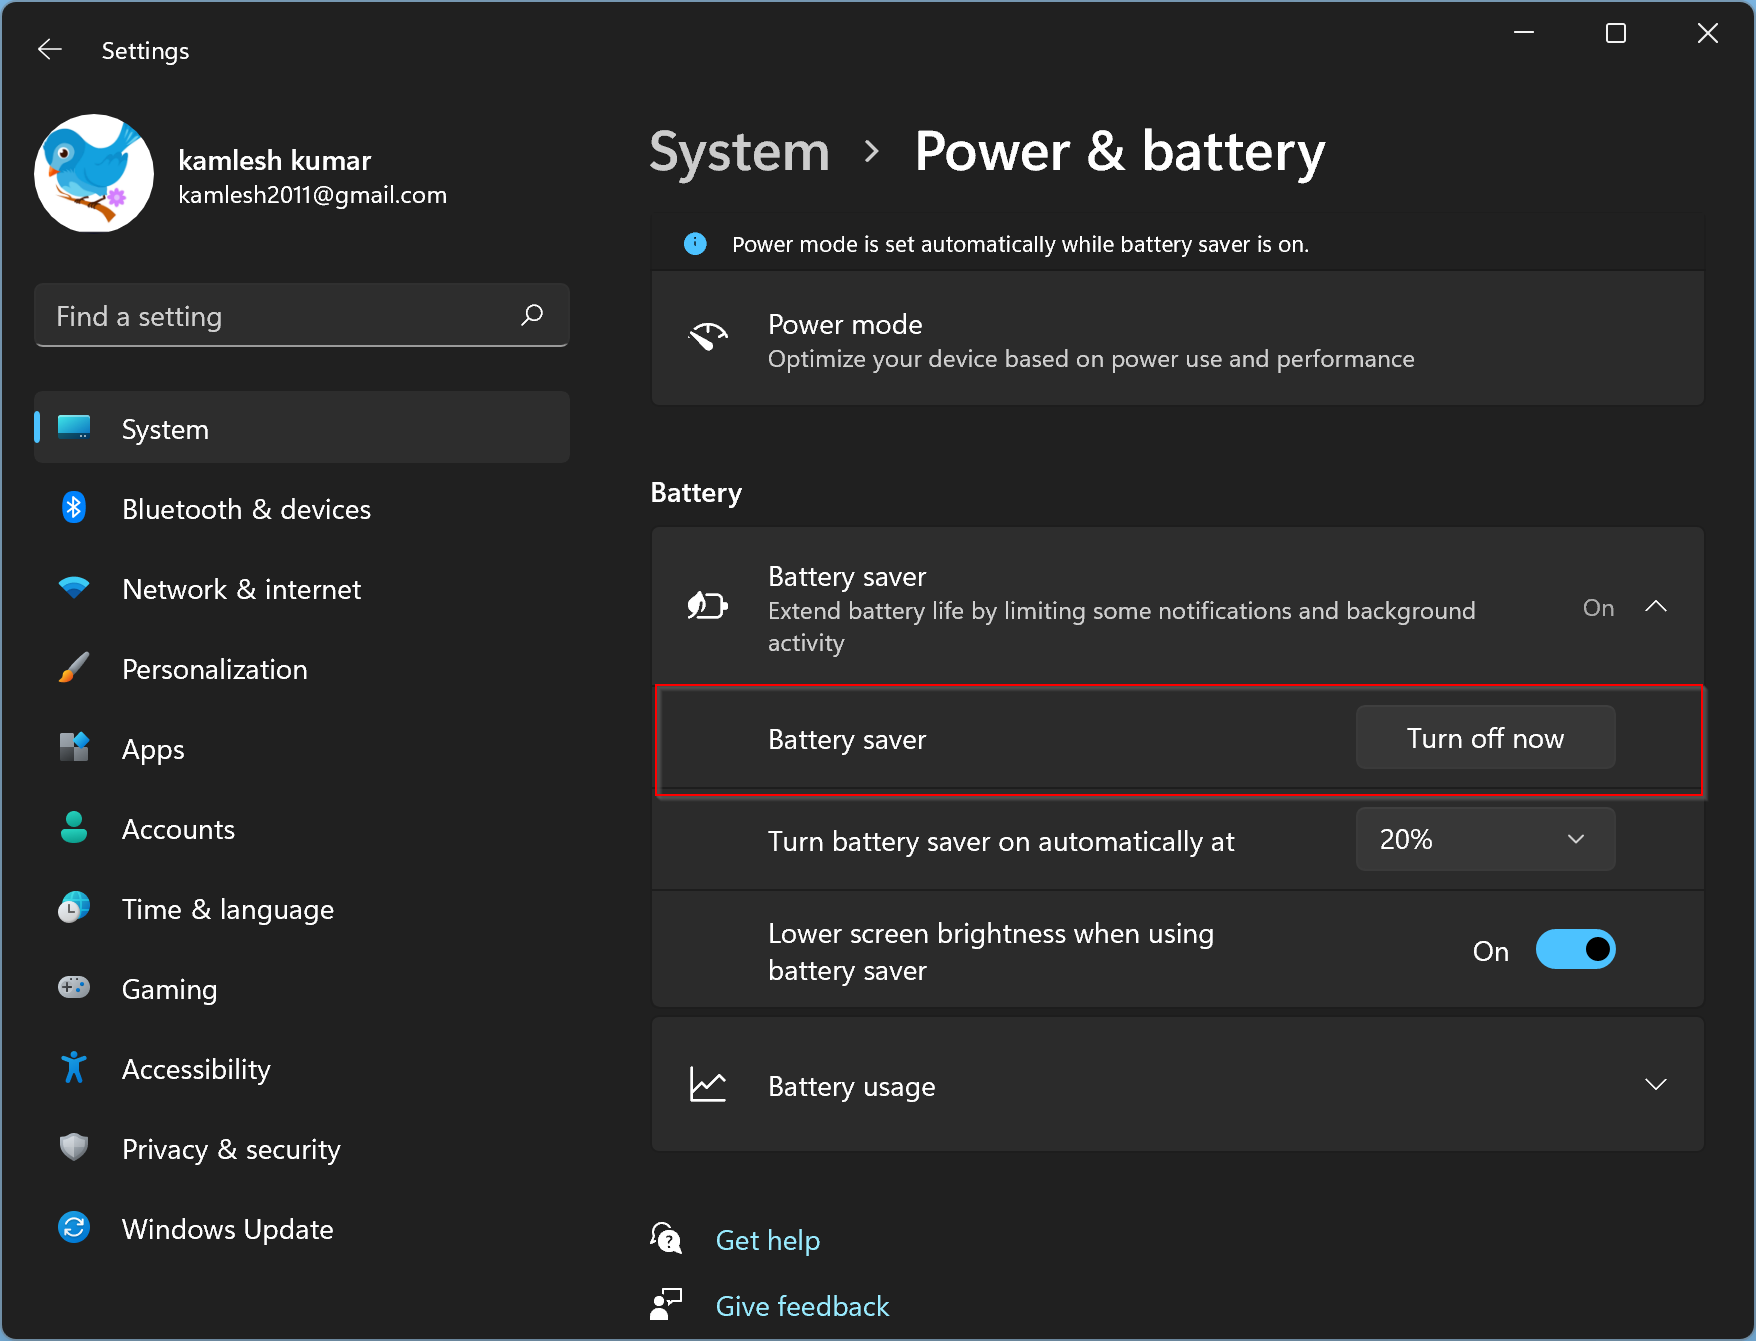
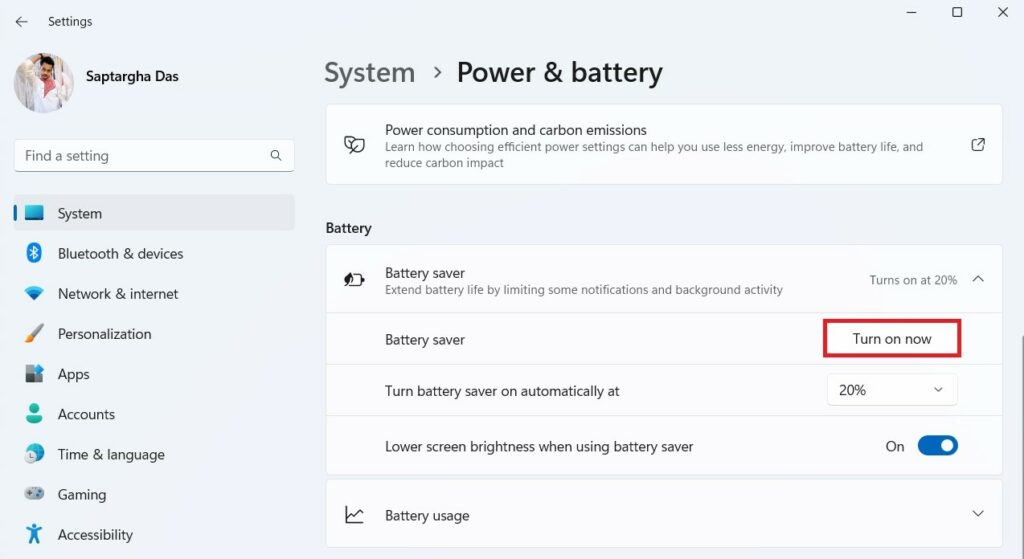
Step 3: Click the Turn on now button to turn it on. However, if battery saver is already turned on and you want to turn it off, there will be a Turn off now button. You can click it to disable battery saver on Windows 11.
Way 3: Turn Battery Saver on or off Automatically in the Settings App
You can also set a value. When the battery level reaches that value, the battery saver will be automatically turned on.
Step 1: Go to Setting > System > Power & battery.
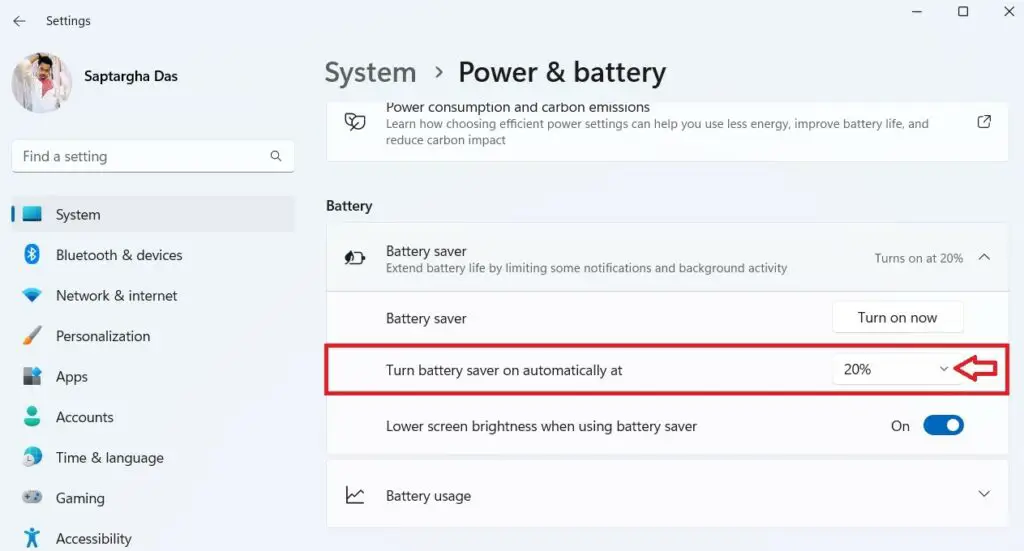
Step 2: Expand Battery saver.
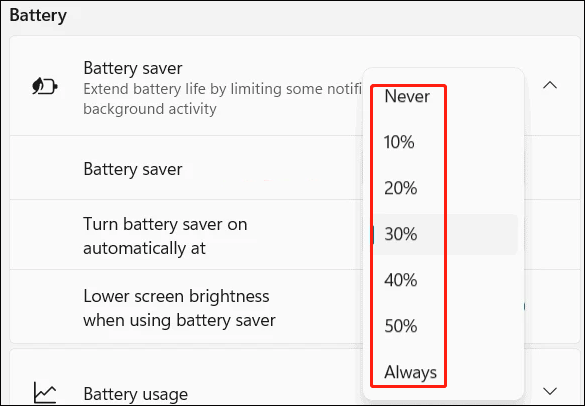
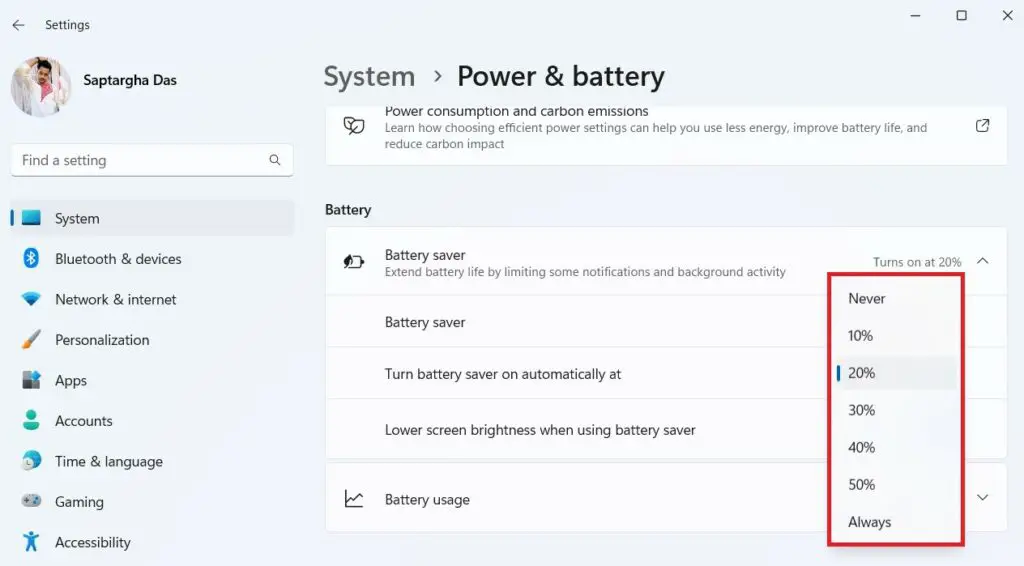
Step 3: Expand the options next to Turn battery saver on automatically at, then select the percentage as per your requirements. Well, how to disable battery saver on Windows 11 using this method? You can just select Never.
Way 4: Turn Battery Saver on or off Automatically Using Windows PowerShell
For advanced users, they can run command in Windows Terminal to turn on or off battery saver on Windows 11. You can also use this method to automatically open battery saver when the battery power reaches a level.
Step 1: Open Windows PowerShell on Windows 11.
Step 2: Type the following command and press Enter to run the command:
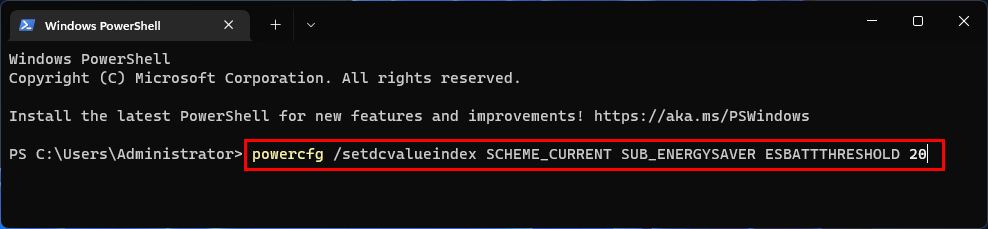
powercfg /setdcvalueindex SCHEME_CURRENT SUB_ENERGYSAVER ESBATTTHRESHOLD <percentage>
Replace <percentage> with a number from 1 to 100. Here are some simple explanations:
- 0 percent is equal to Never.
- 20 percent is the default setting.
- 100 percent is equal to Always.
These are the four methods to turn on or turn off battery saver on a Windows 11 computer. We hope you can find your needed method here.
Additionally, if you want to recover your lost and deleted files on Windows 11, you can try MiniTool Power Data Recovery, a professional data recovery software.
MiniTool Power Data Recovery TrialClick to Download100%Clean & Safe
Should you have any other related issues, you can let us know in the comments.
About The Author
Position: Columnist
Stella has been working in MiniTool Software as an English Editor for more than 8 years. Her articles mainly cover the fields of data recovery including storage media data recovery, phone data recovery, and photo recovery, videos download, partition management, and video & audio format conversions.
Battery Saver is a critical feature of Windows 11. If your laptop is low on battery and you want to get the most out of every minute of power, turning on Battery Saver mode may work as a boon for you. It is a unique Windows power-saving mode that juices more life from your battery by dimming your screen brightness, reducing background apps, and limiting notifications.
A similar feature is available on iPhone, known as “Low Power Mode,” and on Android, “Battery Saver.”
By default, Windows 11 turns on Battery Saver mode automatically when your battery reaches 20% power if your device ships with a battery. However, it is also possible to alter this mode percentage by navigating to Settings > System > Power & battery. One should note that even if the battery saver is turned on and battery power is lower than the specified limit when you plug your machine into the charging point, this Battery Saver mode will be turned off automatically. Moreover, if you wish to conserve battery life, you can manually enable this Battery Saver mode on your PC at any time.
There are several ways through which you can enable or disable this Batter Saver mode on Windows 11. You can use either method to turn on/off this mode according to your needs.
How to Turn On or Off Battery Saver on Windows 11 using the Quick Settings Menu?
To enable or disable battery saver on your Windows 11 machine through the Quick Settings menu, use these steps:-
Step 1. Open the Quick Settings menu by pressing Windows + A keyboard shortcut. Alternatively, click the Quick Settings area on the taskbar.
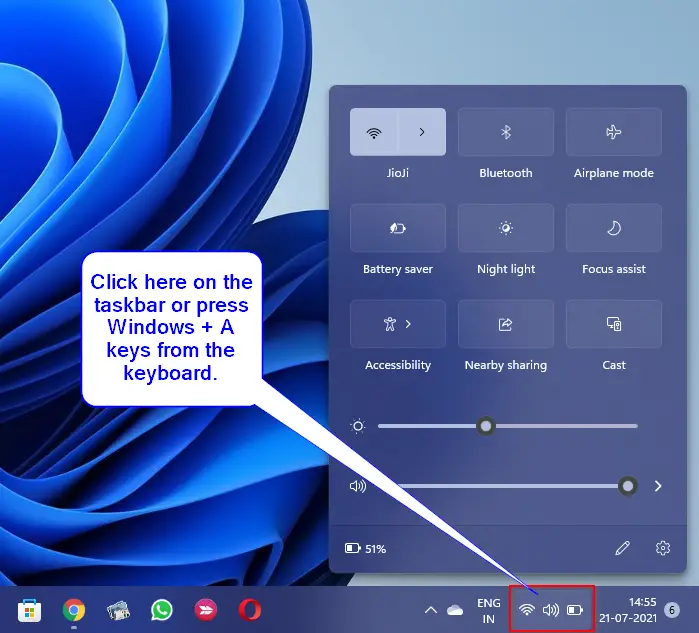
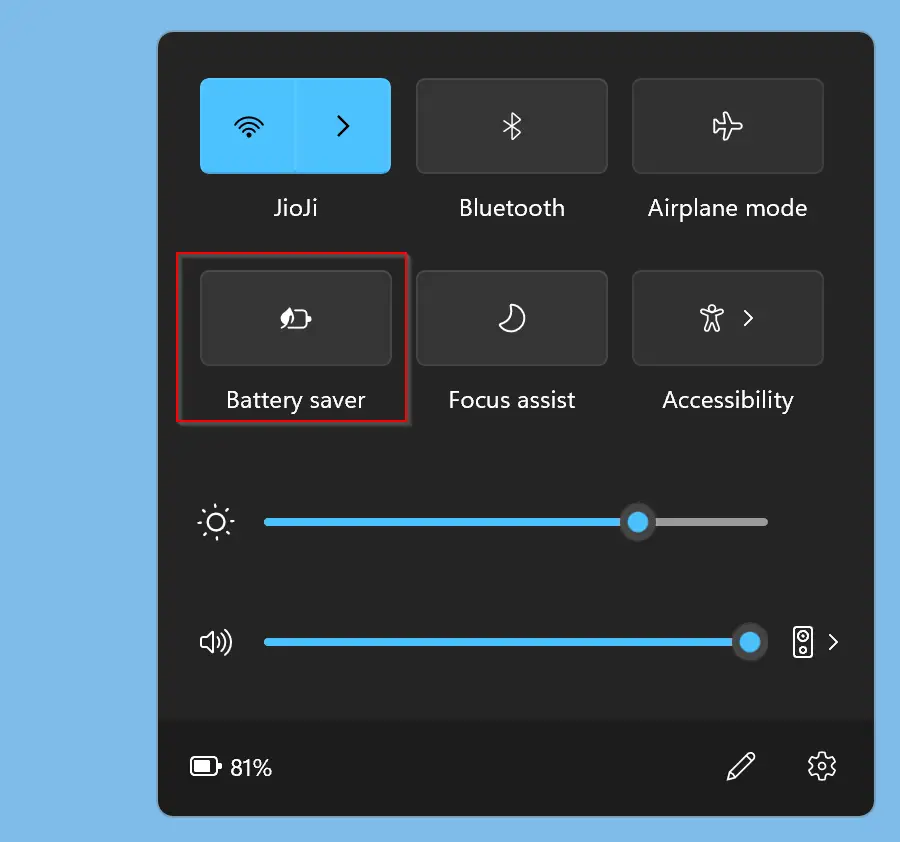
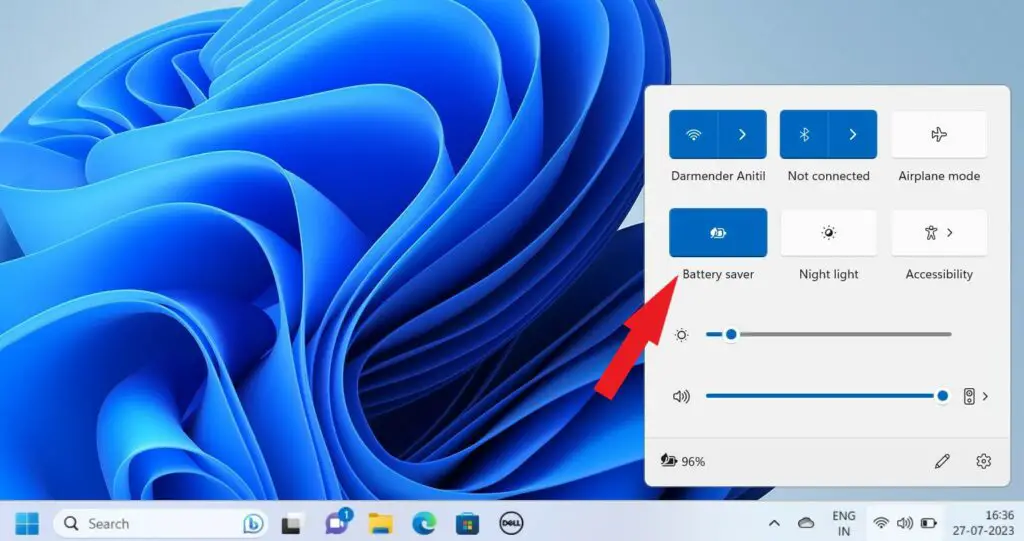
Step 2. When the Quick Settings menu opens, click the Battery Saver button to enable or disable it.
If you don’t find Battery Saver under Quick Settings, click the pencil icon at the bottom and choose Add option. Then select Battery Saver in the list that appears. Now that Battery Saver will appear in the Quick Settings menu immediately. When you’re done, click on its icon to turn it on/off.
How to Enable or Disable Battery Saver on Windows 11 through the Settings App?
To turn on or off battery saver on Windows 11 using the Settings app, do these steps:-
Step 1. To configure Battery Saver, first open Windows Settings by pressing Windows + I on your keyboard.
Step 2. When Windows Settings opens, select the System category in the left sidebar.

Step 3. Then, click the Power & battery tab on the right sidebar of the System.
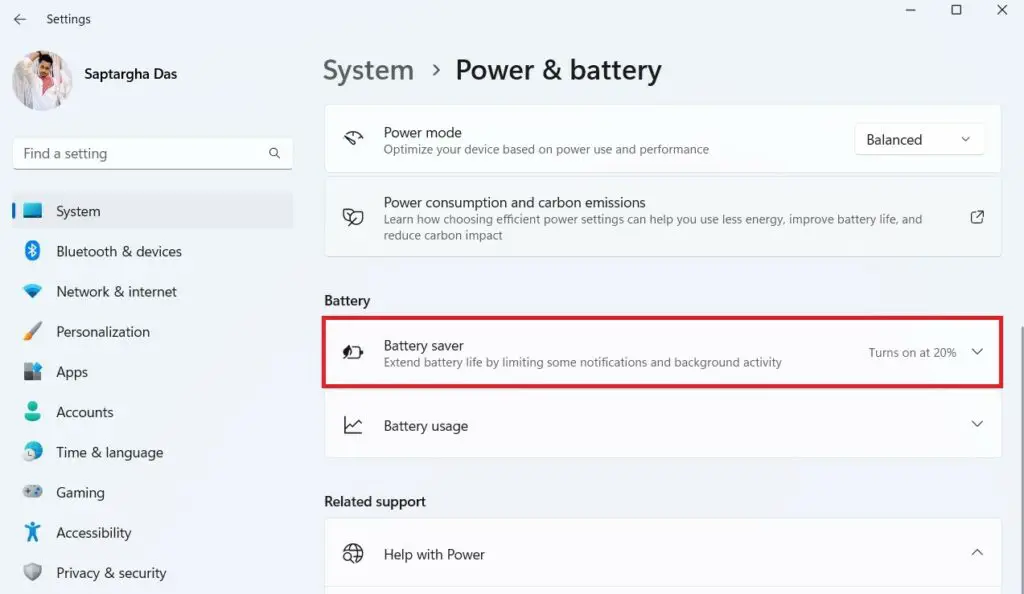
Step 4. After that, click the Battery saver option to expand it.
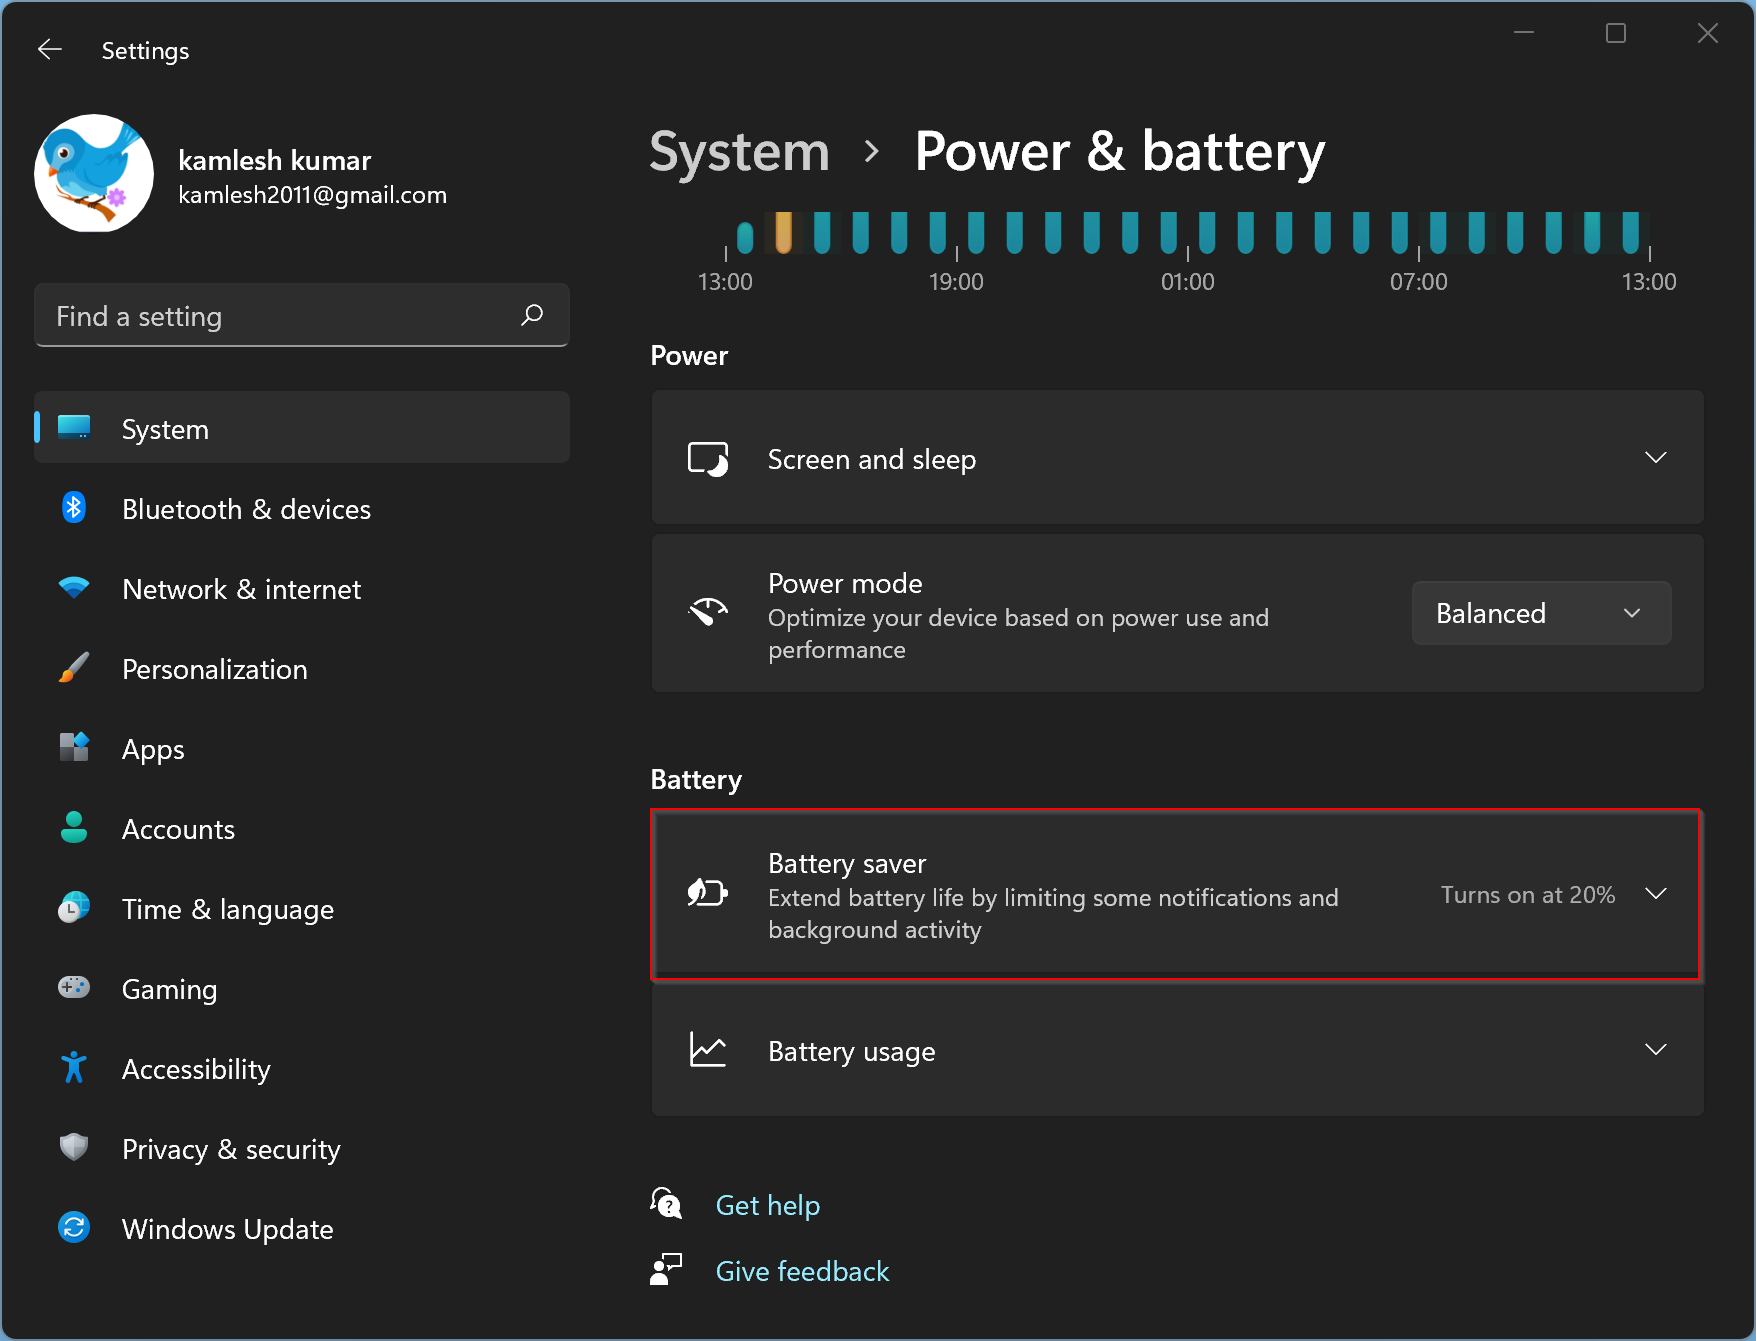
Step 5. When the Battery saver is expanded, click the Turn on now button beside the Battery saver to immediately enable the Battery Save mode.
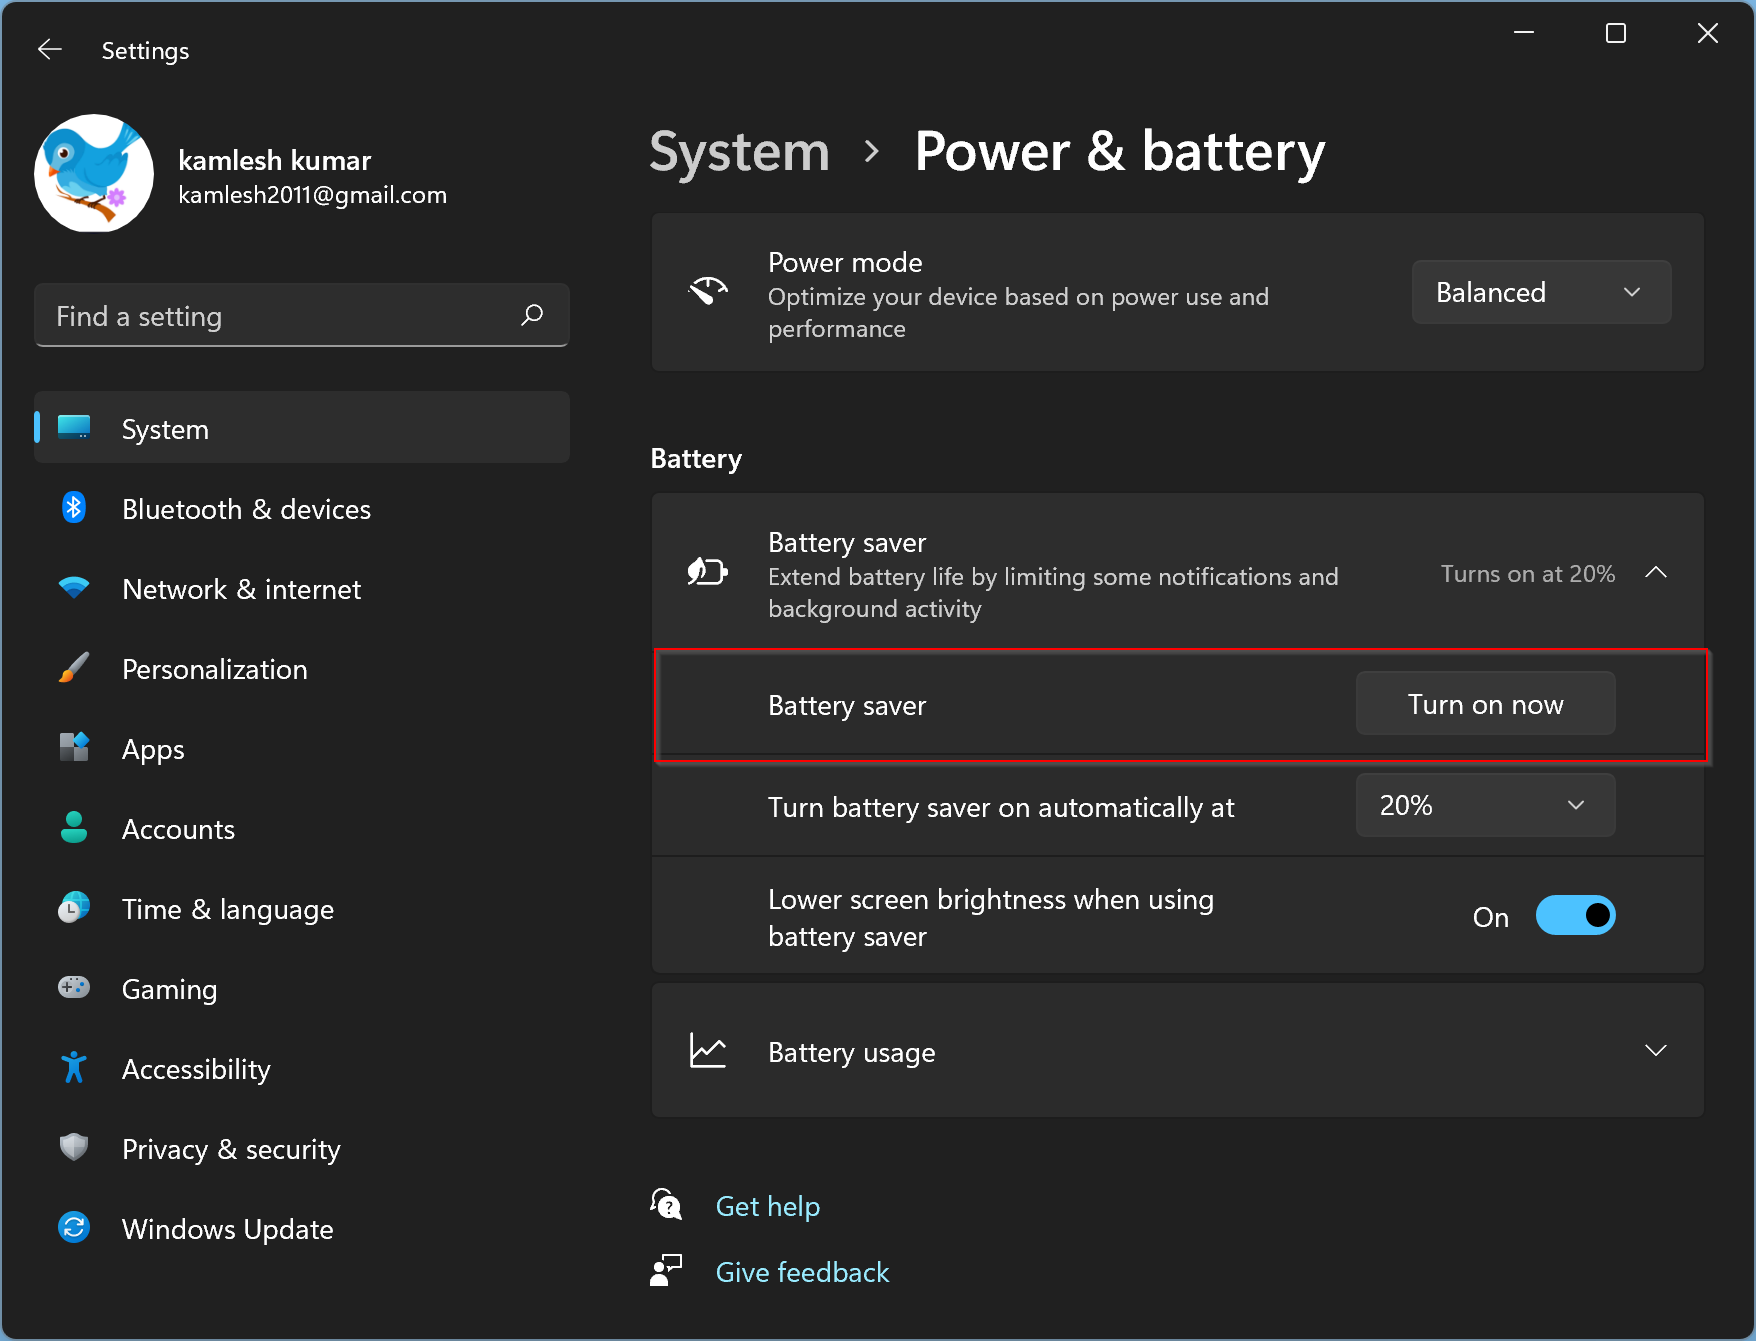
When Battery Saver mode is enabled, and you wish to turn it off, click the button Turn off now beside Battery saver.
You can also change the percentage at which Battery Saver will enable itself when you are on the above screen. To do that, click the drop-down menu “Turn battery saver on automatically at” and select the desired percentage. Select the Always option if you wish to turn on Battery Saver mode permanently. And if you want to disable Battery Saver mode forever, select the Never option.
If you need, turn on/off the toggle switch beside “Lower screen brightness when using battery saver,” whether Battery Saver should dim the screen. We recommend keeping this option turned on; that will help you significantly extend your PC’s battery life.
Further, if you want to see the Battery usage in detail, expand the Battery usage option by clicking on it. You can see the battery usage percentage in a graph for the last 24 hours or 07 days. Here, you will also find the battery usage percentage by application.
Conclusion
In conclusion, Battery Saver mode is an essential feature of Windows 11 that helps users extend their device’s battery life by dimming the screen brightness, limiting notifications, and reducing background app activity. This mode is automatically enabled when the battery level reaches 20%, but users can also enable it manually or change the percentage at which it activates through the Settings app. Moreover, users can turn on/off the Battery Saver mode through the Quick Settings menu as well. By using this feature, users can optimize their device’s battery life and make the most out of every minute of power.
We all wish our laptop batteries could last longer. Well, this is where Battery Saver Mode comes in handy! Battery Saver on Windows is a useful tool for extending the battery life of your device when you need it most. So, to conserve energy and keep your device running for longer, you can enable or disable Battery Saver on Windows 11.
To do so, you can use the below-mentioned methods to enable it through Quick Settings or Windows Settings and set it to activate automatically based on battery percentage for more battery life and a worry-free experience. Also, we will take you through the steps of how to disable the Battery Saver on Windows whenever needed. Let’s get started.
What is Battery Saver Mode on Windows?
Battery Saver on Windows 11 is a handy feature that extends your device’s battery life. It acts as a smart battery manager, adjusting your system settings and background activities to reduce power consumption when activated. The end result? Battery life extension for your laptop or tablet! It’s the best option for when you’re on the go or away from charging options, ensuring that your device stays powered up when you need it the most.
You might be wondering what happens when the battery-saver mode is enabled. When you enable battery saving in Windows, the system automatically adjusts settings like screen brightness, background apps, and notifications to save power. Some features, such as app performance or background app updates, can be impacted when the feature is turned on. But on the brighter side, you can continue to use your device and access the majority of its apps and features.
With Battery Saver Mode, you can squeeze every last drop of energy from your battery, extending its life and preventing the anxiety of having a low battery.
Now, let’s discuss the methods to enable or disable Battery Saver on the Windows operating system.
1. Using Quick Settings
The easiest method to enable or disable the Battery Saver option is through the taskbar’s Quick Settings. Here are the steps to do so:
1. Go to the Taskbar and click on the battery, Wi-Fi, or sound icon to access Quick Settings.
2. Now, to enable the Battery Saver mode on Windows 11, click on the Battery Saver icon listed. You can click on it again to disable the feature when required.
That’s all! Your Windows PC now has Battery Saver enabled. In case you are experiencing issues such as a missing battery icon or Quick Settings not responding, there’s another easy method that you can try out.
2. Using Windows Settings
The Settings app also makes it simple to enable or disable Battery Saver; just follow these steps:
1. Press the Windows key and click on the Settings gear icon to open the system settings. Alternatively, you can also open the Settings app by pressing Win + I.
2. Here, you will get the Windows system settings window. Click on the System option and then on the Power & Battery option.
3: Scroll down to the Battery section; here, you will find the Battery Saver option. Click on it to expand the option.
4. To enable Battery Saver, click the Turn on Now button. To disable it, click the same button when needed.
You can easily manage Battery Saver on Windows by following these steps. However, if you prefer enabling and disabling the Batter Saver automatically, we have you covered. Continue reading to find out how to set Battery Saver to activate or deactivate automatically.
How to Turn Battery Saver ON or OFF Automatically
Avoid the hassle of constant monitoring by automatically enabling or disabling Battery Saver on your Windows device. Windows also provides a straightforward method to do this. You can enable automatic battery saving using Windows Settings and Terminal. You can use any of these methods. Let’s discuss them.
1. Using Settings
Configuring the automatic activation of Battery Saver in Windows is a simple process. You just need to specify the battery percentage at which you want the battery saver to turn on or off on your Windows PC.
For that, you can simply follow these steps:
1. On your keyboard, press Win + I to open settings.
2. Go to the System option and then to the Power & Battery option. By default, it is set to 20%. That means when the battery hits 20%, it will automatically enable the battery saver. However, you can change it to your preference.
3. For that, expand the Battery Saver option by clicking on the arrow icon.
4. Now, click on the arrow icon next to the option ‘Turn battery saver on automatically at‘ to change the battery percentage based on your preferences.
5. You will have the option to select the desired battery percentage.
2. Using Terminal
If the steps seem lengthy, you can achieve the same using PowerShell. You need to run one simple terminal command.
However, this method is for advanced users. If you are not familiar with PowerShell, we suggest using the Windows settings to automatically enable Battery Saver on your PC.
If you are still interested in knowing the steps to enable it using PowerShell, here are the steps you can follow:
1. Click on the Windows icon and type PowerShell, then click Run as Administrator.

2. A prompt will appear; click on Yes to open it with administrator permission.
3. Type the command below and press the [Enter] key to execute it.
powercfg /setdcvalueindex SCHEME_CURRENT SUB_ENERGYSAVER ESBATTTHRESHOLD 20
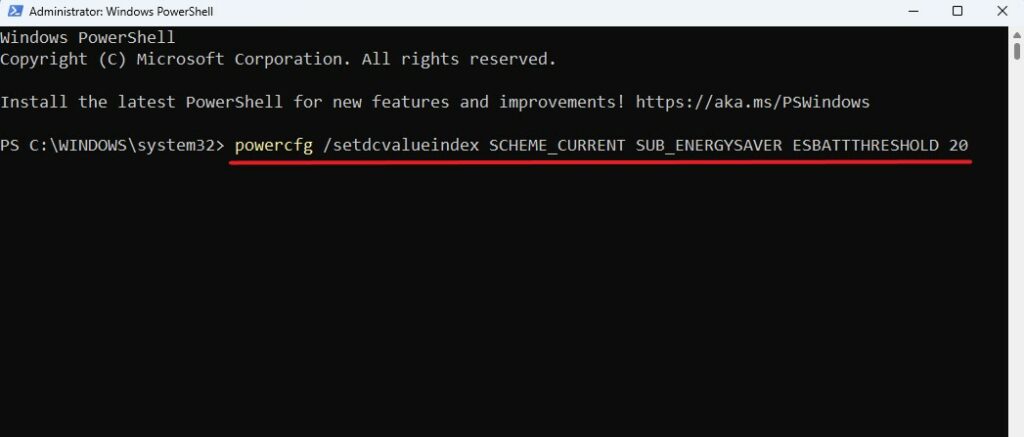
Here, ’20’ denotes the battery percentage at which Battery Saver will be enabled on your system. You can change it from 1 to 100 as per your preference.
That’s all there is to it! Battery Saver will now run automatically on your device, effortlessly saving the battery life whenever it’s needed.
Conclusion
Battery Saver Mode on Windows 11 works like a trusted ally in this tech-savvy world, keeping your device charged and ready to go. This power-saving wizard steps in to save your battery life, giving you more time to work, play, and stay connected whether you’re on the go or far from charging options.
With two simple methods at your disposal, you can easily enable or disable Battery Saver on Windows. You can access it via the Quick Settings button in your taskbar or by going into the Windows Settings app for more customization. You can save energy and keep your laptop running smoothly in a few simple steps.

This tutorial will show you how to turn on or off battery saver for your account in Windows 11.
The battery saver feature helps conserve power when a system is running on battery. When battery saver is on, some Windows features are disabled or behave differently. Using battery saver is the easiest way to extend battery life.
Battery saver will turn on automatically when your battery falls below 20% by default.
Display brightness is automatically reduced up to 30% by default when using battery saver. You can specify the percentage value to scale brightness to when battery saver is turned on. You can also turn on or off Lower screen brightness when using battery saver.
Battery saver can only be turned on while your PC is running on battery power.
Battery saver is turned off automatically while your PC is plugged in.
When your laptop enters battery saver mode, efficiency mode becomes active in Microsoft Edge and is indicated by a filled heart pulse icon in your browser’s toolbar.
Starting with Windows 11 build 26002 (Canary), Microsoft is introducing energy saver, which extends and enhances battery saver. It is an easy way to extend battery life and reduce energy use by trading off some system performance. It can be toggled on and off or configured to run automatically whenever the device reaches a certain battery percentage. While optimized to extend battery life, energy saver will be available when PCs are plugged in (this also includes desktop PCs) for those aiming to conserve energy all the time.
Reference:

Battery Saver
The battery saver feature exists on Windows 11 24H1 (and earlier) and on Windows 10. It helps conserve power when a system is running on battery. When battery saver is on, some Windows features are disabled or behave differently.
docs.microsoft.com
Contents
- Option One: Turn On or Off Battery Saver in Quick Settings
- Option Two: Turn On or Off Battery Saver in Settings
- Option Three: Turn On or Off «Turn Battery Saver On Automatically» in Settings
- Option Four: Turn On or Off «Turn Battery Saver On Automatically» in Windows Terminal
EXAMPLE: Power icon on taskbar corner with battery saver off and on
Option One
Turn On or Off Battery Saver in Quick Settings
1 Open Quick Settings (Win+A).
2 Click/tap on the Battery saver button to toggle on or off. (see screenshots below)
Option Two
Turn On or Off Battery Saver in Settings
1 Open Settings (Win+I).
2 Click/tap on System on the left side, and click/tap on Power & battery on the right side. (see screenshot below)

3 Click/tap on Battery saver to expand it open. (see screenshot below)
4 Click/tap on Turn on now or Turn off now to the right of Battery saver for what you want.
5 You can now close Settings if you like.

Option Three
Turn On or Off «Turn Battery Saver On Automatically» in Settings
1 Open Settings (Win+I).
2 Click/tap on System on the left side, and click/tap on Power & battery on the right side. (see screenshot below)
3 Click/tap on Battery saver to expand it open. (see screenshot below)
4 Select Never, 10%, 20% (default), 30%, 40%, 50%, or Always for what you want in the Turn battery saver on automatically at drop menu.
5 You can now close Settings if you like.
Option Four
Turn On or Off «Turn Battery Saver On Automatically» in Windows Terminal
For more details on the command used in this option, see: Energy Saver settings overview
1 Open Windows Terminal, and select either Windows PowerShell or Command Prompt.
2 Type the command below into Windows Terminal, and press Enter. (see screenshot below)
powercfg /setdcvalueindex SCHEME_CURRENT SUB_ENERGYSAVER ESBATTTHRESHOLD <percentage>
Substitute <percentage> in the command above with a number 0 to 100 for the percentage you want battery saver to turn on automatically at.
0 percent is the same as Never.
20 percent is the default.
100 percent is the same as Always.
For example: powercfg /setdcvalueindex SCHEME_CURRENT SUB_ENERGYSAVER ESBATTTHRESHOLD 20

That’s it,
Shawn Brink
Related Tutorials
- Turn On or Off USB Battery Saver in Windows 11
- Change Power Plan Settings in Windows 11
- Turn On or Off Lower Screen Brightness when using Battery Saver in Windows 11
- Change Percentage to Lower Brightness when using Battery Saver in Windows 11
- Enable or Disable OneDrive Syncing in Battery Saver Mode in Windows 11
- Check Battery Usage per App in Windows 11
- Turn On or Off Efficiency mode in Microsoft Edge
- Use Balanced or Maximum Savings with Efficiency mode in Microsoft Edge
- Turn On or Off Sleeping Tabs in Microsoft Edge
Quick Tips
- To manually enable the battery saver, go to Settings > System > Power & battery > Battery saver and click Turn on now.
- To enable battery save automatically, go to Power & battery settings, expand Battery saver, and set the desired activation percentage.
How to Turn On or Off Battery Saver Manually
Method 1. Using Quick Settings
Step 1: Click on the battery, Wi-Fi, or sound icon in the taskbar to open Quick Settings.

Step 2: Under Quick Settings, single-click on the Battery saver option (the background will be highlighted).
That’s it. You have successfully enabled battery saver on your Windows PC. If the battery icon missing from the taskbar or the Windows Quick Settings is not working, move to the next method.
Method 2. Using the Settings App
Step 1: Press the Windows key, type Settings, and click Open.
Step 2: Under System, go to Power & battery.

Step 3: Scroll down and under Battery, expand Battery saver.

Step 4: Finally, click on Turn on now to enable the battery saver.

With this, you have successfully, turned on the battery saver on Windows.
How to Turn Battery Saver on or off Automatically
Windows PC automatically turning on or off battery saver eases up the manual work. You don’t have to keep an eye on your PC’s battery level, Windows will do it for you.
Method 1. Using the Settings App
Step 1: Press the Windows key, type Settings, and click Open.
Step 2: Under System, go to Power & battery.
Step 3: Scroll down and under Battery, expand Battery saver.
Step 4: Click on the chevron (arrow) icon next to the Turn battery saver on automatically at option. Select the percentage as per your requirements.

Method 2. Using PowerShell
Step 1: Press the Windows key, type Windows PowerShell, and click Run as Administrator. In the prompt, select Yes.
Step 2: Type the below command and hit Enter.
Note: Replace <percentage> with a number from 1 to 100. You can set it to 0, which means never turning on the battery saver, or 100, which means always turning it on.
powercfg /setdcvalueindex SCHEME_CURRENT SUB_ENERGYSAVER ESBATTTHRESHOLD <percentage>

FAQs
1. Is it good to keep the battery saver on all the time?
Well, it depends on your usage and needs. Keeping battery saver mode on all the time can help conserve power and extend the battery life of your device. However, it limits the performance of certain features or apps, and notifications may be affected.
So, if you were to do only basic tasks such as browsing, email, etc., and not CPU-intensive tasks, you can keep battery saver mode on all the time.
2. At what percentage should you turn on the battery saver?
The exact percentage at which you should turn on battery saver mode on Windows may vary depending on your device and usage. However, it’s typically recommended that you do so at 20%.
Was this helpful?
Thanks for your feedback!
The article above may contain affiliate links which help support Guiding Tech. The content remains unbiased and authentic and will never affect our editorial integrity.