
You are here:
Home » Windows 10 » How To Disable Auto or Adaptive Screen Brightness In Windows 10
Last evening, I received the new ThinkPad laptop that I had ordered a couple of days ago through an eCommerce website. Since the ThinkPad ships with an earlier version of Windows 10, I upgraded the OS to the latest version of Windows 10 Pro, and the upgrade process went smoothly without any issues.
After upgrading to the latest version of Windows 10 and installing/updating all drivers, while browsing the web, I noticed that Windows 10 was automatically adjusting the screen brightness. Like most users, I prefer manually setting screen brightness and don’t want the operating system to automatically adjust screen brightness with the help of ambient light sensors.
For the uninitiated, when the adaptive screen brightness feature is running, Windows 10 calculates the ambient light using the built-in sensors of your PC and automatically adjusts the screen brightness accordingly.
If your Windows 10 is automatically adjusting the screen brightness, it’s most likely because a feature called adaptive brightness is turned on. And if you’re sure that the adaptive brightness or auto-brightness is disabled on your PC, then it could be because your PC using Intel HD graphics and the Intel power saver technology is trying to save some power by automatically decreasing the backlight intensity.
In this guide, we will see how to disable the auto-brightness or adaptive brightness in Windows 10. Use the directions in Method 3 to configure the Intel HD Graphics Control Panel and instructions in Method 4 to turn off the display power-saving technology in AMD, which decreases backlight intensity to extend the battery life.
Method 1 of 5
Disable automatic brightness in Windows 10 via Settings
NOTE: Available in Windows 10 build 21354 and later only. Also, the option shows up only if your PC supports the Content adaptive brightness control (CABC).
Step 1: Go to Windows 10 Settings app > System > Display page.
Step 2: Turn off the option labeled Automatically adjust contrast based on the displayed content to help improve battery.

Method 2 of 5
Disable adaptive or auto brightness via Control Panel
Step 1: Right-click on the battery icon in the system tray and click Power Options to open the same.

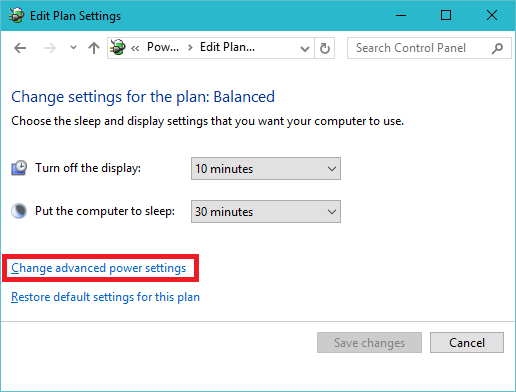
Step 2: On the left pane, click Choose when to turn off the display option to open the Edit Plan Settings window.

Step 3: Here, click Change advanced power settings to open the Power Options dialog.

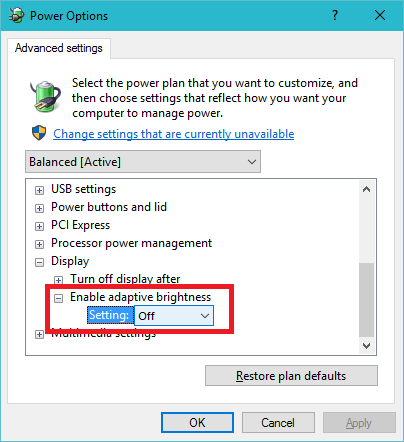
Step 4: Extend Display, extend Enable adaptive brightness, and then select Off option for both On battery and Plugged in.

Click the Apply button.
Note that you have just disabled adaptive brightness only for the current power plan. So, if you often switch between the power plan, you need to repeat the same for all power plans. For instance, if you just disabled adaptive brightness for a Balanced power plan, you will need to do the same for the Power saver plan as well if you don’t want Windows 10 to automatically adjust the brightness while using the Power saver plan.
Method 3 of 5
Disable automatic brightness via the Intel Graphics Command Center app
Step 1: Launch the Intel Graphics Command Center app using the taskbar/Start search. If not installed, you can get it from the Windows 10 Store.
Step 2: Once the app is running, in the left pane, click on System.
Step 3: Now, on the right side, click Power.
Step 4: In the On battery section, turn off the Display Power Savings option. That’s it!

Method 4 of 5
Disable auto-brightness via Intel HD Graphics Control Panel
If you have AMD graphics, follow the directions in Method 3.
I am no expert and I might be completely wrong, but it looks like the Intel power saver technology was the reason why I was feeling like the display brightness was automatically adjusting even after turning off adaptive brightness.
Use this method only if you have a feeling that the screen brightness is automatically adjusting even after turning off auto-brightness using the instructions mentioned above. Obviously, this is only for PCs that ship with Intel onboard graphics.
There might be a similar feature/option in graphics drivers from other manufacturers as well. Have a look at the properties of the graphics drivers before contacting Microsoft support.
Step 1: Right-click on the desktop and click Graphics Properties.

NOTE: If the Graphics Properties option is not available in the desktop context menu, open Control Panel, change View by to Small icons and then click Intel HD Graphics.

Step 2: Once Intel HD Graphics Control Panel is launched, click Power.

Step 3: On the left pane, click On Battery.
Step 4: Finally, click Disable option for Display Power Saving Technology and then click Apply button.

If the issue is fixed, remember that Intel graphics Control Panel might be reset to default settings when a newer version of the driver is installed, and you might need to disable the feature again by following the directions mentioned above.
Method 5 of 5
Disable AMD Vary-Bright
Step 1: Right-click on the desktop and then click on the AMD Radeon Settings option.
Step 2: Expand the Power tab and then click on PowerPlay. Here, disable or turn off the Enable Vari-Bright option.
Your automatic brightness issue should now be solved. Good luck!
If you have a dedicated graphics card, please check out its settings as well. Your automatic brightness issue should now be solved. Good luck!
Do let us know if you were able to fix the issue using one of these methods.
Disable adaptive brightness in Settings or Control Panel
Updated on November 24, 2023
What to Know
- Windows 11: Go to Settings > System > Display > Brightness, then turn off battery optimization.
- Windows 10: Power Options > Change plan settings > Change advanced power settings > Display > turn off Enable adaptive brightness.
- If you can’t disable auto brightness, create a new Power Plan and adjust it as you wish.
This article explains how to turn off auto brightness (also known as adaptive brightness) in Windows. The instructions apply to Windows 11 and Windows 10.
How to Turn Off Auto Brightness on Windows 11
The auto-brightness options are different depending on your version of Windows. On Windows 11, you can use the Settings app to disable battery-saving features that affect screen brightness.
Not all Windows 11 devices support the options mentioned in these steps.
-
Open the Start menu and select Settings.
-
Select System, then choose Display.
-
Select Brightness.
-
Uncheck the box next to Help improve battery by optimizing the content shown and brightness.
-
Go back to System settings and select Power & battery.
-
Select Battery saver.
-
Turn Off the toggle switch next to Lower screen brightness when using battery saver.
How to Turn Off Auto Brightness on Windows 10
In some versions of Windows 10, you can disable advanced power settings through Control Panel.
-
Open Control Panel. One way is to search for it from the Start menu.
-
Select the heading called Hardware and Sound.
-
Choose Power Options.
-
Select Change plan settings to the right of the selected power plan.
-
Select Change advanced power settings and a small window will appear.
-
Scroll down to find Display, and select the plus sign next to it for more options.
-
Next to Enable adaptive brightness is a drop-down menu. Set it to Off, then press OK, to disable the auto-brightness feature.
How to Create a Power Plan in Windows
Not all Windows computers have the option to disable auto-brightness. In that scenario, you can create a new Power Plan and ensure your computer’s brightness settings stay consistent. This works in Windows 11 and Windows 10.
-
Go back to Power Options in Control Panel and select Create a power plan on the left-hand side of the window.
-
Select a plan. Your options include Balanced (recommended), Power saver, and High performance.
-
Name your custom power plan and then select Next.
-
Configure the plan to suit your needs. In this example, the laptop display is set to turn off after 5 minutes and go to sleep after 10 minutes of inaction.
-
Select Create, and your new custom plan will be made
FAQ
-
If you don’t see an option to turn this feature off from Power Options or it doesn’t seem to work, open the Intel graphics control panel you have on your device. Select Power and move the toggle to the off position next to Adaptive Brightness or uncheck the box next to Display Power-Saving Technology or Maximum Performance power plan.
-
If your Sony VAIO has a setting to adjust automatic brightness, turn this feature off from Power Options as described above. Then open the VAIO Control Center > select Display > and uncheck the box beside Adjust Brightness Settings Automatically.
Thanks for letting us know!
Get the Latest Tech News Delivered Every Day
Subscribe
В этой статье:
-
Настройка яркости дисплея
-
Ночной свет
-
Управление цветным профилем
-
Использование HDR
Настройка яркости дисплея
Управление яркостью дисплея может значительно улучшить просмотр и сэкономить время работы батареи. Вы можете настроить яркость вручную или позволить компьютеру обрабатывать ее автоматически в зависимости от условий освещения или содержимого.
Важно: Ползунок Яркость может не отображаться на устройствах с внешним монитором. Чтобы изменить яркость внешнего монитора, используйте кнопки на нем.
Чтобы настроить яркость экрана, щелкните значок Сеть в правой части панели задач, а затем переместите ползунок Яркость , чтобы настроить яркость.
Кроме того, можно настроить яркость дисплея в разделе Параметры > системный > дисплей.
Важно: Ползунок Яркость может не отображаться на настольных компьютерах с внешним монитором. Чтобы изменить яркость внешнего монитора, используйте кнопки на нем.
На некоторых компьютерах Windows может автоматически регулировать яркость экрана в зависимости от текущих условий освещения. Чтобы узнать, поддерживает ли это ваш компьютер, выберите Параметры > системный > дисплей. Выберите Яркость, найдите поле Изменение яркости автоматически при изменении освещения проверка а затем выберите его, чтобы использовать эту функцию. Благодаря этой автоматической настройке текст на экране будет хорошо виден независимо от окружающих условий. Даже если вы используете его, вы все равно можете переместить ползунок Яркость, чтобы точно настроить уровень яркости для встроенного дисплея.
Примечание: На дисплеях HDR Windows оптимизирует автоматическую корректировку яркости в соответствии с тем, как воспринимает изменение яркости человеческий глаз. В результате регулировка яркости может занять больше времени на дисплеях HDR при изменении условий освещения.
Некоторые Windows 11 пк могут автоматически настраивать яркость и контрастность экрана в зависимости от содержимого, отображаемого на встроенном экране. Например, если вы смотрите видео с темной сценой, за которой следует более яркая сцена (например, с ярким солнечным днем), яркость и контрастность могут измениться. Это нормально.
Адаптивное управление яркостью содержимого обеспечивает идеальный уровень яркости и контрастности, одновременно экономя питание и обеспечивая более длительное время работы батареи. Если эти внезапные изменения яркости отвлекают вас или если вы работаете в приложениях для фото и видео, где точность цвета важна для вас, эти параметры можно настроить в соответствии с вашими потребностями между обеспечением соответствующей яркости и контрастности и экономией заряда батареи.
-
Нажмите кнопку Пуск и введите параметры. Выберите Параметры > Системный > Дисплей .
-
В разделе Параметры отображения выберите Яркость , а затем при необходимости задайте раскрывающийся список Изменить яркость на основе содержимого:
-
От: Адаптивное управление яркостью будет отключено, а яркость и контрастность экрана не будут регулироваться. Это может привести к более короткому сроку работы батареи.
-
Всегда:Адаптивное управление яркостью всегда будет работать независимо от того, подключено ли устройство к сети или от батареи.
-
Только от батареи: Адаптивное управление яркостью будет активировано только в том случае, если устройство работает от аккумулятора.
-
Ночной свет
Дисплей излучает синий свет, похожий на дневной. Однако ночью этот свет может мешать вам спать. Чтобы лучше засыпать, включите ночной свет для дисплея. В результате свет дисплея смягчится и не будет утомлять глаза.
Примечание: Ночной индикатор недоступен, если на устройстве используются определенные драйверы, например DisplayLink или Basic Display.
Щелкните значок Сеть в правой части панели задач. затем найдите Ночной свет в разделе Быстрые параметры и выберите его, чтобы включить или отключить его.
Кроме того, можно переключить параметр Ночной свет в разделе Параметры > системный > дисплей.
-
Нажмите кнопку Пуск , а затем введите параметры в поле поиска. Выберите Параметры > Система > Отображение > ночного света.
-
Переместите ползунок прочности, чтобы отрегулировать интенсивность уменьшения синего света.
-
Нажмите кнопку Пуск , а затем введите параметры в поле поиска. Выберите Параметры > Система > Отображение > ночного света.
-
Включите параметр Расписание ночного света. Затем выберите От заката до рассвета или Установить время и задайте время включения и отключения ночного света.
Управление цветным профилем
Параметры управления цветом Windows позволяют пользователям добавлять или удалять цветовые профили, задавать цветовые профили по умолчанию для подключенных дисплеев, а также получать доступ к калибровке дисплея и включать автоматическое управление цветом.
Творческие профессионалы и энтузиасты заботятся о полностью откалиброванных, точных цветах, потому что это помогает обеспечить согласованность цветов от начала до конца своих проектов. Автоматическое управление цветами в Windows обеспечивает управление цветом на уровне системы, чтобы цвета в приложениях Windows отображались точно и согласованно на поддерживаемых дисплеях независимо от того, управляются ли они цветом.
Автоматическое управление цветом также помогает новым и обновленным приложениям отображать больше цветов с большей точностью. Это обеспечивает дополнительную детализацию и меньшее число цветовых артефактов (например, в градиентах, тени и более темных сценах или рисунках). Благодаря автоматическому управлению цветом приложения могут использовать миллиарды цветов с точностью от 10 до 16 бит. Даже на дисплеях, поддерживающих только 8-разрядный цвет, автоматическое управление цветом помогает улучшить качество цвета с помощью различных методов, таких как дизеринг.
Включение автоматического управления цветом
-
Нажмите кнопку Пуск , а затем выберите Параметры > Системный > Дисплей > Профиль цвета.
-
Выберите дисплей в верхней части экрана, а затем проверка для следующего параметра: Автоматическое управление цветом для приложений.
-
Выберите Автоматически управлять цветом для приложений, чтобы включить его.
-
Перейдите в раздел Параметры > Системный > Дисплей > Профиль цвета.
-
На странице Параметры управления цветом выберите дисплей, для которого вы хотите управлять цветными профилями.
-
Добавьте новый цветной профиль, щелкнув Добавить профиль и найдите цветной профиль.
-
Перейдите в раздел Параметры > Системный > Дисплей > Профиль цвета.
-
На странице Параметры управления цветом выберите дисплей, для которого вы хотите управлять цветными профилями.
-
Разверните цветной профиль, который нужно удалить, и нажмите кнопку Удалить в нижней части экрана.
-
Перейдите в раздел Параметры > Системный > Дисплей > Профиль цвета.
-
На странице Параметры управления цветом выберите дисплей, для которого вы хотите управлять цветными профилями.
-
Задайте один из цветовых профилей по умолчанию, нажав кнопку Задать профиль.
-
Перейдите в раздел Параметры > Системный > Дисплей > Профиль цвета.
-
Выберите Calibrate display (Калибровка дисплея ) и следуйте инструкциям по калибровке дисплея. При этом будет создан новый цветовой профиль для дисплея, на котором расположен инструмент калибровки.
Использование HDR
Содержимое HDR в Windows обеспечивает лучшую яркость и цветовые возможности по сравнению с традиционным содержимым (иногда называемое стандартным динамическим диапазоном [SDR]). Традиционное содержимое обычно показывает детали в яркой части сцены или более темной части сцены, но не в обеих частях одновременно.
Дополнительные сведения о параметрах HDR в Windows см. в статье Что такое HDR в Windows?
For computers with a light sensor, typically laptop computers, Windows 10 has the ability to automatically adjust the screen brightness depending on the ambient light levels.
This feature can be more annoying than helpful – either leaving your screen too dark or frequently adjusting the brightness levels.
Here’s three ways to disable the automatic screen brightness feature.
Method 1: using the systems setting
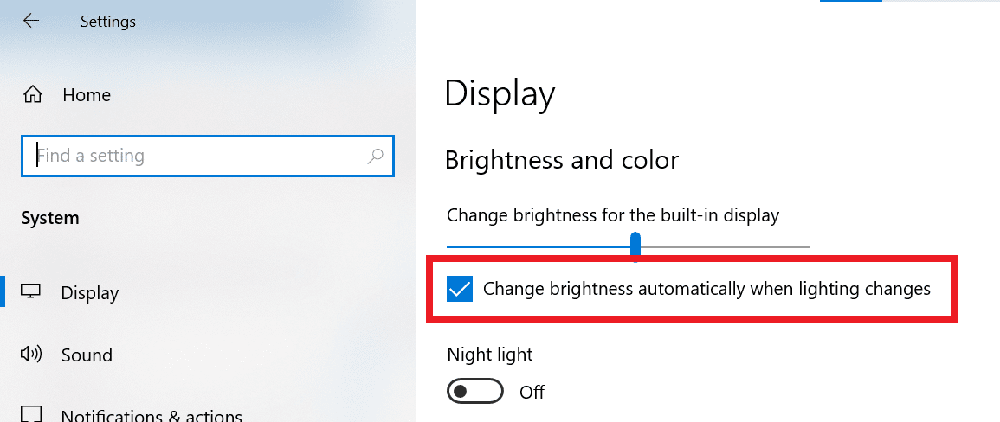
- Open the Windows start menu and click on ‘Settings’ (a cog icon)
-

- In the settings window, click on ‘System’
- The ‘Display’ menu should be selected on the left, if it is not – click on ‘Display’
- Untick ‘Change brightness automatically when lighting changes’
-

Help – I don’t have the ‘Change brightness automatically when lighting changes’ option
If you don’t have the ‘Change brightness automatically when lighting changes’ option it’s likely your computer does not have a light sensor and therefore does not have the automatic brightness feature.
If you’re sure your computer does have a light sensor – try checking the manufactures website for the correct driver and/or software package. It is possible that Windows 10 support is not provided.
In this case you will need to use the manual brightness adjustments. On laptops, these are usually done using buttons on or new the keyboard – sometimes in combination with a Fn (function) key. For desktop computers, the monitor will have buttons and a menu on the front or the side of the monitor.
Help – ‘Change brightness automatically when lighting changes’ won’t change
If your laptop is connected to two screens – in extended mode – the ‘Change brightness automatically when lighting changes’ option won’t change.
This appears to be a bug with Windows 10.
Method two: change the power plan advanced options
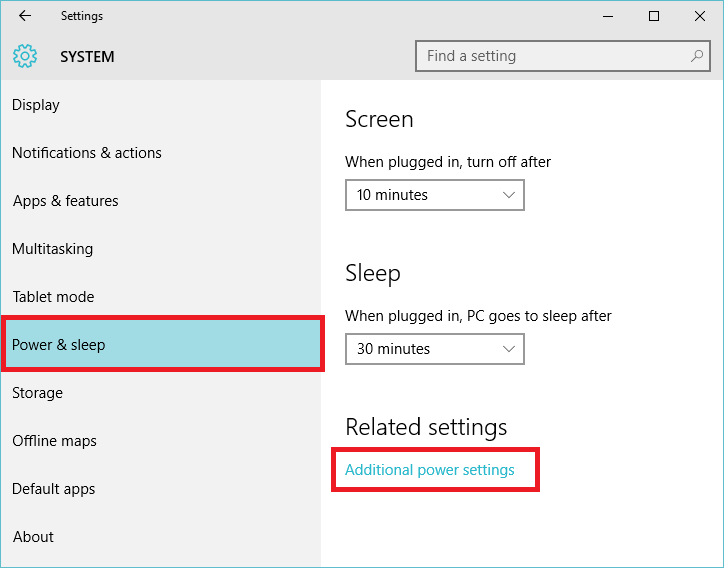
- Open the Windows start menu and click on ‘Settings’
-
- In the settings window, click on ‘System’
- Click on ‘Power & sleep’ in the left hand menu, then click on the ‘Additional power settings’ link
-

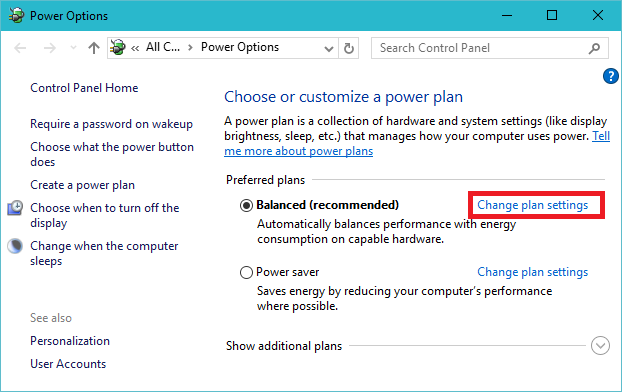
- For the power plan you currently have enabled (balanced by default – the enabled plan will be bold), click on ‘Change plan settings’.
-

- Click on ‘Change advanced power settings’
-

- Expand ‘Display’ -> ‘Enable adaptive brightness’ and make sure the setting is set to ‘Off’
-

- Click ‘OK’ to save the changes.
Method 3 – Install the latest drivers from the laptop manufacture
If none of the other options worked – either your laptop does not have the light adaptive sensors, or the correct drivers are not installed.
In this case, you can try
- installing the latest driver / software updates from the laptop manufacture’s website
- opening the computer Device Manager and changing the driver for the video card to the Microsoft basic driver.