
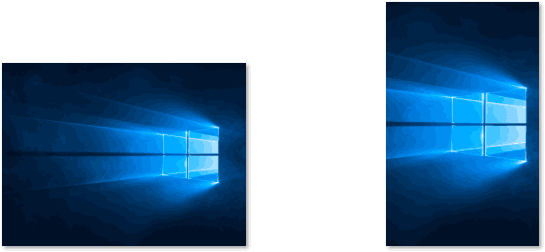
If you have a convertible device or tablet equipped with an accelerometer and gyroscope sensors, Windows 10 can rotate the display in portrait or landscape mode automatically so no matter how you grab it, the screen is always facing up.
Although it’s a convenient feature, there are some situations in which auto-rotation can just get in the way, such as when trying to see an image or read content from a different angle. Windows 10 includes multiple ways to disable screen auto-rotation if it’s not a feature that you need.
In this Windows 10 guide, we walk you through the steps to disable the screen auto-rotation feature using Action Center, Settings, and using the Registry.
- How to disable screen rotation using Action Center
- How to disable screen rotation using Settings
- How to disable screen rotation using Registry
How to disable screen rotation using Action Center
To disable automatic screen rotation using Action Center, use these steps:
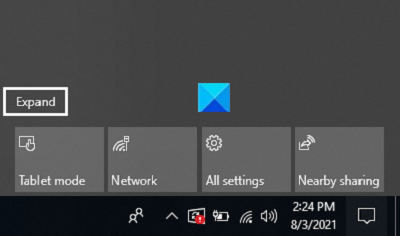
- Open Action Center.Quick tip: You can open Action Center using the Windows key + A keyboard shortcut or clicking the icon in the notification area of the taskbar.
- Click the Rotation lock button.
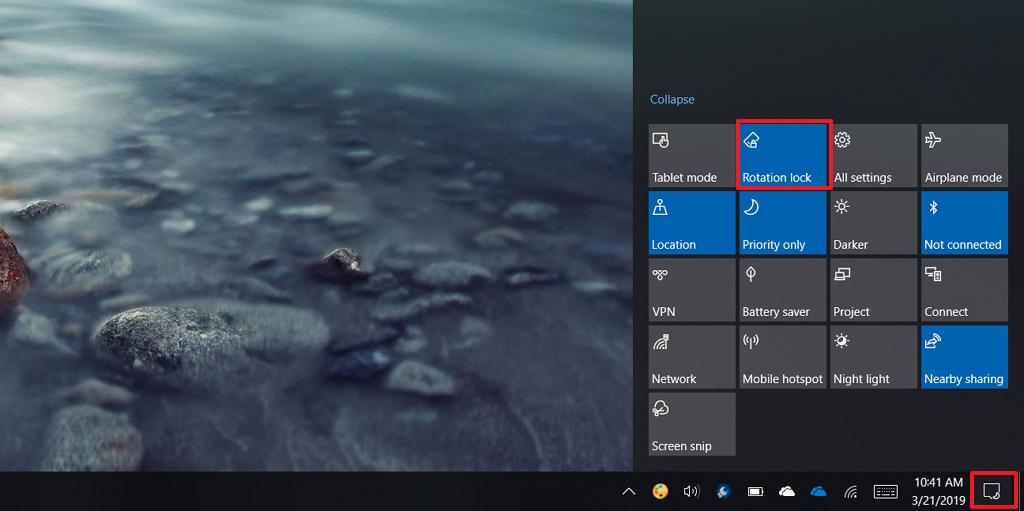
If you can’t see the button, click the Expand option in the top-left of the Quick actions area. If the option isn’t available, your device doesn’t support this feature or you need to add the button from Settings > System > Notifications & actions > Add or remove quick actions, and enabling the Rotation lock toggle switch.
Also, sometimes, the «Rotation lock» option will be available, but it’ll be grayed out. When this happens it’s likely that your device has a removable keyboard attached, or the convertible is in laptop mode. You can quickly enable the option by removing the keyboard or changing the convertible to tablet mode. If you’re still having problems with this feature, refer to this guide.
Once you complete these steps, the screen will no longer change its orientation automatically as you rotate the device.
All the latest news, reviews, and guides for Windows and Xbox diehards.
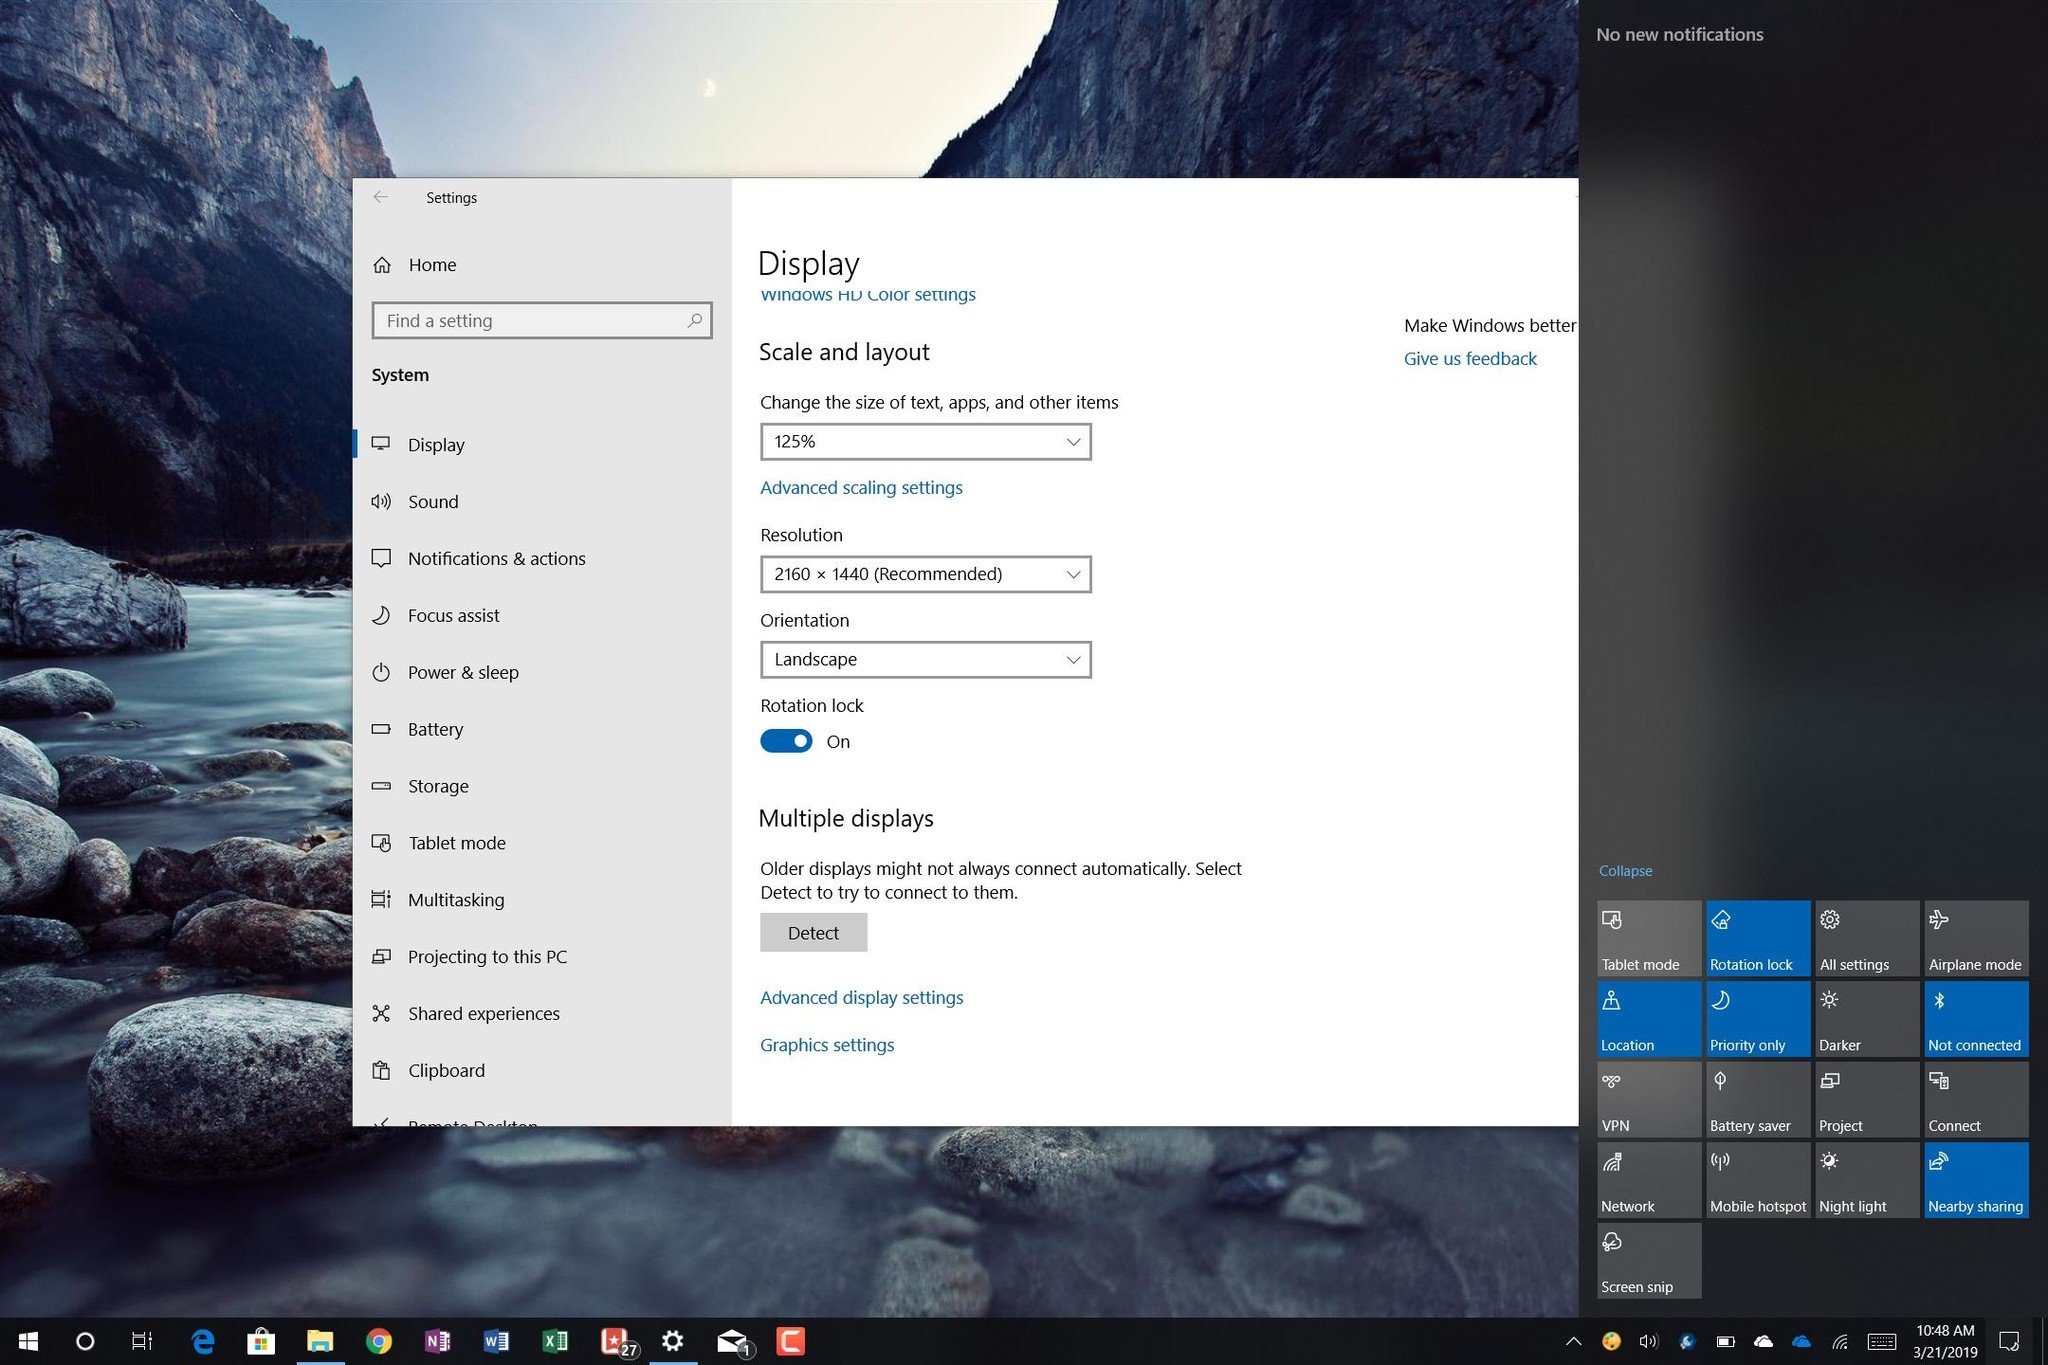
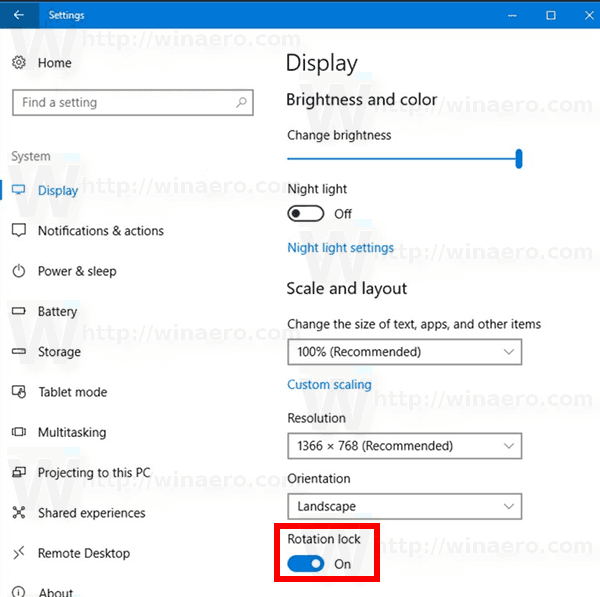
How to disable screen rotation using Settings
To turn off auto-rotation using the Settings app, use these steps:
- Open Settings.
- Click on Display.
- Under the «Scale and layout» section, turn off the Rotation lock toggle switch.
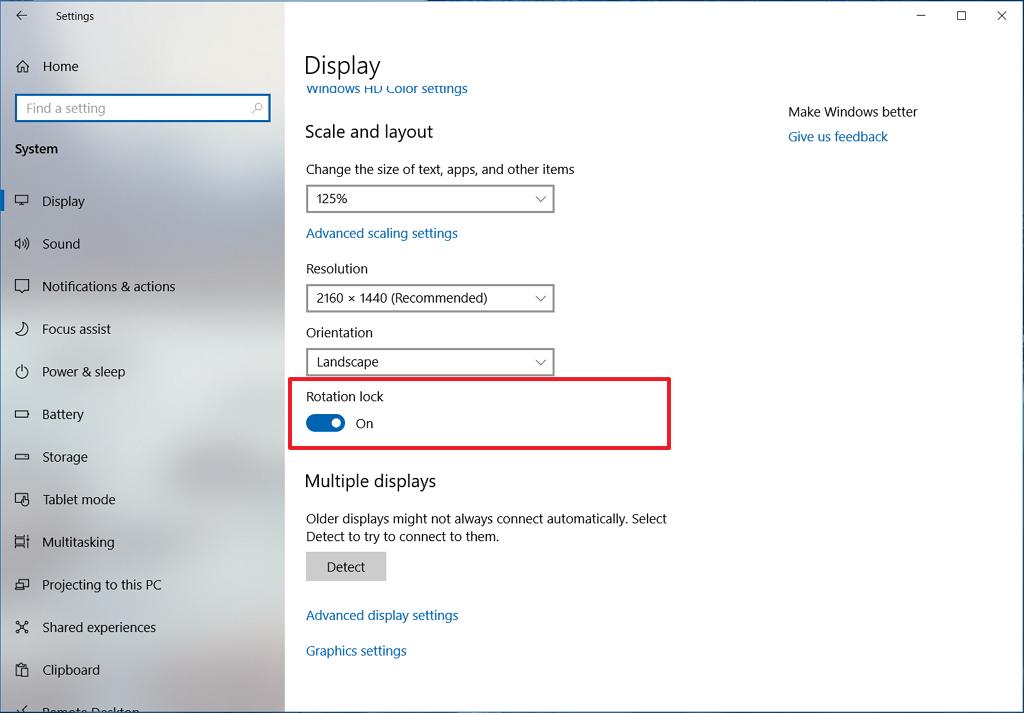
If you don’t see the option, your device doesn’t support this feature.
After completing the steps, the screen won’t rotate automatically as the device changes its orientation.
How to disable screen rotation using Registry
Alternatively, you can also prevent the screen from switching to portrait or landscape mode automatically by modifying the Registry.
Warning: Editing the Registry is risky, and it can cause irreversible damage to your installation if you don’t do it correctly. We recommend making a full backup of your PC before proceeding.
To disable automatic screen rotation with the Registry, use these steps:
- Open Start.
- Search for regedit and click the top result to open the Registry.
- Browse the following path:
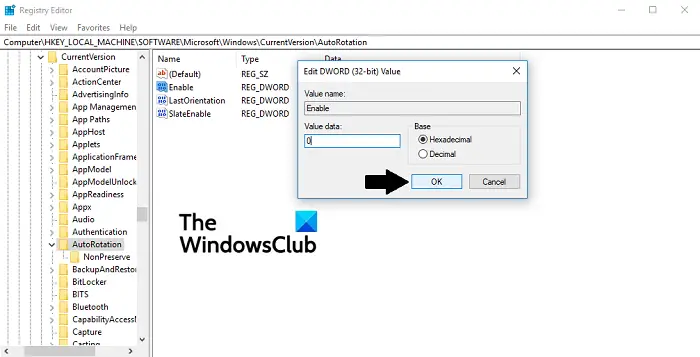
HKEY_LOCAL_MACHINE\SOFTWARE\Microsoft\Windows\CurrentVersion\AutoRotationQuick Tip: On Windows 10, you can copy and paste the path in the Registry’s address bar to quickly jump to the key destination. - Double-click the Enable DWORD and set the value from 1 to 0.
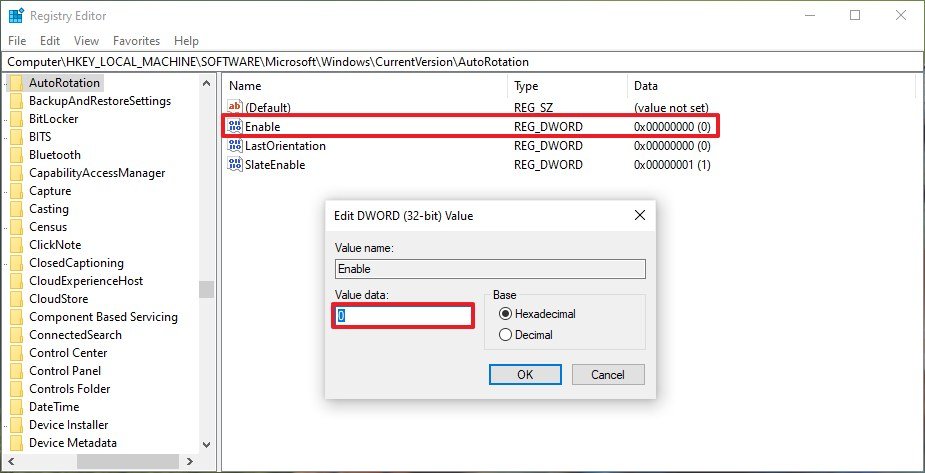
- Click OK.
Once you complete these steps, restart your computer to apply the settings, and the feature will disable, preventing the screen from rotating automatically.
If you change your mind, you can always revert the changes using the same instructions, but on step No. 4, make sure to change the value from 0 to 1.
More Windows 10 resources
For more helpful articles, coverage, and answers to common questions about Windows 10, visit the following resources:
- Windows 10 on Windows Central – All you need to know
- Windows 10 help, tips, and tricks
- Windows 10 forums on Windows Central
Mauro Huculak has been a Windows How-To Expert contributor for WindowsCentral.com for nearly a decade and has over 15 years of experience writing comprehensive guides. He also has an IT background and has achieved different professional certifications from Microsoft, Cisco, VMware, and CompTIA. He has been recognized as a Microsoft MVP for many years.
Download Windows Speedup Tool to fix errors and make PC run faster
Automatic Screen Rotation is common for those who use big screen devices like phones and laptops to read stuff or watch videos. If your device is equipped with gyroscope sensors and an accelerometer, Windows 11/10 has the power to rotate the screen to either a portrait or landscape mode to accommodate the content you’re viewing. While this seems like a convenient feature on paper and in most cases, it is, it can bug you a little sometimes. Autorotation can disturb your viewing experience, so you may want to disable it on your PC. There are several ways in which you can do this. In this article, we will be discussing how you can disable Auto rotation on Windows 11/10.
There are three ways in which the automatic screen rotation on your Windows device can be disabled. Bear in mind that this option only extends to certain Windows devices, as has been specified above. This means that if you don’t see the options discussed, then your device isn’t offering the feature. Here’s a quick summary of all that we will be discussing in this article.
- Via Windows Settings
- Via the Action Center
- Via Registry Editor.
1] Disable auto screen rotation via Windows Settings
- Open Windows Settings by pressing the Windows + ’I’ key combination
- On the Settings homepage
- Select System
- Click on the Display sub-option
- Under the Scale and Layout head here, you’ll see a Rotation Lock option.
- Toggle it off and close the Settings window.
2] Disable auto screen rotation via the Action Center
- The Action Center is the button to the extreme right of your taskbar, an icon that looks like a chat bubble. Click on it
- You’ll only see a handful of options firsthand, so click on Expand
- If you find the Rotation Lock option to be enabled, click on it to turn it off
3] Turn off auto screen rotation via Registry Editor
Lastly, the same change can be implemented via the Registry Editor. Users should note that any changes made to your Registry, if not done properly, can cause irreversible damage to your PC. Thus, you’re advised to back up your existing registry settings before making any changes.
- Open the Run dialog box by pressing Windows + ‘R’ keys
- Type ‘Regedit’ and press enter
- In the address bar on top, paste the following location
HKEY_LOCAL_MACHINE\SOFTWARE\Microsoft\Windows\CurrentVersion\AutoRotation
- Here, you’ll see a DWORD value by the name of Enable. Right-click on it and select Modify
- Change its bit value data from 1 to 0 and click on Ok to save the changes
- Close the Registry Editor and restart your PC to make the changes take effect
If you want to undo this process, simply visit the same DWORD value and revert its Value data to 1.
TIP: Windows Sensors Troubleshooter from Microsoft will fix issues relating to Location, Screen Rotation, Motion and other Sensors on your Windows PC.
How do you fix your computer screen when it’s zoomed in?
If you observe that the text and icons on your computer screen are larger than they usually are, chances are that the Windows Magnifier is turned on. While this setting may be of us on occasion, that isn’t the case always. You can press the Windows and Esc keys together to turn it off. The Ease to access settings can help you modify it too. If you want to manually reduce the icon size on, say, your Desktop, press the Ctrl button and scroll down your mouse.
We hope that this post was able to bring some clarity to the Automatic Screen Rotation on Windows computers and how you can disable it if you want to.
Shiwangi loves to dabble with and write about computers. Creating a System Restore Point first before installing new software, and being careful about any third-party offers while installing freeware is recommended.
You are here:
Home » Windows 10 » How To Disable Auto or Adaptive Screen Brightness In Windows 10
Last evening, I received the new ThinkPad laptop that I had ordered a couple of days ago through an eCommerce website. Since the ThinkPad ships with an earlier version of Windows 10, I upgraded the OS to the latest version of Windows 10 Pro, and the upgrade process went smoothly without any issues.
After upgrading to the latest version of Windows 10 and installing/updating all drivers, while browsing the web, I noticed that Windows 10 was automatically adjusting the screen brightness. Like most users, I prefer manually setting screen brightness and don’t want the operating system to automatically adjust screen brightness with the help of ambient light sensors.
For the uninitiated, when the adaptive screen brightness feature is running, Windows 10 calculates the ambient light using the built-in sensors of your PC and automatically adjusts the screen brightness accordingly.
If your Windows 10 is automatically adjusting the screen brightness, it’s most likely because a feature called adaptive brightness is turned on. And if you’re sure that the adaptive brightness or auto-brightness is disabled on your PC, then it could be because your PC using Intel HD graphics and the Intel power saver technology is trying to save some power by automatically decreasing the backlight intensity.
In this guide, we will see how to disable the auto-brightness or adaptive brightness in Windows 10. Use the directions in Method 3 to configure the Intel HD Graphics Control Panel and instructions in Method 4 to turn off the display power-saving technology in AMD, which decreases backlight intensity to extend the battery life.
Method 1 of 5
Disable automatic brightness in Windows 10 via Settings
NOTE: Available in Windows 10 build 21354 and later only. Also, the option shows up only if your PC supports the Content adaptive brightness control (CABC).
Step 1: Go to Windows 10 Settings app > System > Display page.
Step 2: Turn off the option labeled Automatically adjust contrast based on the displayed content to help improve battery.

Method 2 of 5
Disable adaptive or auto brightness via Control Panel
Step 1: Right-click on the battery icon in the system tray and click Power Options to open the same.

Step 2: On the left pane, click Choose when to turn off the display option to open the Edit Plan Settings window.

Step 3: Here, click Change advanced power settings to open the Power Options dialog.

Step 4: Extend Display, extend Enable adaptive brightness, and then select Off option for both On battery and Plugged in.

Click the Apply button.
Note that you have just disabled adaptive brightness only for the current power plan. So, if you often switch between the power plan, you need to repeat the same for all power plans. For instance, if you just disabled adaptive brightness for a Balanced power plan, you will need to do the same for the Power saver plan as well if you don’t want Windows 10 to automatically adjust the brightness while using the Power saver plan.
Method 3 of 5
Disable automatic brightness via the Intel Graphics Command Center app
Step 1: Launch the Intel Graphics Command Center app using the taskbar/Start search. If not installed, you can get it from the Windows 10 Store.
Step 2: Once the app is running, in the left pane, click on System.
Step 3: Now, on the right side, click Power.
Step 4: In the On battery section, turn off the Display Power Savings option. That’s it!

Method 4 of 5
Disable auto-brightness via Intel HD Graphics Control Panel
If you have AMD graphics, follow the directions in Method 3.
I am no expert and I might be completely wrong, but it looks like the Intel power saver technology was the reason why I was feeling like the display brightness was automatically adjusting even after turning off adaptive brightness.
Use this method only if you have a feeling that the screen brightness is automatically adjusting even after turning off auto-brightness using the instructions mentioned above. Obviously, this is only for PCs that ship with Intel onboard graphics.
There might be a similar feature/option in graphics drivers from other manufacturers as well. Have a look at the properties of the graphics drivers before contacting Microsoft support.
Step 1: Right-click on the desktop and click Graphics Properties.

NOTE: If the Graphics Properties option is not available in the desktop context menu, open Control Panel, change View by to Small icons and then click Intel HD Graphics.

Step 2: Once Intel HD Graphics Control Panel is launched, click Power.

Step 3: On the left pane, click On Battery.
Step 4: Finally, click Disable option for Display Power Saving Technology and then click Apply button.

If the issue is fixed, remember that Intel graphics Control Panel might be reset to default settings when a newer version of the driver is installed, and you might need to disable the feature again by following the directions mentioned above.
Method 5 of 5
Disable AMD Vary-Bright
Step 1: Right-click on the desktop and then click on the AMD Radeon Settings option.
Step 2: Expand the Power tab and then click on PowerPlay. Here, disable or turn off the Enable Vari-Bright option.
Your automatic brightness issue should now be solved. Good luck!
If you have a dedicated graphics card, please check out its settings as well. Your automatic brightness issue should now be solved. Good luck!
Do let us know if you were able to fix the issue using one of these methods.
Modern tablets and convertibles support screen rotation thanks to built-in hardware sensors. When you turn your device, its desktop may change the display to a portrait or landscape orientation. This is very useful, because you will always see your software from the right angle. There is a way to lock the rotation, so the display will remain in a portrait or landscape orientation regardless of your device’s position.
The automatic screen rotation feature is very useful. However, there are a number of situations when it can be annoying. The best example is when you are lying in your bed with your tablet and reading something. Once you change the screen angle a little, the device suddenly changes the screen orientation. This is very disturbing. That’s why you may want to temporarily lock the screen rotation.
In Windows 10, you can use of the methods listed below.
To disable Screen Rotation in Windows 10, do the following.
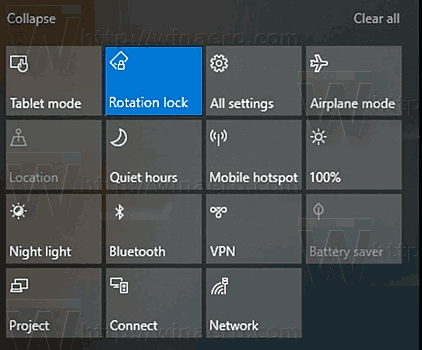
- Open the Action Center. You can tap on its icon in the system tray (notification area).
- In the Action Center, tap on the quick action button «Rotation lock» to enable it.

- Later, you can unlock the screen rotation feature using the same button.
Tip: If you have a keyboard connected to your device, you can use the Win + A shortcut keys to quickly open the Action Center.
Also, there is a dedicated hotkey to toggle enable the Rotation lock. Just press Win + O.
There are a number of alternative methods.
- Open the Settings app.
- Go to System -> Display.
- On the right, turn on the option Rotation lock.

- The screen rotation feature is now disabled.
Finally, if required, you can apply a Registry tweak. Here is how.
Disable Screen Rotation with a Registry tweak
Note: You must be signed in with an administrative account to continue.
- Open the Registry Editor app.
- Go to the following Registry key.
HKEY_LOCAL_MACHINE\SOFTWARE\Microsoft\Windows\CurrentVersion\AutoRotation
See how to go to a Registry key with one click.
- On the right, create a new 32-Bit DWORD value Enable.
Note: Even if you are running 64-bit Windows you must still create a 32-bit DWORD value.
Set its value data to 1 to enable the feature. A value data of 0 will disable it. - To make the changes done by the Registry tweak take effect, you need to sign out and sign in again to your user account.
To save your time, you can download the following Registry files:
Download Registry Files
That’s it!
Support us
Winaero greatly relies on your support. You can help the site keep bringing you interesting and useful content and software by using these options:
If you like this article, please share it using the buttons below. It won’t take a lot from you, but it will help us grow. Thanks for your support!
Распределенное обучение с TensorFlow и Python
AI_Generated 05.05.2025
В машинном обучении размер имеет значение. С ростом сложности моделей и объема данных одиночный процессор или даже мощная видеокарта уже не справляются с задачей обучения за разумное время. Когда. . .
CRUD API на C# и GraphQL
stackOverflow 05.05.2025
В бэкенд-разработке постоянно возникают новые технологии, призванные решить актуальные проблемы и упростить жизнь программистам. Одной из таких технологий стал GraphQL — язык запросов для API,. . .
Распознавание голоса и речи на C#
UnmanagedCoder 05.05.2025
Интеграция голосового управления в приложения на C# стала намного доступнее благодаря развитию специализированных библиотек и API. При этом многие разработчики до сих пор считают голосовое управление. . .
Реализация своих итераторов в C++
NullReferenced 05.05.2025
Итераторы в C++ — это абстракция, которая связывает весь экосистему Стандартной Библиотеки Шаблонов (STL) в единое целое, позволяя алгоритмам работать с разнородными структурами данных без знания их. . .
Разработка собственного фреймворка для тестирования в C#
UnmanagedCoder 04.05.2025
C# довольно богат готовыми решениями – NUnit, xUnit, MSTest уже давно стали своеобразными динозаврами индустрии. Однако, как и любой динозавр, они не всегда могут протиснуться в узкие коридоры. . .
Распределенная трассировка в Java с помощью OpenTelemetry
Javaican 04.05.2025
Микросервисная архитектура стала краеугольным камнем современной разработки, но вместе с ней пришла и головная боль, знакомая многим — отслеживание прохождения запросов через лабиринт взаимосвязанных. . .
Шаблоны обнаружения сервисов в Kubernetes
Mr. Docker 04.05.2025
Современные Kubernetes-инфраструктуры сталкиваются с серьёзными вызовами. Развертывание в нескольких регионах и облаках одновременно, необходимость обеспечения низкой задержки для глобально. . .
Создаем SPA на C# и Blazor
stackOverflow 04.05.2025
Мир веб-разработки за последние десять лет претерпел коллосальные изменения. Переход от традиционных многостраничных сайтов к одностраничным приложениям (Single Page Applications, SPA) — это. . .
Реализация шаблонов проектирования GoF на C++
NullReferenced 04.05.2025
«Банда четырёх» (Gang of Four или GoF) — Эрих Гамма, Ричард Хелм, Ральф Джонсон и Джон Влиссидес — в 1994 году сформировали канон шаблонов, который выдержал проверку временем. И хотя C++ претерпел. . .
C# и сети: Сокеты, gRPC и SignalR
UnmanagedCoder 04.05.2025
Сетевые технологии не стоят на месте, а вместе с ними эволюционируют и инструменты разработки. В . NET появилось множество решений — от низкоуровневых сокетов, позволяющих управлять каждым байтом. . .