
По умолчанию в настройках Windows включена автоматическая перезагрузка ОС при возникновении стоп ошибки (BSOD). При этом Windows создает минидамп памяти, который можно в дальнейшем проанализировать с помощью WinDbg или BlueScreenView. Но кроме дампа памяти на BSOD экране отображается код ошибки, которого иногда бывает достаточно для определения проблемы. Но пользователь не всегда успевает увидеть код ошибки на BSOD экране, т.к. компьютер уходит в перезагрузку слишком быстро. В этой статье мы рассмотрим, как включить/отключить функцию автоматической перезагрузки при отказе системы (Automatic Restart on System Failure) в Windows 10 и 11.
Включить/отключить автоматическую перезагрузку Windows при сбоях можно несколькими способами
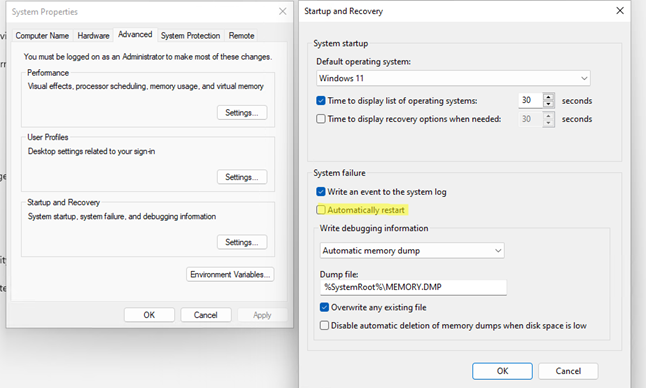
- Через графический интерфейс свойств компьютера. Выполните команду
SystemPropertiesAdvanced.exe
-> Advanced -> снимите чекбокс Automatic Restart (Выполнить автоматическую перезагрузку) в секции System Failure (Отказ системы).
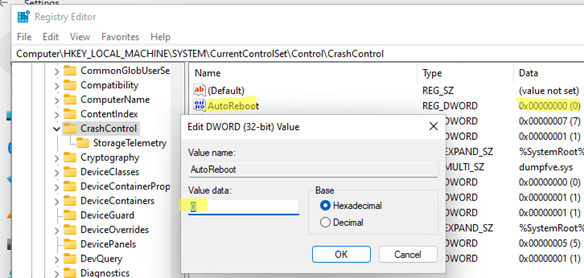
- Можно отлючить автоматическую перезагрузку через ключ реестра AutoReboot (типа REG_DWORD) в ветке HKEY_LOCAL_MACHINE\SYSTEM\CurrentControlSet\Control\CrashControl. Можно изменить значение этого ключа вручную через
regedit
или из командной строки. Чтобы отключить перезагрузку компьютера, измените значение параметра на
0
:
reg add «HKEY_LOCAL_MACHINE\SYSTEM\CurrentControlSet\Control\CrashControl» /v AutoReboot /t REG_DWORD /d 0 /f
- Также для отключения перезагрузки Windows при сбоях можно воспользоваться утилитой командной строки wmic:
wmic RecoverOS set AutoReboot = False
Для включения авто-перезагрузки при BSOD, используйте:
wmic RecoverOS set AutoReboot = True

Если вам нужно отключить автоматическую перезагрузку только один раз (при следующей загрузке компьютера), перезагрузите компьютер в режиме расширенных параметров загрузки (командой shutdown:
shutdown /r /o /f /t 00
, либо с зажатой клавишей
Shift
щелкните по кнопке перезагрузки в стартовом меню Windows).
Выберите Troubleshoot.
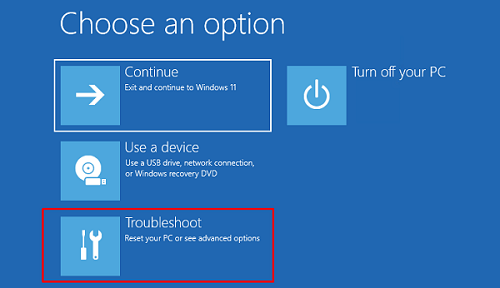
Затем выберите Advanced options -> Startup Settings -> Restart.
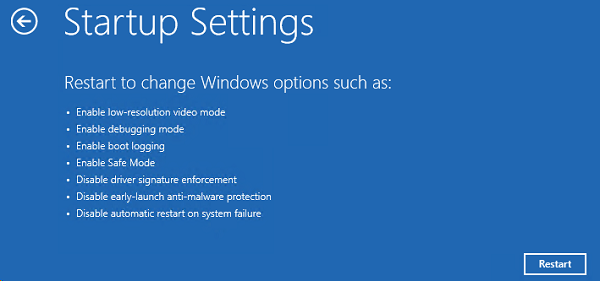
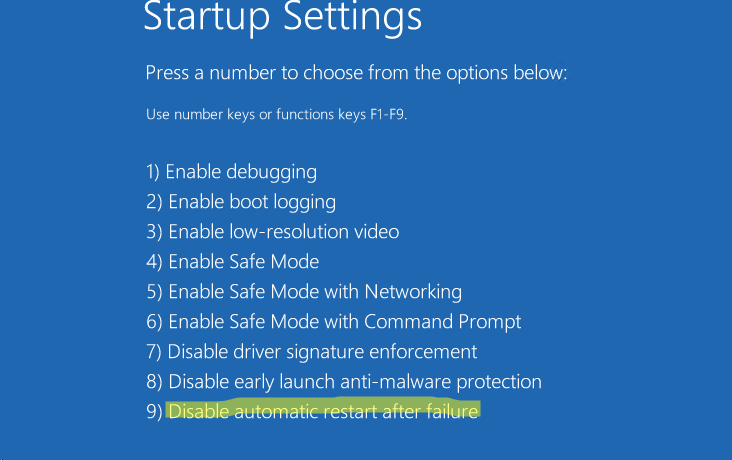
После перезагрузки компьютера в режиме Startup Settings нажмите клавишу F9 или 9 для загрузки компьютера с опцией Disable automatic restart after failure.
Если Windows бесконечно перезагружается и не позволяет внести изменения в свои настройки, вы можете аналогичным образом однократно отключить автоматическую перезагрузку. Для этого достаточно трижды прервать загрузку Windows по питанию.
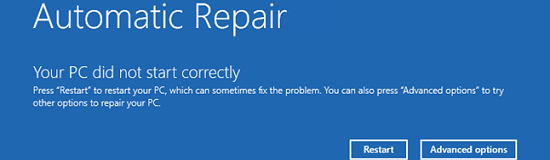
В результате Windows попытается загрузиться с образа восстановления WinRE в режиме автоматического восстановления (Preparing Automatic Repair).
В этом режиме также перейдите в Advanced options -> Startup Settings -> Restart -> F9 для загрузки Windows с отключенной перезагрузкой при сбоях.
Если вам нужно отключить перезагрузку при сбоях для установленного образа Windows в офлайн режиме, нужно загрузится с установочного диска Windows и отредактировать файл реестра
..\Windows\System32\Config\System
. Изменив значение параметра
AutoReboot
в ветке
HKLM\SYSTEM\CurrentControlSet\Control\CrashControl
на
0
и сохраните файл реестра на диск.
Пример офлайн редактирования реестра есть в статье “Компьютер неожиданно перезагрузился, или возникла непредвиденная ошибка. Невозможно продолжить установку Windows”.
348
348 people found this article helpful
Stop the auto restart after a BSOD in Windows 11, 10, 8, 7, Vista, and XP
What to Know
- Go to Control Panel and select System and Security > System > Advanced system settings.
- In the Startup and Recovery section, choose Settings.
- Uncheck the box next to Automatically restart.
This article describes how to disable Windows’ automatic restart on system failure, which gives you time to note the error so you can troubleshoot. The process below is similar across all versions of Windows, although it might vary slightly among them.
How to Stop Automatic Restart on Windows System Failure
You can disable the automatic restart on system failure option in the Startup and Recovery area of System Properties, accessible via Control Panel.
-
Open Control Panel. In newer versions of Windows, the quickest way is to search for control from the Start menu or Run dialog box.
If you’re using Windows 7 or before, go to Start > Control Panel.
-
In Windows 11, 10, 8, and 7, select System and Security.
In Windows Vista, choose System and Maintenance.
In Windows XP, select Performance and Maintenance.
If you don’t see this option because you’re viewing Control Panel applets by their icon, open System instead, and then skip down to Step 4.
-
Choose the System link.
-
Select Advanced system settings from the panel on the left of the screen (Windows 11 shows this link on the right).
Windows XP only: Open the Advanced tab of System Properties.
A much quicker way to reach System Properties is with the sysdm.cpl command. Enter it in a Command Prompt window or the Run dialog box.
-
In the Startup and Recovery section near the bottom of the new window, choose Settings.
-
Select the box next to Automatically restart to remove its check mark.
-
Select OK to save the changes, and then OK again on the System Properties window.
Thanks for letting us know!
Get the Latest Tech News Delivered Every Day
Subscribe
Опубликовано:
Автоматическая перезагрузка Windows происходит при возникновении стоп ошибки операционной системы, также называемой синий экран смерти. Однако, если мы заходим проанализировать проблему, не изучая файлы дампов, а посмотрев на саму ошибку и ее код, можно отключить данную автоматическую перезагрузку.
Графический интерфейс
Реестр
Командная строка
При запуске системы
Дополнительные сведения
БИОС
Перезагрузка раз в час
После обновления
После установки драйвера
Графический интерфейс
Открываем Проводник — кликаем правой кнопкой по Этот компьютер — Свойства:

* также можно зайти в раздел Панель управления — Система и безопасность — Система.
В левом меню кликаем по Дополнительные параметры системы:

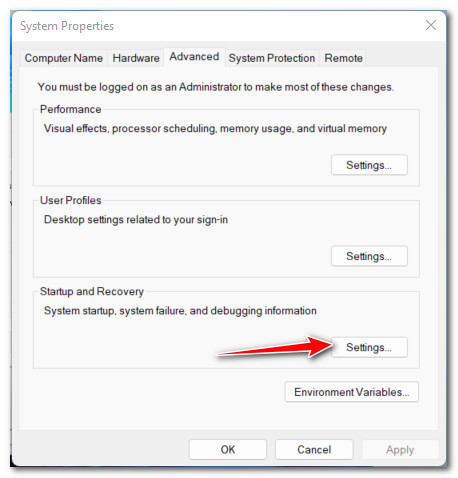
На вкладке Дополнительно в разделе «Загрузка и восстановление» кликаем по Параметры:

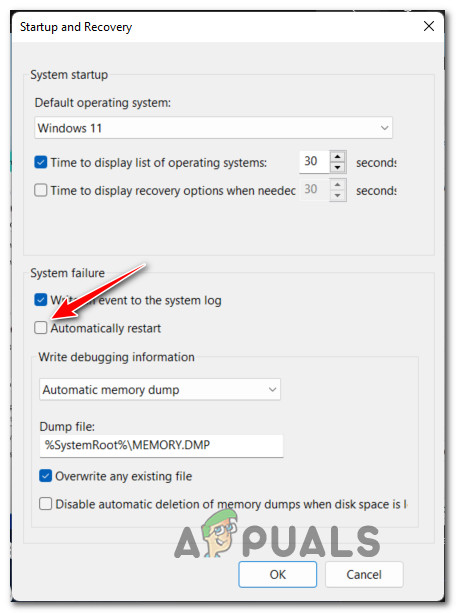
В открывшемся окне в разделе «Отказ системы» снимаем галочку Выполнить автоматическую перезагрузку:
Нажимаем OK.
Через реестр
Открываем редактор реестра (команда regedit) и переходим в ветку HKEY_LOCAL_MACHINE\SYSTEM\CurrentControlSet\Control\CrashControl. Находим ключ AutoReboot и меняем его значение на «0»:

Командная строка
С помощью команды нужно поменять значение ключа в реестре. Делается это так:
reg add «HKEY_LOCAL_MACHINE\SYSTEM\CurrentControlSet\Control\CrashControl» /v AutoReboot /t REG_DWORD /d 0 /f
Это универсальный метод, который подойдет для любой версии операционной системы Windows.
При загрузке системы (циклическая перезагрузка)
Если система бесконечно перезагружается и не позволяет внести изменения в свои настройки, необходимо отключить автоматическую перезагрузку при запуске.
Windows 8 и более поздние
После нескольких неудачных попыток загрузить систему, мы увидим «Подготовка автоматического восстановления»:

Затем «Диагностика компьютера»:
В открывшемся окне нажимаем по Дополнительные параметры:

Вместо перезагрузки мы увидим окно «Выбор действия» — нажимаем по Поиск и устранение неисправностей (Windows 10):

или Диагностика (Windows 8):

Затем по Дополнительные параметры:
И Параметры загрузки:
В открывшемся окне просто нажимаем по кнопке Перезагрузить:
Компьютер перезагрузится и откроется окно «Параметры загрузки». Выбираем Отключить автоматический перезапуск после сбоя (цифра 9):

Windows 7 и более ранние системы
Нажимаем F8 после первой заставки при включении компьютера — в открывшемся меню выбираем Отключить автоматическую перезагрузку при отказе системы:

Дополнительно
Относительно автоматической перезагрузки необходимо знать следующие нюансы.
1. Отключение в БИОСе
Довольно часто, данную настройку пытаются найти в БИОС. На самом деле, автоматическая перезагрузка — функция операционной системы и отключить ее в БИОСе нельзя.
2. Компьютер перезагружается каждый час
Как правило, проблема связана с нарушением лицензионного соглашения. Необходимо активировать Windows.
3. Перезагрузки после обновления
При неудачном обновлении система может перестать работать. Необходимо попробовать запуститься в безопасном режиме или загрузиться с установочного диска и попробовать восстановить систему с использованием точки восстановления.
4. После установки драйвера
Установка или обновление драйвера также может стать причиной критической ошибки. Если компьютер начал постоянно перезагружаться после установки драйвера, необходимо загрузиться в безопасном режиме и откатить драйвер.
Users that have already made the upgrade to Windows 11 are currently reporting a weird issue where the PC engages in random restarts that have no apparent trigger. This problem is confirmed to occur with all the Insider Preview builds of Windows 11 as well as with the latest stable release.
After investigating this particular issue thoroughly, it turns out that this problem can have more than one potential cause. In fact, there are several different culprits that might be responsible for causing this behavior on Windows 11. Here’s a list:
- Inconsistent group policies – As it turns out, it’s not uncommon to face this issue immediately after upgrading due to some incorrectly migrated WU group policies. This issue should eventually get rectified as WU performs this task automatically at some point, but you can speed up the process by running a Gpupdate command from an elevated CMD prompt.
- Failing storage sectors – Another potential cause that might be behind these random restarts is a scenario in which you’re actually dealing with failing hardware storage that’s preventing your OS from accessing certain parts of its system files. In this case, the long-term solution is to change the failing HDD or SSD, but you might be able to get a bit more life out of your current storage device by running a CHKDSK scan and replacing the failing sectors with unused equivalents.
- Overclocked or underclocked components – If you previously overclocked the voltages of your components to get a power boost or underclocked them to make your hardware usable with an insufficient PSU, keep in mind that both of these scenarios can produce random restarts. If you can’t find a stable configuration, the best course of action, in this case, is to revert the custom frequencies and voltages back to their default values.
- Auto reboot is caused by WU – The Windows Update component on Windows 11 is much more aggressive with restarts than it was with previous interactions of Windows. If you feel like these WU-induced restarts happen with not enough warning, you can make some modifications via Registry Editor to ensure that no auto-reboots will occur while the user is logged into Windows 11.
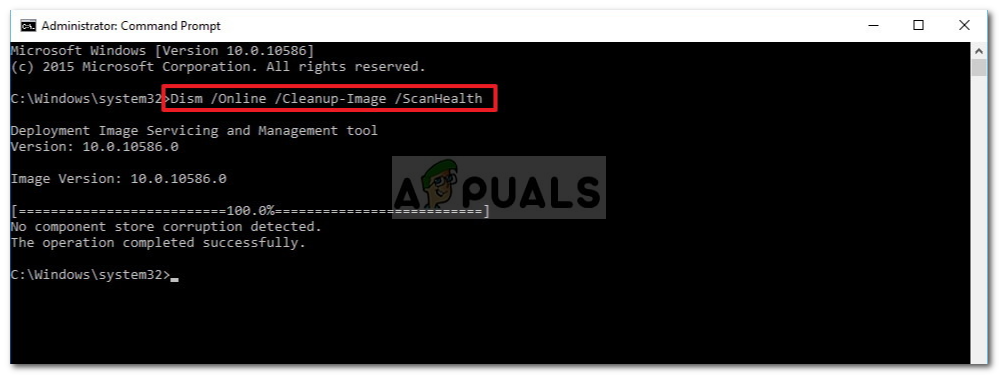
- Restart trigger due to system failure – Every recent Windows version includes a failsafe mechanism that will automatically trigger a restart in every situation where a system failure occurs (this is to protect hardware components). If the issue is software-related, you should be able to fix the issue by running SFC and DISM scans. Additionally, you can disable this failsafe mechanism altogether to prevent the restarts from occurring.
- Restart is caused by Power Management settings – If you’re experiencing this issue on a laptop or ultrabook, you should also consider the fact that this issue might be caused by one or two power management settings meant to prevent unnecessary battery drain. You can rectify this issue by adjusting the minimum processor state and link-state from your current power plan.
Now that you are familiar with every potential issue that might determine your Windows 11 computer to restart itself randomly, here’s a list of verified fixes that other users finding themselves in a similar situation have successfully used to fix this issue permanently:
Update the group policies via CMD
If you’re starting to encounter this issue immediately after upgrading to Windows 11 from an older Windows version, the first thing you should do is ensure that the issue is not being caused by some incorrectly migrated group policies.
This is fairly common with insider builds of Windows 11, so if this scenario is applicable the first thing you should do is update all your group policies from an elevated Windows Terminal prompt.
Note: Windows Update should eventually update these group policies automatically – this method will speed up the process.
Follow the instructions below to use an elevated Windows Terminal prompt to update all your group policies via a CMD command:
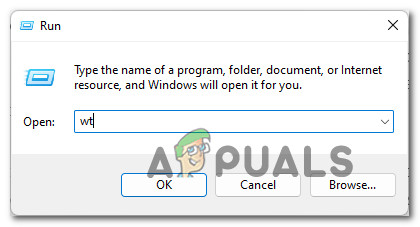
- Press Windows key + R to open up a Run dialog box. Next, type ‘wt’ inside the text box and press Ctrl + Shift + Enter to open up a Windows Terminal app with administrative access.

Opening up a Windows Terminal app - When you’re prompted by the User Account Control prompt, click Yes at the User Account Control prompt to grant administrative privileges.
- Inside the elevated Windows Terminal window, type the following command and press Enter to reset every relevant group policy using a CMD command:
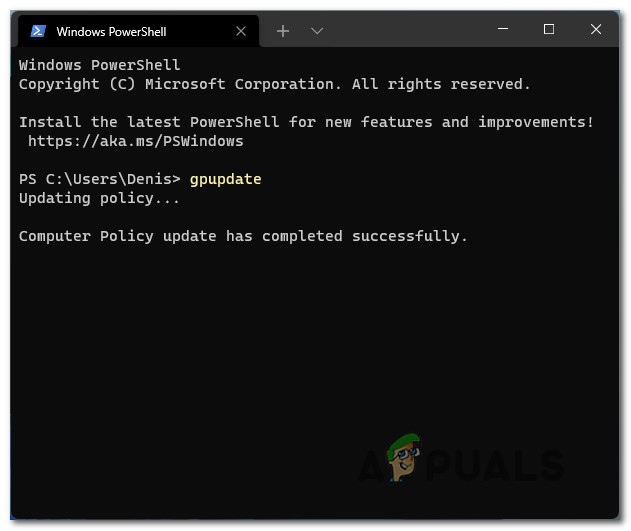
gpupdate

Updating the Gpolicy - After you run this command, wait patiently until you get the Computer Policy update has completed successfully message, then type the following command:
cls
- After the second command is processed, close the Windows Terminal app and restart your computer.
- Once the next Windows 11 startup is complete, use your computer normally and see if the random restarts are still occurring.
If the same kind of issue is still affecting your PC as you’re still dealing with random restarts, move down to the next potential fix below.
Running a CHKDSK scan
Another potential reason why you should expect to be experiencing these random restarts is a situation where you’re actually dealing with failing storage sectors that are preventing your operating system from accessing certain sub-components.
A failing drive usually means you will have to replace it at some point, but you might be able to prolong the life of your current storage device by running a CHKDSK scan from an elevated Command prompt.
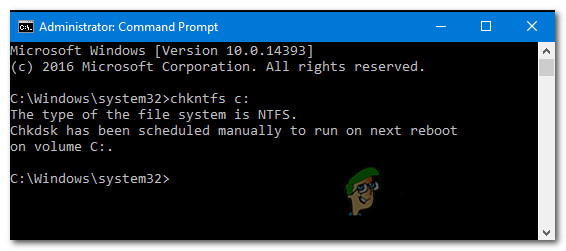
After you run this scan and the CHKDSK utility successfully replaces the failing sectors with unused equivalents, reboot your PC and see if the problem is fixed once the next startup is complete.
In case you’re still experiencing the same kind of unexpected system restarts, move down to the next potential fix below.
Revert overclocking or increase undervolted components (if applicable)
Another potential reason why you might see these unexpected system restarts is if you recently modified the voltages or frequencies of your RAM, CPU, or GPU – doesn’t matter if you overclocked or underclock them.
Underclocking for the sake of utilizing a sub-par PSU or overclocking in order to get an extra power boost can both affect the stability of your OS and produce unexpected restarts.
If you find yourself in this particular scenario, you will likely keep experimenting with different voltages until you find a stable build.

Note: If you are underclocked, our recommendation is to go for a more powerful PSU because the system instability is likely to continue regardless of what tweaks you make.
If you tried adjusting the values and you still can’t find a stage build, the best course of action (if possible) is to revert all overclocking or underclocking changes back to their default values.
In case this method was not applicable or you already applied it and you’re still seeing how your Windows 11 restart unexpectedly, move down to the next potential fix below.
Stop auto reboots caused by WU
I don’t know if you noticed but, Windows 11 is way more aggressive with installing pending updates and doesn’t really shy away from restarting your PC (even without your consent) when certain important updates arrive.
If this is the reason why you’re experiencing unexpected system restarts, you can ensure that the issue doesn’t occur again by using the Registry Editor utility to create a registry key that will prevent Windows 11 from restarting itself automatically when a new update is available.
Follow the instructions below for step-by-step instructions on creating the NoAutoRebootWithLoggedOnUser key via Registry Editor and prevent the unexpected restarts from occurring again on Windows 11:
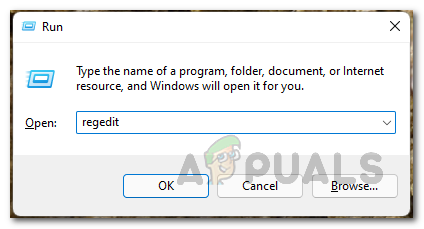
- Press Windows key + R to open up a Run dialog box. Next, type ‘regedit’ inside the text box and press Ctrl + Shift + Enter to open up the Registry Editor with admin access.

Opening up the Registry Editor Utility - Once you’re prompted by the User Account Control prompt, click Yes to grant admin access.
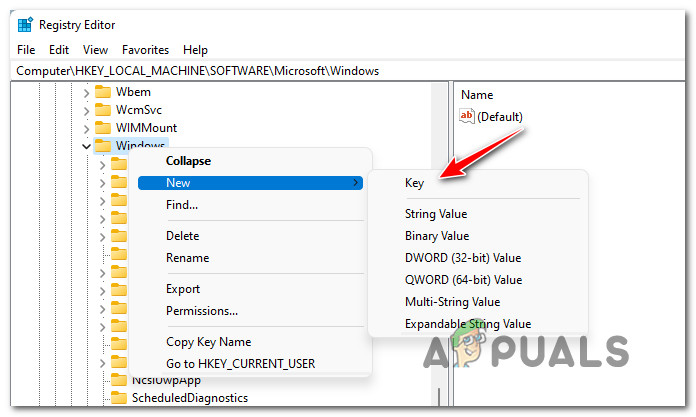
- Inside the Registry Editor, use the menu on the left-hand side to navigate to the following location:
Computer\HKEY_LOCAL_MACHINE\SOFTWARE\Microsoft\Windows
Note: You can either navigate to this location manually (by double-clicking on each key from the menu on the left) or you can paste the full path directly into the navigation bar at the top and press Enter to get there instantly.
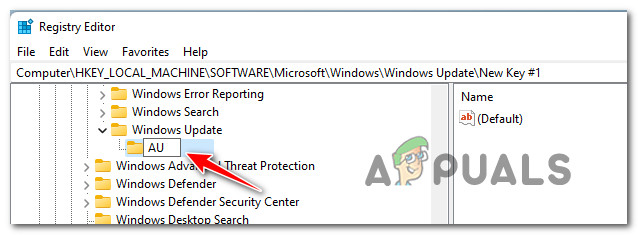
- Next, right-click on the Windows key and choose New > Key from the context menu that just appeared.

Create a new key inside the Windows folder - Next, name the newly created key to Windows Update by right-clicking on it and selecting Rename from the context menu.
- Next, right-click on the newly renamed Windows Update key and choose New > Key once again from the context menu.
- Name this newly created key to AU using the same procedure and press Enter to save the changes.

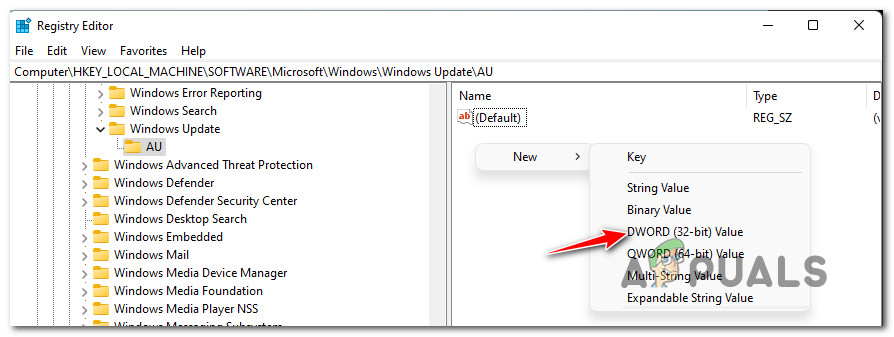
Renaming the new key to AU - Select the AU key from the menu on the left, then move over to the right-hand menu and right-click on an empty space. From the context menu that just appeared, choose New > Dword (32-bit) Value.

Create a new DWORD under the AU key - Next, name the newly created DWORD value to NoAutoRebootWithLoggedOnUser and press Enter to save the changes.
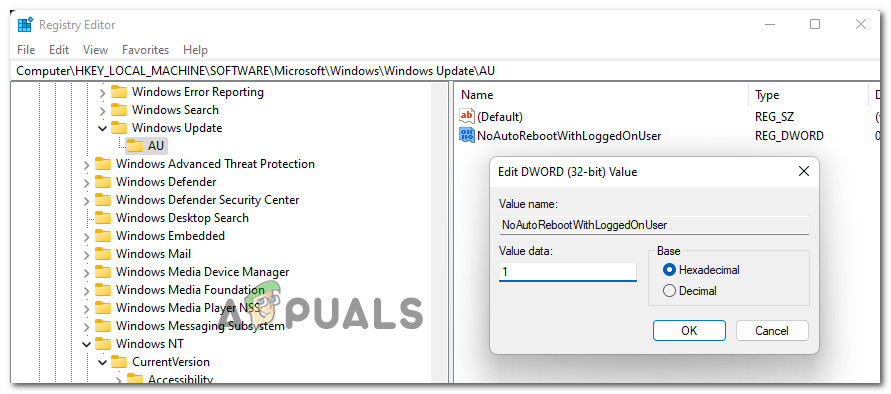
- Finally, double-click on the newly created NoAutoRebootWithLoggedOnUser value and set the Base to Hexadecimal, then set the value data to 1 and click Ok to save changes.

Preventing restarts caused by Windows Update - Once this modification has been operated, restart your PC to enforce these changes and monitor the situation to see if the restart issue on Windows 11 is finally resolved.
In case the same issue is still occurring, move down to the next potential fix below.
Adjust the minimum processor state and Link state Power Management (if applicable)
If you’re experiencing his issue on a laptop or ultrabook (or something with a battery), you should also consider the fact that the problem might occur due to an aggressing power management setting that will automatically switch of your PC when it’s forced to perform resource-intensive tasks while utilizing power from the battery.
In case you find yourself in this particular case, follow the instructions below for step-by-step instructions to re-configure your power management settings and ensure that the system interruption is not occurring due to an aggressive battery management setting:
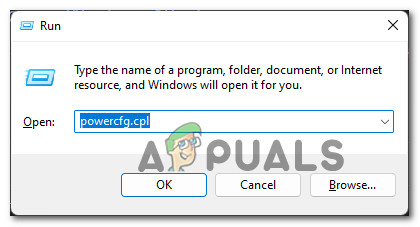
- Press Windows key + R to open up a Run dialog box. Next, type ‘powercfg.cpl’ inside the text box and press Enter to open up the Power Options menu.
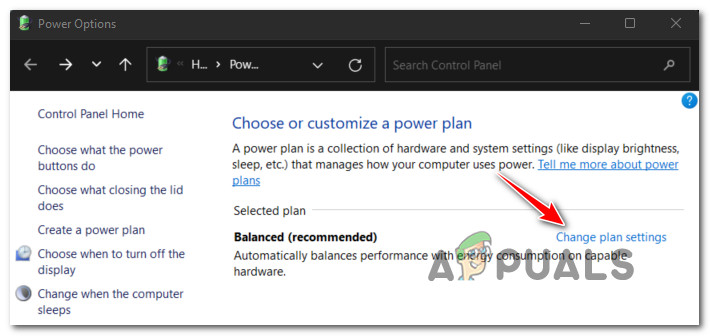
Open the Power settings menu - Inside the Power Options menu, click on the Change plan settings hyperlink associated with your active power plan.

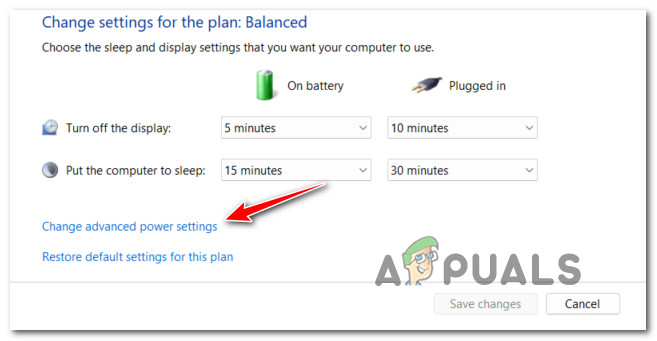
Change the Power Plan settings - Inside the Edit Plan Settings, click on Change advanced power settings.

Changing the advanced power settings - Next, expand the drop-down menu associated with the Minimum processor state and make sure the On Battery % is 5% or lower.
Adjusting the minimum processor rate - Next, expand the drop-down menu associated with Link State Power Management and change the On Battery menu to OFF before clicking on Apply to save the changes.
- Restart your PC to enforce the changes, then reboot your PC and see if the problem is now fixed.
In case the same type of issue is still occurring, move down to the final potential fix below.
Disable Automatic Restarts on System failure
If none of the methods have been effective so far, you need to take into consideration that some kind of system failure is causing your Windows 11 computer to trigger a restart in order to prevent your hardware components from getting damaged.
If you’re dealing with a file corruption-induced system restart, you should take the time to deploy SFC and DISM scan scans first.
If you have determined that you’re dealing with a system failure that doesn’t affect the health of your hardware internals, one way to ensure that the unexpected restarts stop occurring is to modify the Startup and Recovery menu.
Follow the instructions below to access the System Properties screen and modify the default behavior for System failure:
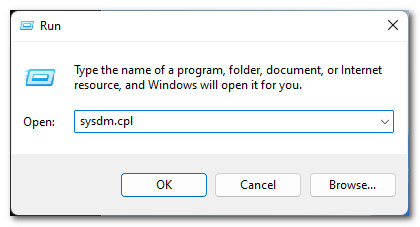
- Press Windows key + R to open up a Run dialog box. Next, type ‘sysdm.cpl’ inside the text box and press Enter to open up the System Properties screen.
Opening the System Properties screen - Once you’re inside the System Properties screen, access the Advanced tab from the ribbon menu at the top, then click on the Settings button associated with Startup and Recovery.

Accessing the Settings menu of Startup and Recovery - Next, from the Startup and Recovery window, go under System Failure and uncheck the box associated with Automatically Restart.

Disabling Automatic restarts on Windows 11 - Utilize your Windows 11 computer normally and see if the problem is now fixed. If the restart is occurring due to a system failure, it should no longer occur.
Windows 11 random restart is a common problem that is reported by many users in forums. If the system keeps restarting after upgrading to Windows 11, how can you get rid of this situation from your PC? Take it easy and you can find some methods from this post on the MiniTool website.
Windows 11 Restarting Loop
Windows 11 is the latest and most advanced operating system from Microsoft. Now, it has been out for the public for several months. You may be interested in this new OS. To enjoy the brand-new user interface, features, settings, and more, you choose to upgrade to Windows 11 from Windows 10/8/7.
However, after the update, you may run into a common problem – Windows 11 random restart. You are not the only one to have this issue and many users also complain about the restarting loop in forums like Reddit, Microsoft, etc.
It can be caused by an overheated graphics card, incorrect group policies, misconfigured settings, overclocking, system infected with malware, faulty storage, and more. When the system restarts automatically without any information, it can be annoying at times. You always lose the unsaved work due to this.
Fortunately, you can get rid of the trouble. To fix the Windows 11 restart problem, try the solutions below.
Tip: If you are running Windows 10 and the system reboots randomly, you can find solutions from this post – Detailed Steps to Fix Windows 10 Endless Reboot Loop.
Fixes for Windows 11 Random Restart
Disable Automatic Restart
When Windows 11 keeps restarting, an auto-restart task may have been created by you to run on the scheduled time. To fix the Windows 11 restart problem, go to perform the following operations to disable automatic restart.
Step 1: Open the Settings app by pressing the Win and I keys on the keyboard.
Step 2: Under the System tab, click About > Advanced system settings.
Step 3: In the System Properties window, click Advanced and choose Settings from the Startup and Recovery section.
Step 4: In the new window, uncheck the box of Automatically restart under System failure.

Step 5: Click OK to save the change.
Step 6: Reboot your computer manually and let the change take effect.
Disable Fast Startup
Fast Startup is a feature that allows the PC to start up faster after a shutdown. When powering off your computer, this feature will put the machine into a hibernation state rather than a full shutdown. But sometimes Fast Startup goes wrong. For instance, you want to shut down the PC but this feature may restart the system.
To fix Windows 11 random restart, disable Fast Startup by following the wizards below.
Step 1: Press Win + R, type powercfg.cpl and click OK to open the Power Options window.
Step 2: Click Choose what the power button does from the left pane.

Step 3: Click Change settings that are currently unavailable.
Step 4: Uncheck the box of Turn on fast startup (recommended) and click Save changes.
Update Graphics Card Driver
A faulty video card driver may also lead to Windows 11 random restart. In this situation, you may find the computer reboots when the GPU loads, for example, you play a big game with heavy video rendering. To get rid of a Windows 11 restarting loop, reinstall or update your graphics card driver.
Step 1: Open Device Manager via the Win + X menu.
Step 2: Expand Display adapters and right-click on the GPU driver to choose Update driver.
Step 3: Click Search automatically for drivers and Windows will detect and install the driver for your PC.

Alternatively, you can right-click on the GPU driver and choose Uninstall device. Then, click Uninstall to remove the driver. After restarting your PC, Windows will install it again.
Besides, you can choose to install the latest version of the graphics card driver via downloading the driver from the manufacturer’s website (like NVIDIA, AMD, etc.). To know more information, refer to the related article – How to Update Graphics Card Drivers (NVIDIA/AMD/Intel).
Change Windows Update Settings Causing Random Restarts
Compared with other Windows versions, Windows 11 is more aggressive when installing pending updates and doesn’t shy away from rebooting your PC even without your consent while there are certain important updates. To fix Windows 11 random restart caused by Windows Update, modify your registry.
Tip: Making changes to the registry is a crucial thing and you should make a backup for the registry since incorrect changes can lead to an unbootable system. (Related article: How to Back up Individual Registry Keys Windows 10/11.) Then, do this task by following the steps below.
Step 1: Ge the Run dialog by pressing Win + R, type regedit, and click OK to launch Registry Editor.
Step 2: Click Yes to grant admin access in the pop-up window.
Step 3: Go to the path – Computer\HKEY_LOCAL_MACHINE\SOFTWARE\Microsoft\Windows.
Step 4: Right-click on the Windows folder and choose New > Key. Name it as Windows Update.
Step 5: Right-click on Windows Update and select New > Key. Name the new key as AU.
Step 6: Click on the newly created key, right-click on the empty space and choose New > DWORD (32-bit Value). Name it as NoAutoRebootWithLoggedOnUser.
Step 7: Double-click on the new item, set Base to Hexadecimal, set Value data to 1, and click OK to save the modification.

After finishing these operations, reboot your PC. Then, use your PC and check if Windows 11 keeps restarting again. If this won’t work, try another way.
Update Group Policies
If Windows 11 restarts automatically at once after you upgrade to Windows 11 from an old version, you should do firstly is to make sure if this issue is caused by incorrectly migrated group policies. Go to update these policies by following the steps below.
Step 1: Right-click on the Start icon and choose Windows Terminal (Admin). Click Yes when getting the UAC prompt.
Step 2: In the new window, click the arrow at the top and choose Command Prompt.
Step 3: Type the gpupdate command and press Enter to execute it.

Scan for Malware
Malware or viruses in your computer may be the possible cause for Windows 11 to reboot automatically. And you should run a deep system scan and get rid of the threats from your computer. To do this task, you can run the built-in antivirus software in Windows 11 and it is Windows Security or Windows Defender.
Step 1: Go to Settings > Privacy & Security.
Step 2: Click Windows Security > Open Windows Security to open this antivirus software.
Alternatively, you can press Win + S, type Windows Security and click the result to launch this app.
Step 3: Click Virus & threat protection, click Scan options and choose Full scan to perform a deep scan.
Step 4: Click Scan now. This process will take some time and scan for all files and running programs on your hard disk.

If some threats are detected, Windows Security will remove them. Then, see if the Windows random restart is fixed when using your computer.
Run an SFC Scan
If your Windows PC has corrupted system files, it may keep restarting automatically and randomly. To fix the Windows 11 restart problem, perform an SFC scan by using System File Checker.
Step 1: Launch Command Prompt as an administrator in Windows 11.
Step 2: Type sfc /scannow and press Enter. The tool will start to scan your system for corruption and fix it.
Run a CHKDSK Scan
If your hard drive goes wrong, perhaps Windows 11 keeps rebooting. You can perform a disk check for troubleshooting.
Step 1: Open Command Prompt with admin rights.
Step 2: Type in chkdsk /f /r and press Enter.
Step 3: You will be asked to schedule the check to run the next time you reboot the PC. Type Y and press Enter to confirm this.
Other Tips
In addition, there are some other ways mentioned by some users and you can also have a try to fix the Windows 11 restart problem:
1. Undo Overlocking
A potential cause for Windows 11 random restart is that you overlock your RAM, CPU, or GPU to let the computer perform faster than what’s it’s able to do. To fix your issue, undo the change.
Related article: Is Overclocking Safe? Whether to Overclock or Not? Look Here
2. Change power settings
If your laptop keeps restarting, the potential reason may be an aggressing power management setting. The setting can power off the PC when it is forced to run resource-intensive tasks while using the battery’s power.
To remove Windows 11 restarting loop, open Power Options by typing powercfg.cpl in Run, click Change plan settings > Change advanced power settings, expand Processor power management > Minimum processor state and ensure On Battery % is 5% or lower.
“Windows 11 keeps restarting? How can you get rid of the restarting loop? Try these solutions and you can share these ways on Twitter to let more persons know.”Click to tweet
Recover Lost Files after Random Restart
A random restart can lead to data loss. To get your crucial files back, you can run a data recovery software. Here, we recommend using MiniTool Power Data Recovery that is compatible with Windows 11/10/8/7. With it, you can recover files from your hard drive, SD card, USB drive, pen drive, CD/DVD, and more. To know much information, refer to this post – Files Missing after Reboot Windows? How to Recover Them.
Back up Your System
System issues are very common, which makes you very annoyed. After fixing the random restart issue, you had better create a system backup for your PC so that you can restore the system to a normal state in case of system issues. With the backup, you won’t spend much time finding solutions.
How can you back up your system for quick disaster recovery? It is an easy task if you use a professional PC backup software. You can also run a MiniTool program – MiniTool ShadowMaker.
This software can be used on your Windows 11 PC. It allows you to create a system image, back up files, folders, disks, and partitions. Besides, full backup, differential backup, incremental backup, and automatic backup are supported. Now, download the trial edition of this software to have a trial within 30 days.
MiniTool ShadowMaker TrialClick to Download100%Clean & Safe
Step 1: Double-click on the shortcut on your PC’s desktop to open MiniTool ShadowMaker Trial Edition.
Step 2: Click Keep Trial to continue using this edition.
Step 3: By default, MiniTool ShadowMaker backs up your system. When seeing the Source section under the Backup tab, you can find this software has chosen system partitions as the backup source. You only need to click Destination and specify an external hard drive or USB drive as the storage path.
Step 4: Click Back Up Now to execute the system backup at once.

After creating a system image, go to Tools > Media Builder to create a bootable USB drive or CD/DVD so that you can perform a system image recovery in case of a system crash or restarting loop.
Final Words
Does your PC keep rebooting in Windows 11? If you are encountering this common issue, try the solutions mentioned above to easily get rid of the Windows 11 random restart. As a suggestion, you had better back up your Windows for fast recovery in case of a system accident.
If you have any other ways to fix the restarting issue, let us know by leaving a comment below. Thanks in advance.