Download Article
Troubleshoot many types of issues in Windows by turning off hardware acceleration
Download Article
- Graphics Hardware Acceleration (Windows 11)
- Graphics Hardware Acceleration (Windows 10)
- Audio Hardware Acceleration (Windows 11)
- Audio Hardware Acceleration (Windows 10)
- Accelerated GPU Scheduling (Windows 10)
- Hardware Acceleration (Google Chrome)
- Hardware Acceleration (Firefox)
- Hardware Acceleration (Edge)
- Video
- Expert Q&A
- Tips
|
|
|
|
|
|
|
|
|
|
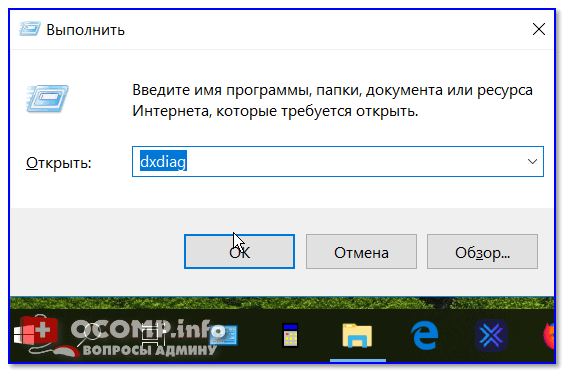
Hardware acceleration is a process that occurs when software hands off certain tasks to your computer’s hardware—usually your graphics and/or sound card. It may improve performance on computers with powerful components but can have the opposite effect on less powerful computers. Disabling hardware acceleration may improve performance if you’re experiencing freezing and crashing. You can also disable hardware acceleration in web browsers like Google Chrome. This wikiHow guide teaches you how to turn off hardware acceleration on your Windows PC.
Disabling Hardware Acceleration
- Graphics: Right-click the desktop, go to «Display Settings» > «Graphics» > «Change default settings», then turn off «hardware-accelerated GPU scheduling».
- Audio: Go to «Settings» > «System» > «Sound» > «More sound settings» > your audio device > «Properties» > «Advanced», and uncheck «Allow hardware acceleration.»
- Chrome: Click the menu, go to «Settings» > «System», and toggle off hardware acceleration.
-

This opens your display controls.[1]
- Note: Not all hardware supports system-wide hardware acceleration. You’ll typically only find the option to enable or disable hardware acceleration on PCs with high-end GPUs. If you can’t adjust your hardware acceleration settings for the entire system, you can often disable the feature in certain apps, including your browser, AutoCAD, Discord, and various games.
- If you have a dedicated GPU, you may see the option to open your GPU’s settings on the right-click menu. Depending on your GPU, you may be able to find the setting to disable hardware acceleration if you click that menu item.
- If you want to turn off your hardware acceleration to stream movies on Discord, see the section to disable it in Google Chrome, Mozilla Firefox, or Microsoft Edge.
-
It’s below «Related Settings» in the Display Settings menu.
Advertisement
-
It’s the blue text at the top of the menu below «Default settings.»
-
It’s the first option at the top of the menu. This disables hardware acceleration.
-
Once you disable hardware acceleration, you’ll need to restart your computer for the changes to take effect.


Advertisement
-
This opens your display controls.[2]
- Note: Not all hardware supports system-wide hardware acceleration. You’ll typically only find the option to enable or disable hardware acceleration on PCs with high-end GPUs. If you can’t adjust your hardware acceleration settings for the entire system, you can often disable the feature in certain apps, including your browser, AutoCAD, Discord, and various games.
- If you have a dedicated GPU, you may see the option to open your GPU’s settings on the right-click menu. Depending on your GPU, you can find the setting to disable hardware acceleration if you click that menu item.
- If you want to turn off your hardware acceleration to stream movies on Discord, see the section to disable it in Google Chrome, Mozilla Firefox, or Microsoft Edge.
-
It’s toward the bottom of the right panel. This opens properties for your monitor and GPU.
-
It’ll be under the «Display information» header. A new window will expand.
-
If your video card supports hardware acceleration, you’ll usually see this tab at the top of the window.
- If you don’t have a Troubleshoot tab, click the Properties button at the top of the window, and then click the Resources tab.
-
If the Change settings button is grayed out/deactivated, your graphics card doesn’t support changing hardware acceleration settings.[3]
If you’re sure your card can handle this change, you probably need to update your drivers. -
This disables hardware acceleration on your PC.


Advertisement
-
It’s the gear icon in your Start menu. You can also open your Settings by pressing Windows key + i on the keyboard.
- If hardware acceleration is turned on for your PC’s sound card, sound tasks may be shifted from the CPU to the audio card to avoid overtaxing the CPU. You can try disabling hardware acceleration if you’re experiencing high amounts of noise, choppy sound, and slow performance during audio playback.
-
It’s the first option in the menu bar to the left.
-
It’s the second option in the main menu panel. It’s next to an icon that resembles a speaker.
-
It’s the last option below the «Advanced» header.
-
It will likely be speakers. It may be labeled as «Realtek Audio» or whatever sound card model you are using. Click it to highlight it.
-
It’s in the lower-right corner of the Sound menu.
-
It’s at the top of the window.
-
It’s under the «Hardware Acceleration» header.
-
This disables hardware acceleration for audio immediately.


Advertisement
-
It’s the gear icon in your Start menu. You can also open your Settings by pressing Windows key + i on the keyboard.
- If hardware acceleration is turned on for your PC’s sound card, sound tasks may be shifted from the CPU to the audio card to avoid overtaxing the CPU. You can try disabling hardware acceleration if you’re experiencing high amounts of noise, choppy sound, and slow performance during audio playback.
-
It’s the first icon in the Settings panel.
-
It’s on the left panel.
-
It’s under the name of your sound device at the top of the panel.
-
You’ll see this toward the bottom below «Related settings.»
-
It’s at the top of the window.
-
It’s under the «Hardware Acceleration» header.
-
This disables hardware acceleration for audio immediately.


Advertisement
-
It’s the gear icon in your Start menu. You can also open your Settings by pressing Windows key + i on the keyboard.
- Since the 2020 release of Windows 10 version 2004, Microsoft has included a new feature called Hardware Accelerated GPU Scheduling, which reduces latency and performance while running apps and games that use the GPU. This feature is only available if you have a separate GPU with updated drivers, so not everyone can access the setting.
- Most GPU drivers are updated automatically, but you can always check the manufacturer’s website to see if new updates are available.[4]
-
It’s the first icon in the Settings panel.
-
You’ll see it at the top of the left panel.
-
It’s toward the bottom of the right panel.
-
You’ll only see this switch if you have a modern GPU with updated drivers and an up-to-date version of Windows 10. If you don’t see this option and have a GPU separate from your motherboard, it may not support this feature.
- After disabling the feature, you’ll be prompted to restart your computer. Hardware accelerated GPU scheduling will be turned off once your computer comes back up.


Advertisement
-
Google Chrome uses hardware acceleration to take advantage of your computer’s GPU to lighten the load on your CPU. However, sometimes software incompatibilities can cause problems. Disabling hardware acceleration may fix these problems.
-
It’s the icon with three dots in the upper-right corner.
-
It’s in the menu that appears when you click the icon with three dots.
-
It’s in the menu bar to the left.
-
The switch will turn grey, and hardware acceleration will be disabled.
- Make sure to restart your browser to completely apply the new settings.


Advertisement
-
This looks like an orange fox wrapped around a purple sphere.
-
This is in the top-right corner.
-
You can find this towards the bottom of the pop-up menu.
-
This is on the General’ tab.
-
Once unchecked, a new option will appear.
-
This will disable hardware acceleration on Firefox.
- Make sure to restart your browser to completely apply the new settings.


Advertisement
-
This looks like a blue and green swirled e.
-
This is in the top-right corner.
-
You can find this towards the bottom of the pop-up menu.
-
This is in the left panel.
-
This will disable hardware acceleration in Microsoft Edge.
- Make sure to restart your browser to completely apply the new settings.


Advertisement
Add New Question
-
Question
Should I turn off hardware acceleration?
Spike Baron
Network Engineer & Desktop Support
Spike Baron is a Network Engineer & Desktop Support Expert based in Los Angeles, California. He is the owner of Spike’s Computer Repair. With over 25 years of working experience in the tech industry, Spike specializes in PC and Mac computer repair, used computer sales, virus removal, data recovery, and hardware and software upgrades. He has worked as an IT Systems expert for numerous companies, including Huntington Health, Blackbox, Honda, and Manufacturers Bank. In his spare time, Spike also builds and restores computers. He has his CompTIA A+ certification for computer service technicians and is a Microsoft Certified Solutions Expert.
Network Engineer & Desktop Support
Expert Answer
It depends on the tasks you need to perform. Keep in mind that some programs actually need hardware acceleration. Things like playing a DVD movie might need hardware acceleration to function correctly. The more in-demand the hardware is, the more you want to increase the acceleration.
-
Question
What about Windows 10?
Xavier Camden
Community Answer
What do you mean? I personally prefer Windows 10 over any operating system ever, if that’s what you mean. But this article likely wouldn’t help for Windows 10 since it is new. This is mostly for older computers.
-
Question
What else can I do if I do not have the troubleshoot option?
Look up your problem online, and be as specific as you can. Check official websites for whatever isn’t working (i.e. the Microsoft website for Windows problems, the Adobe website for Adobe problems). Also check forums where the community discusses questions. If you still can’t find an answer, contact support, or post your problem on one of these forums. Customer Support may be more prompt, but probably also more stressful.
Ask a Question
200 characters left
Include your email address to get a message when this question is answered.
Submit
Advertisement
Video
-
Disabling hardware acceleration can be helpful if your computer is running slowly. This typically happens in older computers or when a computer with a weak video card attempts to run software or games that demand many computer resources and require a higher-tier video card. If a computer runs slowly when you start a video or play a game, turning off the hardware acceleration can alleviate the problem without investing in a new computer.
Thanks for submitting a tip for review!
Advertisement
References
About This Article
Article SummaryX
1. Right-click the desktop and select Display settings.
2. Click Advanced display settings.
3. Click Display adapter properties for Display 1.
4. Click Troubleshoot.
5. Click Change settings.
6. Turn off hardware acceleration.
Did this summary help you?
Thanks to all authors for creating a page that has been read 830,122 times.
Is this article up to date?
В современном мире, в котором технологии стремительно развиваются, эффективность работы на компьютере становится все более важной. Одним из ключевых аспектов, влияющих на производительность систем, является аппаратное ускорение.
В операционных системах Windows 10 и 11 подобная функция позволяет улучшить производительность графики, оптимизировать обработку данных и повысить общую отзывчивость системы. Однако в некоторых случаях необходимо отключить эту функцию, чтобы избежать проблем совместимости или снизить нагрузку на систему. Поэтому понимание того, как включить или выключить аппаратное ускорение, имеет важное значение для пользователей, стремящихся максимально эффективно использовать свои устройства.
В этой статье мы рассмотрим, в каких ситуациях бывает целесообразно активировать или деактивировать эту функцию, а также пошаговые инструкции, которые помогут вам с этим.
Аппаратное ускорение
Аппаратное ускорение — это технология, позволяющая использовать компоненты устройства (например, графическую карту) для выполнения определенных задач, что может повысить производительность на многих уровнях.
На операционных системах Windows 10 и 11 ускорение в основном применяется в контексте графических и мультимедийных приложений, таких как игры, видеоредакторы и браузеры.
Источник: troshinn.ru / Windows
Для чего это нужно и когда лучше отключить
Зачем нужно аппаратное ускорение
- Повышение производительности: использование специализированных компонентов (например, графических процессоров) для обработки тяжелых задач.
- Снижение нагрузки на ЦП: освобождение процессора от выполнения задач, которые могут быть выполнены более эффективно другим оборудованием.
- Улучшение качества графики: более качественная обработка визуальных эффектов, что особенно важно для игр и мультимедийных приложений.

Источник: drive2.ru / Мем задумчивый человек
Когда стоит его отключить
- Проблемы совместимости: некоторые приложения могут иметь конфликты с аппаратным ускорением;
- Старая техника: на устаревших системах может произойти снижение производительности;
- Измерения производительности: если вы испытываете проблемы с производительностью, отключение данной функции поможет определить источник проблем.

Источник: urdesignmag.com / Отключение из розетки
Возможные проблемы
Несмотря на свои преимущества, использование аппаратного ускорения может вызывать ряд проблем:
- Моральное давление на CPU и GPU. Иногда данная функция может привести к перегрузке процессора или видеокарты, вызывая увеличение температуры и снижение общего срока службы устройств.
- Совместимость с приложениями. Не все приложения подходят для работы с аппаратным ускорением. Некоторые из них могут не функционировать должным образом или даже вызывать сбои.
- Проблемы с воспроизведением видео. В некоторых случаях использование данной функции может привести к искажению изображения, зависанию видео или другим проблемам, связанным с воспроизведением.
- Графические артефакты. На экране могут появляться графические артефакты, такие как фризы или зависания, что может быть следствием неправильной работы драйверов или общего конфликта в системе.
- Необходимость обновления драйверов: если они не обновлены до последних версий, вы можете столкнуться с проблемами производительности и совместимости.

Источник: recruitingtimes.org / Возможные проблемы
Как включить и как отключить аппаратное ускорение
Перед тем как включить аппаратное ускорение, нужно убедиться, что ваши драйвера видеокарты и звукового устройства обновлены.
- Нажмите сочетание клавиш «Win + X» и выберите «Диспетчер устройств»;
- Найдите свою видеокарту в списке, дважды щелкните правой кнопкой мыши;
- Выберите вкладку драйвер, затем «Обновить драйвер», а дальше следуйте указаниям.
Источник: CQ.ru / Обновление драйверов
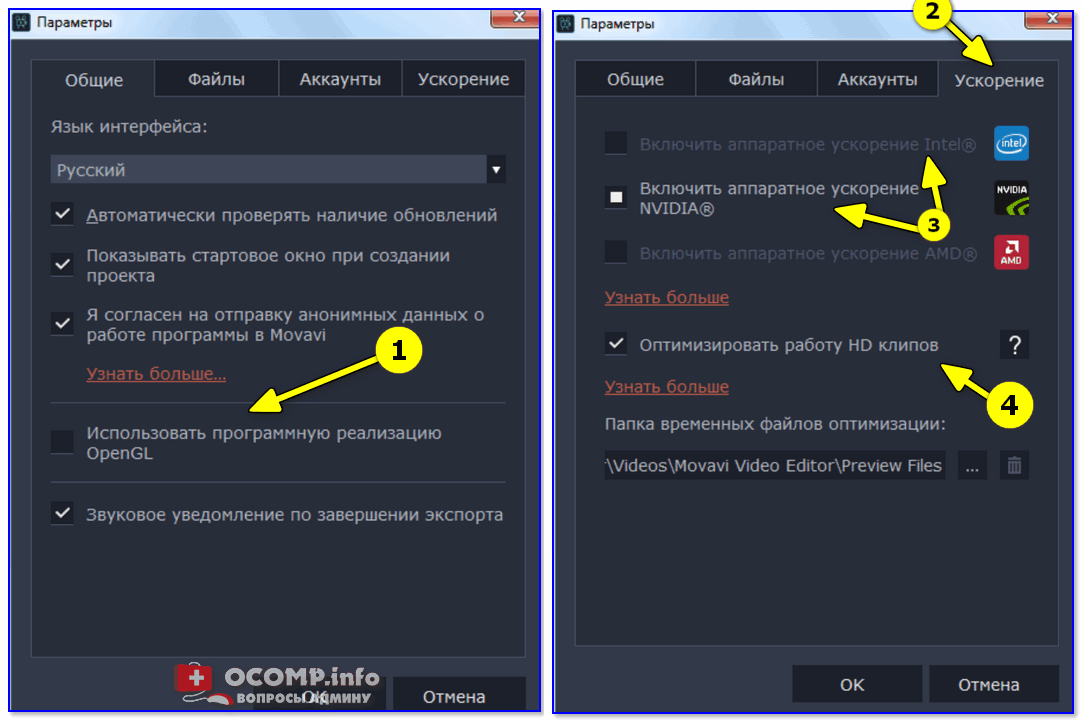
Процесс включения в Windows 10
- Откройте «Параметры» (сочетание клавиш «Win + I»);
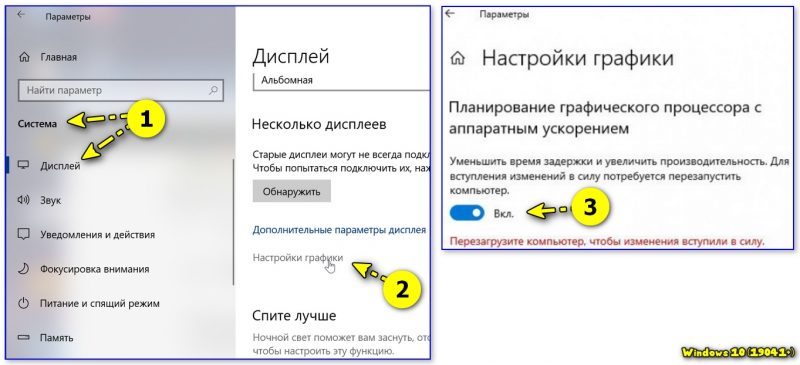
- Перейдите в раздел «Система», после чего выберите вкладку «Дисплей»;
- Прокрутите вниз и нажмите на пункт «Настройка графики»;
- Чтобы включить нужную нам функцию, во вкладке «Планирование графического процессора с аппаратным ускорением» переместите ползунок;
- А если хотите отключить, то верните ползунок в изначальное состояние.
Источник: CQ.ru / Инструкция для Виндовс 10
Процесс включения в Windows 11
- Откройте «Параметры» (сочетание клавиш Win + I);
- Перейдите в раздел «Система», далее «Дисплей»;
- Прокрутите вниз и выберите «Графика», после чего нажмите «Изменение стандартных параметров графики»;
- Чтобы включить нужную нам функцию, потяните ползунок под настройкой «Планирование графического процессора с аппаратным ускорением»;
- При необходимости можете отключить.
Источник: lumpics.ru / Инструкция для Виндовс 11
Ускорение в браузере
Некоторые приложения, такие как браузеры и редакторы, имеют свои настройки для аппаратного ускорения.
Яндекс Браузер
- Откройте Яндекс Браузер и перейдите в меню (три полоски в правом верхнем углу), далее нажмите «Настройки»;
- Слева на панели настроек выберите «Системные»;
- В разделе «Производительность» включите опцию «Использовать аппаратное ускорение, если возможно»;
- Для его отключения переместите ползунок обратно.
Источник: CQ.ru / Инструкция для Яндекс Браузера
Google Chrome
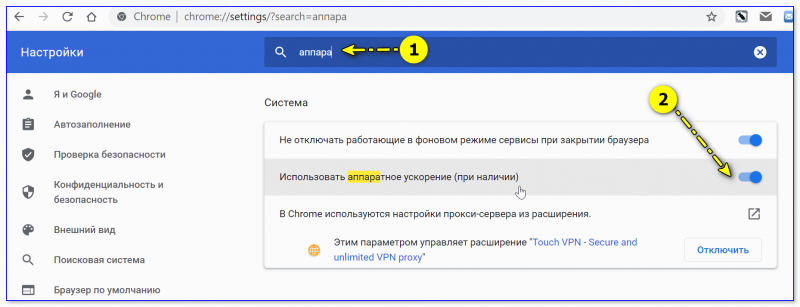
- Откройте Google Chrome и перейдите в меню (три точки в правом верхнем углу);
- Выберите «Настройки»;
- В разделе «Система» (также на панели слева) включите опцию «Использовать аппаратное ускорение, если оно доступно»;
- Если же вы хотите отключить данную функцию, переместите ползунок назад.
Источник: CQ.ru / Инструкция для Google Chrome
Аппаратное ускорение звука
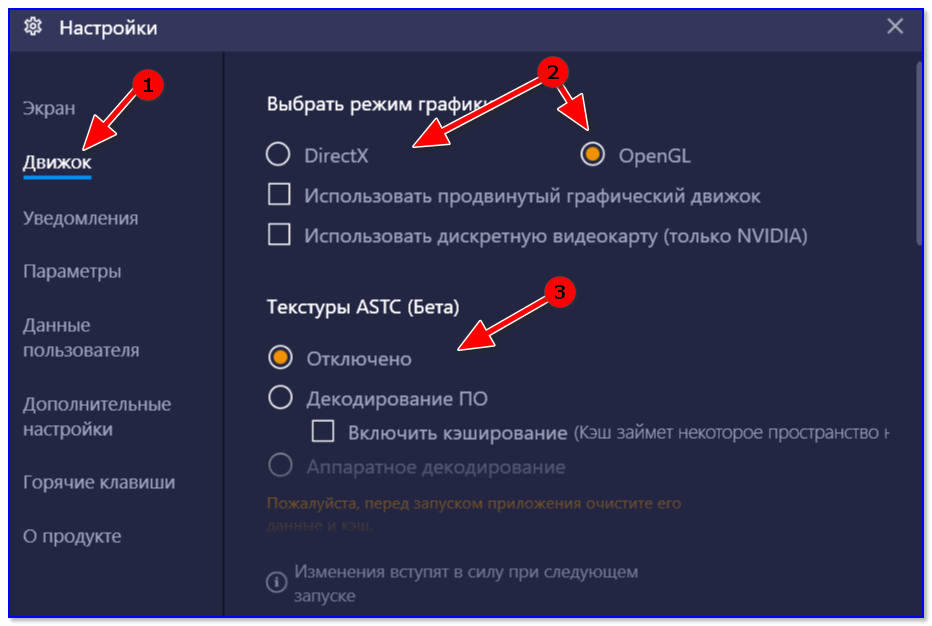
Некоторые приложения также используют аппаратное ускорение звука. Проверьте параметры вашего звукового устройства в панели управления или настройках звука.
Источник: CQ.ru / Инструкция для звука
Полезные советы

Источник: sun9-51.userapi.com / Важно
- Убедитесь, что драйверы вашей видеокарты и других компонентов обновлены до последних версий. Это может значительно повысить стабильность и производительность.
- Многие приложения, такие как браузеры и программы для редактирования, имеют свои настройки для управления аппаратным ускорением. Попробуйте отключить его в настройках приложения, если возникают проблемы.
- Используйте утилиты для мониторинга температурных показателей CPU и GPU. Так вы сможете контролировать их состояние и избежать перегрева.
- Перед использованием нового программного обеспечения или игр, проверьте, поддерживается ли данная функция.
- Если вы столкнулись с проблемами, попробуйте отключить ее и посмотрите, улучшится ли ситуация. Так вы определите, является ли аппаратное ускорение источником проблем.
- Windows имеет встроенные средства для диагностики проблем с производительностью: с помощью них вы можете выявить конфликты и другие проблемы, связанные с устройствами.
- В настройках Windows можно найти параметры для управления производительностью и графикой. Попробуйте изменить настройки, чтобы найти оптимальный баланс между качеством и производительностью.
- Иногда проблемы могут решаться простым отключением и повторным подключением устройства (например, видеокарты) или даже перезагрузкой системы.
Мы разобрали, что включение и отключение аппаратного ускорения не является сложным процессом, однако, подобные действия могут существенно повлиять на производительность вашего компьютера. Включив эту функцию, вы сможете повысить эффективность работы графических приложений и игр, делая их более плавными и отзывчивыми. Но в некоторых случаях, таких как проблемы совместимости или чрезмерная нагрузка на GPU, может возникнуть необходимость в отключении этой функции.
Помните, что настройки, которые вы выбираете, могут значительно изменить ваш опыт работы с компьютером, поэтому не стесняйтесь экспериментировать и находить оптимальные решения для вашей индивидуальной ситуации!
Заглавное фото: CQ.ru с помощью DALL-E