Windows Defender — встроенная антивирусная программа в операционной системе Windows, которая защищает устройство от вредоносного программного обеспечения и других угроз. Однако бывают ситуации, когда необходимо временно отключить защиту, например, для установки программного обеспечения, которое может быть заблокировано антивирусом, или для выполнения задач, требующих полного контроля над системой. В этом руководстве расскажем, как отключить антивирус Windows, обеспечив при этом максимальную безопасность вашего устройства.
Важные моменты перед отключением
Перед тем как отключить Windows Defender, необходимо учитывать несколько ключевых аспектов:
Риски безопасности
Временное отключение антивируса увеличивает вероятность заражения системы. Отключайте защиту только на короткий срок и убедитесь, что у вас есть альтернативные средства защиты.
Дополнительная защита
Если требуется отключить встроенный антивирус, нужно установить стороннее решение, например, PRO32 Total Security, которое будет обеспечивать защиту вашей системы на время отключения Windows Defender.
Отключение через параметры системы
Самый простой способ временно отключить Windows Defender — использовать встроенные системные настройки:
1. Доступ к настройкам безопасности:
- Откройте меню Пуск и выберите «Параметры».
- Перейдите в раздел «Обновление и безопасность» и выберите «Безопасность Windows».
2. Отключение защиты в реальном времени:
- В разделе «Антивирус и защита от угроз» выберите «Управление настройками».
- Отключите опцию «Защита в реальном времени», передвинув переключатель. Это временно деактивирует антивирус, однако система может автоматически включить его через некоторое время.
Полное отключение через редактор локальной групповой политики
Если вы используете Windows Pro или Enterprise, можно полностью отключить Windows Defender через редактор локальной групповой политики:
1. Запуск редактора групповой политики:
- Нажмите Win + R для открытия окна «Выполнить».
- Введите команду gpedit.msc и нажмите Enter.
2. Настройка отключения антивируса:
- Перейдите в раздел Конфигурация компьютера → Административные шаблоны → Компоненты Windows → Антивирусная программа Windows Defender.
- Найдите параметр «Отключить антивирусную программу Windows Defender» и включите его, чтобы полностью отключить встроенную защиту.
Отключение через редактор реестра
Этот метод требует осторожности, поскольку некорректное изменение реестра может вызвать проблемы в работе системы:
1. Запуск редактора реестра:
Откройте окно «Выполнить» с помощью сочетания клавиш Win + R и введите regedit, затем нажмите Enter.
2. Изменение параметров реестра:
- Перейдите по пути: HKEY_LOCAL_MACHINE\SOFTWARE\Policies\Microsoft\Windows Defender.
- Если параметр DisableAntiSpyware отсутствует, создайте его:
- Щёлкните правой кнопкой мыши в правой части окна, выберите Создать → Параметр DWORD (32 бита).
- Присвойте параметру имя DisableAntiSpyware и установите значение 1.
Временное отключение через командную строку
Если необходимо временно остановить работу Windows Defender, можно воспользоваться командной строкой:
1. Запуск командной строки с правами администратора:
В меню Пуск введите cmd, затем щёлкните правой кнопкой мыши на «Командная строка» и выберите «Запуск от имени администратора».
2. Остановка антивирусной службы:
Введите команду sc stop WinDefend и нажмите Enter. Это временно остановит работу Windows Defender.
3. Повторное включение защиты:
Чтобы снова включить антивирус, введите команду sc start WinDefend и нажмите Enter.
Отключение антивируса Windows может быть необходимо в ряде случаев, но всегда следует помнить о рисках, связанных с этим действием. Включайте защиту сразу после выполнения нужных задач. Если у вас возникают сомнения, лучше обратиться к профессионалам. Для обеспечения дополнительной безопасности во время отключения Windows Defender рекомендуется использовать проверенные антивирусные решения, такие как PRO32 Антивирус.
There are times when we want to turn off Windows Defender on Windows 10 quickly. For example, if we are installing a software which requires that the antivirus should be disabled during installation (yes there are some software which requires this).
Windows Defender is an all in one security software from Microsoft consisting of antivirus and a firewall. Windows Defender comes pre-installed with Windows 10. It gets all its updates from Windows Update.
Although you can turn Windows Defender on or off from Windows Settings, there are other quick ways to turn it on or turn off Windows Defender Windows 10 or even Windows 8/8.1. You should choose the best method according to the version of Windows you are using.
Table of Contents
Why turn off Windows Defender?
A general recommendation in terms of security is that you should always have security enabled for your PC at all times. This could be using Windows Defender, Microsoft’s own security solution built into Windows 10, or using a third-party security tool.
Sometimes you will need to disable antivirus and firewall protection in Windows. For example, when you are playing a game but the antivirus keeps on scanning the files and slows down the system. Another example can be when the antivirus detects a program as a false positive although you know that the program is completely safe to use.
Some people believe that it is safe to turn off Windows Defender and use cracking software. This includes activating Windows using illegal tools like KMSPico or the Microsoft Toolkit. These cracking tools are not safe at all. They may inject malware into the system that may not be detectable by the antivirus after installation. The malware is used for cryptomining and other hacking purposes.
There are two ways to turn off Windows Defender, either temporarily or permanently. We will discuss both ways here.
How to Turn Off Windows Defender Using Windows Settings
If you want to turn Windows Defender on or off using Windows Settings, follow the steps below:
- Open Windows Settings (Windows key + i)
- Go to Update & Security –> Windows Security
- From the right-hand pane, select Manage settings under Virus & threat protection settings.
- Toggle the switch to Off under Real-time protection.

This will turn off real-time protection while a manual scan is available at your disposal.
How To Disable Windows Defender Using Command Prompt
To turn off Windows Defender using Command Prompt, follow these steps:
-
Open command prompt with administrative privileges
-
Run the following command to disable Windows Defender:
sc stop WinDefend -
To make sure that Windows Defender is stopped, run this command:
sc query WinDefend
To enable Windows defender again, run the following command:
sc start WinDefendPlease note that this is a temporary method to stop Windows Defender. The service will return to its original state once the system is restarted.
To disable Windows Defender permanently using the command prompt, run the following command:
sc config WinDefend start= disabled
sc stop WinDefend
To enable it again on startup, run the following commands:
sc config WinDefend start= auto
sc start WinDefend
If you want to check the current state of the Windows Defender service, run the following command:
sc query WinDefendCheck the STATE variable. It should be in RUNNING state if it is enabled.

How To Permanently Disable Windows Defender Using PowerShell
One advantage of PowerShell is that you can deploy changes to Windows Defender on multiple computers across the network.
If you prefer PowerShell way, follow the steps below:
- Run PowerShell with administrative privileges (Windows key + X + A)
- To disable real-time monitoring for Windows Defender, run the following command:
Set-MpPreference -DisableRealtimeMonitoring $true - To enable real-time monitoring, run the following command:
Set-MpPreference -DisableRealtimeMonitoring $false
The above method will only turn off real-time monitoring of Windows Defender. If you want to completely remove Windows Defender from Windows 10, use the following PowerShell command:
Uninstall-WindowsFeature -Name Windows-Defender
How To Permanently Turn Off Windows Defender Using Group Policy
If you are a network admin and want to disable Windows Defender from your network, it is wise to use Group Policy. Just follow the steps below to turn off Windows Defender using the Group Policy editor:
- Open Group Policy Editor (Run –> gpedit.msc)
- Go to Computer Configuration –> Administrative Templates –> Windows Components –> Windows Defender Antivirus
- From the right-hand pane, open Turn off Windows Defender Antivirus and select Enabled
This setting can be accessed through Local Group Policy as well as Domain Group Policy. The local policy will turn off Windows Defender for all local users while the domain policy will disable it for all systems on which the policy is applied.
How To Permanently Disable Windows Defender Using Windows Registry
You can also disable Windows Defender permanently from Windows Registry just by creating or altering a few registry keys.. Follow the steps below:
- Go to Run –> regedit. This will open the Windows Registry Editor.
- Navigate to the following key:
HKEY_LOCAL_MACHINE\SOFTWARE\Policies\Microsoft\Windows Defender - In the right pane, right-click the empty area and create a new DWORD (32-bit) value.
- Rename the new item to DisableAntiSpyware
- Double-click DisableAntiSpyware and change its value to 1.
Windows Defender will not load after the next computer restart. To enable Windows Defender again, you can either delete the created registry key or simply change its value to 0.
Please note that you can’t completely uninstall the Windows Defender. Even if you manage to delete its service or files, it will most likely be restored on the next major Windows update.
There are a few scenarios where the user wants to disable a specific part of the Windows Defender system. We will discuss the scenarios below.
How to turn off Windows Firewall only
To turn off Windows Firewall only and keep using other Windows Defender functionality, follow the steps below:
- Open Windows Settings (Windows key + i)
- Click on Update & Security and then Windows Security
- In the right-hand pane, click on Open Windows Security
- From the left-hand pane, select Firewall & network protection
- In the right-hand pane, you will see three protection types. Domain network, Private network, Public network.
- Click on each network type and toggle it to disabled.
This will only turn off the firewall. The antivirus and other functionality of Windows Defender will keep on working.
How to turn off Windows Defender real-time antivirus only
If you want to turn off the antivirus real-time functionality only, you can follow the steps below:
- Open Windows Settings (Windows key + i)
- Click on Update & Security and then Windows Security
- From the left-hand pane, click on Virus & threat protection
- In the right-hand pane, toggle real-time protection to off.
Verdict
If you have not installed any third-party antivirus, then you should keep Windows Defender running as it will protect you from the most common virus/hacking threats while you are connected to the Internet. There should always be an anti-malware solution running on your computer at all times. These methods should be used to disable the security software temporarily.
I hope this has been informative for you. If there are any other easier ways to enable or disable Windows Defender, please let us know in the comments below!
Даже полезные программы иногда мешают работе. Например, встроенный в операционную систему защитник периодически блокирует установку стороннего софта или замедляет устройство. В этот момент приходится выяснять, как отключить антивирус Windows. Убрать его возможно как на время, так и насовсем.
Зачем отключать
В Windows 10 и 11
В Windows 7
После отключения
Чек-лист
Зачем отключать
В Windows 10 и 11
В Windows 7
После отключения
Чек-лист

Разберемся, как отключить антивирус в разных версиях Windows. Выясним, зачем иногда требуется временная деактивация встроенной защиты, какие при этом возникают риски, и что обязательно нужно сделать после отключения.
Стоит ли отключать Windows Defender и когда это может понадобиться
Windows Defender запускается в фоновом режиме и, подобно другим антивирусам, защищает компьютер от вредоносных программ. Отключая защиту, вы оставляете компьютер уязвимым, однако иногда приходится пойти на риск.
Отключение может понадобиться в нескольких случаях.
-
При установке определенных программ или игр, которые ошибочно распознаются как угрозы.
-
Для тестирования программного обеспечения или системных настроек.
-
При переходе на сторонний антивирус — например, Kaspersky, Avast и другие.
-
Когда Defender потребляет слишком много ресурсов и тормозит работу операционной системы.
Помните: не стоит надолго оставлять компьютер совсем без защиты. Если выключили «Защитника Windows», будьте особенно осторожны при загрузке файлов и серфинге в интернете, чтобы не заразить систему вредоносным ПО.
Как отключить защиту Windows 10 и 11
Современные версии операционной системы позволяют временно деактивировать защитник. Также существуют методы его полного отключения. Пошагово разберем все варианты.
Через «Параметры»
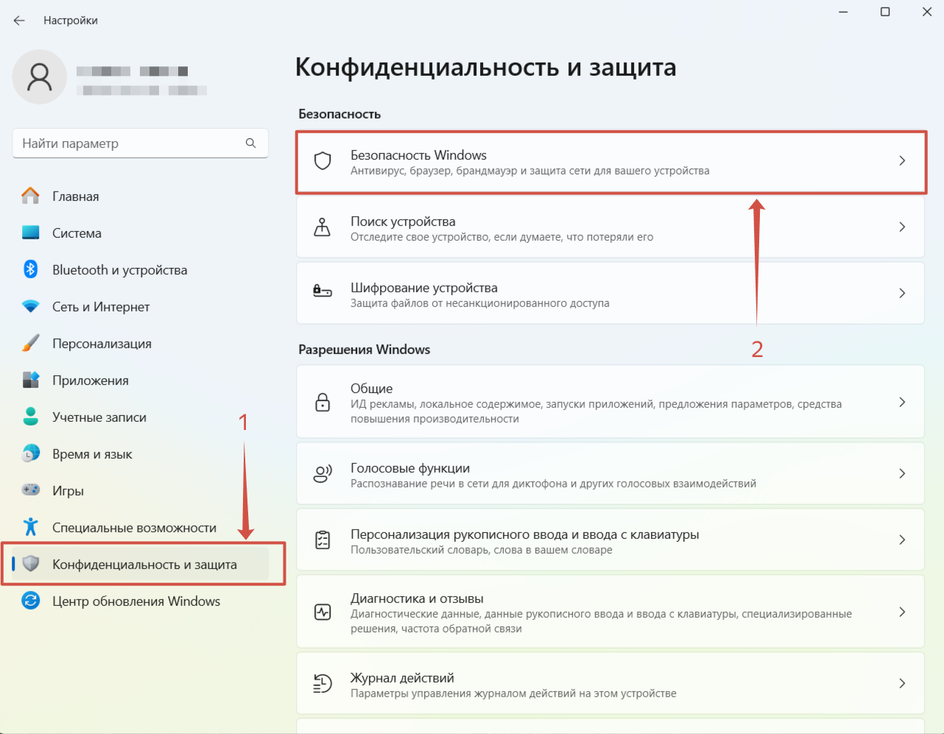
1. Откройте «Параметры» с помощью сочетания клавиш Win + I, выберите «Конфиденциальность и защита», далее «Безопасность Windows».
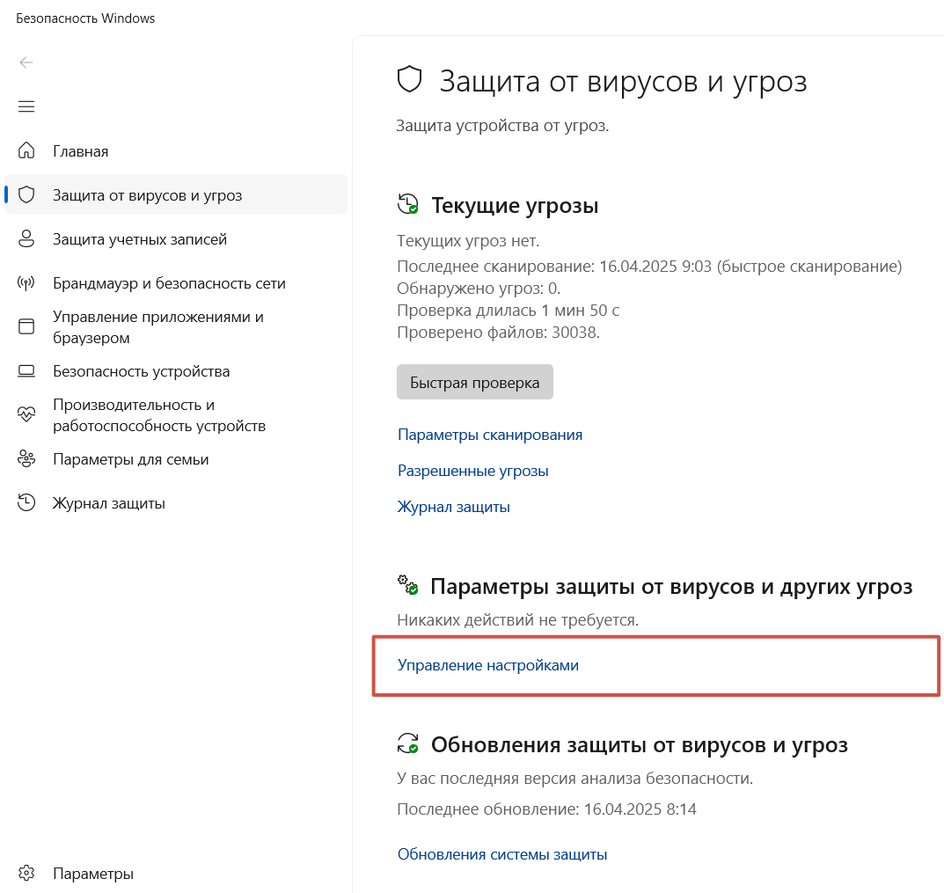
2. Откройте раздел «Защита от вирусов и угроз», после чего переходите в настройки.

3. Перетащите ползунок защиты в режиме реального времени в положение «Выключено».
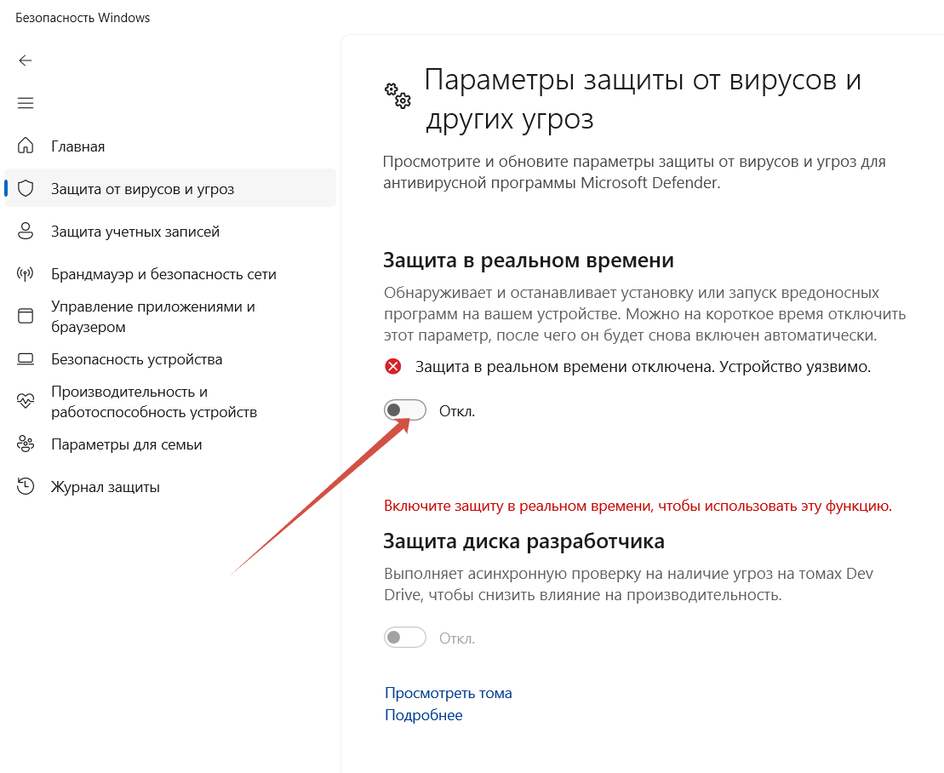
Алгоритм временно отключает защиту. Она включится автоматически после перезагрузки. Можно сразу активировать Defender. Для этого достаточно вернуть ползунок в положение «Включено».
Учтите, что уже запланированную проверку антивирус выполнит, но новые файлы не тронет до следующей диагностики.
Через реестр
Деактивировать программу насовсем получится через реестр. Схема тоже несложная.
1. Чтобы попасть в реестр, нажмите Win + R, введите команду regedit, затем задайте путь или пройдите его вручную: HKEY_LOCAL_MACHINE\SOFTWARE\Policies\Microsoft\Windows Defender.
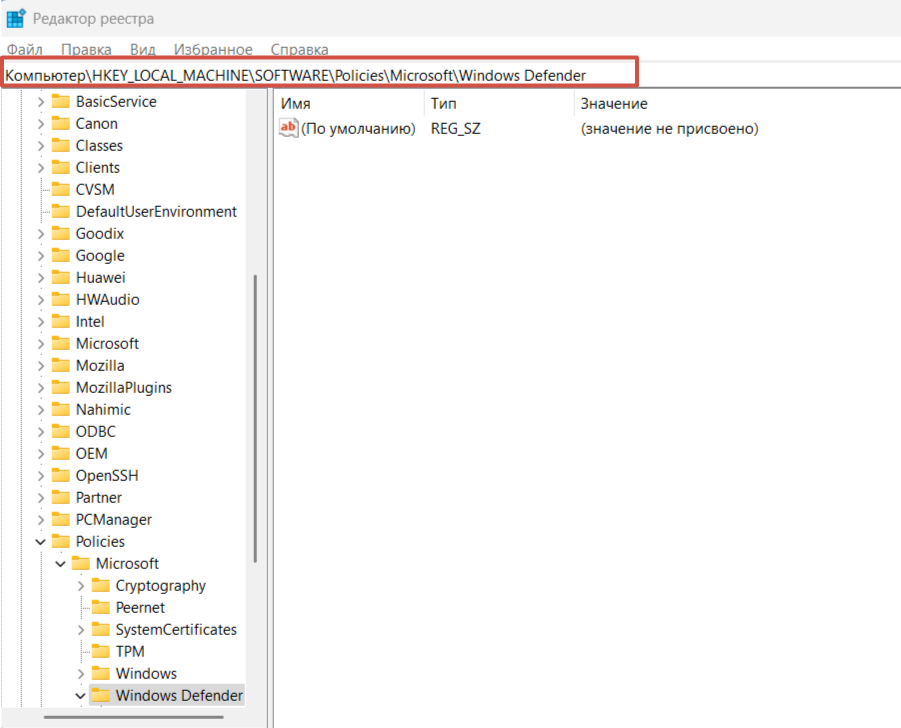
2. Щелкните мышкой справа, чтобы создать параметр DWORD.
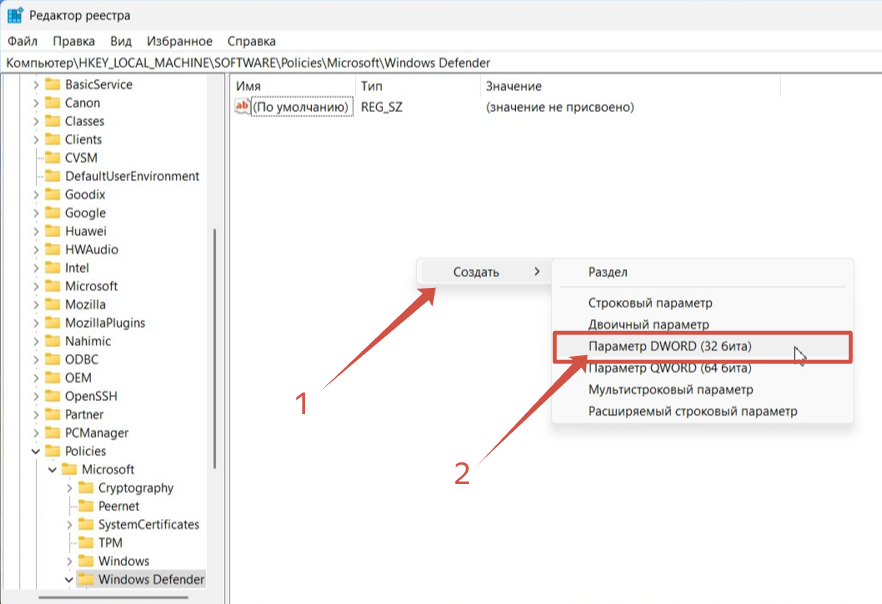
3. Дайте ему имя DisableAntiSpyware.
4. В графе «Значение» поставьте единицу. Отправьте компьютер на перезагрузку.
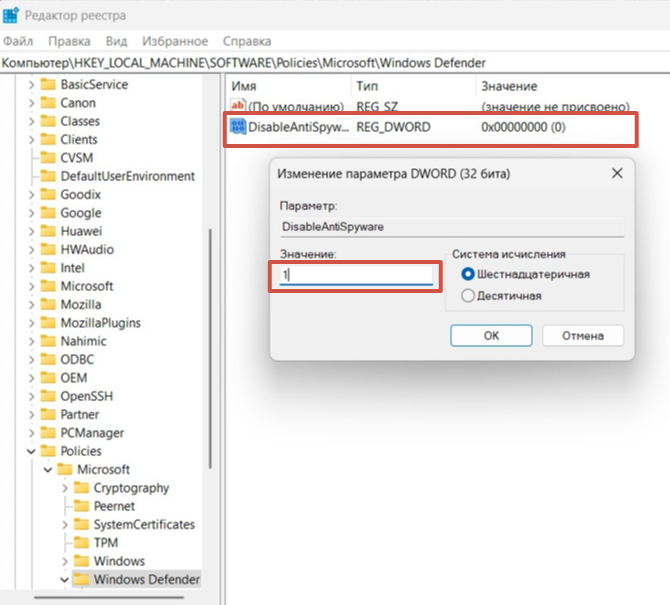
5. Чтобы вновь активировать защиту, поставьте нулевое значение или лишите параметр имени.
Важно. Этот способ работает только в старых версиях платформы безопасности, выпущенных до августа 2021 года.
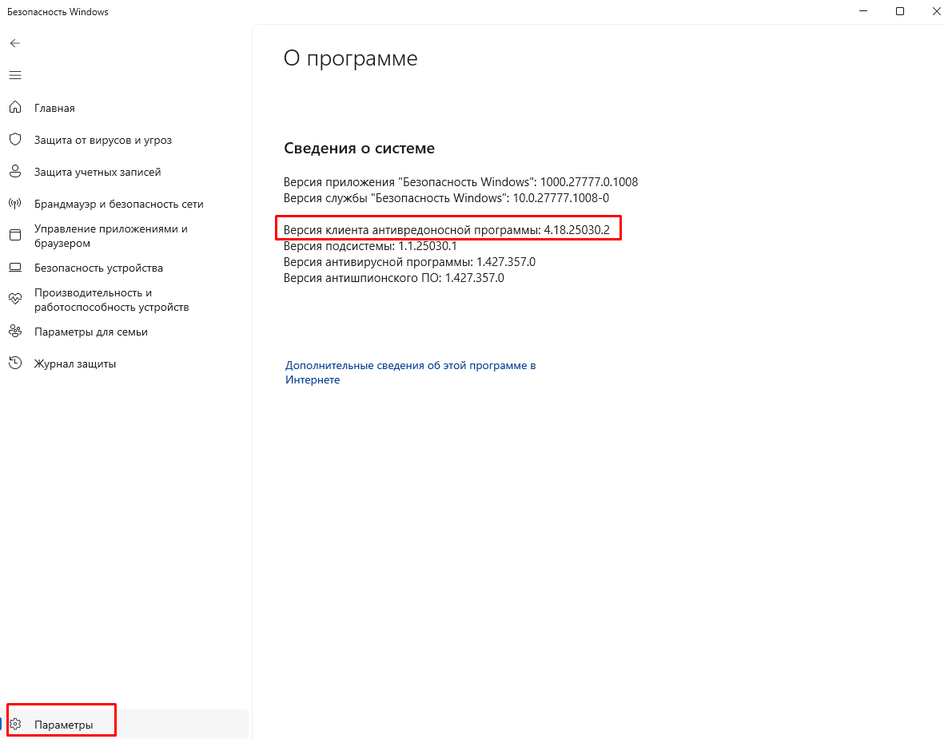
Если у вас установлена платформа антивируса версии 4.18.2108.4 или новее (а это практически все системы на Windows 10 версии 1903+ и Windows 11), то параметр DisableAntiSpyware больше не действует. Его просто игнорирует система.
Это связано с тем, что Microsoft включила функцию Tamper Protection (защита от несанкционированных изменений). Она блокирует любые попытки отключить встроенную защиту через реестр или сторонние программы, чтобы злоумышленники не могли сделать это без ведома пользователя.
Чтобы проверить свою версию платформы безопасности, откройте «Центр безопасности Windows» → «Параметры» → «О программе». Найдите строку «Платформа антивируса».
Если версия 4.18.2108.4 и выше — способ с реестром работать не будет. Отключить Defender можно в настройках, как мы описывали выше, или при установке другого антивируса. Чтобы избежать конфликта ПО, встроенный защитник Windows отключится автоматически.
Через редактор групповой политики
Профессиональные и корпоративные версии Windows 10 и 11 оснащены редактором групповой политики. Он тоже позволяет избавиться от срабатывания защиты навсегда.
1. Зажмите Win + R, используйте команду gpedit.msc.
2. По папкам проделайте такой путь: «Конфигурация компьютера» → «Административные шаблоны» → «Компоненты Windows» → «Антивирусная программа».
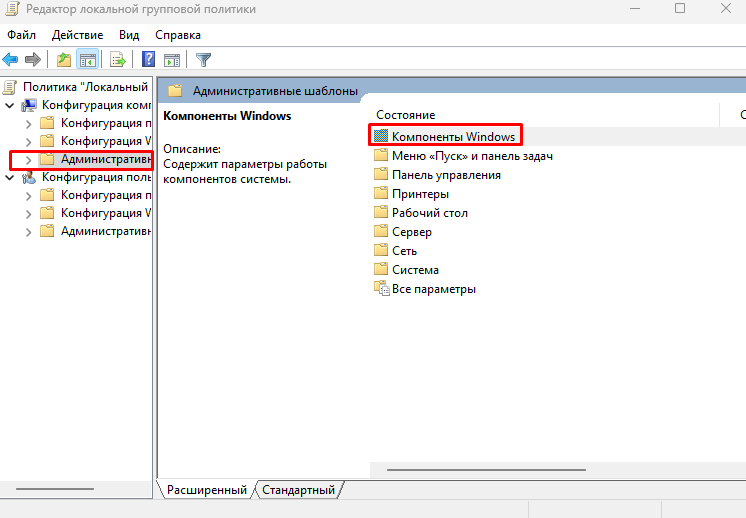
3. Откройте параметр «Выключить антивирусную программу» и выберите опцию «Отключено».
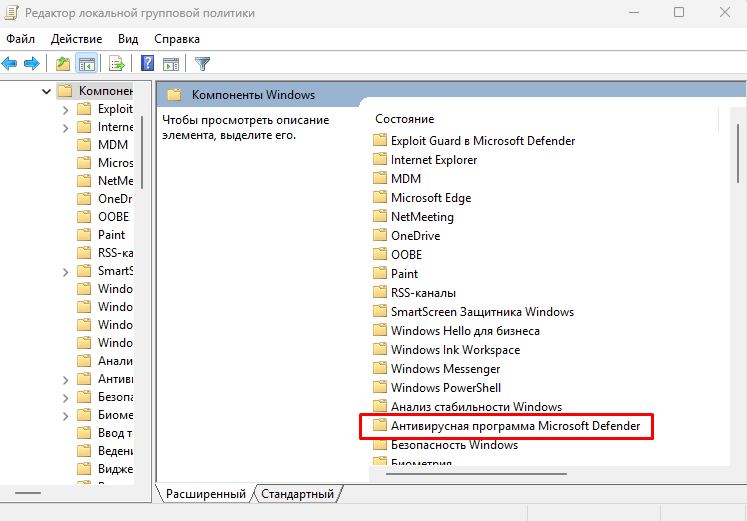
4. В папке «Антивирусная программа» также есть раздел «Защита в режиме реального времени». Деактивируйте все элементы.
5. Антивирус отключится после перезагрузки. Включить его получится, если возвратить параметры в прежнее положение.
Как отключить защиту Windows 7
В «семерке» процесс немного другой, но выключить встроенный антивирус тоже несложно.
1. Откройте «Панель управления» и перейдите в блок «Защитник Windows».
2. Нажмите «Программы» → «Параметры» → «Администратор».
3. Снимите галочку с опции «Использовать эту программу» и сохраните изменения.
Что делать после отключения встроенного антивируса «Защитник Windows»
После выполнения задач, которым мешал Defender, не забывайте включать его снова. В процессе работы с отключенным защитником придерживайтесь мер безопасности.
-
Установите альтернативный антивирус или хотя бы блокировщик рекламы, если у вас его еще нет.
-
Ограничьте время работы без защиты — оставлять так ПК насовсем не стоит.
-
Не посещайте сомнительные сайты, не загружайте и не открывайте подозрительные файлы.
-
Пользуйтесь только проверенными сетями Wi-Fi.
-
Проведите полное сканирование системы, когда закончите и включите встроенный антивирус снова.
Если антивирус каждый раз ложно блокирует определенные программы или файлы, а отключать его не хочется, некоторые папки можно внести в исключения Defender. Но не злоупотребляйте этой функцией, добавляйте только проверенные объекты.
Чек-лист: как отключить антивирус Windows Defender
Выключать антивирус не рекомендуется, но если защита блокирует программы или затрудняет работу, это допустимо.
-
Снимите защиту в реальном времени. Вам нужны параметры «Безопасность Windows» → «Защита от вирусов» → «Управление настройками».
-
Для Windows 7 — снимите галочку «Использовать эту программу» в параметрах защитника.
-
Соблюдайте осторожность и не блокируйте антивирус надолго.
-
Установите альтернативную антивирусную программу.
-
После повторной активации защиты просканируйте систему на вирусы.
Welcome to my blog! Today, we’ll explore how to disable Windows Defender using the Command Prompt (CMD). This powerful tool can help streamline the process and increase your device’s performance. Let’s dive in!
Disabling Windows Defender through CMD: Step-by-Step Guide to Uninstall Default Security App
Disabling Windows Defender through CMD: Step-by-Step Guide to Uninstall Default Security App
Step 1: Press Windows key + X to open the quick access menu and select Command Prompt (Admin) or Windows PowerShell (Admin) to launch the command prompt with administrator privileges.
Step 2: Type the following command in the command prompt and press Enter:
sc stop WinDefend
This command will temporarily disable Windows Defender. If you want to uninstall it completely, proceed to Step 3.
Step 3: Type the following command to remove Windows Defender from your system:
wmic_baseboard where product=”WinDefend” call uninstall
Press Enter, and Windows Defender will be uninstalled.
Note: Uninstalling Windows Defender might leave your system vulnerable to security threats. Make sure to install another reliable antivirus program after uninstalling Windows Defender. Also, be aware that some updates may reinstall Windows Defender automatically.
How to Disable or Enable Windows Defender on Windows 10/11 (2023)
✅100% FIX Windows Security Not Opening/Working On Windows 10 & 11 [5 WAYS]
How to turn on Windows Defender through cmd?
In the context of uninstalling apps, it’s essential to have a reliable antivirus program like Windows Defender to protect your system. If it’s disabled, you can enable it using the Command Prompt. Follow these steps to turn on Windows Defender through CMD:
1. Press the Windows key + X and select Command Prompt (Admin) or PowerShell (Admin) from the list.
2. In the Command Prompt window, type the following command and press Enter:
sc start WinDefend
3. After executing the command, Windows Defender should be enabled on your system. You can verify this by typing the following command and pressing Enter:
sc query WinDefend
If the “STATE” line in the output says “RUNNING,” Windows Defender is active.
Remember, it’s crucial to keep your antivirus software updated and running while uninstalling apps to ensure your computer remains secure.
How do I force Windows Defender to turn off?
To force Windows Defender to turn off in the context of uninstalling apps, follow these steps:
1. Press the Windows key and type ‘gpedit.msc’ in the search bar.
2. Click on the gpedit.msc result to open the Local Group Policy Editor.
3. In the left pane, navigate to Computer Configuration > Administrative Templates > Windows Components > Microsoft Defender Antivirus.
4. Find the policy setting called ‘Turn off Microsoft Defender Antivirus’ and double-click it.
5. Select ‘Enabled’ to turn off Windows Defender and then click ‘Apply’ and ‘OK’.
Please note that turning off Windows Defender might make your computer more vulnerable to threats. Be sure to have another trusted antivirus software installed if you proceed with this action.
How to disable Windows Defender using PowerShell?
In the context of uninstalling apps, disabling Windows Defender can be necessary for various reasons, such as installing third-party security applications or troubleshooting purposes. To disable Windows Defender using PowerShell, follow the steps outlined below:
Step 1: Open PowerShell with administrative privileges
– Press the Windows key + X to open the Power Users menu.
– Select Windows PowerShell (Admin) from the list.
Step 2: Run the command to disable Windows Defender
– Type the following command into the PowerShell window:
“`
Set-MpPreference -DisableRealtimeMonitoring $true
“`
– Press Enter to execute the command.
After completing these steps, Windows Defender should now be disabled. Keep in mind that disabling your antivirus protection may expose your system to potential threats. It’s recommended to enable Windows Defender or have another security application installed as soon as possible.
If you need to re-enable Windows Defender in the future, you can do so by running the following command in PowerShell with administrative privileges:
“`
Set-MpPreference -DisableRealtimeMonitoring $false
“`
How can I disable Windows Defender using Command Prompt (CMD) in the context of uninstalling apps?
To disable Windows Defender using Command Prompt (CMD) in the context of uninstalling apps, follow these steps:
1. Press Windows key + X on your keyboard and click on Command Prompt (Admin) or Windows PowerShell (Admin) from the menu that appears. This will open a command prompt with administrative privileges.
2. In the Command Prompt, type the following command and press Enter:
sc stop WinDefend
This command stops the Windows Defender service.
3. Next, type the following command and press Enter:
sc config WinDefend start= disabled
This command disables Windows Defender from starting automatically when your computer starts.
4. To check if Windows Defender is now disabled, type the command below and press Enter:
sc query WinDefend
If you see “STATE: 1 STOPPED” and “START_TYPE: 4 DISABLED” in the output, Windows Defender has been successfully disabled.
Please note that disabling Windows Defender may expose your computer to security risks. It is recommended to have another antivirus or antimalware solution installed before disabling Windows Defender.
Is it possible to prevent Windows Defender from interfering with app uninstallation by using CMD commands?
Yes, it is possible to prevent Windows Defender from interfering with app uninstallation by using CMD commands. To do this, you can temporarily disable Windows Defender real-time protection using the following steps:
1. Press `Windows key + X` to open the Power User menu and select Command Prompt (Admin) or Windows PowerShell (Admin).
2. Type the following command to disable real-time protection:
“`
Set-MpPreference -DisableRealtimeMonitoring $true
“`
3. Press `Enter`. This will disable Windows Defender’s real-time protection, and it should not interfere with your app uninstallation process.
Remember to re-enable Windows Defender once you have uninstalled the app to ensure your system stays protected. To re-enable real-time protection, follow steps 1 and 2 again and enter this command instead:
“`
Set-MpPreference -DisableRealtimeMonitoring $false
“`
Keep in mind that disabling Windows Defender may expose your system to potential risks, so only do this if you are confident about the uninstallation process, and always remember to enable it as soon as you finish.
What are the key CMD commands for disabling Windows Defender temporarily during an app uninstallation process?
In the context of uninstall apps, it is essential to disable Windows Defender temporarily to avoid any interference during the app uninstallation process. The key Command Prompt (CMD) commands for disabling Windows Defender temporarily are as follows:
1. Open Command Prompt: Press Windows key + R, type cmd, and hit Enter to open the Command Prompt.
2. Disable Windows Defender Real-time Protection: Type the following command and press Enter:
PowerShell Set-MpPreference -DisableRealtimeMonitoring $true
Please note that after your app uninstallation process is completed, you should re-enable Windows Defender’s Real-time Protection. To do this, simply use the below command and press Enter:
PowerShell Set-MpPreference -DisableRealtimeMonitoring $false
These commands help ensure a smooth uninstallation process by temporarily disabling Windows Defender’s real-time protection. Remember to always re-enable it once the process is complete to maintain system security.
Post Views: 460
Provide feedback
Saved searches
Use saved searches to filter your results more quickly
Sign up
Appearance settings


