
How to Temporarily Disable Avast, ESET, McAfee, Avira, and Webroot Antivirus in Windows 10
Antivirus is computer software used to prevent, detect and remove malicious software. However, in some situations, you may want to disable your antivirus program temporarily, and this article will show you how to do this on the most popular antivirus applications.

There are situations when antivirus software needs to be disabled. For example, when installing certain programs, an installation program requests that you disable the antivirus software. This can happen when the antivirus software has difficulty determining whether the program you want to install is malicious or legitimate.
If this is the case, we recommend that you re-enable the antivirus software when you have finished downloading and installing your new software. We also strongly advise against disabling the antivirus when you do not expect anything to be installed or when you are prompted to do so by a website or an email message.
This guide shows how to temporarily disable antivirus software such as Avast, Eset, McAfee, Avira, and Webroot antivirus.
Video Showing How to Temporarily Disable Avast, ESET, McAfee, Avira, and Webroot Antivirus:
Table of Contents:
- Introduction
- How to Temporarily Disable Avast Antivirus
- How to Temporarily Disable ESET Antivirus
- How to Temporarily Disable McAfee Antivirus
- How to Temporarily Disable Avira Antivirus
- How to Temporarily Disable Webroot Antivirus
- Video Showing How to Temporarily Disable Avast, ESET, McAfee, Avira, and Webroot Antivirus
Download Computer Malware Repair Tool
It is recommended to run a free scan with Combo Cleaner — a tool to detect viruses and malware on your device. You will need to purchase the full version to remove infections. Free trial available. Combo Cleaner is owned and operated by Rcs Lt, the parent company of PCRisk.com read more.
How to Temporarily Disable Avast Antivirus
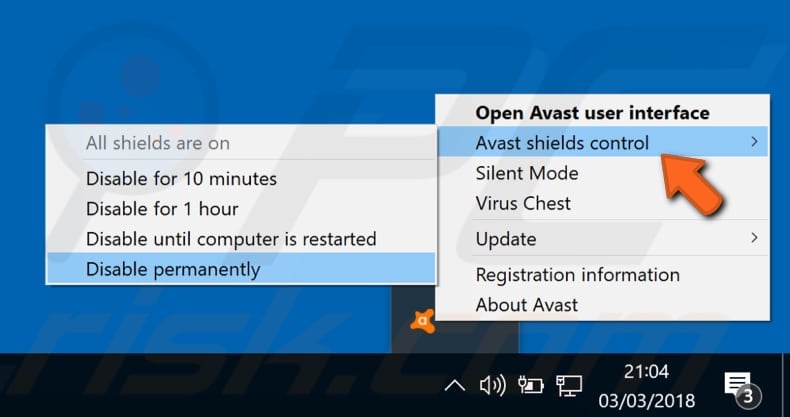
To temporarily (or permanently) disable Avast, click the arrow icon on the Windows taskbar to expand the notification area menu. Find the Avast Antivirus icon and right-click it. A contextual menu should pop up — if that does not happen, try right-clicking the Avast Antivirus icon several times until you succeed.
Then select «Avast shields control» and choose if you want to disable it temporarily (for 10 minutes, 1 hour, or until the next restart) or permanently.
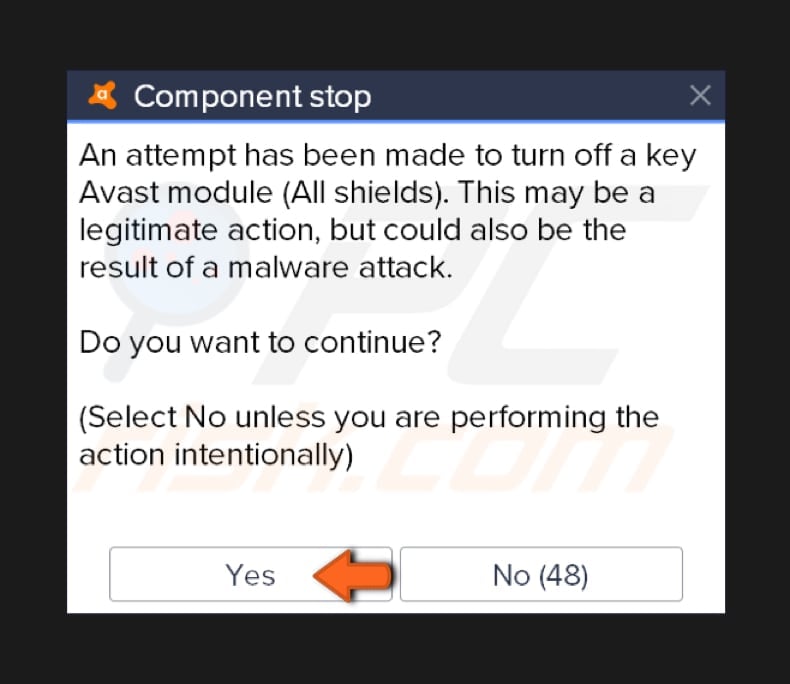
It will ask you to confirm the action by clicking «Yes». Click «Yes» if you really want to disable Avast Antivirus software.
[Back to Table of Contents]
How to Temporarily Disable ESET Antivirus
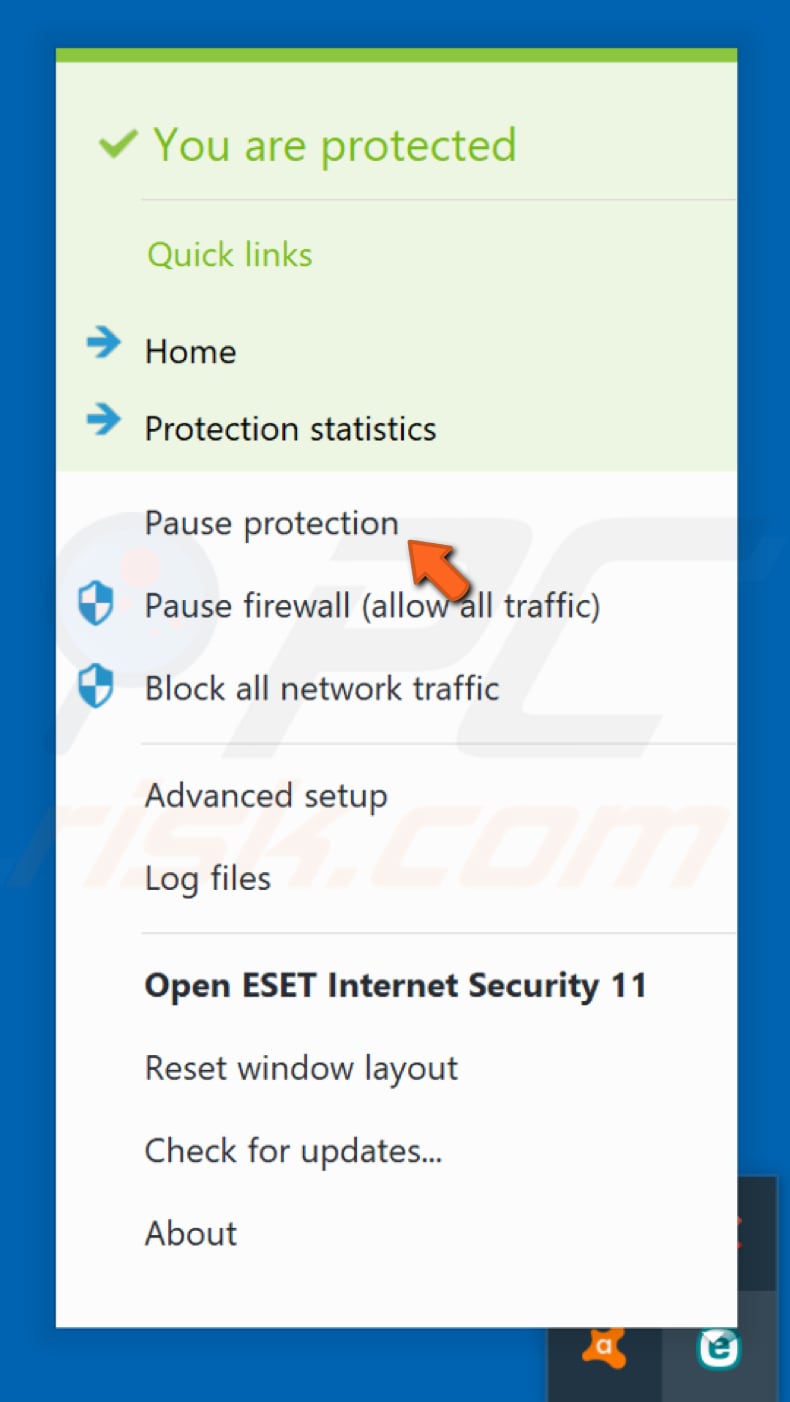
To temporarily disable ESET antivirus, click the arrow icon on the Windows taskbar to expand the notification area menu.
Find the ESET Antivirus icon and right-click it — a contextual menu will pop up. Click «Pause protection».
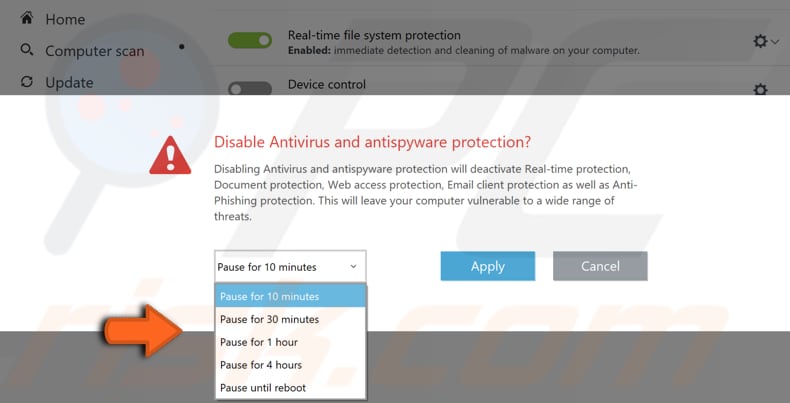
ESET antivirus will ask if you want to disable antivirus and antispyware protection. By disabling antivirus and antispyware protection, you will deactivate real-time protection, document protection, web access protection, email client protection, and anti-phishing protection. Select the time range and click «Apply».
[Back to Table of Contents]
How to Temporarily Disable McAfee Antivirus
To temporarily disable McAfee antivirus, click the arrow icon on the Windows taskbar to expand the notification area menu.
Find the McAfee Antivirus icon and right-click it — a contextual menu will pop up. Select «Change settings» and then click «Real-time Scanning».
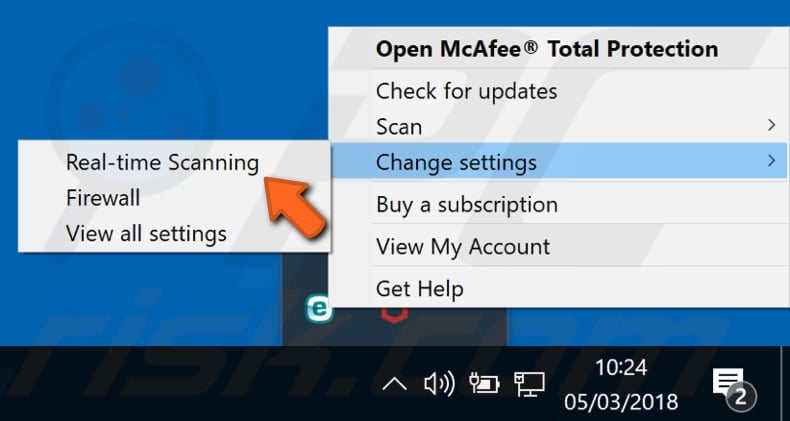
Click «Turn Off» and then select when you wish to resume Real-Time Scanning (how long it is to be disabled). Click the blue «Turn Off» button, and McAfee antivirus will be disabled. If you want to disable its firewall, repeat the steps and select «Firewall» from the contextual menu when right-clicking on the McAfee icon.

[Back to Table of Contents]
How to Temporarily Disable Avira Antivirus
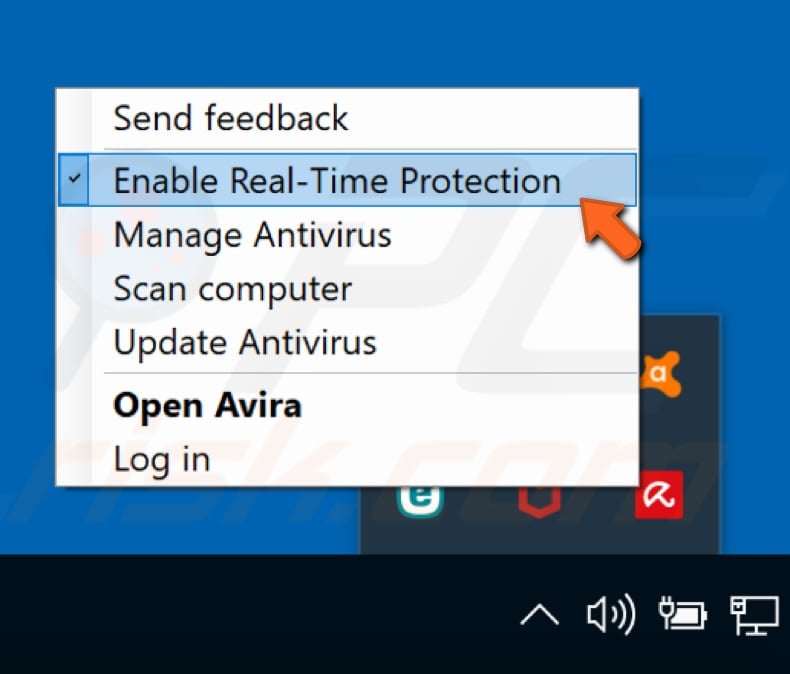
To temporarily disable Avira antivirus, click the arrow icon on the Windows taskbar to expand the notification area menu. Find the Avira Antivirus icon and right-click it — a contextual menu will pop up. Avira real-time protection should be enabled by default — if it is enabled, it will have a checkmark next to «Enable Real-Time Protection».
To disable Avira, simply click «Enable Real-Time Protection», and it will be disabled. Repeat the steps if you want to re-enable it.
[Back to Table of Contents]
How to Temporarily Disable Webroot Antivirus
To temporarily disable Webroot, click the arrow icon on the Windows taskbar to expand the notification area menu.
Locate the Webroot Antivirus icon and right-click it — a contextual menu will pop up. Select «Shut down Protection» and click it.
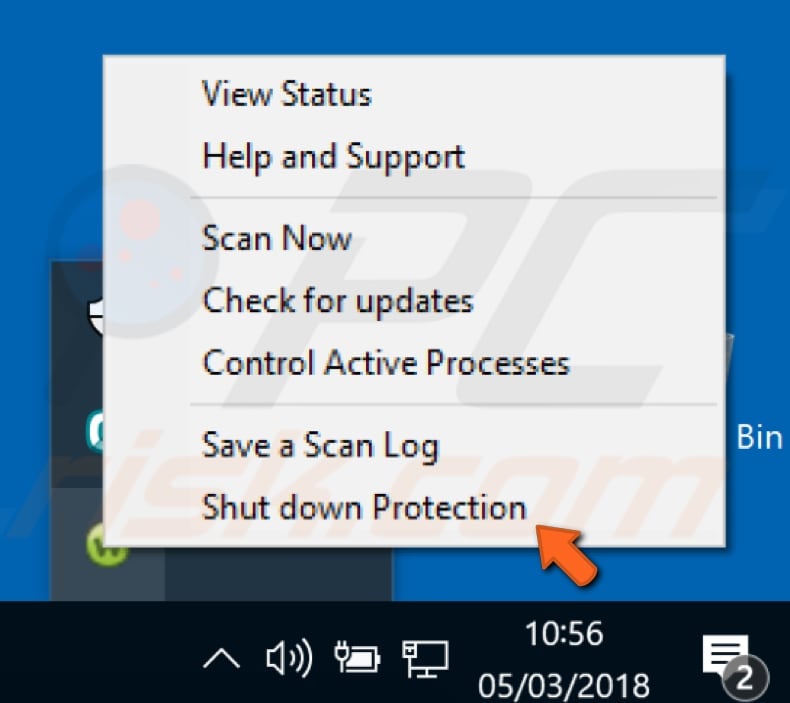
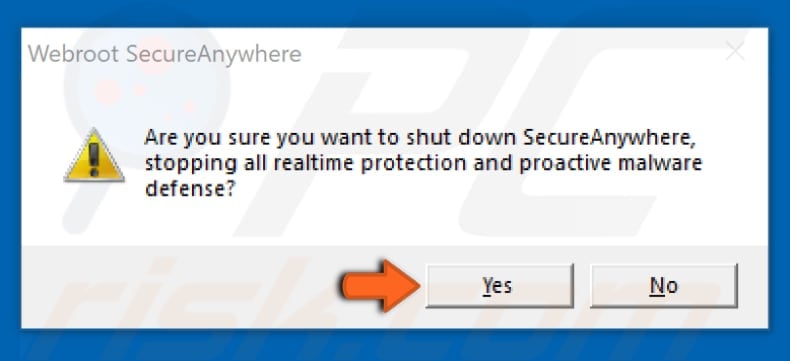
You will be asked if you really want to shut down SecureAnywhere to stop all real-time protection and proactive malware defense. Click «Yes» to confirm the action.
We hope this article was helpful and that you can temporarily or permanently disable antivirus software such as Avast, ESET, McAfee, Avira, and Webroot antivirus.
[Back to Top]
Antivirus programs are great to secure our system from any unfounded malicious virus and malware attacks. However, sometimes antivirus programs may prevent some of the programs from working properly on the system, causing other harmful errors in the processes. Read this article further to know how to disable or turn off antivirus temporarily on Windows 10 including the popular McAfee and Avast Antivirus.

Table of Contents
In some cases, trusted devices are also prevented by the third-party antivirus software from being opened, which may be the reason behind the various system issues. You may disable your antivirus temporarily to fix this error.
Note: Always remember, a system without an antivirus protection suite is more prone to several malware attacks. Enable it again once you have resolved your issue.
In this article, we have mentioned disabling methods of Avast Free Antivirus, BitDefender, Norton Security, and McAfee antivirus suite. Follow the method for the desired antivirus software carefully on your system.
Option I: Disable Avast Free Antivirus
Follow the given steps for your Avast Free Antivirus program:
1. Navigate to the Avast Antivirus icon in the Taskbar and right-click on it.
2. Now, select the Avast shields control option.
3. Choose the option according to your convenience and confirm the prompt displayed on the screen.
- Disable for 10 minutes
- Disable for 1 hour
- Disable until computer is restarted
- Disable permanently
Note: To activate the settings, go back to the Main window. Click on TURN ON button shown highlighted to enable all Avast shields again.

Also Read: 5 Ways to Completely Uninstall Avast Antivirus in Windows 10
Option II: Disable BitDefender
In the how to disable the antivirus temporarily method, we will now see the steps to disable the BitDefender Antivirus program on Windows 10:
1. Click on Start and type BitDefender. Click on Open from the Start menu search results.

2. Click on the Protection tab on the left pane and click on Open under Antivirus.

3. Click Advanced and use the switch off the toggle to turn off BitDefender Shield as depicted.

4. Use the drop-down list to choose the time period for How long do you want to keep the protection disabled? and click on OK.

Also Read: How to Disable Windows 10 Firewall
Option III: Disable Norton Security
If you have the Norton Security Antivirus program installed on your system, follow these steps to disable it:
1. Right-click on the Antivirus Program icon from the system tray and select Disable Auto-Protect as shown.
2. From Select the duration dropdown menu, choose a time period for which the Antivirus will remain disabled.
3. Finally, click OK on the Security Request page to disable it.

Also Read: Fix The Parameter Is Incorrect in Windows 10
Option IV: Disable McAfee
Follow the upcoming steps to disable McAfee Antivirus temporarily.
1. To enter the McAfee control panel, double-click the McAfee icon on the system tray.
2. To access the Navigation Center, click the hamburger icon in the top-left corner of the McAfee window.
3. Click on My Protection as shown.

4. To see the antivirus choices, click the Real-Time Scanning link.
5. Click the Turn off button shown highlighted to disable Real-Time Scanning.

6. In the When Do You Want to Resume Real-Time Scanning? drop-down box, choose the time period as:
- In 15 min
- In 30 min
- In 45 min
- In 60 min
- When I restart my PC.
Note: If you choose Never, the virus prevention option will be disabled unless you explicitly enable it.

7. To turn off the protection, click the Turn Off button.

8. The warning Your Computer Is At Risk appears right away, suggesting that virus protection isn’t turned on. Close the McAfee control panel and Exit.
Recommended:
- How do I Run a Virus Scan on my Computer?
- How to Fix Avast Update Stuck on Windows 10
- Best Free Antivirus software for Android devices
- Fix A problem has occurred in BitDefender threat scanner
We hope you found the answer to how to disable antivirus temporarily on Windows 10 query. Feel free to reach out to us with your queries and suggestions via the comments section below.
Download Article
Download Article
- Using the System Tray Icon
- Using Avast Settings
- Q&A
- Warnings
|
|
|
If you don’t want to completely uninstall Avast, you can disable its features temporarily or permanently using the icon in the System Tray or using the Avast app itself. This wikiHow teaches you how to disable Avast Antivirus.
Things You Should Know
- You can disable Avast Antivirus if you don’t want to uninstall it.
- Right-click the Avast icon in your system tray to disable «shields control».
- When using Avast settings, you’ll need to navigate to «Protection» to disable «Core Shields».
-

It’s in the lower-right corner by default. It resembles an orange splat with an «a» in the middle. Right-click this icon to display a pop-up menu.
- If you don’t see the Avast icon in the System Tray, click the icon that resembles a bracket pointing up in the lower-right corner to display more System Tray icons.
-

It’s the second option in the pop-up menu that appears when you right-click the Avast Antivirus icon in the System Tray.
Advertisement
-
You have four options you can choose from. They are as follows:
- Disable for 10 minutes.
- Disable for 1 hour.
- Disable until computer is restarted.
- Disable permanently.
-
It’s the green button in the pop-up alert. This disables Avast Antivirus.
- To enable Avast Antivirus again, right-click the Avast icon in the System Tray. Then hover over «Avast Shields Control» and click Enable all shields.


Advertisement
-
It has an icon that resembles an orange splat with a lower-case «a» in the middle. You can either double-click the Avast icon on your desktop or Start menu or double-click the Avast icon in the System Tray.
-
It’s the icon with three horizontal lines in the upper-right corner of the Avast main window. This displays the menu.
-
It’s next to an icon that resembles a gear. This displays the Settings menu.
-
It’s the second option in the panel to the left. It has an icon that resembles a lock. This displays the Protection menu.
-
It’s the second option in the panel to the left. This displays the settings menu for the shields that block viruses and malware in real-time.
-
It’s at the top of the page. This disables all shields that provide Avast virus protection.
- Alternatively, you can disable individual shields. To do so, scroll down and click the File Shield, Behavior Shield, Web Shield, or Mail Shield tab. Then uncheck the checkbox at the top of the menu below the tab to disable the shield.
-
You have four options you can choose from. They are as follows:
- Disable for 10 minutes.
- Disable for 1 hour.
- Disable until computer is restarted.
- Disable permanently.
-
It’s the green button in the pop-up alert. This disables Avast Antivirus.
- To enable Avast again, follow these steps to return to the «Core Shields» in the Avast app. Then click the toggle switch at the top to reenable Avast Antivirus.


Advertisement
Add New Question
-
Question
How do I reenable it?
To enable Avast again, follow these above steps to get to the «Core Shields» in the Avast app. Then click the toggle switch at the top to reenable the antivirus.
Ask a Question
200 characters left
Include your email address to get a message when this question is answered.
Submit
Advertisement
Thanks for submitting a tip for review!
-
Do not turn off shields or disable Avast if you do not know, what you are doing.
-
Never confirm disabling Avast shields if you are not doing it intentionally because some malware can ask you to disable Avast.
Advertisement
About This Article
Article SummaryX
1. Right-click the Avast icon in the System Tray.
2. Hover over «Avast shields control.»
3. Click one of the options for how long you want to disable Avast for.
4. Click Ok, Stop.
Did this summary help you?
Thanks to all authors for creating a page that has been read 155,663 times.
Is this article up to date?
There are instances when you might want to disable antivirus protection deliberately. Whether it is to test some file execution or want to get rid of a false positive detection; we list procedure to disable various popular Antivirus protection software on Windows 10.
When you disable the antivirus, your computer shield gets open and you may get infection. So, disable antivirus when it is necessary and don’t forget to enable it later.
To fix various Windows 10/11 problems, we recommend Outbyte PC Repair:
This software will repair common computer errors, protect you from file loss, malware damage, hardware failure, and optimise your computer for peak performance. In three simple steps, you can resolve PC issues and remove virus damage:
- Download Outbyte PC Repair Software
- Click Start Scan to detect Windows 10/11 issues that may be causing PC issues.
- Click Repair All to fix issues with your computer’s security and performance.
This month, Outbyte has been downloaded by 23,167 readers.
Index
- 1. Avast
- 2. AVG
- 3. Bitdefender
- power-off4. Comodo
- power-off5. ESET
- 6. F-Secure
- 7. Kaspersky
- 8. McAfee
- power-off9. Norton
- power-off10. Webroot
#1 – Avast

Right-click on the Avast icon on your taskbar/system tray, move your cursor over to Avast shields control and select disable for 10 minutes, 1 hour, until the computer is restarted, or permanently!
Avast might give you a warning that an attempt was made to disable it. All you have to do is to accept it, and you’ll be good to go!

You can also disable Avast through its settings; if that’s to your preference. Just go to settings -> components, and disable anything that you want to disable.
#2 – AVG

To disable AVG through the system tray, right click on it and select Temporarily Disable AVG Protection.
You can also disable it through its settings. Go to Options -> Advanced Settings -> Temporarily Disable AVG Protection.
You’re free to choose for how long to disable AVG in both of these cases!
#3 – Bitdefender

Keep in mind that this program might have a lot of features to disable depending on the Bitdefender product that you’re using.
To disable the main Antivirus shield, open the program and click on the hamburger button at the upper left side of your screen.
Then go to Protection -> View Features -> Antivirus Settings (On the Settings icon of the Antivirus module) -> Shield, and turn off Bitdefender Shield. At that point, all you have to select for how long to turn off Antivirus.
If your Bitdefender has multiple features and you want to turn them off, then you’ll have to repeat the same process for all of them.
#4 – Comodo
Disabling Comodo is very easy. Just right-click on the Comodo system tray icon, move your cursor over to Antivirus, and select Disabled.
You can repeat the same process for the other features as well.
#5 – ESET

Open ESET and go to Setup -> Computer Protection -> Pause Antivirus and antispyware protection.
#6 – F-Secure
Launch the program and go to Tools -> Turn off All Security Features. As simple as that!
To enable your Antivirus again re-launch F-Secure and click on Turn On.
#7 – Kaspersky

For some reason, the official website only shows how to disable Kaspersky’s self-defence. That’s the screenshot that you see above.
However, you should be able to disable Kaspersky by going to Settings -> General -> Protection -> Off.
The procedure might slightly differ depending on the version of Kaspersky that you currently use!
You can also try pausing Kaspersky’s security by right-clicking on the system tray icon and selecting pause.
To turn off self-defence, go to Settings -> Additional -> Self-Defense, and untick Enable Self-Defense.
#8 – McAfee

You can turn off McAfee by launching it and going to Navigation -> Real-Time Scanning -> Turn Off.
#9 – Norton
Right-click on the Norton system tray icon and click on Disable Auto-Protect. That should do it!
#10 – Webroot

The easiest way to turn off Webroot is to right-click on its system tray icon and select shut down protection.
If that doesn’t work, then you can go to the advanced settings and make sure that the “Allow SecureAnywhere to be shut down manually” box is ticked.
Side Note
Antivirus programs often have to offer multiple products. And the updates that come with them will sometimes change the way that these programs work.
So, don’t be surprised if one of these guides doesn’t work for you. We’ll try to keep it up to date, though.
Further Reading
How to Permanently Disable Windows Defender?
The Best Antivirus for Windows 10 Enterprise
Just another average person, living an average life. Which, by the way, mostly revolves around art and gaming.
В статье покажу, как отключить Аваст антивирус и всего его компоненты на компьютерах с системой Windows любой версии, буквально за 1 минуту. Речь пойдет о любой версии продукта: бесплатной Avast Free Antivirus или Premium Security.
Решение работает на 100%, в процессе нет ничего сложного! Поэтому, уверен, справиться сможет любой начинающий пользователь ПК. Главное, следуйте за мной по шагам, обращайте внимания на картинки и предупреждения и тогда все точно получится.
Даже если что-то пойдет не так, просто напишите мне внизу страницы в комментариях и я с удовольствием дам обратную связь ?
Как отключить Аваст на компьютере в самой программе
Как и любой антивирусный продукт, Avast можно выключить временно или остановить навсегда (пока не включите вручную). Оба варианта отключения выполняются либо через контекстное меню иконки запуска программы в трее Виндовс, либо через главное окно антивирусника.
Как правило, достаточно первого метода, происходит остановка всей защиты. Но если вам нужна деактивация лишь отдельных модулей, воспользуйтесь вторым (пропустите главу ниже).
Кликните правой кнопкой мыши по иконке в трее.
Трей — область справа внизу панели задач, где расположены системные часы, значок сети, звука и другие.
Значок антивируса не всегда сразу виден на панели задач. Он может скрываться за стрелкой:

Иконка программы Avast скрыта под стрелочкой в трее
В открывшемся списке перейдите в раздел «Управление экранами Avast» и выберите один из вариантов выключения:
- Отключить на 10 минут;
- На 1 час;
- До перезапуска компьютера;
- Навсегда.

Как временно отключить Аваст на Виндовс 10 / 11 в контекстном меню иконки запуска
Соответственно, выбрав предпоследний пункт, антивирус отключится и автоматически запустится сразу как очередной раз перезагрузите компьютер. Выбирая «Отключить навсегда», функции будут деактивированы до момента, пока вы снова сами их не активируете.
Сработает самозащита от случайного отключения (или под действием вирусов) и появится окно с вопросом «Вы действительно хотите остановить работу всех экранов»?. Отвечаем «ОК, остановить».

Предупреждение при попытке выключить Avast
Готово. Теперь на иконке антивируса в трее появится красный крестик, сигнализирующий о выключении всех защитных функций полностью. При наведении курсора будет надпись «вы не защищены».
Повторное ручное включение делается точно также, но в появляющемся перечне программы (при клике правой кнопкой мышки) уже появится пункт «Включить все экраны (13 отключено)».

Как снова включить Avast вручную
Как отключить антивирус Avast в интерфейсе программы
Через интерфейс утилиты отключать менее удобно, потому что дольше. Но есть преимущество — можно выключить выборочно только определенные экраны Аваста.
У расширенного платного выпуска Avast Premium Security 13 экранов. У бесплатной меньше, работают только основные компоненты.
Откройте окно антивируса любым способом, например, с ярлыка на рабочем столе и перейдите в меню.

Переход в главное меню Avast
Перейдите в «Настройки».

Открытие настроек антивируса Avast
Выключаем основные экраны (6 шт.):
- Зайдите на вкладку «Защита», затем «Основные компоненты».
- Здесь вы можете разом выключить 6 основных модулей («Защита файлов»; «Анализ поведения»; «Веб-защита»; «Защита почты»; «Защита от руткитов и эксплойтов»), кликнув по соответствующему переключателю «Вкл. / Выкл.». Выбирайте время, на которое приостанавливаете защитные функции и соглашайтесь на предупреждение во всплывающем окошке.

Остановка самых важных функций Avast
При необходимости отдельного отключения только определенных модулей, пролистайте открытое окно вниз до 4-х вкладок. Над ними можно выключить проверку руткитов и одновременно эксплойтов в фоне. Затем, заходя на каждую вкладку по отдельности, есть возможность остановить работу остальных компонентов, сняв галочку:

Как приостановить отдельные экраны Avast среди основных
Если у вас базовая бесплатная (фри) версия, то больше ничего не требуется. А в расширенной версии (Премиум или Internet Security) есть еще 7 работающих экранов.
4 из них отображается в том же разделе «Защита». По очереди открывайте подразделы «Защита от удаленного доступа»; «Экран от программ-вымогателей»; «Брандмауэр»; «Подлинные сайты» и ставьте переключатель в положение «Выкл.».

Выключение дополнительных защитных функций Аваст на ПК
Наконец, в разделе «Приватность» имеется еще 3 экрана:
- Веб-камеры;
- Конфиденциальных данных;
- Паролей.
Переходите по каждому подразделу, выключайте их стандартным переключателем.

Как отключить экраны приватности в Avast
Кстати, из-за функционала проверки веб-камеры, пользователи часто сталкиваются с тем, что она просто не работает. Оказывается, антивирус по умолчанию может ее блокировать.
Как выключить Аваст средствами системы
Встречаются ситуации, когда Avast не отключается вышеперечисленными способами. Как правило, причина такого — повреждение системных файлов программы, например, вследствие активности различных угроз на компьютере. Или попытка убрать антивирусник из системы при помощи обычного удаления его файлов. Это всегда заканчивается появлением проблем с работой любой программы.
В первую очередь рекомендую попробовать удалить антивирус встроенными инструментами Виндовс («Приложения и возможности» в Win 10 или «Программы и компоненты» Win 7). Затем переустановить его, скачав с официального сайта разработчика, если потребуется.
Если данное действие не помогает, Avast не удаляется и продолжает защищать компьютер, попробуйте отключить его из автозагрузки. Рассмотрим, что необходимо сделать…
Для этого сначала требуется выключить самозащиту:
- Перейдите в настройки Аваста;
- В разделе «Общее» перейдите на вкладку «Устранение неисправностей» и снимите галочку в опции «Включить самозащиту».

Отключение режима самозащиты Avast
Дальнейшие действия различаются в зависимости от выпуска Виндовс.
Для Windows 11 / 10 / 8 / 8.1:
- Перейдите в диспетчер задач, зажав сочетание клавиш на клавиатуре
Ctrl+Shift+Esc(или другим способом, описанным в отдельной заметке по ссылке выше). - На вкладке «Автозагрузка» выделите «Avast» и нажмите кнопку «Отключить».
- Перезагрузите компьютер и Аваст уже не запустится автоматически.

Как убрать Аваст из автозапуска
Для Win 7:
- Зажмите комбинацию
Win+R, введите командуmsconfigи нажмите «ОК». - На вкладке «Автозагрузка» снимите галочку с программы Avast, нажмите «Применить» и «ОК». После перезагрузки ПК антивирус не включится.
Часто задаваемые вопросы и ответы
Почему после отключения Аваста, сразу активируется встроенный защитник Microsoft?
Это встроенный антивирус. Он всегда становится активным, если в операционной системе отключено (удалено или отсутствует) стороннее антивирусное программное обеспечение. Если вы хотите его тоже временно отключить или совсем удалить, воспользуйтесь инструкциями: для Windows 10; Для 11-й.
Основные выводы
Подытоживаем, как отключить Аваст на ПК:
- Проще всего через значок в трее операционки. Разом отключает все 13 компонентов (для расширенной версии).
- Альтернативный метод — при помощи интерфейса программы. Это позволяет деактивировать только нужные экраны.
- Самые неудобный вариант — убирать Avast из автозагрузки, отключая предварительно самозащиту. К тому же в некоторых случаях это может не сработать.
Если остались вопросы или что-то было непонятно, пожалуйста, напишите комментарий ниже и я с радостью постараюсь вам помочь! ?