
Все способы:
- Способ 1: Изменение параметров системы
- Способ 2: Изменение групповых политик
- Способ 3: Изменение ключей в реестре
- Способ 4: Управление устройствами
- Вопросы и ответы: 0
Способ 1: Изменение параметров системы
Функцию Windows Hello в Windows 10, призванную обезопасить компьютер и вместе с этим зачастую существенно упростить авторизацию, вполне можно деактивировать через настройки учетных записей в стандартном приложении «Параметры». При этом важно отметить, что любой вспомогательный метод входа будет отключен автоматически при полном удалении пароля.
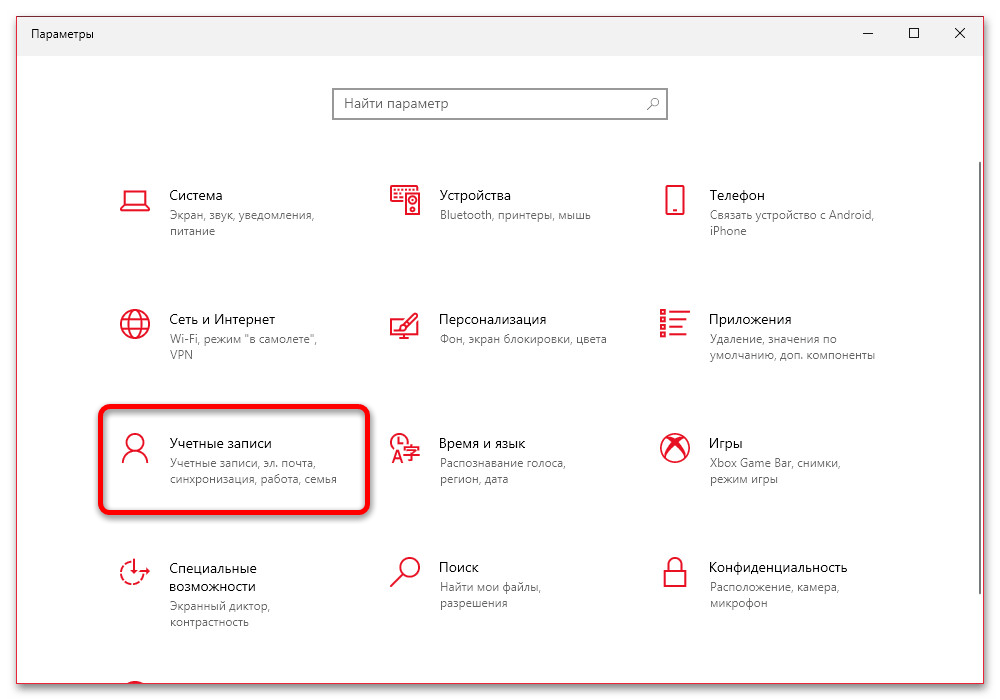
- Если вы хотите просто избавиться от упрощенных способов входа по каким-либо причинам, первым делом необходимо открыть «Параметры» с помощью меню «Пуск» или системного поиска и после этого выбрать категорию «Учетные записи». В качестве альтернативы можно кликнуть левой кнопкой мыши по значку профиля в меню «Пуск» и перейти на страницу «Изменить параметры учетной записи».
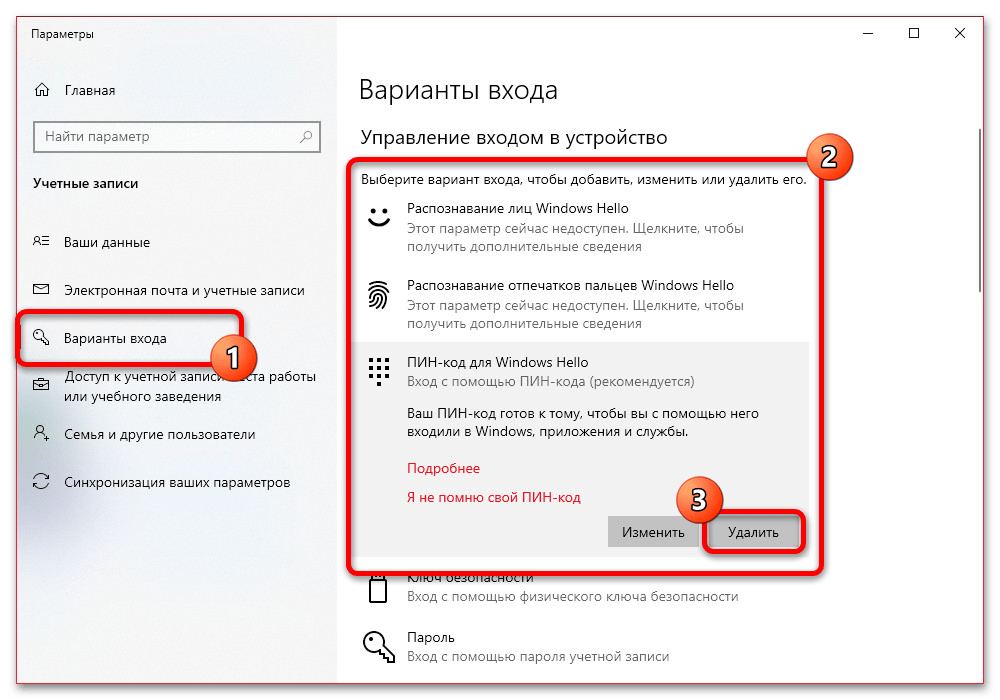
- Разобравшись с открытием настроек, через меню в левой части окна перейдите на вкладку «Варианты входа» и выберите один из пунктов с подписью «Windows Hello», будь то «Распознавание лиц», «Распознавание отпечатков пальцев» или «ПИН-код». Как правило, на большинстве устройств доступен только последний вариант и именно его требуется деактивировать.
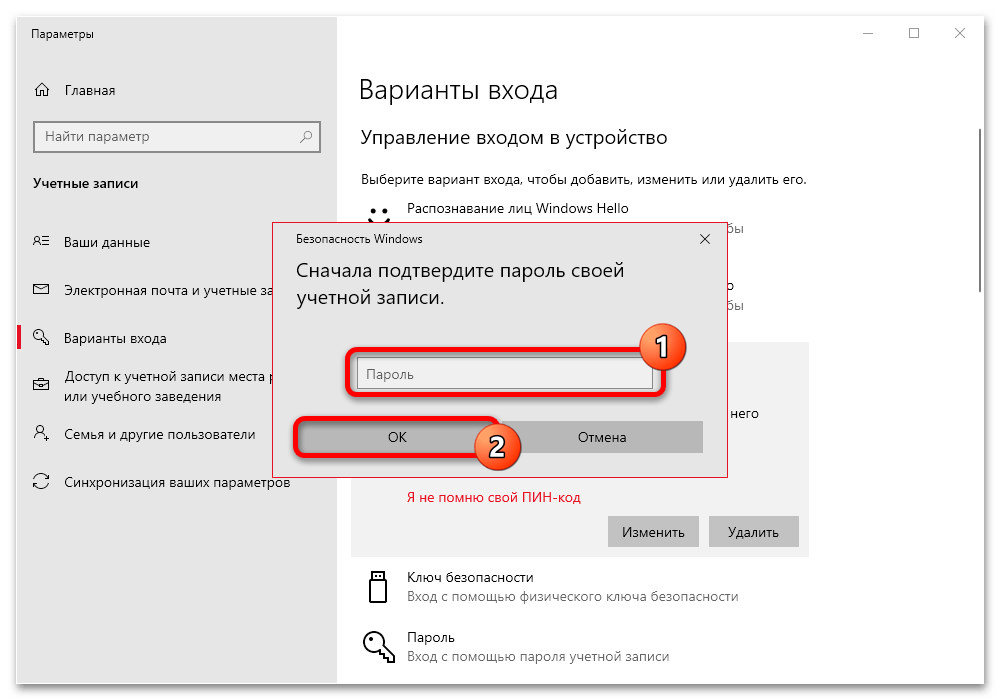
- Чтобы выполнить поставленную задачу, воспользуйтесь кнопкой «Удалить» в рамках нужного блока и после этого во всплывающем окне в обязательном порядке подтвердите выполнение путем ввода основного пароля. По завершении данного действия дополнительный способ авторизации будет моментально деактивирован, в чем можно убедиться путем нажатия клавиш «WIN+L» на клавиатуре.
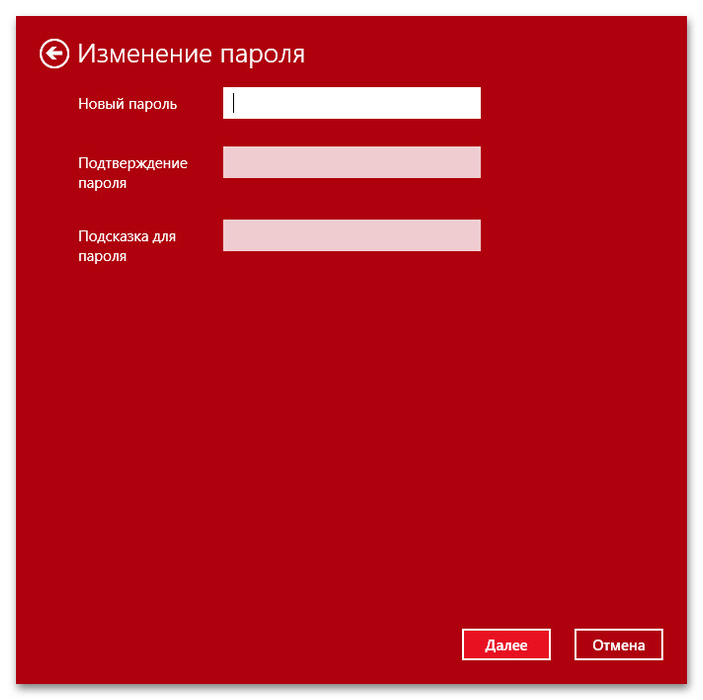
- Как уже было отмечено ранее, в качестве альтернативы, а также с целью быстрого отключения сразу всех вспомогательных методов входа, можете просто избавиться от пароля в соответствующей категории. Для этого достаточно нажать кнопку «Изменить», заполнить поле в соответствии с действующим паролем и впоследствии сохранить настройки, оставив поля пустыми.
Подробнее: Удаление пароля при входе на компьютере с Windows 10
Если все было сделано точно по инструкции, любой ранее доступный метод авторизации будет сразу же заблокирован с отображением просьбы указания нового пароля. При этом запрос ПИН-кода может по-прежнему отображаться на экране блокировки, но легко игнорируется, если воспользоваться ссылкой «Варианты входа» и выбрать «Пароль» в качестве способа авторизации.
Способ 2: Изменение групповых политик
Еще один, хоть и менее удобный, но все равно рабочий метод деактивации Windows Hello заключается в использовании «Редактора групповых политик», доступного исключительно в профессиональной или корпоративной версии Windows 10. Точный порядок действий может меняться в зависимости от разновидности экрана входа, который требуется деактивировать в вашем случае.
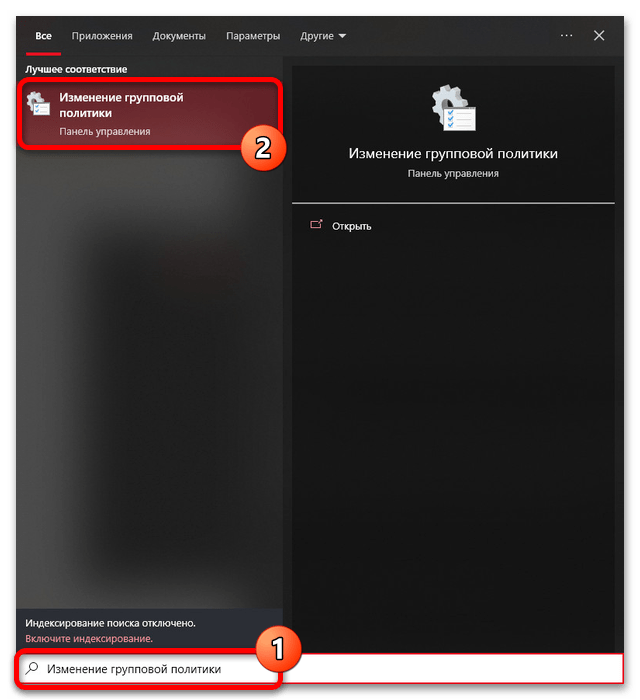
- Для открытия «Редактора групповых политик» в рассматриваемой системе можно на выбор воспользоваться окном «Выполнить» или «Командной строкой» и специальной командой, что было рассмотрено в другой статье. При этом наиболее удобный способ заключается в нажатии сочетания клавиш «WIN+S», поиске и последующем открытии раздела «Изменение групповой политики».
Подробнее:
Запуск «Редактора групповых политик» на компьютере с Windows 10
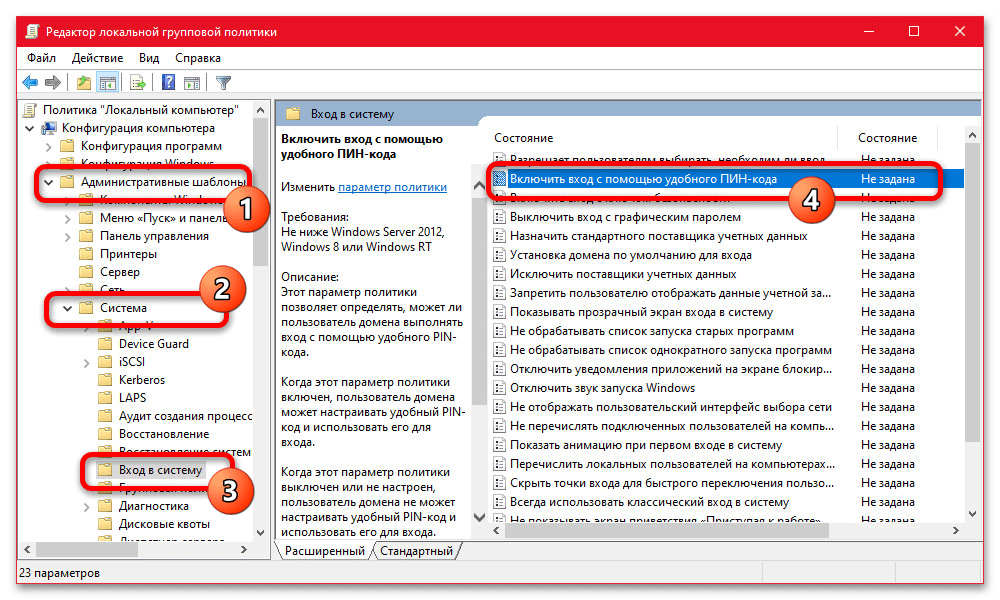
Что делать, если не открывает «Редактор групповых политик» в Windows 10 - Находясь в рамках «Редактор локальной групповой политики», разверните категорию «Административные шаблоны» в «Конфигурации компьютера», аналогичным образом откройте раздел «Система» и выберите «Вход в систему». В свою очередь, здесь в правой колонке практически в самом начале списка следует найти и дважды кликнуть по строке «Включить вход с помощью удобного ПИН-кода».
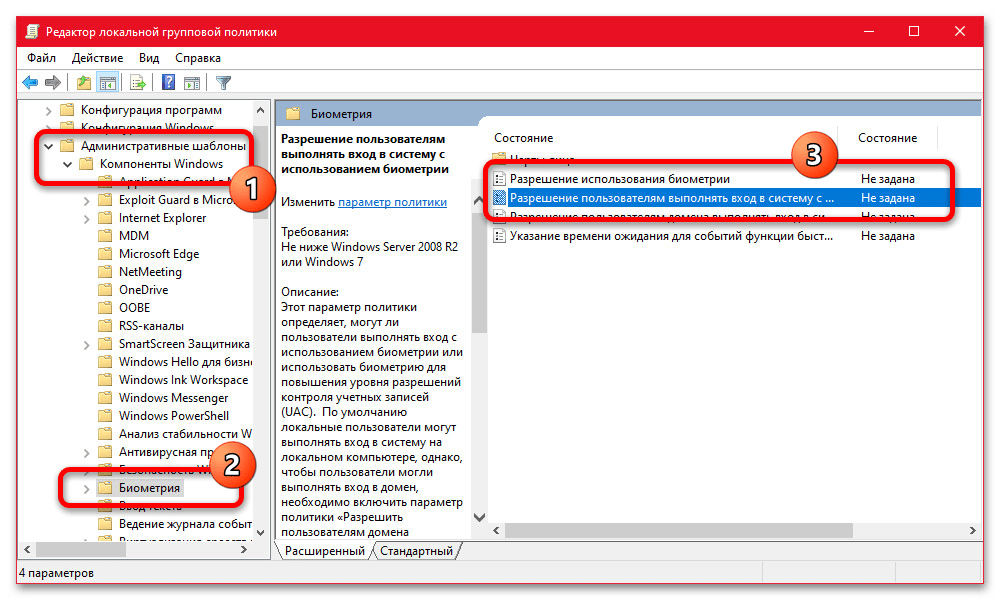
- Если вам необходимо отключить способы входа, связанные с биометрией (распознание лица и отпечатка пальца), следует развернуть категорию «Компоненты Windows» и выбрать «Биометрию» из списка в левой колонке. После этого найдите и откройте параметры «Разрешение пользователям выполнять вход в систему с использованием биометрии» или «Разрешение использования биометрии» для внесения более глобальных изменений.
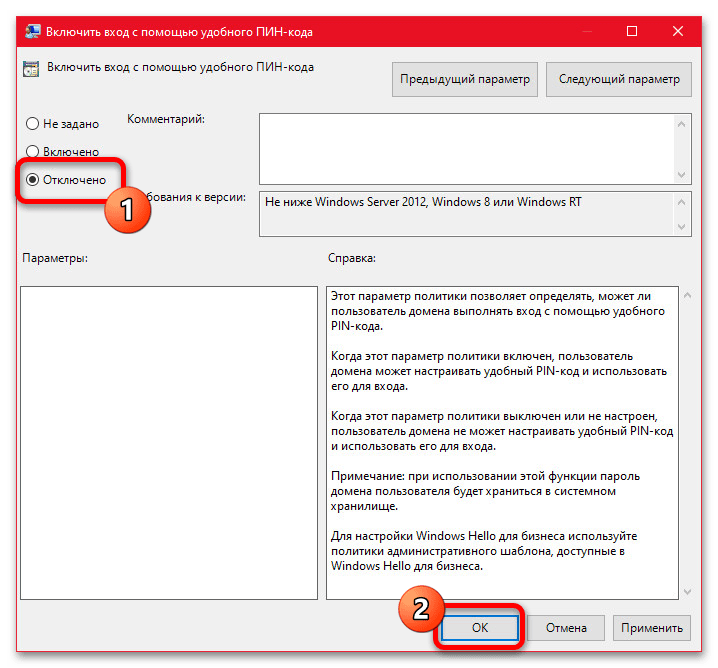
- При открытии нового окна с соответствующим заголовком, установите маркер рядом с опцией «Отключено» и подтвердите сохранение обновленных параметров с помощью кнопки «ОК». В отличие от предыдущего способа, в данном случае, помимо подтверждения, необходимо в обязательном порядке перезагрузить компьютер любым удобным образом.
Подробнее: Способы перезагрузки Windows 10
Убедиться в успешной деактивации Windows Hello можно будет сразу после повторного включения системы, так как по умолчанию будет запрошен пароль от учетной записи. Если по каким-то причинам во время входа по-прежнему требуется ПИН-код или биометрия, попробуйте один раз вручную выбрать «Пароль» из списка «Варианты входа» или повторите описанные действия.
Способ 3: Изменение ключей в реестре
Один из наименее удобных методов отключения Windows Hello в Windows 10 сводится к использованию редактора реестра, с помощью которого можно отредактировать определенные параметры безопасности. Как и в случае с групповыми политиками, условно процесс можно поделить на два варианта, позволяющих отключить ПИН-код или биометрию.
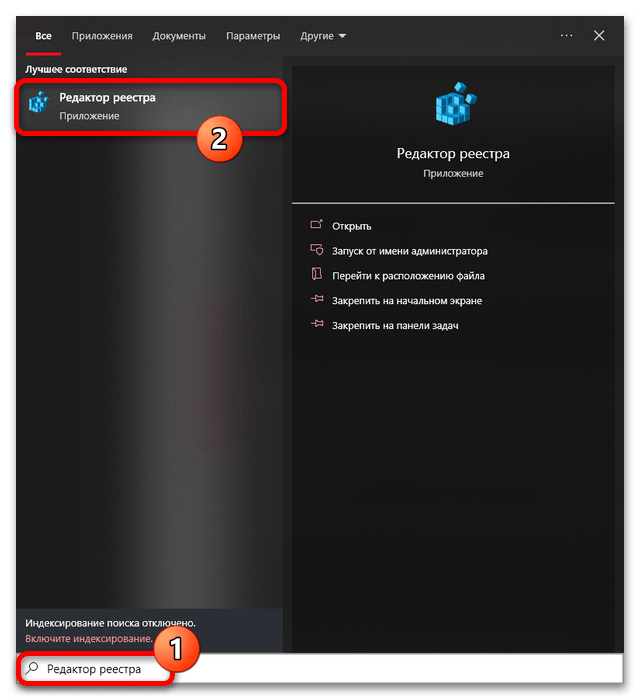
- Для начала необходимо открыть сам редактор реестра, используя сочетание «WIN+R» и специальную команду, или, как и ранее, воспользовавшись системным поиском. Существуют также альтернативные способы, о которых было рассказано в другой статье на сайте.
Подробнее: Способы открытия редактора реестра в Windows 10
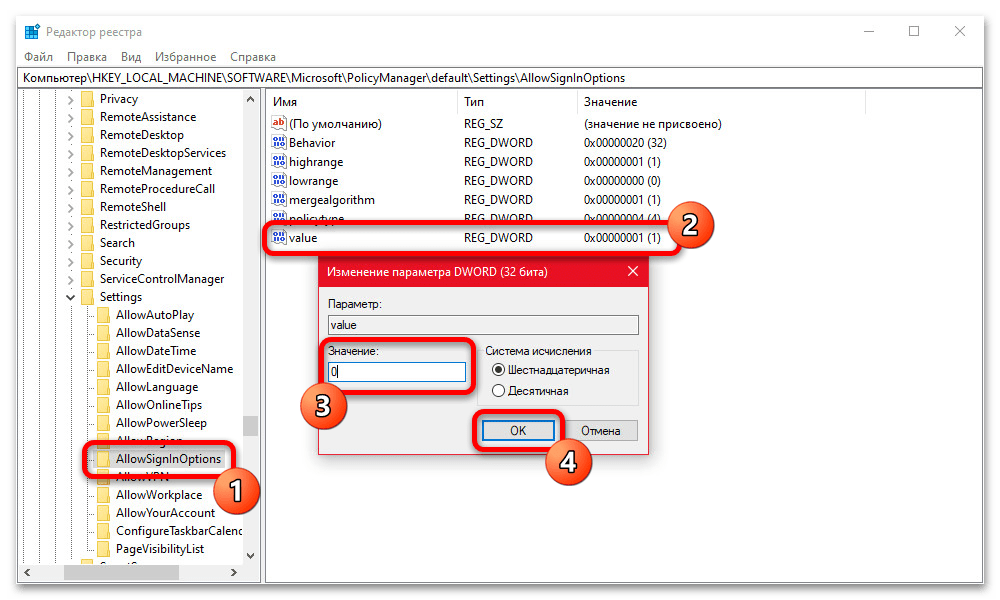
- Если вам достаточно будет деактивации ПИН-кода, разверните ветку «HKEY_LOCAL_MACHINE», выберите «SOFTWARE» и нажмите сочетание клавиш «CTRL+F». Во всплывающем окне в текстовое поле следует вставить «AllowSignInOptions», отметить галочкой «Имена разделов» и нажать кнопку «Поиск далее».
- По завершении в правой колонке найдите и дважды кликните левой кнопкой мыши по строке «Value» и во всплывающем окне в качестве «Значения» укажите «0». Для сохранения обновленных параметров необходимо нажать «ОК» и в обязательном порядке перезапустить компьютер.
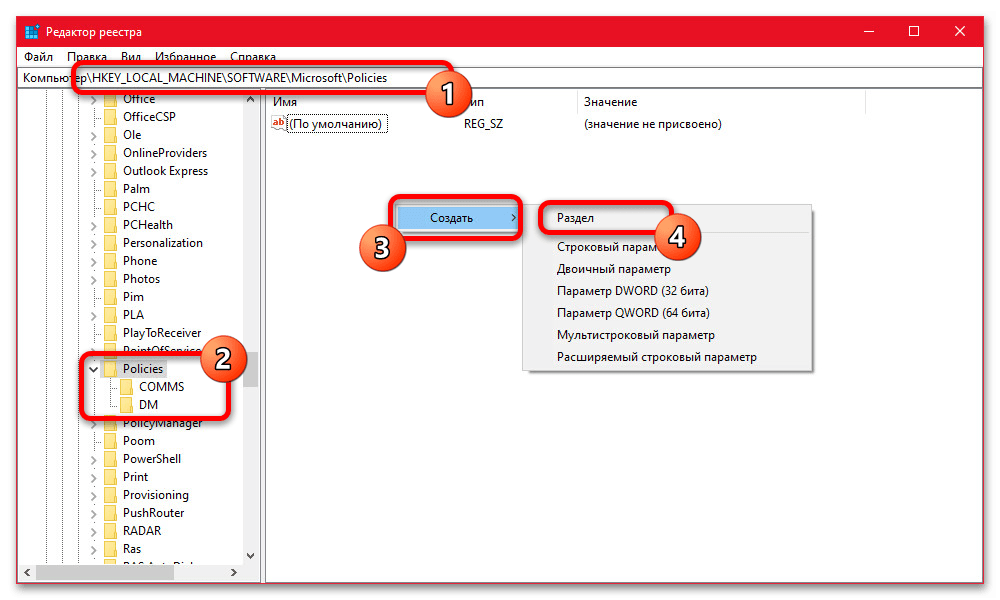
- В свою очередь, для деактивации вариантов входа, так или иначе связанных с биометрией, необходимо найти совершенно другой раздел реестра «Biometrics», который в ряде случаев может отсутствовать. Попробуйте вручную перейти по представленному ниже пути и, если указанный каталог не был создан системой, кликните правой кнопкой мыши, разверните «Создать» и выберите «Раздел», которому необходимо сразу присвоить название «Biometrics».
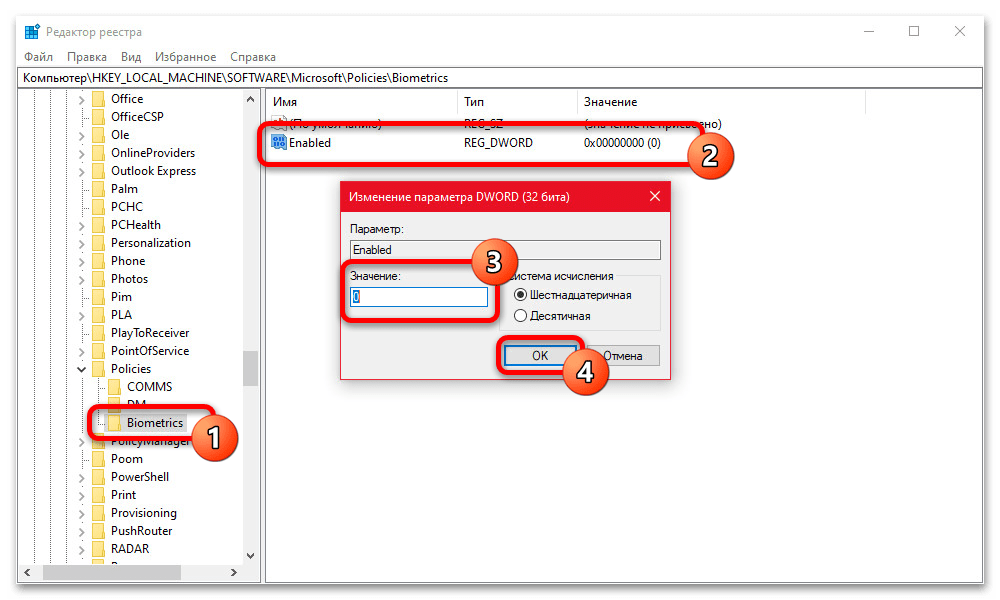
HKEY_LOCAL_MACHINE\SOFTWARE\Microsoft\Policies - Следующим действием необходимо открыть настройки «Enabled», где в качестве значения важно указать «0». Если данный пункт по аналогии с папкой изначально отсутствует, можете создать новый параметр «DWORD (32 бита)» и сразу установить «0» в качестве значения.

Какое бы из действий вы не выполнили, обновленные параметры будут применены только после перезагрузки системы. Убедиться в этом можно сразу при включении, так как по умолчанию будет выбран пароль в качестве стандартного метода авторизации.
Способ 4: Управление устройствами
Последний метод принудительной деактивации Windows Hello, актуальный только для вариантов входа, связанных с биометрией, заключается в отключении соответствующего устройства. Заранее рекомендуем учитывать, что такое решение может в результате привести к ошибкам, и потому рекомендуем ограничиваться самым первым способом в рамках инструкции.
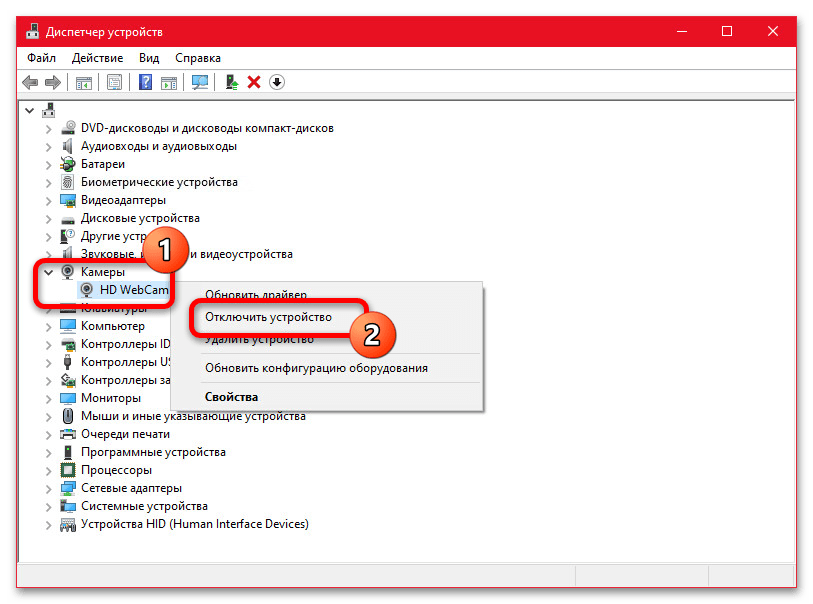
- Сначала необходимо открыть системный «Диспетчер устройств», кликнув правой кнопкой мыши по иконке «Пуск» на панели задач и выбрав соответствующий пункт из списка. Данную утилиту также можно открыть с помощью команды «devmgmt.msc» или окна поиска.
- Находясь в окне «Диспетчер устройств», найдите и разверните категорию «Биометрические устройства». Здесь, в свою очередь, следует щелкнуть правой кнопкой мыши по нужному варианту и воспользоваться опцией «Отключить устройство».
- Кроме деактивации биометрических устройств, аналогичным образом можете перейти в раздел «Камеры» и отключить совместимую с Windows Hello веб-камеру. В случае с компьютерами и оснащенными внешней камерой ноутбуками также можно произвести физическое отключение.

Сохранение новых настроек не требуется, но при этом необходимо, опять же, перезагрузить компьютер. Дополнительно убедиться в отключении рассматриваемых вариантов входа можно в системных параметрах из первого раздела инструкции, где нужные опции будут отмечены в качестве недоступных.
Наша группа в TelegramПолезные советы и помощь
-
Home
-
News
- 3 Ways – Step-by-Step Guide on Disable Windows Hello
By Tina |
Last Updated
Windows Hello is a new feature in Windows 10 that allows users to sign into the operating system using biometric authentication. But some people do not use this feature and want to disable it. This post from MiniTool shows how to disable Windows Hello.
Windows Hello is a more personal, more secure way to get instant access to your Windows 10 devices using fingerprint, facial recognition or a secure PIN. Most PC’s with fingerprint readers already work with Windows Hello, making it easier and safer to sign into your PC.
Windows Hello feature also enables users to sign into the operating system using biometric authentication. But some users do not use this feature and wonder whether it is possible to disable it.
There is no doubt that you can disable Windows Hello. So, in this post, we will show you how to disable Windows Hello.
3 Ways – Step-by-Step Guide on Disable Windows Hello
In this section, we will show you how to disable Windows Hello. If you want to disable Windows Hello pin, the following methods would be very effective.
Way 1. Disable Windows Hello via Settings
At first, Windows Settings allows you to disable Windows Hello. Now, we will show you the tutorial.
- Press Windows key and I key together to open Settings.
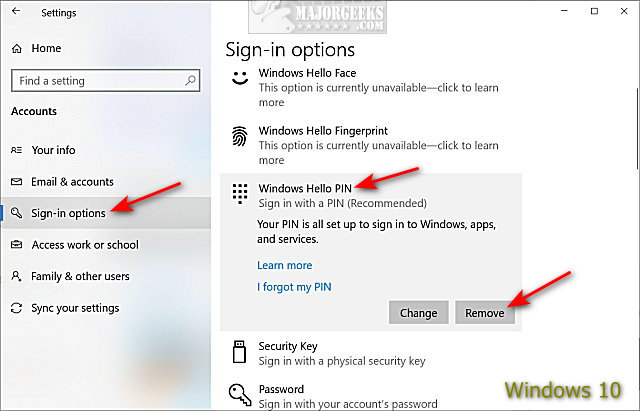
- Then choose Accounts.
- On the left panel, choose Sign-in options.
- On the right side, click Remove under Windows Hello section.

When all steps are finished, you have successfully disabled Windows Hello. Some users may say that there is no Windows Hello option in the Windows Settings. So, in order to disable Windows Hello, you can try other ways.
Way 2. Disable Windows Hello via Group Policy
To disable Windows Hello, here is the second way. You can choose to disable it via Group Policy.
Now, here is the tutorial.
- Press Windows key and R key together to open Run box.
- Then type gpedit.msc in the box and click OK to continue.
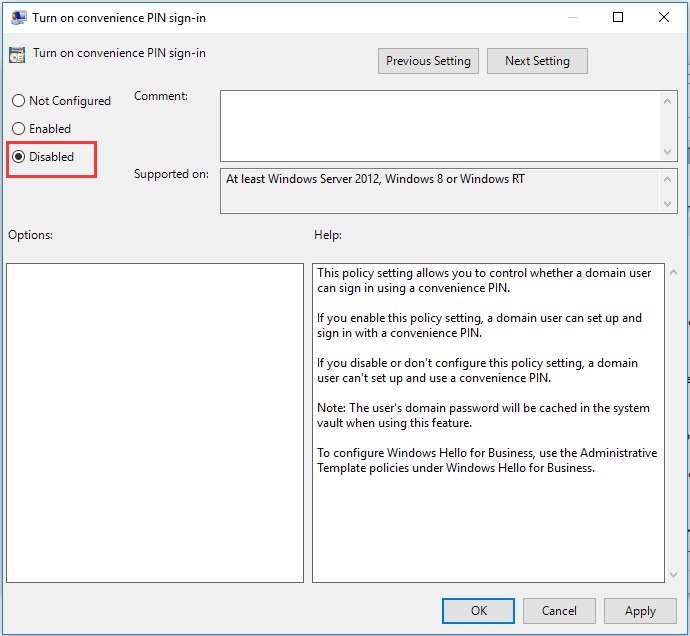
- Navigate to this path: Computer Configuration -> Administrative Templates -> System -> Logon.
- On the right side, double-click on the Turn on convenience PIN sign in.
- In the pop-up window, click Disabled.
- Then click Apply and OK to save the changes.
Then disable other Windows Hello options. After that, exit the Group Policy window and reboot your computer to check whether the Windows Hello is disabled.
Tip: If your computers are connected to Azure Active Directory, the correct location for that in gpedit.msc is Computer Configuration | Administrative Templates | Windows Components | Windows Hello for Business. In the right side, set “Use Windows Hellow for Buiness” to Disabled.
Way 3. Disable Windows Hello via Registry
To disable Windows Hello, you can do that via the Registry. Now, here is the tutorial.
Tip: Modifying the registry may be a risky thing. So, before proceeding, please back up registries first.
- Press Windows key and R key together to open Run dialog.
- Type regedit in the box and click OK to continue.
- Navigate to the path: HKEY_LOCAL_MACHINE\SOFTWARE\Microsoft\PolicyManager\default\Settings\AllowSignInOptions.
- In the right panel, double-click on the DWORD entry named value and set it to 0.
When all steps are finished, reboot your computer and check whether the Windows Hello is disabled.
Final Words
To sum up, this post has shown 3 ways to disable Windows Hello. If you want to do that, try these solutions. If you have any better idea to disable Windows Hello PIN, you can share it in the comment zone.
About The Author
Position: Columnist
Tina is a technology enthusiast and joined MiniTool in 2018. As an editor of MiniTool, she is keeping on sharing computer tips and providing reliable solutions, especially specializing in Windows and files backup and restore. Besides, she is expanding her knowledge and skills in data recovery, disk space optimizations, etc. On her spare time, Tina likes to watch movies, go shopping or chat with friends and enjoy her life.
If you’re looking to disable Windows Hello on your Windows 11 device, you’ve come to the right place. Windows Hello is a nifty feature that allows you to sign in using facial recognition, fingerprint, or a PIN. But, if you’re more of a traditionalist who prefers the good ol’ password, or you just want to turn off this feature for any reason, it’s a pretty straightforward task. Here’s how you can do it in just a few simple steps.
Disabling Windows Hello might sound technical, but trust me, it’s a breeze. By following these steps, you’ll be able to turn off the various biometric and PIN options that Windows Hello offers, allowing you to revert to traditional sign-ins.
Step 1: Open Settings
First, click on the Start button and select “Settings.”
The easiest way to get to the Settings menu is by clicking on the Start icon at the bottom left of your screen. Once there, look for the little gear-shaped icon labeled “Settings.” A click on it will open up a menu where you can control a lot of your computer’s features and functions.
Step 2: Go to Accounts
In the Settings menu, find and click on “Accounts.”
After you’re in the Settings, navigate to the “Accounts” section. This is where all your login information is stored, including your Windows Hello settings. The Accounts section is generally located on the left sidebar.
Step 3: Select Sign-in Options
Under “Accounts,” click on “Sign-in options.”
Once you’re in the Accounts menu, you’ll see a list of options related to your sign-in preferences. Click on “Sign-in options” to proceed. This will show all the different ways you can log into your Windows device.
Step 4: Disable Windows Hello Features
Look for the Windows Hello options and toggle them off.
In the Sign-in options, you’ll find various Windows Hello features like Facial Recognition, Fingerprint, and PIN. Simply click on each of these and follow the prompts to disable them. It may ask you to verify your identity, so be ready to enter your password.
Step 5: Confirm Changes
Follow any on-screen prompts to confirm you’ve disabled the features.
Once you’ve toggled off the features you wish to disable, you might have to click “OK” or “Apply” to confirm your changes. Make sure everything is saved so you can return to your regular password login.
Once you’ve completed these steps, your Windows 11 device will revert to using a password for sign-ins. No more facial recognition or fingerprint scanning—just the trusty old password method.
Tips for Disabling Windows Hello on Windows 11
- Make sure to remember your password if you decide to disable all biometric options.
- Consider keeping at least one biometric option enabled for security.
- Regularly update your password for enhanced security.
- Check for any software updates that might impact sign-in features.
- Be cautious when disabling these features on shared devices.
Frequently Asked Questions
Why would I want to disable Windows Hello?
Some users prefer using traditional passwords for security reasons or find biometric options inconvenient.
Can I enable Windows Hello again after disabling it?
Absolutely, you can always go back to the sign-in options and enable the features anytime you want.
Does disabling Windows Hello affect my Microsoft account?
No, it only affects how you sign into your device locally; your Microsoft account remains unchanged.
Is Windows Hello less secure than a password?
Windows Hello uses biometric data, which is generally considered more secure than passwords, but personal preferences vary.
What happens if I forget my password after disabling Windows Hello?
You can use password recovery options provided by Microsoft to regain access to your account.
Summary
- Open Settings.
- Go to Accounts.
- Select Sign-in Options.
- Disable Windows Hello Features.
- Confirm Changes.
Conclusion
So, there you have it! Disabling Windows Hello on your Windows 11 device is as easy as pie. While the feature does offer some modern conveniences, it’s not for everyone. Whether it’s for personal preference, security concerns, or just wanting to keep things simple, turning off Windows Hello can be done in a jiffy with just a few clicks. Now that you know how to do it, feel free to toggle it on or off as you see fit.
Remember, technology is here to serve you, not the other way around. If you ever change your mind and decide you miss the ease of logging in with a quick glance or touch, you can always go back and enable it again. For more tech-savvy tips and tricks on Windows 11, keep exploring articles and guides that help you make the most of your digital life. Happy computing!
Matthew Burleigh has been writing tech tutorials since 2008. His writing has appeared on dozens of different websites and been read over 50 million times.
After receiving his Bachelor’s and Master’s degrees in Computer Science he spent several years working in IT management for small businesses. However, he now works full time writing content online and creating websites.
His main writing topics include iPhones, Microsoft Office, Google Apps, Android, and Photoshop, but he has also written about many other tech topics as well.
Read his full bio here.
By Timothy Tibbettson 06/15/2023 |
Windows Hello is an option for Windows 10 and 11 that lets you log on easier by using a PIN you create. However, there are some apps that Windows Hello opens when you don’t want it to. Here are your options to stop Windows Hello from popping up.
How to Disable Windows Hello PIN in Windows 10 and 11 — Settings
Click on Start > Settings > Account > Sign-in options.
Click on Windows Hello Pin on Windows 10 or PIN (Windows Hello) in Windows 11.
Click on Remove.
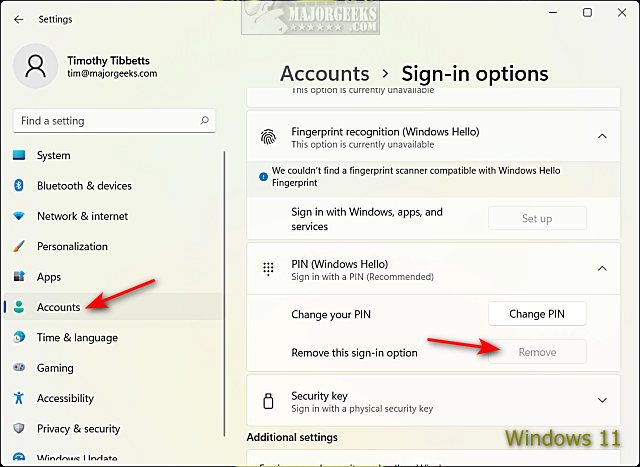
In some cases, if you have a Windows Hello pin set up, you can’t remove the option unless you choose one of the other available sign-in options.
Some users have reported that even by removing a PIN, they still receive a Windows Hello popup. In this case, you can use Group Policy Editor or the Registry Editor.
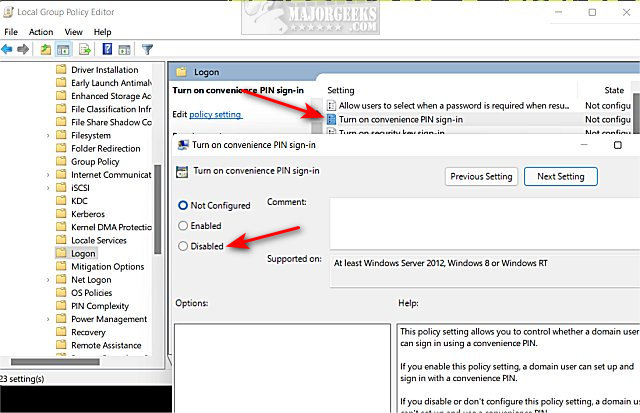
How to Disable Windows Hello PIN in Windows 10 and 11 — Group Policy Editor
Windows 10 and 11 Home users will need to enable Group Policy Editor or use the Registry method.
Open the Group Policy Editor and navigate to:
Computer Configuration > Administrative Templates > System > Logon
Double-click on Turn on convenience PIN sign-in
Click on Disabled to disable the prompt or Not Configured for the default setting.
How to Disable Windows Hello PIN in Windows 10 and 11 — Registry Editor
Open the Registry Editor.
Navigate to:
Computer\HKEY_LOCAL_MACHINE\SOFTWARE\Microsoft\PolicyManager\default\Settings\AllowSignInOptions
Double-click on value on the right pane.
Change the Value data to 0.
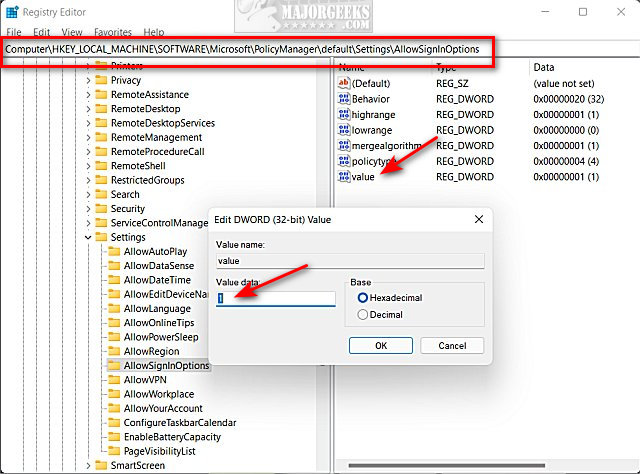
Reboot.
Change the Value data back to 1 to enable Windows Hello.
Similar:
comments powered by Disqus
Updated on Apr 28, 2025
Follow the solutions to disable/remove Windows 10 PIN:
| Workable Solutions | Step-by-step Troubleshooting |
|---|---|
| Use Windows PIN Removal Software | Insert the target USB disk into the computer, download and run EaseUS Partition Master…Full steps |
| Remove PIN on Windows 10 via Settings | Select Settings from the Start Menu…Full steps |
| Disable Hello PIN with Registry Editor | First, open the Registry Editor on your PC or laptop. Navigate to the location…Full steps |
| Disable Password login in Windows 10 | Open the Command prompt. In the dialogue box, type netplwiz and click the Enter key…Full steps |
| Use Group Policy Editor to Disable PIN | First, open the Run dialogue box using the shortcut keys Windows + R…Full steps |
If you use Windows 10 or 11, you might be familiar with the Windows Hello option. It is a feature on Windows that allows you to create a password to log in using a PIN. Even though creating such a PIN for your device is a way to secure it, sometimes a password could be inconvenient. Moreover, Windows Hello might open some apps that you don’t want.
However, if you have already created a PIN but now wish to disable it for easy access to the device, read further to find out. EaseUS will provide quick solutions for disabling PIN on Windows 10.
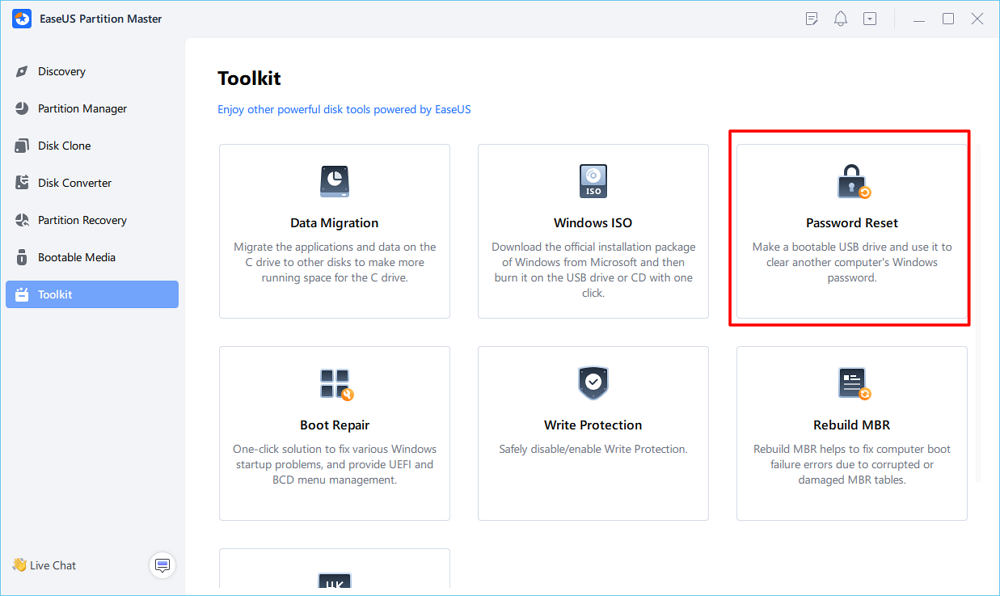
1. Use Windows PIN Removal Software
The first and one of the most straightforward solutions is to use Windows PIN removal software. An impressive tool is EaseUS Partition Master Professional, which has many advanced features that can easily disable your PIN.
This free partition manager tool is equally accessible for all Windows versions. Password Reset is one of its features that will help disable the PIN you created quickly. Here’s how you can use EaseUS Partition Master to remove the PIN on your Windows PC:
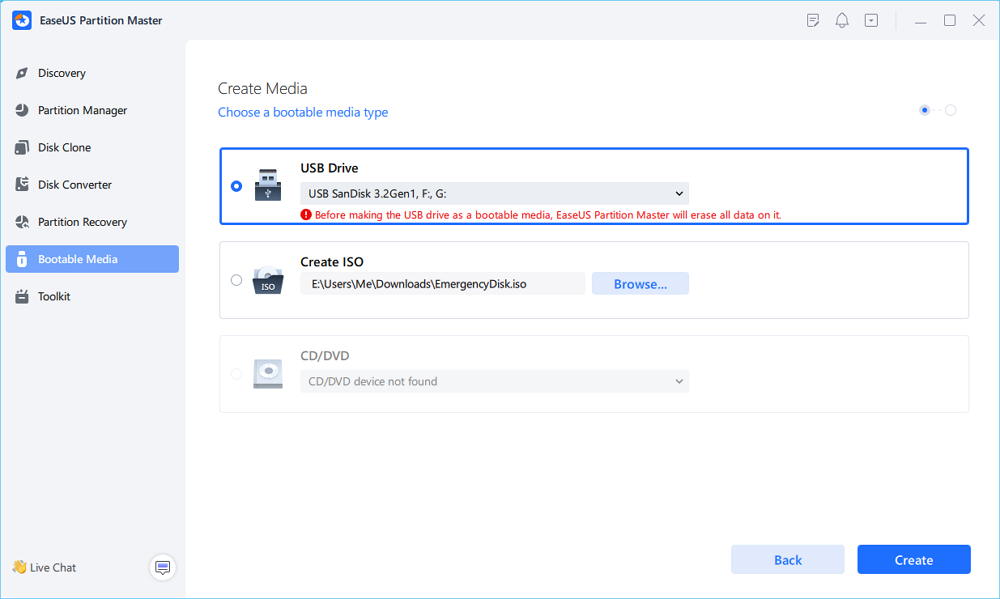
Step 1. Insert the target USB disk into a computer, run EaseUS Partition Master, and click «Toolkit» > «Password Reset.»
Step 2. A message will pop up. After reading it carefully, click «Create» to create bootable media.
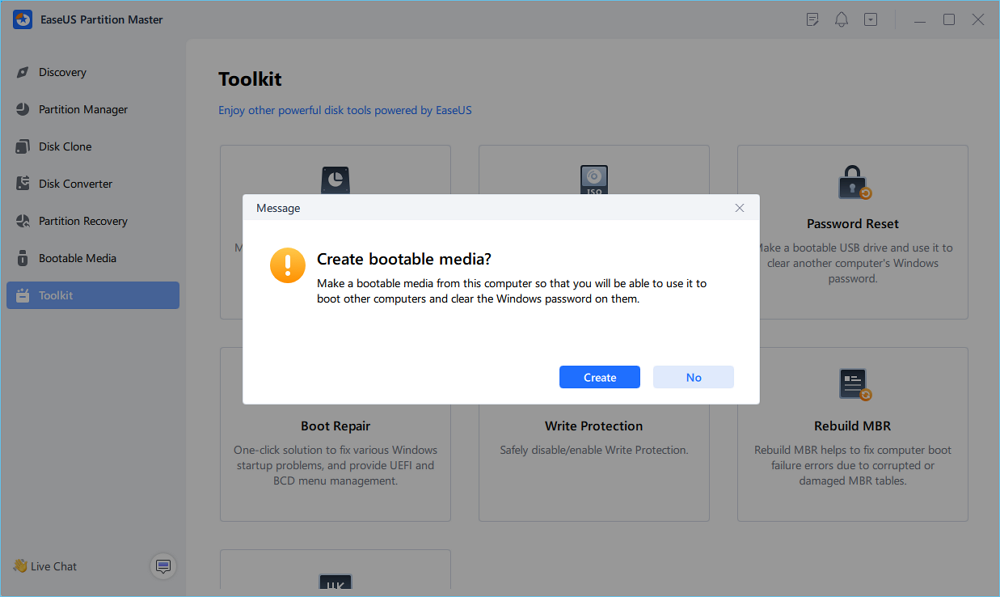
Step 3. Select the correct USB flash drive and click «Create» and «Yes.» This will erase all data on the USB, so please back up if any important data on it.
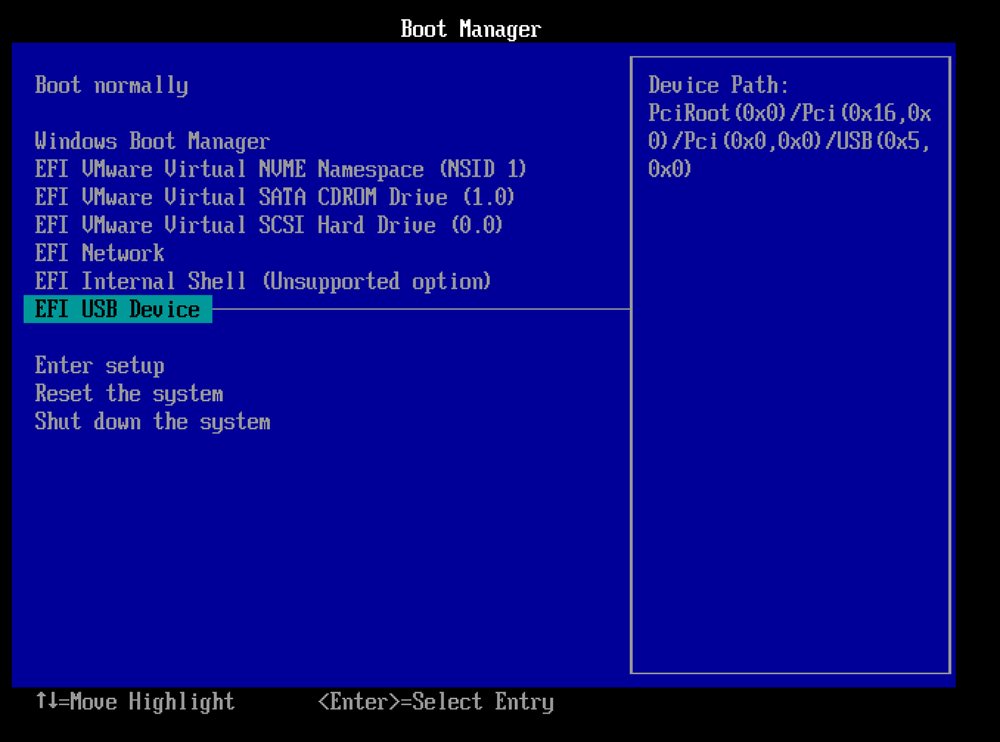
Step 4. Wait patiently. After the password reset USB flash drive is created, connect the USB to the locked PC. Restart the locked PC and press F2/F8/F11/Del to enter the BIOS, set the bootable USB as the boot drive. Once completed, the system will automatically boot from the USB.
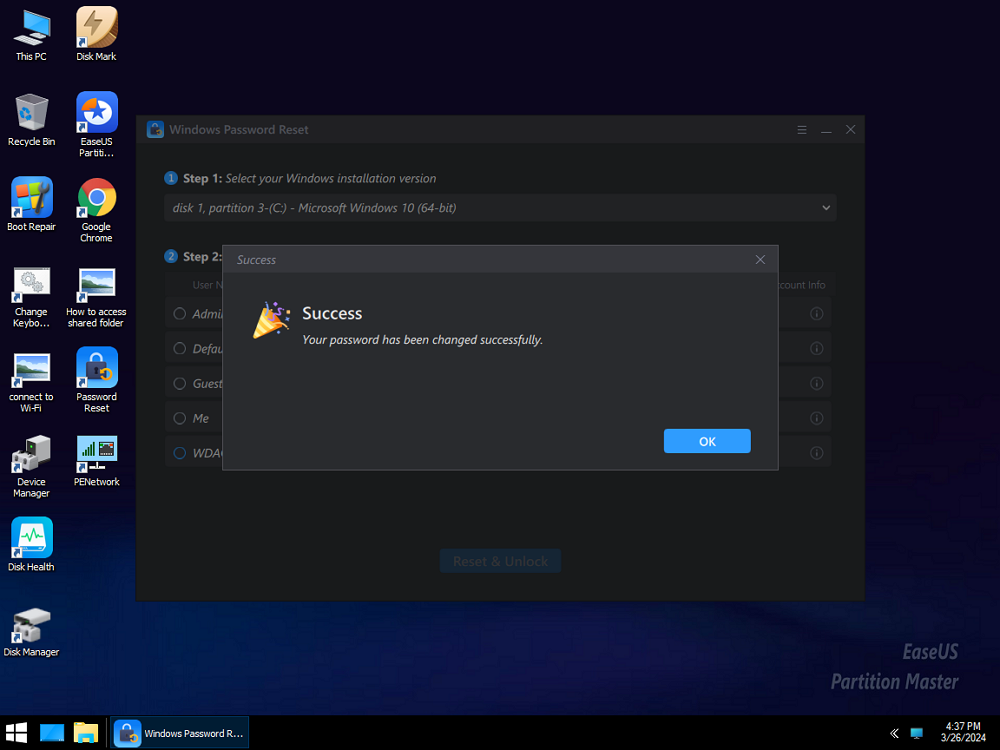
Step 5. After restarting, launch EaseUS Partition Master again and go to «Password Reset.» All accounts on the PC will be displayed in the interface; click on the target account and check «Reset & Unlock.»

Step 6. When you receive this prompt, click «Confirm» to continue. Your password will be erased.
As an all-in-one solution for your Windows requirements, EaseUS Partition Master shines as a great tool. It can also fix the «Your PIN is no longer available» error.
2. Remove PIN on Windows 10 via Settings
Creating a PIN on Windows 10 is easy. Similarly, it can be easily disabled through the Windows Settings options. To do this, you must first sign in to your account on your device.
Step 1. Select Settings from the Start Menu.
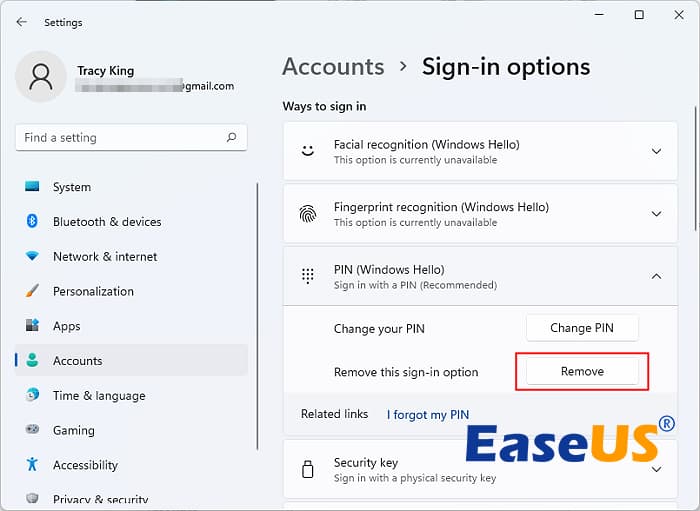
Step 2. In the Settings menu, click on Accounts. This will show many options on the left side. From the options, select Sign-in options.
Step 3. A new menu appears, from which you can select Windows Hello PIN and then click Remove. Before removing the PIN, you will be asked to confirm it once more, and then the PIN will be removed permanently from your Windows.
In case your sign-in account is with Microsoft, you will be asked to enter your Microsoft account password to remove your PIN. If you have encountered the «Windows 10/11 Hello PIN: the option is currently unavailable» issue, you can follow the workable guide to solve it:
3. Disable Windows Hello PIN in Windows 10 with Registry Editor
You can also disable your Windows Hello PIN using the Registry Editor. For this, follow the below steps:
Step 1. First, open the Registry Editor on your PC or laptop. Navigate to the location:
- computer\HKEY_LOCAL_MACHINE\SOFTWARE\Microsoft\PolicyManager\default\Settings\AllowSignInOptions
Step 2. From the new menu that appears, double-click on the option Value from the right-hand side. A new dialogue box appears; here, change the value data to 0 and click OK.
Step 3. Reboot your device to disable the PIN permanently. You can also change the value data back to 1 to enable Windows Hello again whenever needed.

4. Disable Password login in Windows 10
When you sign into your Windows 10 device, you will be asked to type the password if you have opted for a text password. This could be time-consuming and hinder the flow of your daily tasks, especially in a hurry. In such situations, you can also disable the password through the following method:
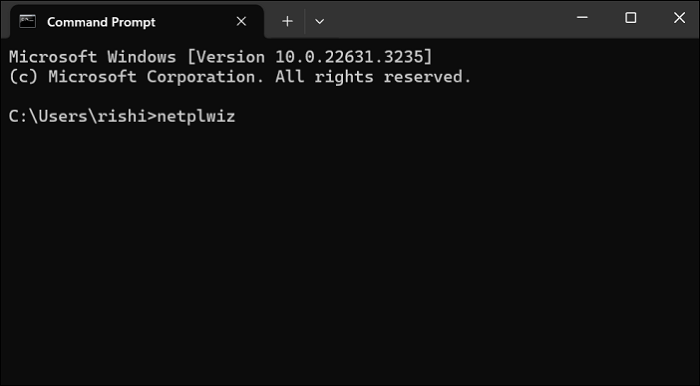
Step 1. Open the Command prompt. In the dialogue box, type netplwiz and click the Enter key.
Step 2. This will open the User Accounts dialogue box. Select the account whose password you wish to disable and uncheck the box next to the option; users must enter a username and password to use this computer. Then select the OK button.
Step 3. After this, type in the correct user name and password created, then click OK. Restart your computer afterward. The password will be disabled, and you will no longer be asked to type it when you sign in to your PC or laptop.
You can check here to learn more about the difference between Windows password and PIN.
🚩Read also: Windows PIN vs Password — What’s the Difference
5. Use Group Policy Editor to Disable PIN
Lastly, you can use Group Policy Editor to sign into the Windows by disabling the PIN created. Below given are the steps to do so:
Step 1. First, open the Run dialogue box using the shortcut keys Windows + R. On the new dialogue box, type gpedit.msc and click OK to launch the Group Policy Editor on your device.
Step 2. From the new menu, select the folder Computer Configuration. Then, expand the folder Administrative Templates among the options and choose folder System from the list.
Step 3. Under the System folder, choose the Logon folder from the list. You will see many options on the right-hand side, including Turn on convenience PIN sign-in.

Step 4. In the next window, click Disabled and then OK. Then click Apply and OK to save the new changes.
Step 5. Once done, Restart your PC or laptop, and the changes to disable the Windows Hello PIN will be made.
Those are the 5 effective ways to remove PIN on Windows 10. If you think these solutions are helpful, share it with others in need.
Conclusion
As much as face recognition, PIN, or text passwords are required and are an excellent option for the safety and protection of any delicate data, sometimes it is better to skip this option. People must remember passwords often, which can be time-consuming in an emergency.
You can try any of the five methods discussed above to disable PIN on Windows 10 if you are facing a PIN not working issue like «Something happened and your PIN isn’t available.» Further downloading and installing a tool such as EaseUS Partition Master is life-saving. Its advanced functions could help you deal with any issues, including disabling PIN on Windows 10.
FAQs About How to Disable PIN on Windows 10
Disabling the PIN you created in Windows Hello is simple and can be accomplished through a few quick methods. Suppose you still have doubts about the same topic. In that case, some questions are commonly raised when disabling Windows Hello PIN on Windows 10. Refer to them for further clarity.
1. Why can’t I remove Windows Hello PIN?
If you cannot remove the Windows Hello PIN you created while signing in, ensure that the account you have signed up for is the right one. Always confirm that the username and password are typed in correctly so that the PIN will be removed quickly. Further from the Settings, select Accounts and Sign-in options to check if the slider next to the Require Windows Hello sign-in for Microsoft accounts is set as an off option.
2. How do I start Windows 10 without a password or PIN?
You can skip creating a password or PIN for your Windows 10 account. However, you can disable the PIN through the Settings option if it is already present. Choose Sign-in options under Accounts from the Settings menu. Choose the Windows Hello PIN and click on the Remove button. You can also use EaseUS partition Master, which has a Password Reset feature to disable the PIN.
3. How to turn off passwords in Windows 11?
To turn off passwords in Windows 11, a simple method, such as using a tool like EaseUS Partition Master, is efficient. This one-in-all partition manager comes with several features to make it easy for you to tackle any technical error within no time. It is also compatible with all versions of Windows, making it a unique and feasible option for turning off or disabling passwords or PINs in Windows 11.