
All gamers know the importance of maintaining their gear, and this includes making sure the controllers are in perfect condition. Some issues can often mess up your aim or even movement, as competitive shooters require the most precise of actions. Luckily, there are ways to reset controller axes on Windows 10.
If you want to learn how to calibrate a controller on Windows 10, this article will help you. There are plenty of options to follow. We’ll also answer some burning questions you may have.
All Windows 10 PCs come with a program called the Calibration Tool. It works with all USB controllers, including PlayStation and Xbox controllers. You can even use it for your Nintendo Switch Pro controller if you wanted to.
Before we get into the steps, let’s try something else.
Reset Controller Calibration to Default
This method is great to deal with minor issues. It essentially refreshes the controller’s calibration, just like you would refresh a malfunctioning or slow webpage on your browser. The steps are extremely simple, and you can finish this whole process in under a minute.
These are the steps for resetting controller calibration:
- Ensure your controller is connected and readable by your Windows 10 PC.

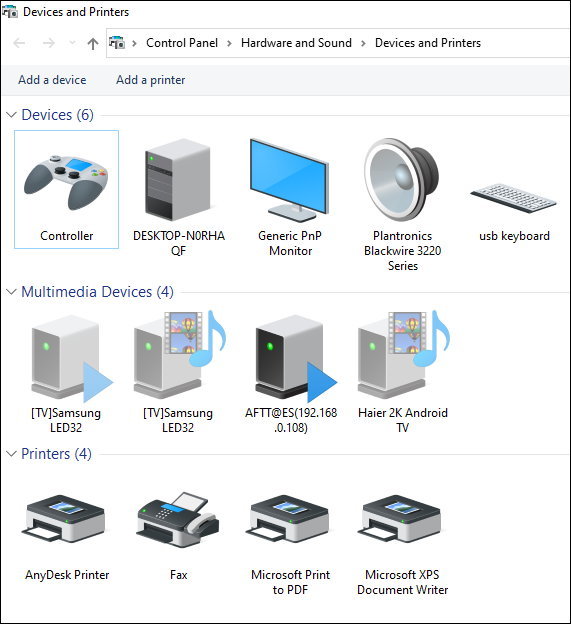
- Go to your “Devices and Printers” settings.

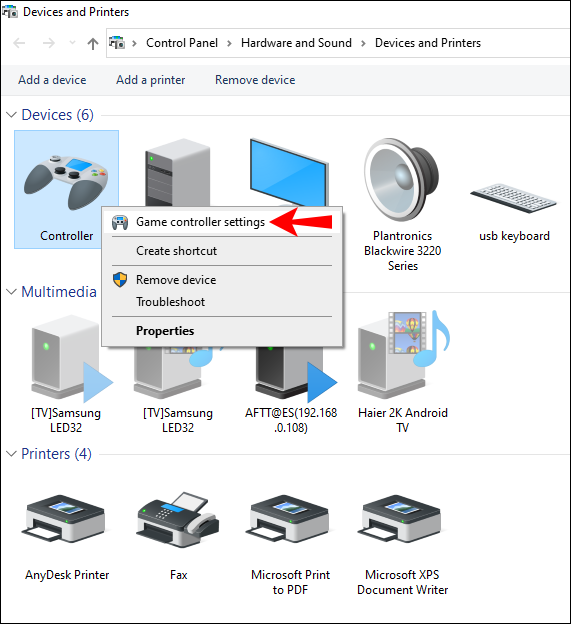
- Find your controller and right-click it. Select “Game Controller Settings” from the drop-down menu.
- Select “Properties” from the new window.

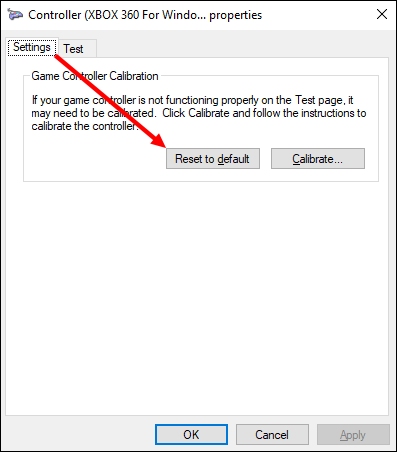
- On the “Settings” tab, select “Reset to Default.”

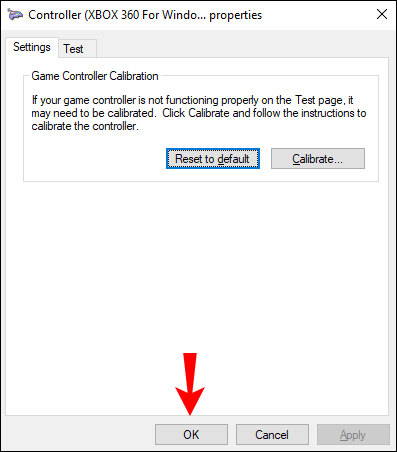
- When done, select “OK” to end.
- Do the same for the original controller window.

- Your controller should be in factory calibration now and you can close “Devices and Printers” if you want.


This quick fix is effective in eliminating strange sensitivity and calibration settings. However, it might not work at times. If the quick reset method doesn’t work, you can try this next method.
Calibrate Your Game Controller With Calibration Tool
The Calibration Tool is reliable to get your controller back in shape. This process takes longer as you’ll have to follow the instructions. However, the tool will tell you what to do.
Here’s how you use the Calibration Tool to calibrate your game controller manually:
- Go to “Devices and Printers.”
- Locate your controller from the hardware. Right-click on the controller and select “Game Controller Settings.”
- Make sure you’re selecting the right controller and then choose “Properties.”
- Go to the “Settings” tab in the new window.
- Select “Calibrate.”
- The Calibration Tool will run, and just select “Next” to begin.

- Leave the D-pad (Xbox) or left thumbstick (PS) centered and press any button.

- Move the D-pad (Xbox) or left thumbstick (PS) to all four corners and then press any button.
- Repeat Step 8 for the right thumbstick. When done, select “Finish” to complete the process.
- Test if everything is working. Select “OK” when done.

- Select “OK” for the original controller settings window.


Manual calibration might be able to solve problems resetting can’t. Usually, your controller will be as good as new after the recalibration session.
If you want to learn how to calibrate with Steam, check out the following section.
Calibrate Your Game Controller With Steam
Did you know that Steam comes with its own controller calibration function? It’s more in-depth and even allows you to adjust the deadzones. You can even fine-tune your controller settings on a game-by-game basis even if the game doesn’t support USB controllers.
Here’s how to perform some basic calibration with Steam:
- Launch the Steam client.
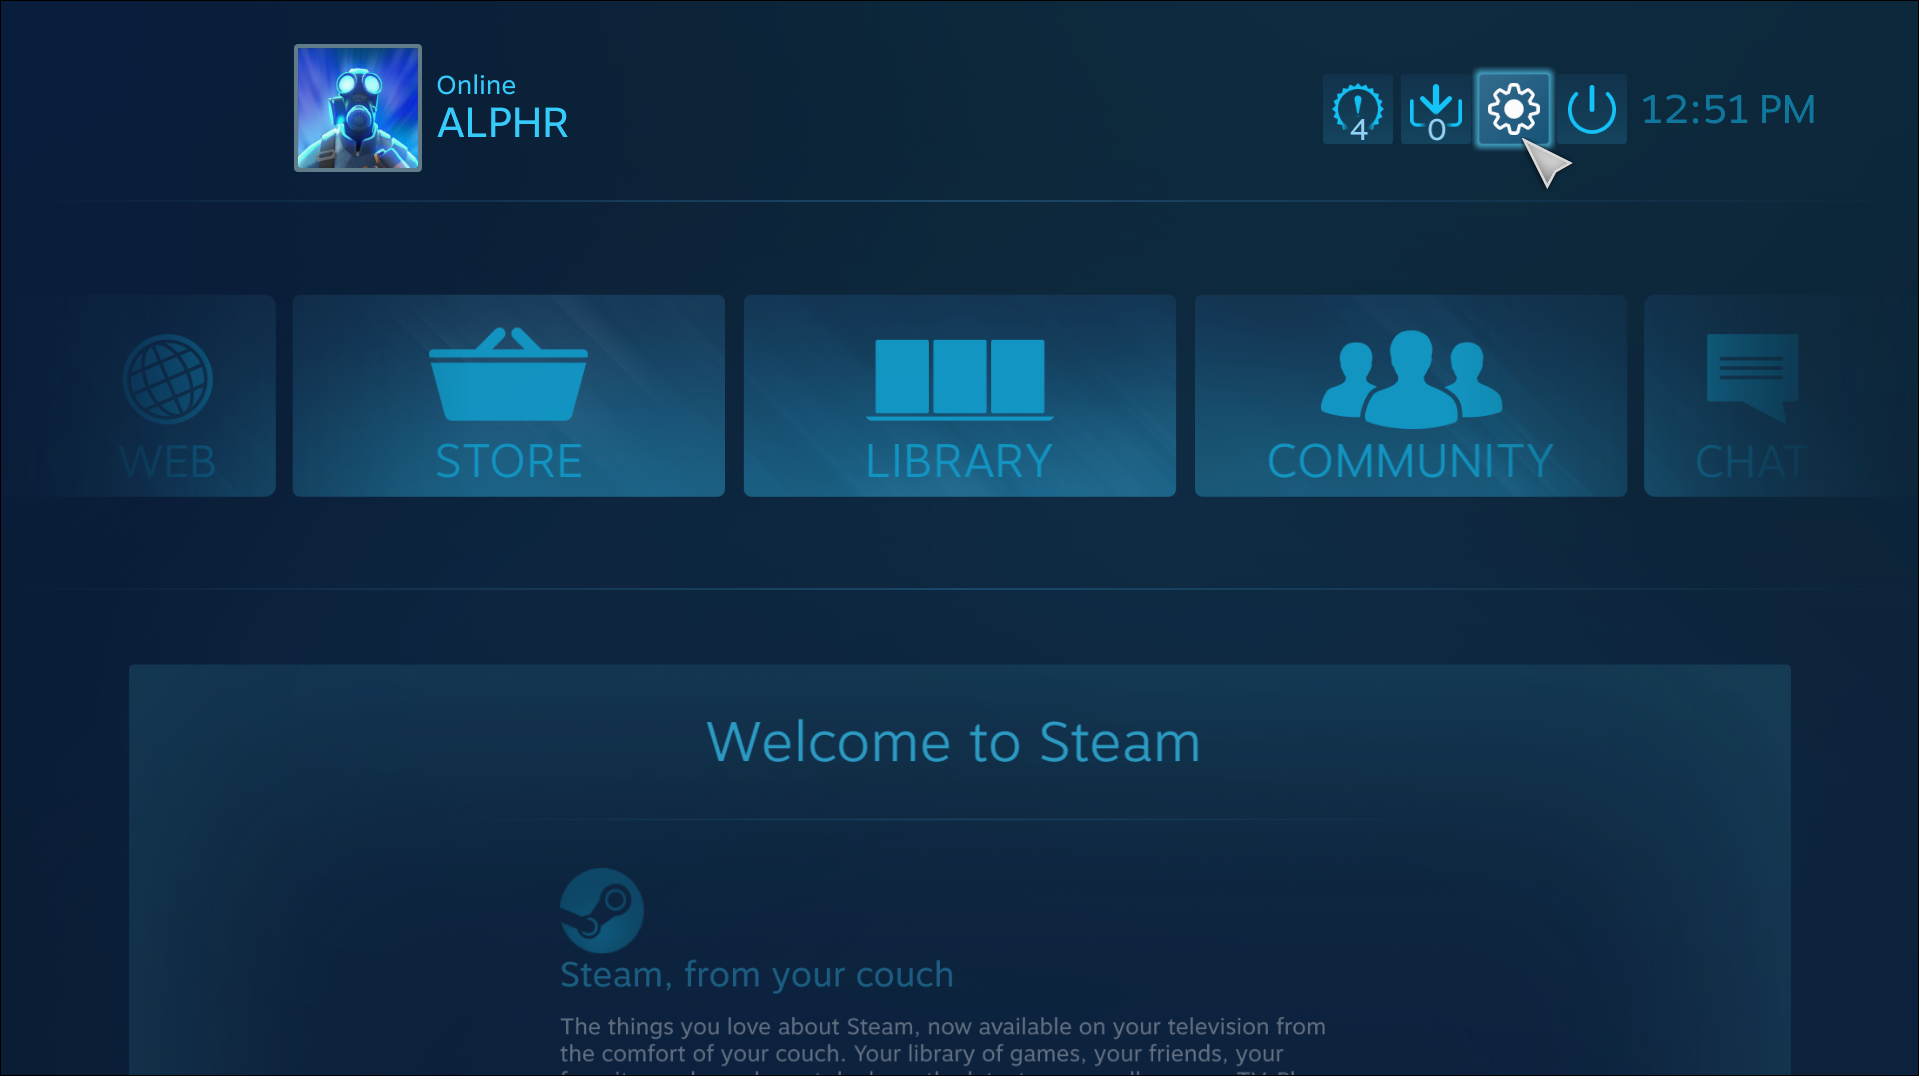
- Open Big Picture Mode by clicking it at the top bar.

- Click the settings cog.

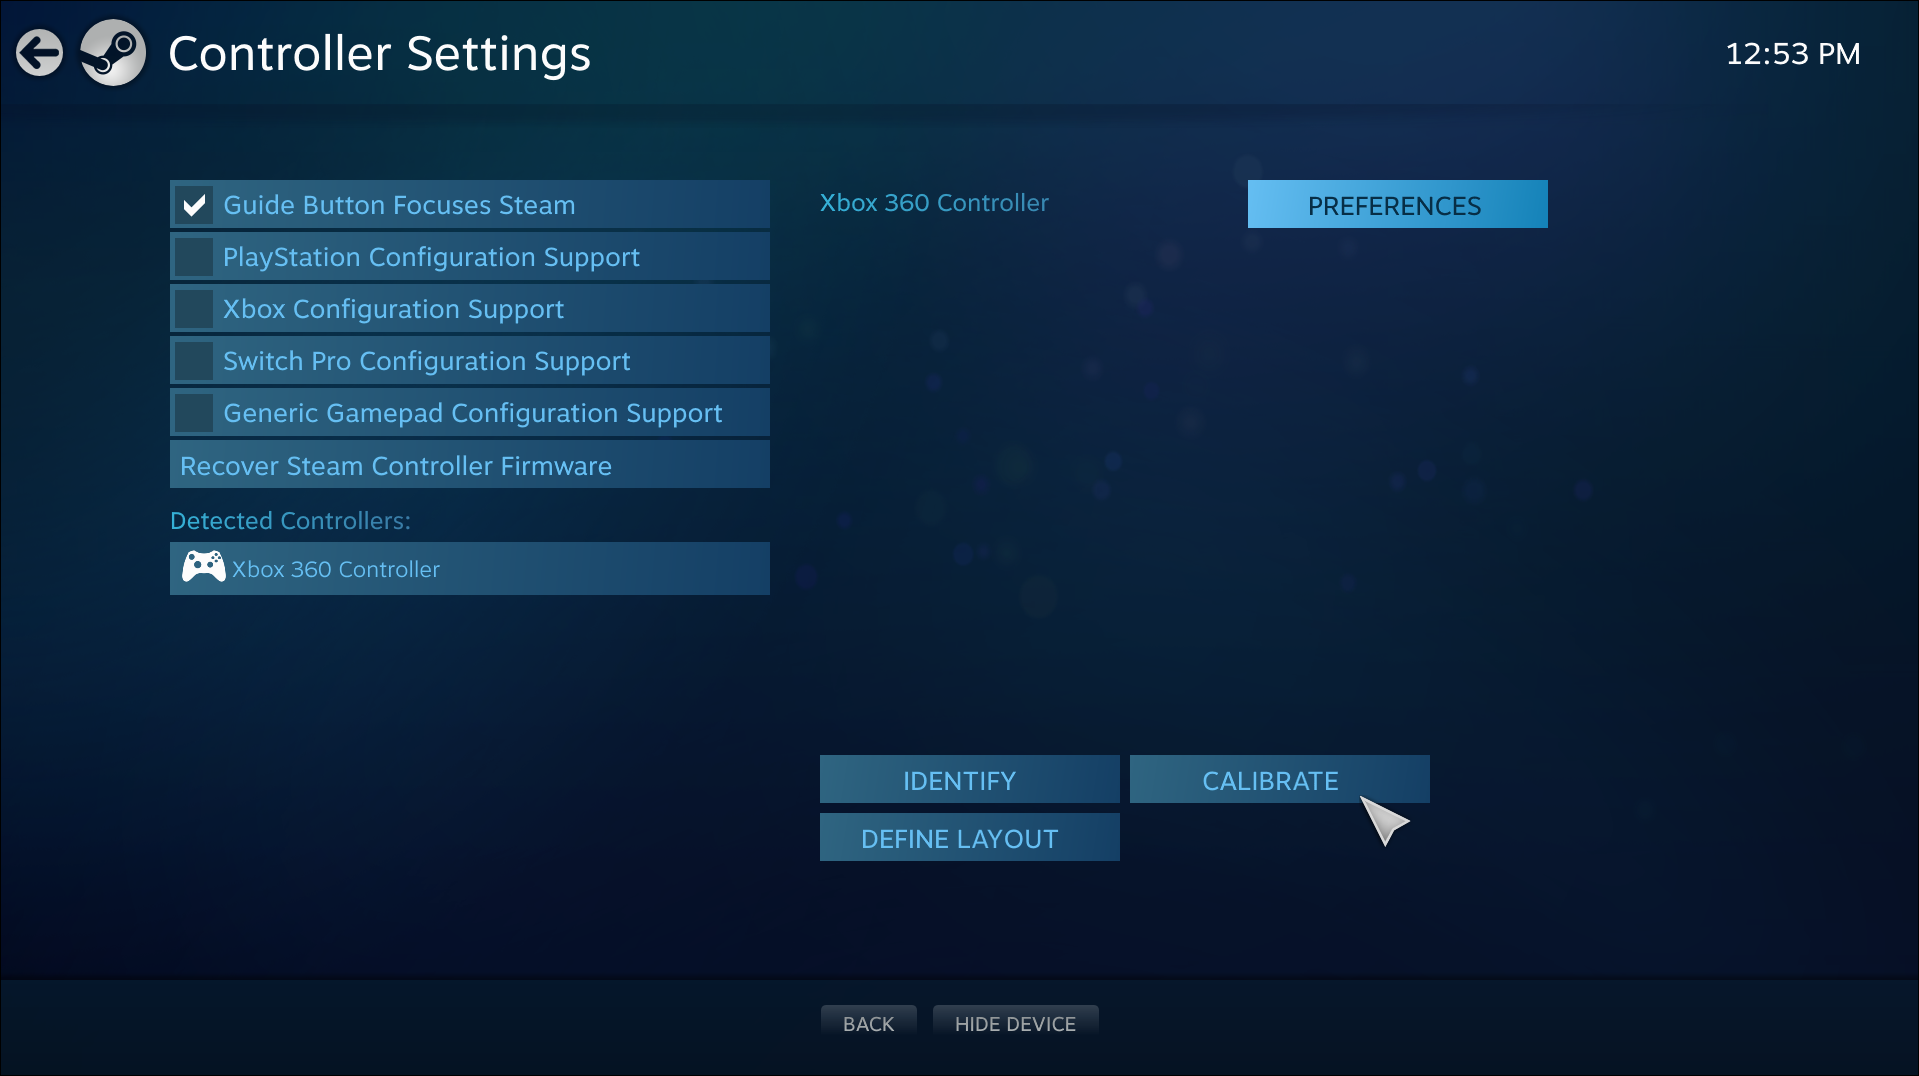
- Go to “Controller” and then “Controller Settings.”
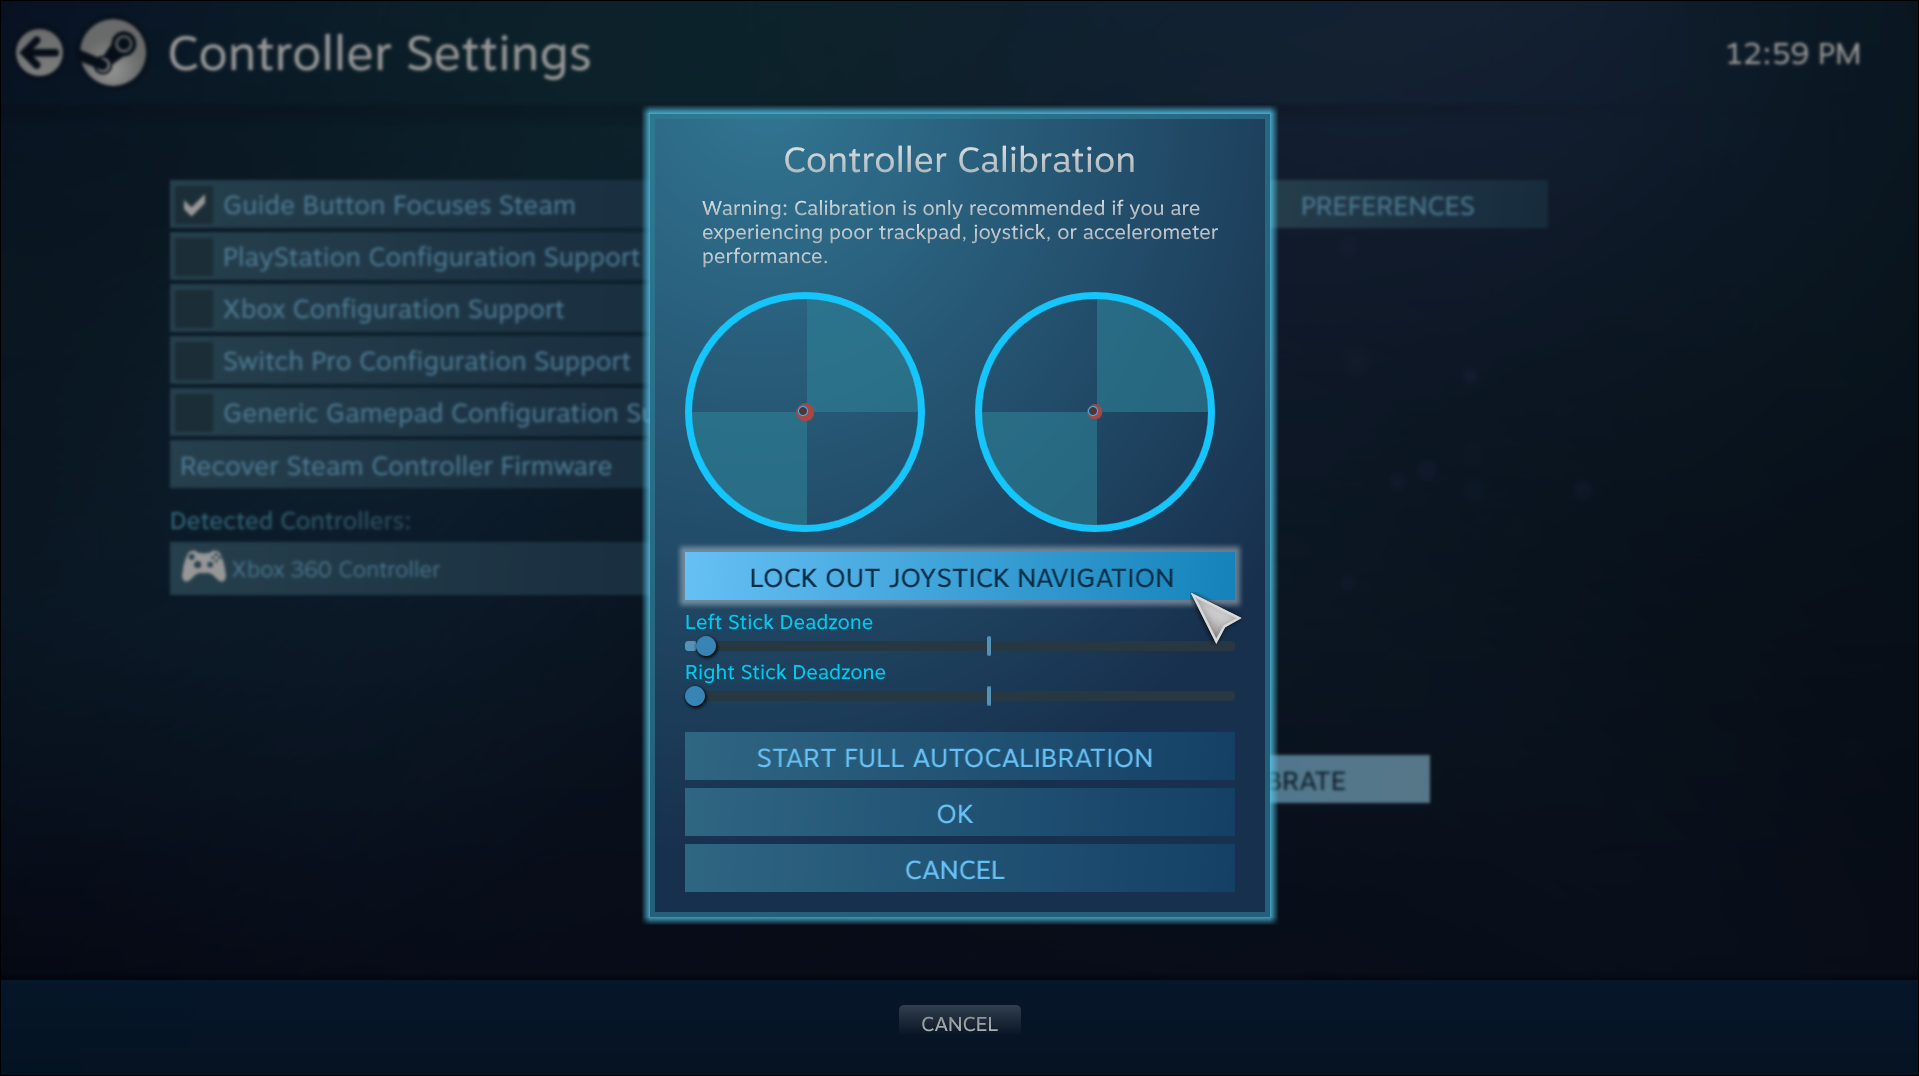
- Select your controller and then select “Calibrate.”
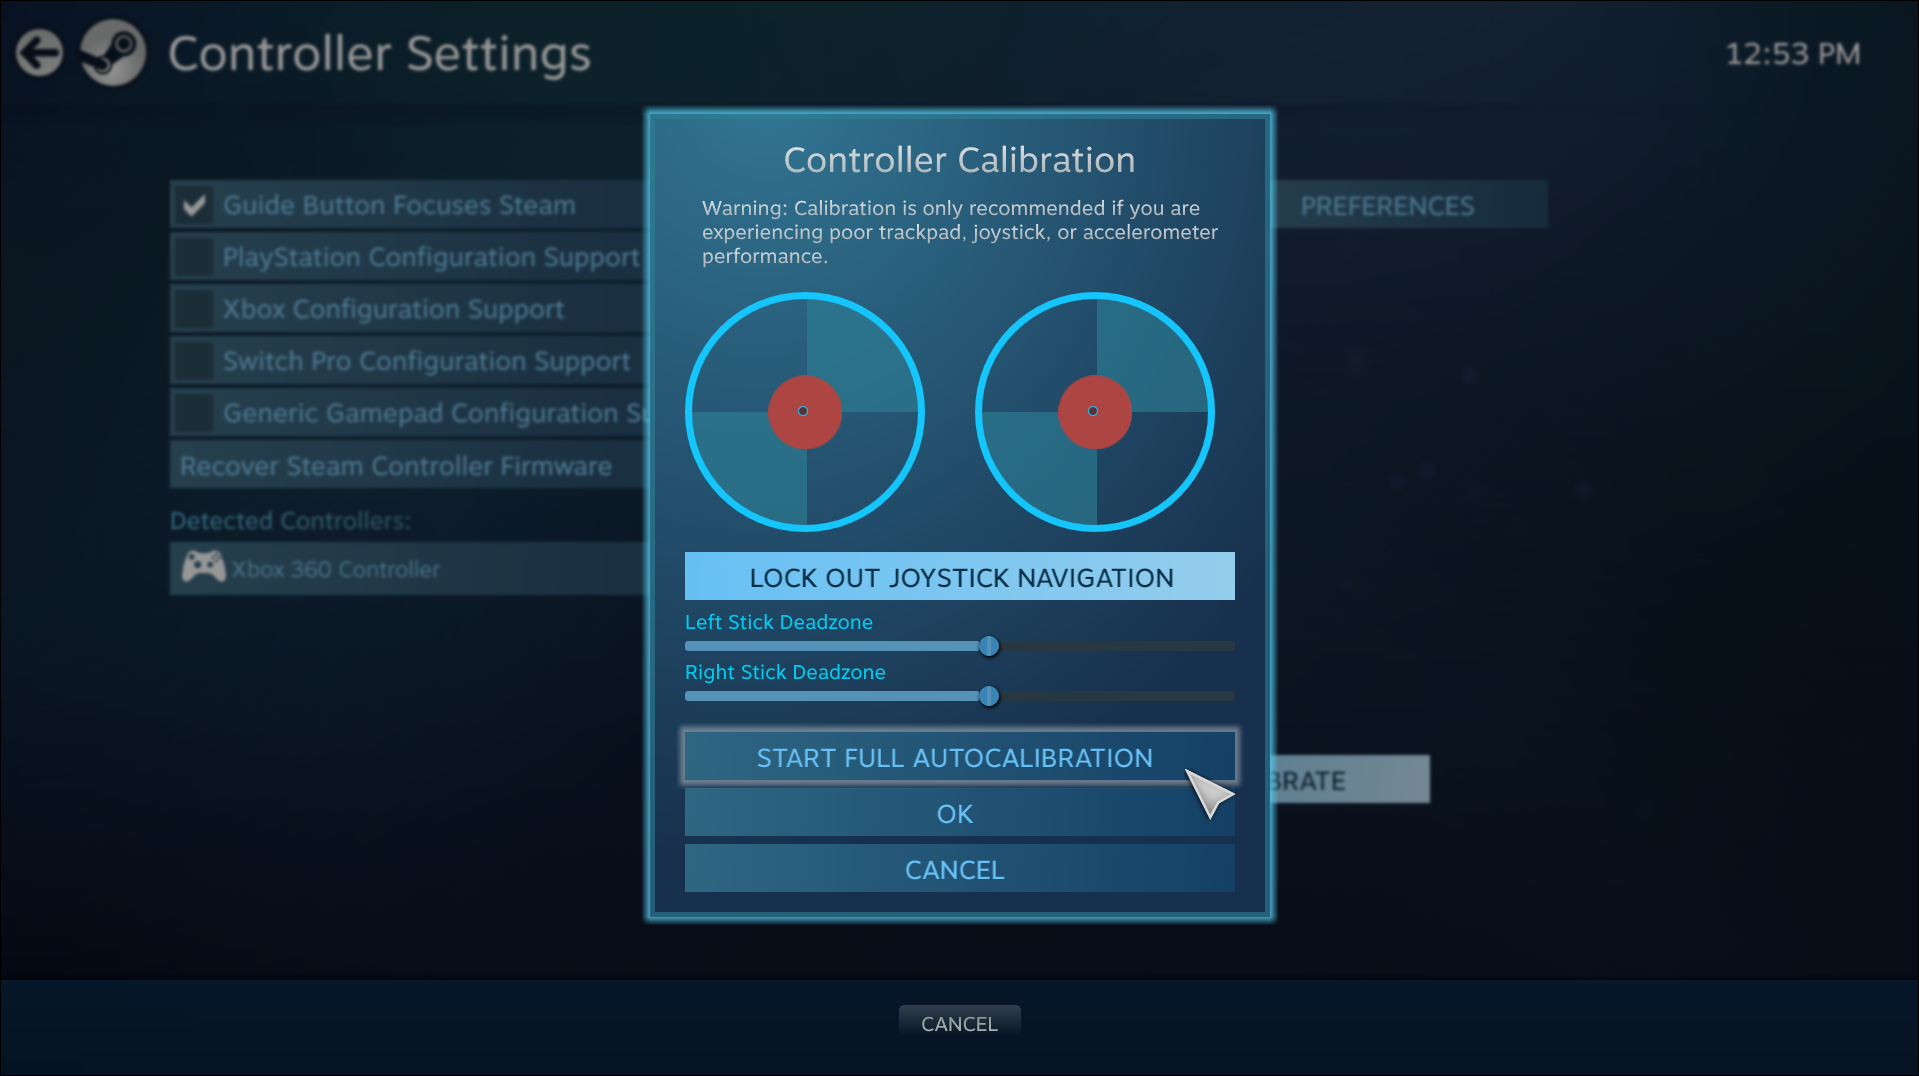
- First, enable “Lock Out Joystick Navigation.”
- After that, select “Start Full Autocalibration.”
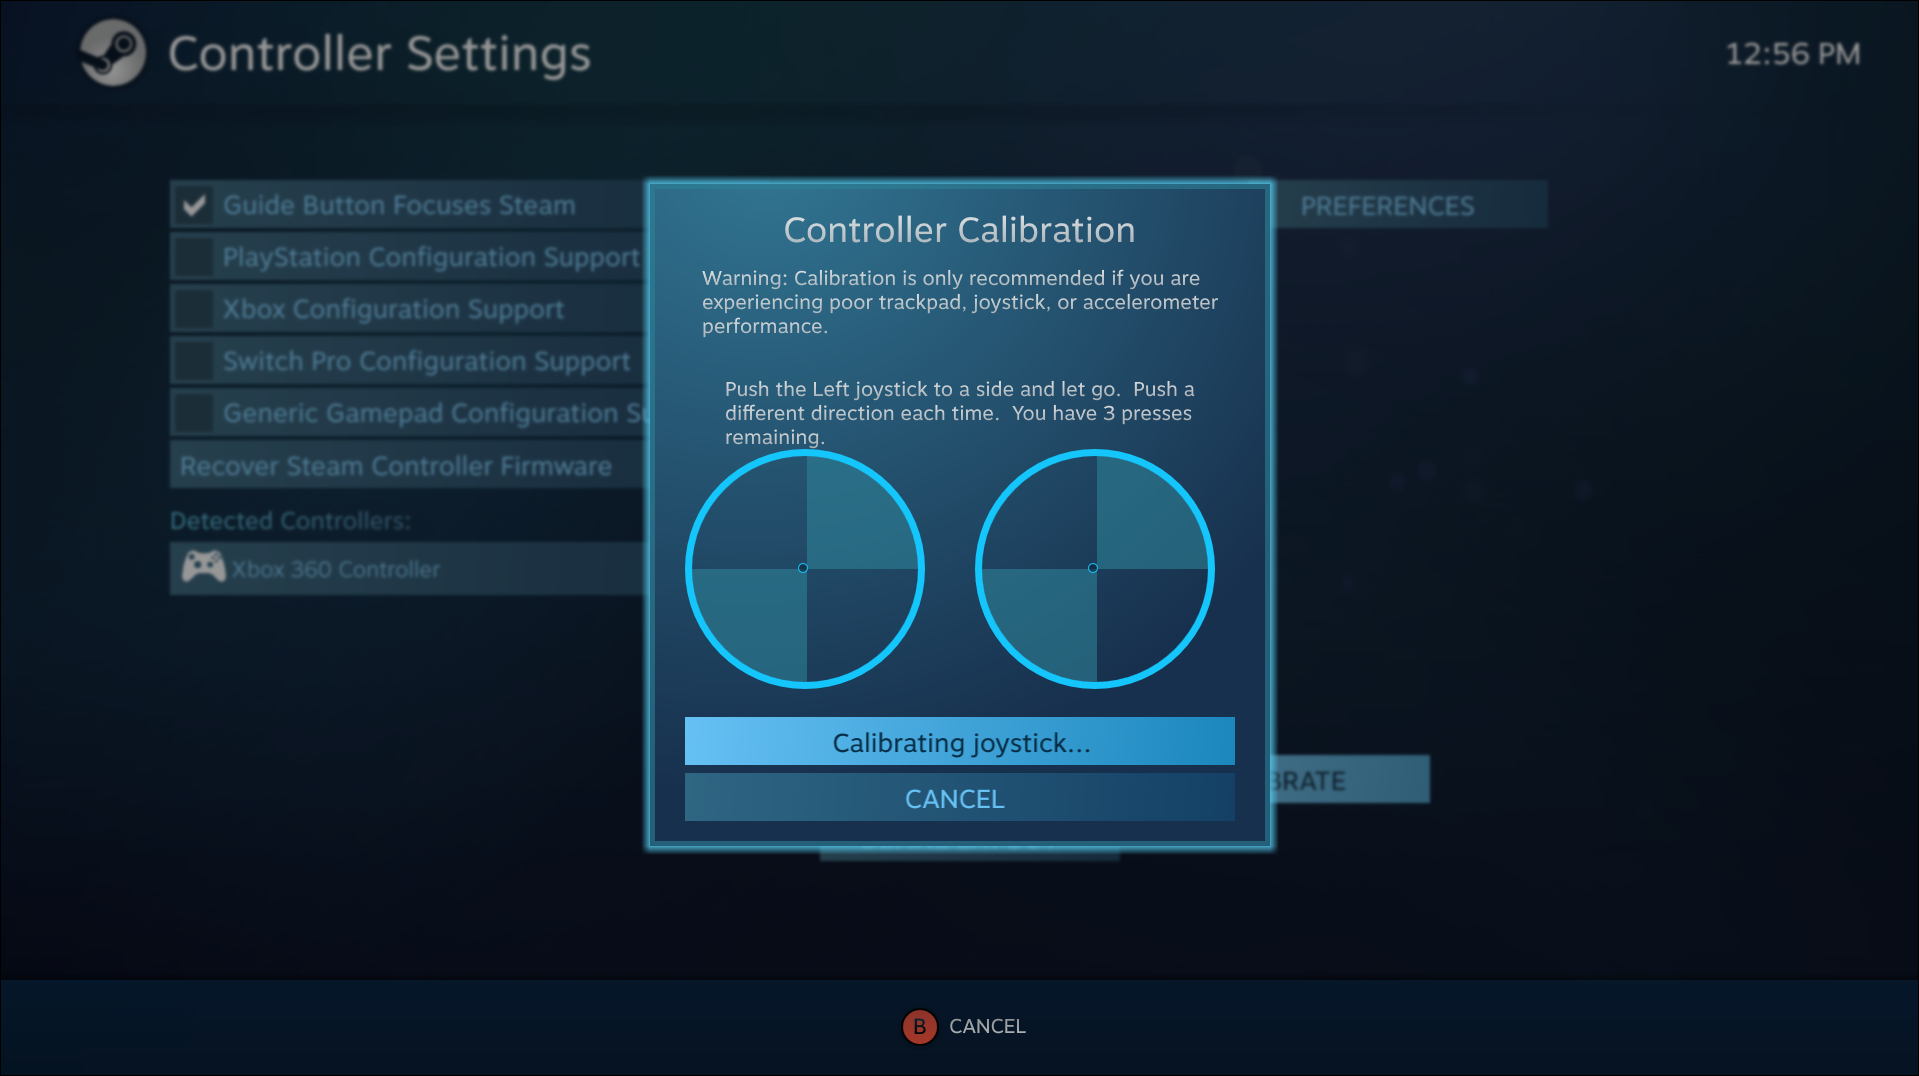
- Follow the instructions and move the analog sticks 10 times each in different directions.


After this, you need to go back and follow these steps:
- Select “Calibrate” again.
- This time, disable “Lock Out Joystick Navigation.”
- Adjust both sticks’ deadzones until you feel comfortable with the settings.
- When you’re done, return to the “Controller Settings” screen.

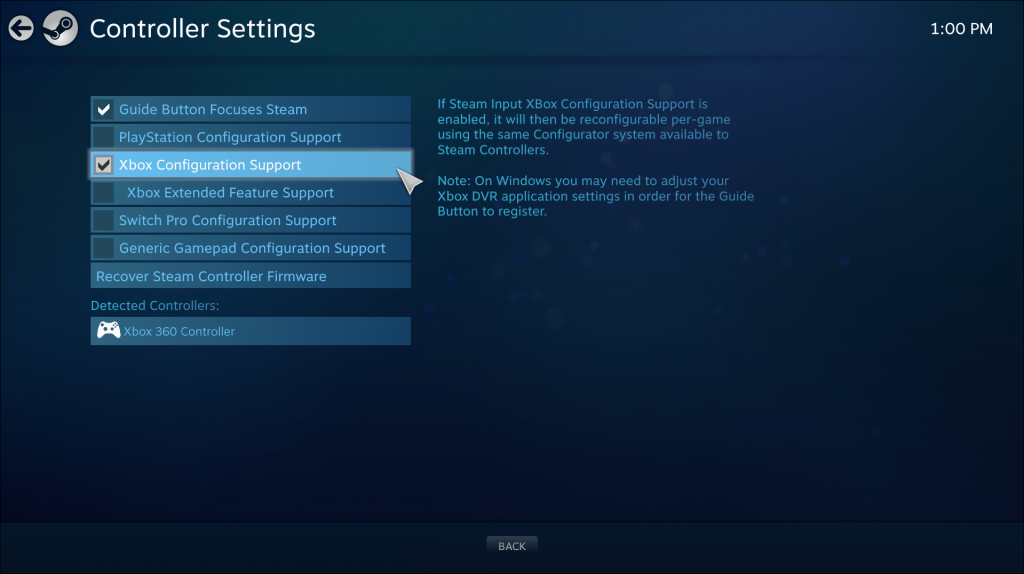
To adjust the settings for individual games, select Xbox Configuration Support or PlayStation Configuration Support according to your controller. After that, select the game you want to adjust for and go wild on the settings if you want.
Calibrate Your Game Controller Using a Third Party
Some websites allow you to calibrate your controller. One of them is Gamepad Tester, and it’s completely free to use. It’s very rough, but it still works well when you use it to calibrate your controller.

Gamepad Tester has some experimental features, but they’re not particularly relevant if you’re not debugging a controller. The simple process should work for you.
Testing the Calibration
You were able to test the calibration using the Calibration Tool earlier, but there’s no better way to test it than to play a game that demands precision. For example, you can load a first-person shooter (FPS) or a racing game. Both genres require very precise inputs to excel in gameplay.

Try and see if your inputs and movement feel smoother. Usually, calibration can restore the feel of the controller to factory condition. Of course, this doesn’t mean that your in-game sensitivity and deadzone settings are wiped, as they’re game-specific.
Some video games even have the option of calibrating the controller. This is usually the same across platforms, so you can calibrate your controller in a video game whether you’re playing on PC, PS5, or Xbox One.
Additional FAQs
Why Would I Need to Do This?
There are times when a controller develops strange readings and settings, particularly if you’re using it in platforms you’re not supposed to. Using a PS4 or PS5 controller on a PC might result in some suboptimal settings and deadzones, for example.
With calibration, you’re making it feel better on the platform you’re using. Of course, adjusting game settings can help, but there are times when calibration is better.
Normally, Xbox controllers are pre-calibrated to work well on PC, but if you notice it feeling strange, you can always calibrate it to ensure it works well.
Older controllers can also become less accurate when you use them for a long time. Calibration helps give it a new lease in life, though it doesn’t fix all problems. If not even intensive calibration is working for your controller, then it’s time to get a new one.
What Is the Z-Axis on a Controller?
The Z-axis is the axis for your trigger buttons on your Xbox controller. When both triggers are in a neutral position, the value should be at 50%. The left trigger reduces it to 0% while the right trigger increases the value up to 100%.
What Controllers Does Steam Support?
There are a variety of different controllers you can use on Steam. Here are the most common ones:
• The Steam Controller
• All Xbox controllers, new or old, wired or wireless
• PS4 Controller, wired or wireless
• PS5 Controller, wired or wireless
• Wired Nintendo Switch Pro Controller
For a very detailed database of supported controllers, please visit this page to find out if yours is on the list. In general, almost all USB or wireless controllers would work with Steam. It’s rare to find something that Steam doesn’t support nowadays.
You can potentially use a GameCube Controller with an adapter and some extra software too. It might take some fiddling, but you’re more than welcome to try and find some good settings.
It Finally Feels Good
After calibration, your controller will surely handle much better than before. Now that you know how to do it on various software, you can adjust the settings to achieve the optimum gaming experience. You’re only as good as how comfortable you feel.
Do you prefer large or small deadzones on your controller? Which controller is your favorite one? Tell us in the comments section below.
Microsoft has done a fantastic job to ensure Xbox and Windows work together. Pairing controllers to your PC is often super easy, often a matter of plugging a USB cable or turning on the Bluetooth. However, sometimes, you may need to intervene for some manual changes.
Gamers know how important it is to maintain and care for their gear. Part of the job is making sure your controllers are in great condition. In particular, wrong settings can damage your aiming, precision, movement, and more.
Therefore, one of the most significant manual changes is calibrating Xbox One controllers. It fixes axis issues, drift movement, thumbstick sensitivity, and similar. In essence, recalibrating the controller will bring back the smooth feel of a factory condition controller.

Why Is My Xbox One Controller Not Calibrated?
You will know you need to calibrate Xbox One controller when you’re having trouble playing. Wrong calibration settings produce random movement during your playtime.
In particular, the issue may rely on the Axis, which is your X-Y-Z movement and perspective.
A non-calibrated controller is a common issue on these occasions:
- You’re using a new controller on your Windows PC
- You’re using a very old controller on your Windows PC
- You haven’t used the controller for a while on your PC
- Steam, Epic Games, or Windows automatically changed your controller’s settings after an update
- There’s physical damage like wear, tear, dust or rust in the controller.
For all causes, the steps are the same. Bear in mind that Xbox One calibration has nothing to do with your PC’s drivers or the controller’s firmware. Either way, keeping both up to date is best to avoid connectivity issues.

How to Calibrate Xbox One Controller?
Windows 10 and Windows 11 PCs have a built-in program for the job, the Calibration Tool.
This works with any controller you plug via a USB cable, including any PlayStation, Xbox One, Xbox Series, Nintendo Switch, or any generic controller. So, our instructions can help you calibrate any controller you have.
There’re three ways to calibrate Xbox One controller on Windows 10:
- Reset the settings to default
- Calibrate the controller manually
- Calibrate the controller via Steam
Before trying one of the three solutions, please make sure your Windows PC recognizes the controller.
How to Reset the Xbox One Controller Calibration?
The first method is resetting the settings. It’s a good idea to test it before manually calibrating the peripheral, as it can be tough. Additionally, you can always engage the option if the manual calibration goes wrong.
- Plug your controller into the PC via a USB cable.
These steps don’t work wireless or via Bluetooth. Only by connecting a controller to the PC can Windows engage the Calibration tool. - Open the Control Panel
Type “Control Panel” on your Windows search bar and open “Control Panel.” - Go to “Devices and Printer.”

Click on “Devices and Printers” on the Control Panel menu.
- Go to your Game Controller Settings
On the Devices and Printers menu, right-click on your controller’s icon and select Game Controller Settings.
- Go to Properties
Inside the controller’s menu, click on Properties at the bottom right. - Go to Settings and Reset to Default
Click at the top left for the Settings menu. The menu has two options: Reset to Default and Calibrate. Click on Reset to Default. - Close the tool
After selecting the Default option, press OK to close the tool and OK again. - Test the calibration
Finally, test your controller by playing on your PC. There’s no better way to see its performance than actually using it.


If it’s not working properly, please continue to the next method. Alternatively, you could start with a manual calibrate instead of resetting to default.
How to Calibrate Xbox One Controller Manually?
We’re going back to the same menu as before for a manual calibration:
- Go to Control Panel
- Select Devices and Printers
- Go to your controller’s Game Controller Settings
Remember to right-click on the peripheral at the Devices and Printers hardware menu. Then, click on the first option in the drop-down menu. - Choose to Calibrate on Settings
Back at the settings menu, we’re now to press the Calibrate option.
- Follow the wizard

Your PC will launch a calibration wizard. Click next, and follow the instructions.
- Center the D-Pad

The first instruction is leaving the D-Pad (or the left thumbstick) centered and then pressing a button on the controller. After you’re done, click Next.
- Find the corners with the D-Pad

Next, you need to move the D-Pad (the left thumbstick) around the corners. Then, press a button on the controller and click next. Additionally, you can check the Display Raw data box below to see your progress.
- Verify D-Pad center
You need to repeat a previous step by leaving the left thumbstick at the center.
- Calibrate the Z-Axis

The next step is moving the Z-Axis up and down. That means moving the left and right sticks all the way and then down. After you finish, press a button on your controller, and click next. Once again, check the raw data box.
The wizard will display a percentage box, letting you know when you finish calibrating the Z-Axis movement settings.
- Calibrate the X-Axis
Now, it’s time to set up the X Rotation. That means moving the right thumbstick left and right. After you finish, press a button on the controller, and click on next.
As before, the wizard showcases a percentage bar to let you know your completion. - Calibrate the Y-Axis
Now it’s time to fix the Y-Rotation. You can move the right thumbstick down and up. After you finish, press a controller button and then click on Next.
- Finish the process

Lastly, click on Finish to close the wizard and save its settings.
- Test the settings
Now, go to the Test tab and test the calibration. You can press your buttons to try it out. When you finish, click on Apply and then on OK.
- Test the controller on games
If everything goes your way, you could test the controller on your games. Often, after you calibrate Xbox One controller, it will be as good as new.


How to Calibrate Xbox One Controller on Steam?
There’re various third-party software calibration features, but we recommend using Stream to calibrate the Xbox One controller. Bear in mind that the Epic Games launcher doesn’t have calibration options.
So, we’re recommending Valve’s storefront, as most PC games already have a Steam account and use the app to buy and play games.
Moreover, Steam allows you to fine-tune the controller on a game-by-game basis, even if these games don’t support USB controllers. It’s a great all-around tool to use.
Here’re the steps:
- Open the Steam app
Type “Steam” on your Windows search bar, and open Steam.
- Open Big Picture Mode
Click on View on the top menu and click on Big Picture Mode. It will open a windowless, full-screen Steam UI.
- Go to Settings
Click on the settings cog at the top right of the Big Picture Mode.
- Go to Controller Settings
On the Settings menu, click on Controller Settings.
- Open the calibration tool
Check on the controller you want to activate (for example, Xbox), and click Calibrate.
Checking the Configuration box of a controller will make Steam install the drivers it needs. However, it will ask you to restart the app to apply the changes. - Enable “Lock Out Joystick Navigation.”
Start by clicking the Joystick Navigation option. It will allow Steam to complete the process automatically.
- Enable the Full Auto Calibration
Press the Full Auto Calibration button next.
- Follow the calibration wizard instructions
The first part of the wizard will ask you to move the analog sticks in different directions. It will complete the basic Xbox One controller calibration.
When the wizard finishes, Steam will close it automatically. - Select Calibrate again
Now, we’re going through a more complex process. For that, you need to click on the Calibrate option again. - Lock Joystick Navigation
This time around, lock the Joystick Navigation option by clicking the box.
- Adjust the sticks’ “deadzones”
Now, you can move the sliders to adjust the stick’s deadzones. These areas around your controller’s thumbstick don’t respond to movements.
It helps worn-out sticks to function if they can’t sit still. If your controller is fresh-new, you can leave the setting at zero or near zero. Better yet, adjust it until you feel comfortable.
- Return to the Controller Settings menu
After adjusting the deadzones, go back to the Controller Settings menu. There’re, you’ll see the games you have in your library, and you can choose each one to adjust the exact settings you want.


Calibrating your Xbox One controller on Windows 10 is an essential step to ensure optimal functionality and precise control while gaming. Whether you’re playing action-packed shooters or racing games, having a properly calibrated controller can make a significant difference in your gaming experience. In this blog post, we will explore various methods to calibrate your Xbox One controller on Windows 10, along with some troubleshooting tips if you encounter any issues along the way.
Video Tutorial:
Why You Need to Calibrate Your Xbox One Controller on Windows 10
Calibrating your Xbox One controller on Windows 10 is crucial for several reasons. Firstly, it ensures that the controller inputs are correctly registered by the system, eliminating any potential inaccuracies. This can be particularly important in competitive gaming scenarios where precision is key.
Secondly, calibrating your controller can help resolve issues such as stuck buttons or unresponsive triggers. By going through the calibration process, you can identify if there are any hardware problems with your controller and take appropriate action to fix them.
Lastly, calibrating your Xbox One controller allows you to personalize your gaming experience. It gives you the opportunity to adjust sensitivity settings, dead zones, and other customization options to suit your gaming style and preferences.
Method 1: Calibrating via Windows Settings
To calibrate your Xbox One controller on Windows 10 using the built-in Windows settings, follow these steps:
1. Connect your Xbox One controller to your Windows 10 PC using a USB cable or the Xbox wireless adapter.
2. Press the Windows key + I to open the Windows Settings.
3. Click on «Devices» and then select «Bluetooth & other devices» from the left-hand menu.
4. Under the «Find and fix other problems» section, click on «Troubleshoot.«
5. From the troubleshoot options, scroll down and locate «Playing and configuring a game controller.«
6. Click on «Run the troubleshooter» under the «Playing and configuring a game controller» section.
7. Follow the on-screen instructions to calibrate your Xbox One controller. This will involve pressing buttons and moving the analog sticks to their extremes to determine their full range of motion.
Pros:
– It is a straightforward method as it utilizes the built-in Windows troubleshooting feature.
– The troubleshooting process can help identify any underlying issues with the controller.
– It does not require any additional software or downloads.
Cons:
– The Windows calibration settings may not provide an extensive range of customization options.
– The troubleshooting method may not resolve complex issues with the controller.
Method 2: Using the Xbox Accessories App
Another method to calibrate your Xbox One controller is by using the Xbox Accessories app. This method provides more customization options and allows you to fine-tune various settings. Here’s how you can do it:
1. Download and install the Xbox Accessories app from the Microsoft Store.
2. Launch the Xbox Accessories app and connect your Xbox One controller to your Windows 10 PC using a USB cable.
3. The Xbox Accessories app will automatically detect your controller. If it doesn’t, make sure your controller is updated with the latest firmware.
4. Once your controller is detected, you can customize various settings such as button mapping, sensitivity curves, trigger dead zones, and vibration intensity.
5. To calibrate your analog sticks, go to the «Configure» tab and select either the left or right analog stick.
6. From here, you can adjust the dead zone and sensitivity settings to your preference. Move the analog stick in different directions to ensure it is registering correctly.
Pros:
– The Xbox Accessories app provides extensive customization options for your controller.
– You can remap buttons and adjust various settings to personalize your gaming experience.
– Calibration settings for analog sticks and triggers allow for precise control.
Cons:
– This method requires downloading and installing the Xbox Accessories app.
– It may take some time and experimentation to find the perfect settings for your preferred gaming experience.
Method 3: Using a Third-Party Calibration Tool
If the built-in Windows settings or the Xbox Accessories app are not sufficient for your needs, you can also consider using a third-party calibration tool. These tools offer advanced calibration options and are particularly useful if you’re experiencing complex issues. One popular example is the «JoyToKey» software. Here’s how you can calibrate your Xbox One controller using JoyToKey:
1. Download and install JoyToKey from the official website.
2. Connect your Xbox One controller to your Windows 10 PC using a USB cable.
3. Launch JoyToKey and ensure your controller is detected by the software.
4. Click on the «Settings» button at the upper-right corner of the application.
5. In the «Adjust Stick Inflection» section, click on «Calibration» for the desired analog stick.
6. Follow the on-screen instructions to calibrate the analog stick by moving it to its extreme positions.
7. Repeat the process for other analog sticks and buttons, if necessary.
Pros:
– Third-party calibration tools like JoyToKey provide advanced customization options.
– You can fine-tune various settings and resolve complex issues.
– These tools work well for specific gaming setups and scenarios.
Cons:
– Additional software downloads and installations are required.
– Some calibration tools may be tailored for specific games or applications, limiting their overall usefulness.
Method 4: Troubleshooting Potential Issues
If you encounter any issues while calibrating your Xbox One controller on Windows 10, there are several troubleshooting steps you can take to resolve the problem. Here are some common fixes:
1. Restart your computer and ensure that all necessary drivers and updates are installed.
2. Try using a different USB cable or Xbox wireless adapter to connect your controller.
3. Update your controller’s firmware by connecting it to an Xbox console and following the instructions from the Xbox Accessories app.
4. Clean the analog sticks and buttons with compressed air to remove any debris or dust particles that may be affecting their sensitivity.
5. If all else fails, consider contacting Xbox support or seeking professional help to diagnose and repair any hardware issues.
Bonus Tips
Here are some additional tips to enhance your Xbox One controller calibration experience:
1. Regularly clean your controller to prevent dust and grime buildup, which can impact its performance.
2. Keep your controller firmware up to date to ensure compatibility with the latest games and features.
3. Experiment with different settings and configurations to find the optimal setup for each game you play.
5 FAQs
Q1: My Xbox One controller is not being detected by Windows 10. What should I do?
A: First, try connecting your controller to a different USB port on your PC. If that doesn’t work, make sure your controller is updated with the latest firmware. You can do this through the Xbox Accessories app. If the issue persists, check if your controller works on an Xbox console or contact Xbox support for further assistance.
Q2: How often should I calibrate my Xbox One controller?
A: It is not necessary to calibrate your controller frequently, unless you notice any issues with its performance or responsiveness. However, it is recommended to check for firmware updates regularly to ensure compatibility with new games and features.
Q3: Can I calibrate my Xbox One controller wirelessly on Windows 10?
A: Yes, if you have the Xbox wireless adapter, you can connect your controller wirelessly to your Windows 10 PC and calibrate it using the methods mentioned above. Ensure you have the latest drivers installed for the Xbox wireless adapter.
Q4: Can I use these calibration methods for Xbox Series X/S controllers?
A: Yes, the methods mentioned in this blog post are applicable to both Xbox One and Xbox Series X/S controllers, as they share similar functionality and compatibility with Windows 10.
Q5: Are there any risks involved in calibrating my Xbox One controller?
A: Calibrating your Xbox One controller poses minimal risks to your device or gameplay. The calibration process is designed to improve performance and address any hardware issues. However, it is always recommended to follow the instructions provided by the manufacturer and backup any important data before making any changes.
Final Thoughts
Calibrating your Xbox One controller on Windows 10 is a crucial step to ensure optimal functionality and precision while gaming. By following the methods outlined in this blog post, you can personalize your gaming experience, resolve hardware issues, and enhance your overall gameplay. Remember to experiment with different settings and configurations to find the perfect setup for each game you play. If you encounter any difficulties, don’t hesitate to reach out to Xbox support or seek professional assistance. Happy gaming!

This tutorial will show you how to calibrate a Xbox Wireless Controller for your account on a Windows 10 or Windows 11 PC.
If you are having trouble (this could include joystick drift, awkward calibration, or controls not responding as expected) with your Xbox Wireless Controller connected to your PC, you can calibrate the controller to help get 100% accuracy again.
Movement accuracy issues with a game controller can happen with wear and tear.
Contents
- Option One: Calibrate Xbox Wireless Controller
- Option Two: Reset Xbox Wireless Controller Calibration to Default
Option One
Calibrate Xbox Wireless Controller
1 Connect the Xbox Wireless Controller you want to reset its calibration.
2 Open Game Controllers (joy.cpl) settings.
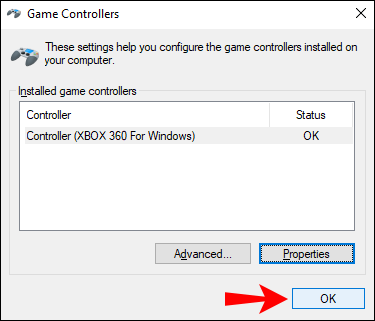
3 Select the game controller you want to reset, and click/tap on Properties. (see screenshot below)

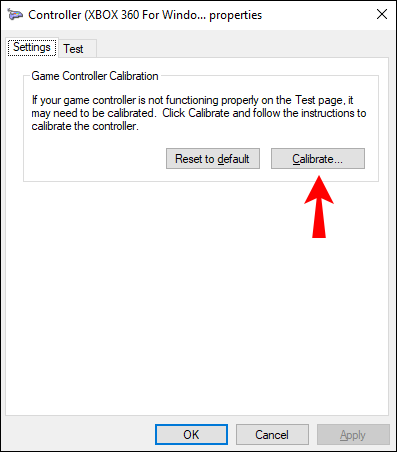
4 Click/tap on the Settings tab, and click/tap on the Calibrate button. (see screenshot below)

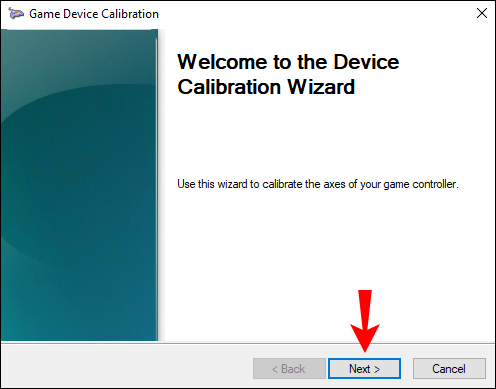
5 Click/tap on Next. (see screenshot below)

6 Leave the left thumbstick centered on the controller, then press a button on the controller. (see screenshots below)

7 Move the left thumbstick around all corners on the controller, then press a button on the controller. (see screenshots below)
8 Leave the left thumbstick centered on the controller, then press a button on the controller. (see screenshots below)
9 Press the left trigger (z axis up) and right trigger (z axis down) on the controller, then press a button on the controller. (see screenshots below)

10 Press the right thumbstick (X Rotation) left and right on the controller, then press a button on the controller. (see screenshots below)
11 Press the right thumbstick (Y Rotation) up and down on the controller, then press a button on the controller. (see screenshots below)
12 Click/tap on Finish to save your calibration. (see screenshot below)
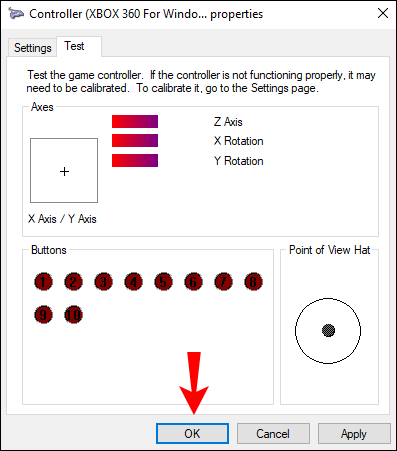
13 Test your calibration by moving the thumbsticks and pressing buttons on your game controller. Click/tap on OK when finished. (see screenshot below)
14 Click/tap on OK. (see screenshot below)
Option Two
Reset Xbox Wireless Controller Calibration to Default
1 Connect the Xbox Wireless Controller you want to reset its calibration.
2 Open Game Controllers (joy.cpl) settings.
3 Select the game controller you want to reset, and click/tap on Properties. (see screenshot below)
4 Perform the following steps: (see screenshot below)
- Click/tap on the Settings tab.
- Click/tap on the Reset default button.
- Click/tap on OK.
5 Click/tap on OK. (see screenshot below)
That’s it,
Shawn Brink
While playing games, precise and accurate movements are very important for a frequent game player.
We always recommend a controller to play video games. So calibration is very important when you connect your controller to your PC, but it does not matter whether you connect it through a USB cable or through Bluetooth.
Many players don’t know how to calibrate the controller. This article will assist you in calibrating your controller effectively in different ways.
Why Do You Need Calibration on Your Xbox One Controller?
In some circumstances, like trouble playing, you can identify that your controller needs to be calibrated. If you experience any random movement while playing, it is because of the wrong calibration.
When you are using a new controller on your PC, the controller may not be calibrated. If your controller is an old one, it may also suffer from non-calibration issues. The non-using controller also shows the same defect.
After the update to Windows, Steam, or Epic Games, the settings of the controller may change automatically. Tears, dust, and wear can cause physical damage. In these situations, calibration is very essential for proper functioning.
How Do I Reset My Xbox Controller Calibration?
Windows 10 PCs have features like the calibration tool. It is suitable for all USB controllers, including PlayStation and Xbox controllers.
Before doing the calibration, you need to reset the controller calibration to default. This can solve minor issues and give a refreshment.
To reset controller calibration by default follow below steps.
- Be sure that your controller is connected perfectly to your PC and that it is readable by it.
- Then navigate to the device and printer settings.
- Click on your controller after finding it by pressing the right button of your mouse.
- From the dropdown option, go to game controller settings.
- Choose properties from the new window.
- The properties window will open; from there, click on the settings tab.
- Now you will get the option to “reset to default” and hit the OK button to end it.
- Again, click OK on the game controller window.
Now the controller is in factory calibration, and you can close the window for devices and printers.
Using Windows Inbuilt Setting
First, connect your controller to your PC, so you can find it in the device manager section.
- Open the “Control Panel”.
- Navigate to the “Devices and Printers” option.
- In the hardware section, go to your “Game Controller” and right-click on it.
- Choose “Controller Settings” from the dropdown box.
- The right controller is a must. Go to “Properties”.
- From the window, select “Settings” and then click on “Calibrate”.
- A new window will appear.
- Wait a few seconds to execute the calibration process, and then the option will appear next. Select it.
- First calibration of your D-Pad. If you press next, they will ask you to press all D-Pad buttons. After one button press, hit the next option. It will proceed with the calibration process.
- Next X Rotation is the right-hand joystick. To calibrate this axis, you need to move the right joystick left and right, but after you see a blue bar moving left and right on the screen, go to Next.
- Y Rotation. Here, you should move your joystick up and down. When the blue bar appears and moves left and right, click on the next option on the bottom right side.
- Z Rotation. You can pull the left trigger of your controller, and it will be considered the Z axis by your PC. You will see a blue bar increase and decrease on the screen when you hit the next button.
- Now you will get a message in the window. That means you have calibrated your device.
- Choose the finish option to finish the process.
- Check that everything is working properly, then click “OK” on that window.
- Now you will reach the actual controller settings window; click “OK” there also.
Using the Steam App
First, connect your controller to your PC, so you can find it in the device manager section.
- Open the “Steam” client.
- Click on the view section at the top and choose “Big Picture Mode“ from the options.
- From the new window, select the “settings” icon. Select “controller settings” from the “Controller” menu.
- Find your controller, then click on “Calibrate”.
- Allow the option “Lockout Joystick Navigation”.
- Then choose “Start Full Auto Calibration“.
- Now you need to follow the instructions and move the analog sticks in different directions, each 10 times.
- Once you finish it, go back.
- Again, select “Calibrate”.
- You can see the option “Lockout Joystick Navigation” on the screen; select that option to turn it off.
- You need to adjust both sticks’ dead zones until you feel comfortable with the settings.
- Proceed to the “Controller Settings” screen after you finish the above step.
- Note: On Xbox, you can adjust settings for a specific game.
- For this from the controller settings window, select “Xbox Configuration Support” or any option that you want according to your controller.
- Then choose the game you want to adjust, and then go through the settings if you want.
Calibrate The Controller Device Checker Tool
There are some websites that you can use to calibrate your controller. Controller Tester is one of those programs.
It is a web based tool which your browser will support to execute, and it is very tough to use. Even though it works perfectly to calibrate your controller.
Loading an FPS or any racing game needs precise inputs to excel in playing games.
- First, connect your controller to your PC.
- Then open your browser and go to the Device Checker Gamepad Tester Webpage to calibrate your controller.
- Hit the button that shows on the screen, or the START button will be there on the screen.
- After the process, you will get a better gameplay experience when you check it out.
FAQs
Can You Recalibrate Your Xbox One Controller?
- Click the controller with the right mouse button, then choose “Game Controller Settings”.
- Make sure you choose the appropriate controller.
- After that, select “Properties.” In the new window, select the “Settings” tab.
- Choose the “Calibrate” option to recalibrate your controller.
How Do I Calibrate My Xbox One Controller Drift?
- First, you need to check the button mapping on your console.
- You must open the guide by tapping the Xbox button..
- Then select settings, which will be located under the profile and system options.
- From the options, go to device and connections and click on accessories.
- Select the Xbox wireless controller to open the option.
- From the open window, select the configure option.
- Go through the current mapping for each of the buttons on your controller thoroughly.
How Do I Reset My Xbox Controller Sensitivity?
- Launch the Xbox Accessories application.
- Select Configure when you’ve scrolled to your Xbox Adaptive Controller.
- Choose a profile to modify or start a new one.
- Choose the Edit button, then pick a sensitivity setting from the Left Stick or Right Stick tabs.
Does Calibration Fix Drift?
Yes,we can resolve the controller drift issue by recalibrating your control sticks in the Switch settings.
Conclusion
If you are a frequent videogame player, the calibration of your controller is an important and effective feature to get accuracy in gameplay.
The methods that I mentioned above will definitely direct you to calibrate your controller in a perfect way within a few minutes and without any failure.