
Файловая система ExFAT для флешки, карты памяти, жесткого диска или SSD используется всё чаще по мере увеличения размеров файлов. Основная причина: широкая поддержка большинством устройств с разными операционными системами, включая Linux, Android и MacOS (в отличие от NTFS) при отсутствии достижимого ограничения на размер файла (в отличие от FAT32).
В этой инструкции о способах отформатировать накопитель в ExFAT в Windows 11 или Windows 10, в том числе если эта файловая система не отображается в списке доступных для диска. Инструкция прежде всего для Windows, но в разделе «Дополнительная информация» есть сведения и о форматировании в MacOS.
Форматирование в ExFAT в Проводнике Windows
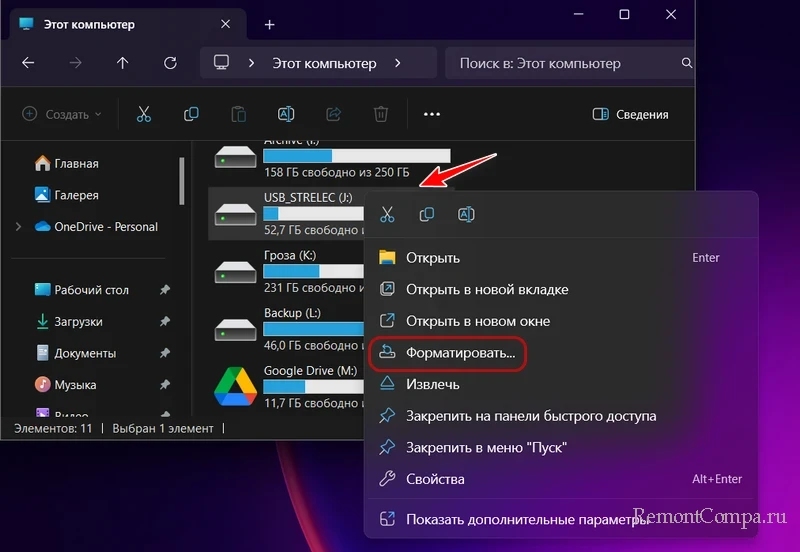
Базовый способ форматировать флешку или диск в ExFAT в Windows — использование соответствующей функции в проводнике. Шаги будут следующими:
- Откройте проводник, нажмите правой кнопкой мыши по нужному накопителю и выберите пункт контекстного меню «Форматировать».

- В поле «Файловая система» выберите ExFAT. Ситуация, когда этой файловой системы нет в списке будет рассмотрена далее в статье.
- Нажмите кнопку «Начать» (данные с накопителя будут удалены) и дождитесь завершения процесса форматирования.

В результате вы получите накопитель, отформатированный в нужную файловую систему.
Самая частая проблема при форматировании локальных дисков, а также съемных HDD или SSD — отсутствие файловой системы ExFAT среди доступных для выбора, как на изображении ниже:
Обычно это решаемо, о чём подробнее — в разделе статьи про форматирование с помощью командной строки.
Управление дисками
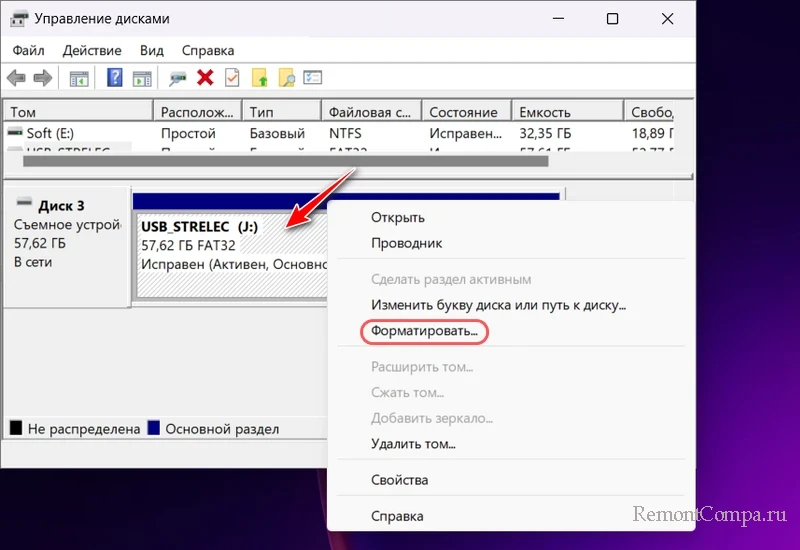
Ещё одна возможность форматирования в нужную файловую систему — использование утилиты «Управление дисками»:
- Откройте «Управление дисками». Для этого можно нажать клавиши Win+R, ввести diskmgmt.msc и нажать Enter, либо использовать меню по правому клику на кнопке «Пуск» в Windows 11 и Windows 10
- В управлении дисками нажмите правой кнопкой мыши по нужному диску или разделу и выберите пункт «Форматировать».
- Откроется окно, в котором вы сможете выбрать нужную файловую систему и выполнить форматирование.
Как и в предыдущем случае, есть вероятность, что файловая система ExFAT не будет отображаться в списке.
Командная строка и DISKPART
Для флешек или карт памяти способов, описанных выше, обычно бывает достаточно. Однако, для некоторых накопителей и особенно для локальных дисков и разделов на них опция ExFAT может быть недоступной в поле выбора файловой системы:
Обычно это решаемо путем форматирования в нужную файловую систему в командной строке. Важно: если речь идёт о локальном диске Windows, на котором размещены какие-либо системные файлы (подкачки, гибернации, приложения Microsoft Store), форматировать его в ExFAT не следует.
Самый простой метод, который подойдет, если нужно отформатировать в ExFAT конкретный раздел накопителя, которому уже назначена буква — использовать следующую команду в командной строке (лучше, если она будет запущена от имени администратора, букву X следует поменять на нужную букву раздела диска):
format X: /q /fs:exfat
Более «продвинутый» вариант, который подойдёт и в тех случаях, когда на накопителе нет разделов — использование команд DISKPART. С помощью DISKPART можно отформатировать накопитель в ExFAT, используя один из следующих подходов.
Первый — подойдет в случае, если форматируется весь съемный накопитель или целый диск, а не отдельный раздел на нём, при использовании этого способа все разделы с диска будут удалены, а затем создан один с файловой системой ExFAT, все данные на всём диске (физическом) будут потеряны:
- Запустите командную строку от имени администратора.
- Введите команды
diskpart
list disk
- Обратите внимание на номер диска, который нужно форматировать (далее — N) и используйте следующие команды по порядку (после выполнения второй или третьей команд может открыться окно проводника с предложением форматирования, нажмите отмена или проигнорируйте его):
select disk N
clean
create partition primary
format fs=exFAT quick
exit

- Если всё прошло успешно, накопитель будет отформатирован в указанную файловую систему.

Второй вариант: форматирование отдельного раздела на диске:
- Запустите командную строку от имени администратора.
- Введите команды
diskpart
list volume
и обратите внимание на номер раздела, который вам нужно отформатировать (далее в команде — N).
- По порядку используйте команды
select volume N
format fs=exFAT quick
exit


Готово, форматирование завершено. Возникновение ошибок в процессе очистки диска или форматирования может говорить о различных факторах: часто — использование диска системой или программами при попытке форматирования.
В завершение ещё несколько нюансов, которые могут пригодиться при форматировании накопителя в ExFAT:
- Если что-то в Windows блокирует форматирование диска, при этом вы уверены, что само форматирование безопасно, вы можете выполнить форматирование в командной строке, запущенной с загрузочной флешки (например, при использовании установочной флешки Windows вы можете нажать клавиши Shift+F10 для открытия командной строки) или загрузившись в WinPE (пример использования WinPE, но в другом контексте — в этой статье).
- Для форматирования накопителя в ExFAT в MacOS достаточно открыть дисковую утилиту (например, с помощью поиска Spotlight), выбрать накопитель, нажать «Стереть» и указать нужную файловую систему для него.


Если у вас остались вопросы, касающиеся форматирования в ExFAT или, возможно, другие файловые системы, вы можете задать их в комментариях ниже.
В этой публикации, друзья, рассмотрим, как форматировать диск или флешку в exFAT. Файловая система exFAT предназначена для использования на внешних носителях информации – флешках, внешних HDD и SSD, SD-картах. Создана в 2006 году компанией Microsoft для замены FAT32, устаревшей, имеющей ограничение на запись файлов весом более 4 Гб. exFAT – это решение для обмена данными между разными устройствами. Если отформатировать в exFAT флешку, SD-карту, раздел на внешнем или внутреннем жёстком диске, его содержимое будет доступно в операционных системах Windows, macOS, Linux, Android, а также на различных устройствах как то: телевизоры, фотоаппараты, медиаплееры, ТВ-приставки и т.п.
Самый простой способ форматирования в exFAT – в проводнике Windows. Но этот способ подходит только для внешних устройств информации. Для разделов на внутренних дисках форматирование возможно только в NTFS. В контекстном меню на форматируемом логическом диске жмём «Форматировать».
Выбираем файловую систему exFAT. Жмём «Начать».
Другой способ, как форматировать внешний диск или флешку в exFAT – в управлении дисками Windows. Этот способ также подходит только для внешних устройств информации. Запускаем управление дисками в меню по клавишам Win+X или с помощью системного поиска. В контекстном меню на форматируемом логическом диске выбираем «Форматировать».
Жмём «Да».

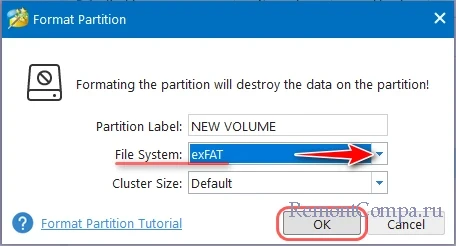
Выбираем файловую систему exFAT. Жмём «Ок».
Форматировать в exFAT как внешние устройства, так и разделы внутренних жёстких дисков можно с помощью командной строки Windows. Запускаем её, вводим:
diskpart
lis vol
Смотрим, под каким номером значится форматируемый логический диск. Подставляем этот номер далее в команду вместо номера 2 в нашем случае:
sel vol 2И вводим:
format fs=exFAT quick
exit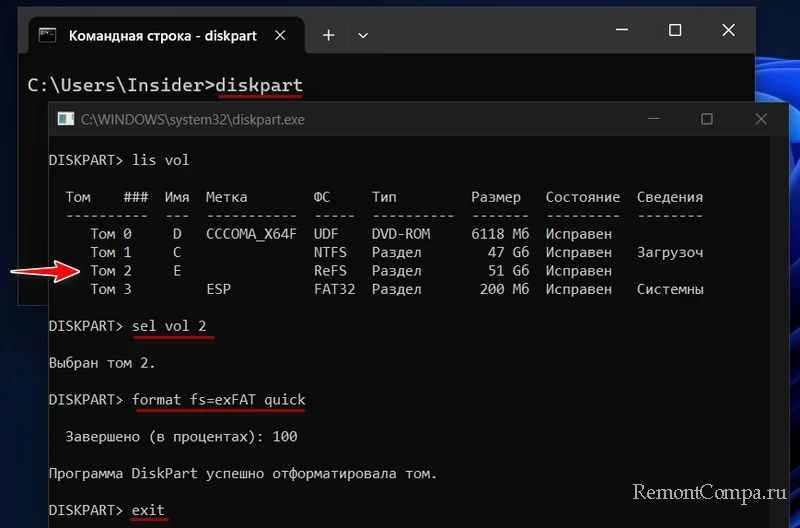
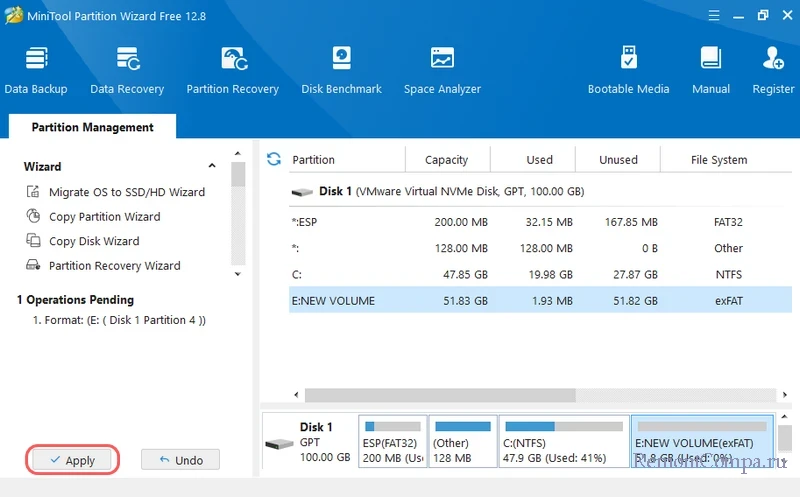
И, друзья, ещё один способ, как форматировать в exFAT вне зависимости от типа устройства информации, будь это флешка, SD-карта, раздел внешнего или внутреннего жёсткого диска, для тех, кто не любит командную строку, а предпочитает программы с графическим интерфейсом. Программа MiniTool Partition Wizard – это менеджер дискового пространства, предлагающая в бесплатной версии базовый функционал, в числе которого – форматирование логических дисков разные файловые системы, включая exFAT. В окне программы делаем клик на форматируемом логическом диске. На панели операций слева выбираем «Format Partition».
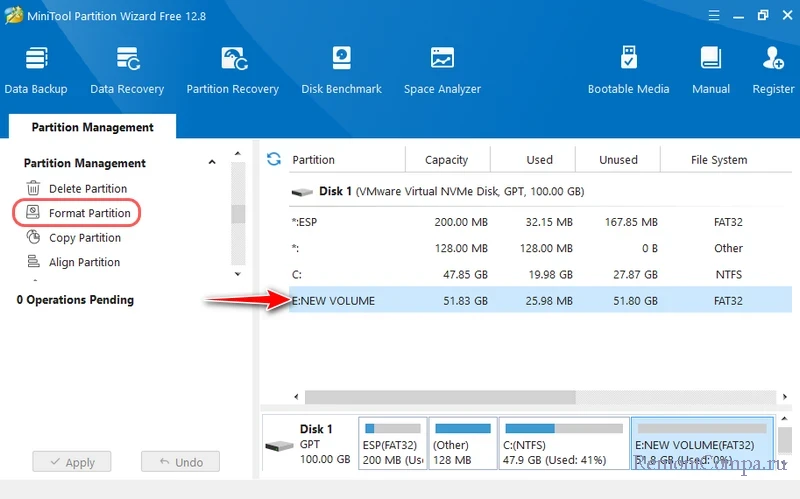
В графе «File System» выбираем exFAT. Жмём «Ок».
Жмём «Apply».
И жмём «Yes».

Summary: This post offers a step-by-step guide for how to format drive to exFAT on Mac or Windows 10/11 PC.
exFAT format is compatible with both Windows and Mac. How to format USB or external hard drive to exFAT so that you can use it on both Mac and Windows computers? You can check the step-by-step guide below.
How to Format USB or External Hard Drive to exFAT on Mac
- Back up data. Connect the USB or HDD to your Mac computer. Copy all data on the drive to another device since formatting the drive will erase all existing data.
- Open Disk Utility. To format the drive to exFAT on Mac, you can use Disk Utility. Disk Utility is a built-in macOS application that allows you to manage hard drives. Press Command + Space and search for “Disk Utility” to open it.
- Select the USB or external hard drive. In Disk Utility, you can find and select the target drive in the left sidebar. If you don’t see it, you may click View > Show all devices.
- Format the drive to exFAT. Click the Erase button in the top toolbar. Type a name for the drive. Select exFAT from the drop-down menu of Format. Choose GUID Partition Map scheme. After that, click the Erase button to start formatting the USB or external hard drive to exFAT format.

How to Format USB/HDD to exFAT on Windows 11/10
- Connect the USB or external hard drive to your Windows PC. Back up all needed data to another device.
- Double-click This PC to open Windows File Explorer.
- Locate and right-click the target USB flash drive or external hard drive that you want to format to exFAT. Select Format from the context menu.
- In the pop-up Format window, you can choose exFAT from the drop-down menu of File System. Optional type a new name for the drive.
- Make sure to tick the “Quick Format” option and it delivers a faster formatting process.
- Click the Start button to start to format the drive to exFAT format.
Once the formatting process is complete, your USB drive or HDD should be in exFAT format now. It is compatible with both Mac and Windows systems. You can use it to transfer files between the two platforms without any issues.
Bonus: How to Write to NTFS Drives on Mac
If you have an NTFS-formatted drive at hand, you may find that you can’t copy or write to the NTFS drive from your Mac.
NTFS is a Windows-based file system format. macOS only supports reading the NTFS drive but not writing to it. To make the NTFS drive writable on Mac, you need to utilize a professional NTFS for Mac software application.
BuhoNTFS is an easy-to-use NTFS for Mac application. You can use it to easily mount NTFS drives in read & write mode on your Mac and flawlessly write data on the NTFS drive.

Conclusion
exFAT vs FAT32 vs NTFS, the exFAT format is the best choice to format a drive if you need to use the drive on both Mac and Windows systems. exFAT wins due to its cross-platform compatibility and large file support. This post offers detailed guides on how to format drive to exFAT on Mac or Windows 10/11, working with USB or external hard drive. Hope it helps.
Do you want to format a hard drive to exFAT in Windows 11/10/8/7? You may encounter the no exFAT format option issue. This post from MiniTool Partition Wizard tells you how to solve this problem and why the Windows doesn’t offer the exFAT format option.
No exFAT Format Option Available Issue
When you format a drive using File Explorer or Windows Disk Management, if the drive is smaller than 32GB, there are FAT32 and NTFS format options. But if the drive is larger than 32GB, you may find that there is only the NTFS file system option. There is no exFAT format option.
I have an internal hard drive that I use as storage where I dump the stuff I need backed up. I want to format it to exFAT instead of NTFS so that it doesn’t have to deal with permissions. The problem is, it only appears to be available to format as NTFS. Is there a way to force it to be formatted as exFAT? — superuser.com
Of course, there are also some people reporting that the no exFAT format option issue also happens to external hard drives.
I cannot format my external HDD from NTFS to exFAT on windows 10. All my drivers are updated and every time I start format it fails instantly. Anybody have any suggestions or know how to fix this? I was trying to use it for my ps4 so I can back up games and save data but I can’t do that without it being in exFAT format. Please help? — answers.microsoft.com
Then, what to do if there is no exFAT format option? You can try the following methods to solve the problem.
[Solved] FAT32 Format Option Is Not Available in Windows
Method 1. Delete and Create
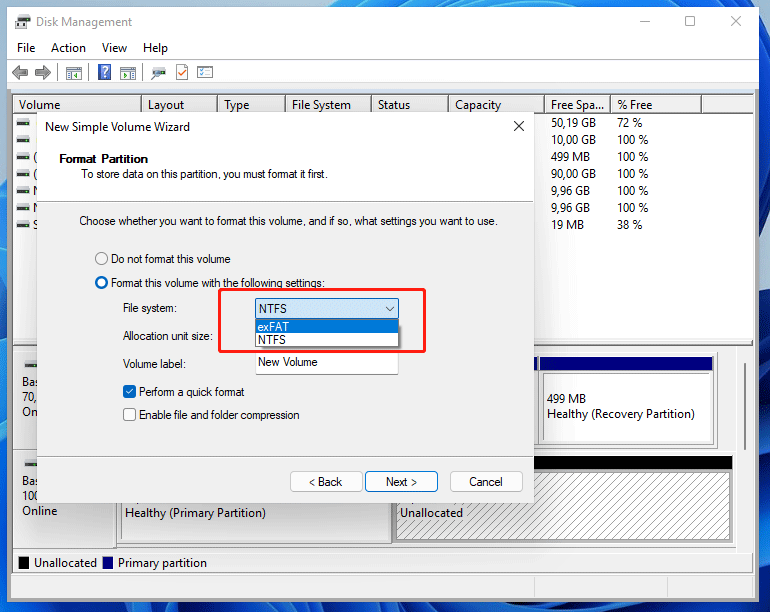
The first method is to delete the partition and then create an exFAT partition on the unallocated space. Although Windows Disk Management doesn’t support formatting an internal hard drive to exFAT directly, it supports creating an exFAT partition. Therefore, you can try this method. Here is the guide:
Step 1: Press Windows key + R to open the Run dialog. In the dialog, type “diskmgmt.msc” and then press Enter. In this way, you can open the Disk Management tool.
Step 2: Right click on the partition that you want to format to exFAT, and then choose Delete Volume. Then, click Yes.
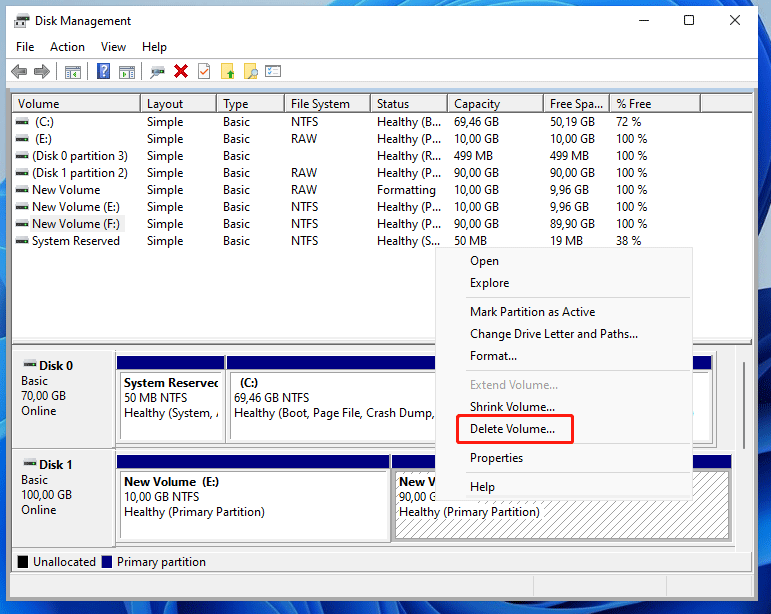
Step 3: After the partition is deleted successfully, it becomes unallocated space. Right click on the unallocated space and choose New Simple Volume. Then, follow the wizard to create a new partition. In this process, please choose exFAT when you are asked to choose a file system.
Tip: The exFAT format option only appears when the partition to be created is larger than 32GB. If the new partition is smaller than 32GB, there are only FAT32 and NTFS options.
Method 2. Use Command Line
Apart from the above method, Windows also allows you to format the drive to exFAT directly by using command lines. There are 2 different command lines that you can use to format a drive to exFAT.
Command 1: Through CMD
- Type “cmd” into Windows search box, right click on the best-matched result, and choose Run as administrator.
- In the cmd.exe window, type command “format f: /fs:exfat” (where F is the drive letter of the partition you want to format) and press Enter.
- Type the current volume label. If the partition has no label, please press Enter key for none.
- Type “Y” to confirm the format operation.
- Type new partition label. Likewise, press Enter key for none.
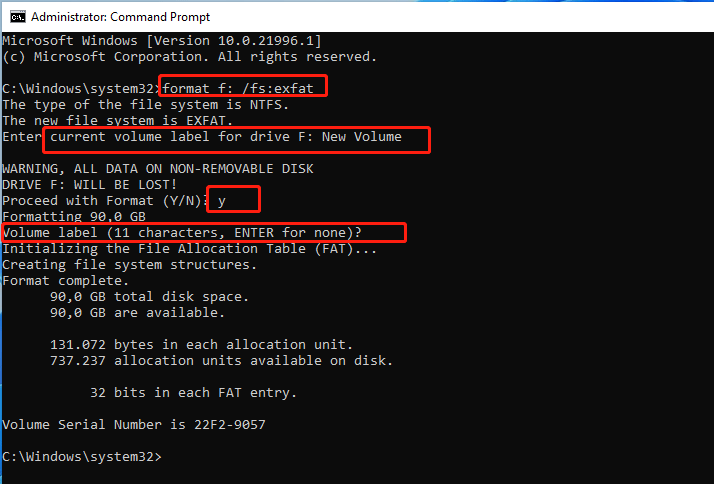
Through this way, you can format a drive to exFAT. But please note that this method may take a long time if the partition is large, because this method will perform a full format.
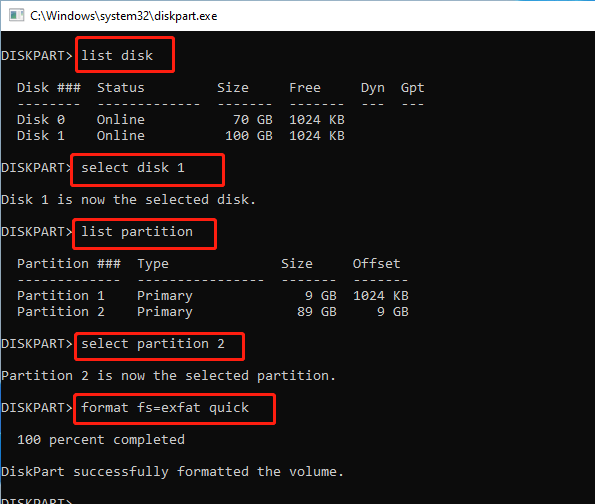
Command 2: Through DiskPart
Compared with the above command, this command will take a shorter time, because it usually performs a quick format.
Press Windows key + R to open the Run dialog. In the dialog, type “diskpart” and then press Enter. In this way, you can open the diskpart.exe tool.
- Type “list disk” and press Enter. It will list all disks on the PC.
- Type “select disk *” and press Enter. * should be the disk number where the partition you want to format is located.
- Type “list partition” and press Enter. It will list all partitions on the disk.
- Type “select partition #” and press Enter. # should be the partition number that you want to format.
- Type “format fs=exfat quick” and press Enter.
How To Fix DiskPart Has Encountered An Error – Solved
Method 3. Use Third-Party Software
Some third-party programs like MiniTool Partition Wizard also offer the exFAT format option to you. With this tool, you can format a drive to exFAT easily. Here is the guide:
MiniTool Partition Wizard FreeClick to Download100%Clean & Safe
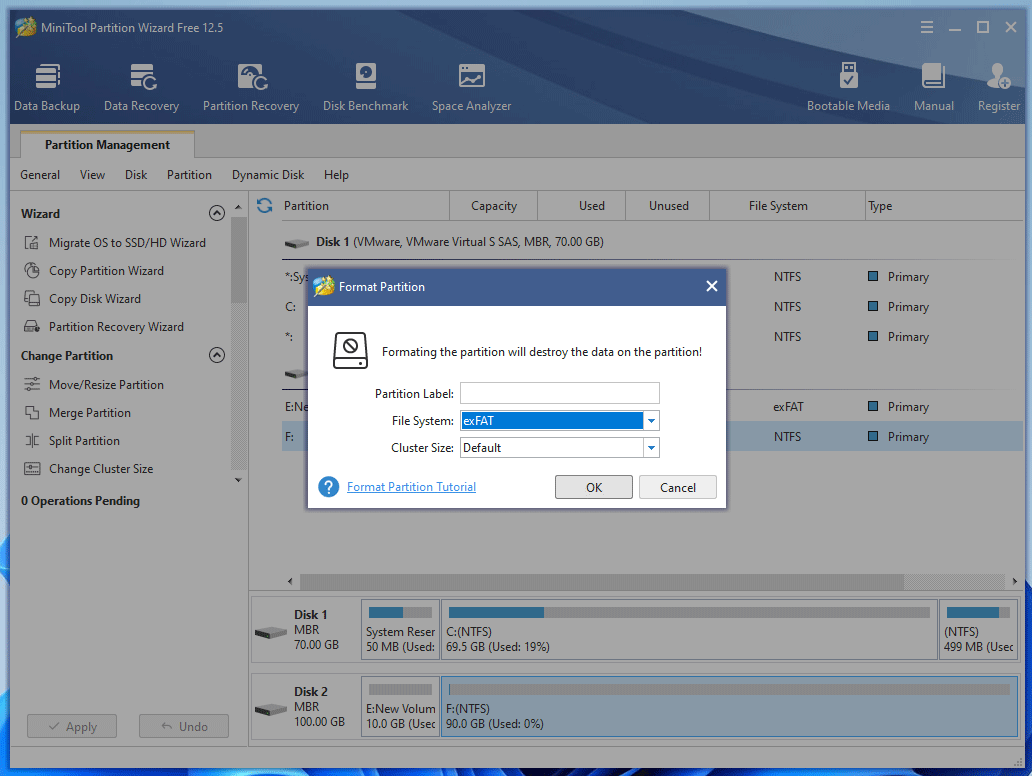
Step 1: Launch MiniTool Partition Wizard. In the main interface, right click on the partition that you want to format, and then choose the Format option from the context menu.
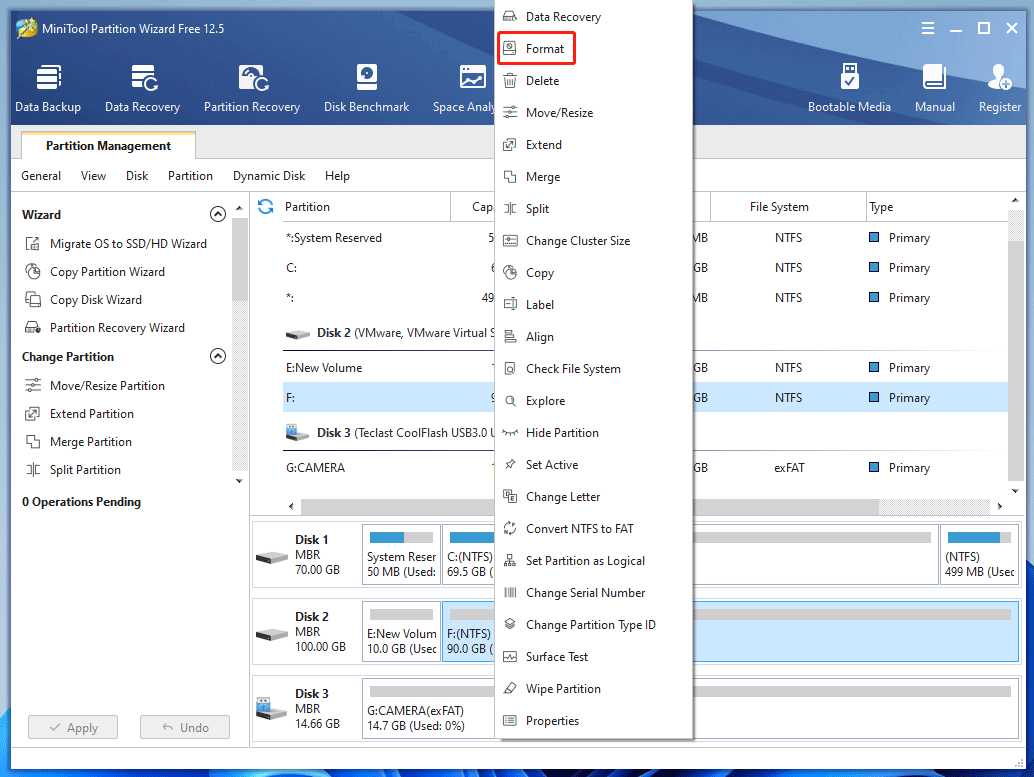
Step 2: In the pop-up window, choose the exFAT file system and then click the OK button.
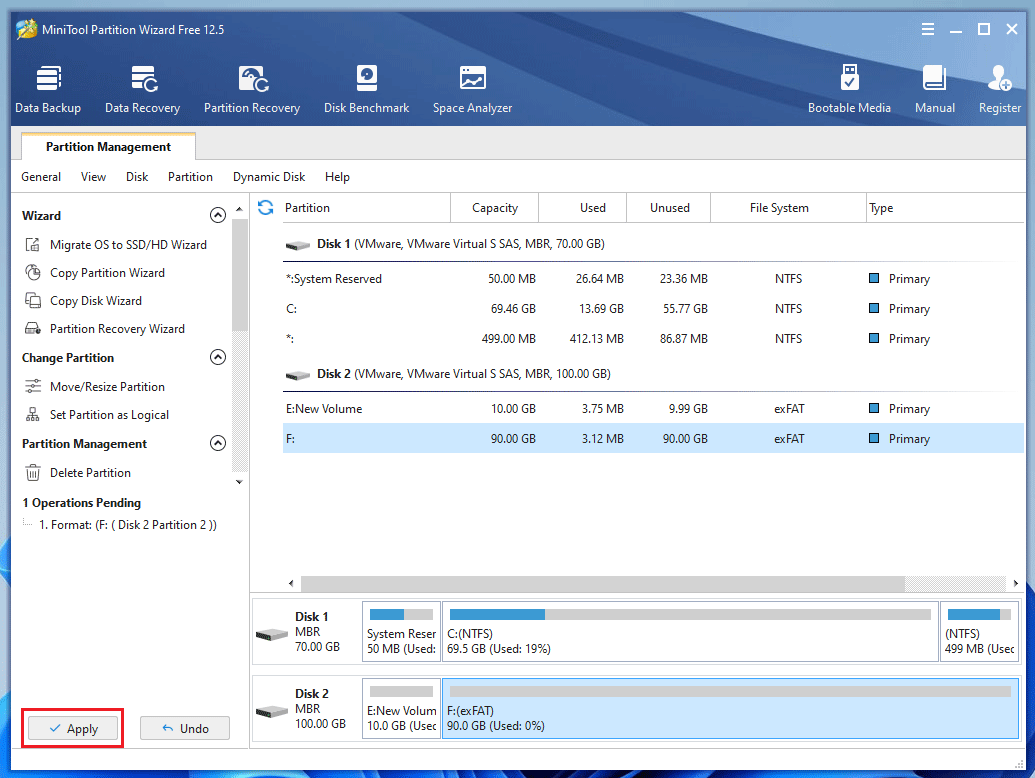
Step 3: Click the Apply button to perform the pending operation.
Why There Is No exFAT Format Option
exFAT (Extensible File Allocation Table) is a file system introduced by Microsoft in 2006 and optimized for flash memory such as USB flash drives and SD cards. It has been adopted by the SD Association as the default file system for SDXC cards larger than 32 GB.
exFAT is widely supported in Windows 7 and higher versions, Windows Server 2008 and higher versions, Windows Embedded CE 6.0, macOS starting from 10.6.5, Linux via FUSE or natively starting from kernel 5.4, and iPadOS starting from 13.1.
Tip: For Windows XP, Windows Server 2003, and Windows Vista, you should install a certain update so that they can support exFAT.
Although Windows 7/8/10/11 supports exFAT file system, it doesn’t offer the exFAT format option when you format an internal hard drive. Why does Microsoft make such a limitation? The possible reasons are as follows:
- FAT32, exFAT, and NTFS can all be used in Windows. However, FAT32 and exFAT are not journaling file systems and they don’t have logs to record metadata changes to the volume. As a result, data loss is easy to happen.
- FAT32 has 4GB file limit. Therefore, many people may prefer NTFS to FAT32. However, exFAT doesn’t have this limit, therefore it’s possible that some people may use exFAT in Windows, but that’s not a thing Windows would like to see.
Windows only offer the exFAT format option to removable devices. But if there is no exFAT format option available for external hard drive, you should consider whether there are errors on the system or the drive.
1. exFAT is not recognized by Windows 10
This issue usually occurs when you share the exFAT drives between macOS and Windows. You have first formatted the drive to exFAT in macOS. However, it is said that the exFAT formatted by Mac OS won’t be readable unless it is Mac OS X 10.7 (Lion) or 10.8 (Mountain Lion). Mac OS uses large cluster size for exFAT that cannot be accepted by Windows.
To fix this error, you can choose Master Boot Record (MBR) instead of Universally Unique Identifier (UUID) while formatting on Mac. Or, you can do partition alignment on Windows 10 directly.
2. Data loss
Many people may think data loss is easy to happen to exFAT, because it’s not a journaling file system. Actually, if you use the exFAT normally, data loss will not happen. Data loss usually happens when abnormal situations occur, for example, power outages, storage failures, system crashes, etc.
In this case, the data is still on the hard drive but it can’t be read by PC. To get the data back, you need to use data recovery software. MiniTool Partition Wizard is such a program. It can recover data from exFAT partitions. To use this software, here is the guide:
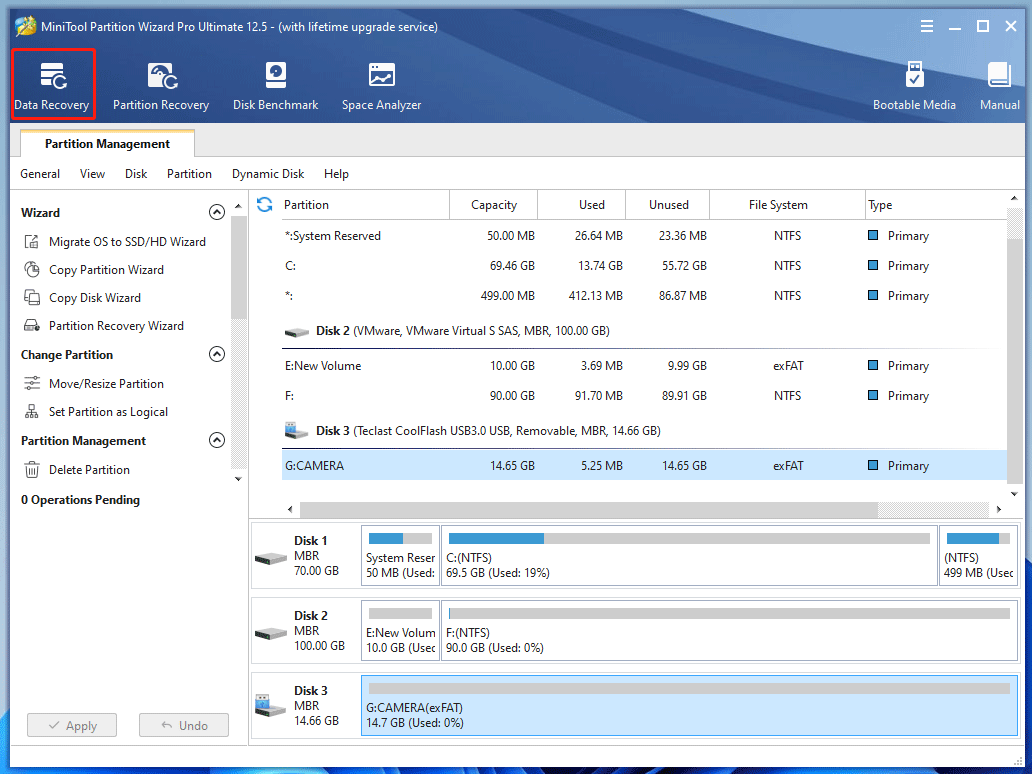
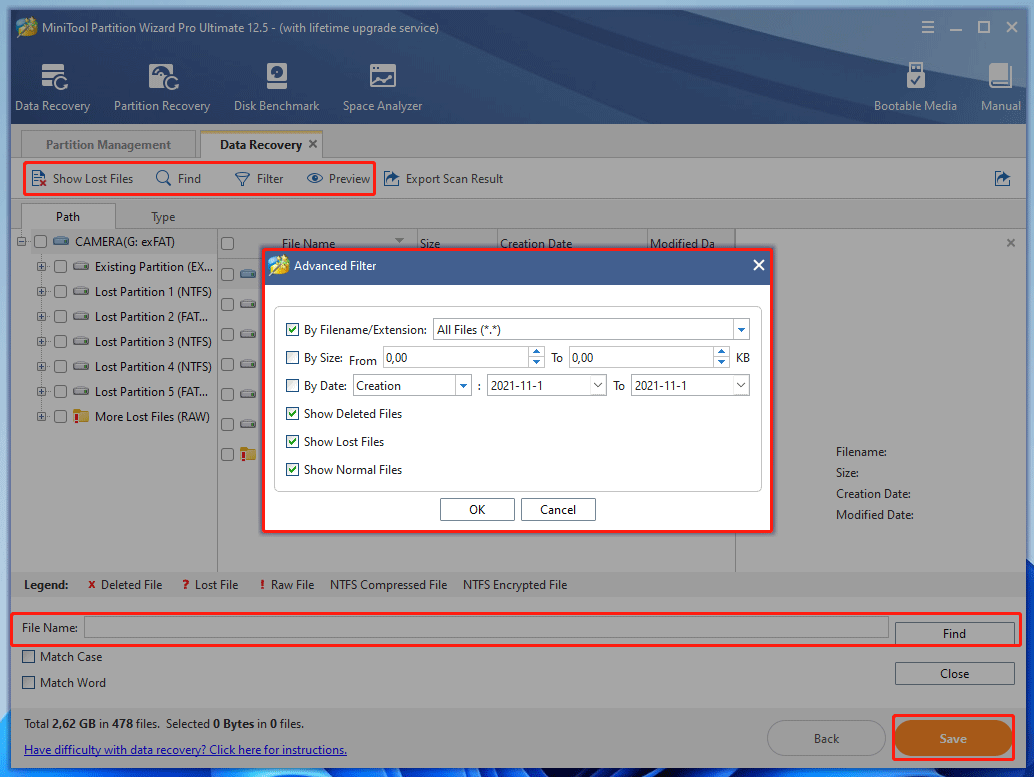
Step 1: Launch MiniTool Partition Wizard and click Data Recovery on the Toolbar.
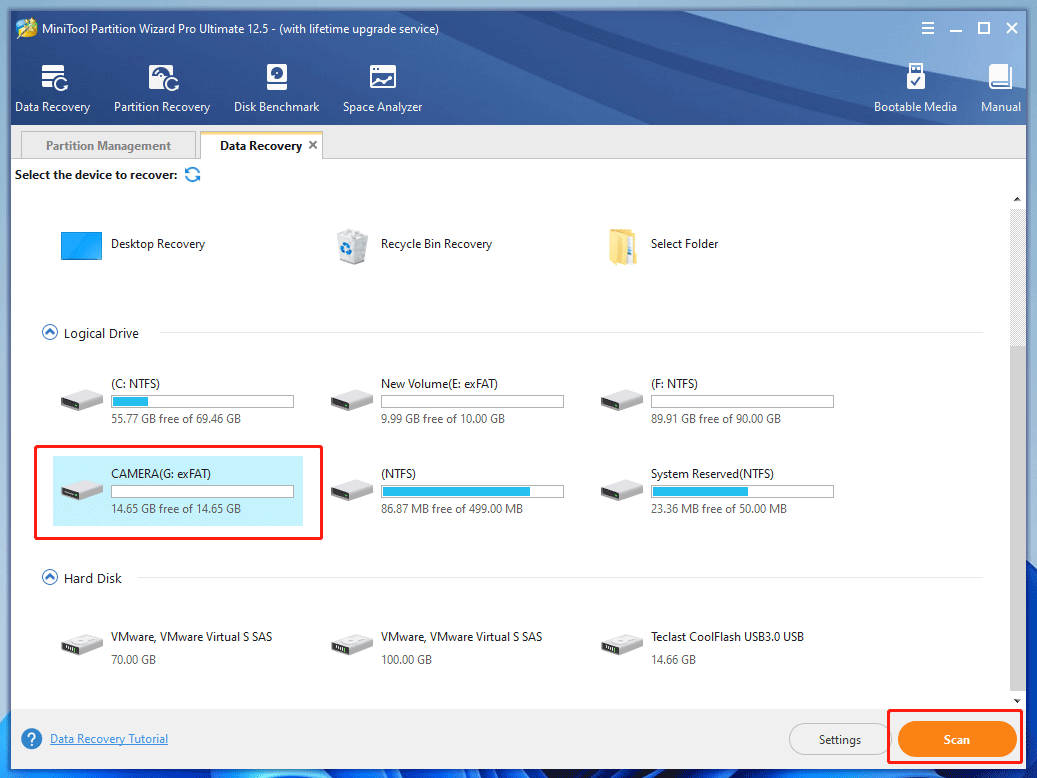
Step 2: Under the Logical Drive section, click the exFAT partition where data is lost. Then, click the Scan button.
Step 3: After the scanning process is completed, find the files you want with built-in tools. Then, select files and Save them to a safe place. These built-in tools include:
- Show Lost Files: It can display the lost files according to path and type.
- Find: It allows you to find out the lost files by typing continuous part of their file names.
- Filter: It allows you to find out the lost files through narrowing down the files range according to filename/extension, file size, creation/modification date, etc.
- Preview: It allows you to preview the files that don’t exceed 100 MB before the data is saved.
In Windows 11/10/8/7, there is no exFAT format option available when you format an internal hard drive. Here is a post explaining why this issue occurs and offering 3 ways to work around this issue.Click to Tweet
Bottom Line
Is this post useful to you? Do you have other ideas about the no exFAT format option issue? Do you know other methods that can solve the no exFAT format option issue? Do you know other issues related to exFAT file system and how to solve them? Please share them with us in the following comment zone.
In addition, if you have difficulty in formatting partitions or recovering data from exFAT partitions, please feel free to contact us via [email protected]. We will get back to you as soon as possible.