
Все способы:
- Способ 1: Перезагрузка ПК
- Способ 2: Мониторинг ресурсов
- Способ 3: Обновление системы
- Способ 4: Обновление драйверов
- Способ 5: Удаление вирусов
- Вопросы и ответы: 1
Windows 11 самостоятельно управляет оперативной памятью, поэтому возможности пользователя в этом плане минимальны. В данном случае можно лишь предпринять несколько шагов, чтобы освободить ОЗУ, о чем мы и поговорим в статье. Но если операционная система на вашем ПК стала медленнее работать, причем это отражается даже при выполнении простейших задач, то скорее всего дело не просто в оперативной памяти и нужен более комплексный подход.
Подробнее:
Как ускорить Windows 11
Удаление временных файлов в Windows 11
Программы для очистки ПК от мусора
Способ 1: Перезагрузка ПК
В первую очередь перезагрузите компьютер. Возможно, текущий сеанс был слишком длительным, было запущено множество программ, которые так и не закрылись полностью, и теперь занимают большую часть ОЗУ. Рестарт операционной системы сбросит все процессы в ней и очистит содержимое оперативной памяти.
Подробнее: Способы перезапуска ОС Windows 11

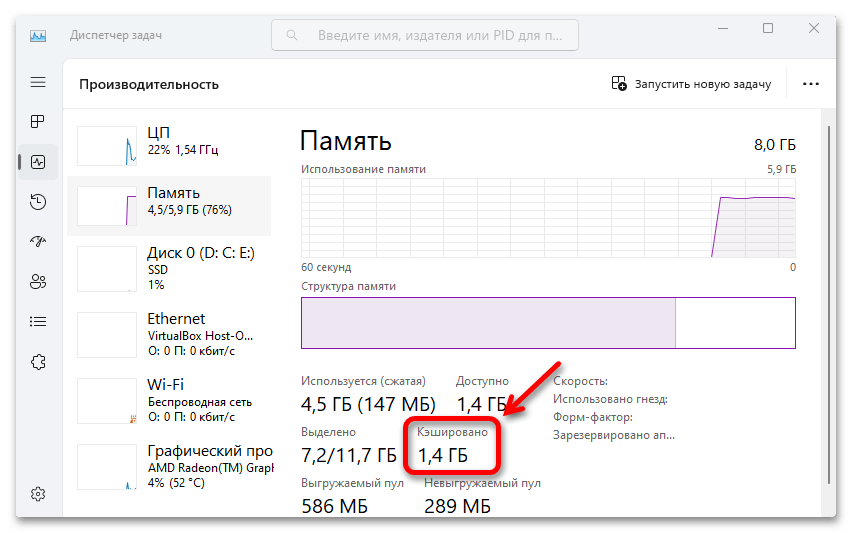
Таким же образом сбрасывается и кэширование, информацию о котором можно увидеть на экране производительности в «Диспетчере задач». Благодаря этой функции Виндовс 11 резервирует страницы памяти и заполняет их данными, которые в дальнейшем процессор может запросить.
Все это в целях оптимизации, ведь получение данных происходит быстрее, чем если бы их пришлось считывать с диска. Поэтому в сбросе кэша особого смысла нет, так как ОС все равно будет создавать его, но в качестве эксперимента можете попробовать выполнить некоторые дополнительные действия, описанные в специальной статье на эту тему.
Подробнее: Очистка кеша оперативной памяти в Windows 11
Способ 2: Мониторинг ресурсов
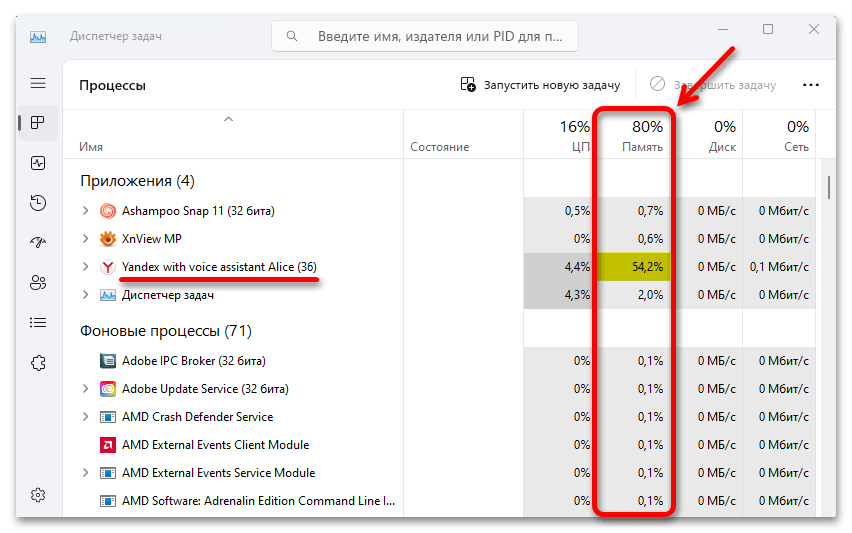
Windows 11 поддерживает системный монитор, который отслеживает состояние основных компонентов компьютера, а также показывает влияние на них запущенных в системе процессов и программ.
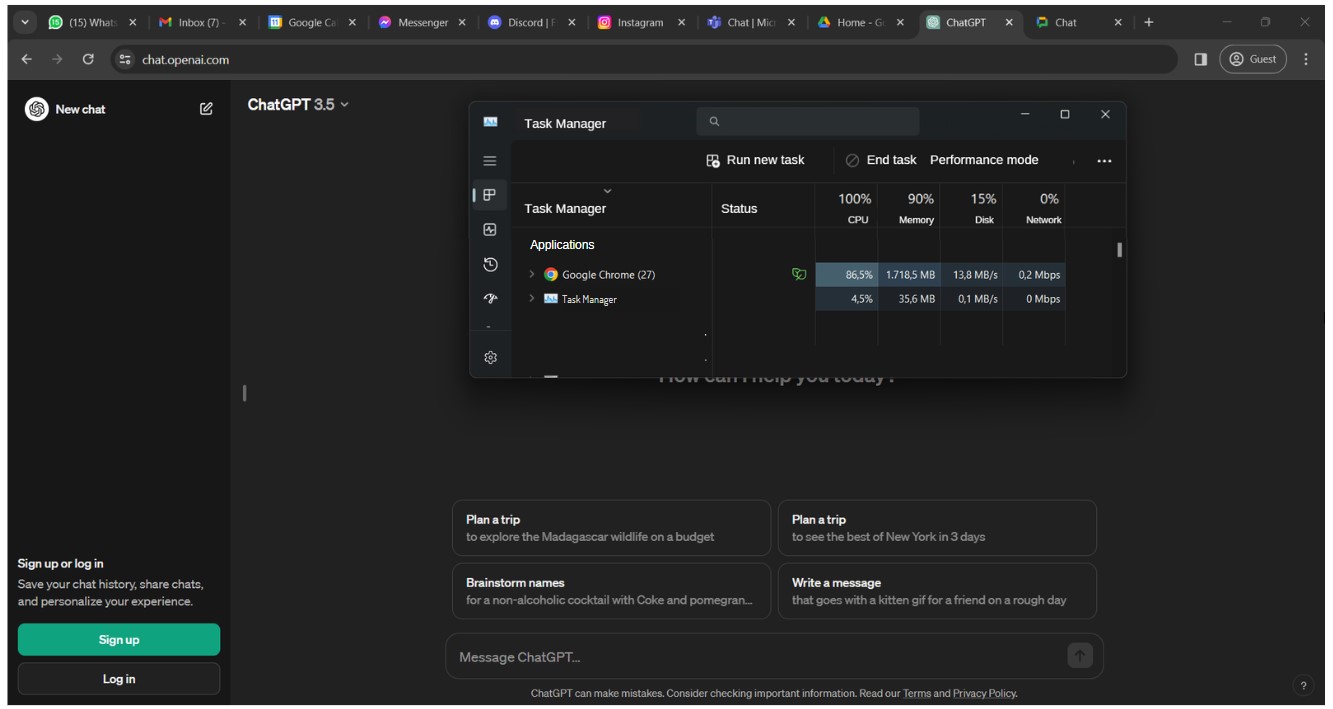
- Кликаем правой кнопкой мышки «Пуск» и открываем «Диспетчер задач».

Читайте также: Вызов «Диспетчера задач» в Windows 11
- Мы сразу можем увидеть все запущенные приложения и процессы, а также объем ресурсов, который они в данный момент используют. Например, на скриншоте ниже показано, что память загружена на 80% и большую ее часть расходует браузер.

Если в вашем списке есть такое приложение и сейчас оно не используется, выделите его и завершите эту задачу.
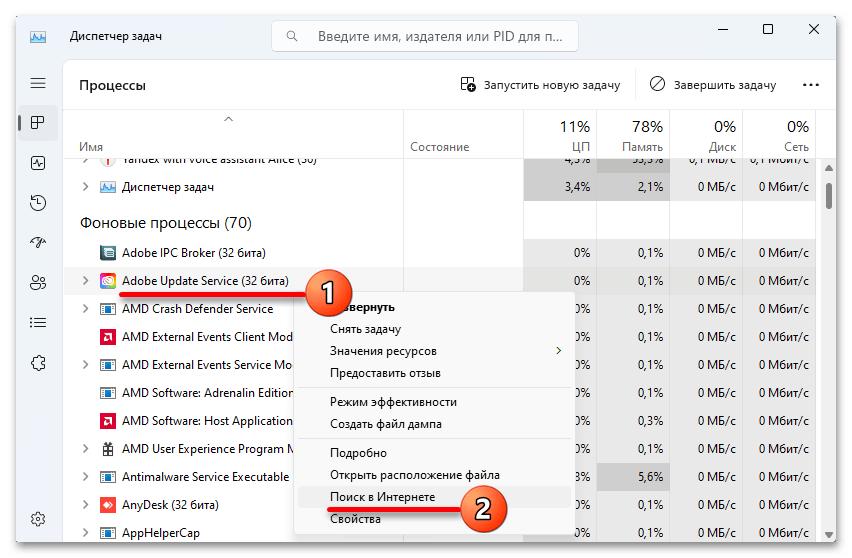
- Переходим в раздел фоновые процессы. Тут важно понимать, что некоторые из них системные, поэтому их лучше лишний раз не трогать. А вот сторонние в основном можно спокойно отключать. Если есть сомнения по поводу принадлежности того или иного процесса, кликаем по нему правой кнопкой мышки, выбираем «Поиск в интернете» и пробуем найти информацию о нем.
- Чтобы отключить процесс, в контекстном меню выбираем «Снять задачу».


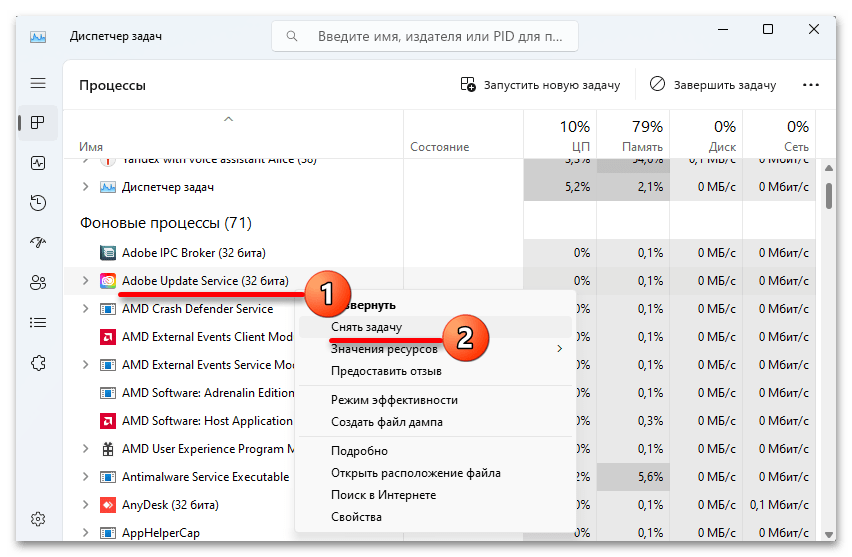
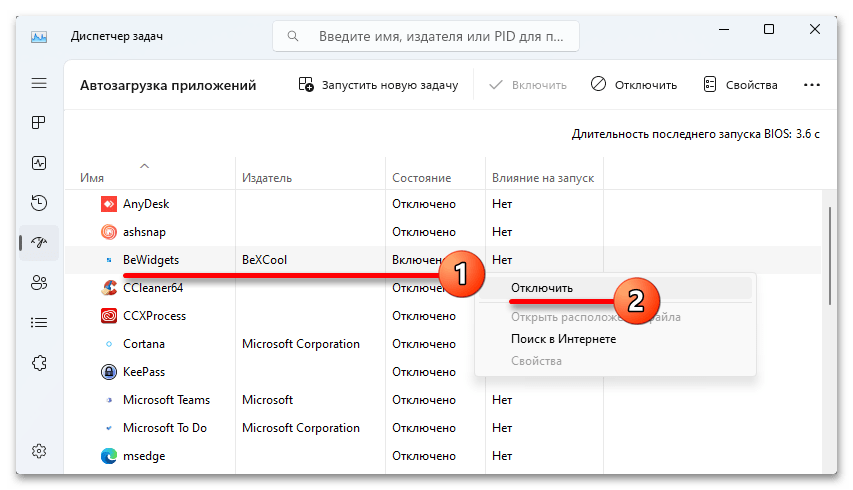
«Диспетчер задач» также включает в себя раздел атозагрузки, который показывает, какие приложения работают в фоновом режиме, а значит, используют оперативную память. Подумайте, какой софт на вашем компьютере не должен запускаться автоматически вместе с системой, и запретите ему это делать.
Подробнее: Отключение автозапуска программ в Windows 11
Способ 3: Обновление системы
Если вы редко проверяете «Центр обновления» Windows 11, то, возможно, пропустили апдейты, которые могли бы оптимизировать взаимодействие ОС с ОЗУ. О наличии важных пакетов система все же иногда «намекает», но большинство из них будут ожидать, пока вы сами не проявите интерес.
Подробнее: Обновление Windows 11 до последней версии
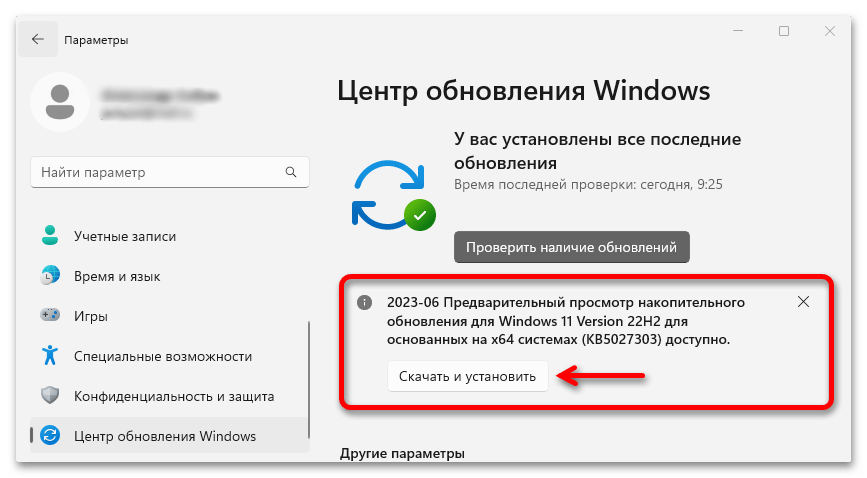
Понятно, что все обновления разрабатываются исключительно во благо, но в редких случаях бывает, что они дают прямо противоположный эффект. И если вы подозреваете, что оперативной памяти стало не хватать именно после установки апдейта, попробуйте удалить его, чтобы проверить свою версию.
Подробнее: Как удалить обновление в Windows 11

Способ 4: Обновление драйверов
Сразу уточним, что искать драйверы для ОЗУ не нужно, так как их пока не существует. Речь идет о материнской плате, в которую непосредственно подключаются планки оперативной памяти. И если предположить, что конфликт возник на уровне железа, то обновить драйверы смысл есть.

Естественно, мы не используем «Диспетчер устройств» или «Центр обновления», так как все, что было на серверах Microsoft, скорее всего, уже установлено. А лучше сразу идем на официальный сайт производителя материнской платы/ноутбука или в крайнем случае используем специальное программное обеспечение для поиска и установки драйверов.
Подробнее:
Установка драйверов в Windows 11
Установка драйверов для материнской платы
Способ 5: Удаление вирусов
Антивирусную проверку можно включать практически в любую инструкцию по решению проблем с Windows. Трояны, черви и другие угрозы появляются, наверное, ежедневно и никто, кроме их создателей, сразу не может сказать, какое воздействие они окажут. С помощью вредоносного ПО уже давно личные данные воруют, поэтому представить вирус, который тихо сидит где-то в системе и просто перетягивает на себя ресурсы компьютера, вообще несложно.
Встроенный Защитник Windows регулярно делает проверку, но обычно в облегченном режиме. Поэтому стоит сразу запустить полное сканирование.
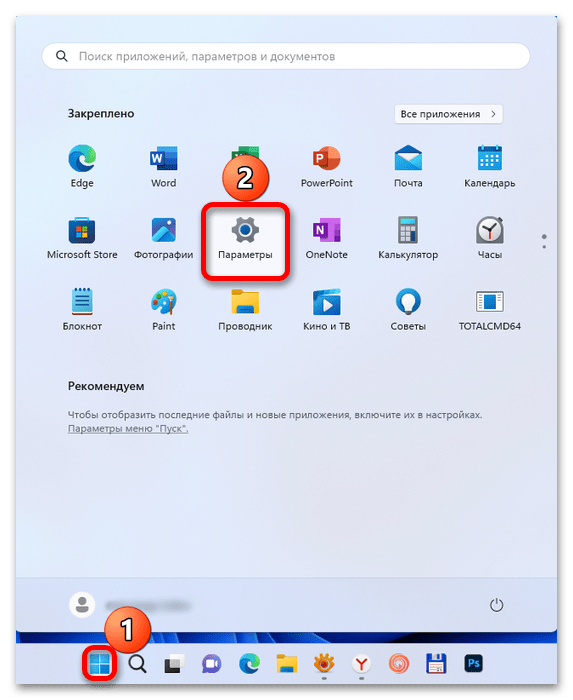
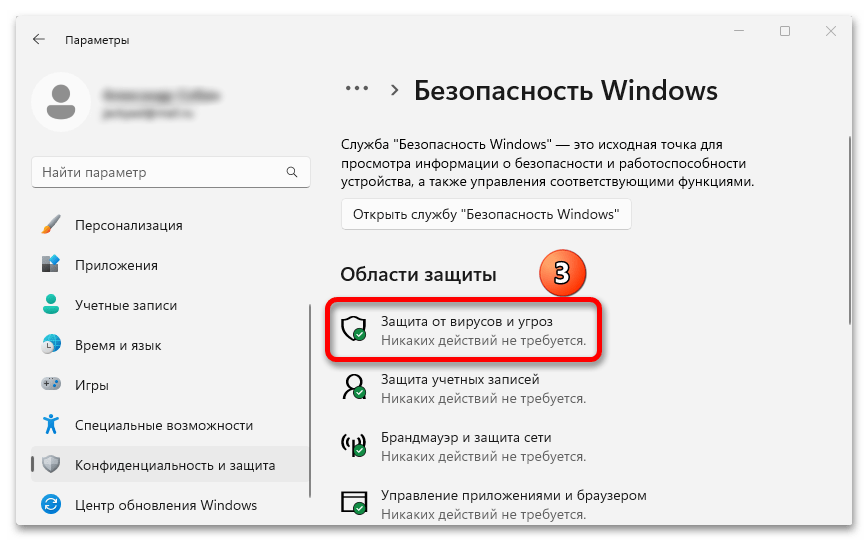
- Открываем меню «Пуск» и вызываем системные параметры.
- Переключаемся на вкладку «Конфиденциальность и защита», жмем «Безопасность Windows»

а затем «Защита от вирусов и угроз».
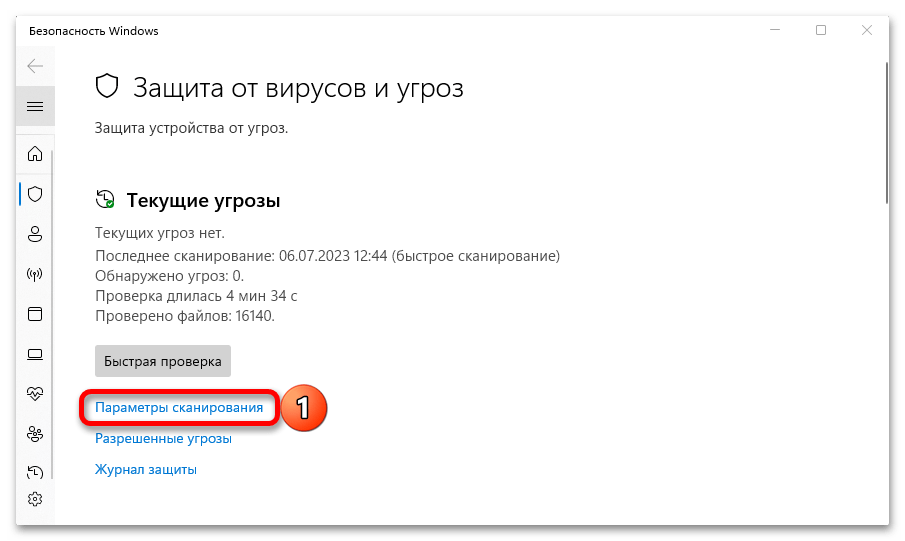
- Быстрая проверка нам не подходит, так как в этом случае сканируются только те места, в которых чаще всего бывают угрозы. Открываем параметры сканирования,

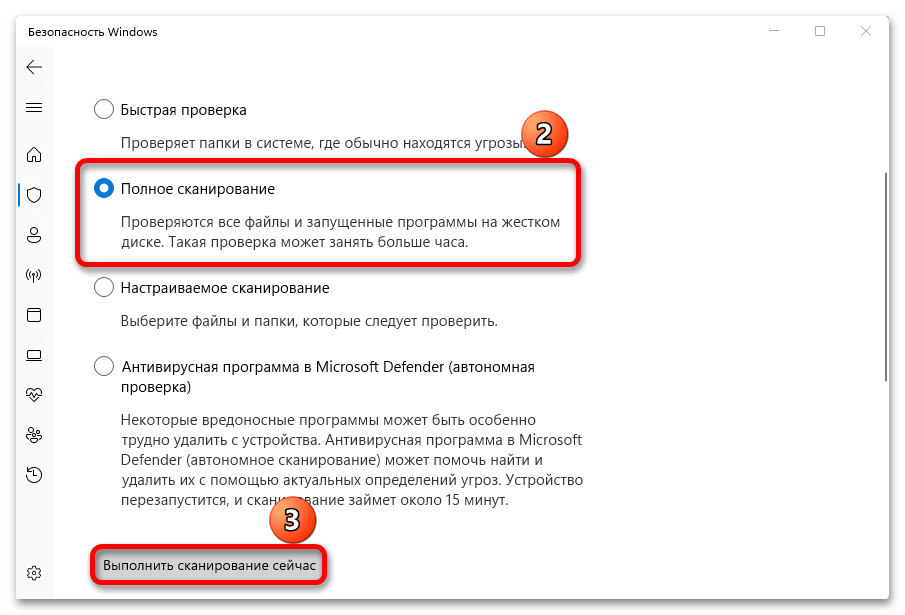
выбираем «Полное сканирование», запускаем его и дожидаемся результата.

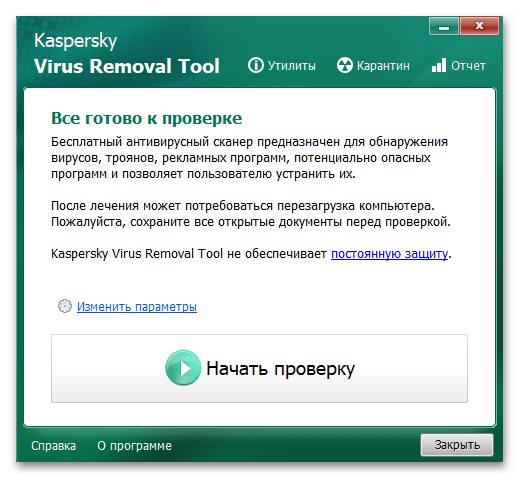
При этом ограничиваться только Windows Defender не стоит. Если есть возможность, задействуйте сторонний антивирус. Кроме того, есть довольно мощные и бесплатные антивирусные сканеры, например Dr.Web CureIt или Kaspersky Virus Removal Tool, которые даже не требуют установки на компьютер.
Подробнее:
Проверка компьютера на наличие вирусов без антивируса
Впрочем, дело может быть в том, как вы стали использовать устройство. Например, если оперативной памяти раньше хватало, но недавно вы увлеклись фотографией или видеосъемкой и теперь работаете с мощными графическими и видеоредакторами, то прежней производительности может быть недостаточно. Чтобы получать удовольствие от нового хобби, потребуется апгрейд и хорошо, если вы ограничитесь покупкой дополнительной планки ОЗУ, а то, может, придется обновить и другие комплектующие.
Наша группа в TelegramПолезные советы и помощь
Sometimes, it is common to notice that the computer runs slower than usual. When it comes to working, this is a problem since productivity and efficiency in tasks are significantly reduced.
In addition, for people, it means an increase in stress and frustration at not being able to develop and complete the most straightforward jobs.
If you have ever identified with these feelings because your computer was running as slow, it is probably due to a lack of RAM.
For that reason, at Rambox, we show you the best tricks to free up RAM and recover your computer’s speed so you can perform your functions typically and increase your productivity.
Contents
- What is RAM?
- Initial steps to free up RAM
- 1. Restart PC
- 2. Clear RAM cache
- 3. Try other browsers
- 4. Update applications
- 5. Remove unused extensions
- 7 ways to free up RAM on your Windows 11
- 1. Keep all your apps in one place
- 2. Task Manager
- 3. Uninstall unused programs
- 4. Reduce background applications
- 5. Clean page file
- 6. Swapping images for performance
- 7. Make sure your computer is malware-free
- FAQ
- How much free RAM should I have in Windows 11?
- How to free up more RAM on Windows 11?
- What can I do if my RAM is still low after trying these tips?
- Are there any tools to help manage RAM usage better?
- Why is my computer still slow even with enough free RAM?
What is RAM?
RAM (Random Access Memory) is the main memory of any device, from computers to cell phones. It temporarily stores the data of the programs you are currently using. It manages the data of the running applications, so the more RAM you have, the more applications you can handle simultaneously. Therein lies its importance.
RAM has two fundamental characteristics that differentiate it from other types of storage:
- It has tremendous speed.
- Data is stored only temporarily. When you reboot or turn off the device, the data stored in RAM will be lost.
The RAM is a physical component of the device that comes in the form of a card connected directly to the device’s motherboard. RAM cards have different integrated memory modules connected, and in devices such as computers, there are slots to add multiple RAM cards to increase memory.
Mainly there are two types of RAM:
- DDR (Double Data Rate): they can perform two operations in each clock cycle. They are activated twice in each clock signal cycle, either by level (high or low) or edge (rising or falling).
- SDR (Single Data Rate): they perform only one read or write operation.
Initial steps to free up RAM
The following tips for freeing up RAM can be used regardless of whether you have a Windows or Mac device. Here is a list of simple steps before taking more aggressive measures to free up space:
1. Restart PC
As mentioned above, RAM is characterized by storing data temporarily and only for the programs running at the time. Processes and programs are running in the background without your knowledge, so restarting the computer will clean up the processes running in the background that could consume your PC’s RAM.
For this reason, restarting your computer is the easiest way to free up RAM storage space without the risk of losing files or documents you are working on.
2. Clear RAM cache
The cache relies heavily on RAM, using short-term memory to reload pages you have recently visited. This helps you browse the Internet quickly, but it can demand a large amount of RAM that might be needed to finish other, more critical tasks.
If you have already tried restarting your device, clearing your browser’s cache may be your solution to free up RAM.
3. Try other browsers
There are many options when choosing a browser, and some browsers are better designed than others to allocate and manage RAM usage.
We know that habits are hard to change, and we all have a favorite browser. However, if you’ve cleared your browser’s cache and still notice that it’s running slowly, it may indicate that you need to try new, more intelligent browsers.
Google Chrome may be one of the favorites and most used by users, but it is one of the most RAM-consuming browsers. If you regularly use Google Chrome and your PC is running slow, we recommend trying browsers like Microsoft Edge, Mozilla Firefox, Brave, and Opera.
4. Update applications
Updating applications is essential, firstly, for security reasons. Secondly, updates can help you reduce RAM waste.
When a program does not return RAM to the pool once it has finished using those resources, it is called a memory leak. These leaks, over time, will use an increasing amount of RAM space and cause a lack of resources for the other applications on your system.
Updates are based on fixing bugs and problems from previous versions, so it is expected that if an application has a memory leak, the update will include a fix for this problem.
Also, the latest updates usually include optimizations and improvements so that the software can use less RAM.
5. Remove unused extensions
The extensions that browsers allow you to install can be a handy tool to increase productivity and efficiency in our work. But it is one of the most frequent causes of RAM consumption.
Extensions are loaded into memory when the browser is opened and store many resources over time. It is common to install extensions occasionally or to try something new and then forget to delete them. A simple way to free up RAM is to prevent extensions that you do not usually use from consuming RAM.
7 ways to free up RAM on your Windows 11
If the above tips have yet to help to free up RAM and make your device recover or increase its operating speed, it’s time to make changes a little more technical. Here is a compilation of 7 ways to free up RAM memory on a Windows 11 device:
1. Keep all your apps in one place
Rambox is a tool that makes your workspace simpler by bringing everything you need into one interface. Its main goal is to eliminate the need for using multiple desktop apps or opening various websites in your browser, which can eventually slow down your computer.

Wondering how Rambox can speed up your PC and save its energy? We’ve got the scoop!
We handpicked 10 of the most-used apps by our users every month. Then, we compared how much power they chug when run in Chrome versus through Rambox.
Here’s the kicker: opening these apps in your browser sucks up around 1700MB of your PC’s resources.
But switch to Rambox, and they slim down to just about 1500MB. That’s a solid savings of 11.76%!
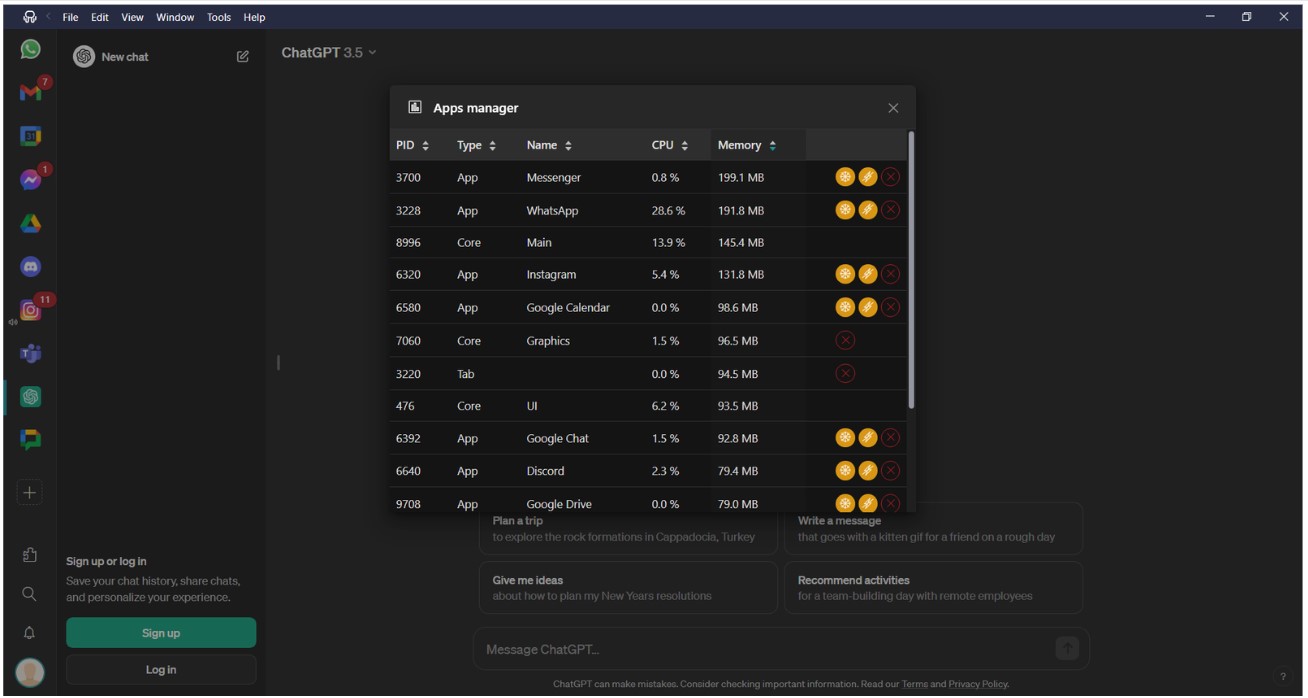
Plus, Rambox comes with a nifty app manager. It’s like mission control for your apps, showing you exactly how much energy each one is using. You can even pause or stop the ones that are draining too much power. Just pop open the quick search panel (Alt+Shift+K) and type “app manager” to find it. Easy as pie!
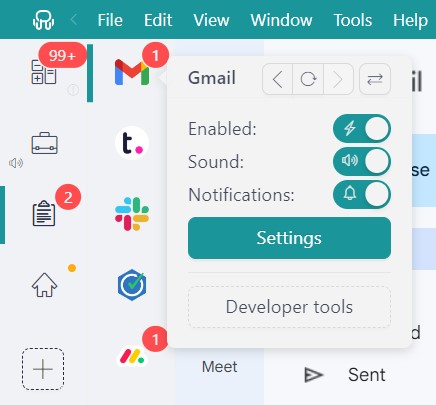
Rambox also lets you quickly turn off apps you’re not using, which can help save resources. Just right-click on an app and choose “Enabled” to turn it on or off.
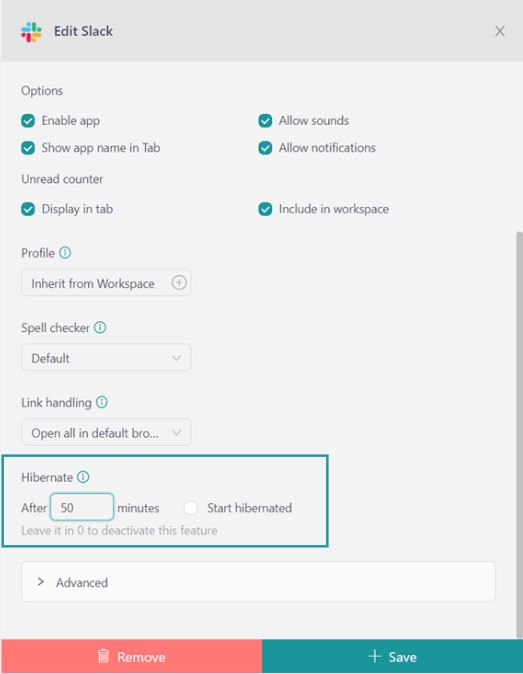
Plus, Rambox has a cool “Hibernation” feature – it can automatically put apps to sleep after they’ve been inactive for a while. This stops them from using up your computer’s resources in the background. You can set how long an app can be inactive before it goes into hibernation mode. To enable this feature, you only have to right-click on the app or workspace where you want to set a hibernation time, select “Settings” and set the time.
And that’s not all! If Rambox detects high CPU consumption by an app, it will warn you immediately with a popup message so you can disable, hibernate, or reload the troubling app right away.
Sounds good, doesn’t it? Sing up and download Rambox for free on Windows, Mac, or Linux and speed up your PC.
2. Task Manager
Windows Task Manager makes finding the source of RAM exhaustion simple. This tool shows exactly which programs and processes are consuming the most RAM.
To access the task manager and check the status of your RAM, follow the steps below:
- Press Ctrl+Shift+Esc or Ctrl+Alt+Del or click start and type “task manager” in the search engine.
- Once the task manager is open, click on the “Processes” tab and the “Memory” heading. In this section, you will see a list of the programs and processes that consume more RAM, ordered from highest to lowest.
With this list in front of you, you can close the applications that are consuming the most RAM at that moment, which you can temporarily do without. To close these applications, you must right-click on the application you want to close and choose the “End task” option. The application will close immediately, and you will free the RAM it was consuming.
It is also possible that an application accumulates a lot of information while running. In this case, it is OK to continue the task but to restart it. To restart applications, you must go back to the “Processes” section, right-click on the application that is accumulating data, and click “Restart”.
Finally, a high RAM consumption may be due to all those applications that, by default, start with the system when you turn on the computer. To disable this function, go to the “Startup” tab in the task manager. From this section, right-click on the applications and select the “Disable” option to prevent the application from starting with the system.
3. Uninstall unused programs
Once you have identified the programs and applications that consume the most RAM, thanks to the task manager, you may specify an application that consumes a large amount of memory. They may be applications you hardly use or applications you need at specific times. In either case, the best thing to do is to uninstall the application and look for a more efficient alternative.
To uninstall applications, you must go to “Windows Settings” and click on the “Applications” section. Select “Apps and Features,” find the application consuming RAM, and choose the “Uninstall” option. Some programs are best uninstalled from the old application uninstaller of previous Windows versions. To find it, scroll down to the bottom of this menu and click on the “Programs and Features” option.
4. Reduce background applications
Some applications are programmed to run in the background, although we are not using them. These types of applications are not only often responsible for RAM shortages but also for excessive battery and bandwidth consumption. For example, applications running behind the scenes can help receive notifications or perform automatic updates. However, when they become a nuisance when performing tasks, monitoring the applications and disabling them as needed becomes a priority.
To disable applications running in the background, you must go to “Settings” and click on the “Privacy” section. Using the category panel on the left side of the window, scroll down until you find “Background Apps.” Here you will find a list of such applications, and you can enable or disable any of them.
5. Clean page file
The page file can prevent your computer from slowing down even when RAM is almost exhausted. It is stored on the hard disk, so unlike RAM, it is not automatically deleted when the PC is turned off or restarted.
It is possible to program the computer so that the page file is automatically deleted when the device is restarted, although this must be done manually.
To program this function, click “Start” and type “Registry Editor” in the search panel. The computer will ask if you want the registry editor to change your device. You must click “Yes.” Once these steps are done, you must scroll down on the left side of the window and click on “HKEY_LOCAL_MACHINE.” Once in this section, you will click on the following sections (consecutively):
- SYSTEM
- Current control set
- Control
- Session Manager
- Memory management
- ClearPageFileAtShutdown
- Value data
- Enter value 1
- OK
6. Swapping images for performance
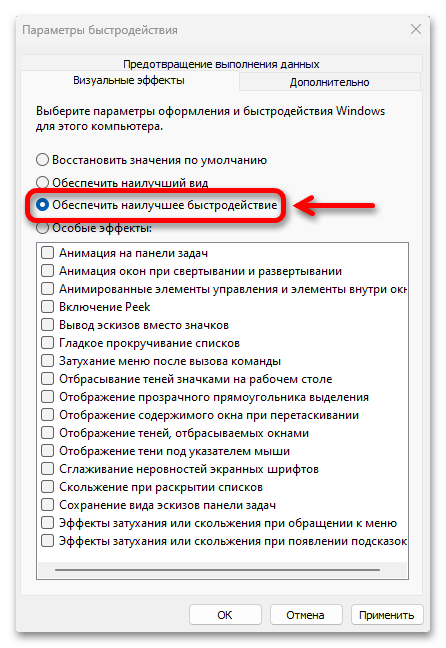
As technology develops, so does the design and aesthetic multimedia content that goes with it. Images, videos, and animations consume a large amount of RAM. For this reason, if your computer is slowing down due to a lack of RAM and the aesthetic aspect of the device is not a priority when performing your tasks, you should consider changing the visual effects to have a better performance.
To decrease the visual effects of your PC, you must first go to the “File Explorer” located in the taskbar or the start button. Click “This PC” on the left and select the “Priorities” option. Click on the “Advanced System Settings” option and open the “Advanced” tab at the top edge. Once in this section, select the “Performance” option and “Adjust for best performance.” In this section, you can disable all animations or decide which visual effects you want to leave active or inactive.
7. Make sure your computer is malware-free
If you have tried all the above tips and your computer is still running slowly and inefficiently, your device may have malware. Malware is a term used to describe any malicious program or code harmful to systems, attempting to invade, damage, or disable computers, computer systems, networks, tablets, and mobile devices, thus interfering with their regular operation.
It would help if you scanned your computer for malware. To do this, you must open the “Windows Security Settings”. Then select “Threat and Virus Protection” and click “Scan Options.” Once in this section, choose “Windows Defender Offline scan” and click “Scan now.” It is essential that before doing this process, you make sure that you have saved all open files and closed applications and programs because the computer will restart, and you could lose this data. The offline exam takes approximately 15 minutes to run.
To view the test results, go to “Windows Security Settings” once the PC has restarted. Select “Threat and Virus Protection” and click “Virus Protection History”. The Windows Defender scan will automatically detect and remove the malware or, failing that, quarantine it.
Preventively, in order not to be affected by malware again, we recommend using anti-malware to detect any possible malicious software and avoid system malfunction. In addition, anti-malware will also allow you to reset the proxy, Winsock, TCP/IP, firewall, and Host file settings.
If you’ve already tried all these steps to reduce RAM usage but your PC is still running slow, it might be time to check out some of the best optimization tools for Windows to help boost performance and keep things running smoothly.
If you are overwhelmed by the number of applications you have to work with, consuming your RAM, and making your desktop extremely low, try Rambox for free. All you have to do is download the program, configure it to your liking, and enjoy its functionalities. No cards, no cheating, it’s that simple!
FAQ
How much free RAM should I have in Windows 11?
In Windows 11, it’s recommended to have at least 2-4 GB of free RAM for general usage such as browsing the internet and using office applications. For more intensive tasks like gaming or video editing, having 8-16 GB of free RAM is ideal to ensure smooth performance. Monitoring your RAM usage through the Task Manager can help you determine if you have enough free RAM for your needs.
How to free up more RAM on Windows 11?
To free up more RAM on Windows 11, start by restarting your PC to clear temporary data and stop background processes. Clear your browser’s cache, switch to a more memory-efficient browser if necessary, and update your applications to prevent memory leaks. Disable or uninstall unused browser extensions and identify memory-hogging tasks in Task Manager to end them. Uninstall programs you no longer need and disable unnecessary background apps in the settings. Clean the page file through the Registry Editor, adjust visual effects for better performance, and scan for malware using Windows Defender. These steps can help you manage your system’s memory effectively.
What can I do if my RAM is still low after trying these tips?
If your RAM is still low after trying these tips, consider upgrading your physical RAM. Adding more RAM can provide a significant performance boost, especially if you frequently run memory-intensive applications. Check your device’s specifications to ensure compatibility before purchasing additional RAM.
Are there any tools to help manage RAM usage better?
Yes, tools like Rambox can help manage RAM usage by consolidating multiple applications into one interface, reducing the need to run several memory-consuming apps simultaneously. Rambox allows you to monitor and control app energy consumption, enabling you to pause or hibernate apps that are not in use, helping to free up RAM and improve overall performance.
Why is my computer still slow even with enough free RAM?
If your computer is still slow despite having enough free RAM, other factors might be affecting its performance. These could include a slow hard drive, outdated drivers, or a cluttered operating system. Regularly updating your system, performing disk cleanups, and ensuring your hardware components are functioning properly can help maintain optimal performance. Additionally, ensure your system is free from malware by running regular scans with Windows Defender.
Windows 11, the newest version of the Microsoft operating system, comes with many exciting features, making it a big improvement from Windows 10. But, some users are dealing with a problem of high RAM or memory usage. This issue happens because of different reasons, making Windows 11 not work as well as it could on laptops and PCs.
If you’re one of those facing this problem and want to boost your computer’s performance or increase your laptop’s RAM, you’re in the right spot. You can go through these effective solutions to reduce memory usage in Windows 11. You can also look at what is Memory Usage on Windows and how to check Memory Usage on Windows 11. Just follow the whole article to make your PC work better without hassle.
What Is Memory Usage on Windows?
Memory usage on Windows is the amount of random access memory (RAM) that is currently being used by the operating system, applications, and other processes. RAM is a type of volatile memory that is used to store data that is being actively used by the computer. When the computer is turned off, all of the data in the RAM is lost.
However, upon restarting or booting up the system, background services, operating system functions, and actively running applications begin to utilize the available RAM.
If the memory usage percentage is excessively high, it can lead to performance issues such as slow responsiveness, lags, or even system freezes.
Therefore, balancing and managing memory usage in Windows is fundamental for ensuring an efficient and smooth computing experience. Regularly monitoring memory usage can help you prevent performance degradation.
How to Check Memory Usage on Windows 11
There are a few different ways to check memory usage on Windows. One way is to use Task Manager. To open Task Manager, press Ctrl + Shift + Esc. In Task Manager, click the Performance tab. Under Memory, you can see how much RAM is currently being used and how much RAM is free.
Another way to check memory usage is to use Resource Monitor. To open Resource Monitor, press Windows + R to open the Run dialog box. Type resmon and press Enter. In Resource Monitor, click the Memory tab. You can see a more detailed view of memory usage on this tab, including which processes are using the most RAM.
High RAM usage can be a common problem in Windows 11, especially if you have a lot of programs running at the same time. If you’re experiencing high RAM usage, it can cause your computer to slow down and become unresponsive.
There are a few things you can do to fix high RAM usage in Windows 11, and we’ll discuss some of the most common solutions in this article.
1. Restart PC
One of the easiest and most effective ways to resolve excessive RAM usage in Windows 11 is to simply restart the computer. It can address various issues and reduce excessive RAM consumption. When you restart your computer, it shuts down all currently active programs and background processes. This effectively refreshes your system, stopping any tasks that use a lot of memory and are causing the computer to use too much RAM.
As your PC restarts, it releases the memory that was previously allocated to various applications. This action can help free up valuable RAM and ensure a more seamless experience. Follow the below steps to do so.
1. Click the Start Menu.
2. Click on the Power icon, and then select Restart.

2. Update Windows 11
Restarting your computer might have helped you, but if you still notice that your PC is using high RAM, making sure your operating system is up to date can make a big difference. Regular system updates not only make your computer run better but also can solve problems related to RAM. Windows 11 updates include bug fixes and optimizations for better resource management. These updates can resolve software issues that contribute to high RAM usage.
Keeping your operating system updated is also essential for security reasons. This helps keep your system safe from potential problems that can slow it down. Follow the steps below to check for Windows 11 updates.
1. Press the Windows + I button simultaneously to open Settings.
2. In the Settings window, select Windows Update.

3. Click Check for updates and follow the on-screen instructions to download and install any available updates.

3. Uninstall Unused Apps
You might be facing a shortage of RAM in your Windows 11 for various reasons, and one of the primary reasons is the accumulation of numerous unnecessary apps over time. Even if you rarely use these applications or don’t use them at all, they continue to occupy a significant portion of your computer’s RAM.
Many of these apps are configured to automatically launch every time, which is unnecessary if you rarely use them. This continuous auto-start contributes to the excessive consumption of RAM. That’s why uninstalling these unused apps is crucial to free up storage space and improve your PC’s RAM situation.
Here’s how you can uninstall apps on Windows 11:
1. Open Settings.
2. Navigate to the Apps section on the left-hand panel.
3. Select Installed Apps from the options available on the right-hand panel.

4. Upon clicking Installed Apps, all the applications on your PC will appear in the window. Here, locate the applications that you wanna uninstall.
5. Then, click the three-dot icon and select Uninstall from the menu popup.

6. A confirmation dialog will appear. Click Uninstall again to proceed with the uninstallation.

4. Close Unnecessary Apps and Services
If you’ve tried the previously mentioned methods to fix high RAM usage in Windows 11 and still face the same issues, it may be because of unnecessary apps and services running in the background.
When you open numerous apps and services that you don’t frequently use, they continue running in the background, consuming your PC’s storage and, importantly, RAM. This can be a significant drain on your system’s resources. However, you can regain control and free up precious RAM by ending these unnecessary apps and services using the built-in Windows Task Manager.
Here’s how you can close unnecessary apps and services using the Task Manager:
1. Press Ctrl + Shift + Esc on your keyboard simultaneously to open Task Manager.
2. In the Task Manager window, click on the Processes tab, and then click on the Memory column to sort the processes by memory usage, with the highest consumers listed first.
3. Now, look for apps and services you don’t need at the moment or are using excessive RAM. Common examples might include background applications related to software updates, unnecessary browser tabs, or applications you’ve opened but aren’t actively using.
4. Right-click on the unnecessary apps and services.
5. Then, click the End Task option from the pop-up menu.

5. Run Windows Memory Diagnostic
Is your Windows 11 computer experiencing issues like slow performance, freezing issues, hanging, blue screen errors, or unexpected reboots? These problems can sometimes be attributed to memory issues, particularly with your computer’s Random Access Memory (RAM).
To identify and diagnose such problems, Windows 11 provides a built-in tool called the Windows Memory Diagnostic Tool. It is a valuable tool that can help you identify and address potential memory problems on your PC.
Here are the steps to run the Windows Memory Diagnostic Tool:
1. Press the Windows key + R to open the Run dialog box.
2. Type mdsched in the search field, and hit OK.

3. A window pop-up will appear with two distinct options.
4. Here, click on Restart now and check for problems option to run the memory diagnostic.

Your computer will restart, and the Windows Memory Diagnostic Tool will begin running. The test will take several minutes to complete as it performs two different tests, so please be patient.
Once the test is complete, your computer will restart, and you will see a notification with the test results. You can also view the results in Event Viewer. To learn more, you can check out our guide on how to use the Windows Memory Diagnostic Tool.
If the test detects any errors, you will need to contact your computer manufacturer or a qualified technician to replace the faulty RAM module.
6. Disable Startup Apps
You can boost your Windows 11 computer’s performance and free up RAM by taking control of unnecessary startup apps. These are the applications that automatically launch when you restart your computer. While some apps are essential for your workflow, many of them are superfluous and can be easily disabled.
You can even customize your list of startup apps to include the ones you frequently use. This way, you can have your preferred apps ready to go as soon as your computer boots up.
Let’s explore how to manage these startup apps and ensure your system runs efficiently.
1. Open the Windows Settings app.
2. Click on Apps in the left sidebar and click on Startup in the right pane.

3. Toggle off the switch next to the apps you don’t want to start at startup.

Using the above steps, you can control the Startup apps and reduce RAM usage on your Windows 11 system.
7. Disable SysMain Service
The SysMain service, known as Superfetch, is a Windows service that monitors how you use your computer and preloads frequently used applications and data into memory. This can improve the startup and load times of your applications.
However, the SysMain service can also use a significant amount of CPU and disk resources, especially when it is first running. If you are experiencing performance problems with your computer, you may want to consider disabling the SysMain service.
Here’s how you can disable the SysMain service:
1. Press the Windows key + R to open Run.
2. Here, type services.msc and press Enter.

3. Scroll down and double-click on the SysMain from the lists of services.
4. Then, click the Stop button to stop the service.

8. Adjust for Best Performance
Adjusting the best performance will disable some of the visual effects in Windows 11 and it may help to smoothly run the PC. For example, you may notice that windows no longer fade in and out when you open and close them. You may also notice that fonts are not as smooth as they were before. But it will also help to improve performance on older or less powerful computers.
Follow the steps below to adjust for the best performance in Windows 11
1. Open the Start menu and search for Performance.
2. Click on Adjust the appearance and performance of Windows option.

3. Click on the Visual Effects tab and select Adjust for best performance.
4. Now, to apply and save the changes, click on the Apply and OK button.
5. After that, Restart your PC.

9. Change Registry Key
The Windows Registry is a powerful tool that can be used to optimize your system’s performance. Changing the registry key is also an important method to fix high RAM usage in Windows 11. It is important to note that changing registry keys can be dangerous, follow the steps very precisely and only change keys that you are familiar with. Do not change what a key does if you are unsure.
1. Press Windows key + R to open Run.
2. Here, type regedit and press Enter to open the Registry Editor.

3. A confirmation pop-up will appear saying Do you want to allow this app to make changes to your device. Press Yes if you want.
4. Navigate the HKEY_LOCAL_MACHINE registry key and expand SYSTEM > CurrentControlSet > Control.

5. Furthermore, expand Session Manager > Memory Management.
6. In the right-hand pane, double-click the ClearPageFileAtShutdown registry key.

7. Click on Modify from the menu that appears.

8. Change the value data to 1 and select base as Hexadecimal.
9. Then, click OK to save the change.
10. After that, close the Registry Editor and restart your computer.

10. Check for Virus
If you continue to experience the same issue, there’s a significant possibility that your PC has viruses, which can result in high usage of memory or RAM. To address this, you should promptly scan and remove any viruses from your computer.
Here are some steps you can follow to eliminate these threats from your system. To check for viruses in Windows 11, you can use Windows Security, which is Microsoft’s built-in antivirus software.
Let me show you how you can check for viruses using Windows Security:
1. Click on the Start button.
2. It will open the Start menu, type Windows Security, and open it.

3. Click on the Virus & threat protection tab and then click on the Quick Scan button. However, if you want to perform a full scan, click on Scan options.

4. Here, select Full Scan and click on the Scan Now button.

Windows Security will scan your computer for viruses and other malware. If any threats are found, Windows Security will prompt you to remove them.
11. Upgrade or Install Additional RAM
After following all the above methods, if you are still facing high RAM usage on Windows 11, you might need to upgrade or install additional RAM modules on your system. As the installed RAM modules may not be sufficient enough to handle processes on your system.
However, adding physical RAM requires purchasing compatible modules and installing them on your laptop or PC. After upgrading or installing RAM modules, you should see an effective boost and improvement in performance to a certain extent fixing high RAM usage.
Conclusion
The suggested methods for fixing RAM usage in Windows 11 should have helped you resolve the issue. After that, check the memory usage to identify the status of your RAM and the reasons behind its high usage.
If any of the fixes did not work, you might also consider upgrading or installing additional RAM in your Windows 11 system.

Speed up your Windows 11 performance by clearing your RAM Cache. It’s your computer’s short-term memory—fast but limited in space. Overload it, and your system slows to a crawl.
Clearing RAM doesn’t just free up space; you’re supercharging your machine for the tasks ahead. Learn why it’s a critical part of your PC’s maintenance routine.
What is RAM?
RAM—Random Access Memory—is your computer’s mental scratchpad. RAM holds data for your CPU to grab instantly, making your system’s performance fast. But, when RAM reaches its limit, your PC’s performance stutters, making even the simplest tasks feel like a slog. Let’s dig into why that matters.
Why is RAM important?
The amount of RAM you have directly impacts your system’s performance. Insufficient RAM means your computer will struggle, as it doesn’t have the storage space to complete its tasks, particularly when multitasking or juggling multiple programs. More RAM equals a zippier, more responsive machine.
One solution is more RAM. It lets your computer hold more data at the ready, avoiding slower writes to your hard drive — making multitasking and app-switching almost telepathic.
Why is clearing RAM important?
Your RAM Cache is your computer’s real-time working memory. Managed by Windows, this temporary mini-storage compartment holds frequently used data for quick retrieval, acting as a buffer between your CPU and slower storage drives (SSD or HDD). By storing this data in its cache, it speeds up the performance of apps.
But here’s the hitch: overload your RAM Cache, and your system hits a bottleneck. Clearing this cache speeds up data access and fine-tunes your system’s performance. Plus, RAM is a volatile memory. This means every time you reboot, you’re giving your computer a fresh start.
Imagine it as the desk where your PC juggles all its tasks in real time. Cram too much onto this desk, and tasks get delayed; productivity takes a nosedive. Clearing RAM is like decluttering your desk and making room for new tasks.
5 signs it’s time to clear your RAM
Watch for these red flags to know when to free up memory:
- Error messages: Get pop-ups like «Low Memory» or «System Out of Resources»? That’s your cue to clear your RAM.
- Sluggish system response: Noticeable lag? Clearing RAM boosts performance immediately. An overloaded cache slows down your computer.
- Software crashes: Frequent application stalls or crashes? Resetting your RAM cache smooths out these disruptions for a better user experience.
- High CPU usage: CPU running at high capacity even for simple tasks? It’s a hint your RAM needs decluttering, relieving your processor from undue stress.
- Basic troubleshooting: Facing application errors or performance issues? Your first step should be to clear the RAM cache. This often resolves minor issues, allowing you to tackle more complex solutions if needed.
Keep reading for a few different ways you can free up RAM space.
How to check your RAM cache on Windows 11
To find out how much RAM cache your system uses, open the Task Manager. Here’s a quick list:
- Press Windows Key + X to open the Power User Menu.
- Select Task Manager.
- Select the hamburger menu that’s in the top-left corner.
- Navigate to Performance on the left sidebar, then click Memory in the right menu.
- Look for the Cached value to see your current RAM cache usage.
Now that you know where to find it, let’s work out how to clear your RAM Cache.
How to clear RAM cache on Windows 11
Here’s a step-by-step guide to clearing that RAM cache. Follow these methods to give your system a quick refresh.
1. Restart your computer to clear the RAM Cache
A restart is as basic as it gets. It’s effective because it flushes the RAM cache. Windows shuts down all your background applications and services, including those using the RAM cache.
- Press Alt + F4 to open the shutdown menu.
- Select Restart from the drop-down options.
- Click OK to confirm and restart your computer.
Restarting gives your system a clean slate, wiping the RAM cache and allowing your machine to start fresh. It’s not the best option if you’re in the middle of something, but it’s a surefire way to clear that RAM.
2. Analyze RAM with RAMMap
RAMMap is a nifty tool by Sysinternals that gives you a deep dive into how Windows allocates your RAM. You can discover which processes eat up your RAM to the nitty-gritty details. You can fine-tune your system’s performance and even clear specific cache areas.
Here’s how to use RAMMap
- Download RAMMap from the Sysinternals website.
- Extract the ZIP file and run the RAMMap.exe.
- Check out the various tabs to understand RAM allocation.
RAMMap is more of a diagnostic tool than a quick fix. But it’s a great way to understand what’s happening so you can make informed decisions on managing it.
3. Delete temporary files
Next on the list is clearing out temporary files. By deleting them, you remove unnecessary files that accumulate over time. This includes data that may be stored in the RAM cache.
Before clearing temp files, it’s best to save your work and close any open apps to play it safe.
Delete temporary data running under your user account
- Type Win + R to bring up the Run window.
- Enter %temp%. Click Enter to access the folder with temporary files. Usually, it’s: C:\Users\[Username]\AppData\Local\Temp
- Use Ctrl + A to highlight everything in that folder.
- Tap the Delete key to clear all the files.
Delete your system-level temporary directory files
- Type Win + R to re-open the Run dialog.
- Enter temp. Press Enter to locate your folder with temporary files.
- Wipe out all the files in this second folder to ensure you’ve covered all your bases.
Now, your RAM cache is looking a lot less cluttered.
4. End processes via Windows Task Manager
The Task Manager isn’t just for closing frozen apps but also for clearing RAM. You can end resource-hogging processes, freeing up more space for other tasks. Just proceed cautiously, as you don’t want to shut down essential system processes accidentally.
Here’s how to end processes through Task Manager:
- Press Ctrl + Shift + Esc to open Task Manager, or the steps outlined above.
- Navigate to the Processes tab. You’ll see a list of running apps and background processes.
- Identify high-memory usage processes: Click the Memory column header to sort from most to least RAM usage.
- Right-click on the app you want to end. Avoid system processes or ones you’re unfamiliar with.
- Select End Task from the context menu to terminate the process. Then, repeat the same process for other processes.
5. Reduce startup programs you don’t need
Startup programs are those that activate when your computer is booted up. Too many startup programs can slow down your computer and consume RAM immediately. Lighten the load by disabling non-essential apps that launch at startup.
How to disable startup programs
- Press Ctrl + Shift + Esc to open Task Manager.
- Click the Startup apps tab. You’ll see a list of apps set to launch at boot-up.
- Identify non-essential apps: Sort by Startup impact to see which apps are resource-heavy.
- Right-click and pick «Disable» for apps you don’t need at startup.
- Reboot your device for these changes to take effect.
When these programs start, each one consumes RAM in the background. By removing them, you’ve streamlined your startup process, freeing up RAM and accelerating boot time!
6. Uninstall unused apps to free up RAM
Ditch those apps you never touch. They do more than take up disk space; they can hog your RAM.
- In the taskbar search, enter ‘Control Panel’ and click to open it.
- Navigate to Programs > Programs and Features.
- Right-click on the unwanted program and choose Uninstall or Uninstall/Change.
- Follow the on-screen instructions to finalize.
7. Stop background apps
In Windows, apps can continue to operate even when they’re not open. Background apps can be silent memory consumers, eating up:
- RAM
- Battery life
- Mobile data
So, let’s remove them.
How to disable background apps in Windows 11
- Open Windows Settings: Hit Win + I to open.
- In the left pane, click Apps.
- Click on Installed apps in Windows 11. Use search if you need to find a specific app.
- Next to the app, click the three-dots menu, then select Advanced options. If the option isn’t there, the app doesn’t support this feature.
- Scroll down until you find the Background Apps permissions section.
- Click the drop-down for Let this app run in the background and select Never.
8. Use ReadyBoost to supplement RAM
ReadyBoost is an old-school trick for enhancing RAM without actually adding physical RAM. It uses a USB drive to act like extra RAM. Great for older systems but won’t work or speed up if you have an SSD.
Here’s how to set up ReadyBoost
- Plug in a USB drive that you’re willing to allocate to ReadyBoost.
- Open File Explorer and right-click on the USB drive, then select Properties.
- Go to the ReadyBoost tab.
- Choose Use this device and allocate the amount of space you want to use for ReadyBoost.
- Click OK to finalize the settings.
ReadyBoost won’t replace actual RAM, but it’s a helpful tweak when you need a quick performance boost.
The Takeaway: RAM’s Your Fast-Track in Windows 11
You now know why RAM is your PC’s MVP and how to keep it uncluttered. Clear your RAM, speed up Windows 11. It’s that simple. Make it a habit.
Recommended Products
Robert is a Taiwan-based writer and digital marketer at iamrobert design. He has a passion for helping people simplify their lives through tech.
Пользователи Windows 11 (и предыдущей версии ОС), открыв вкладку «Производительность» в диспетчере задач, а в ней — раздел «Память», может увидеть, что часть оперативной памяти находится в статусе «Кэшировано», причём объем кэшированной памяти может быть значительным и расти со временем.
В этом материале о том, что такое кэшированная память в Windows, почему она может расти и занимать много от общего объема доступной RAM и как её можно очистить.
Память «Кэшировано» — что это?

Кэшированная память в Windows 11 — это занятая в настоящий момент оперативная память, которая сейчас не используется: эти страницы памяти содержат данные, которые потенциально могут потребоваться в работе как системных, так и сторонних процессов, но не задействованы прямо сейчас. В графическом представлении оперативной памяти в диспетчере задач она отображается как «Зарезервировано» с соответствующим описанием:

Задача — ускорить получение доступа к данным, которые часто используются или, с «точки зрения» менеджера памяти Windows 11 могут скоро потребоваться: из оперативной памяти получить эти данные можно будет значительно быстрее, чем с диска.
Иначе говоря, задача кэшированной памяти — ускорить работу системы и программ. По мере работы занятый памятью «кэшировано» объем будет увеличиваться, и он будет тем больше, чем больше свободной оперативной памяти присутствует на компьютере: лучше использовать её эффективно, чем просто держать свободной — сама по себе свободная оперативная память не несёт никакой пользы и не приводит к повышению производительности.
Как очистить кэшированную память
Частый вопрос пользователей касается очистки кэшированной памяти в Windows 11 или иных версиях системы. Здесь следует учитывать следующее: в большинстве случаев какая-либо ручная очистка этой памяти не требуется.
Если окажется, что какому-то из запущенных процессов: программе, игре или чему-либо ещё, потребуется больше оперативной памяти, чем доступно в статусе «Свободно», необходимое количество кэша будет очищено автоматически и с какими-либо проблемами из-за кэшированной оперативной памяти вы не столкнётесь.
Вы можете это легко проверить: запустите что-то такое, чему требуется очень много RAM, а потом снова зайдите в диспетчер задач — вы увидите, что объем памяти «Кэшировано» уменьшился сам по себе, хотя до этого лишь рос.
И, как я уже писал выше, числа в разделе «Свободно» сами по себе никак не влияют на общую производительность системы, хотя некоторые пользователи предпочитают видеть максимум свободной RAM.
Если же вы всё-таки решили очистить кэшированную память, для этого есть сторонние инструменты:
- EmptyStandbyList.exe (официальный сайт)
- Mem Reduct официальный сайт
- Intelligent Standby List Cleaner ( официальный сайт )
Например, при использовании первой потребуется запустить командную строку от имени администратора и ввести команду (указав полный путь к исполняемому файлу программы в команде)
emptystandbylist.exe standbylist
в результате кэшированная память будет очищена.
Я не могу прямо рекомендовать использование указанных инструментов: если кэшированная память не вызывает никаких проблем в работе системы, а лишь приводит к внутреннему дискомфорту, когда вы видите её объем, очистка не требуется.