
Is it possible to remove or hide the drive letter in Windows? How to remove the drive letter? If you have the same question, you can follow this post of MiniTool Partition Wizard to rename the partition in Windows. There are several methods listed to remove the drive letter and hide the partition.
A drive letter refers to a single alphabetic character A to Z, which is assigned to a partition on your disk. When the computer detects a new internal or external hard drive, your Windows operating system automatically assigns an available drive letter to it. Then you can make changes to the devices directly and do not have to assign the drive letters manually.
However, there are several drive letters assigned by default. For instance, the first active hard disk partition containing the operating system is assigned the drive letter C. Besides, drive letters A and B are reserved by Windows for floppy drives, which are not commonly used for other partitions.
Although it is convenient that Windows assigns the drive letter automatically, users may want to remove or change the drive letter for some reason. For instance, some letters are preferred and some are not, so you may not want Windows to assign the drive letters automatically. Besides, a partition can get hidden by removing its drive letter. If you remove the drive letter of a hard drive, it won’t be able to show up in File Explorer.
How to hide the drive letter? There are five methods listed below to give you a reference. You can have a try on them according to your situation.
How to Remove the Drive Letter
Method 1. Use File Explorer
If you only want to remove the drive letter of the partitions on your disk, you can use File Explorer to hide the drive letter. In this way, data stored in the partition can still be viewed and changed. Follow the detailed steps below.
Step 1. Press the Win + E keys to open File Explorer, then click the View tab from the ribbon toolbar and click Options.
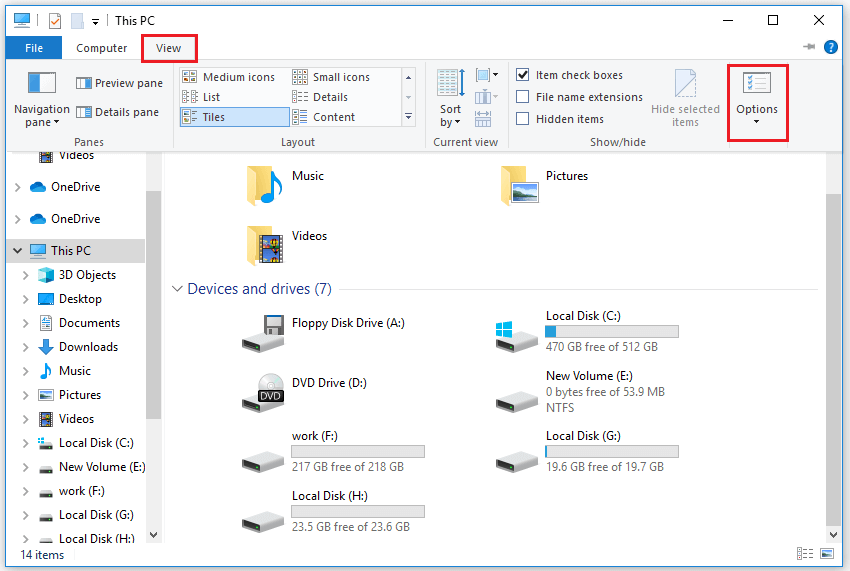
Step 2. When the Folder Options window pops up, click the View tab. Then find and uncheck Show drive letters box under the Advanced settings section. Click Apply and OK sequentially to save changes.
Step 3. Then you can see that the drive letters of all the hard drives on the disk are removed. Besides, you can still open the partition and view the files and folders on it. If you want to restore the drive letters, you can repeat the above steps and then check the Show drive letters option.
If you want to hide the partition by removing the drive letter and protect the data stored in it, you can refer to the following methods.
Method 2. Use Disk Management
You can use the Windows built-in tool – Disk Management to remove the drive letter. After removing the drive letter, you cannot view and open the partition on the computer. Follow the detailed steps below.
Step 1. Right-click the Windows Start menu and select Disk Management. When Disk Management opens, right-click the partition of which you want to remove or change its drive letter and select Change Drive Letter and Paths.
Tips:
If the partition is not in use, removing the drive letter can go smoothly. However, if the partition is used by programs, drive letter removal may cause unexpected issues. Thus, it’s recommended not to remove or change the drive letter of the partition that has Windows and apps running right now.
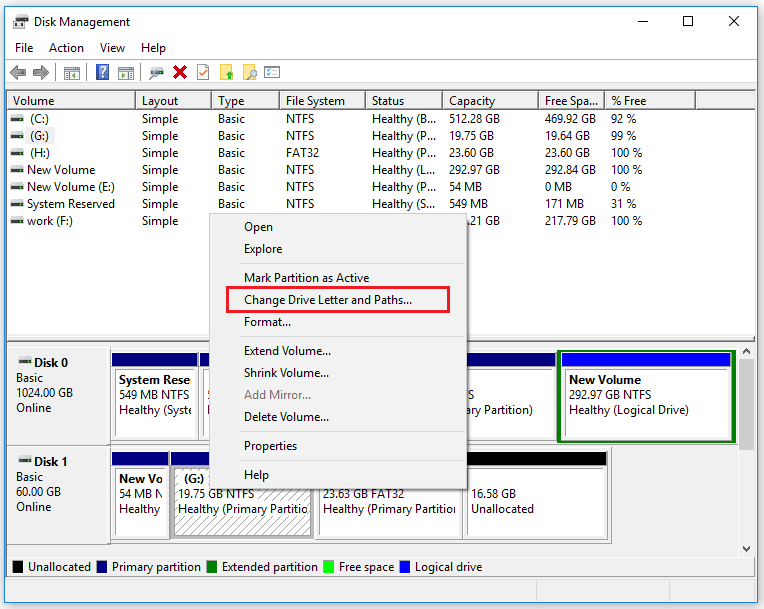
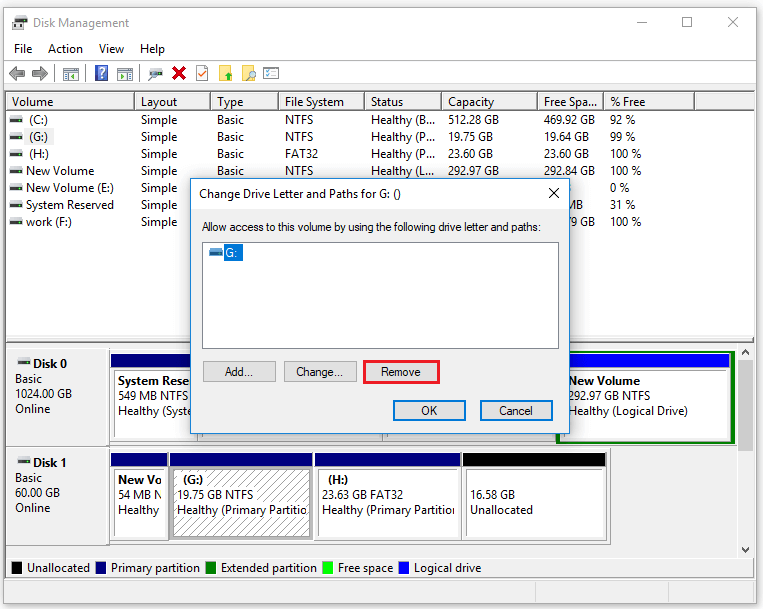
Step 2. Select the drive letter of the selected partition and then click the Remove button. Then a warning window will pop up, click Yes.
Step 3. Now you can see the drive letter is removed in Disk Management, and you can’t find the corresponding partition in File Explorer. Besides, you cannot open and explore the data stored in this partition even in Disk Management.
Method 3. Use Command Prompt
You can try to hide the drive letter by using Command Prompt, which is a command line interface for Windows operating system. Follow the detailed steps below.
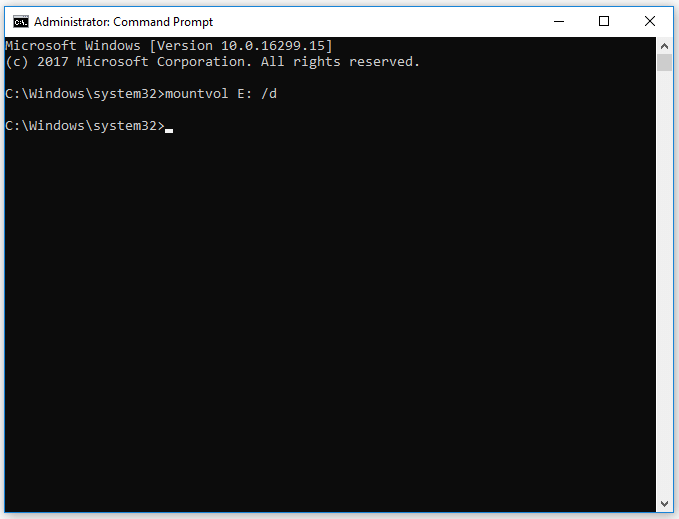
Step 1. Press the Windows + R keys to open the Run box. Then type cmd in the box and press the Ctrl + Shift + Enter keys to run Command Prompt as administrator.
Step 2. Then in the pop-up window, type mountvol <Drive Letter>: /d and press the Enter key to execute the command.
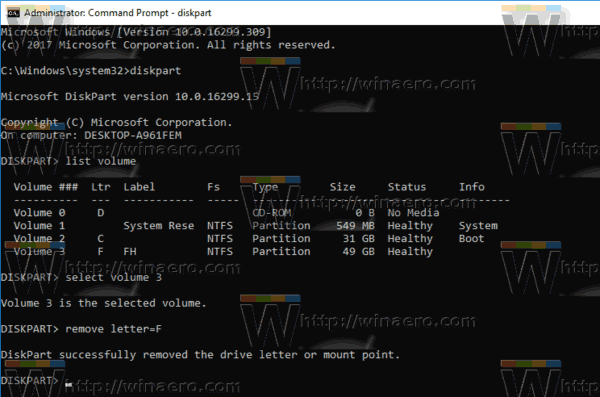
Also, you can type diskpart in Command Prompt to open it. Then type the following commands in diskpart and press Enter after each command to execute.
list volume (this command can list the partition information of your disk; you need to confirm the drive letter of the volume which you want to remove its drive letter)
select volume * (* represents the volume number that you want to select. For example, I type select volume 4 to make changes to it)
remove letter= * (* represents the letter of the selected volume)
exit

Step 3. After exiting the Command Prompt, you can go to File Explorer to view the change. You will find that the partition is not shown in File Explorer and you can’t open and explore the data stored in this partition.
If you want to restore the drive letter, you can repeat above steps and type assign letter=* instead or give letter in Disk Management.
Method 4. Use PowerShell
Besides, you can refer to the following steps to remove the drive letter via PowerShell.
Step 1. Right-click the Windows icon and select Windows PowerShell (Admin) to run PowerShell as administrator.
Step 2. In the pop-up window, type the following commands to remove the drive letter. Remember to press the Enter key after each command to execute.
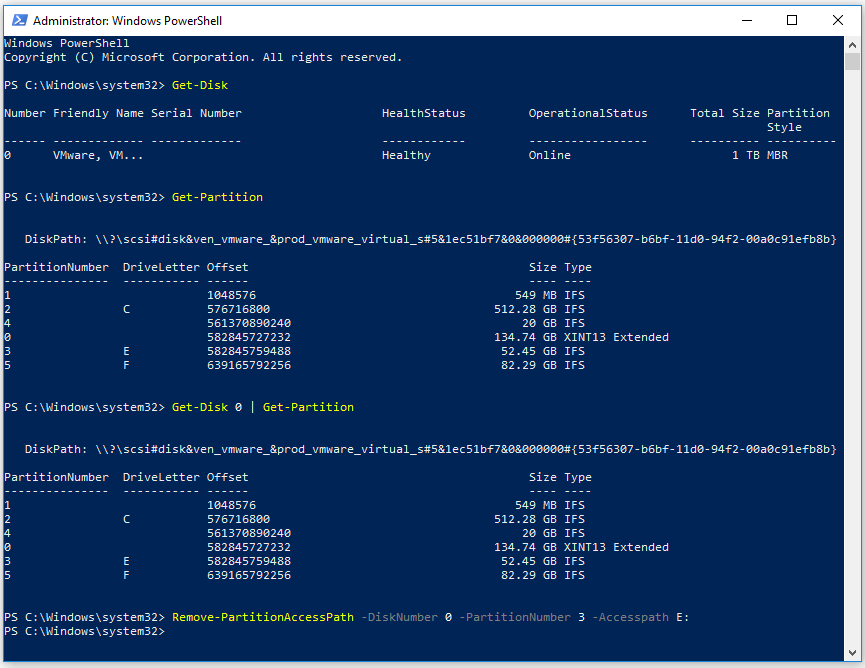
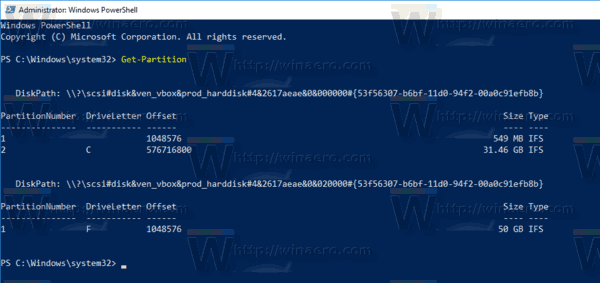
Get-Disk (you can see the list of your drives)
Get-Partition (you can see the list of your partitions)
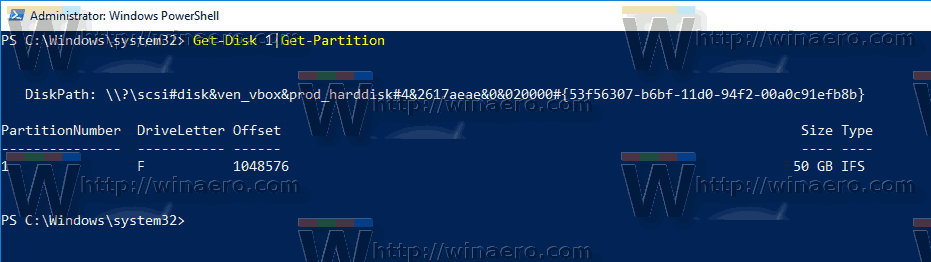
Get-Disk <disk number> | Get-Partition (substitute <disk number> with the actual disk number that you want to select. Ensure the selected disk contains the partition that you want to remove its drive letter)
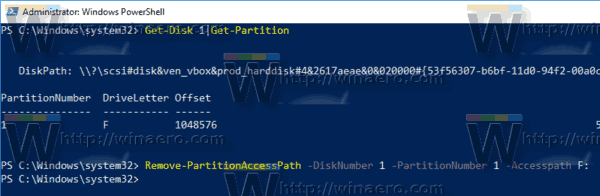
Remove-PartitionAccessPath -DiskNumber <disk number> -PartitionNumber <partition number> -Accesspath <drive letter> (you can check the disk number, partition number and drive letter in above commands.)
Tips:
You must type the correct command into the window. For example, I type Remove-PartitionAccessPath -DiskNumber 0 -PartitionNumber 3 -Accesspath E: to remove the drive letter E from the partition on disk 0.
Step 3. Exit the PowerShell and you can view the change in File Explorer and Disk Management.
Method 5. Use MiniTool Partition Wizard
In addition to above methods, I highly recommend using a professional partition manager – MiniTool Partition Wizard to hide the drive letter. As a multifunctional tool, MiniTool Partition Wizard can help you manage your disks and partitions safely and conveniently.
MiniTool Partition Wizard has a number of useful functions. For instance, it can help you rename the partition flexibly. Besides, if you want to recover lost or deleted data in the partition, you can use the Data Recovery function of MiniTool Partition Wizard.
What’s more, its Change Letter function can help you remove the drive letter or change the drive letter for free. After removing the drive letter in MiniTool Partition Wizard, you can still explore the files and folders in the partition and make more changes to the partition.
Now I will show you the specific steps to hide the drive letter by using MiniTool Partition Wizard.
Step 1. Download MiniTool Partition Wizard, install and launch it to get its main interface.
MiniTool Partition Wizard FreeClick to Download100%Clean & Safe
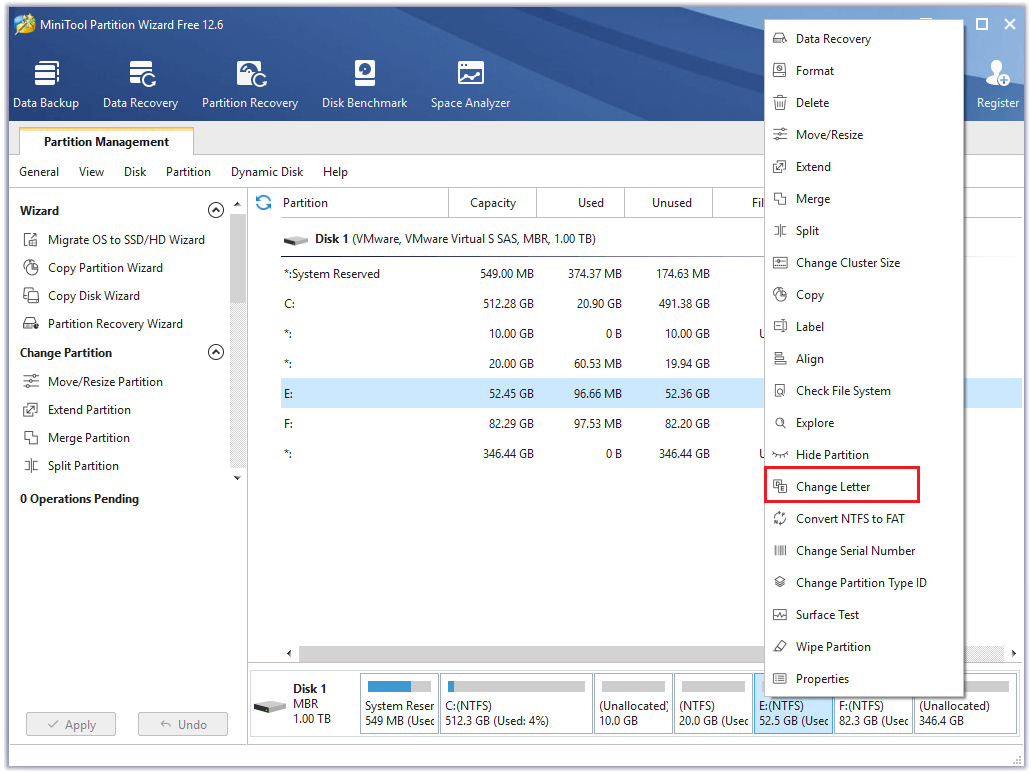
Step 2. Choose the partition of which you want to remove its letter, then right-click it and select the Change Letter function.
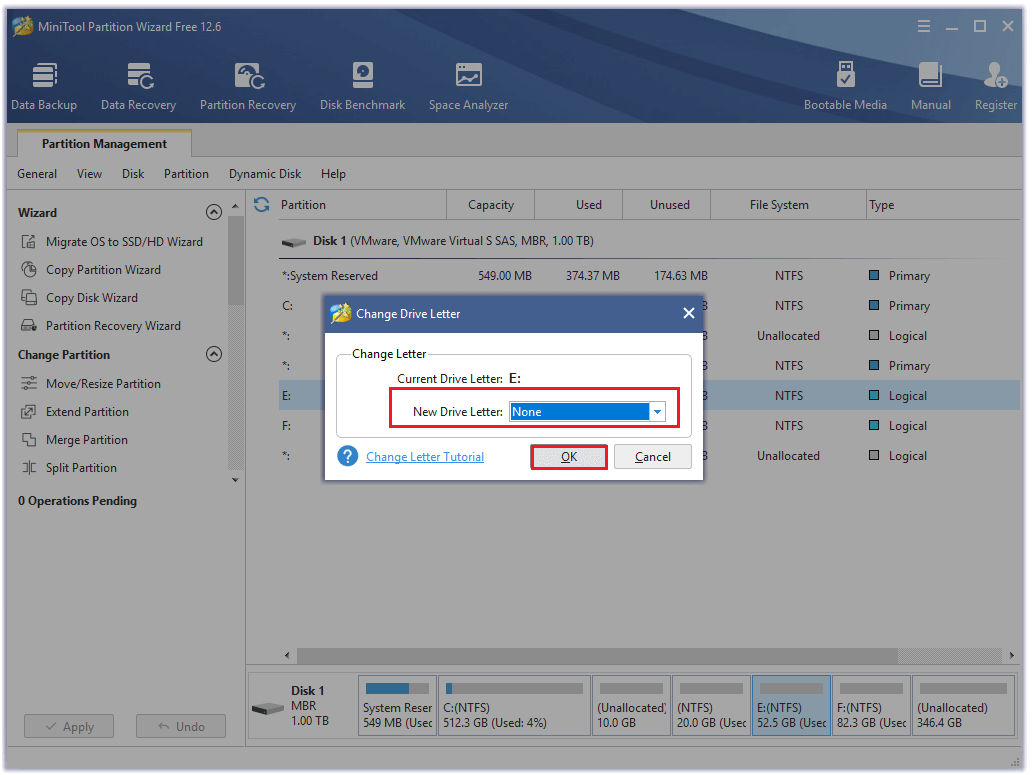
Step 3. In the pop-up window, select None as New Drive Letter. Then click OK.
Step 4. Click the Apply button to apply the changes. After removing the drive letter, you can right-click the partition of which the letter is removed and select Explore to view the data stored in it.
How to Hide a Partition
If your aim of removing the drive letter is to hide the partition and prevent the date stored on it from viewing and modifying, it’s more recommended to use the Hide Partition function of MiniTool Partition Wizard.
After hiding the partition, the partition cannot be viewed and modified except for deletion. Thus, it’s safer and more convenient than removing the drive letter to hide the partition. You can refer to the following steps to hide the partition.
Step 1. Download MiniTool Partition Wizard Free Edition, install and launch it to get its main interface.
MiniTool Partition Wizard FreeClick to Download100%Clean & Safe
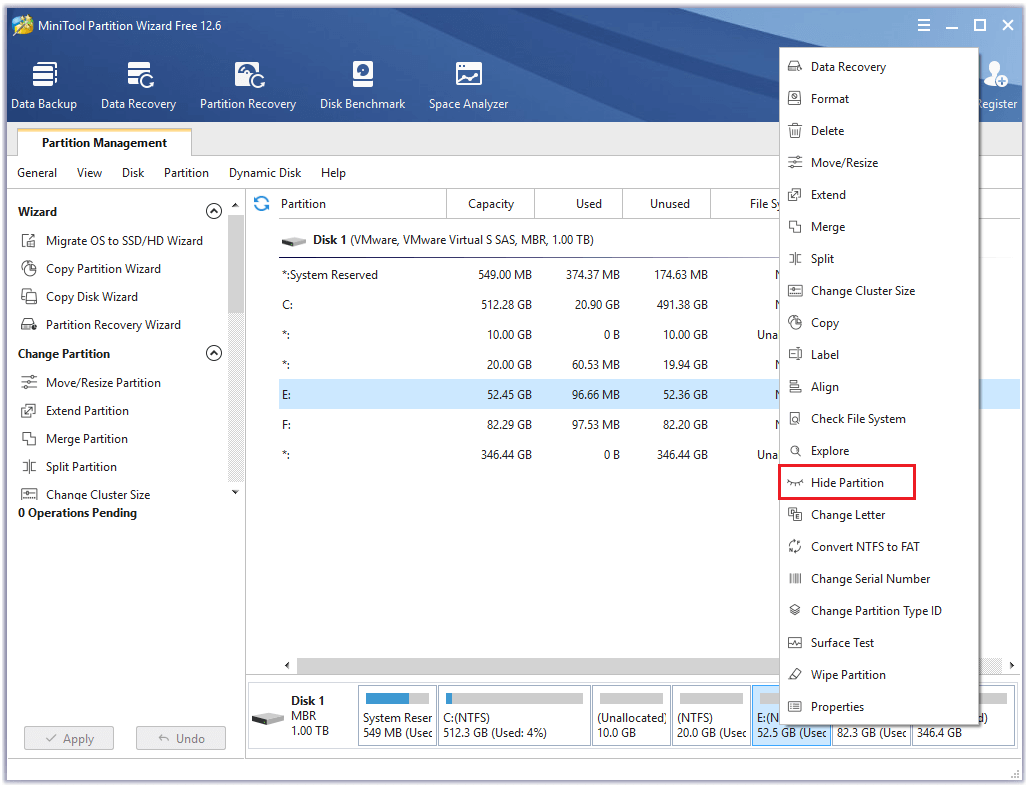
Step 2. Right-click the partition that you want to hide and select the Hide Partition function.
Step 3. Then click the Apply button. Click Yes in the pop-up window and wait for a while until the process ends up. If you want to hide more partitions, you can repeat above steps.
After hiding the partition, you can check it in Disk Management. The only operation you can do is to Delete Volume. If you want to unhide the partition, you can right-click the hidden partition and select the Unhide Partition function.
Wrapping Things Up
In this post, you have learned the ways to remove the drive letter and hide the partition on computer. For instance, you can use File Explorer, Disk Management, Command Prompt and PowerShell to help remove the drove letter. Remember doing these just hide the drive letter but doesn’t hide the partition.
MiniTool Partition Wizard is a better choice to remove the drive letter and hide the partition. In addition, there are a number of functions provided in MiniTool Partition Wizard to help you manage your disk and partitions.
If you have any issues using MiniTool Partition Wizard, just feel free to contact us via [email protected] or leave us a message.
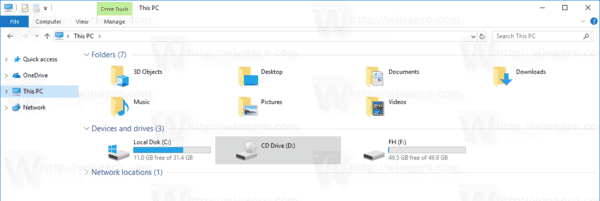
Windows 10 assigns an available drive letter to a new drive connected to the computer. The operating system goes through the alphabet from A to Z to find the first available letter to assign it to various drives. It is possible to remove a drive letter assigned by the OS.
Historically, Windows reserves the drive letters A and B for floppy drives. Modern Windows versions assign the letter C to the system partition on which Windows is installed. Even in a dual-boot configuration, Windows 10 displays its own system partition as C:.
Removing a drive letter can be very useful for a number of situations. For example, you can quickly hide the drive from all apps. While Windows offers a Group Policy tweak to hide a drive, it will affect the File Explorer app only. Alternative file manager apps like FAR, Total Commander, etc will show the drive regardless of the options mentioned in the article:
How To Hide a Drive in Windows 10 File Explorer
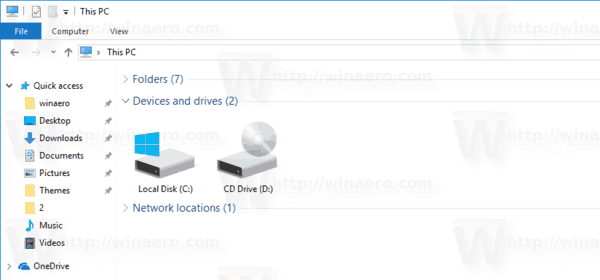
However, if you remove a drive letter, the drive will become hidden from all apps installed on your computer. You can use this trick to quickly hide the presence of a drive or to prevent other apps from writing to a drive or partition and modifying the data stored there.
In Windows 10, there are a number of methods you can use to remove drive letters. This can be done with Disk Management, diskpart, and PowerShell. Let’s review these methods.
To remove a drive letter in Windows 10, do the following.
- Press the Win + X keys together.
- In the menu, select Disk Management.
- In Disk Management, right-click on the partition whose drive letter you would like to change. Select Change Drive Letter and Paths in the context menu.
- In the next dialog, click on the Remove… button.
- Confirm the operation.
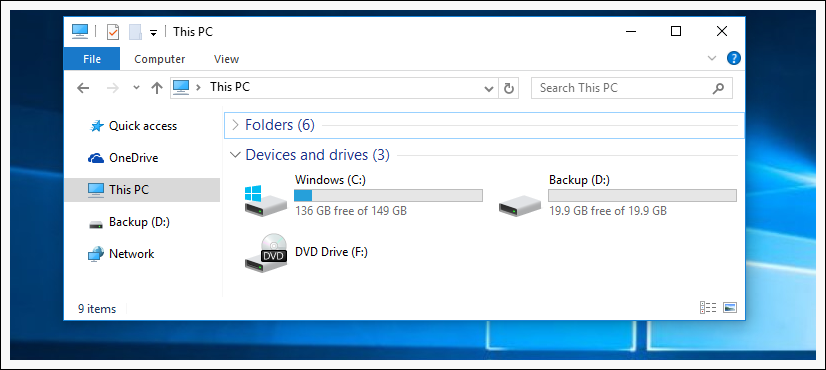
You are done. The drive will disappear in File Explorer. The removed letter can now be assigned to another drive.
Before
After
Change the drive letter in the command prompt
- Open an elevated command prompt.
- Type
diskpart. - Type
list volumeto see all drives and their partitions.
- Look at the ### column in the output. You need to use its value with the command
select volume NUMBER. Substitute the NUMBER portion with the actual partition number for which you want to change the drive letter.
- Type the command
remove letter=Xto remove the drive letter. Substitute the X portion with the appropriate letter.
You are done. You can close the Diskpart window.
Change the drive letter in PowerShell
- Open an elevated PowerShell instance.
- Type
Get-Diskto see the list of your drives.
- Type
Get-Partitionto see the list of your partitions.
- Note the disk number and the drive letter you want to remove and type the next command:
Get-Disk YOUR_DISK_NUMBER|Get-Partition
Ensure that the disk under the disk number contains the partition for which you want to remove the letter. In my case, I type
Get-Disk 1|Get-Partition
- Finally, type the following command:
Remove-PartitionAccessPath -DiskNumber YOUR_DISK_NUMBER -PartitionNumber YOUR_PARTITION_NUMBER -Accesspath CURRENT_DRIVE_LETTER:

This will remove the specified drive letter for the partition. In my case, the command looks as follows: Remove-PartitionAccessPath -DiskNumber 1 -PartitionNumber 1 -Accesspath F:.
That’s it!
Support us
Winaero greatly relies on your support. You can help the site keep bringing you interesting and useful content and software by using these options:
If you like this article, please share it using the buttons below. It won’t take a lot from you, but it will help us grow. Thanks for your support!
Sign in to your How-To Geek account
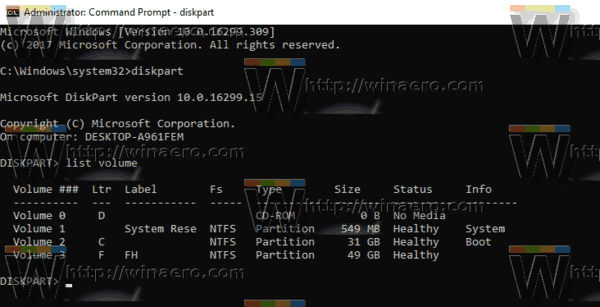
The Disk Management tool in Windows gives you an easy-to-use graphical interface to dealing with partitions and drive letters, but what if you want to just quickly change a drive letter on the command prompt? The diskpart utility makes it easy.
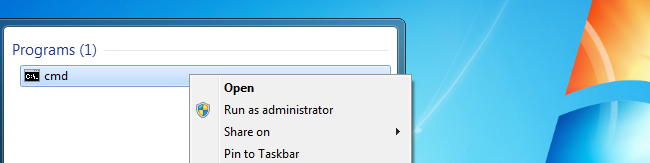
You’ll need to start by opening an administrator mode command prompt — type cmd into the search box, and then right-click and choose Run as administrator, or use the CTRL + SHIFT + ENTER keyboard shortcut.
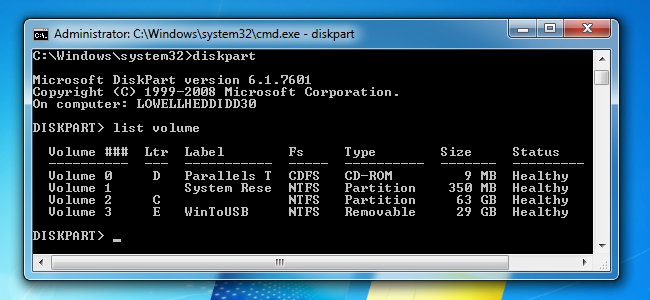
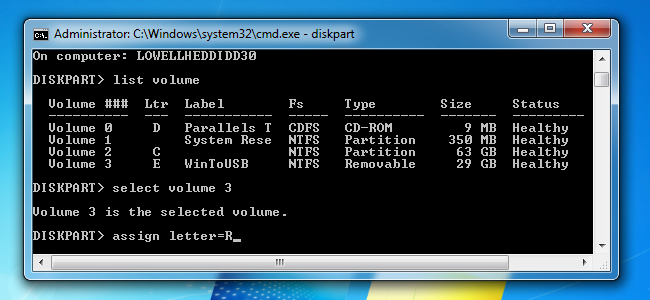
Once there, run the diskpart command, and then type in the following to list out the volumes on your system.
list volume
You’ll want to note the volume number next to the drive that you want to change the letter of. In our case, that number is 3.
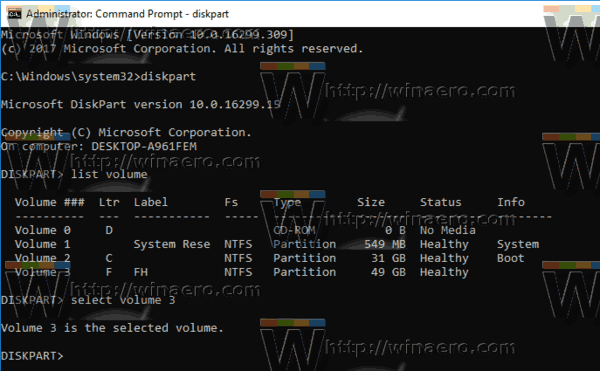
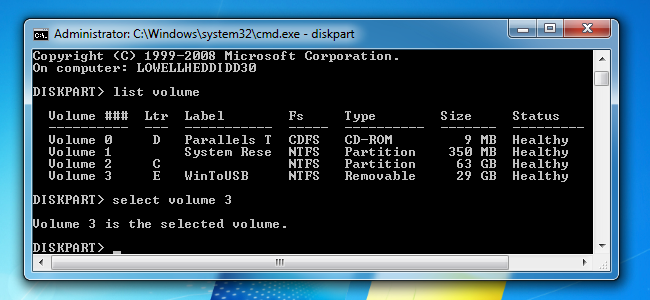
Now we’ll use the select volume command to tell diskpart to make changes to that volume. If your drive number is different, you’ll want to replace the 3 with the number in your configuration.
select volume 3
You should see a message that the volume is now selected.
At this point you can easily assign a new drive letter. Just type in this command, substituting R for the drive letter you’d like to use:
assign letter=R
Make sure to hit enter once you’re done, of course.
Once you’ve made that change, your drive should show up again as a new device, and be available for browsing immediately.
If you want to unassign a drive letter in order to hide the drive, you can also use the remove letter command in the same way. We wouldn’t necessarily advise doing this, of course.
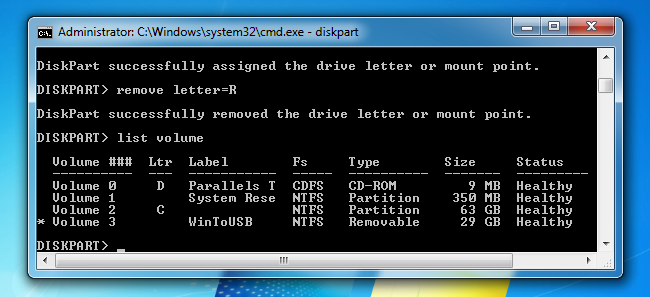
Don’t bother trying to change your C: drive, because that’s not going to work.
Diskpart is very powerful Windows Utility, which allows certain number of operation with hard disk.
In this article we will show you how to assign, change or remove drive letter with Diskpart using.
You bought hard drive for Backup, but it has automaticaly gained letter D. You want to change it to E.
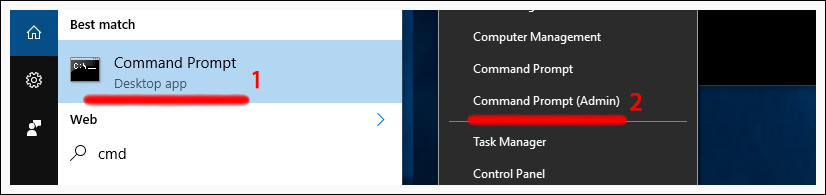
First we need to open Command Prompt with Administrator Rights.
Type cmd into the search box, and then right-click and choose Run as administrator. If you have Windows 10 use the CTRL + SHIFT + ENTER keyboard shortcut on Screen 1, or click on Start with right click and choose Command Prompt (Admin) on Screen 2.
When Command Prompt pops up, run the diskpart command.
Now we type list volume to list our volumes, we need to know the number of our volume.
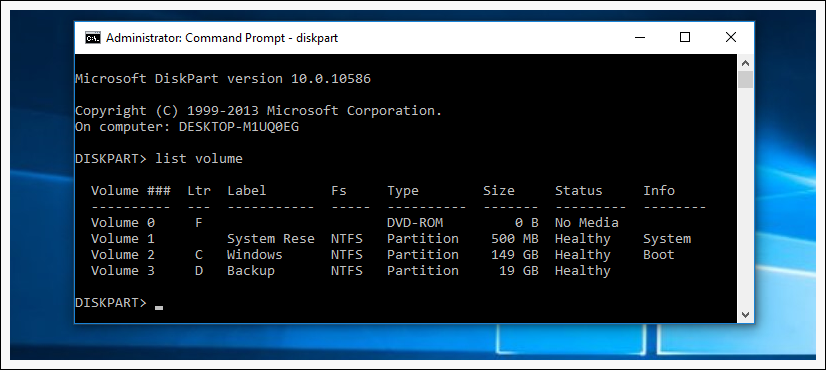
In our case our hard drive is Volume 3 and that number is 3.
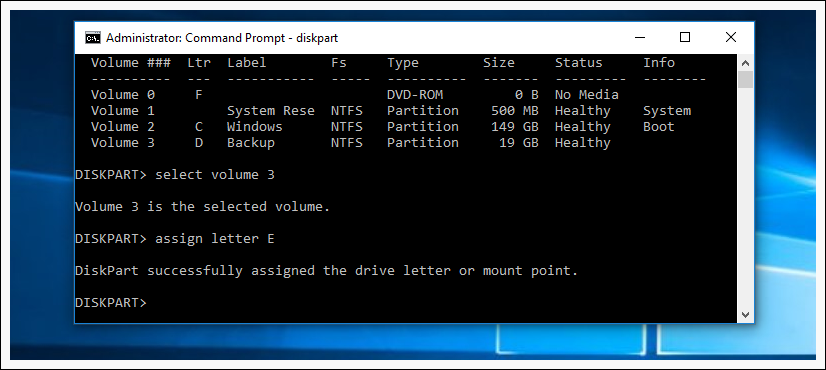
Now we use command select volume 3 to make changes to that volume. If your volume number is different, you need to replace number 3 with the number from your volume. After we have selected our volume we use command assign letter E, to assing letter E to our volume.
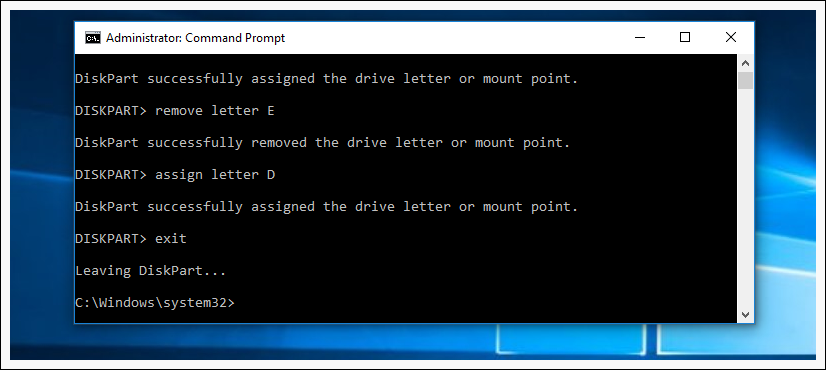
Now you know how to change or assign another letter to your volume, also if you need you can remove volume letter with command remove letter E

For security reasons you cannot change or remove your current system disk letter (esp C), it will not work.
To exit diskpart type in exit.
HowTos, HowTos: Windows, Know how: Windows, KnowHow
Tags: assign letter, change letter, diskpart, drive letter, remove letter
Loading…