
When solid-state drives (SSDs) first went mainstream in the PC market, they offered a significant improvement in performance over legacy hard disk drives (HDDs). Over the years, they have become the default choice for primary storage on consumer laptops and desktops, so we all enjoy the benefits of fast transfer speeds and silent operation.
However, as with nearly all the major components inside our computers, there are ways to ensure you’re getting optimal SSD performance and the fastest load speeds overall. Here are our favorites.
Adjust Your Power Plan
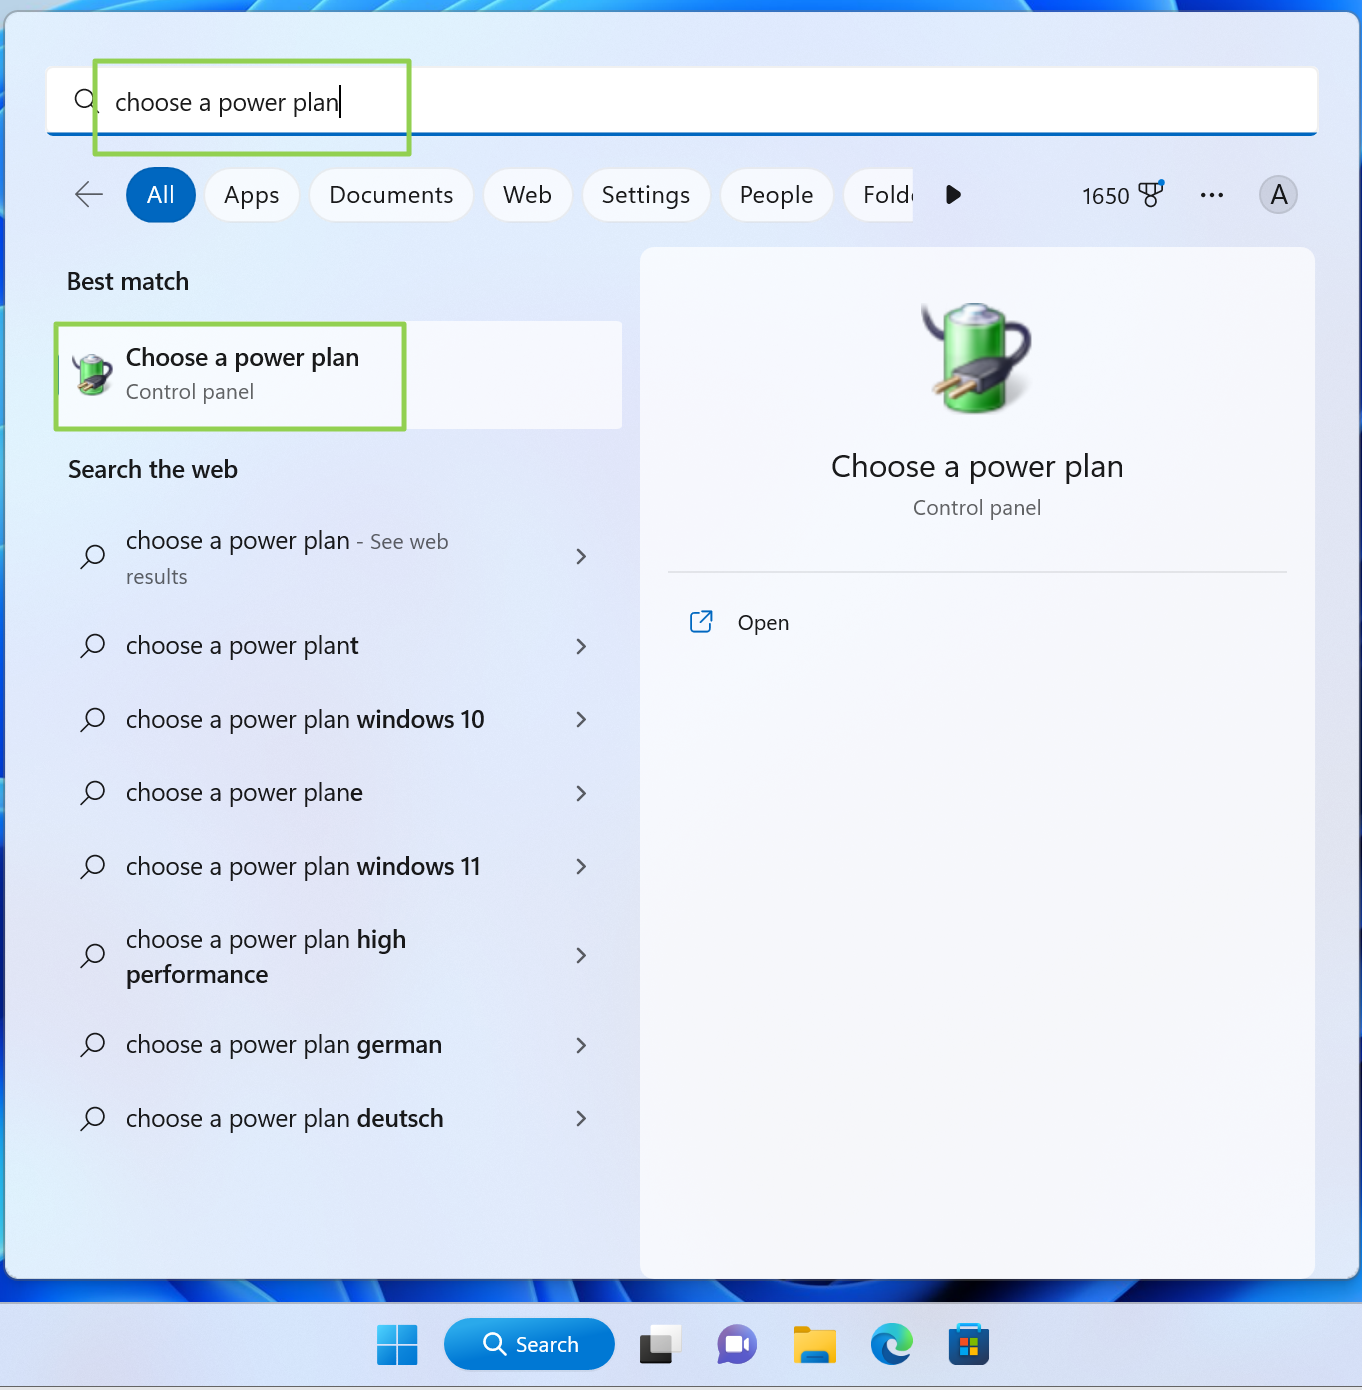
1. Type «Choose a power plan» into the search box and click the top result.
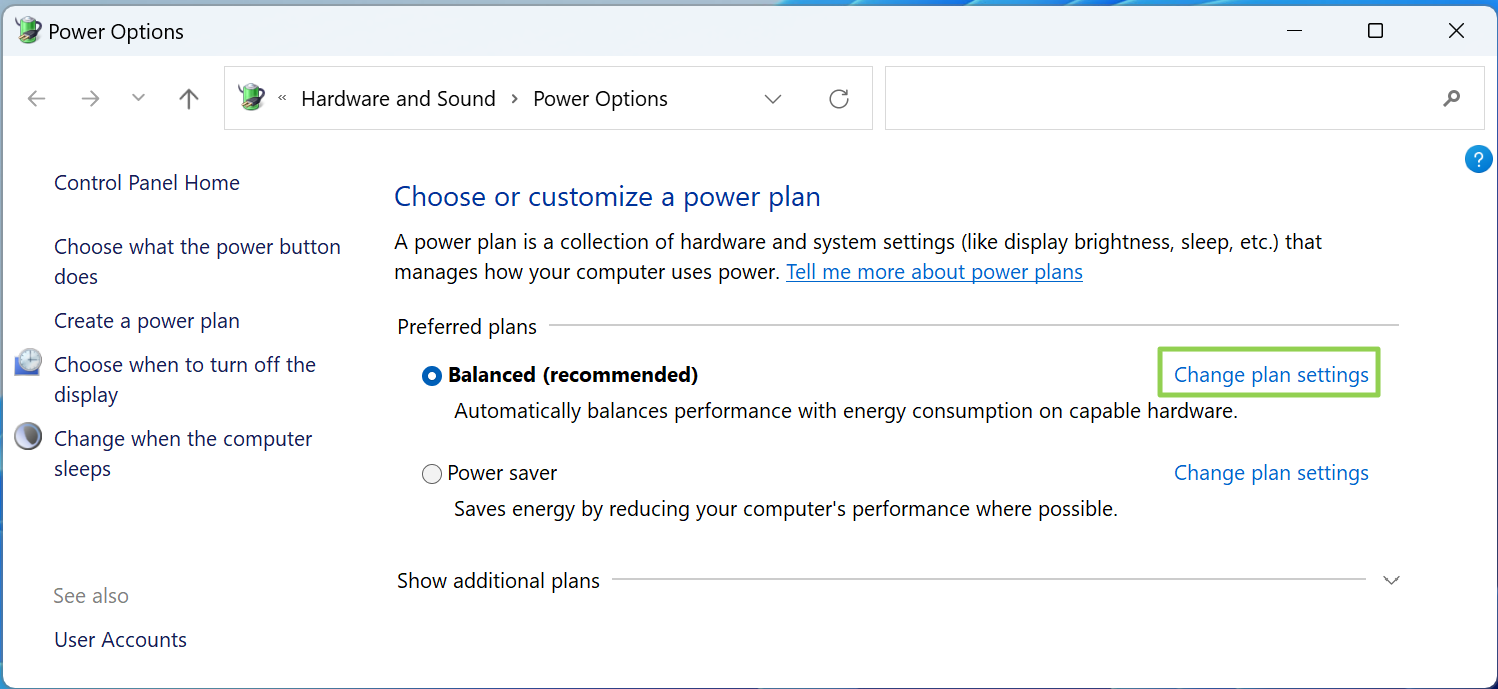
2. Click «Change plan settings» beside your chosen power plan.
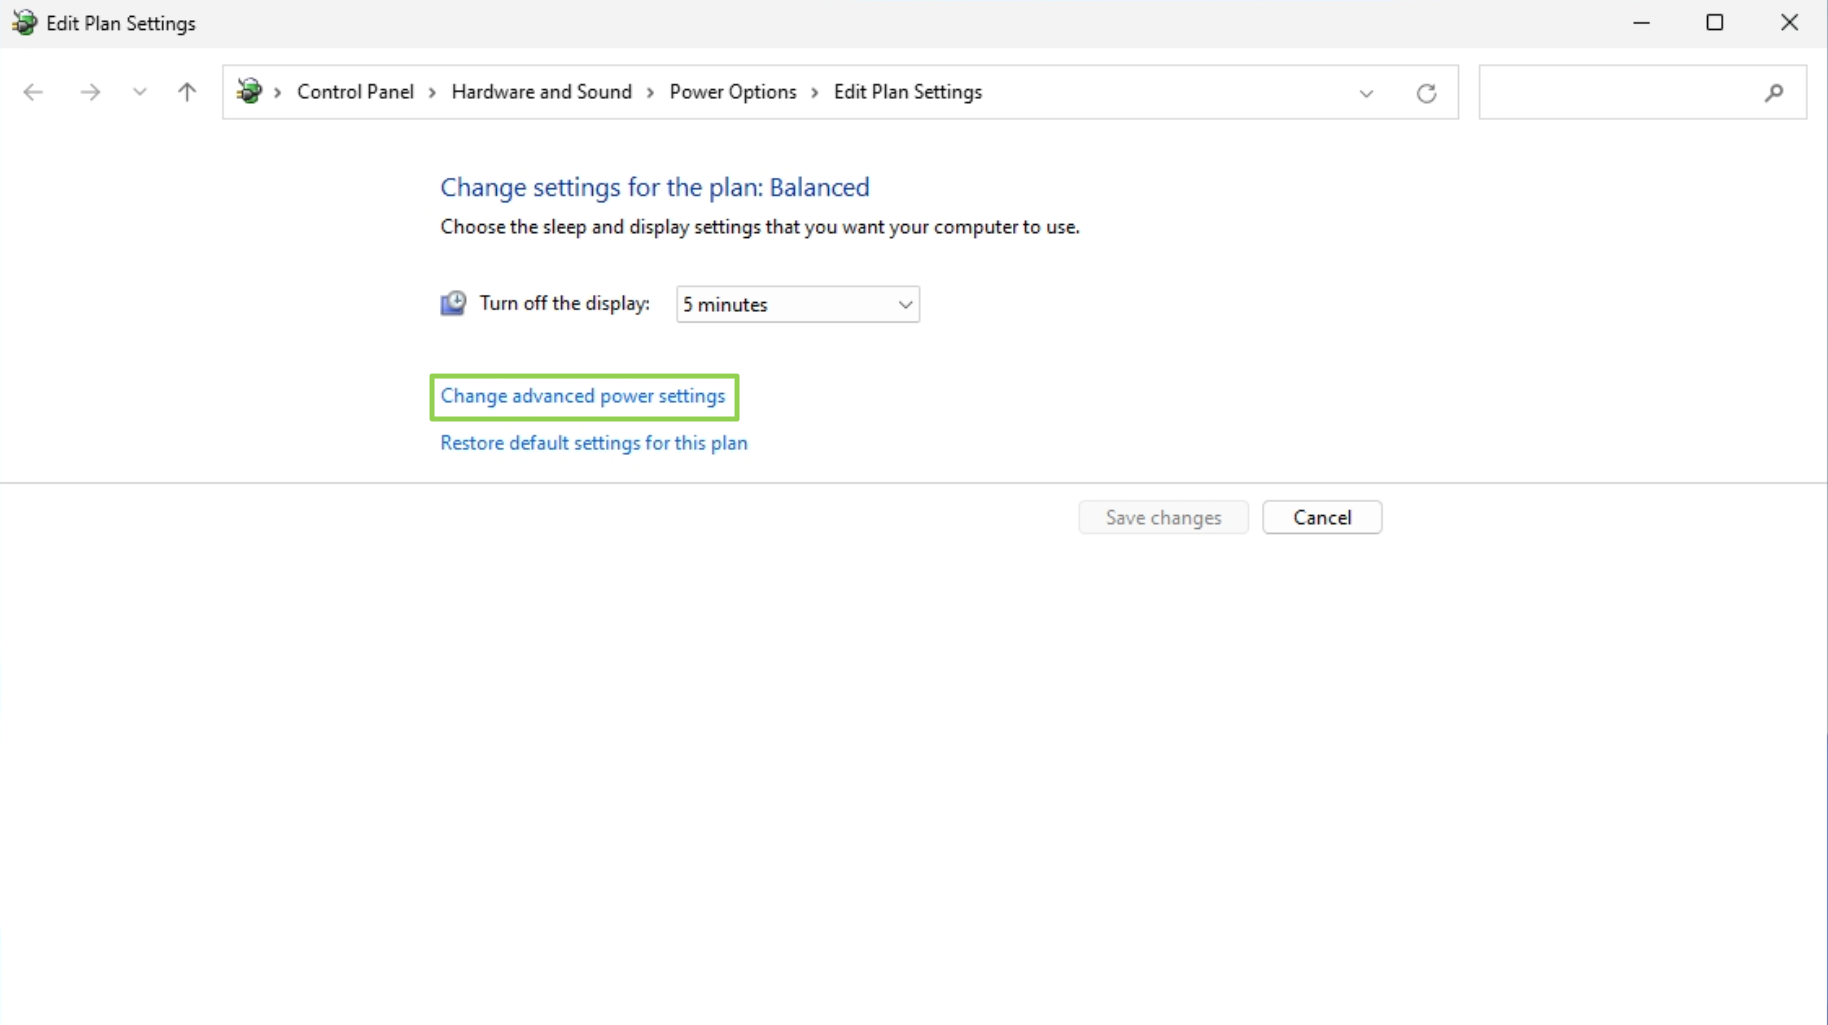
3. Click «Change advanced power settings»
4. Set «Turn hard disk after» to zero.
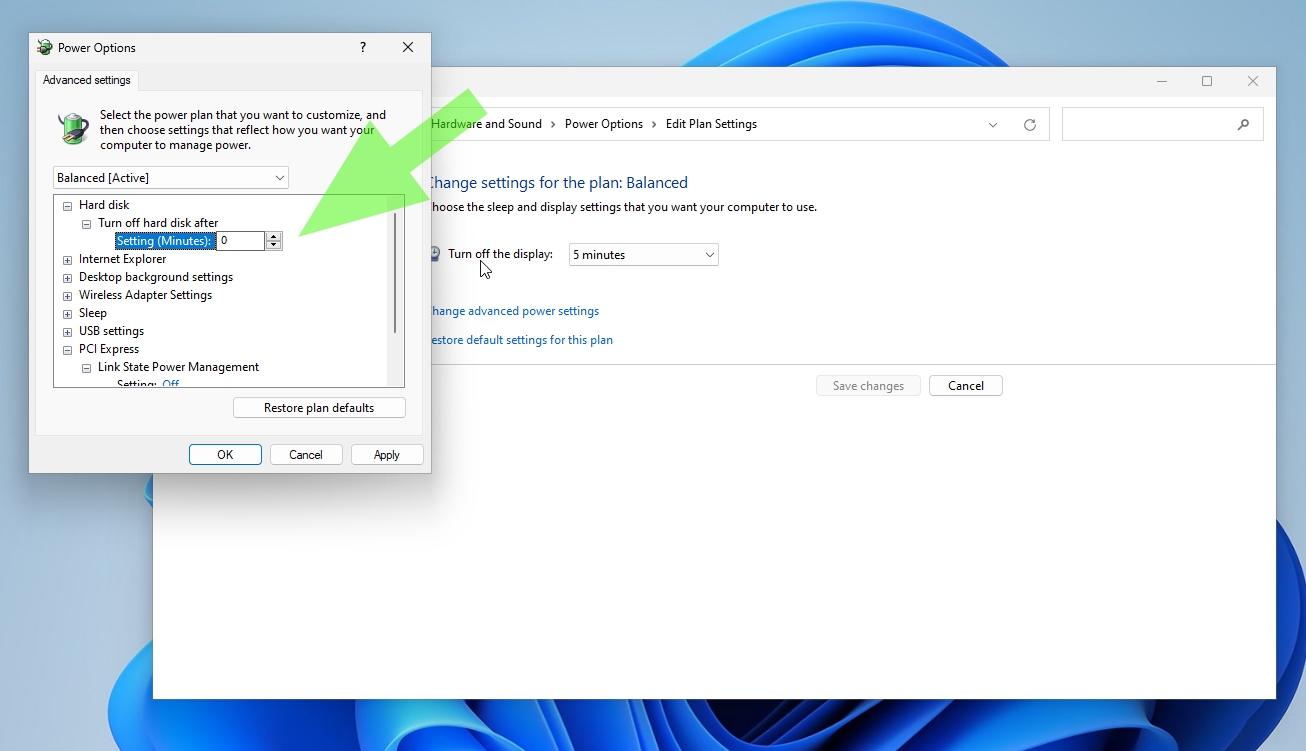
This setting prevents your SSD from going to sleep, which saves you from having to wait an extra second or two for it to wake up.
Get Tom’s Hardware’s best news and in-depth reviews, straight to your inbox.
5. Change the setting from «Maximum power savings to «Off» under PCI Express and Link State Power Management.
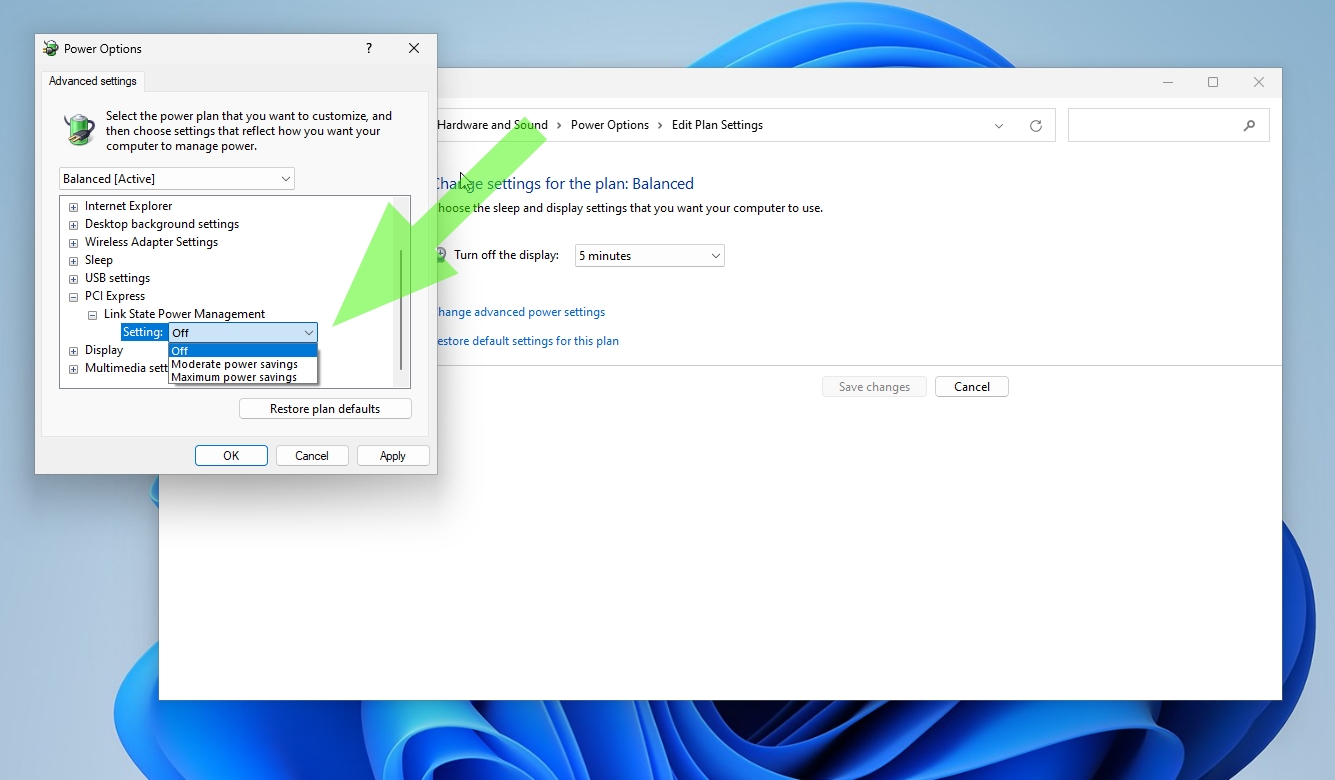
This setting will prevent the PCIe bus from downclocking, which robs a bit of performance from your SSD. The PC consumes more power when the setting is off but it minimizes latency. If you’re a desktop PC user, you’re probably safe turning this setting off and reaping the performance benefits. The «Moderate» setting is likely a good balance between power savings and performance for laptop users.
Enable Write Caching
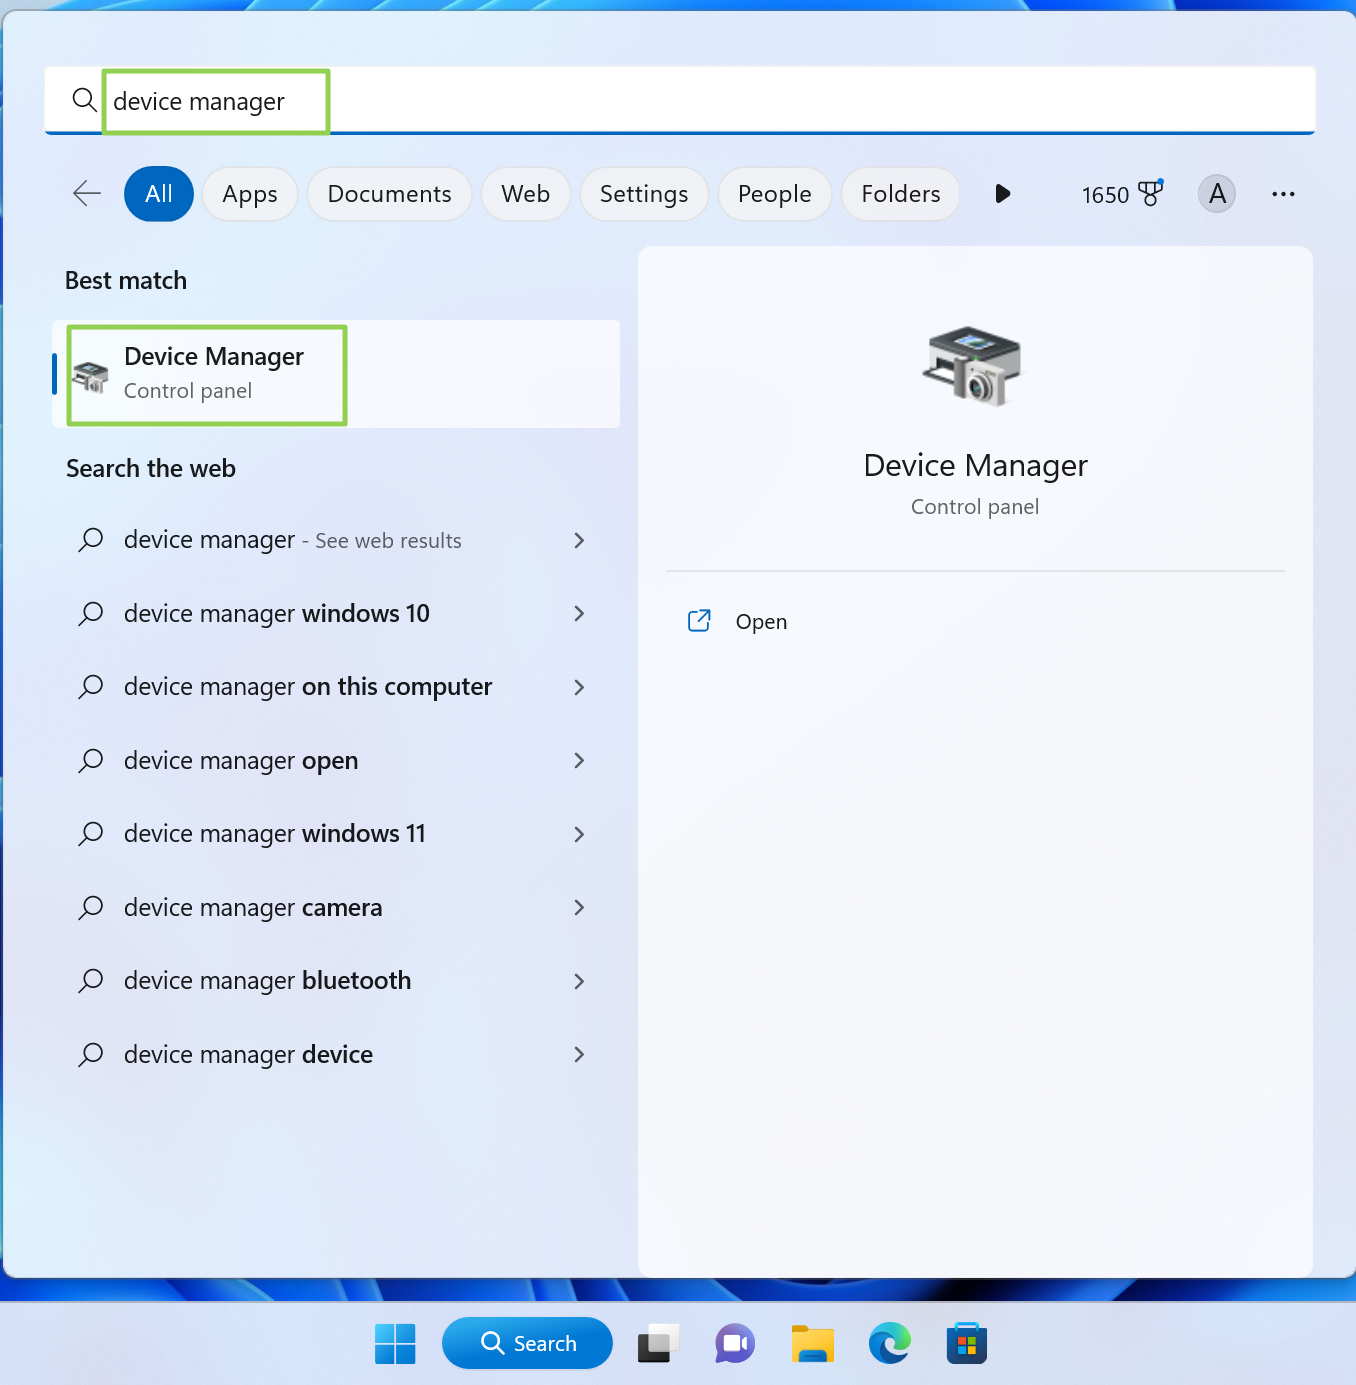
1. Type «Device Manager» into the search box and launch the utility
2. Scroll down to Disk drives, right-click on your SSD, and select Properties.

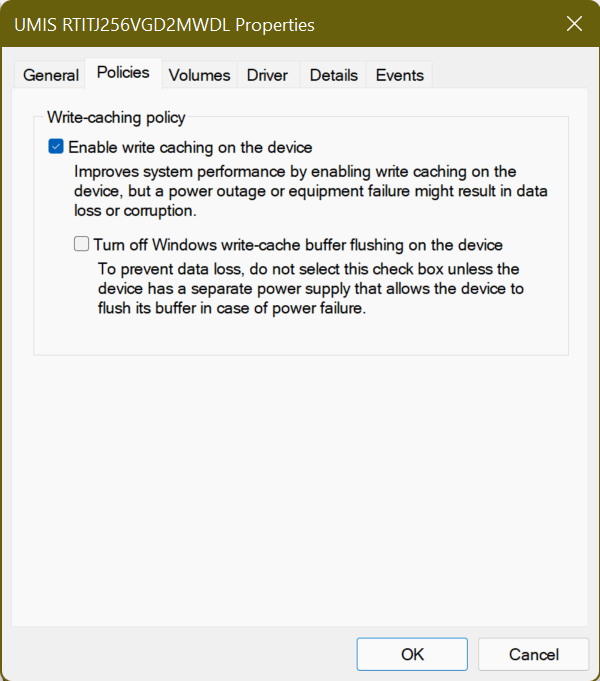
3. Select the «Policies» tab and make sure that write caching is enabled.
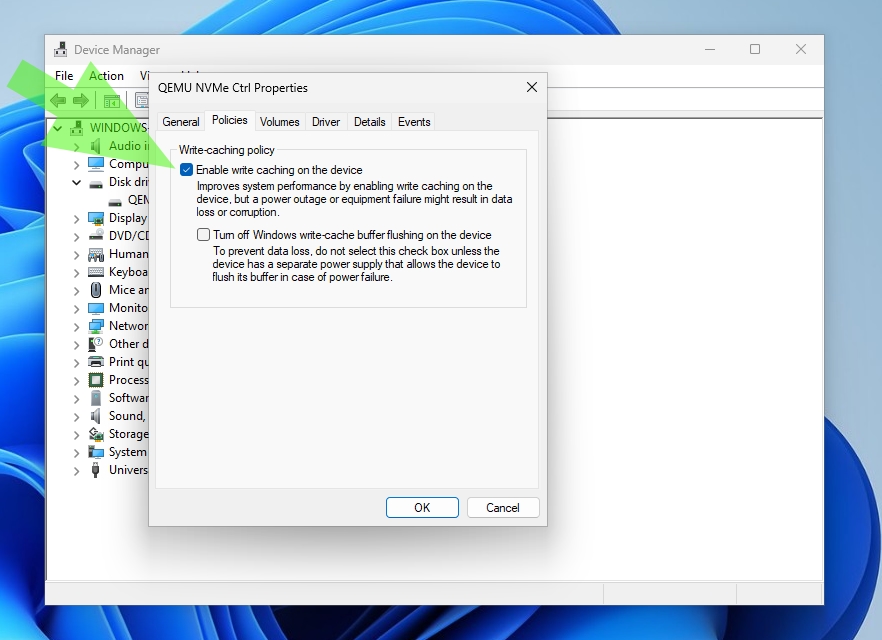
Windows warns that enabling this feature could result in data loss during a power outage, but the speed at which SSDs operate makes this possibility extremely remote. In addition, this warning mainly applies to older, slower HDDs. However, proceed with caution if you are uncomfortable with enabling this feature.
Optimize Your SSD on a Schedule
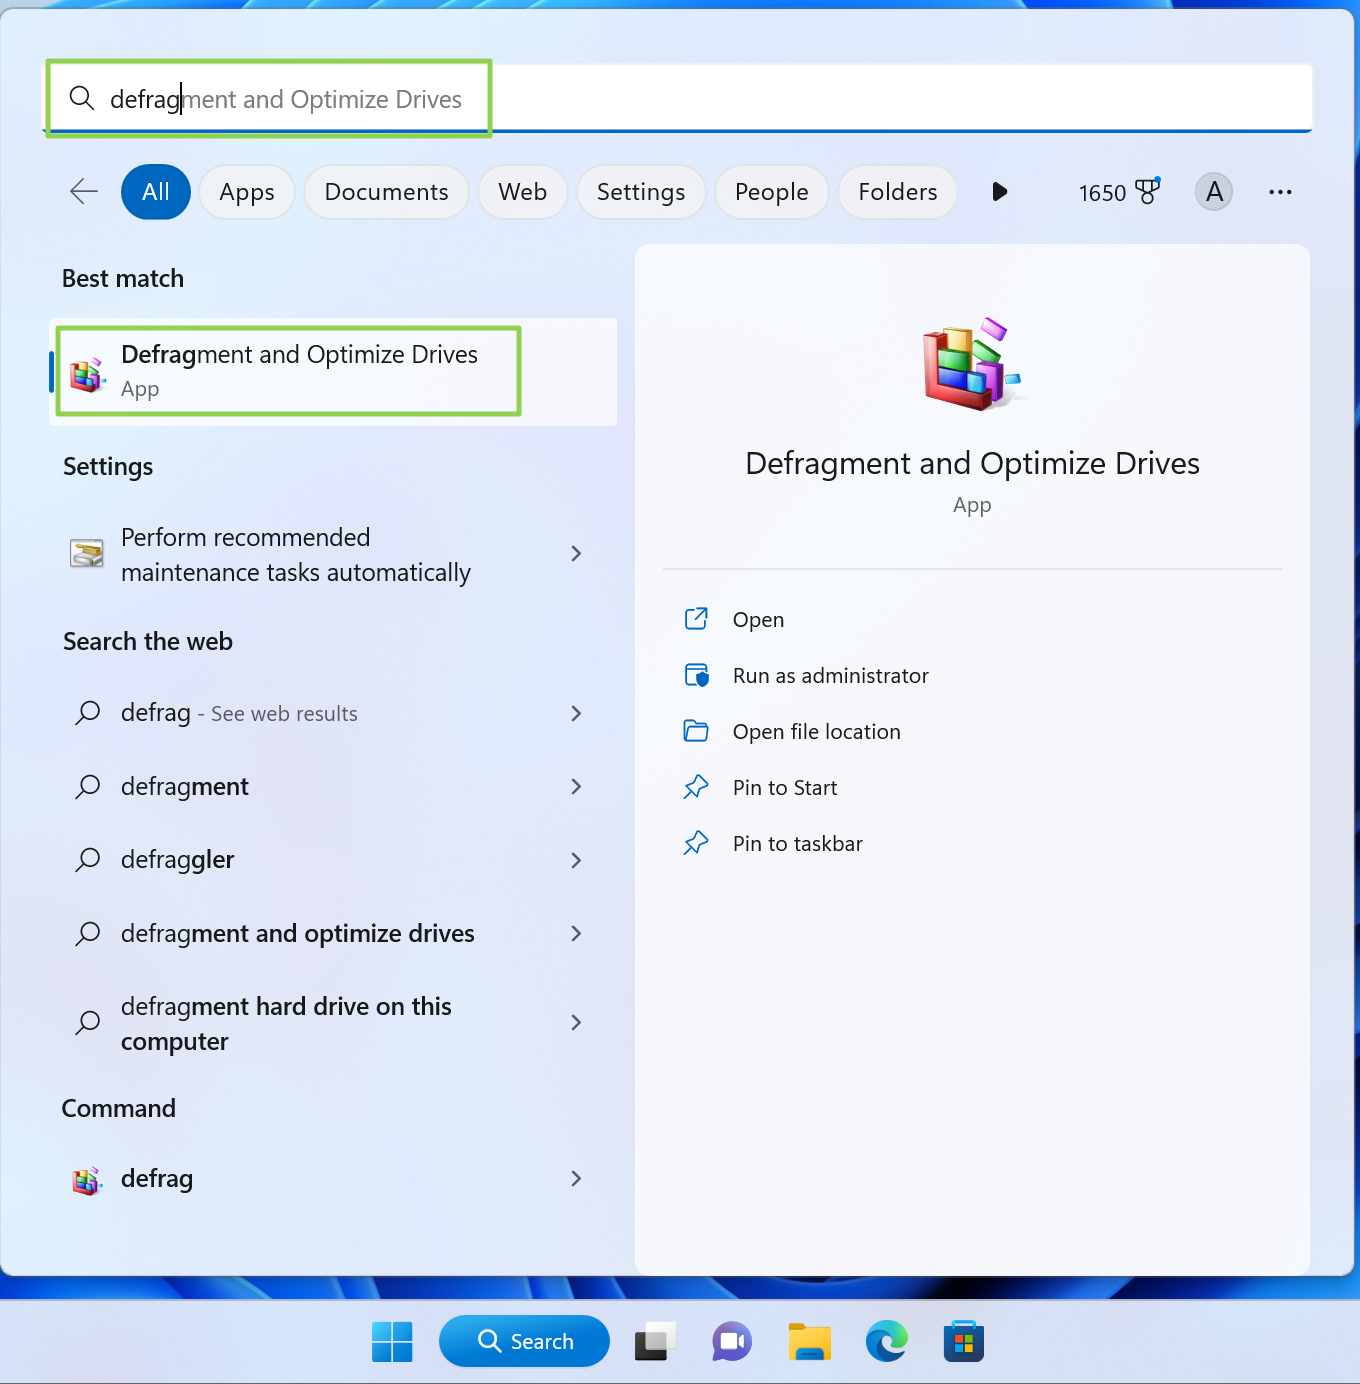
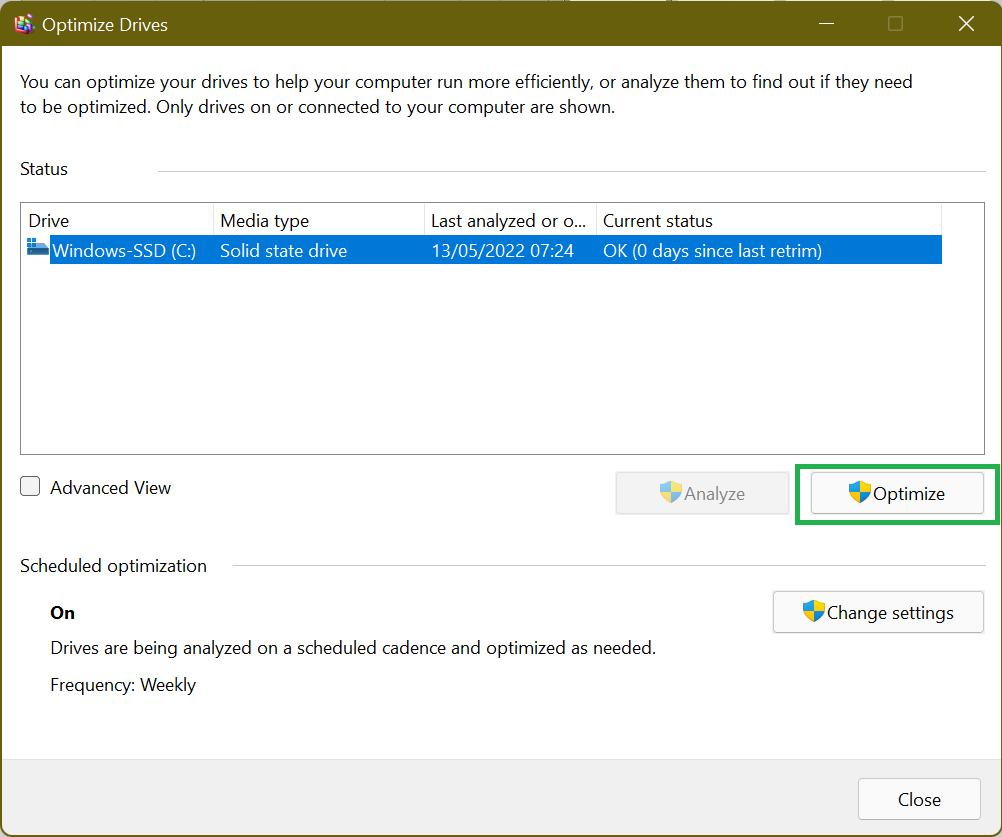
SSDs operate differently than HDDs, as their outright speed makes traditional defragging an unnecessary operation. However, when files are deleted from an SSD, a trim function is necessary to mark those blocks for future use. That’s where the Defragment and Optimize utility comes into play.
1. Search for “Defrag” and click Defragment and Optimize.
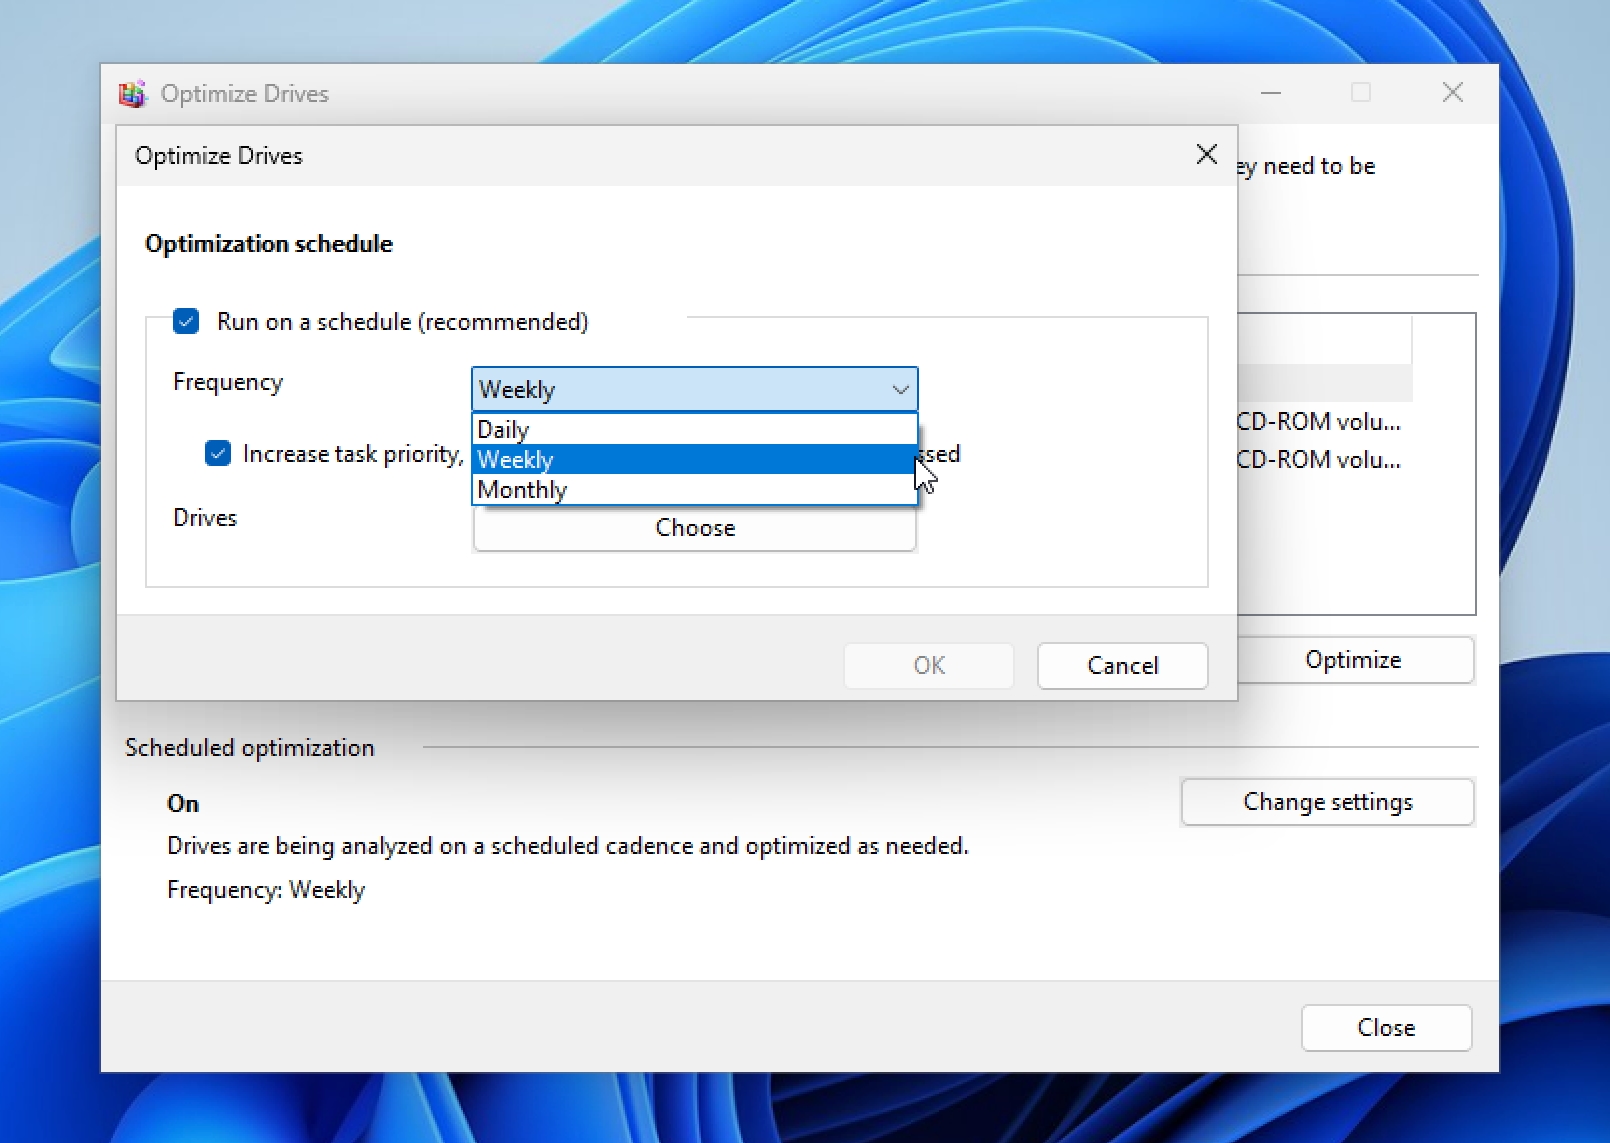
2. Click the Change settings button
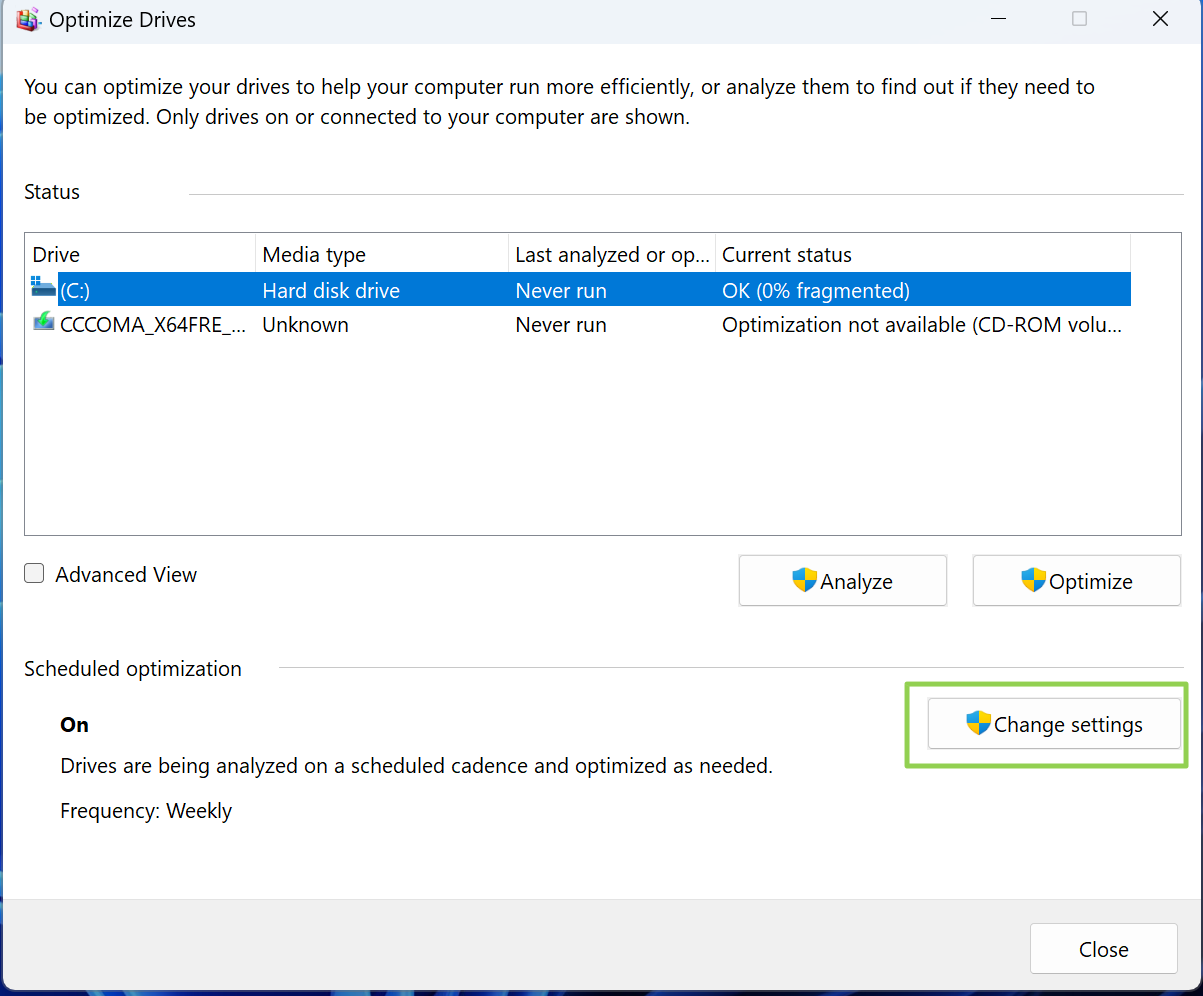
3. Set how often you want Windows 11 to optimize your SSD. By default, Windows 11 chooses “Weekly,” but you can set the utility to optimize daily or (not recommended
When Windows “optimizes” an SSD, it retrims the blocks, informing the drive which areas should be considered empty and ready to write new data to. An SSD that contains many untrimmed blocks can lead to reduced overall performance, making such weekly (or daily) maintenance regimens a good idea.
Disable the Windows Search Indexer
Windows 11 includes the Search Indexer using a process called SearchIndexer.exe running in the background. The Search Indexer is constantly analyzing files and media on your computer so that the results are available nearly instantaneously when you perform a search. However, this process also consumes CPU and RAM cycles, which is unnecessary when your SSD is fast enough to find the files without an index.
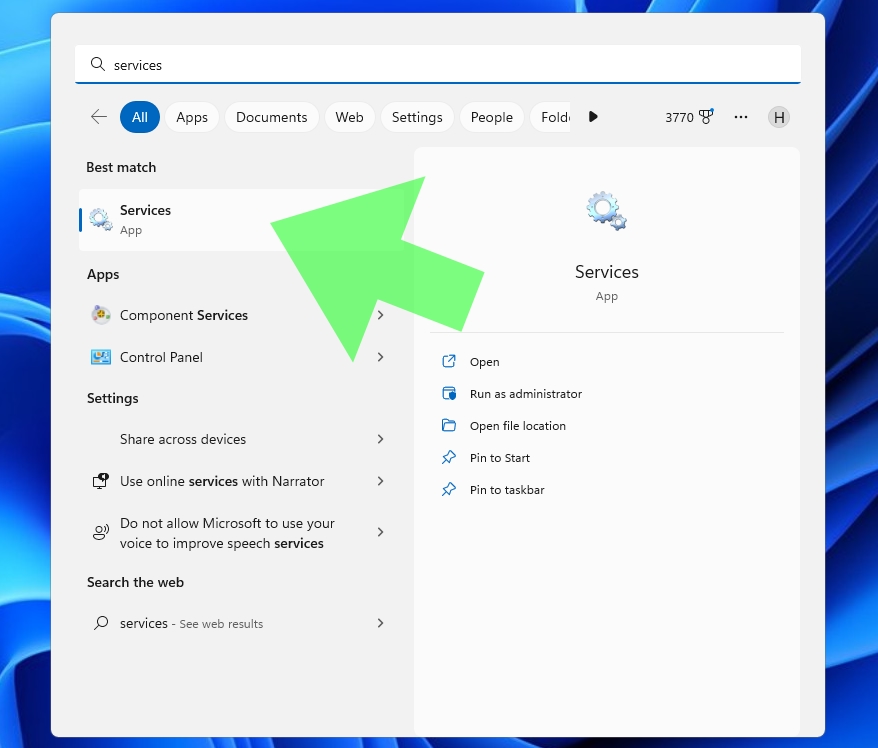
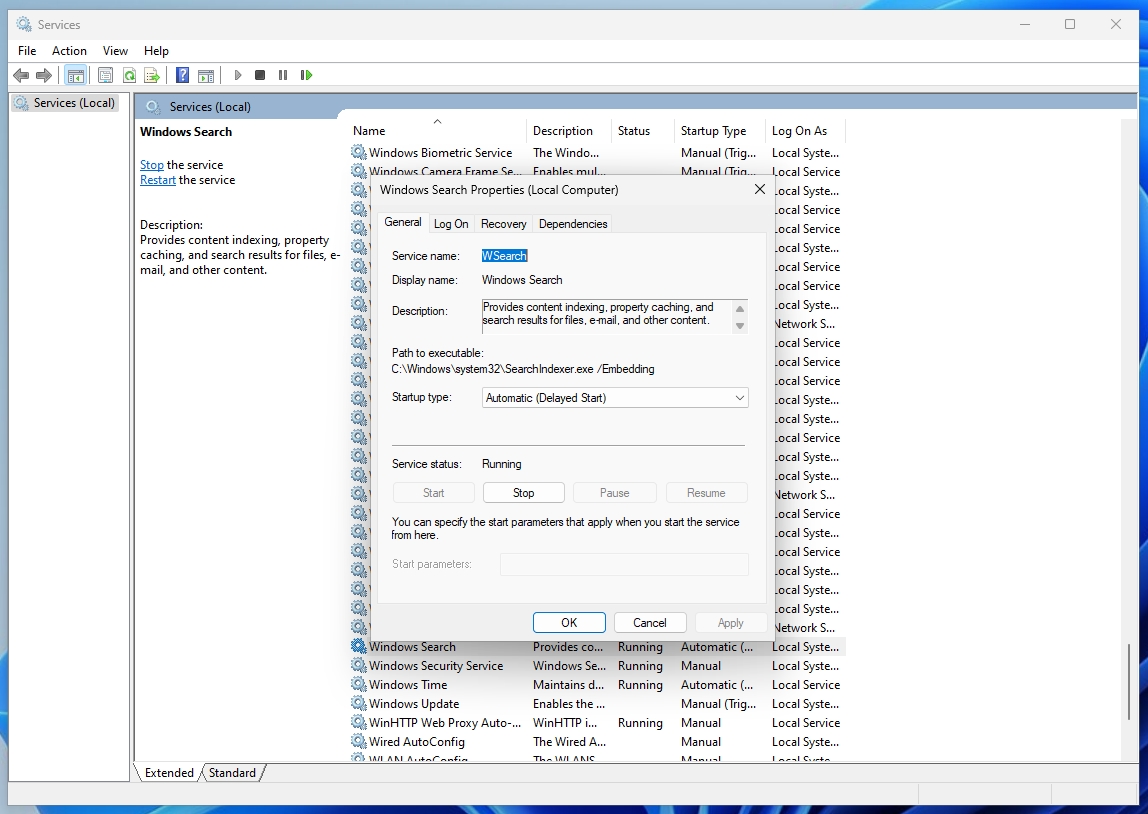
1. Search for “services” to bring up the Services app.
2. Double click on the Windows Search service to open it.
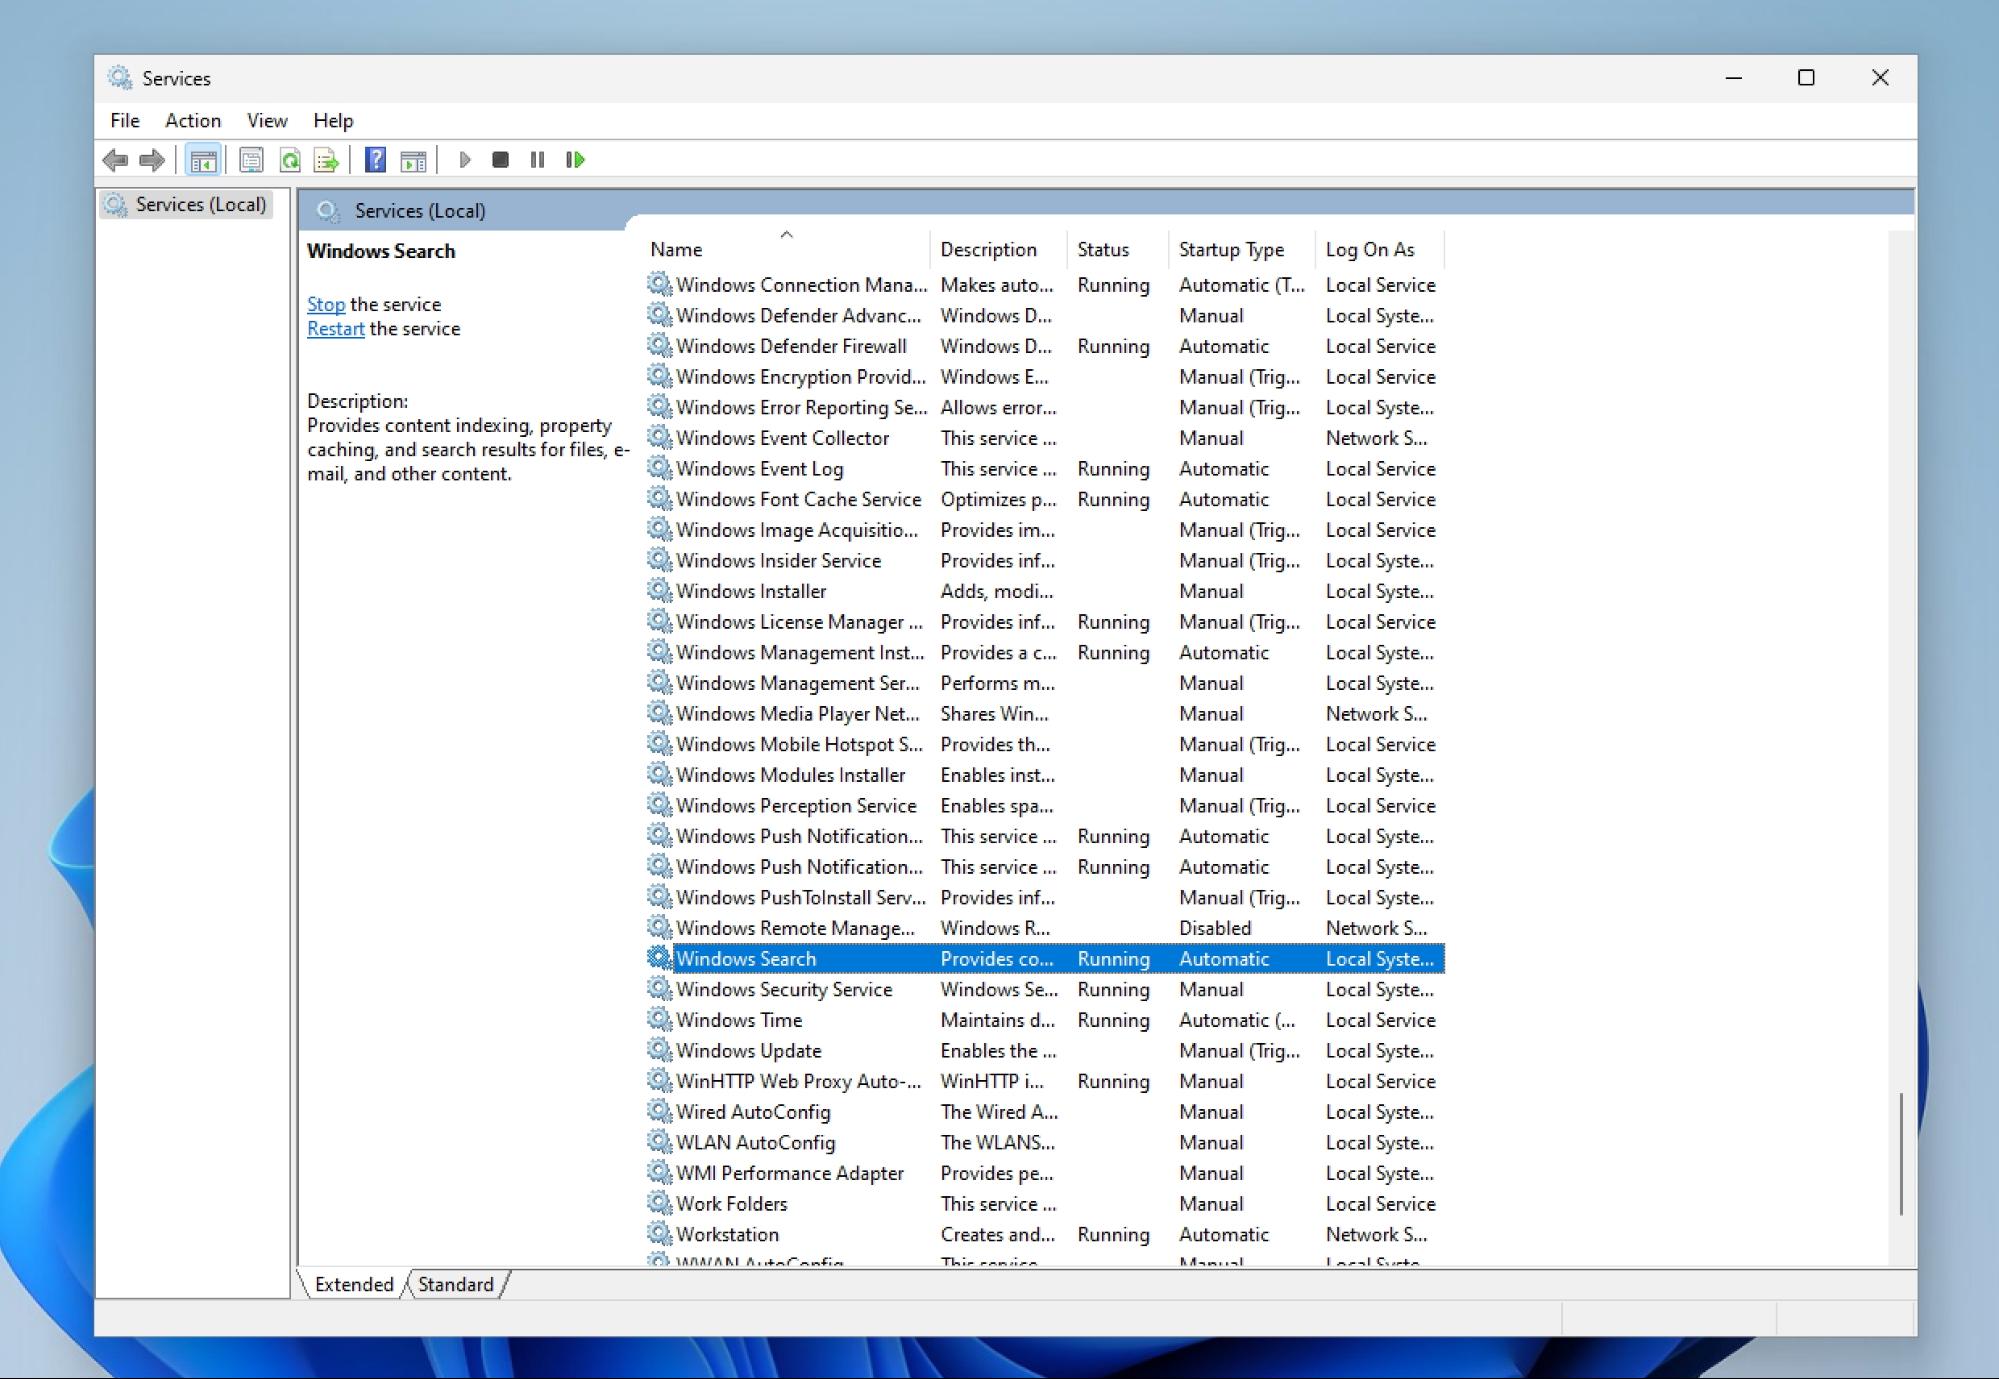
3. The Service status will likely show as Running, so you can click the Stop button to end it immediately.
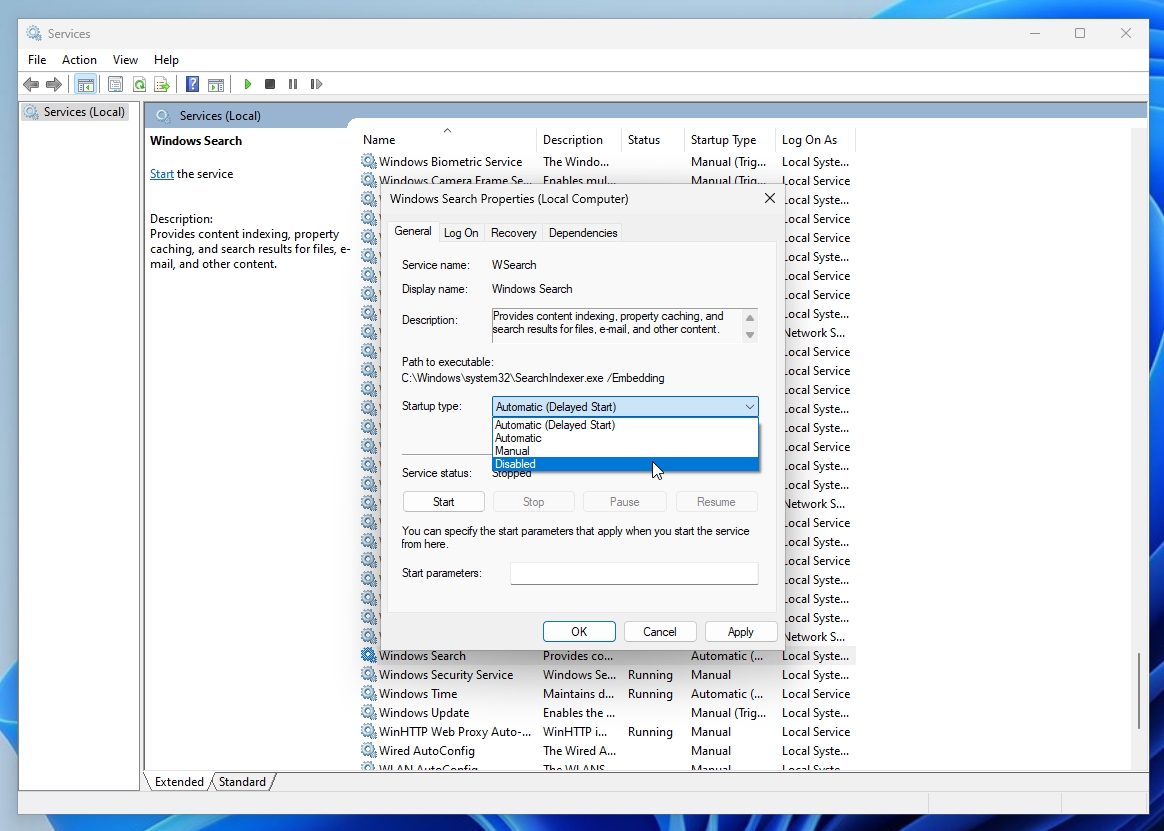
4. Select Disabled Under Startup type and click Apply to prevent it from running on each subsequent boot into Windows.
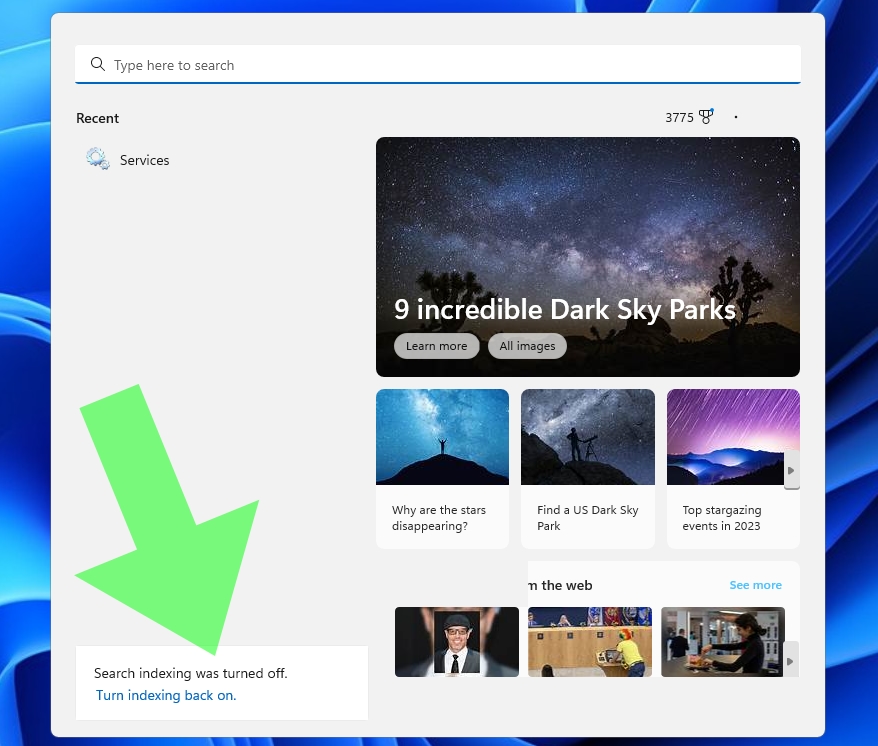
You’ll now notice that when you perform a search, a little warning message in the bottom left corner of the window stating, “Search indexing was turned off,” and it gives you the option to turn it back on.
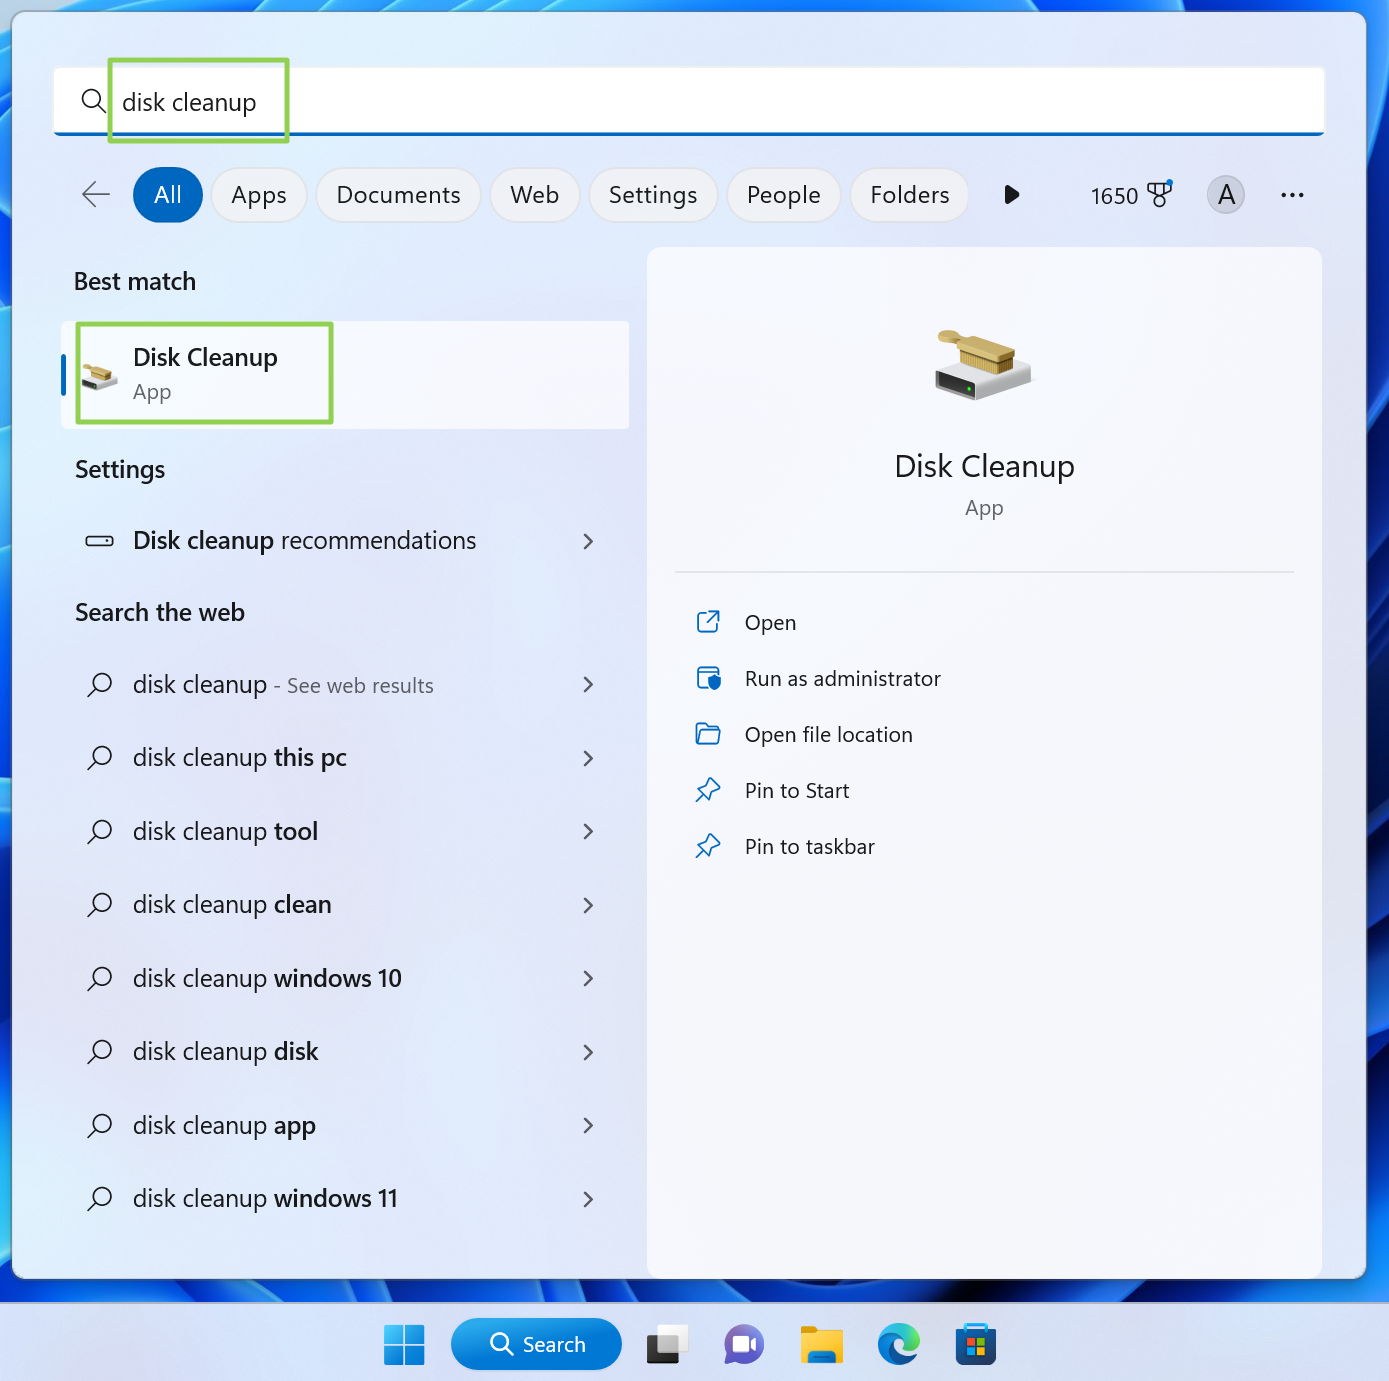
The Disk Cleanup tool scans your system to uncover unnecessary files that can be safely deleted. SSDs tend to slow down in performance as they fill up, so ensuring that you “take out the trash” is an excellent way to maintain your drive’s health.
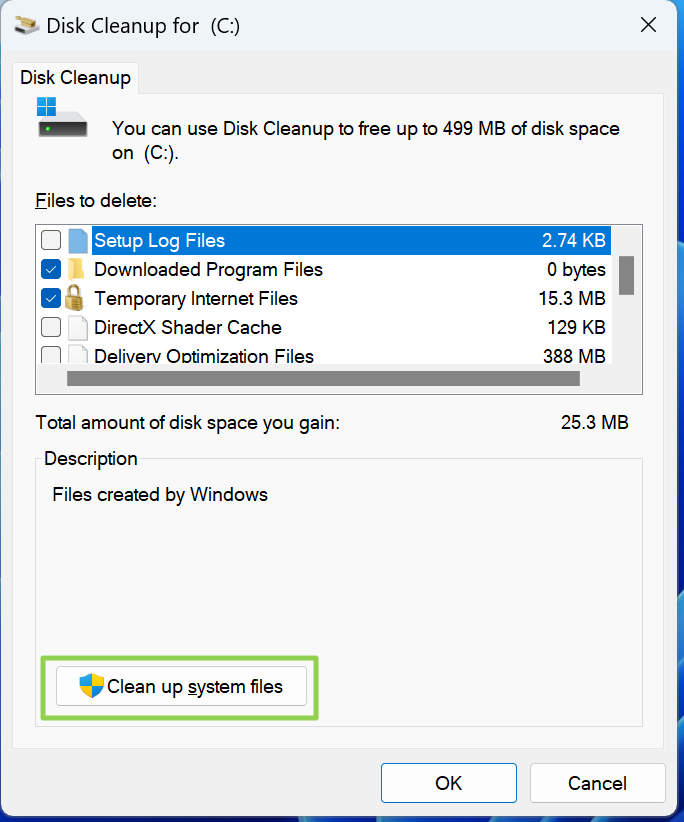
1. Search for “disk cleanup” to open the utility
2. Click Clean up system files. The system will include all the types of data you can clean up after a brief scan.
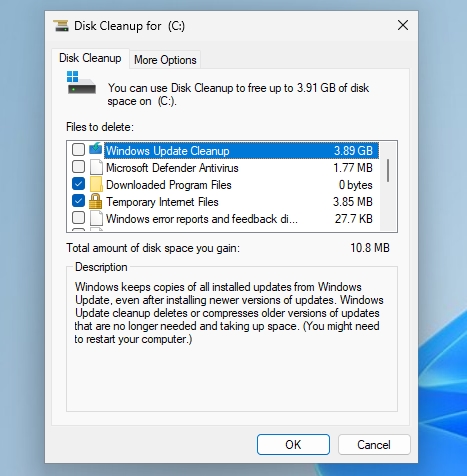
3. Choose data types to delete, including Windows Update files, Temporary Internet Files, device driver packages, and your Recycle Bin. The screenshot above shows that I have nearly 4GB that can be recovered by performing a Windows Update Cleanup.
Disable Hibernation (on desktop PCs)
Hibernation is beneficial for laptops, as it saves your current computer state without consuming power. While this is great for a laptop running on battery power, desktop PCs are always plugged in and don’t necessarily require this feature.
The hibernation file consumes a significant chunk of SSD space (40 percent of your installed RAM by default). Unless you have a ton of free space on your SSD, you can disable the hibernation file and get back several GB.
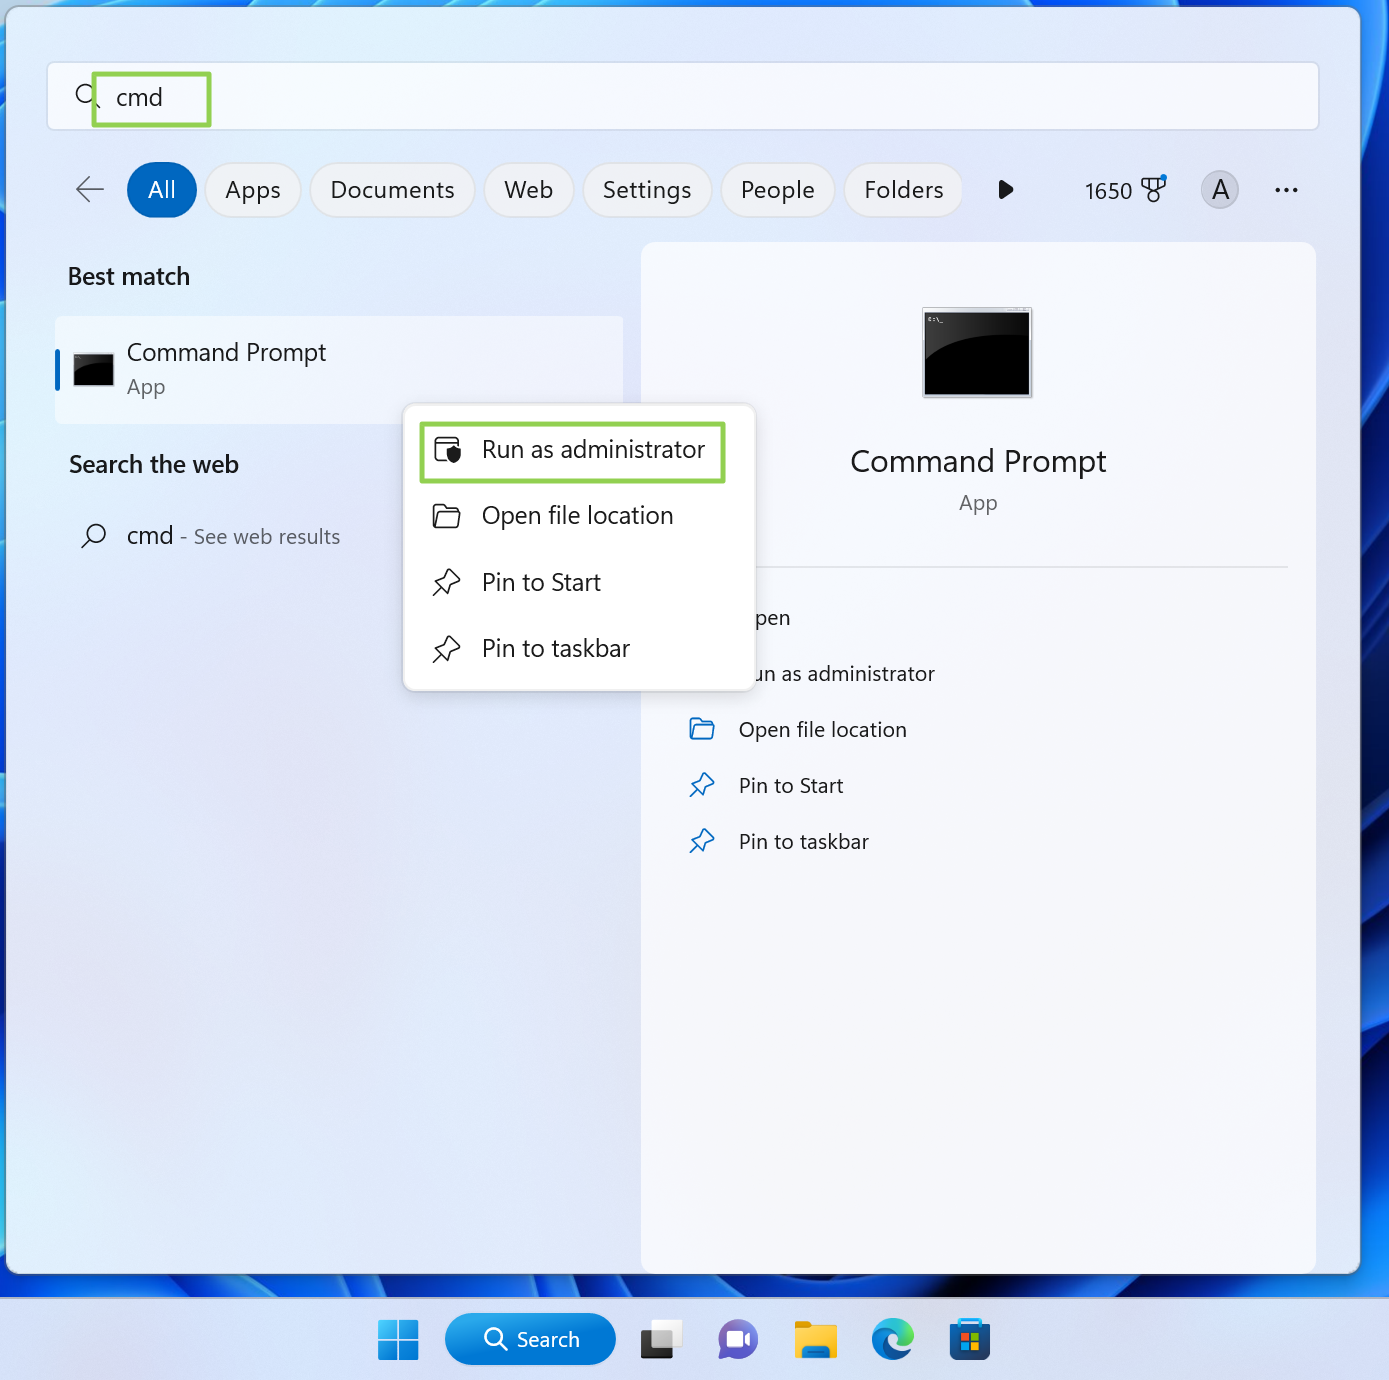
1. Open the Windows Command Prompt as an Administrator. You can do it by searching for “cmd,” right clicking and selecting “Run as administrator.”
2. Type «powercfg -h off» without the quotes and press Enter.
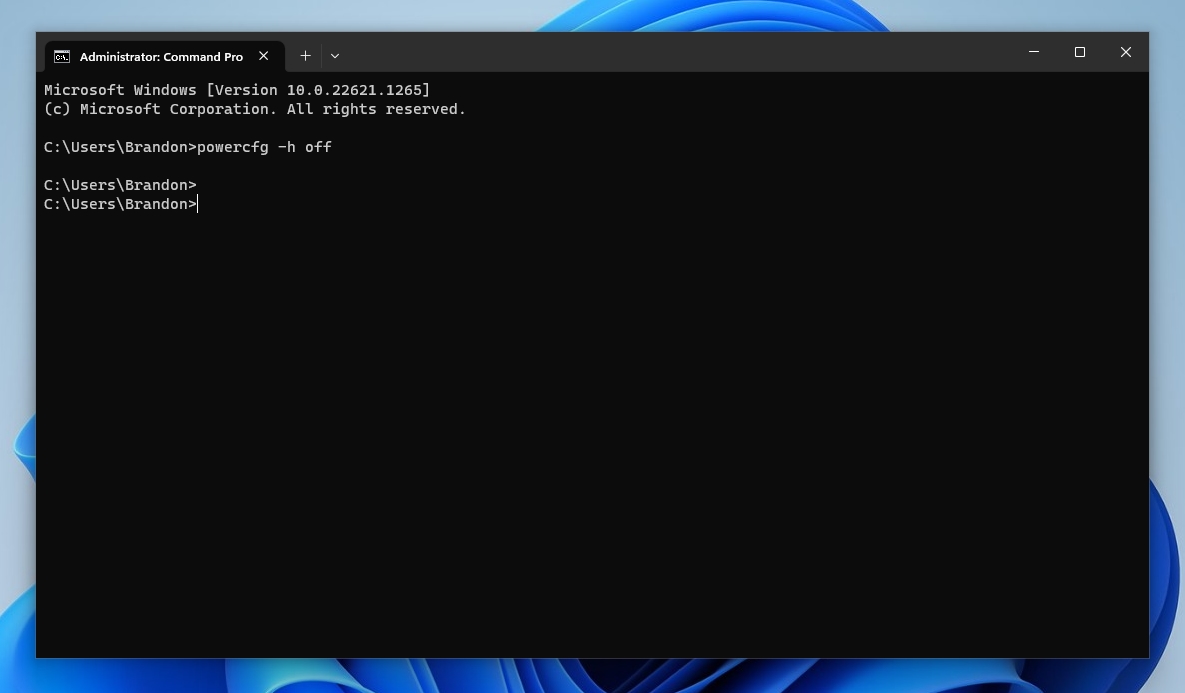
This will disable the hibernation file if it is currently enabled on your system.
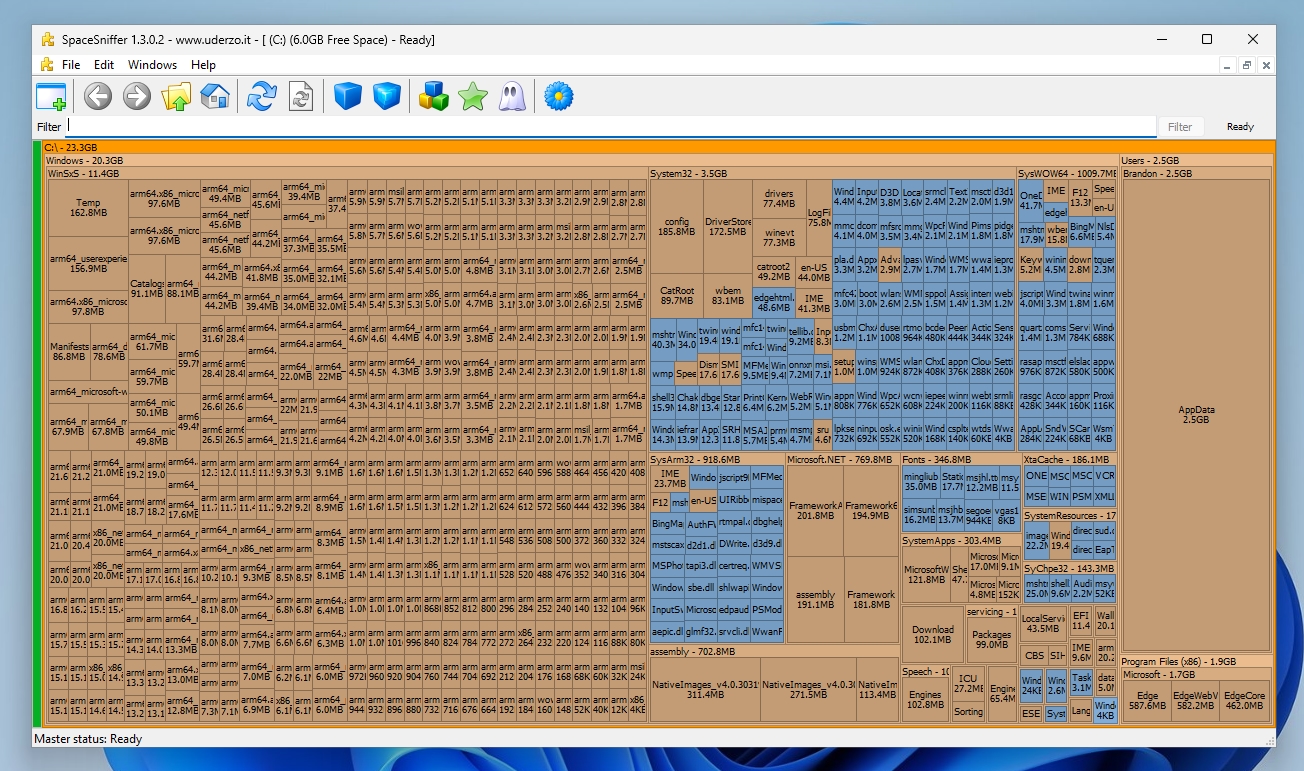
Use SpaceSniffer to free up space
SSDs tend to lose performance as they fill up with large amounts of data. One way to keep your SSD in tip-top shape is to remove large, unnecessary files from the drive.
Apps like SpaceSniffer will scan your SSD and give you an easy-to-decipher map that shows which files are taking up the most space. You can get detailed information on the files, find their exact file path and even delete them right from the app if you desire.
Install the Latest Firmware Update for Your SSD
Although SSD firmware updates don’t typically arrive regularly like graphics card drivers, they can sometimes provide performance updates or squash existing bugs. One notable example is the 5B2QGXA7 firmware for Samsung 980 Pro SSDs. The 5B2QGXA7 firmware resolves an issue where a 980 Pro’s health status could rapidly deteriorate, eventually leading to an SSD that reverts to read-only mode (rendering the SSD unusable).
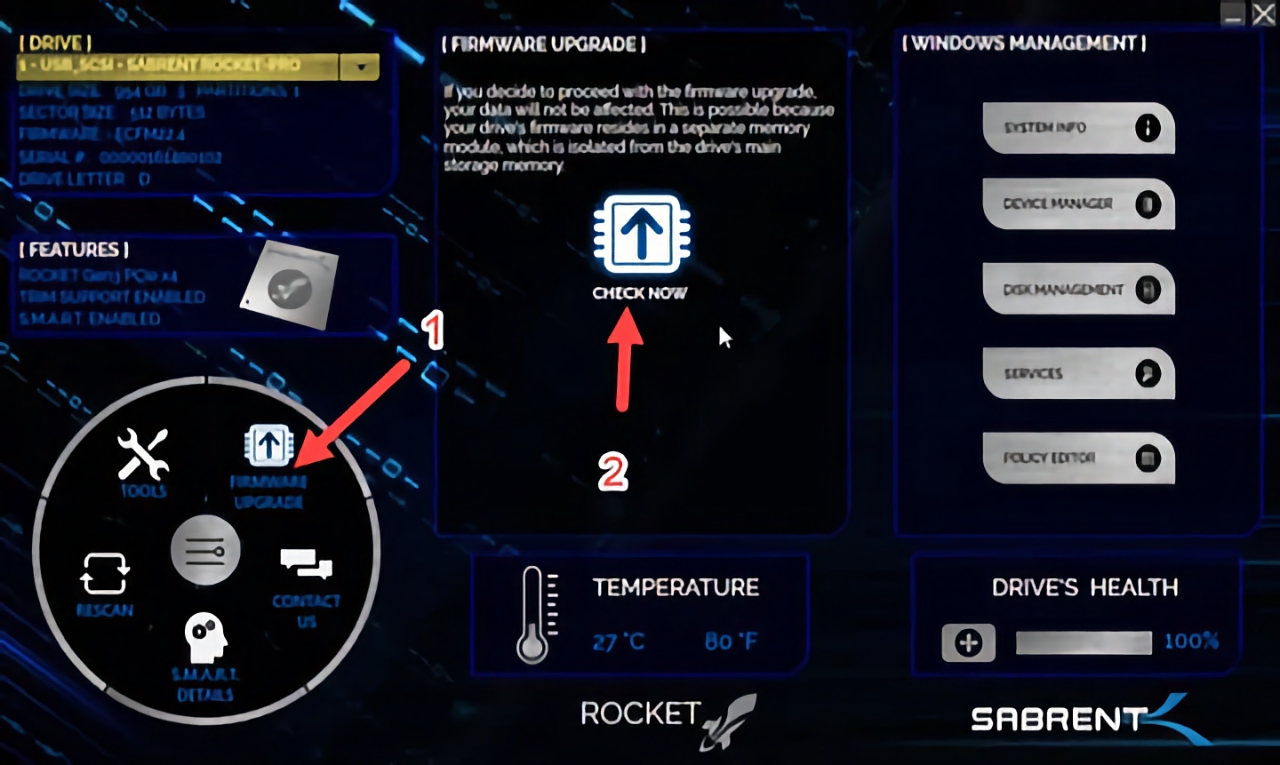
Some companies like Samsung and Western Digital provide easy-to-use utilities that allow you to update the firmware on the SSD. For Samsung SSDs, you can download the Samsung Magician app, while Western Digital has the Western Digital Dashboard. Another example is the Sabrent Rocket Panel for that manufacturer’s SSDs. If your SSD maker doesn’t provide an all-encompassing GUI, you can go to their support page to download and apply firmware updates manually.
Now that Windows 11 is available, you’ll want to make sure the OS is getting the most out of your SSDs. Windows 11 comes with many preset SSD configurations, but here are some recommendations that will help you further increase system and SSD performance.
Before you start
The first thing you should do is make sure you have the latest Windows 11 update. Click the Windows icon in the bottom menu on your screen, then type settings to open the Settings application. In the top right-hand corner, click Windows Update, then Check for Updates. Follow the on-screen directions to install an update if you need to.
The next thing you might want to do is set a system restore point, which is a quick and easy way to try out these optimizations—because you can revert back to the saved restore point if you don’t like them. To set a system restore point, click the Windows icon at the bottom of your screen and type restore. Click Create a restore point, select your C: drive and click Configure. Make sure “Turn on system protection” is checked and set Max Usage to about 5%. Click Apply, then OK. Navigate down to your C: drive again, but this time click Create. Give your restore point a name, then click Create.
1) Choose the right formatting: GPT disk partition
Because BIOS was developed in the 1970s, it wasn’t designed to support the high-speed bandwidth and massive data volumes that are common today. Most PCs today use a new protocol called UEFI, which offers much faster boot and shutdown times, as well as some enhanced security features. To use UEFI to boot your PC, your computer’s drive must be formatted in the GPT format. Microsoft has provided instructions on how to use the GPT partition format.
2) Leave some free space on your SSD
The more data on a SSD, the larger the flash translation table grows. This is like a database that maps the location of the data on the drive. As with any document or spreadsheet, the more data it contains the longer it takes to find the data you want. Try to only use 75% of your SSD for storage and leave the other 25% free to keep the drive fast. This will also increase your endurance over time.
3) Two is better than one
The easiest way to manage the amount of data on an SSD is to use two or more drives. Keep the primary SSD (C:/ drive) for your operating system and Microsoft Office applications. Then install your other applications to a secondary drive (D:/ drive). When installing software, you will have a choice where to install it. The easiest way to do this is to simply change the drive letter from C:/Program Files to D:/Program Files.
4) Set optimize schedules
Windows 11 has an application to optimize your drives on a regular basis. Most experts recommend a weekly schedule. To do this:
1. Click the Windows icon at the bottom of your screen.
2. Type Tools and click the Windows Tools application.
3. Double-click Defragment and Optimize Drives, then select the drive you want to optimize.
4. You can choose to Optimize the drive and/or Change Settings to alter the automated optimizing schedule.
5) Disable indexing
Indexing in Windows was developed to speed up file searches by creating an index of file locations. That was helpful when you had a hard disk drive (HDD), but the improved speed and performance of SSDs has basically eliminated the need for this feature. Disabling it will stop the feature from using CPU cycles, and will also stop the system from make numerous writes to the SSD, which can cause unnecessary wear. To disable indexing:
1. Click the Windows icon at the bottom of your screen.
2. Type file explorer and click to Open the File Explorer application.
3. Select the drive you want to check, right-click and select Properties.
4. Uncheck the box next to “Allow files on this drive to have contents indexed in addition to file properties.”
5. Click Apply, then OK.
6) Set power mode for performance
When your computer has been idle for a while, it’s common to experience a bit of latency when you try to turn it back on. Changing the power mode to adjust for performance over power can eliminate that latency and increase speeds. To do this:
1. Click the Windows icon at the bottom of your screen.
2. Type Settings and click on the Settings application to open it.
3. Click System on the left-hand side menu, then Power & battery.
4. Click to open the drop-down menu for Power mode. Select Best Performance or Ultimate Performance.
NOTE: If you don’t see Ultimate Performance as an option, simply own Power Shell as an administrator and paste this code in: powercfg -duplicatescheme e9a42b02-d5df-448d-aa00-03f14749eb61.
7) Enable write caching
Write caching is a feature that uses system memory to place write commands into a temporary queue until the SSD is ready to write them to the disk. It enhances performance because applications don’t have to wait for the SSD to be ready to operate. This feature is typically on by default, but if it isn’t, you can enable it:
1. Click the Windows icon at the bottom of your screen.
2. Type Device and click on the Device Manager application to open it.
3. Double-click Disk Drives, then select the drive you want.
4. Click the Policies tab, and make sure “Enable write caching on the device” is checked.
 Disable low-power states for PCIe lanes
PCs have come a long way in reducing power consumption. For desktop users, the time it takes components to move from low power states to full performance adds latency, the enemy to performance. While L1.2 can save you a few dollars a year on your electric bill, it can also cost you vital time. If your new SSD feels slower than you think it should, it is likely the PCIe bus slowing you down.
1. Click the Windows icon at the bottom of your screen.
2. Type Control and then click the Control Panel application to open it.
3. Click Hardware & Sound, then Power Options.
4. Under “Choose or customize a power plan,” click Change plan settings.
5. Click Change advanced power settings.
6. Click the + next to PCI Express, then click the + next to Link State Power Management.
7. Turn off Max Power Settings for your plugged-in mode and select Max Performance.
9) Use RAID to improve high queue depth professional software
If you use powerful professional software daily to edit images or manipulate video, you may benefit from building a high-performance RAID array. Building an array with two or more SSDs largely depends on your CPU and motherboard. Intel and AMD both have dedicated drivers and software to build an array and some motherboard makers even have utilities to make the process easier.
With a simple two-drive RAID 0 array you will nearly double the sequential performance over a single drive, but will lose some small block size random performance due to increased driver latency. Also, if one of the drives fail in RAID 0, you will lose all of the data from both drives.
10) Go with a direct-to-CPU NVMe connection
Non-volatile memory express (NVMe) is a storage protocol that offers high performance and excellent scalability. Built on parallel high-speed/low-latency PCIe lanes, NVMe connects directly to the CPU via a PCIe interface. This direct-to-CPU connection can achieve more than double the speed of traditional SAS and SATA interfaces.
11) Make life easier with God Mode
Every version of Windows theoretically tries to make things easier for users, but in practice sometimes it doesn’t—especially when it comes to presenting configuration options. The Control Panel we all knew and loved has been pushed into the background in favor of the new Settings menu. And a lot of important options are now hard to find. God Mode, however, is a game changer (and time saver!). It allows you to save more than 200 settings menus in a single folder, neatly organized into categories like Security and Power Options. Here’s how to get it:
1. Right-click on your desktop and select New > Folder.
2. Name the folder exactly as shown here (the name will disappear once you’re finished): GodMode.{ED7BA470-8E54-465E-825C-99712043E01C}
3. Open the folder to see all of your wonderful settings options.
4. For even faster access, you can drag and drop individual shortcuts to your desktop.
Please note that the God Mode folder icon may change, typically once you reboot. It looks like the image below.
Image credit: Tom’s Hardware
12) Trim the fat—regularly
There are several quick maintenance-type actions you can take periodically to keep your system running at peak performance.
Disable startup programs
1. Press Ctrl+Alt+Del and click on Windows Task Manager to open it.
2. Click the Startup tab. All the “Enabled” applications listed here boot up when you log into your computer. If you don’t need them immediately, they’re simply slowing down your startup and login times, as well as your system overall because each program is using CPU cycles and RAM.
3. Disable programs by highlighting them and clicking Disable.
Note: You can still use disabled programs. You’ll simply have to open them up manually when you need them .
Delete temp files
1. Click the Windows icon at the bottom of your screen.
2. Type run and press Enter.
3. Type %temp% and click OK.
4. In the window that opens, highlight everything, right-click and select the trash icon to delete the files.
5. If a popup comes up, check “Do this for all current items” and click Continue. If you get another popup that says “This action cannot be completed …” check “Do this for all current items” and click Skip.
6. Once the files have been deleted, exit out of the window and click the Windows icon again.
7. Type run and press Enter.
8. Type temp and click OK.
9. Highlight all the files, right-click, and select the trash icon to delete the files. Handle any popups the same way you did in step 5.
Use the Windows Disk Cleanup tool
1. Click the Windows icon at the bottom of your screen.
2. Type disk cleanup and click on the Disk Cleanup application to open it.
3. Select the drive you want to clean up and click OK.
4. Click Clean up system files.
5. Select the drive again and click OK.
6. Unclick any selections you don’t want to delete, then click OK.
13) Don’t forget about Game Mode
Microsoft began offering Game Mode with Windows 10 in an effort to improve game optimization. The feature gives your game access to more CPU and GPU resources and limits the resources to background apps. The first iteration of Game Mode was a little rocky, but it now works as it should and can deliver better performance in some scenarios. To enable it:
1. Click the Windows icon at the bottom of your screen.
2. Type game mode and click the Game mode settings application to open it.
3. Under Game Mode, click the slider to On.
Windows 11 has brought many new features. However, the OS is still undergoing significant improvements. Many users who have installed the new OS have complained about slower SSDs, system crashes, and other SSD-related issues. Luckily, there are ways to improve SSD performance on Windows 11 using different methods. I will address this in this tutorial, so read away if you face similar problems.
Improve SSD Performance Windows 11
If your system doesn’t meet Windows 11, it is better not to install it forcefully. If, however, you are facing issues even though your system meets the requirements set by Microsoft, then there are some things you can try to fix declining SSD performance. Try out the following methods and check which works for you.
Method 1: Improve SSD Performance by Updating System
Microsoft released the Windows 11 KB5007262 in late 2021, and it is supposed to solve the SSD issues that many users face after the OS upgrade. You should check your Windows Update history from the Settings app and check if this update has been installed on your system. If not, then follow the steps below to update manually:
Step-1: Use the shortcut keys Win + I to open the Settings app.
Step-2: Select Windows Update from the left pane.

Step-3: Click on the Check for Updates option, and if KB5007262 is in the list, install the update and restart your system.

There is a chance that you may not receive this update automatically. In case that happens, follow the steps below:
- Use this link and click Download next to the KB5007262 x64 version.

- Once installed, restart the system.

Method 2: Disable Startup Apps and Programs
Reducing the number of startup apps and programs can also help improve SSD speeds. To reduce the startup programs, follow the steps below:
Step-1: Right-click on the Windows icon and open the WinX menu. (You can use shortcut keys Win + X to open the menu as well)
Step-2: Select Task Manager.

Step-3: Click on the Startup tab.

Step-4: Right-click on the apps you wish to disable and select Disable.

Method 3: Fast Startup
- Click on the search icon on the taskbar and type Control Panel. Click Open.

- Select Hardware and Sound

- Click on Power Options

- Select Choose what the power buttons do from the left pane.

- Click on Change settings that are currently unavailable.
- Under the Shutdown settings section, check the Turn on fast startup box.
- Select Save changes.


Windows 11 has a lot of exciting features, but it is still in the upgrading stage, and it is expected that hopefully, this year, many of the issues will be resolved.
If you want to learn more about Windows, follow this link and go through our Windows tutorials.
Твердотельный накопитель (SSD) имеет ограниченное количество циклов записи в ячейку, поэтому их необходимо сократить. Старые операционные системы Windows XP/Vista/7/8 не знают о существовании SSD. Windows 10/11 распознает SSD и умеет с ним работать, но количество операций записи на диск также можно сократить. В начале статьи будут показаны основные методы для всех версий Windows, ближе к концу для старых версий. Отключать на свое усмотрение, необязательно следовать статье.
1. Проверка AHCI, наличие TRIM, правильность разметки
Проводить эти проверки имеет смысл только на версиях младше Windows 10.
Для проверки режима AHCI для SATA контроллера открываем Диспетчер устройств и проверяем в разделе “контроллеры IDE ATA/ATAPI” наличие устройства SATA с припиской ACHI.
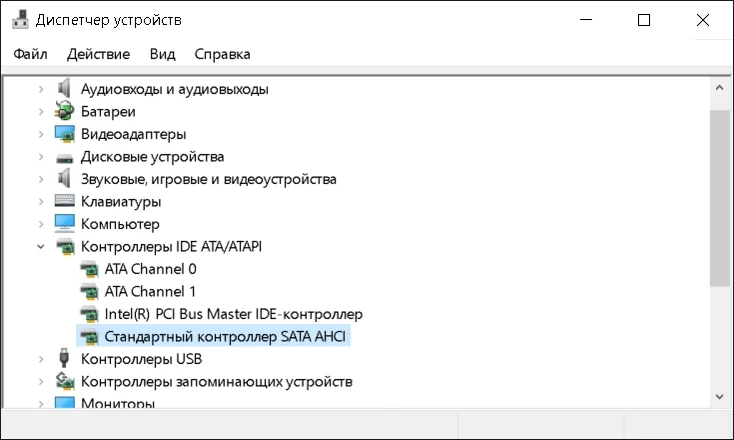
Если режим AHCI не включен для SATA, заходим в UEFI(BIOS) в разделе настройки SATA и включаем его.
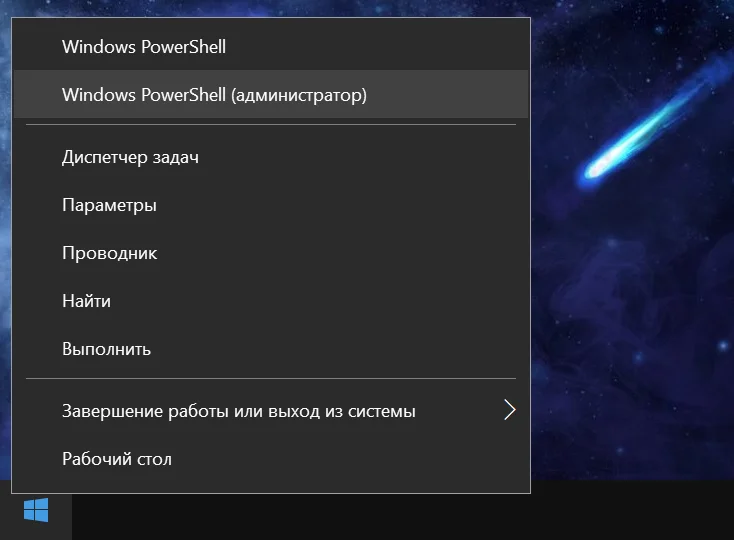
Запускаем консоль (cmd или PowerShell) от имени администратора.
В Windows 7 и ниже нажимаем ПУСК ⇒ Выполнить или Win + R, вводим cmd и нажимаем Enter
В новых версиях кликаем правой кнопкой мыши на ПУСК и выбираем Командная строка (Администратор) или Windows PowerShell (Администратор)
Вводим команду для проверки TRIM
fsutil behavior query disabledeletenotify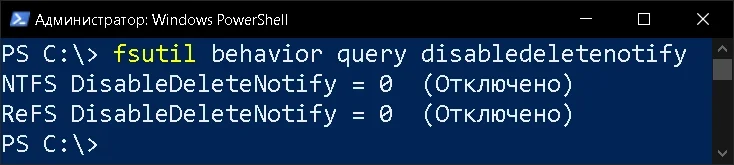
Если параметр DisableDeleteNotify равен 0, то функция TRIM активна и работает.
Для проверки правильности разметки запускаем утилиту msinfo32.exe через консоль или ПУСК ⇒ Выполнить.
В открывшейся утилите “Сведения о системе” выбираем Компоненты ⇒ Запоминающие устройства ⇒ Диски
Находим параметр SSD накопителя “Начальное смещение раздела”, у меня оно равно 1 048 576 байт. Этот параметр должен делится на 4096 без остатка.
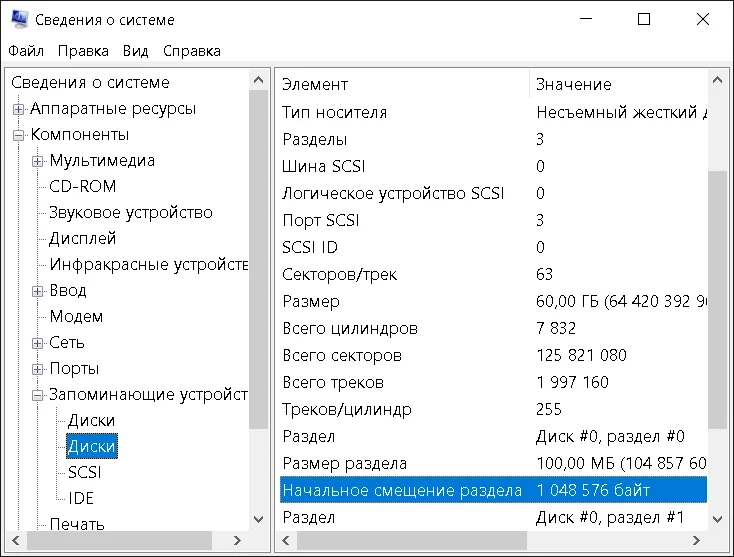
Проверяем, 1048576 ÷ 4096 = 256. Разметка диска произведена корректно.
2. Отключение спящего режима (гибернация)
Спящим режимом мало кто пользуется, да и при скорости загрузки SSD он просто не нужен. Отключение даст больше места на SSD накопителе. Файл отвечающий за спящий режим, находится по адресу C:\hiberfil.sys (размер примерно ⅓ оперативной памяти).
Запускаем консоль (cmd или PowerShell) от имени администратора.
В Windows 7 и ниже нажимаем ПУСК ⇒ Выполнить или Win + R, вводим cmd и нажимаем Enter
В новых версиях кликаем правой кнопкой мыши на ПУСК и выбираем Командная строка (Администратор) или Windows PowerShell (Администратор)
Отключаем спящий режим
powercfg -h offИ проверяем что файл hiberfil.sys пропал с системного локального диска C:
dir c:\ -h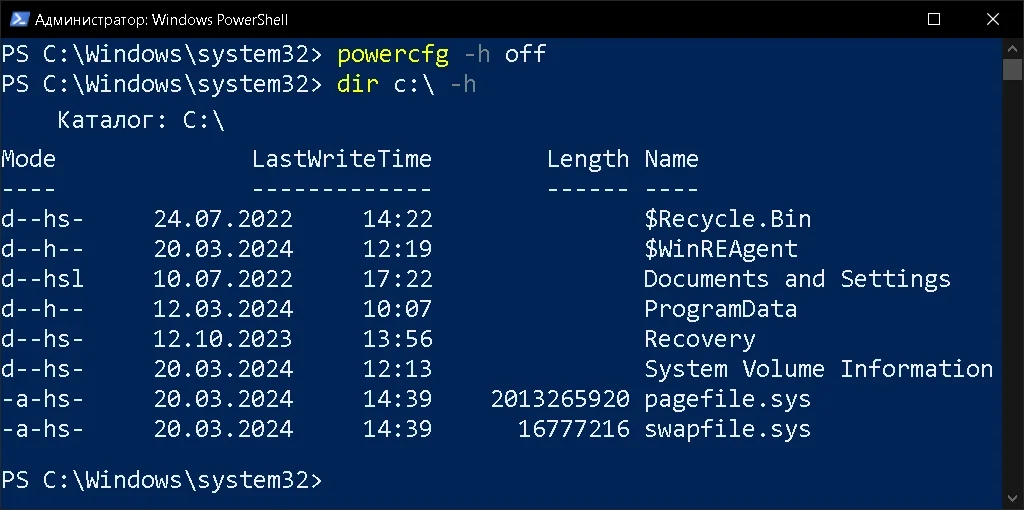
Спящий режим отключен.
3. Отключение восстановления системы
Периодически Windows записывает точки восстановления системы при установке программ и обновлений, для возможности откатить систему. Когда я пользовался Windows, восстановление системы у меня нормально никогда не работало и я всегда отключал его.
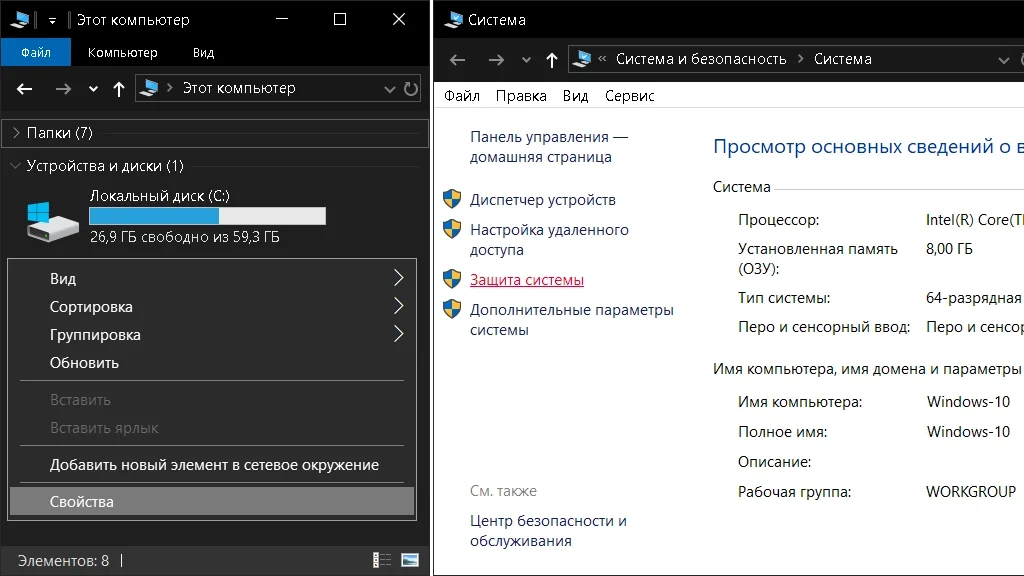
Нажимаем правой кнопкой на Мой компьютер и выбираем Свойства. В открывшемся окне сбоку нажимаем Защита системы.
В окне Свойства системы, выбираем вкладку Защита системы. Выбираем SSD диск и нажимаем Настроить. В открывшемся окне выбираем пункт “Отключить защиту системы”. Нажимаем кнопку Удалить, чтобы удалить созданные точки восстановления и нажимаем OK
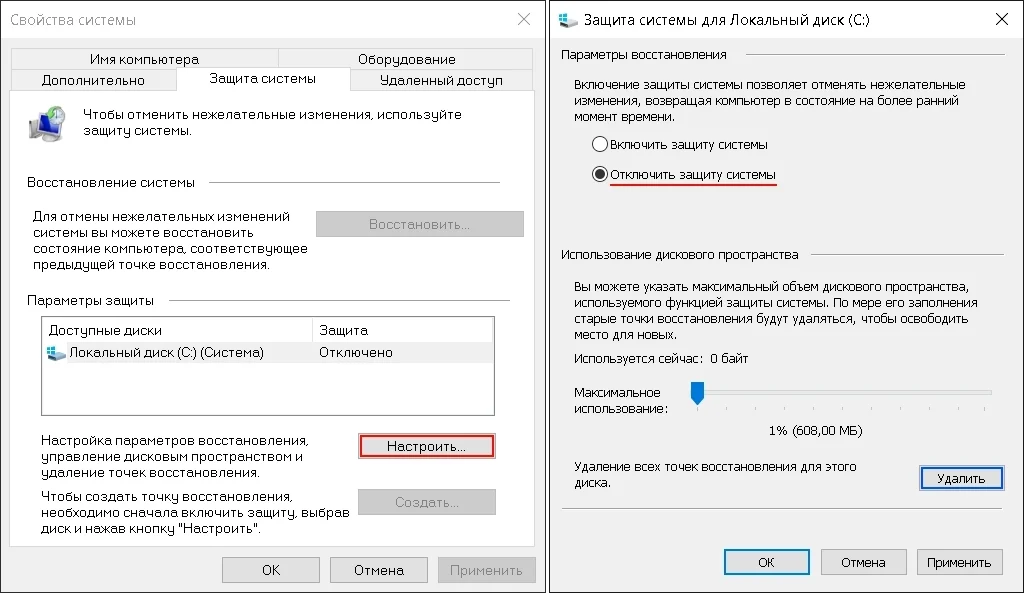
Восстановление системы отключено и все ранее созданные точки восстановления удалены.
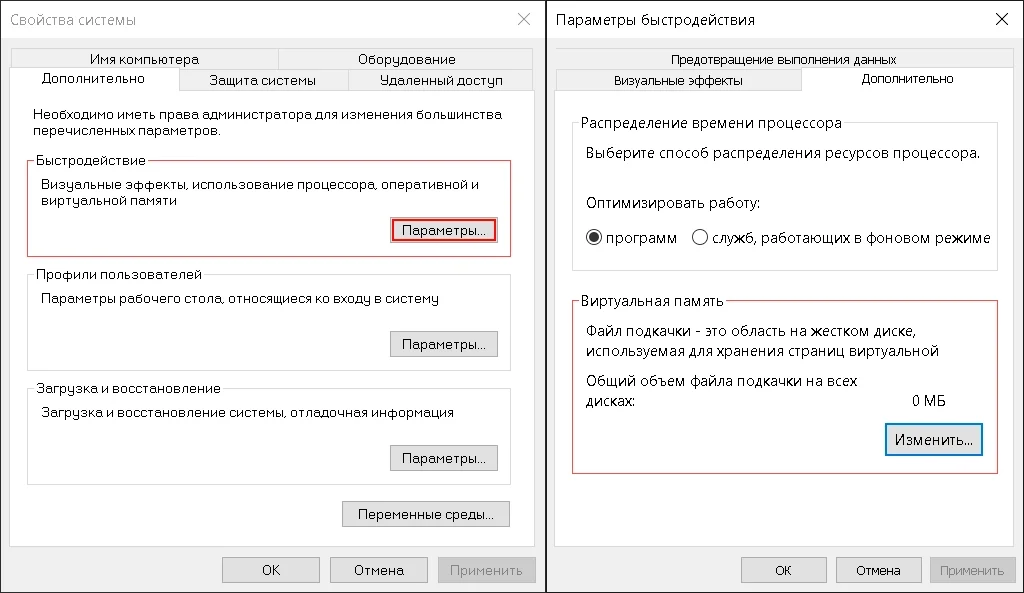
4. Отключение файла подкачки
Файл подачки находится по адресу C:\pagefile.sys (размер примерно ½ оперативной памяти). Насчет отключения есть споры, у меня он был отключен давно и проблем с работой я не заметил за время пользования Windows. Если оперативной памяти меньше 4 ГБ не стоит его отключать, хотя это уже на усмотрение конкретного пользователя.
Нажимаем правой кнопкой на Мой компьютер и выбираем Свойства. В открывшемся окне сбоку нажимаем Дополнительные параметры системы.
Открываем Свойства системы, выбираем вкладку Дополнительно. Нажимаем Параметры… раздела Быстродействие. В открывшемся окне выбираем вкладку Дополнительно, в разделе “Виртуальная память” нажимаем Изменить…
В открывшемся окне Виртуальная память снимаем галочку с пункта “Автоматически выбирать объём файла подкачки”, выбираем опцию “Без файла подкачки” и нажимаем кнопку Задать
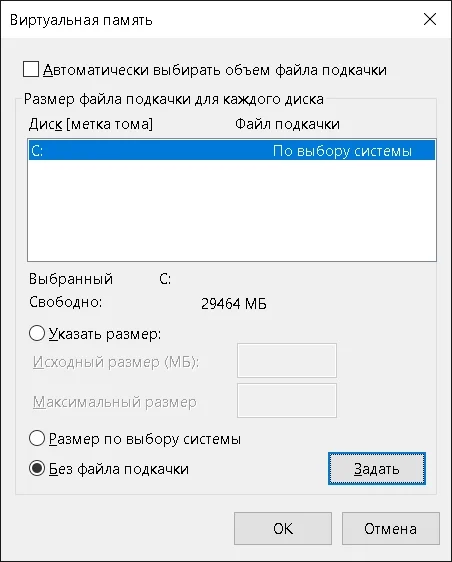
Подтверждаем отключение файла подкачки и нажимаем OK. Изменения будут применены после перезагрузки компьютера.
5. Отключение индексирования файлов и службы поиска
Если ты очень часто пользуешся поиском в Windows, то нет смысла это отключать, так как это замедлит поиск и сделает невозможным искать внутри содержимого файлов. Для Windows 7 и ниже есть смысл отключать точно.
Открываем Мой компьютер и выбираем Локальный диск которым является SSD. В открывшемся окне снимаем галочку “Разрешить индексировать содержимое файлов на этом компьютере в дополнение к свойствам файла” и нажимаем Применить
Оставляем выбранный параметр применять к диску и всем вложенным папкам и файлам и нажимаем OK.
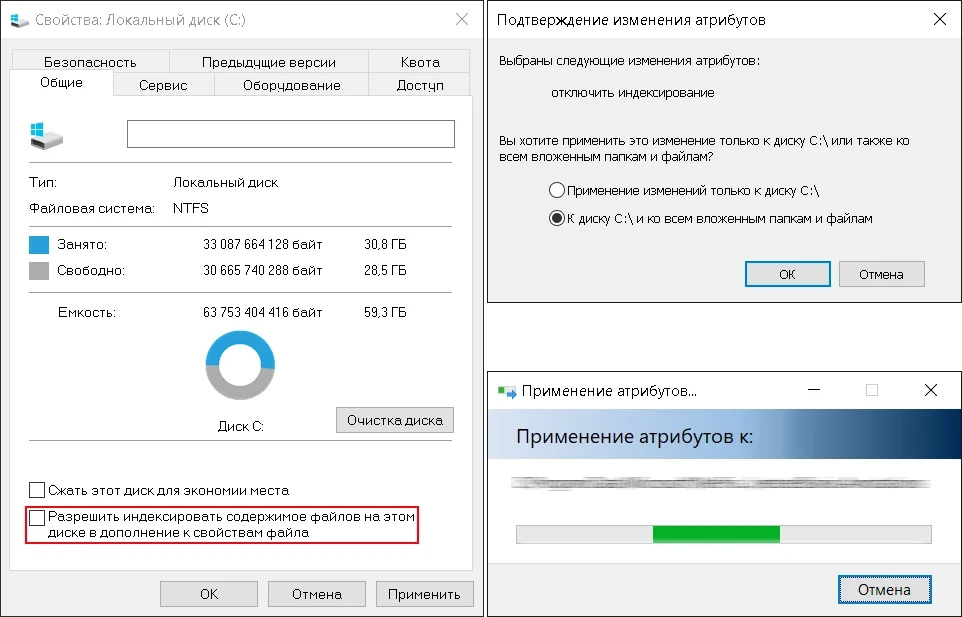
Если будет выведено сообщение, что нет доступа к файлам, нажимаем Пропустить все и дожидаемся окончания процесса.
Нажимаем ПУСК ⇒ Выполнить или Win + R, вводим services.msc и нажимаем Enter
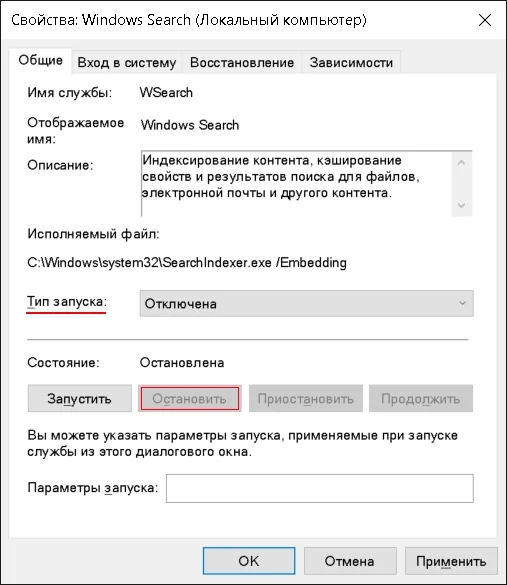
В списке служб ищем Windows Search (Служба поиска), нажимаем на нее правой кнопкой мыши и выбираем Свойства. В окне настройки службы выбираем Тип запуска: Отключена, нажимаем Остановить
6. Отключение дефрагментации диска
Windows 10/11 определяет твердотельный накопитель корректно и дефрагментация диска не проводится, а вместо нее проводится оптимизация SSD. Отключать только для старых версий Windows XP/Vista/7/8
Нажимаем ПУСК ⇒ Выполнить или Win + R, вводим dfrgui.exe и нажимаем Enter
Нажимаем Настроить расписание…, в открытом окне снимаем галочку “Выполнять по расписанию” и нажимаем OK
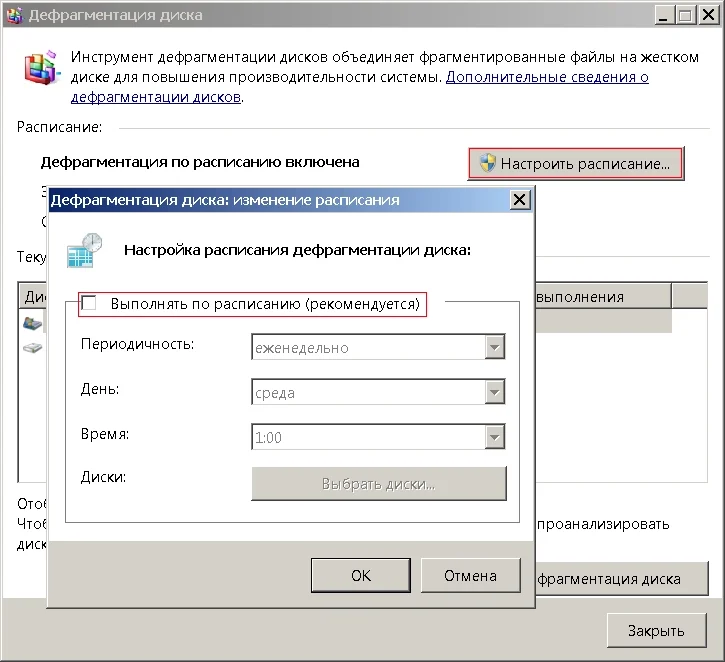
Дефрагментация диска на старых операционных системах Windows отключена.
Table of contents
- Why Is SSD Faster than HDD?
- Useful Methods to Optimize SSD Windows 10/11
- Method 1: Disable startup programs
- Method 2: Disable fast startup
- Method 3: Confirm TRIM is enabled
- Method 4: Make sure the SSD firmware is up to date
- Method 5: Turn on write caching
- Method 6: Schedule SSD optimization
- Method 7: Set your power plan to high performance
- Method 8: Enable AHCI mode
- Method 9: Disable indexing service/Windows search
- Conclusion
- FAQs
Solid state drives (SSDs) have numerous benefits. However, one drawback is that their performance might deteriorate with time and become slower than their initial state. But there are several measures you can take to optimize SSD for better performance. In this article, we’ll look at practical ways to speed up your SSD using SSD optimization methods. Let’s begin.
Why Is SSD Faster than HDD?
Unlike an HDD, which requires track seeking and latency time to read data, an SSD can retrieve and read data directly from any flash memory location.
It basically takes under 0.1ms (random access time) for an SSD to read data. That’s almost no time at all.
This fast response makes it more favorable than the traditional HDD. This means you can open and run applications on your PC at lightning speed.
That said, SSDs are also affected by wear and tear, and it’s usually advisable to back up your data regularly to the cloud for safekeeping.
Related: SSD vs HDD: What’s the Difference and What to Choose?
Useful Methods to Optimize SSD Windows 10/11
First things first. Make sure to use the SSD as the boot or system disk (the disk containing Windows OS). That way, you’ll have quicker boot time and increased system running speed.
On top of that, if you’re still using Windows 10, we highly suggest upgrading to Windows 11, as it’s one of the most advanced operating systems today.
Apart from offering a wonderful experience, this system has plenty of features to optimize SSD, such as the TRIM command.
Below are SSD tweaks to ensure your SSD performs optimally:
Method 1: Disable startup programs
Your PC’s boot time
is affected by the startup programs set to run when you turn on your machine. Luckily, the startup application manager shows which programs are most slowing down the startup process.
Often, the programs you install add themselves to the startup process and automatically start every time you boot your PC.
The good news is that you can quickly access the Startup applications manager in the Task Manager and disable these programs.
Here’s how:
- Use the
Ctrl + Shift + Esckeyboard shortcuts to bring up Task Manager. Alternatively, pressCtrl + Alt + Deleteand select Task Manager.
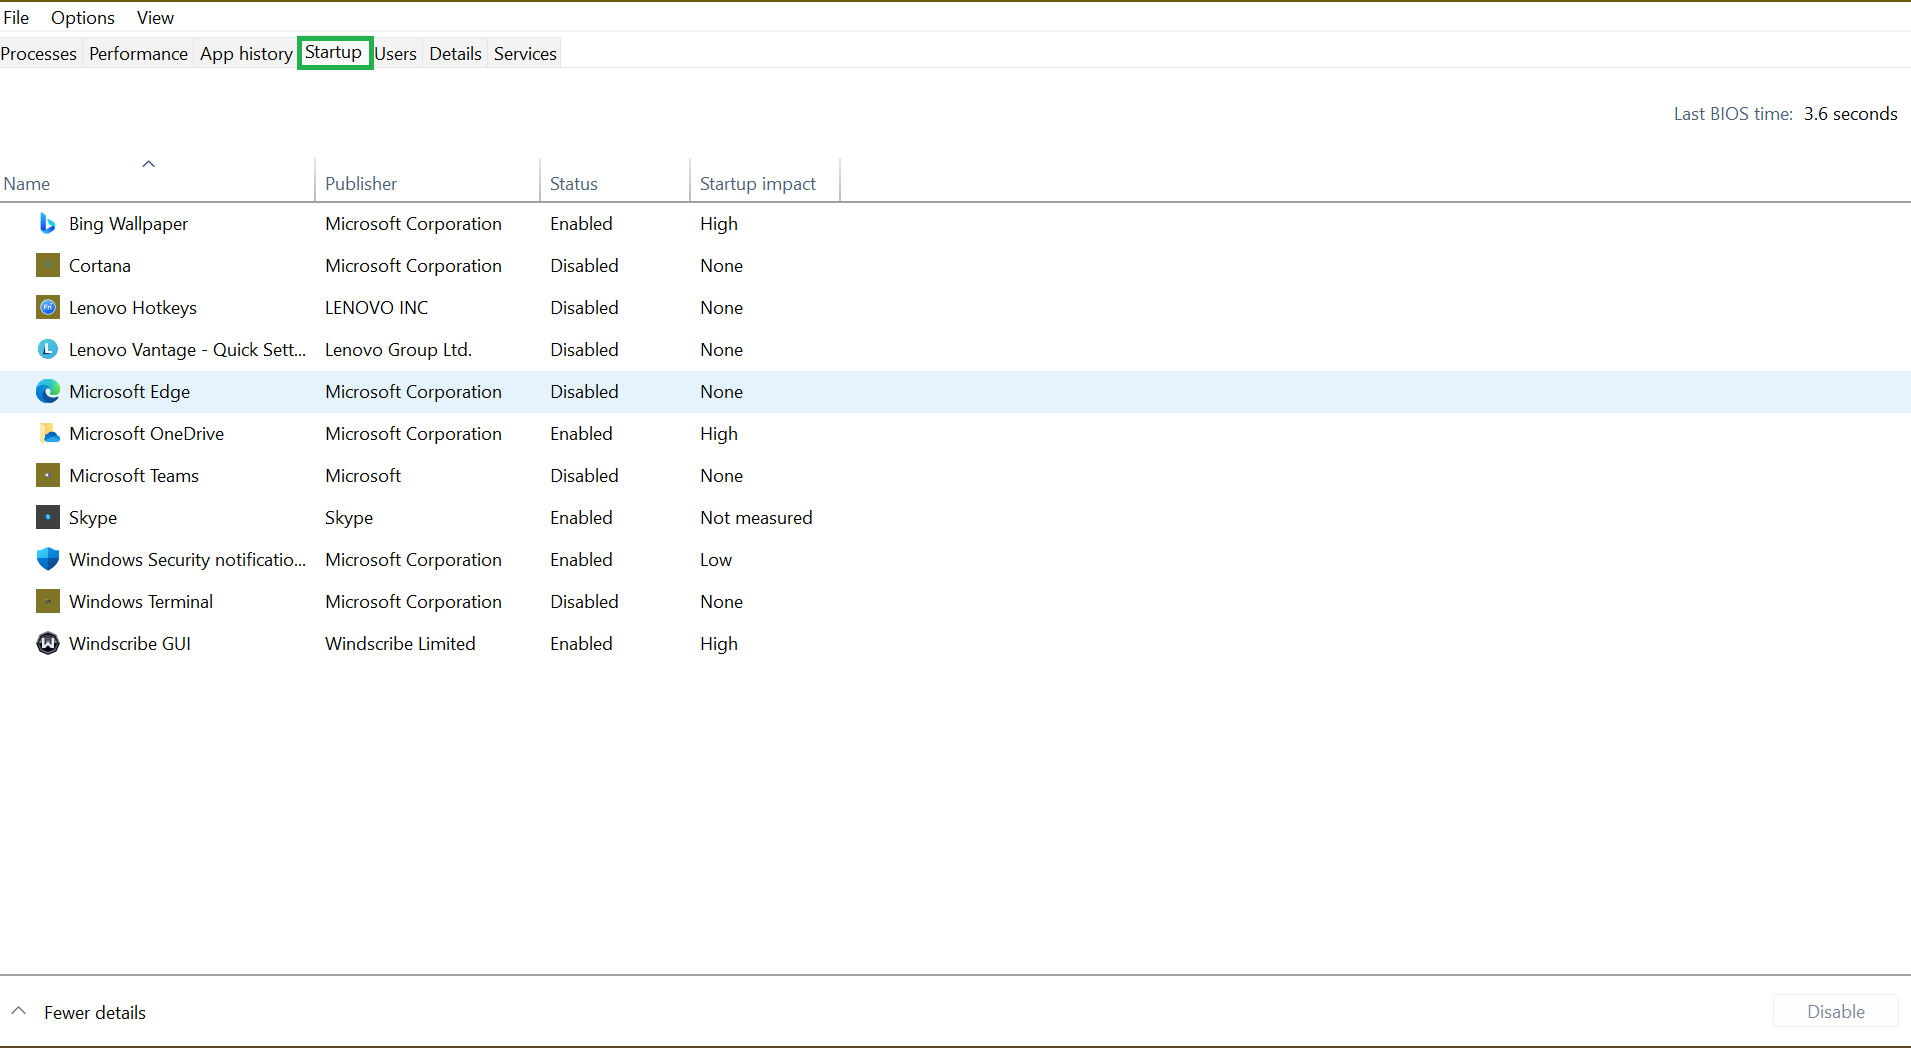
- From the Task Manager’s interface, switch to the Startup tab to see a list of startup programs and their impact on your computer’s startup. You may want to disable all applications with a High impact.
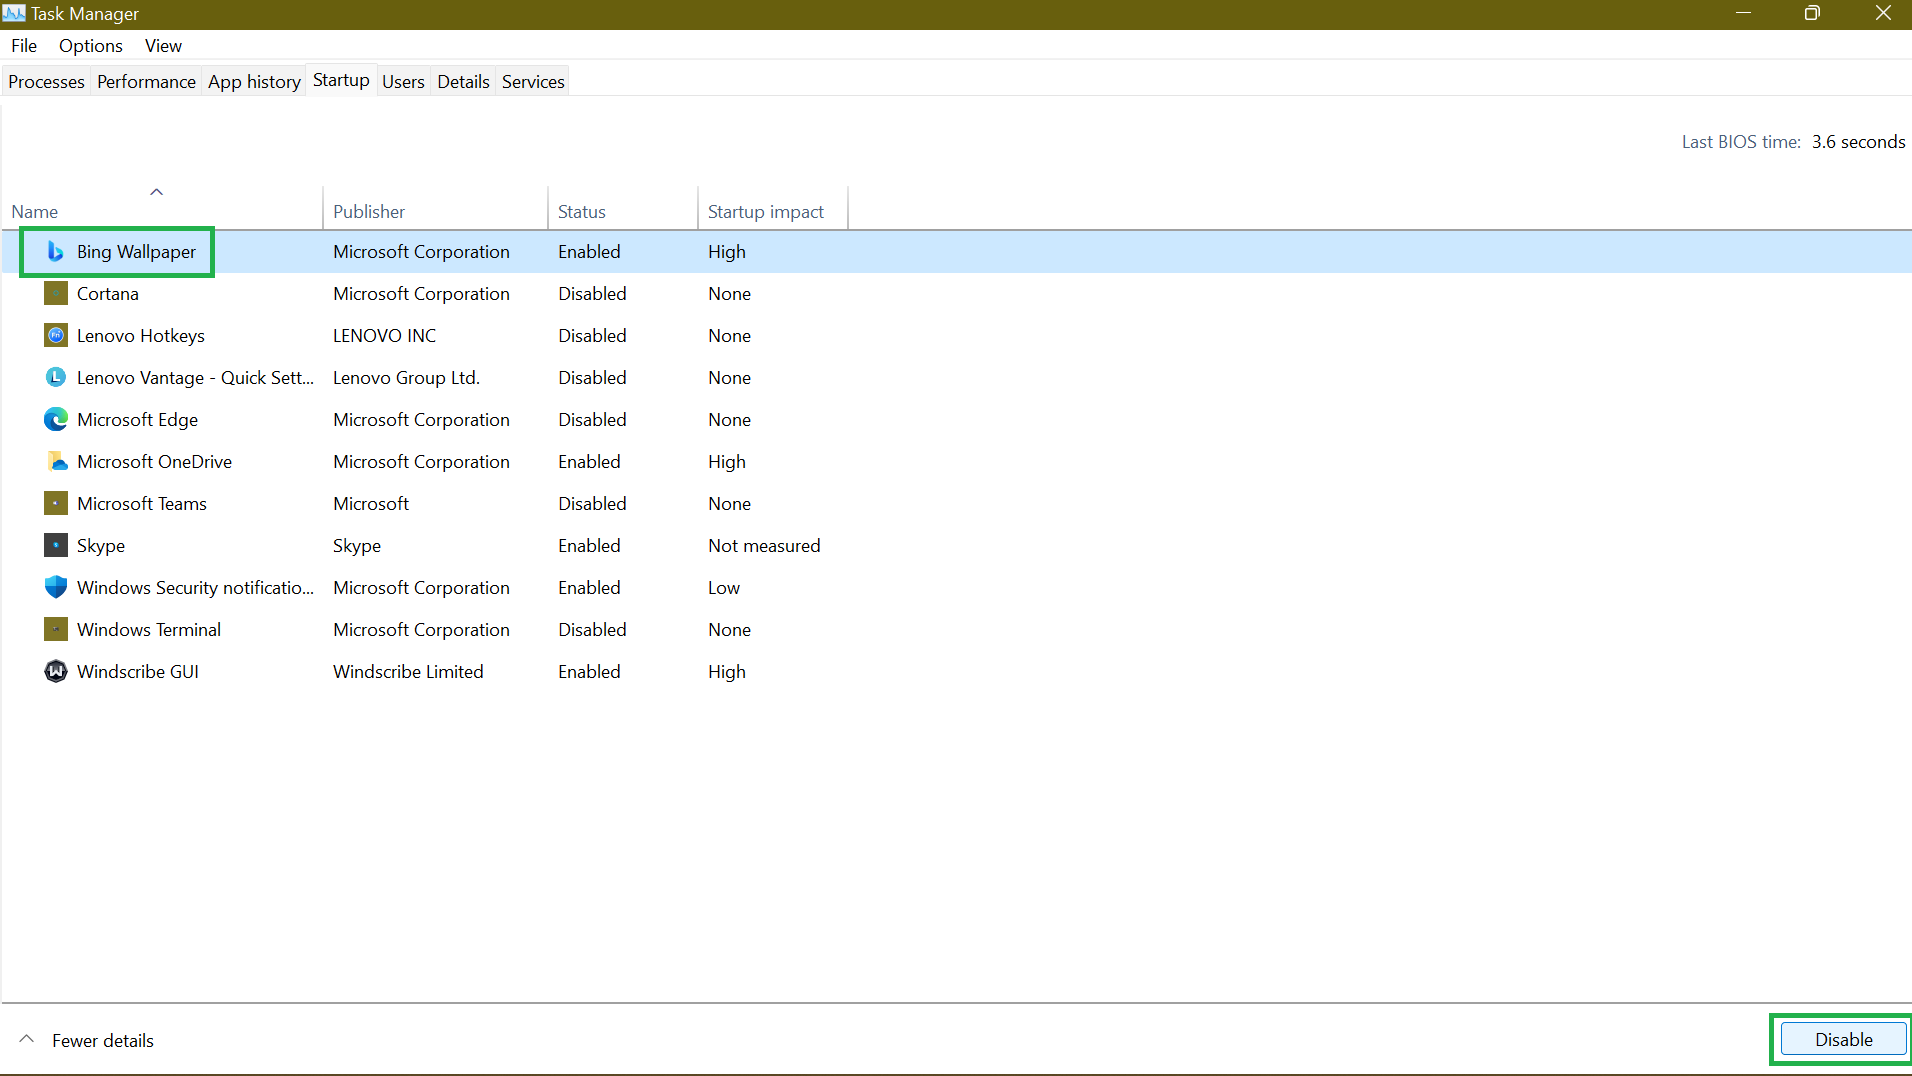
- To disable a program, select it and click Disable at the far-right bottom section of the page.
That said, disabling some programs can limit their functionality. Applications like OneDrive or Google Drive need to run at startup to keep your files synced.
Thus, you want to enable them to sync your files in the background automatically.
Related: Quick Tips: How to Disable Startup Programs in Windows 10
Method 2: Disable fast startup
Another SSD optimization method is the Fast Startup . This feature was solely designed to accelerate the boot process, particularly for machines with SSDs. So, you might be wondering, why disable it? An SSD is so fast that the time gained by enabling a fast startup is almost insignificant. In fact, disabling this feature may allow your Windows computer to get a clean full reboot. While disabling Windows Fast Startup may not have a big impact, it could be useful.
- Access the Control Panel from your Start Menu.
- Open Power Options and click Choose what the power button does.
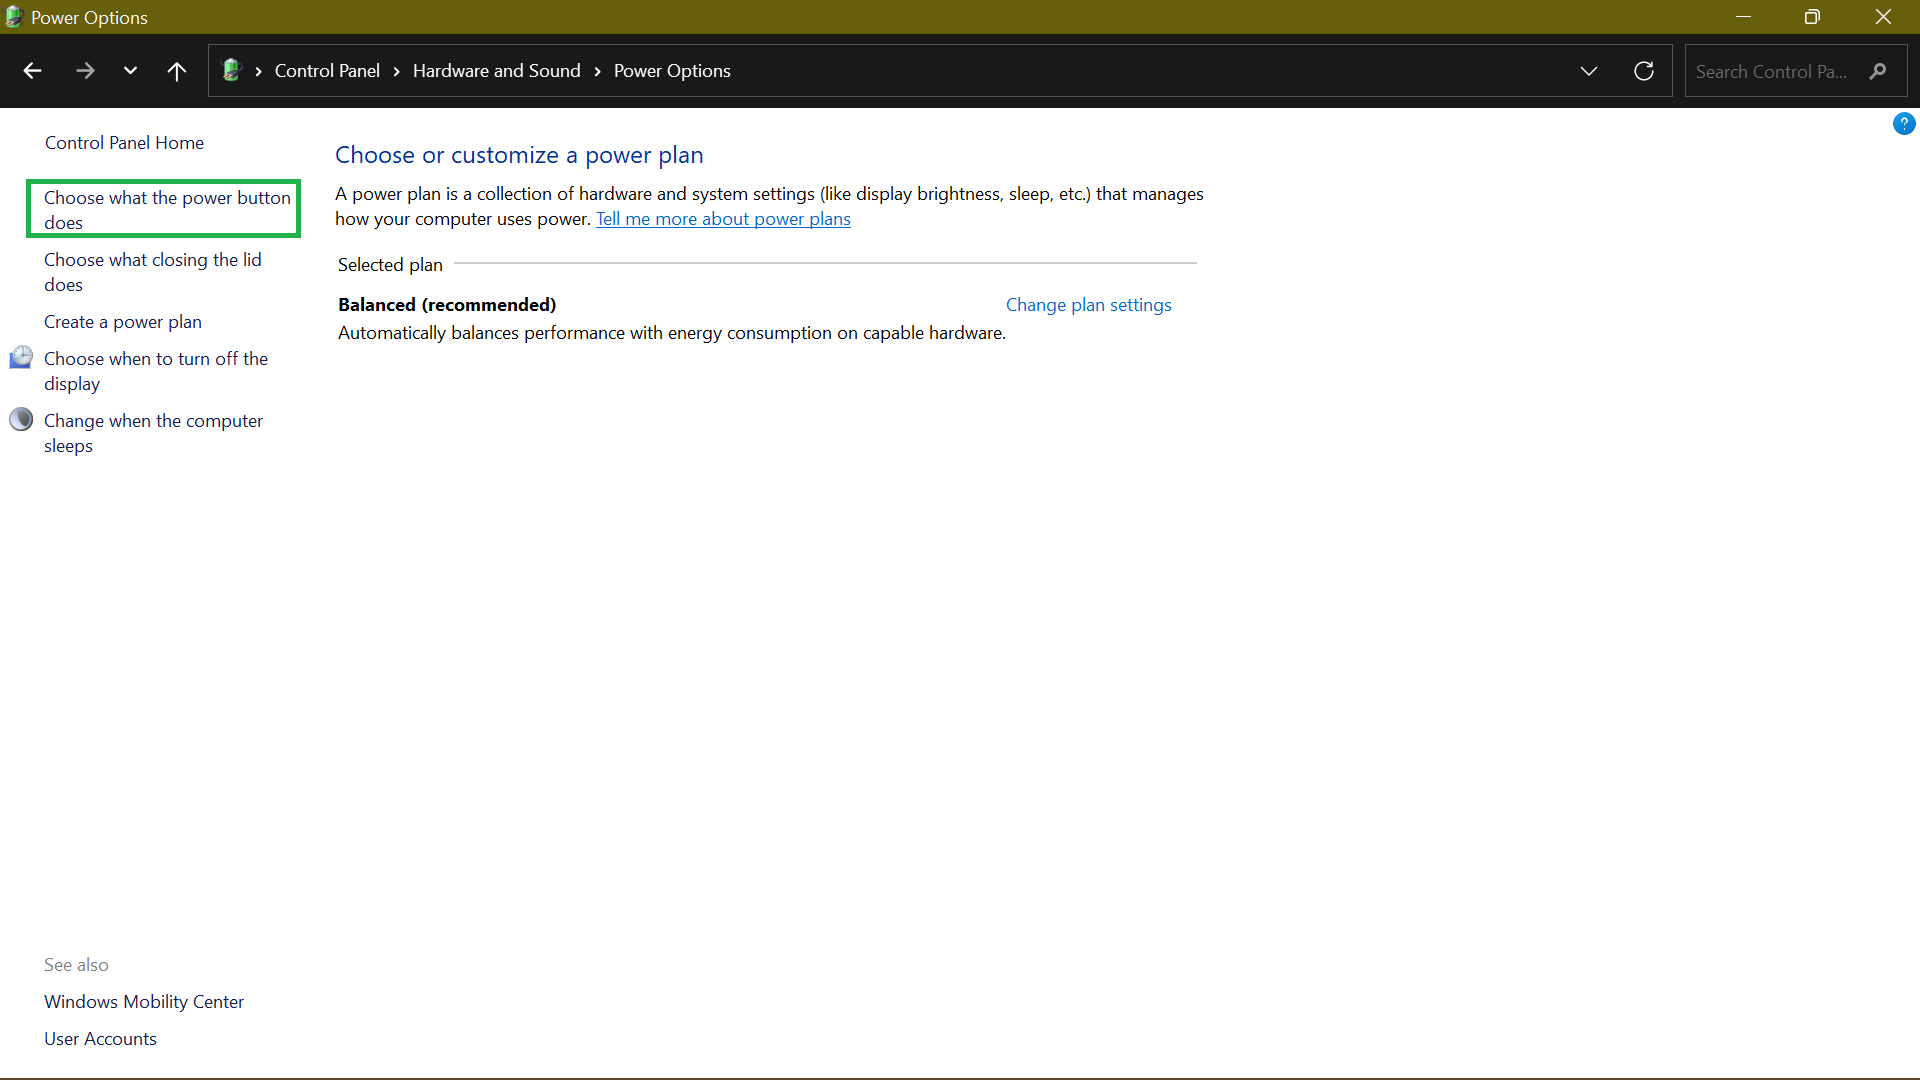
- If the Shut-down settings option is grayed out, click Change settings that are currently unavailable.

- Uncheck the Turn on fast start-up (recommended) box and click on Save changes.
Download Auslogics SSD Optimizer
Your safe and effective SSD performance guard, the app will optimize data placement on your solid-state drive, help clear disk space, monitor drive health and extend its service life.
Method 3: Confirm TRIM is enabled
TRIM ensures that the SSD wipes data from blocks no longer in use. Doing so reduces the write speed and helps maintain optimum performance throughout the SSD’s lifespan.
TRIM should be enabled by default on your Windows 10/11 machine. However, sometimes that’s not the case. That’s why it’s worth checking and ensuring that it’s functioning.
To do so, perform the following steps:
- Hit the
Windows Keyon your keyboard and typeCMD. On the right sidebar, select Run as administrator.
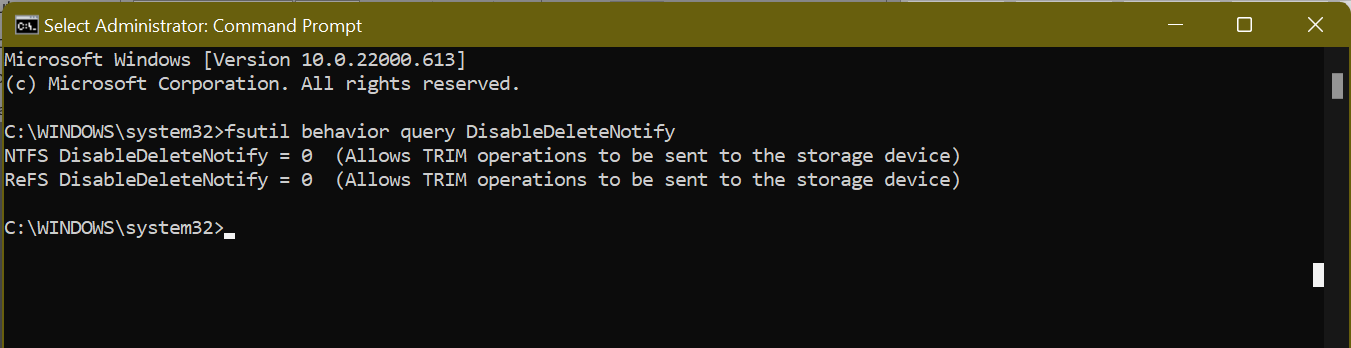
- Next, execute the command
fsutil behavior query DisableDeleteNotify. If it is set to “0”, TRIM is enabled. If it is set to “1”, TRIM is disabled, and you need to enable it.
Method 4: Make sure the SSD firmware is up to date
The SSD can only run efficiently if the SSD firmware stays updated. Unfortunately, the process isn’t automated; you must do it manually. Nonetheless, it’s not a complex process. All you have to do is visit your SSD’s manufacturer’s website and find the available SSD firmware upgrades. Usually, you’ll find a step-by-step guide there on how to update your SSD firmware and help you optimize your SSD .
Related: What is BIOS on a Computer: Everything You Need to Know
Method 5: Turn on write caching
Enabling
write caching may not always be the best idea. And that’s because, in case of a power outage or device malfunction, it might result in data corruption or loss. Therefore, use this feature with caution.
If you want SSD optimization in Windows 10 , follow these steps to enable write caching:
- Right-click your Start Menu or press the
Windows + Xkey combination and select Device Manager. - Locate Disk Drives, expand it, and open Properties. Alternatively, double-click your SSD to open its properties window.
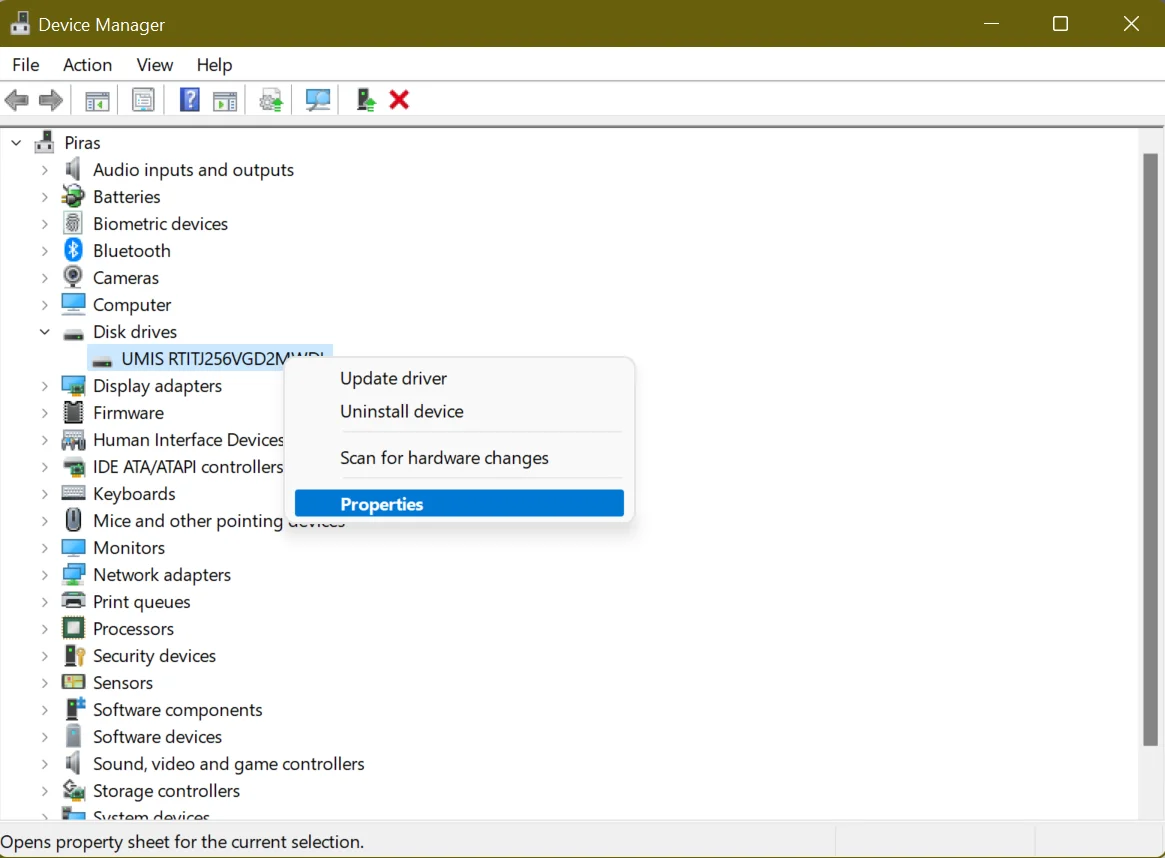
- On the next screen, go to the Policies tab and find the Write-Caching Policy section.
- Under it, you’ll see an option labeled Enable write caching on the device. Check the box next to it and select OK.
Now, use your SSD as you normally would and check for performance behaviors. If it’s improved, keep the option on. If not, follow the process and disable it.
Method 6: Schedule SSD optimization
You may have noticed that modern computers using SSDs don’t have the option to defragment an SSD. On Windows 10 and Windows 11, you can only “Optimize” your drives. Defragmenting a drive ensures that large files are stored in one contiguous section of a hard disk for faster access. It’s applicable for mechanical drives with a long wait time of around 15ms. So, every time a file is fragmented, you lose 15ms as it tries to find the next one. Over time, this can add up, resulting in longer read times. That’s not the case with SSDs since the seek time is approximately 0.1 ms. This speed and the fact that SSDs move data already on your disk to other areas on the disk, usually storing them in a temporary position first, means there’s no performance advantage of defragmentation.
But Windows already knows this. No wonder there isn’t an option to defrag your SSD on modern versions of Windows. In its place is the option to Optimize your SSD.
Among other things, the process will retrim the SSD , which forces the deletion of data no longer deemed necessary, a task usually handled by TRIM.
Therefore, ensure you regularly configure a schedule to allow Windows 10 SSD optimization , thus keeping its performance optimal.
Download Auslogics BoostSpeed to Optimize SSD
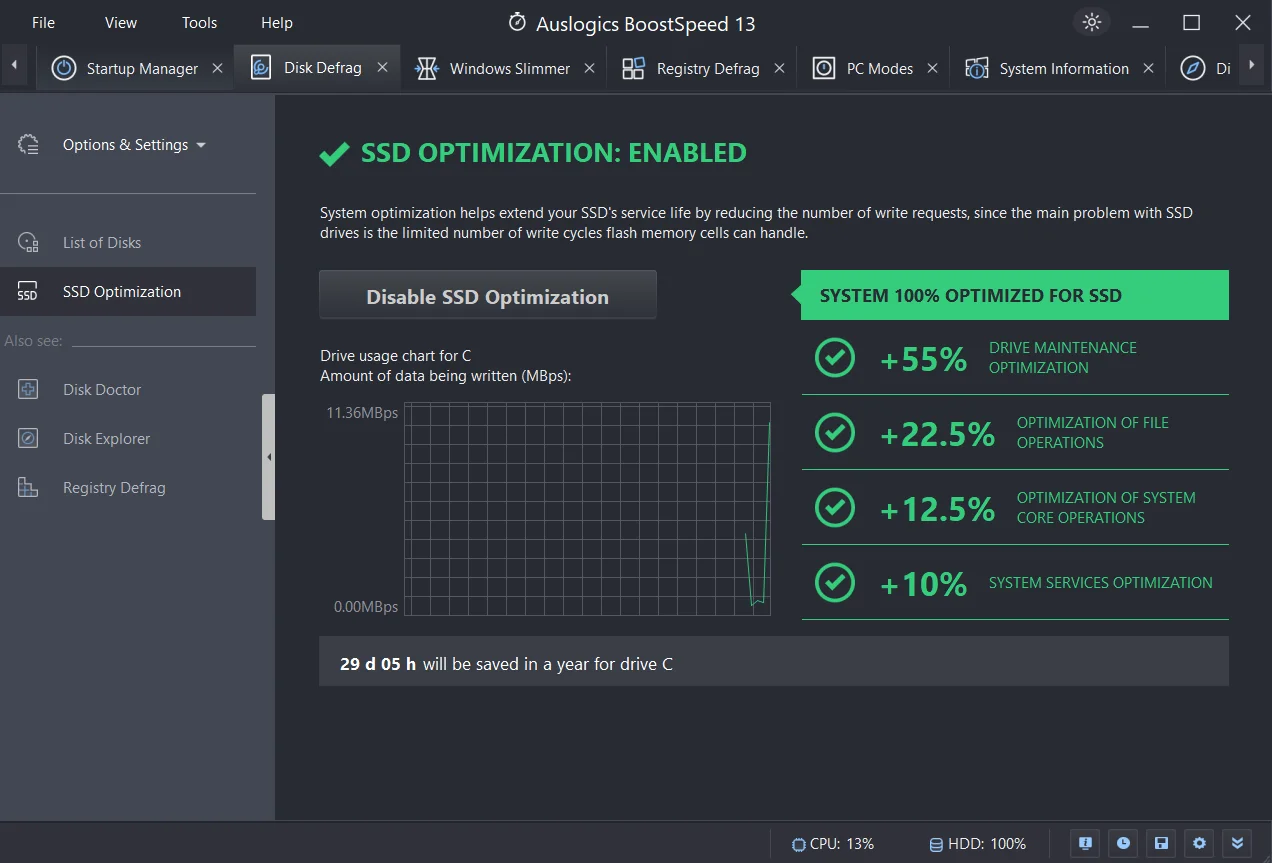
While Windows performs the necessary optimization on your SSD, it doesn’t always resolve speed-reducing issues like junk files, corrupt keys, invalid registry entries, or duplicate files. That’s where a tool such as Auslogics BoostSpeed comes in.
The program automatically scans and detects PC junk like unused error logs, web browser cache, user temporary files, etc.
It then deletes them, reclaiming the much-needed space on your SSD. By freeing up this space, your SSD can perform much better than when it’s almost out of space.
Additionally, BoostSpeed checks your registry and fixes anything damaged or corrupt.
As you are aware, your registry is crucial to your system’s core functioning, and if there are corrupt keys or invalid entries, you might start experiencing system glitches or even crashes.
Generally, BoostSpeed identifies issues that slow down your computer’s performance, tweak non-optimal system settings, and ultimately enhance your PC’s operations.
Download Auslogics BoostSpeed
Your one-stop PC maintenance and optimization tool, this program will clean, speed up, repair and tweak your system to ensure maximum speed and efficiency.
Related: Speed Up Slow Computer: Auslogics BoostSpeed 13
Method 7: Set your power plan to high performance
By default, Windows sets your system to the Balanced power plan, which automatically kills power to your drives when they aren’t in use. This is useful for laptops, as it helps prolong battery life.
Switching to High Performance means the drives remain powered on all the time and will eliminate the lag you notice after your PC has been idle for a while.
To change the power options:
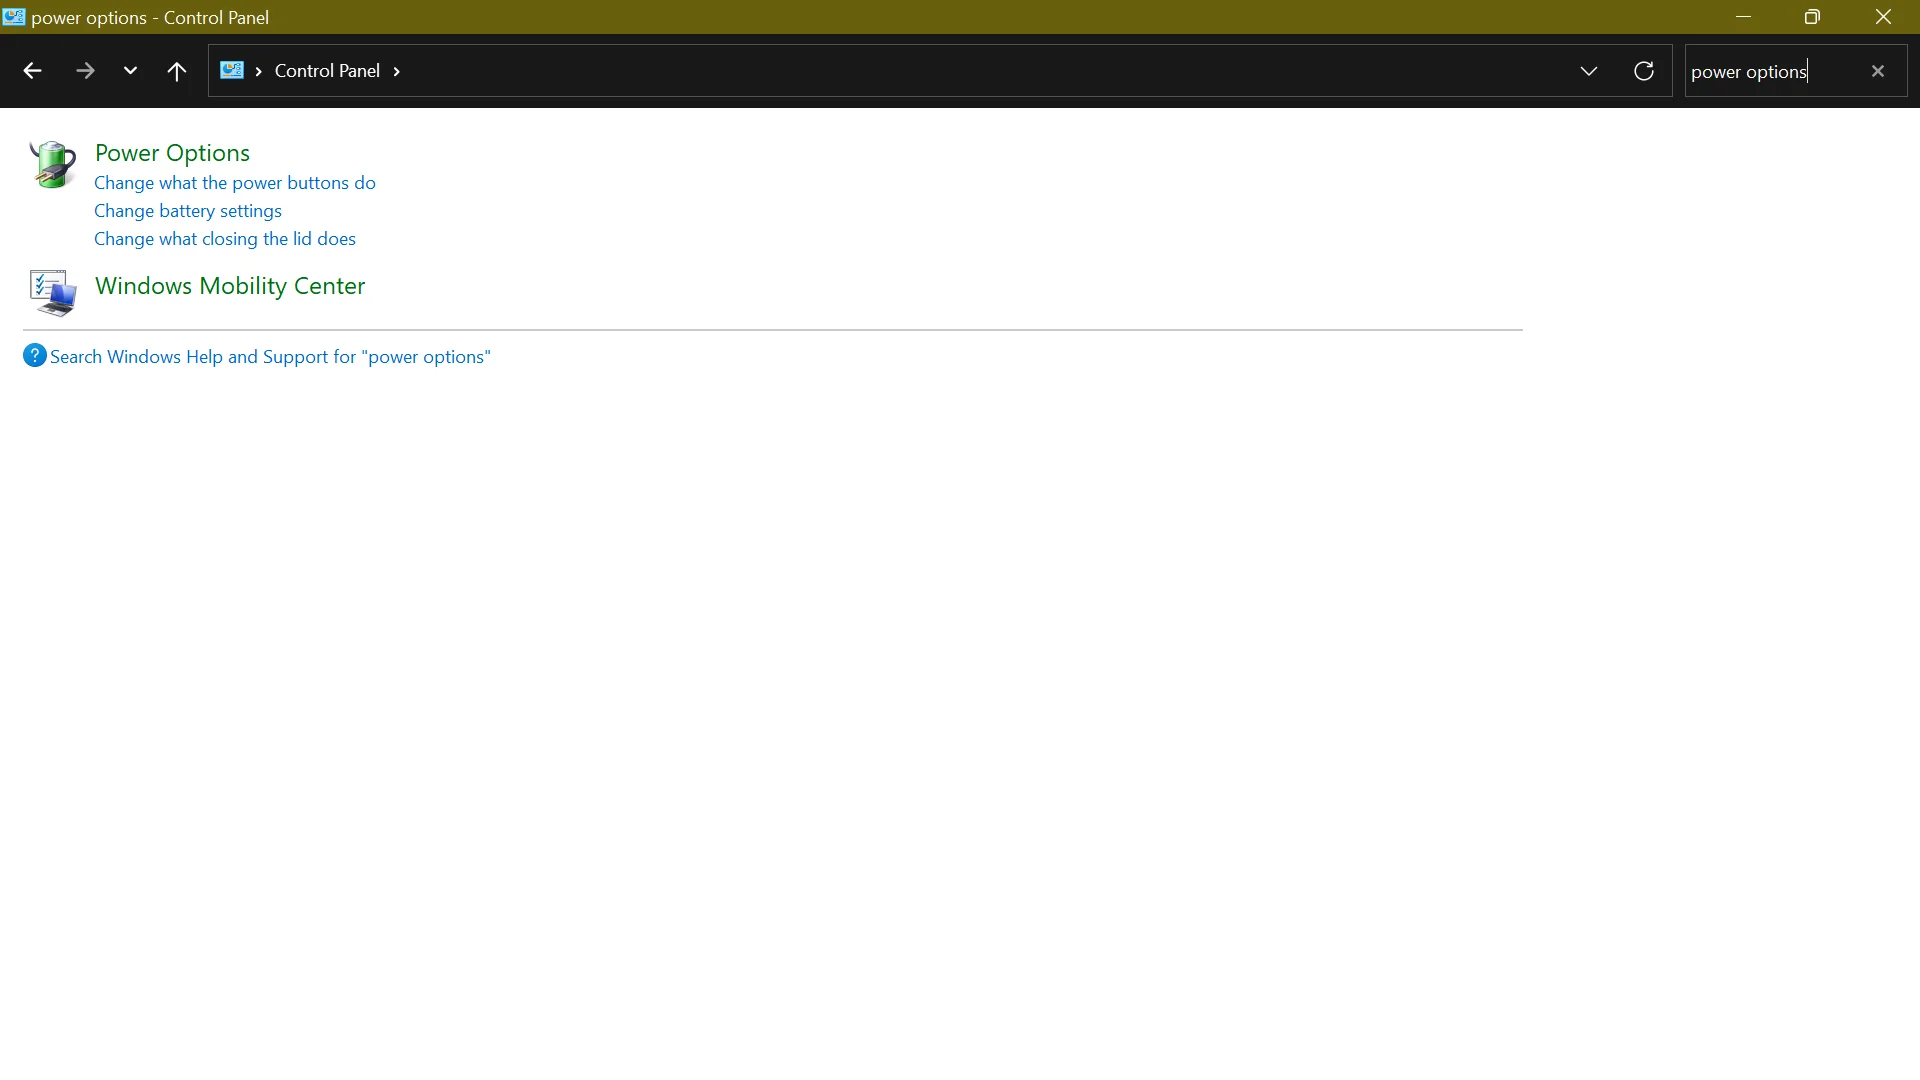
- You’ll need to access the Control Panel via the Start Menu.
- Once there, locate Power Options from Settings. A quick way to do that is to use the search function. Simply type
power optionsin the Search Control Panel text field and select Power Options. - Choose the High Performance option to speed up your system’s performance. However, this power plan will consume more energy, and your battery may drain faster.
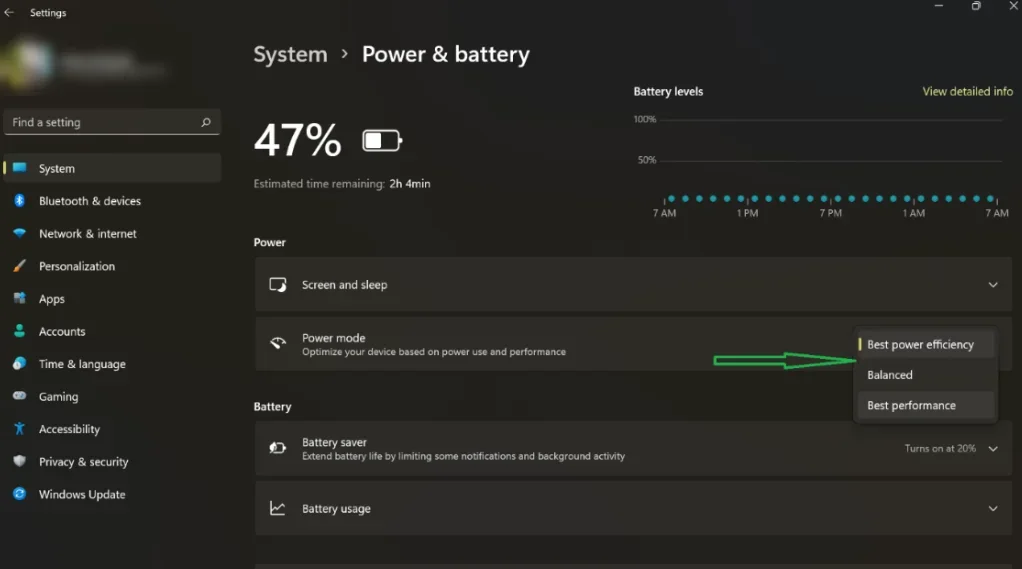
- On a Windows 11 machine, click on the battery icon at the far right corner of your taskbar and select the battery icon on the window that pops up. On the Settings page, click the drop-down menu next to Power mode and choose Best Performance.
There you have it! These SSD tweaks will ensure your Windows 10/11 PC boosts faster and runs efficiently every time you use it.
Method 8: Enable AHCI mode
AHCI is usually confused with IDE mode. The IDE mode is designed to help you easily add and remove hardware components but comes with a speed penalty.
On the other hand, AHCI or advanced host controller interface uses a more streamlined approach that doesn’t require too much overhead, making your computer faster overall.
Setting the SATA controller to run in AHCI Mode ensures your SSD performs better.
If you want to optimize your SSD, switch from IDE mode to AHCI in your BIOS. However, you must do this before installing your Windows OS.
Otherwise, your PC will fail to boot properly. It will only force you to format Windows and reinstall it in the correct mode.
Then again, enabling the AHCI mode on a Windows install that is in IDE mode is possible. And for this, you need to access the registry. Here’s how:
- Launch the Run menu by pressing the
Windows + Rshortcut. - Input
regeditand pressEnterto launch the Registry Editor. - Then go to HKEY_LOCAL_MACHINE\System\CurrentControlSet\services\iaStorV and change the reg_dword start value from 3 to 0.
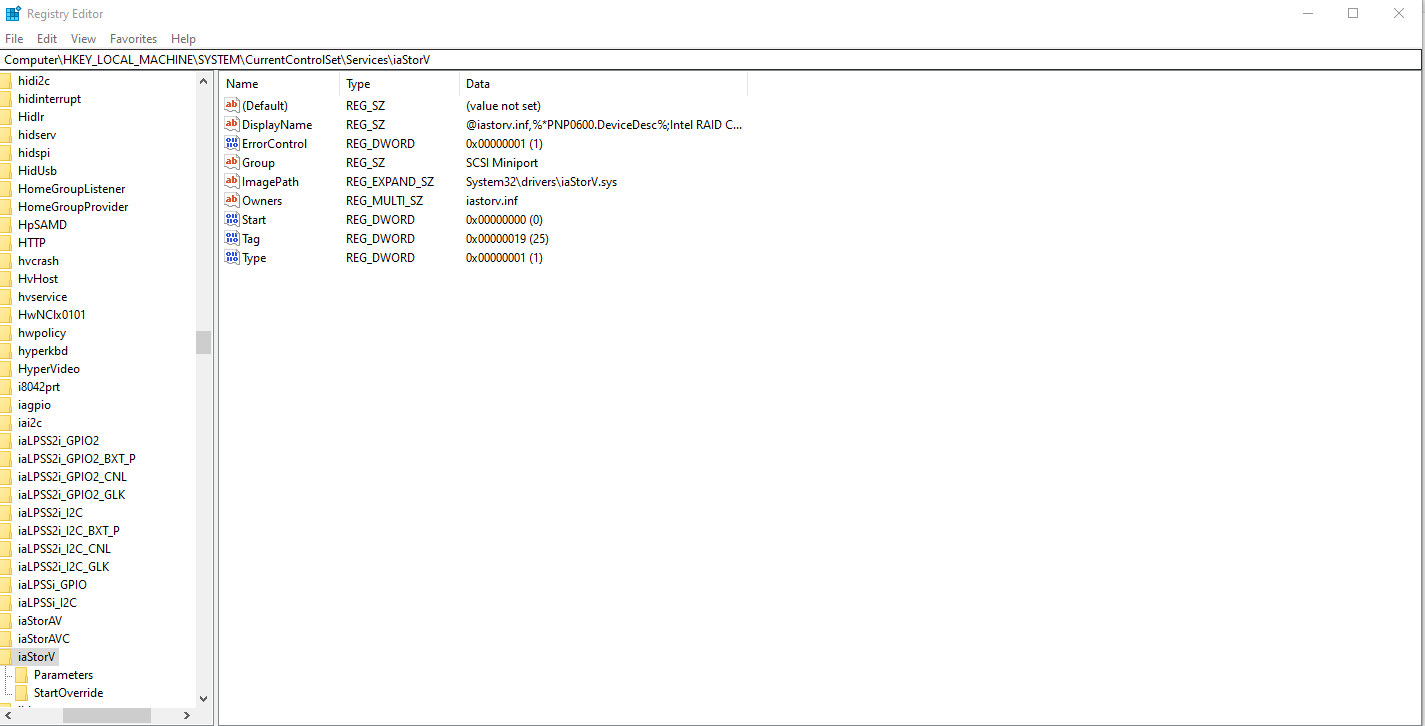
- Next, access this location: HKEY_LOCAL_MACHINE\System\CurrentControlSet\services\msahci and change the reg_dword start value to 0.
- Once done with these two changes, restart your computer and enter the BIOS mode.
- Now, switch from the IDE mode to AHCI.
Method 9: Disable indexing service/Windows search
When searching, Windows checks all your disks when looking for documents. This means every bit of data on your computer is being read multiple times as it searches. Because of its design, an SSD can only be written several times before it starts deteriorating in performance and dies, making indexing your search process even more important. By disabling the indexing service, Windows is prevented from writing data over an existing file. This means you can significantly increase your drive’s life span without reducing speed. So, how do you disable the indexing service?
- Press
WindowsKey + Rto launch and open a Run box. - Type
services.msc. - Find Windows Search and right-click on it.
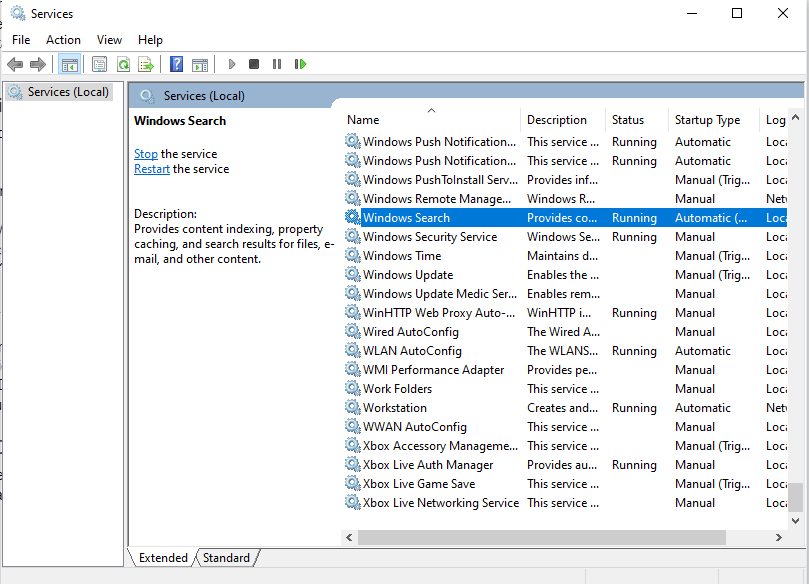
- Select Properties and click Stop.
- Change the Startup type to Disabled.
- Click OK and restart your PC.
Conclusion
You can use the SSD optimization methods discussed in this guide to improve your Pc performance. Although SSDs offer outstanding speed, remember they are not immune to deterioration. So you need to regularly backup your data
.
By implementing the suggested SSD optimization techniques, you can ultimately unlock the potential of your SSD and experience a faster, more effective computing experience.
FAQs
How to improve SSD performance?
You can improve SSD speed by updating the SSD firmware, ensuring the most recent drivers are loaded, turning on TRIM, turning off pointless background processes, and not using the SSD to its maximum capacity.
Do SSDs need defragmentation?
If you defrag SSD like an HDD, it won’t improve your computer performance. That’s because SSDs operate differently from HDDs. After all, they access data electronically, not physically, like HDDs.
You can use software like Auslogics BoostSpeed’s Disk Defrag to optimize SSDs because it uses a unique algorithm to optimize your system.
Should SSDs be optimized?
Yes. SSDs can benefit from SSD optimization. This includes turning on TRIM, turning off disk indexing, changing power options, and configuring the operating system to work best with SSDs.
You can check out Auslogics BoostSpeed to defrag your SSD in a way that improves your system’s performance.
What does SSD optimization do?
SSD optimization involves implementing different methods to increase the SSD’s performance and lifespan.
Typically, it involves turning on TRIM, stopping pointless background programs, tweaking power options, and setting up the operating system to take advantage of the SSD’s features best.