
Here is how to check if your Processor is 32-bit, 64-bit, or ARM in Windows 10 (CPU architecture).
The CPU, Central Processing Unit, or simply Processor is the main electronic circuitry in a computer responsible for carrying out instructions of a computer software, including the OS and installed apps. It also manages the other components in your computer by performing the basic arithmetic, logic, controlling, and input/output (I/O) operations specified by the instructions in the program. The architecture of the CPU defines which OS you will be able to run on your computer and which apps you will be able to use.
Modern consumer devices include processors of the following CPU architectures: 32-bit (x86), 64-bit (x64), or ARM. If your CPU is a 32-bit processor, you will only be able to install a 32-bit version, e.g. a 32-bit Windows 10 release, a 32-bit Linux distro, etc. A 64-bit CPU is able to handle both 32-bit and 64-bit operating systems. In this case, it is recommended you to install a 64-bit OS in order to use all available hardware resources. Check out the following CPU requirements for Windows 10.
This post will show you how to find the CPU architecture and check if it is 32-bit, 64-bit, or ARM on Windows 10. There are two methods you can use.
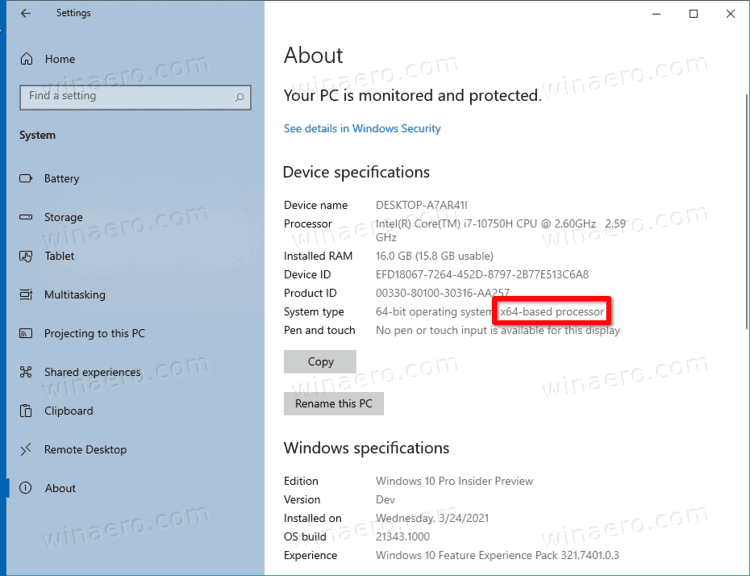
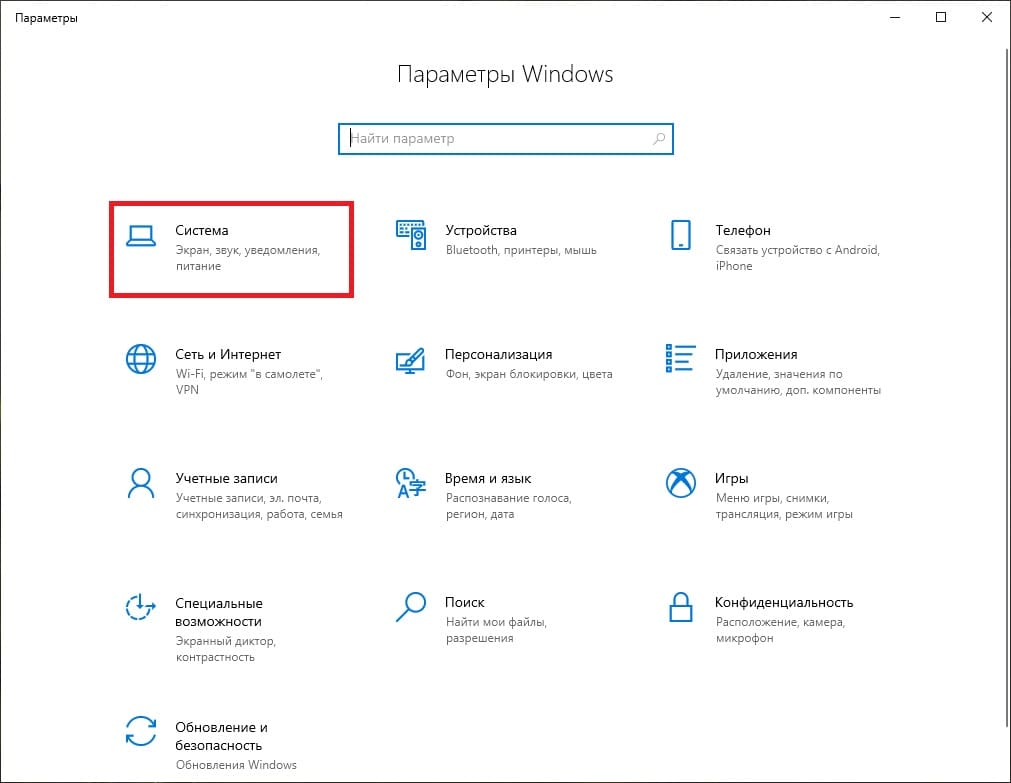
- Open the Settings app.
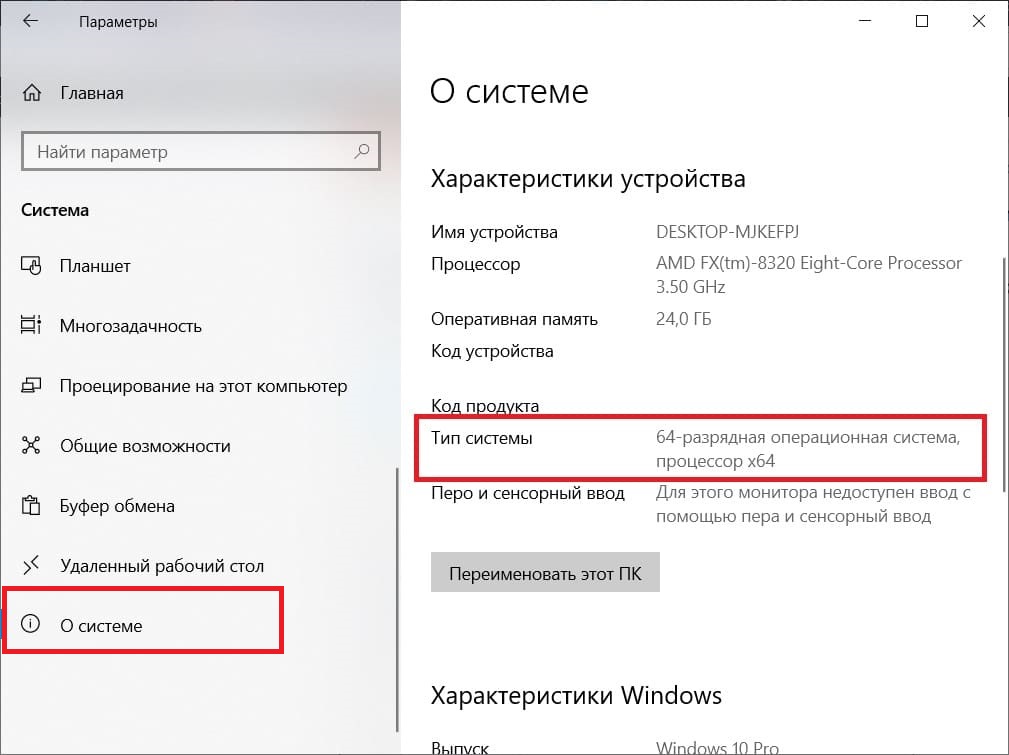
- Navigate to System > About.
- On the right, check out the System type value.

- It shows either a x86-based processor (32-bit), x64-based processor (64-bit), or ARM-based processor depending on the hardware you have.
You are done.
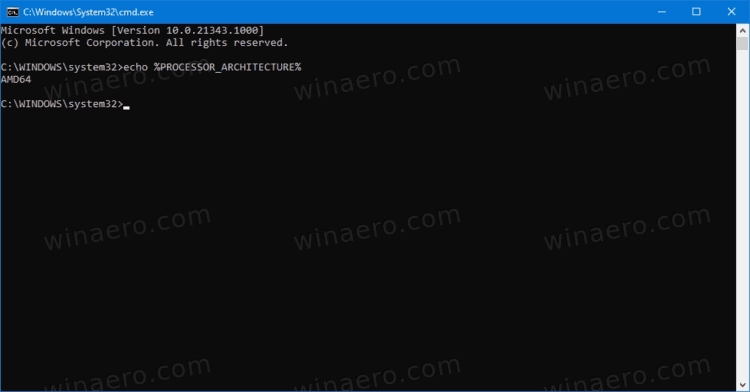
That’s quite easy and simple. However, there is an alternative method you can use. You can find find the CPU architecture in the command prompt. That can be used in various automation scenarios.
Find CPU architecture type in command prompt
- Open a new command prompt.
- Type
echo %PROCESSOR_ARCHITECTURE%and hit the Enter key. - The output includes one of the following values: x86 for a 32-bit CPU, AMD64 for a 64-bit CPU, or ARM64.

- You can close the command prompt if you want.
It is worth mentioning that while there are plenty of 32-bit only devices in use, they no longer being produced and superseded by x64 processors. Also, Microsoft still releases Windows 10 32-bit, but that’s not for long.
That’t it.
Support us
Winaero greatly relies on your support. You can help the site keep bringing you interesting and useful content and software by using these options:
If you like this article, please share it using the buttons below. It won’t take a lot from you, but it will help us grow. Thanks for your support!
Check four ways to tell if your computer is 32 or 64 it in Windows 10:
| Workable Solutions | Step-by-step Troubleshooting |
|---|---|
| Fix 1. Check System Type from Settings | Click the Start button and then select «Settings > System». Click «About» on the left panel of the System…Full steps |
| Fix 2. Check System Version Using Command Prompt | Type cmd in the search box and press Enter. Run Command Prompt as administrator. Type systeminfo…Full steps |
|
Fix 3. Check Windows 10 System Type with Run Tool |
Press Win + R keys to open the Run tool. Type msinfo32 in the box and click «OK». The System Information…Full steps |
|
Fix 4. Check Windows System Type in Control Panel |
Open the Control Panel and choose «System». On the system settings screen, click «About». Find Device specifications…Full steps |
When using a computer, it is often necessary to install software or install device drivers for the hardware. At this point, you are often asked whether the computer is 32-bit or 64-bit. Many users are at a loss when asked this question, but choosing the wrong one, you may get stuck and cannot continue. So it’s important to know whether your Windows version is 32-bit or 64-bit.
In this article, you will learn how to tell if your computer is 32-bit or 64-bit and get a comprehensive understanding of the difference between 32-bit and 64-bit computers. If you’re interested, don’t miss it. Let’s start now.
How to Tell if Your Computer Is 32 or 64 Bit Windows 10 in 4 Ways
If you don’t know or are unsure what version, 32-bit or 64-bit, of Windows 10 your computer is running, take any of the following four ways to check if you have a 32-bit or 64-bit Windows 10.
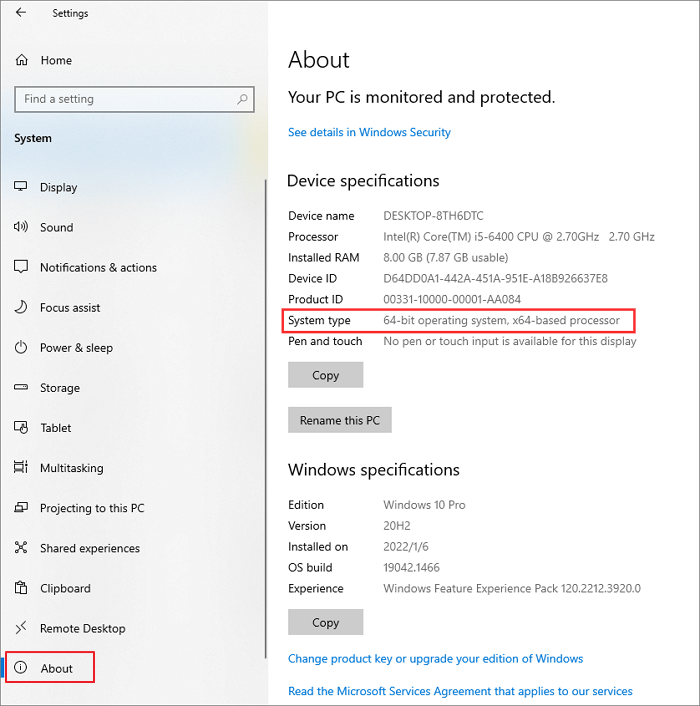
Method 1. Check System Type from Settings
Step 1. Click the Start button and then select «Settings > System».
Step 2. Click «About» on the left panel on the System Settings window.
Step 3. At the right pane, under Device specifications, find «System type». Then, you will see if your computer is running a 64-bit operating system, x64-based processor, or not.
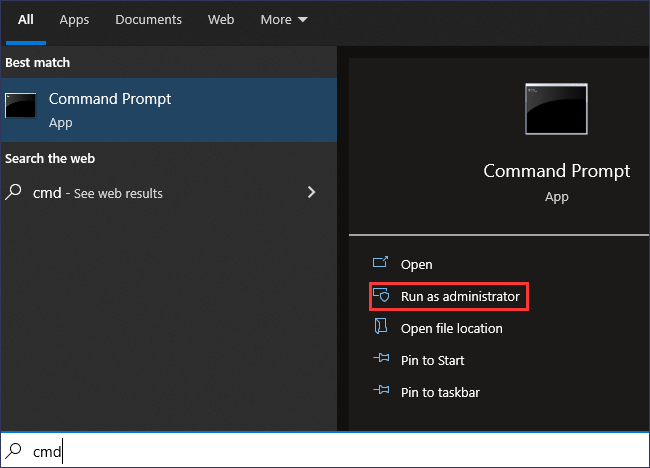
Method 2. Check if the Windows 10 System Is 32-Bit or 64-Bit in CMD
Step 1. Type cmd in the search box and press Enter.
Step 2. Click «Command Prompt» from search results and choose «Run as administrator» at the right.
Step 3. In the Command Prompt window, type systeminfo and press Enter.
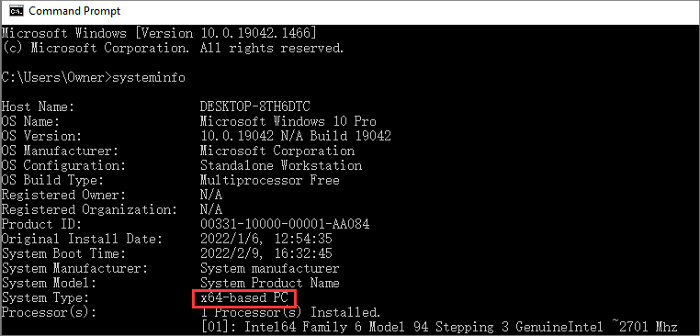
Step 4. The system information will display on the screen. Find System Type and check if your Windows 10 is 32-bit or 64-bit.
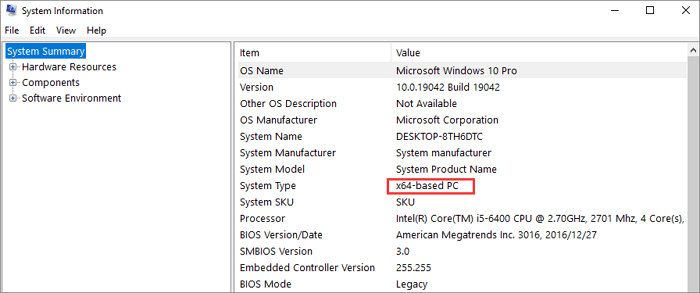
Method 3. Check Windows 10 System Type with Run Tool
Step 1. Press Win + R keys at the same time to open the Run tool.
Step 2. In the Run box, type msinfo32 and click «OK».
Step 3. The System Information window will pop up.
Step 4. Find «System Type» in the right dialog and check if your Windows is an x86-based PC or an x64-based PC.
Method 4. Check Windows System Type in Control Panel
Step 1. Open the Control Panel on your computer. Choose «System».
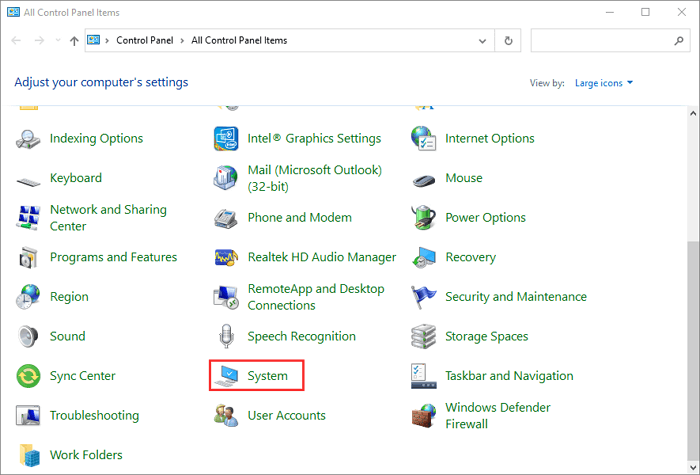
Step 2. On the system settings screen, click «About».
Step 3. Find Device specifications and check the System type like the screenshot shows below.
Related Reading: Windows 10 64-Bit Free Download Full Version
Additional Guide: How to Perform 64-Bit or 32-Bit Windows 10 Data Recovery Without Backup
Whether your computer is 64-bit or 32-bit Windows 10, data loss may happen unexpectedly due to system installation, hard drive problem, or software crash. How to perform Windows 10 data recovery without backup? Try EaseUS Data Recovery Wizard to make it easy.
- Recover deleted Word, Excel, PPT, PDF, photos, videos, audio, emails, and other hundreds of files
- recover deleted files from Recycle Bin, HDD, SSD, USB flash drive, SD card, and external hard drives
- Restore lost data on Windows 10/8.1/8/7/Vista/XP and Windows Server 2019 — 2003
- Retrieve deleted files from Mac computer running macOS 11.2 ~ 10.9
Now, free download this file recovery and repair tool to retrieve lost data on Windows 10 for any reason.
Note: To guarantee a high data recovery chance, install EaseUS data recovery software on another disk instead of the original disk where you lost files.
Step 1. Launch EaseUS Data Recovery Wizard on your Windows 11, Windows 10, Windows 8, or Windows 7 computer. Select the disk partition or storage location where you lost data and click «Search for Lost Data».

Step 2. This recovery software will start scanning the disk to find all lost and deleted files. When the scan process completes, click «Filter» > «Type» to specify lost file types. If you remember the file name, you can also search in the search box, which is the fastest way to find the target file.

Step 3. Preview and restore lost Windows files. You can double-click to preview the scanned files. Then, select the target data and click the «Recover» button to save them to another safe spot in the PC or Cloud drive.

32-Bit and 64-Bit Windows: Frequently Asked Questions
Here are more helpful answers to some common questions about the 32-bit and 64-bit versions of Windows.
1. What’s the difference between 32-bit and 64-bit Windows?
The terms 32-bit(x86) and 64-bit(x64) refer to the way a computer’s processor (also called a CPU), handles information. 64-bit computers are theoretically more powerful and faster at processing data than 32-bit computers. Here are the main differences:
- Different computing abilities: 64-bit systems are theoretically twice as fast as 32-bit systems, and their memory addressing is different.
- The maximum running memory is different: 32-bit computers only support the maximum 4G (generally only 3.25G or so), and 64-bit computers can support 128G or even larger.
- Support different software versions: a 32-bit computer can only run 32-bit software, while a 64-bit computer can run 32-bit software as well as 64-bit software.
- Different supported systems: 32-bit computers support 32-bit systems, while 64-bit computers support both 32-bit and 64-bit systems.
2. How can I tell if my computer is running a 32-bit or 64-bit version of Windows 11?
The way to check the system type of Windows 11 is the same as that on Windows 10:
Step 1. Choose «Start > Settings > System > About».
Step 2. Find System type under «Device specifications».
Step 3. See if your computer is running a 32-bit or 64-bit version of Windows.
3. Is my computer 32 or 64-Bit Windows 8?
Find the operating system information in Windows 8.1 or Windows RT 8.1 in these ways:
Step 1. Select «Settings» and click «Change PC settings».
Step 2. Choose «PC and devices > PC info».
Step 3. Under PC, you will see the System type is a 32-bit or 64-bit version of Windows.
4. How to tell if your computer is 32 or 64-bit Windows 7?
Step 1. Click the Windows icon. Type computer in the search box.
Step 2. Choose «Computer» from search results. Right-click it and choose «Properties».
Step 3. Under Windows edition, you’ll see which version and edition of Windows 7 your computer is running.
The Bottom Line
There are noticeable differences in hardware and software compatibility between 32-bit and 64-bit computers. Knowing whether your computer is 32-bit or 64-bit will help you use it properly. You can use the ways above to check which version is your system type on Windows 11, Windows 10, Windows 8, and Windows 7.
If you have any further problems on Windows computer, including Windows file restoring, feel free to contact us via email or live chat.
Applies ToLync 2010
При установке программы Microsoft Lync 2010 в зависимости от операционной системы компьютера следует использовать 32-разрядную или 64-разрядную версию установщика.
Минимальные требования к операционной системе для Lync 2010 — это Windows 7, Windows Vista или Windows XP Professional с пакетом обновления 3 (SP3). Дополнительные сведения о требованиях к системе см. в статье Требования к системе для Lync Online и настройки «Собрание по сети» для Microsoft Lync 2010.
Определение разрядности операционной системы
-
Windows 7 или Windows Vista
-
Windows XP Professional
Windows 7 или Windows Vista
В системах Windows Vista и Windows 7 есть два способа определить разрядность версии. Если не сработает один, используйте другой.
Способ 1. Окно «Система» панели управления
-
Нажмите кнопку Пуск, введите система в поле поиска и выберите пункт Система в списке Панель управления.
-
Операционная система описывается следующим образом:
-
64-разрядная версия: в разделе Система в поле Тип системы указано 64-разрядная операционная система.
-
32-разрядная версия: в разделе Система в поле Тип системы указано 32-разрядная операционная система.
Способ 2. Окно «Сведения о системе»
-
Нажмите кнопку Пуск, введите система в поле поиска и щелкните Сведения о системе в списке Программы.
-
При выборе пункта Сводные сведения о системе в области навигации операционная система описывается следующим образом:
-
64-разрядная версия: в разделе Элемент в поле Тип системы отображается запись Компьютер на базе x64.
-
32-разрядная версия: в разделе Элемент в поле Тип системы отображается запись Компьютер на базе x86.
Windows XP Professional
В Windows XP есть два способа определить разрядность версии. Если не сработает один, используйте другой.
Способ 1. Окно «Свойства системы» в панели управления
-
Нажмите кнопку Пуск, а затем — Выполнить.
-
Введите sysdm.cpl и нажмите кнопку ОК.
-
Откройте вкладку Общие. Операционная система описывается следующим образом:
-
64-разрядная версия: Windows XP Professional, выпуск x64, версия <год> в разделе Система.
-
32-разрядная версия: Windows XP Professional, версия <год> в разделе Система
Способ 2. Окно «Сведения о системе»
-
Нажмите кнопку Пуск, а затем — Выполнить.
-
Введите winmsd.exe и нажмите кнопку ОК.
-
Выбрав пункт Сведения о системе в области навигации, найдите Процессор в разделе Элемент в области сведений. Обратите внимание на указанное значение.
-
Если значение в строке Процессор начинается с x86, то на компьютере установлена 32-разрядная версия Windows.
-
Если значение в строке Процессор начинается с ia64 или AMD64, то на компьютере установлена 64-разрядная версия Windows.
Нужна дополнительная помощь?
Нужны дополнительные параметры?
Изучите преимущества подписки, просмотрите учебные курсы, узнайте, как защитить свое устройство и т. д.
Все способы:
- Методы определения разрядности Windows 10
- Способ 1: AIDA64
- Способ 2: Системные средства
- Вопросы и ответы: 0
При установке стороннего программного обеспечения необходимо обязательно учитывать разрядность как его самого, так и операционной системы. В противном случае инсталлировать ничего не получится. И если все необходимые данные о загружаемой программе обычно отображаются на сайте, то как, в свою очередь, узнать разрядность ОС? Именно о том, как выяснить эту информацию в Windows 10 мы и расскажем в рамках данной статьи.
Методы определения разрядности Windows 10
Существуют множество способов, которые помогут узнать битность используемой операционной системы. Причем сделать это можно как с помощью стороннего софта, так и встроенными средствами самой ОС. Мы расскажем вам о двух самых популярных методах, а в заключении поделимся полезным лайфхаком. Давайте приступать.
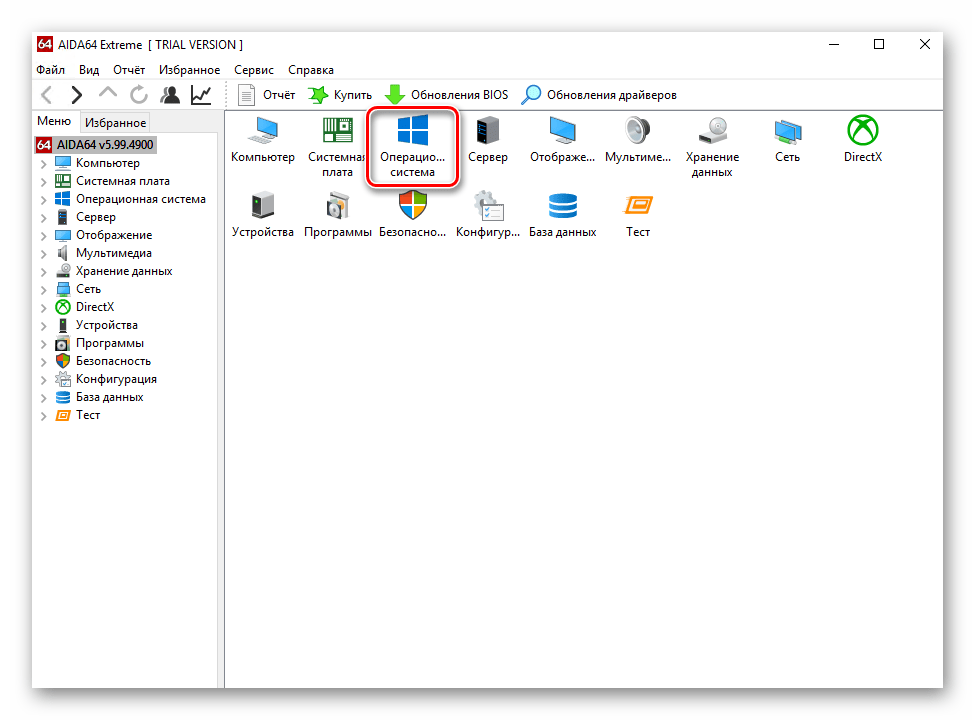
Способ 1: AIDA64
Помимо определения разрядности операционной системы, упомянутое в названии приложение способно предоставить огромное количество другой полезной информации. Причем не только о программных компонентах, но и о «железе» ПК. Для получения интересующих нас сведений нужно сделать следующее:
Скачать AIDA64
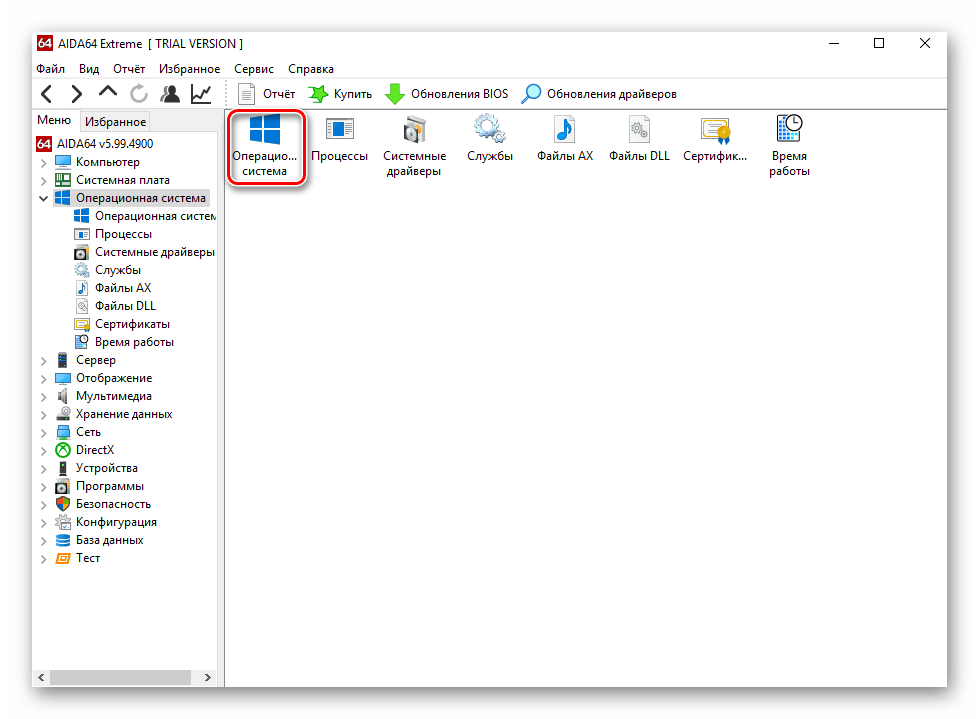
- Запустите ранее скачанную и инсталлированную AIDA64.
- В основной области открывшегося окна найдите раздел с названием «Операционная система»и откройте его.
- Внутри будет находиться перечень подразделов. Кликните по самому первому из них. Он носит такое же название, как и основной раздел.
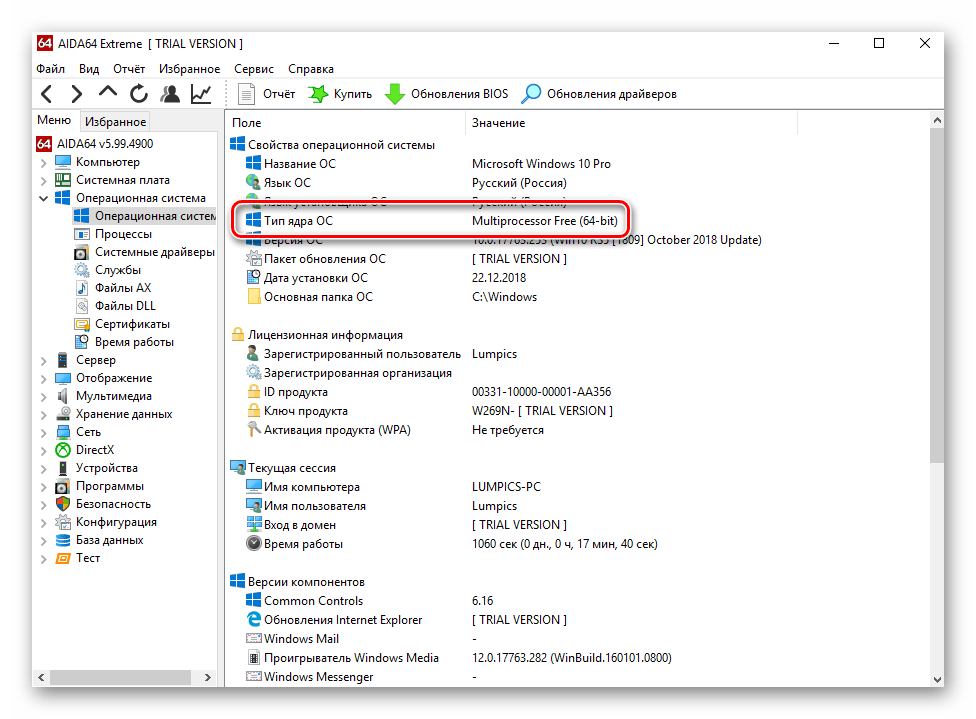
- В результате откроется окно со информацией об используемой системе, где есть и данные о разрядности Windows. Обратите внимание на строку «Тип ядра ОС». Напротив нее в самом конце в скобках стоит обозначение «x64» в нашем случае. Именно это и есть битность архитектуры. Она может быть «x86(32)» либо же «x64».
Как видите, этот способ достаточно прост и легок в применении. Если же вам по каким-то причинам не нравится AIDA64, можно использовать аналогичный софт.
Способ 2: Системные средства
Если вы из тех пользователей, которые не любят устанавливать лишнее программное обеспечение на компьютер, можете воспользоваться стандартным инструментарием ОС, благодаря которому тоже можно узнать ее разрядность. Мы выделили два пути.
Свойства системы
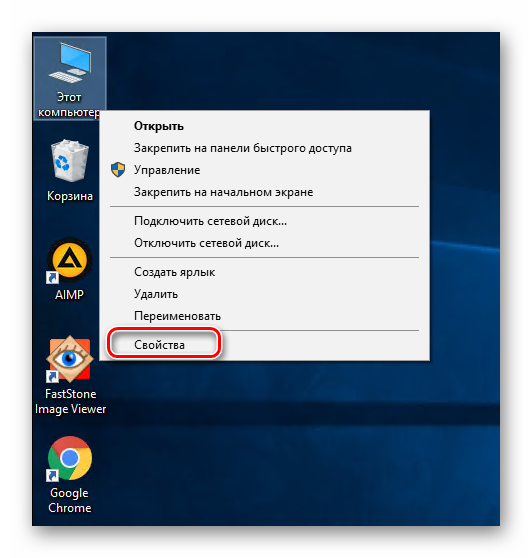
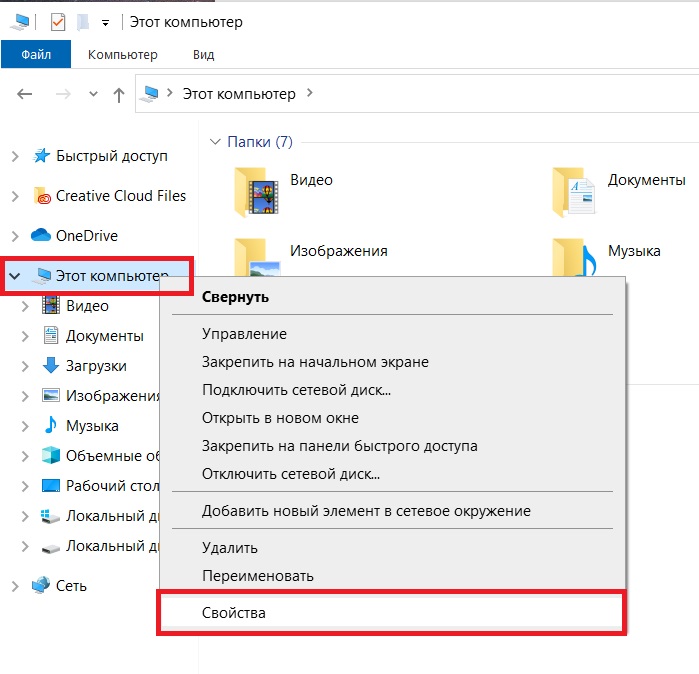
- На рабочем столе найдите иконку «Этот компьютер». Нажмите на ней правой кнопкой мышки. В меню, которое появится в результате, выберите пункт «Свойства». Вместо выполнения этих действий можно воспользоваться клавишами WIN+PAUSE.
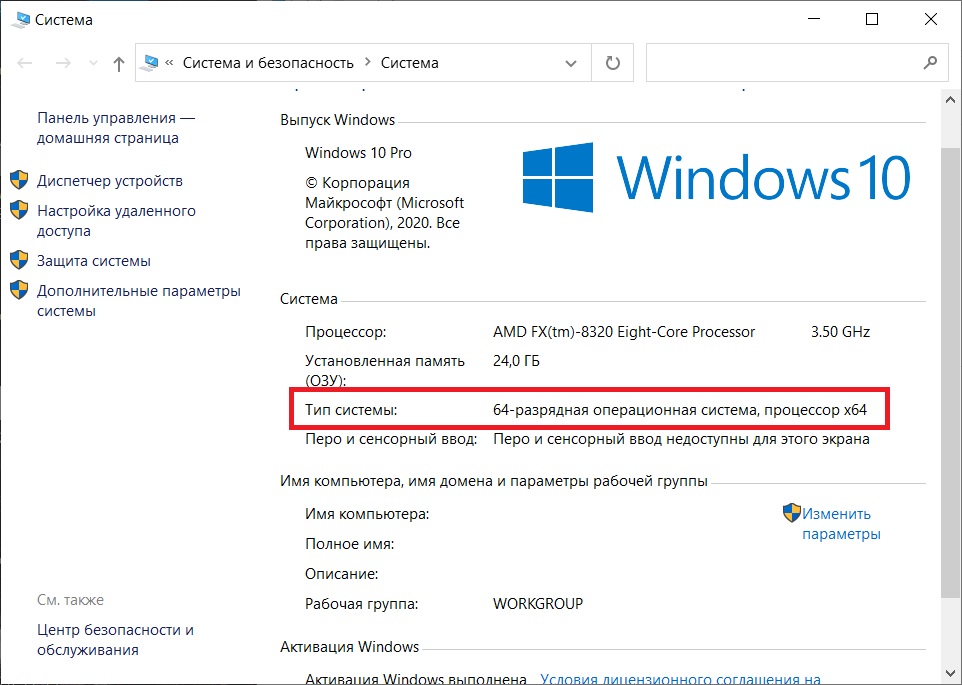
- Появится окно с общими сведениями о компьютере, где есть и данные о разрядности. Они указаны в строке «Тип системы». Пример вы можете увидеть на скриншоте ниже.

«Параметры» ОС
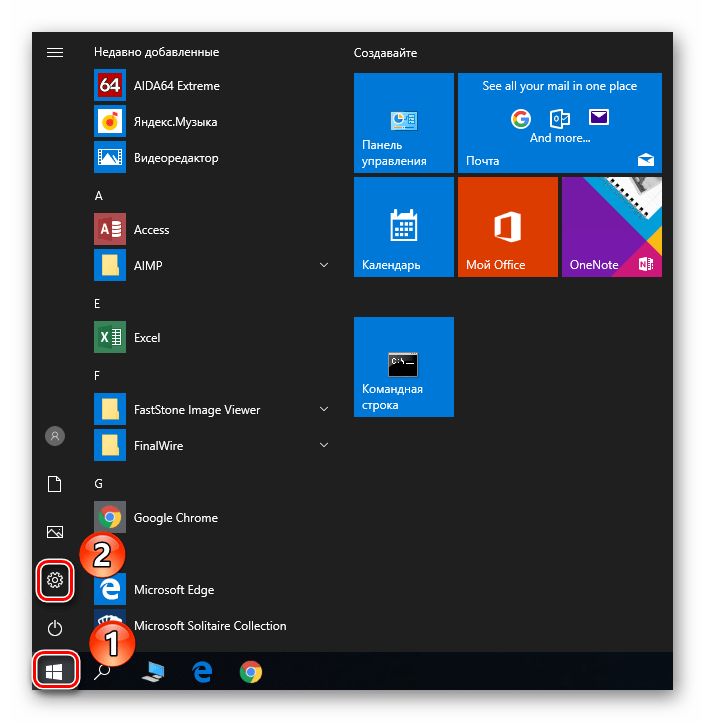
- Нажмите на кнопку «Пуск» и кликните во всплывшем меню по кнопке «Параметры».
- Из перечня разделов выберите самый первый – «Система», кликнув один раз по его названию.
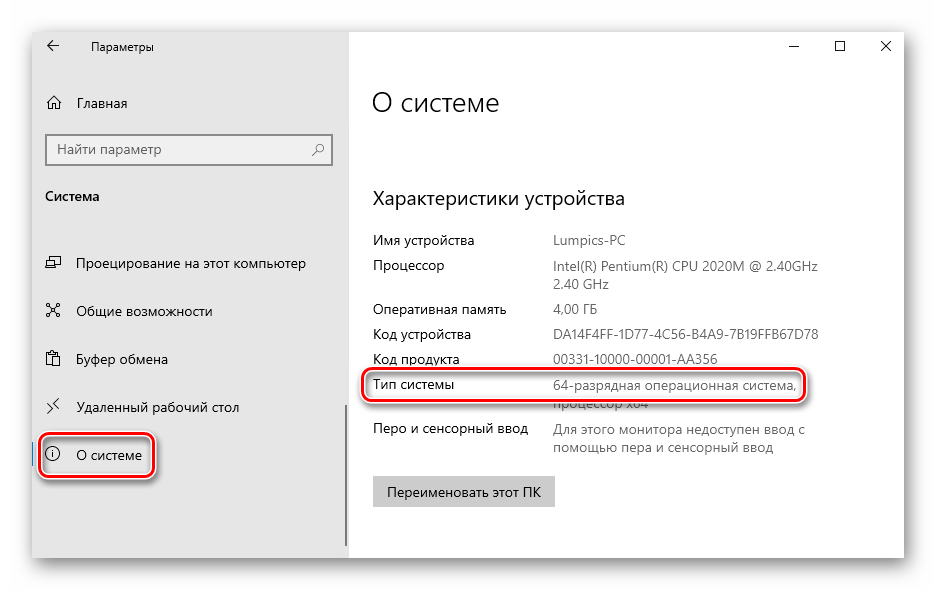
- В результате вы увидите новое окно. Оно разделено на две части. Прокрутите левую область в самый низ до подраздела «О системе». Выберите его. После нужно прокрутить немного вниз и правую половину окна. В области «Характеристики устройства» будет блок с информацией. Разрядность используемой Windows 10 указана напротив строки «Тип системы».
На этом описание методов определения битности завершено. В начале статьи мы обещали вам рассказать о небольшом лайфхаке на эту тему. Он довольно прост: откройте системный диск «C» и взгляните на папки внутри. Если в нем есть два каталога «Program Files» (с пометкой х86 и без нее), то у вас 64-разрядная система. Если папка «Program Files» одна – система 32-битная.
Надеемся, что изложенная нами информация была для вас полезной и вы без труда смогли определить разрядность Windows 10.
Наша группа в TelegramПолезные советы и помощь
В данной статье рассмотрим как узнать разрядность Вашей операционной системы Windows (10, 8/8.1, 7, Vista). Разрядность системы может быть как x64, или x32. Главное отличие у них в том, что x32 (x86) не поддерживает видимость и работоспособность оперативной памяти (озу) более 4х Гб, а так же, x32 (x86) система не поддерживает x64 приложения.
Общая инструкция
Проще всего — это сделать из проводника в меню «Свойства системы», данная инструкция подходит для всех версий Windows. Заходим в проводник, в левом меню правой кнопкой мыши нажимаем на «Этот компьютер» (Компьютер) => Свойства
Далее в этом меню смотрим на пункт «Тип системы». Как пример на скриншоте ниже — указано, что установлена x64 версия системы.
Как определить разрядность системы только для Windows 10
В Windows 10 есть особое меню «Параметры Windows», которое так же позволяет посмотреть разрядность системы.
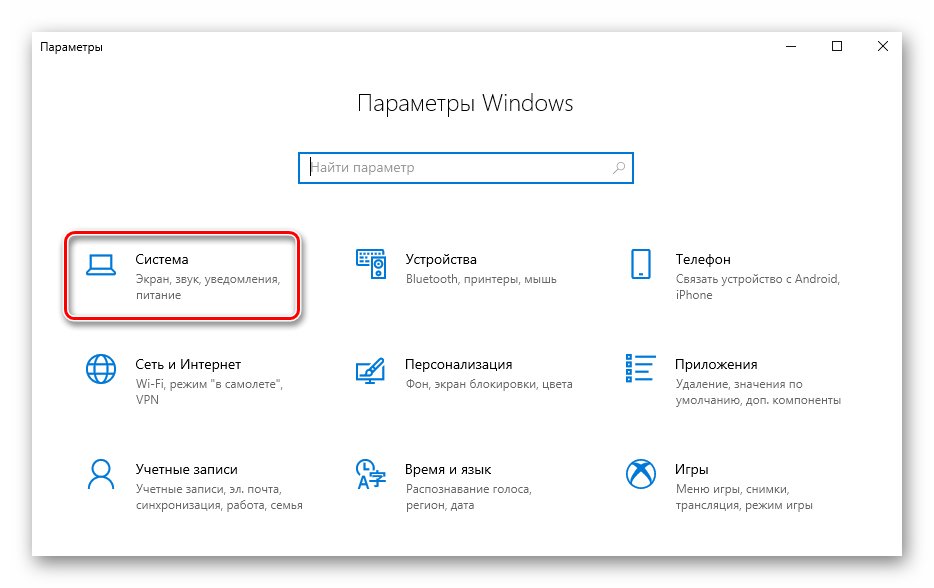
Заходим в меню «Пуск» => Параметры.
В меню «Параметры Windows» заходим в следующее меню «Система».
В новом окне, слева переходим в меню «О системе» и в данном меню можете просмотреть тип Вашей системе. На примере — это x64 версия.
Приобрести лицензионные ключи активации на Windows 10, Windows 8.1 и Windows 7 Вы можете в нашем каталоге по самым низким ценам от 1140 ₽. Моментальная доставка лицензий на Вашу электронную почту в автоматическом режиме. Круглосуточная техподдержка. Гарантия.
Лицензионный ключ активации Windows 10 от