
Quick Links
-
How to limit the battery charge on HP laptops
-
How to limit the battery charge on Lenovo laptops
-
How to limit the battery charge on Dell laptops
-
How to limit the battery charge on Surface laptops (and tablets)
-
How to limit the battery charge on Asus laptops
-
How to limit the battery charge on Acer laptops
-
How to limit the battery charge on MSI laptops
-
How to limit the battery charge on LG laptops
-
Battery warnings for other laptops
Battery technology has evolved a lot over the years, but unfortunately, batteries still degrade over time. The way that energy storage works simpply means that batteries lose the capacity to hold as much charge the more they’re used, which means battery life on your devices gets worse.
While charging and discharging a battery is the fastest way to wear it down, keeping a battery fully charged at 100% constantly will also cause faster wear. Thankfully, PC manufacturers have come up with a feature that lets you limit the battery charge on your laptop to 80% (sometimes even less), so if you use your laptop plugged in most of the time, you can prolong its longevity by keeping it below that threshold. Unfortunately, this feature isn’t in Windows 11 itself yet, but most laptops offer some version of it.
Related
How to extend battery life on Windows 11
If you want to extend the battery life of your laptop, there are a few Windows 11 settings you can change to help with that.
How to limit the battery charge on HP laptops
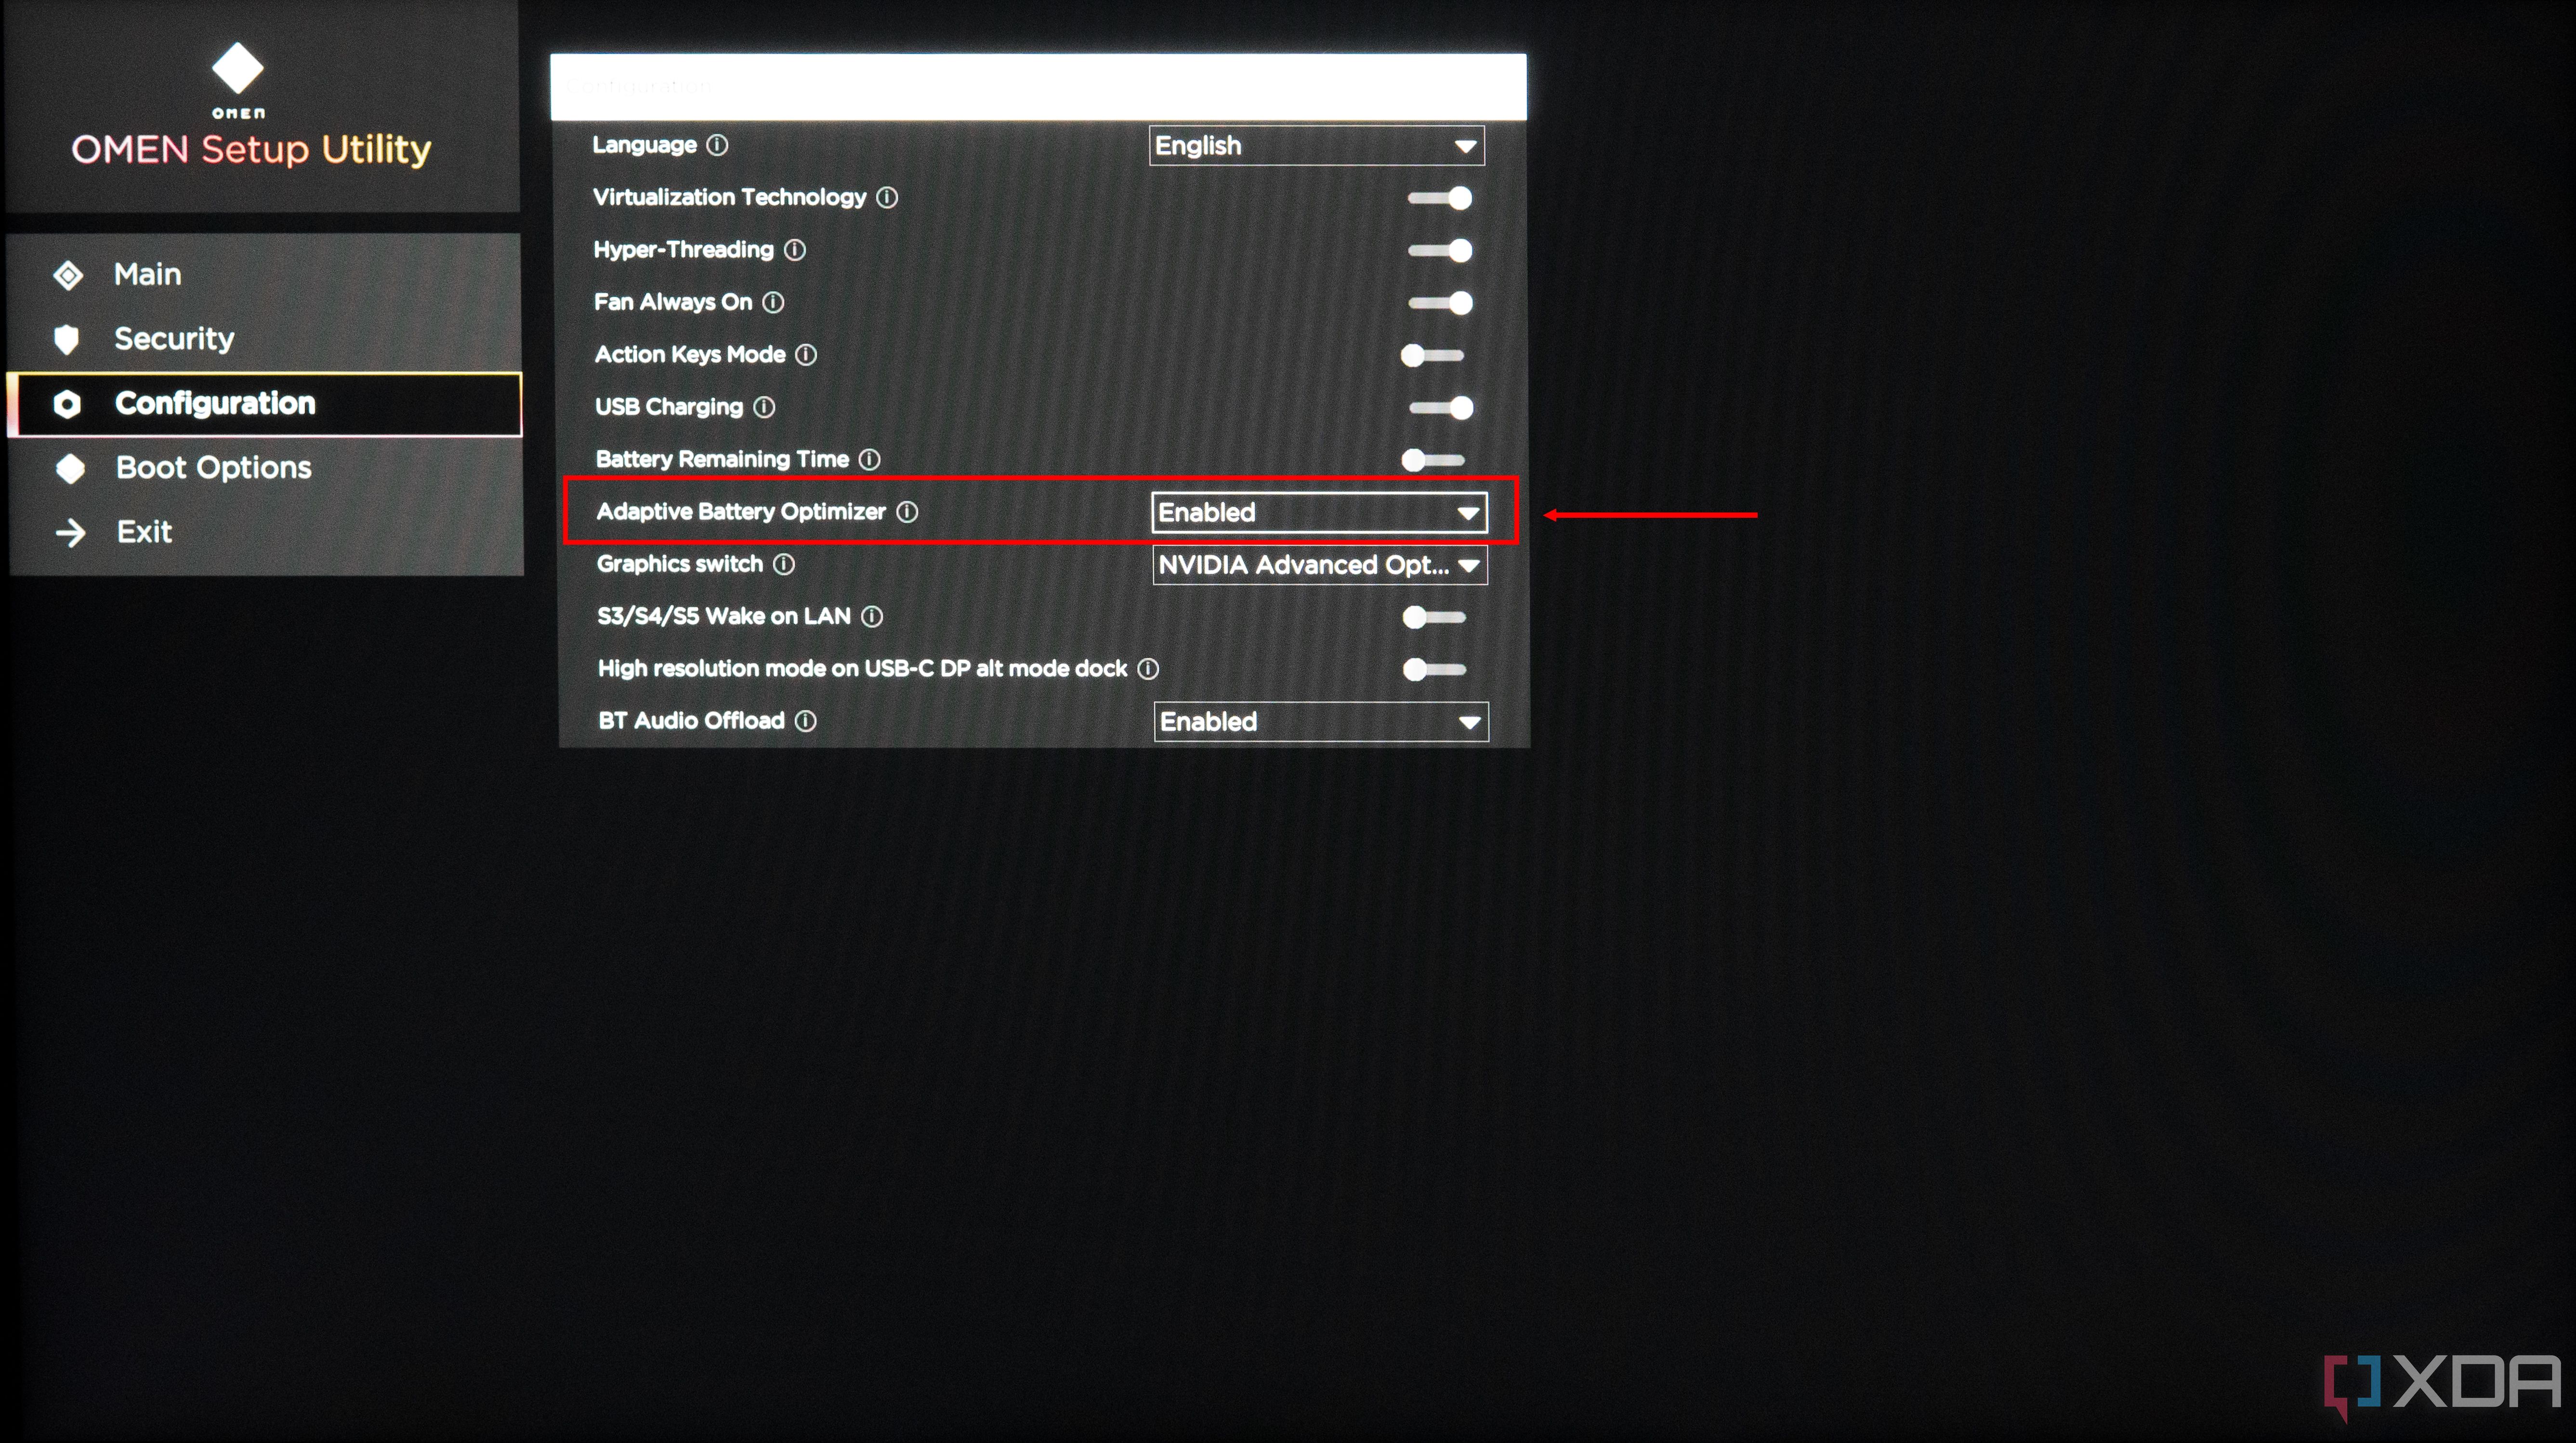
HP has two methods for limiting the battery charge on its laptops: Adaptive Battery Optimizer and Battery Care Function. Both of these are found in the BIOS, and they’re mutually exclusive. Adaptive Battery Optimizer automatically adapts the battery charging behavior based on your usage patterns, while Battery Care Function gives you more of a hard limiter. Keep in mind that your BIOS may look different, but the general functionality is usually similar. Also, Adaptive Battery Optimizer is usually enabled by default.
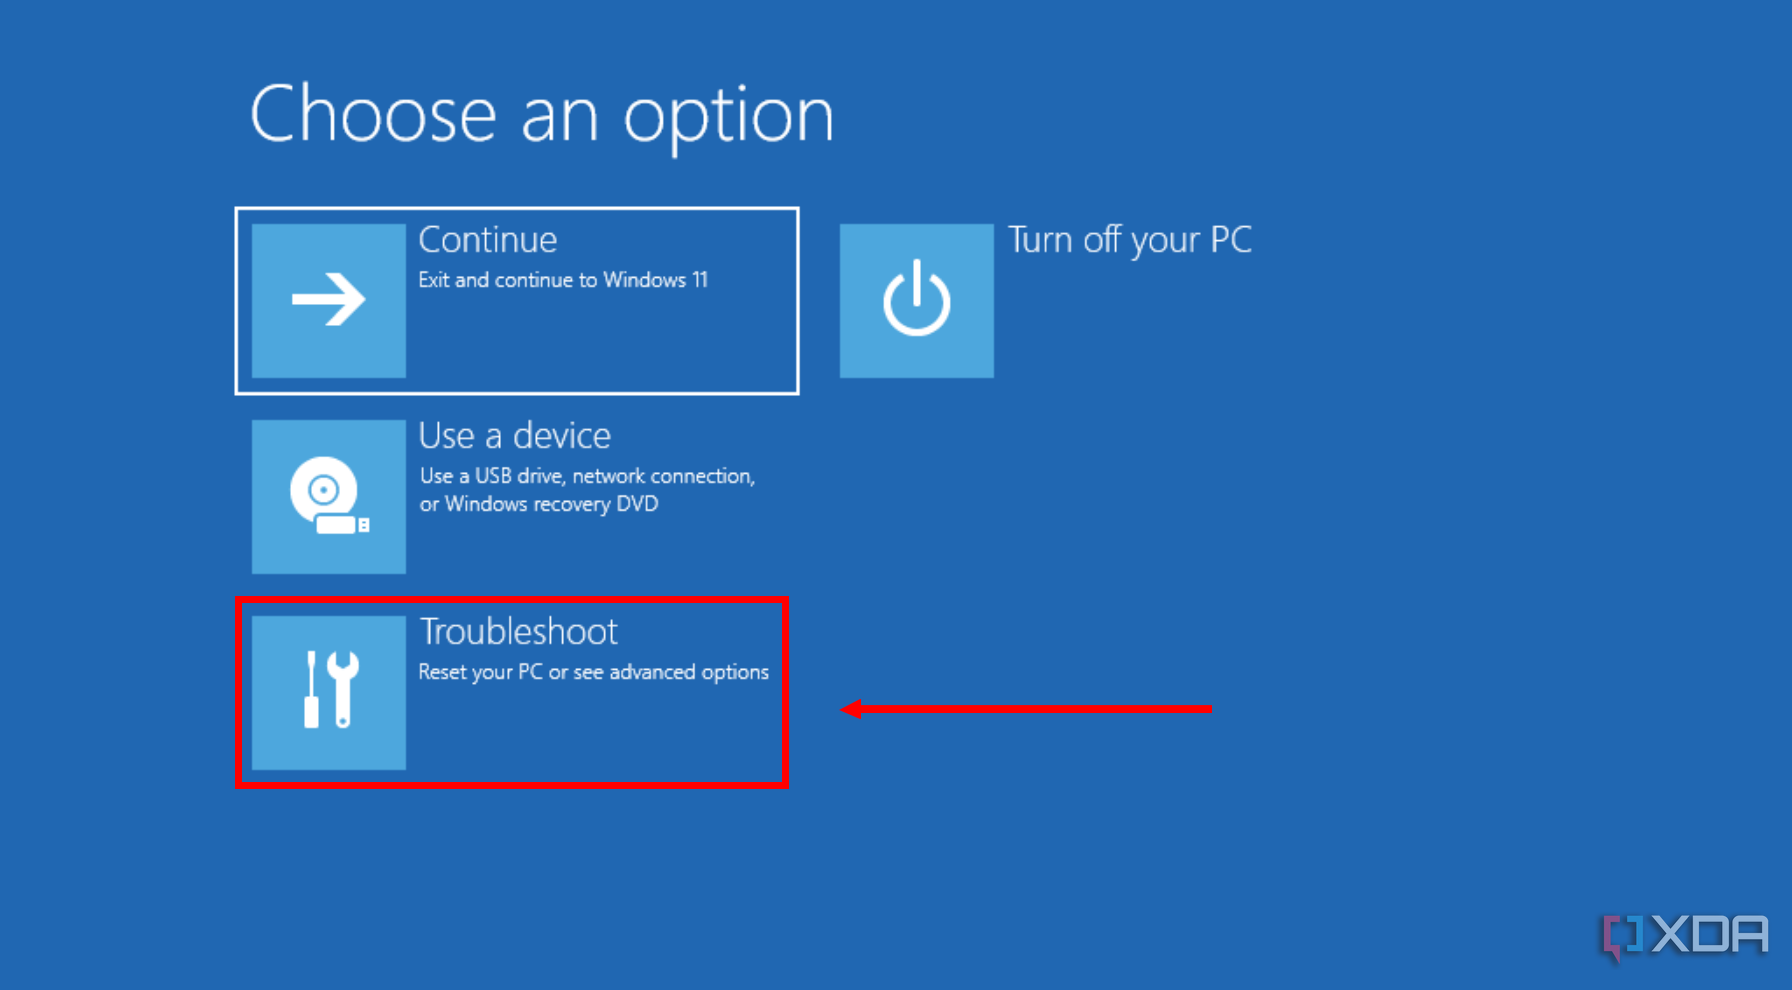
- Open the Start menu.
- While holding Shift on your keyboard, click the Power button and then Restart.
-
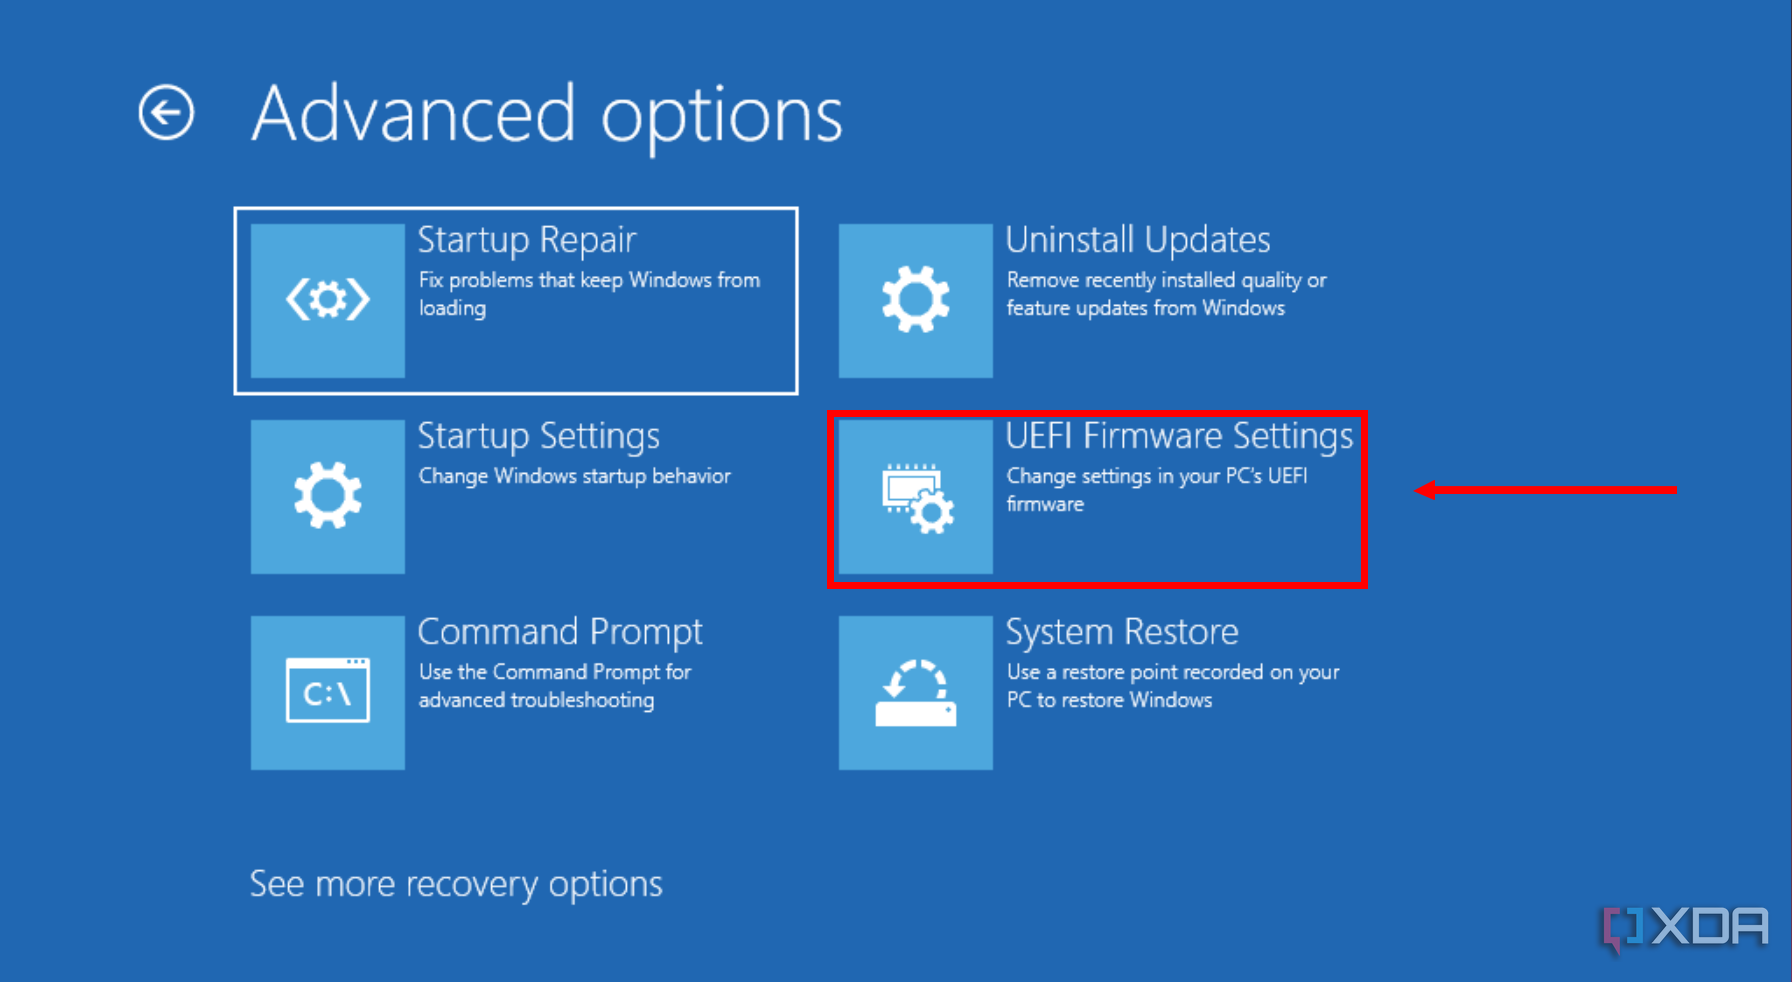
Click Troubleshoot, then Advanced options.

-
Choose UEFI Firmware settings to access the BIOS.

-
Navigate to the Configuration tab (on some laptops, you may need to choose BIOS Setup first).
Some laptops may also have this under the Advanced tab.
- Option 1: Select Adaptive Battery Optimizer and set it to Enabled.
- Option 2: Select Battery Care Function and set it to 80%.
-
Option 3: Select Battery Health Manager and set it to Maximize my battery health.

Unfortunately, some HP laptops may not offer any of these options, so you may need to look for an alternative solution to improve your laptop battery’s health.
How to limit the battery charge on Lenovo laptops
Lenovo laptops make it a little easier to set your battery charging limit, since it uses the Lenovo Vantage app inside Windows. The Vantage app can look a bit different on different devices, plus it’s undergone some updates recently, so things may vary.
- Open the Lenovo Vantage app (you can install it from the Microsoft Store, or get Lenovo Commercial Vantage for ThinkPads).
-
In the latest version of the Lenovo Vantage app, follow these steps:
-
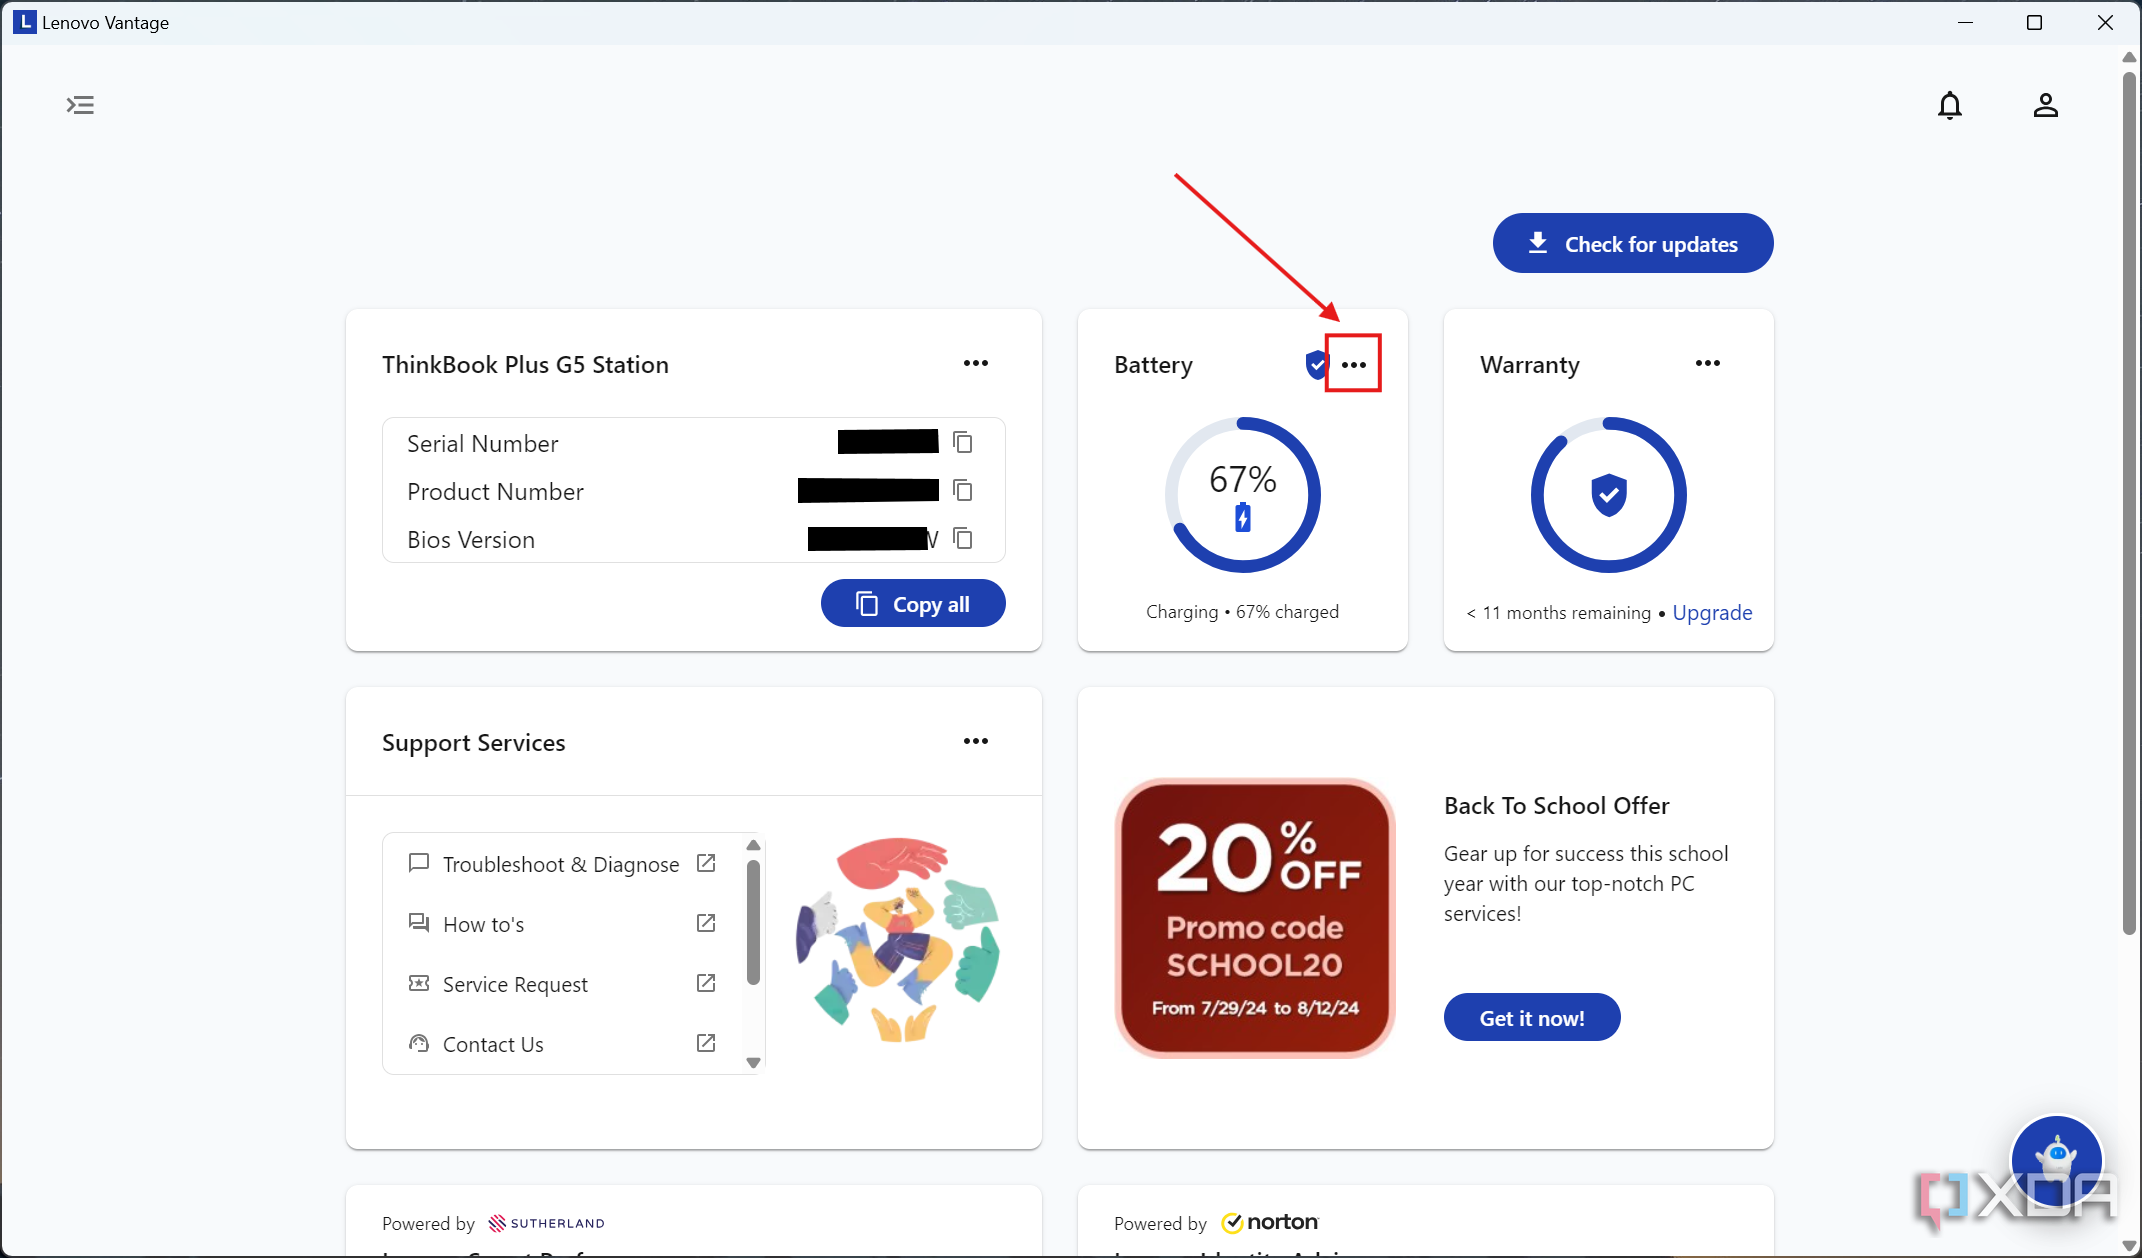
Click the ellipsis button next to Battery and choose Battery settings.

-
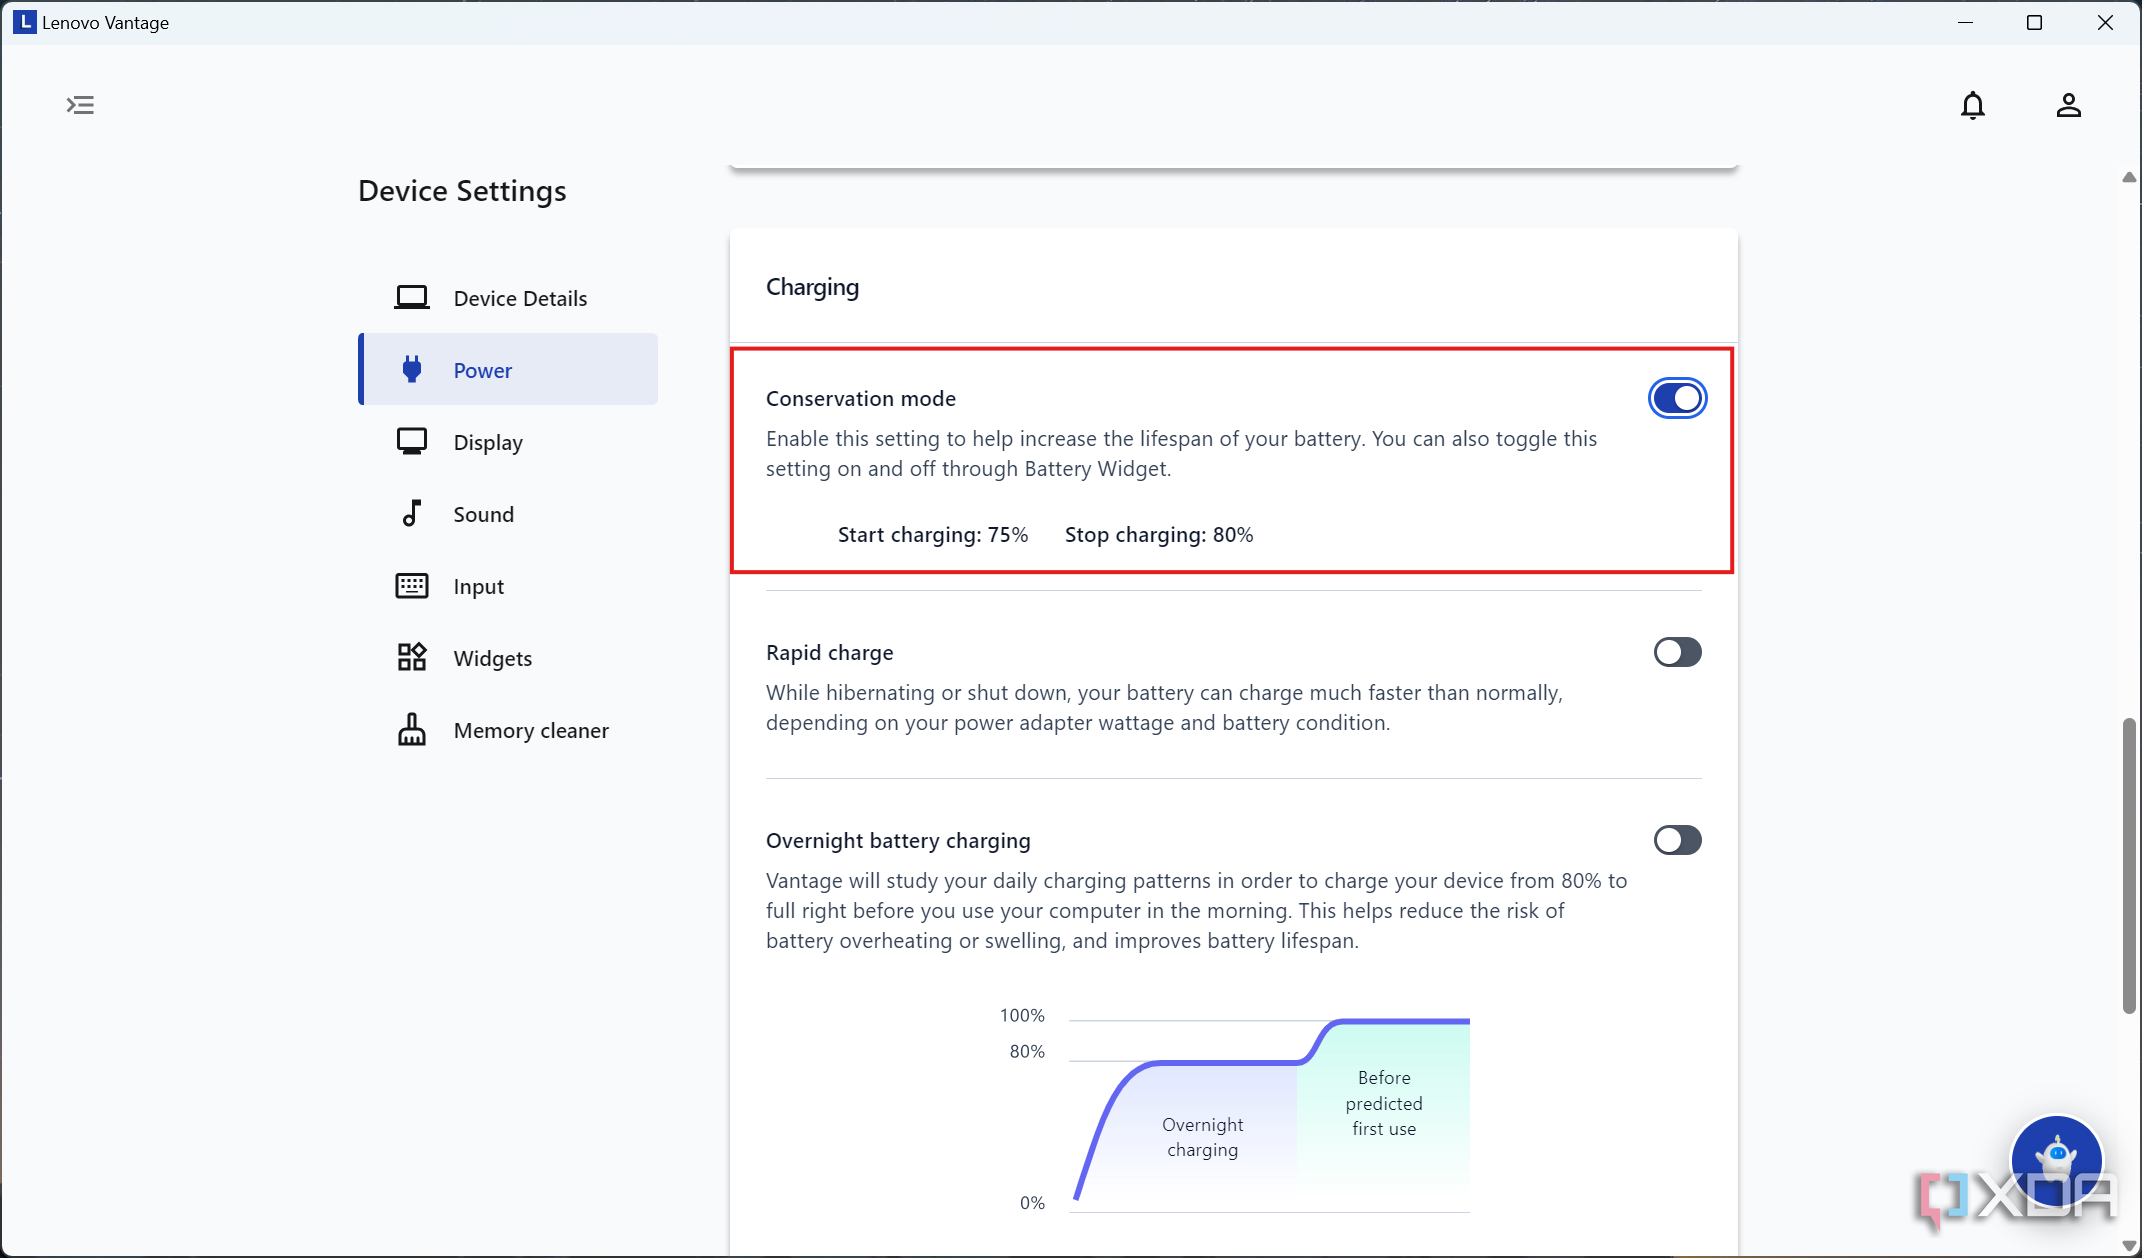
Scroll down and enable Conservation mode.
By default, it will start charging the laptop when the battery falls under 75% and stop charging at 80%, but you can change these values to your liking.
-
Click the ellipsis button next to Battery and choose Battery settings.
-
If you have an older version of the Vantage app, these steps may be more relevant:
-
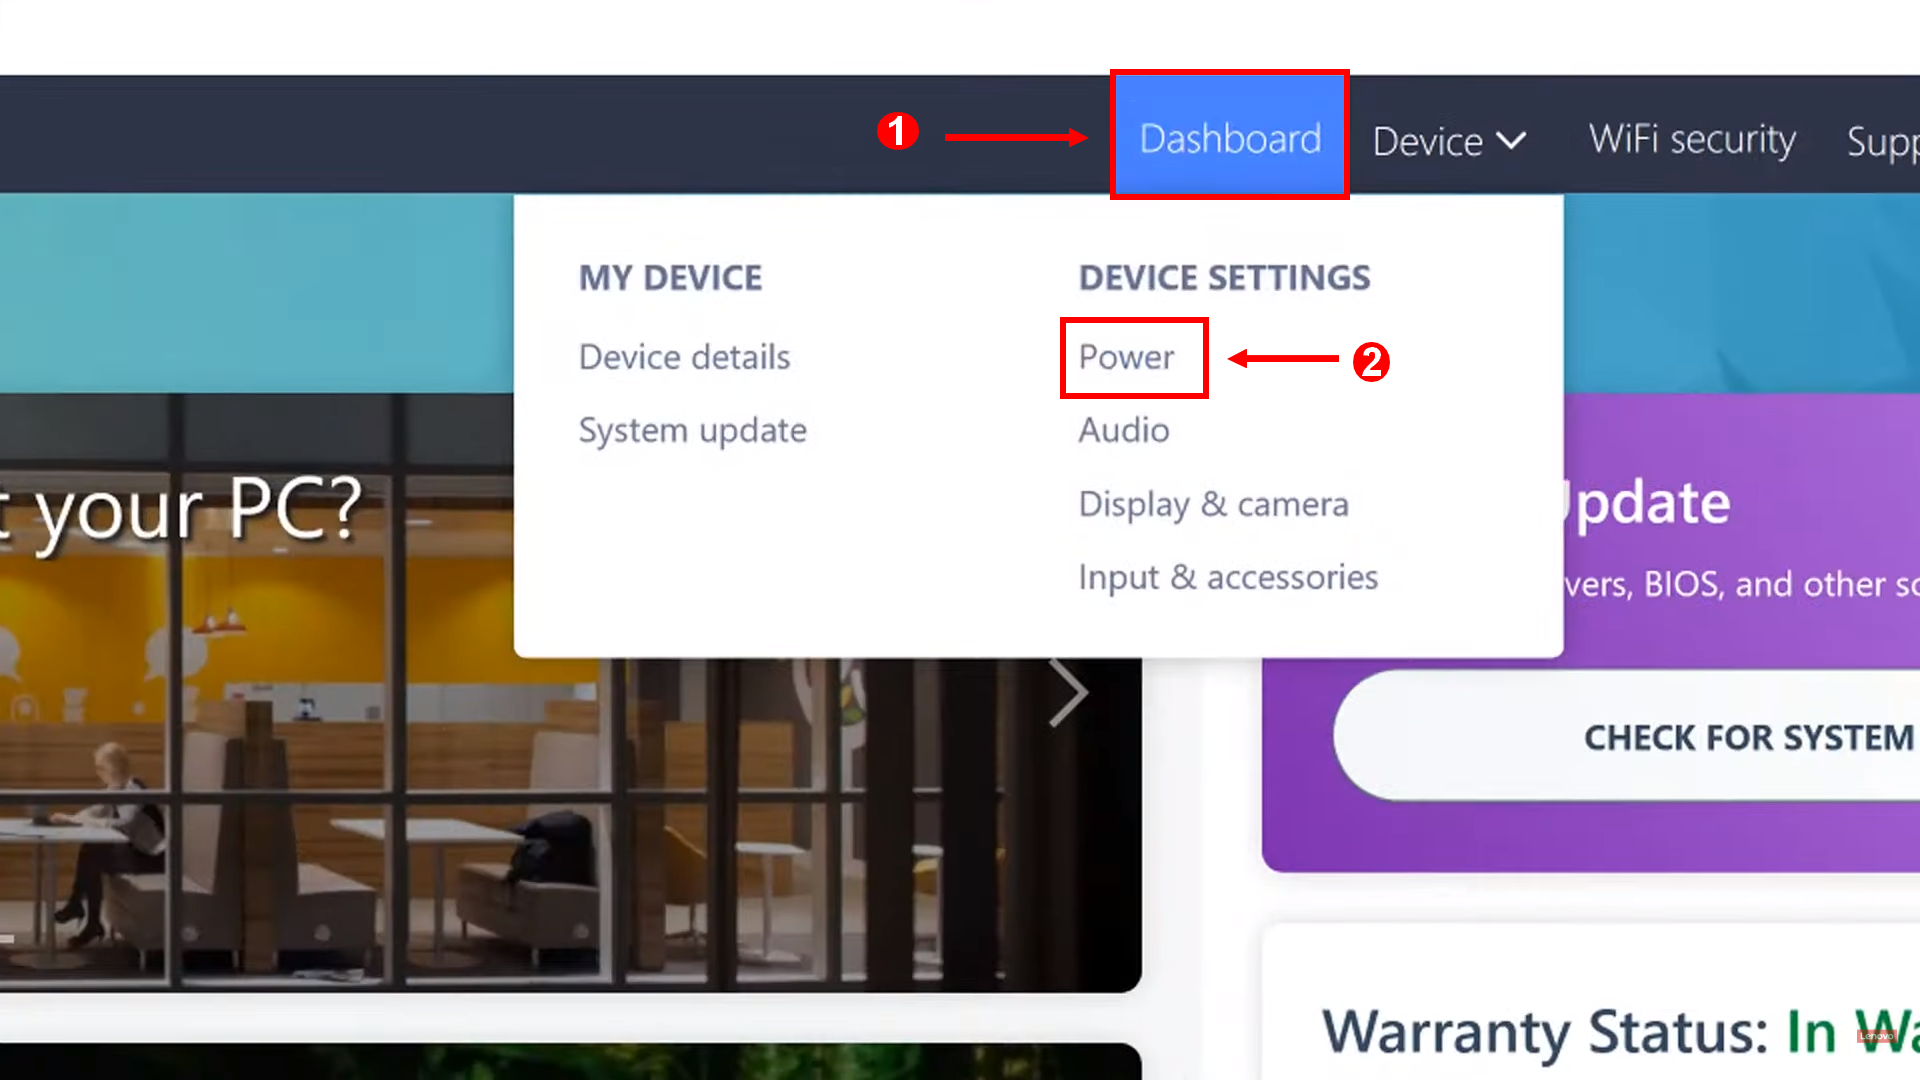
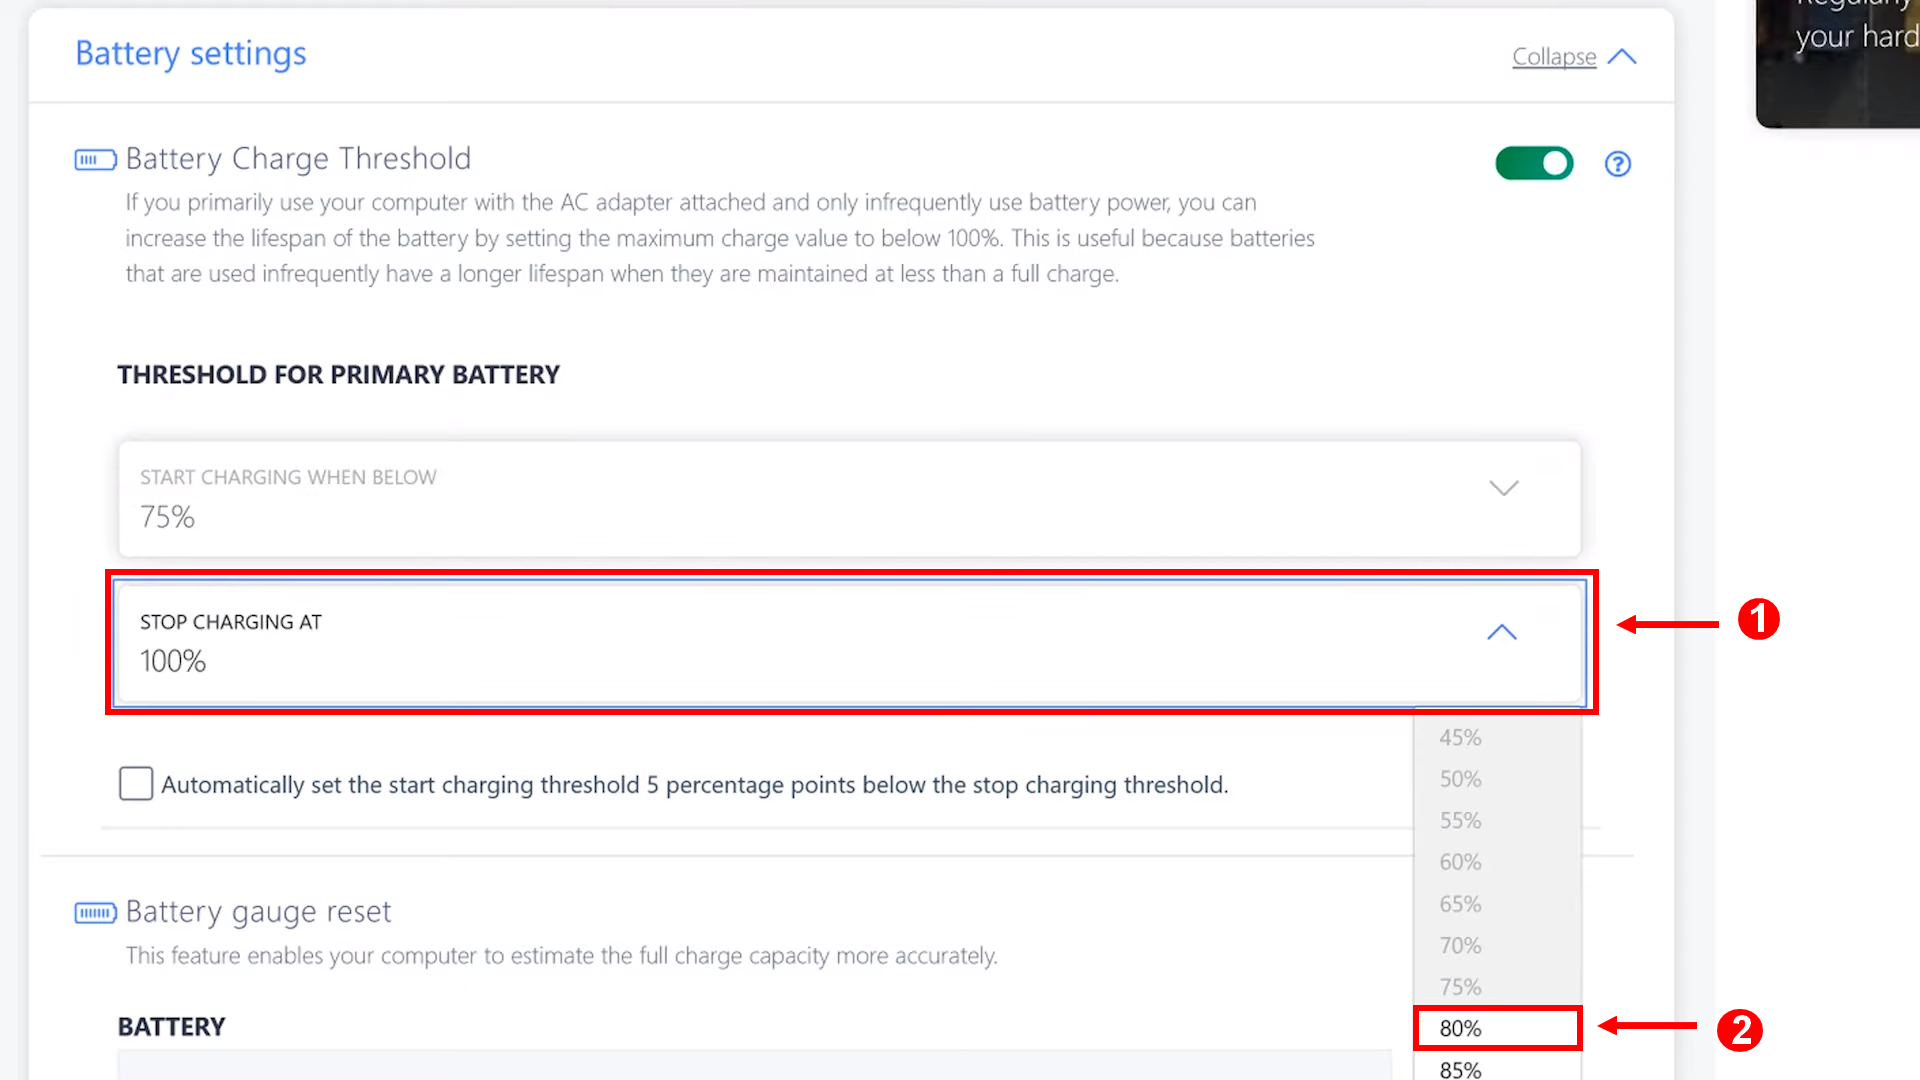
Click Device and then Power.

- Scroll down to the Battery settings section.
-
Under Battery charging threshold, set the Stop charging at field to 80%.
Image credit: Lenovo (YouTube)
-
Click Device and then Power.
Note that the Lenovo Vantage logo and app may look different depending on your laptop model.
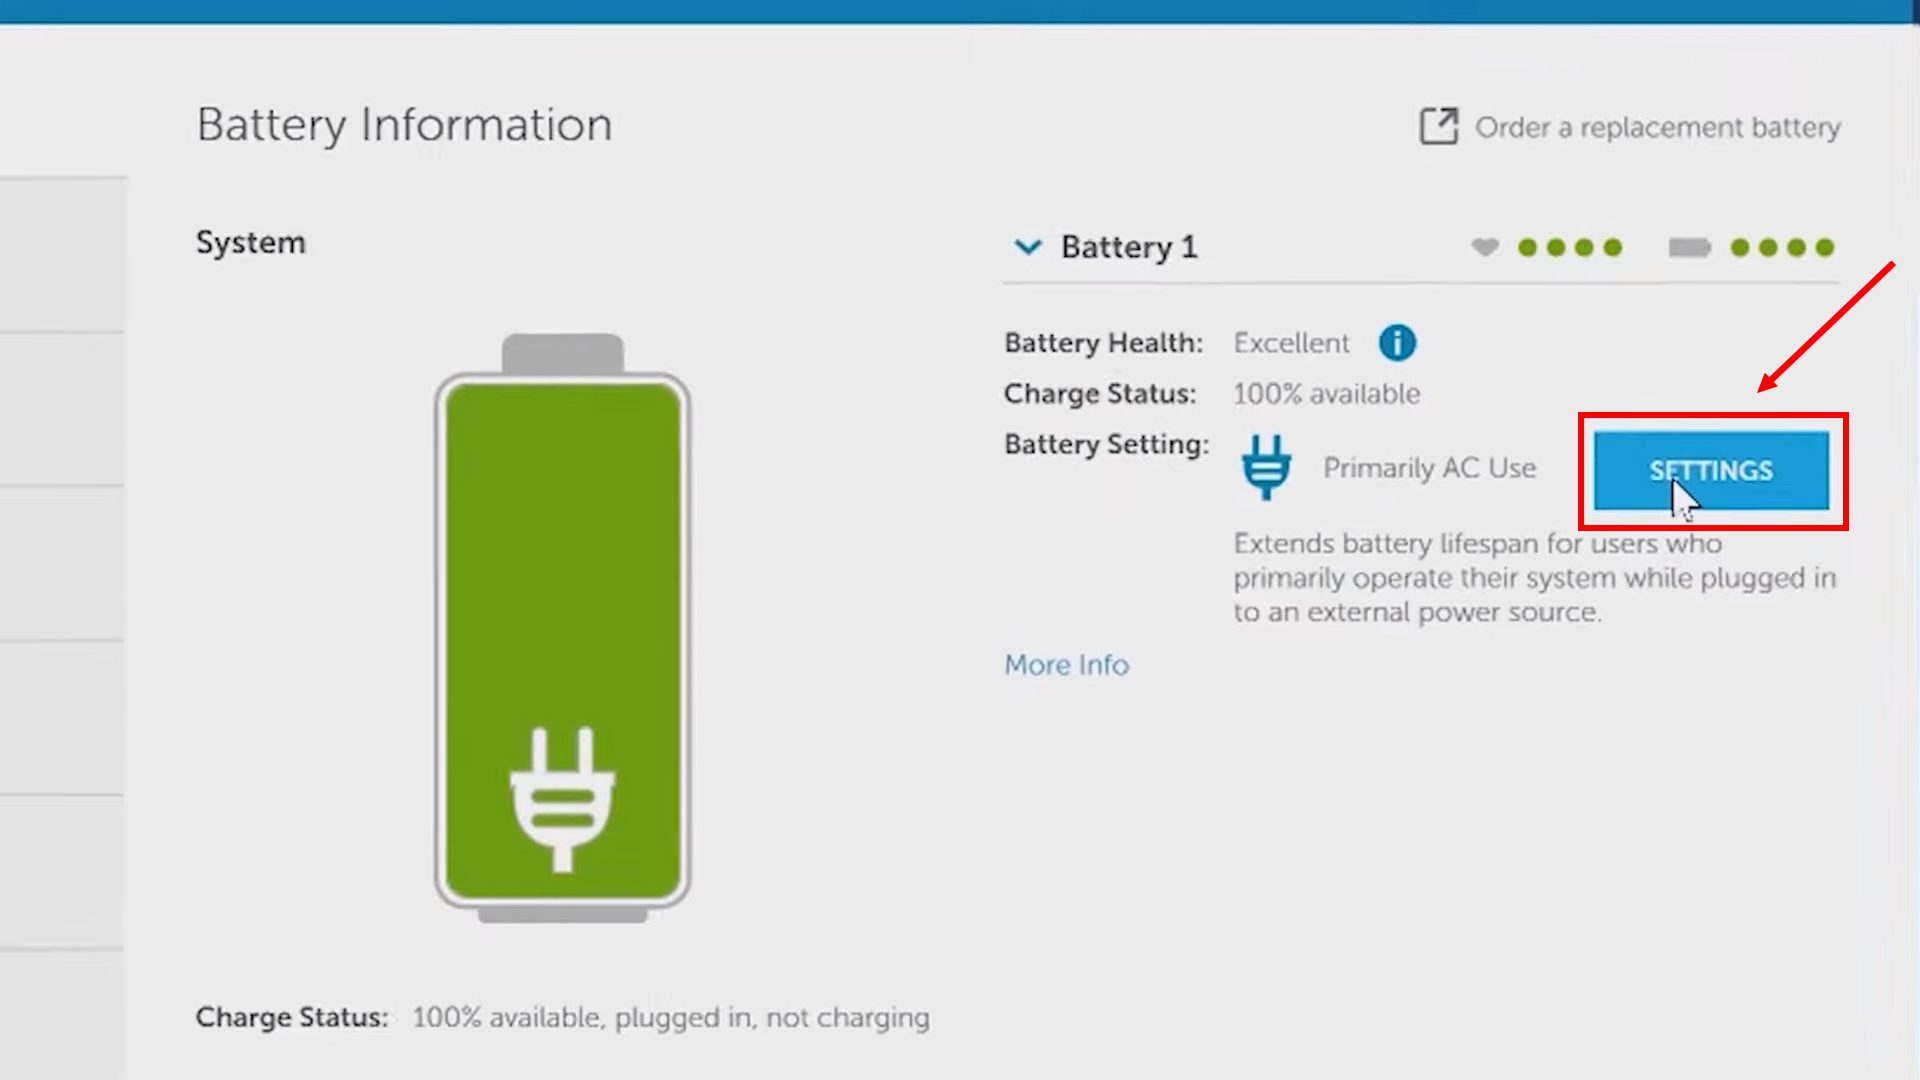
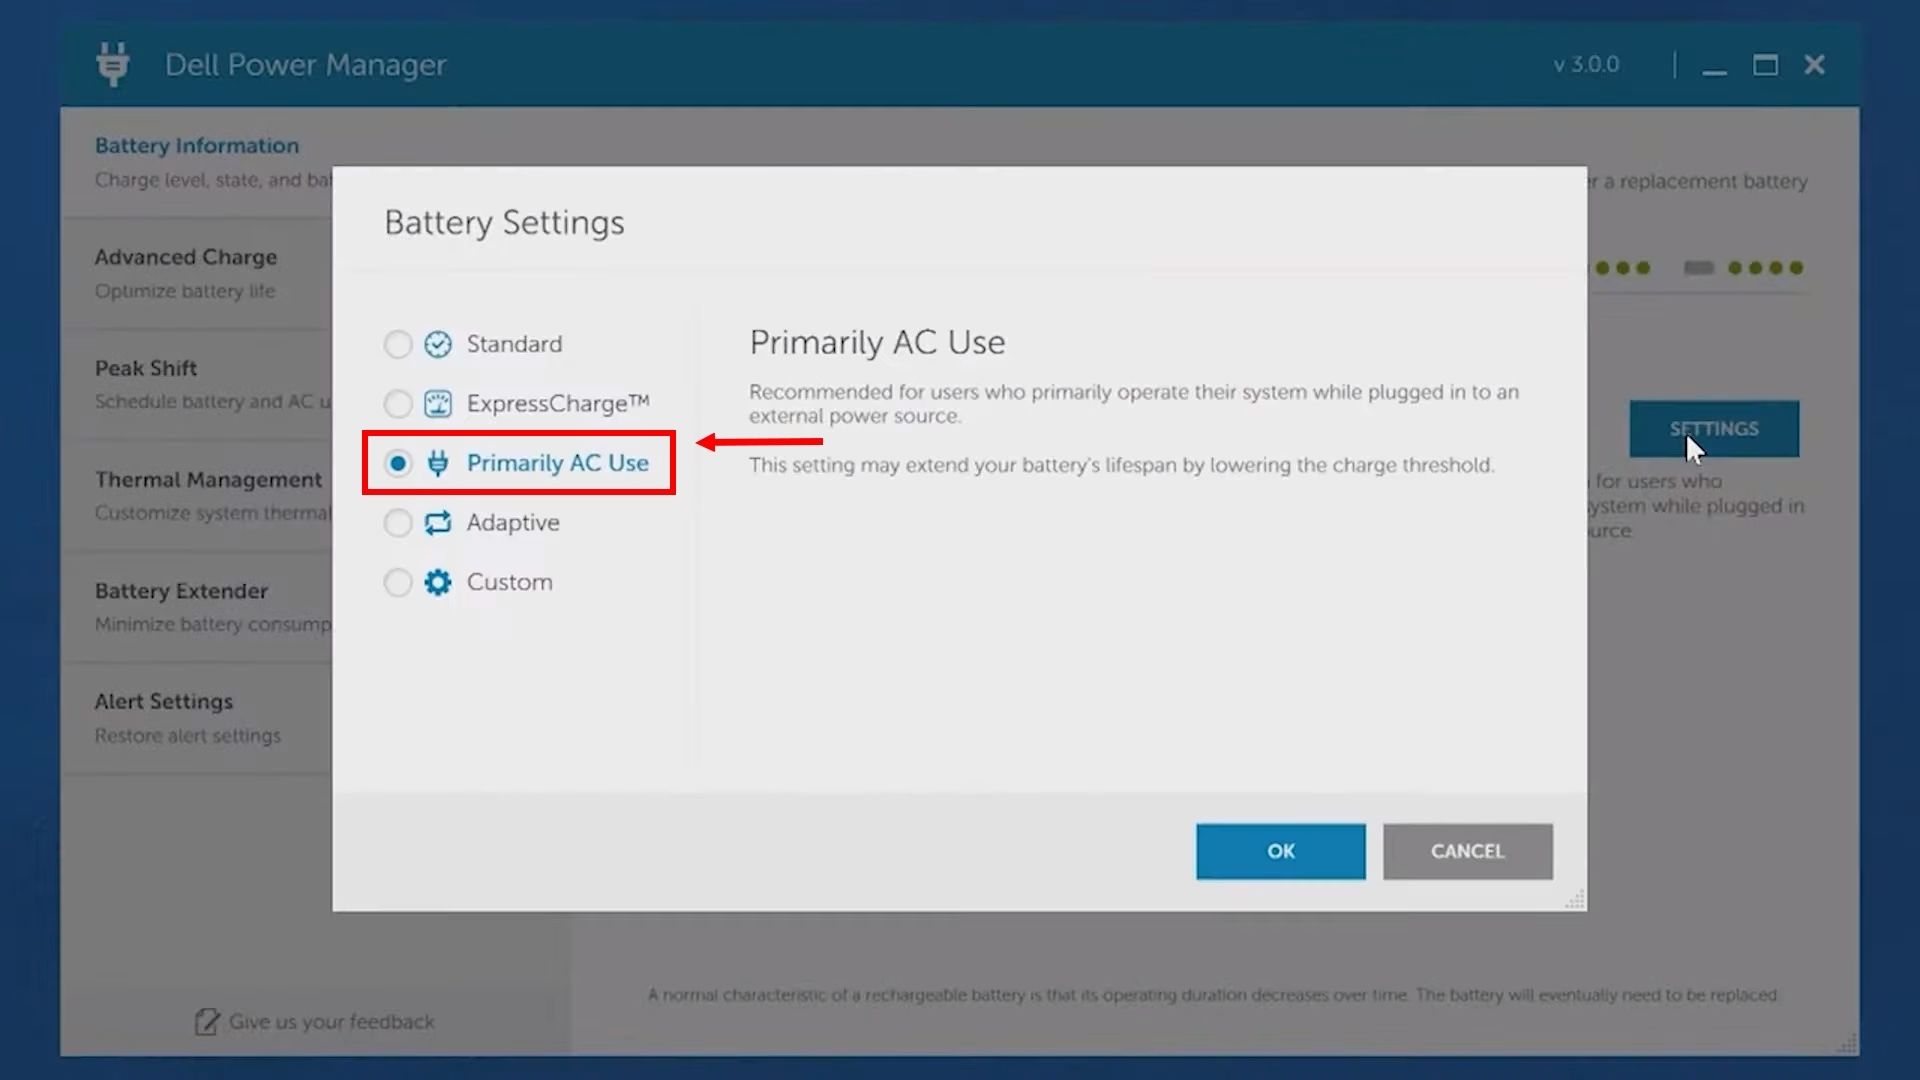
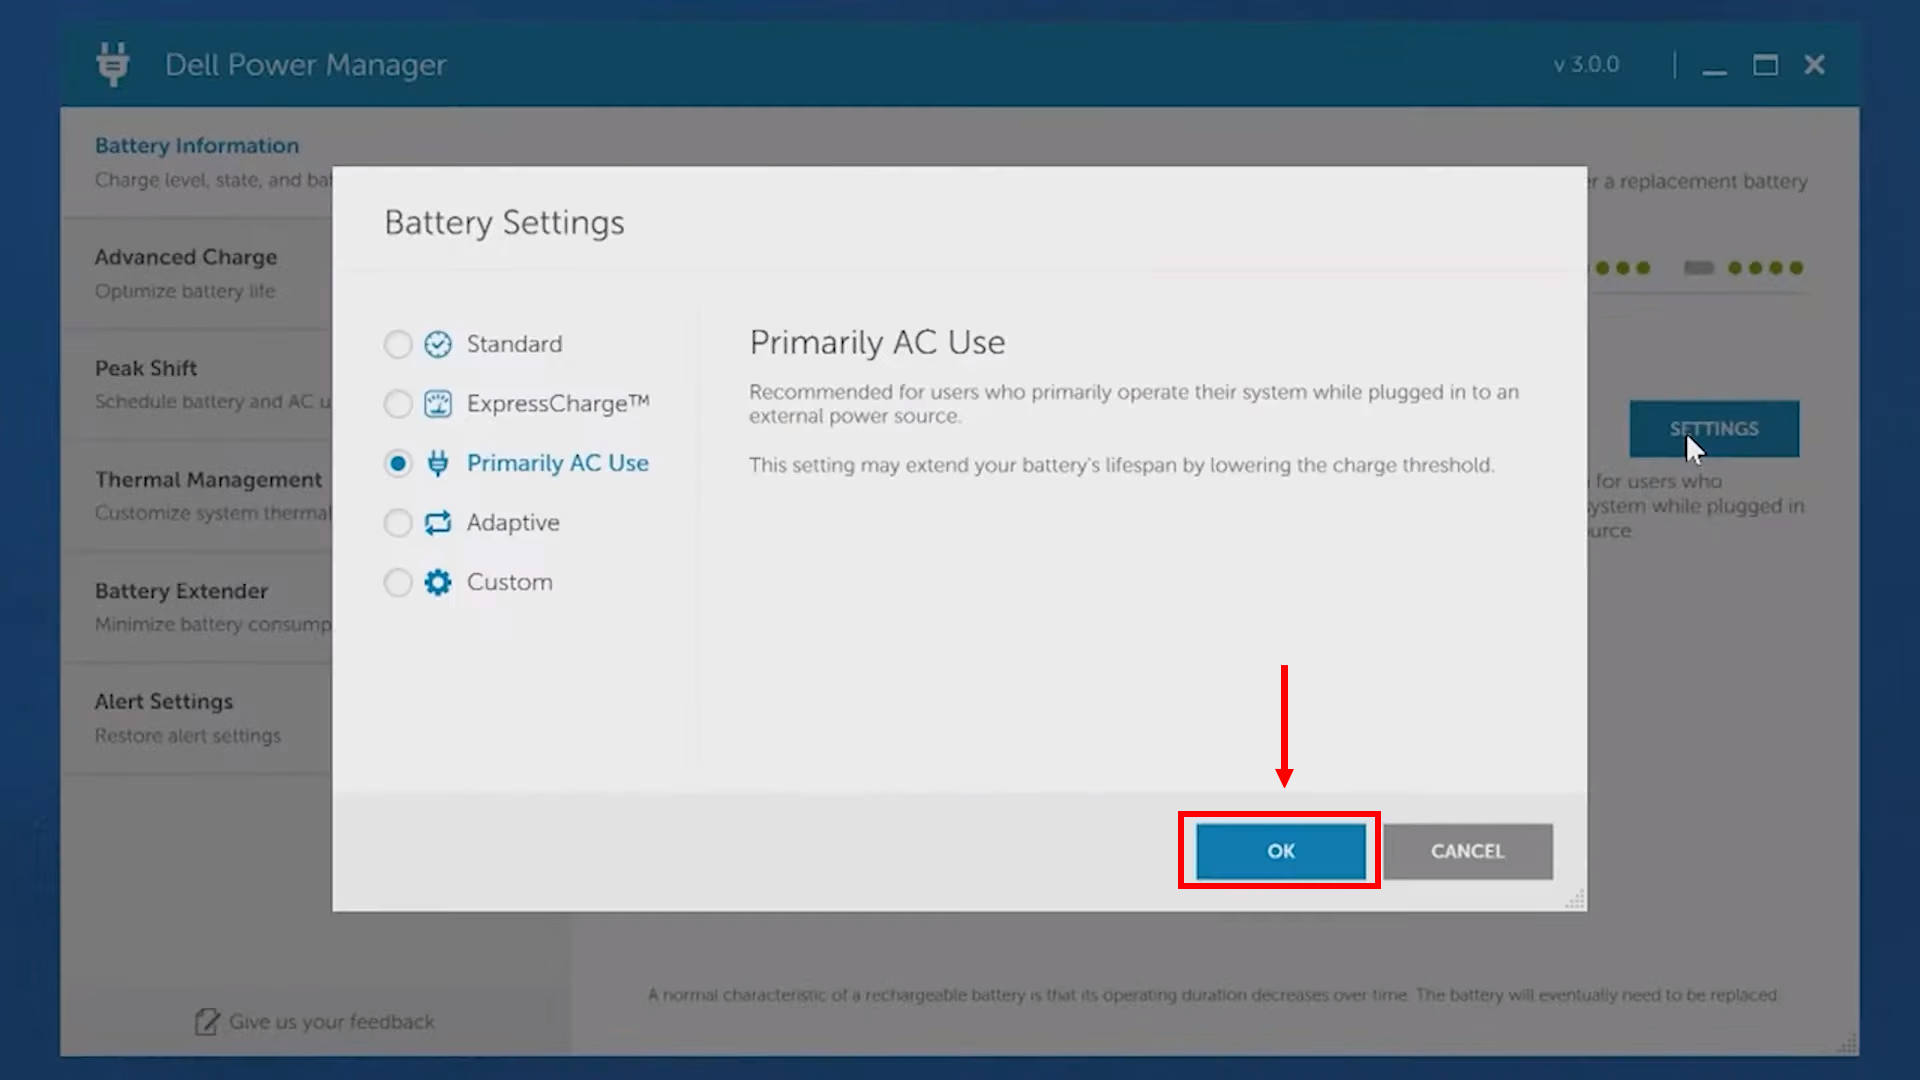
How to limit the battery charge on Dell laptops
Dell laptops also use Windows software to manage battery charging limits with the Dell Power Manager app. It works similarly to Lenovo’s solution:
- Open Dell Power Manager (you may need to install it from the Microsoft Store).
-
In the Battery information tab, click Settings.
-
Click Primarily AC Use to automatically limit the maximum charge.
-
Alternatively, click Custom and set the Stop charging field to 80%.
-
Alternatively, click Custom and set the Stop charging field to 80%.
- Click OK.
How to limit the battery charge on Surface laptops (and tablets)
Microsoft lets you limit the battery charge using the Surface app on its devices. It’s usually enabled by default, but here’s how to make sure:
- Launch the Surface app. You can install it from the Microsoft Store.
-
Check that the Smart charging field says Currently on.

On some devices, smart charging may always be on and not show this indicator.
- If not, expand the field by clicking it.
- Click the button to enable smart charging.
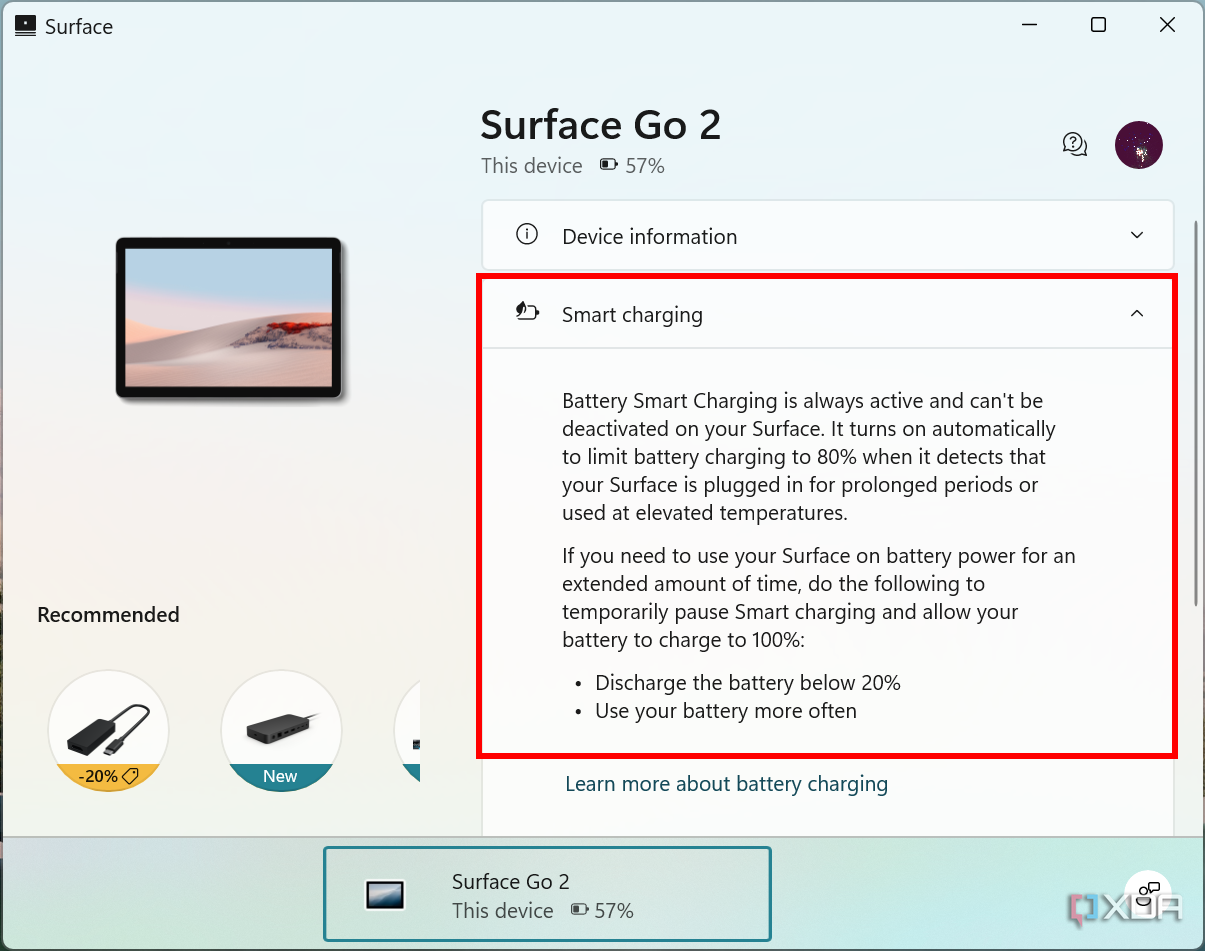
Smart charging will limit the maximum battery charge to 80% in most cases, but it will be paused if you frequently drain the battery below 20%.
Alternatively, most Surface devices also have an option in the BIOS settings called Enable Battery Limit Mode. This limits the battery charge to just 50%, which is less than ideal since it will take away a big chunk of the battery capacity when you do need it. Most modern laptops have set this to 80% so you get a good balance of battery life per use, but also more longevity in the long term.
How to limit the battery charge on Asus laptops
Asus laptops come with the MyAsus app, which also provides a way to limit the battery charge. Depending on your version of the MyAsus app, this option may be slightly different, but here’s how to use it in the latest version:
- Launch the MyASUS app (you can download it from the Microsoft Store).
-
Click Device settings on the left-side menu

-
Enable Battery Care Mode to limit the battery charge to 80%
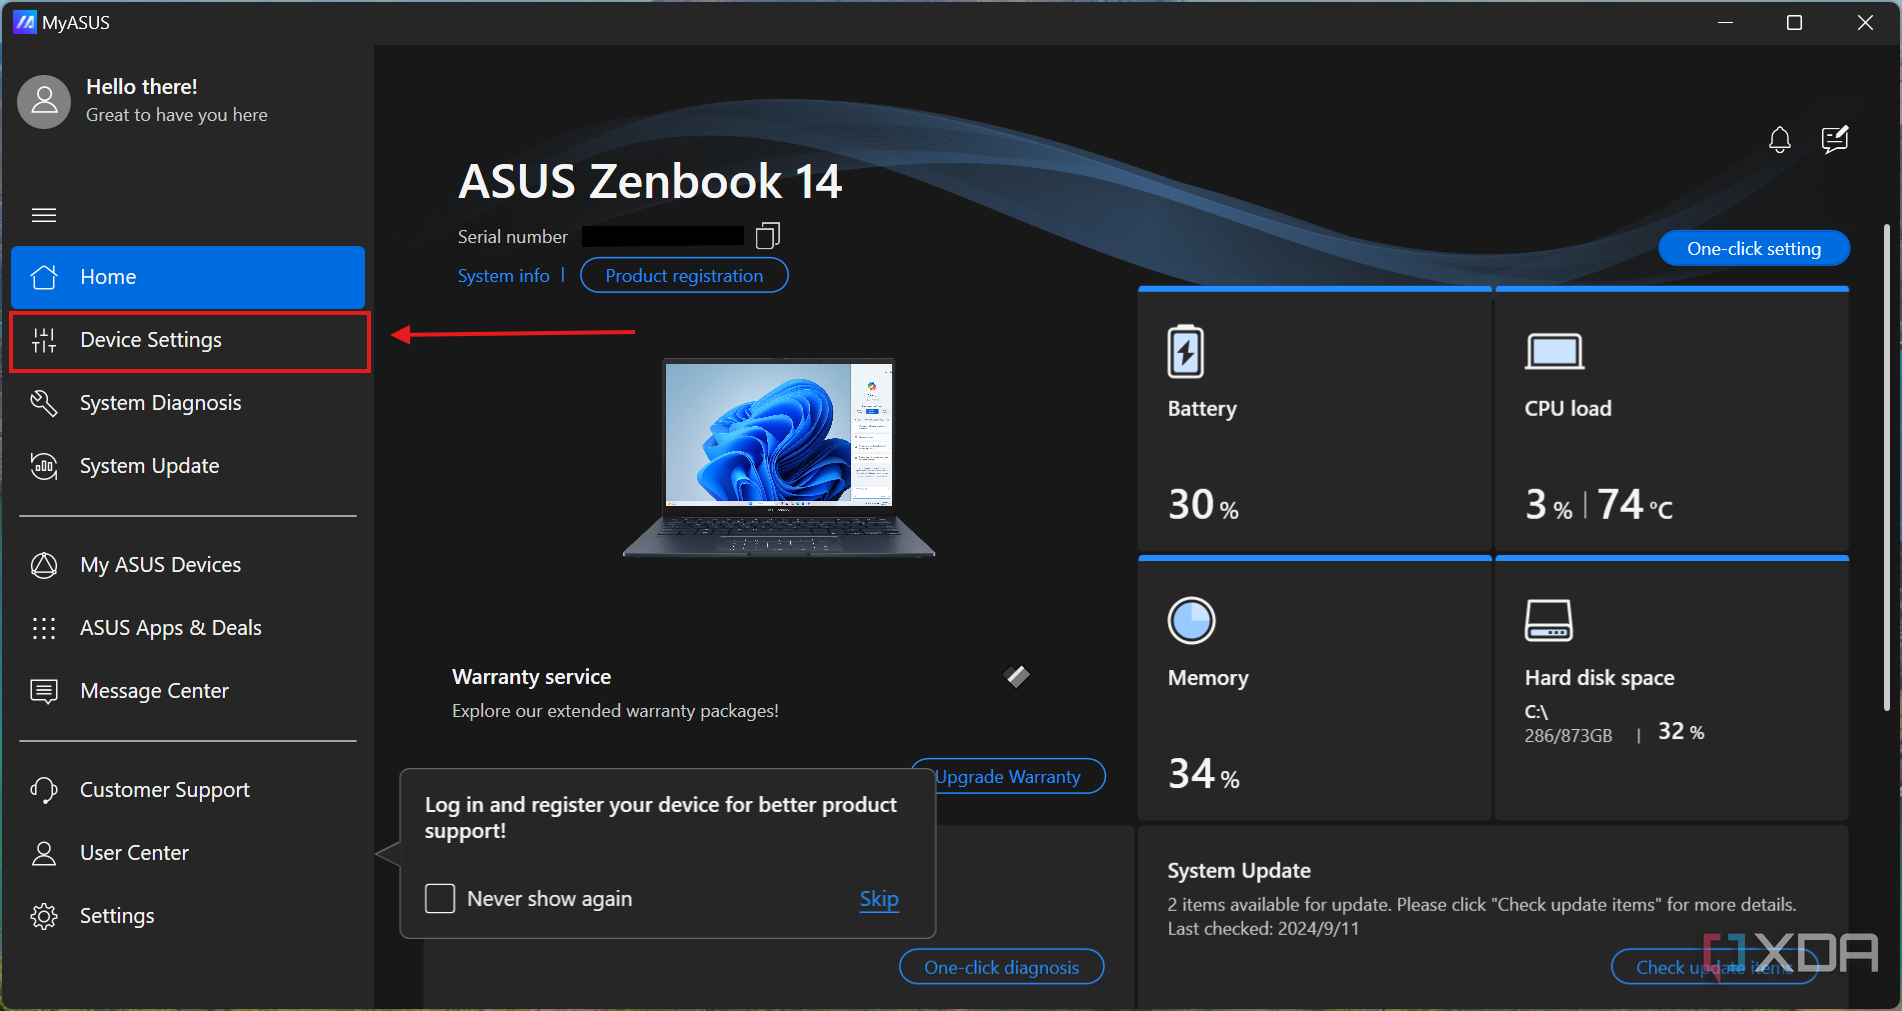
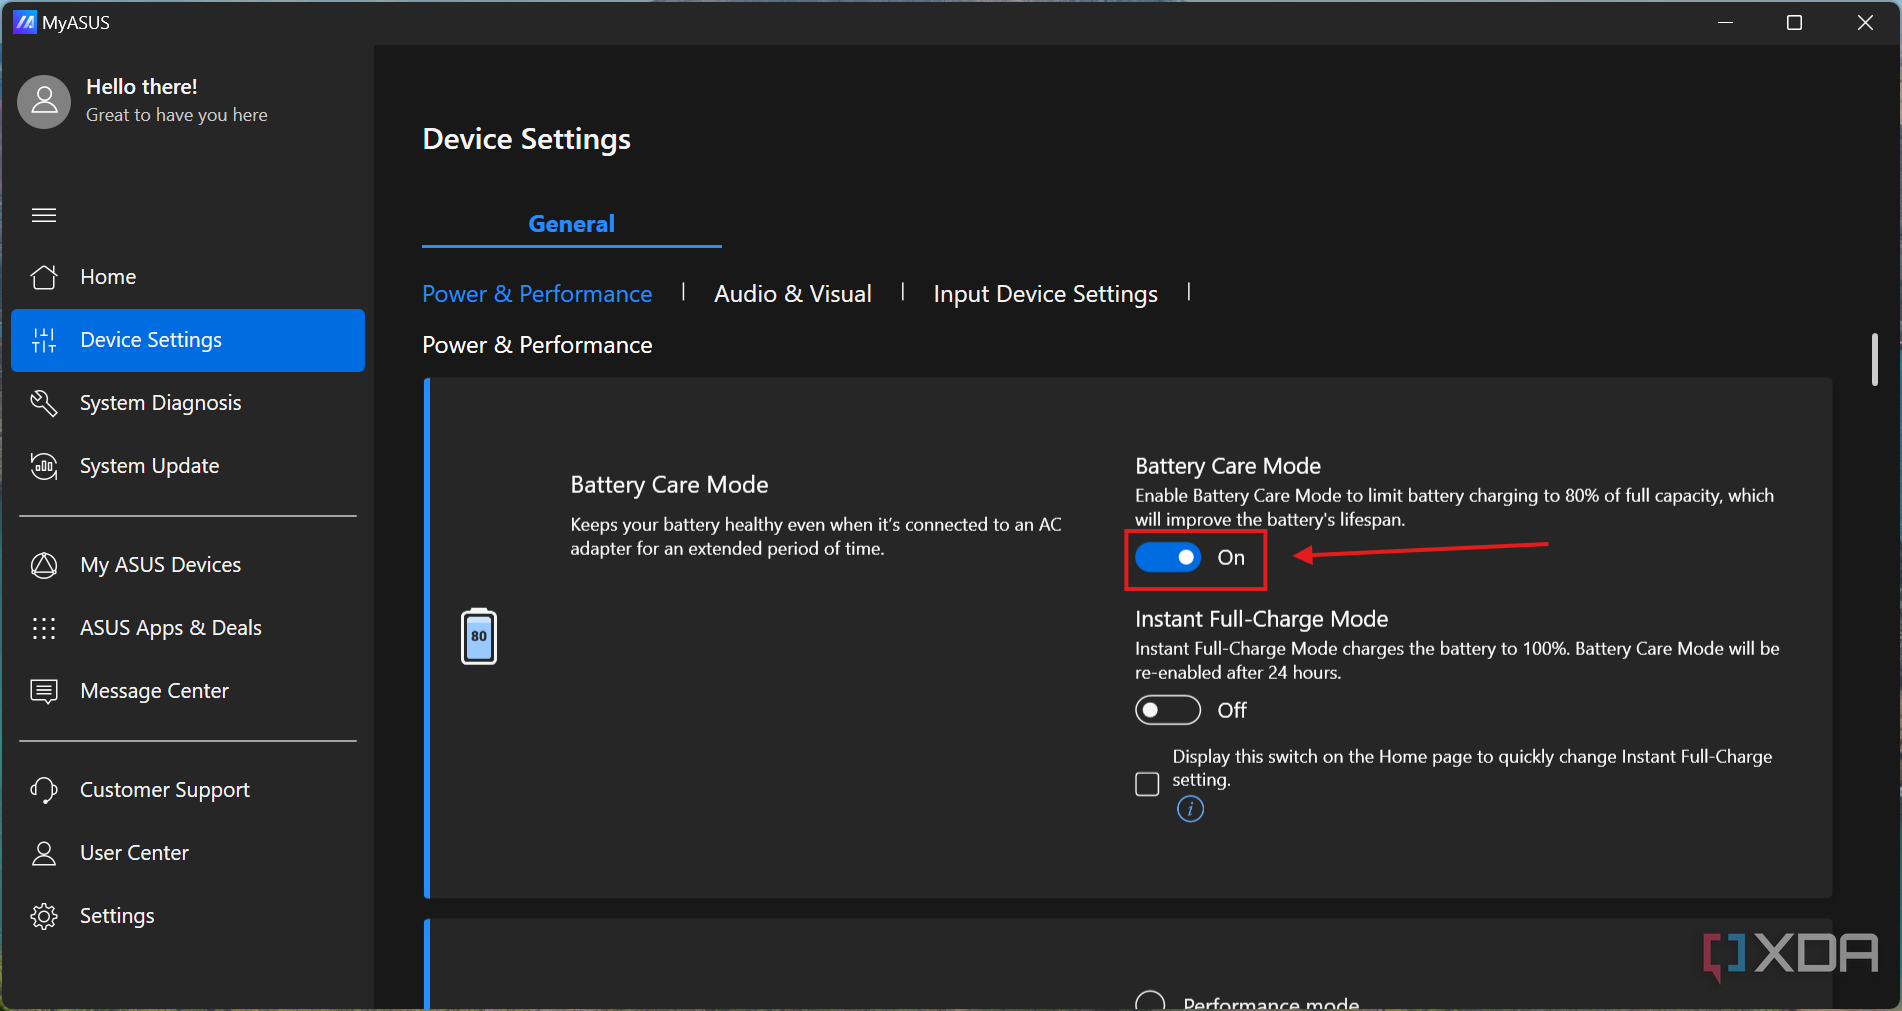
You can also use the Instant full-charge mode if you know you’re going to have a day where you need the full capacity of the battery. This will bypass the charging limit for that day, but revert it automatically later.
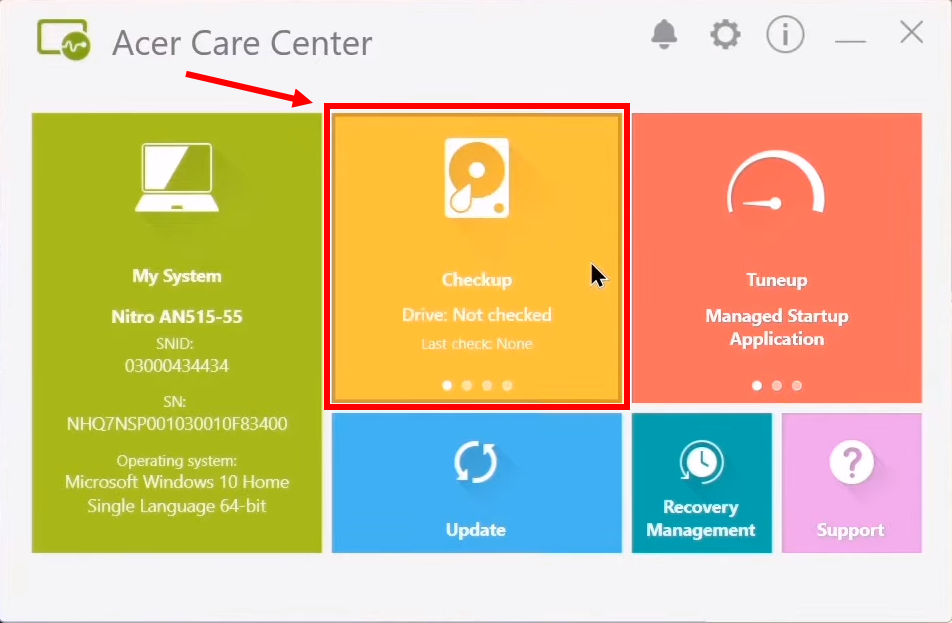
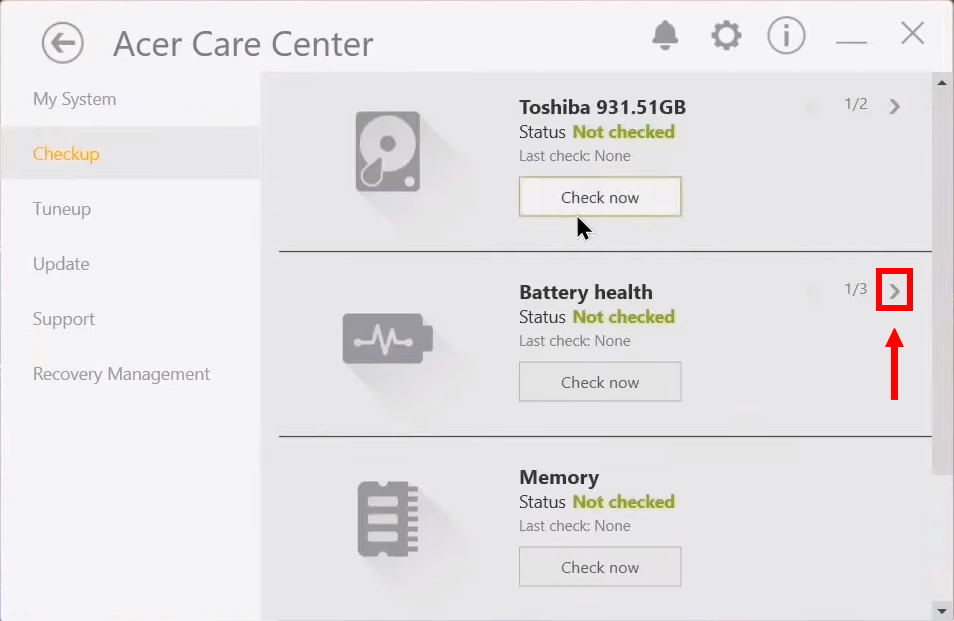
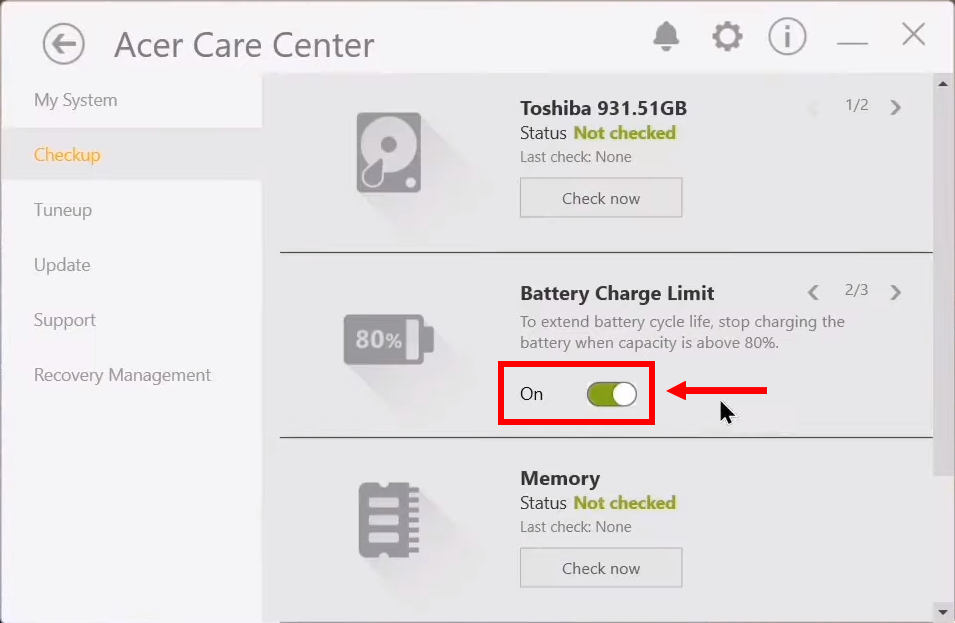
How to limit the battery charge on Acer laptops
Acer also includes the Acer Care Center on its laptops and it provides a similar feature. Here’s how to use it:
- Launch Acer Care Center (it may be labeled as just Care Center). You can download the app from Acer’s support website.
-
Click Checkup (the yellow area).

-
Click the right arrow next to the Battery health area.

-
Set the Battery Charge Limit toggle to On.

- Click OK to confirm your choice.
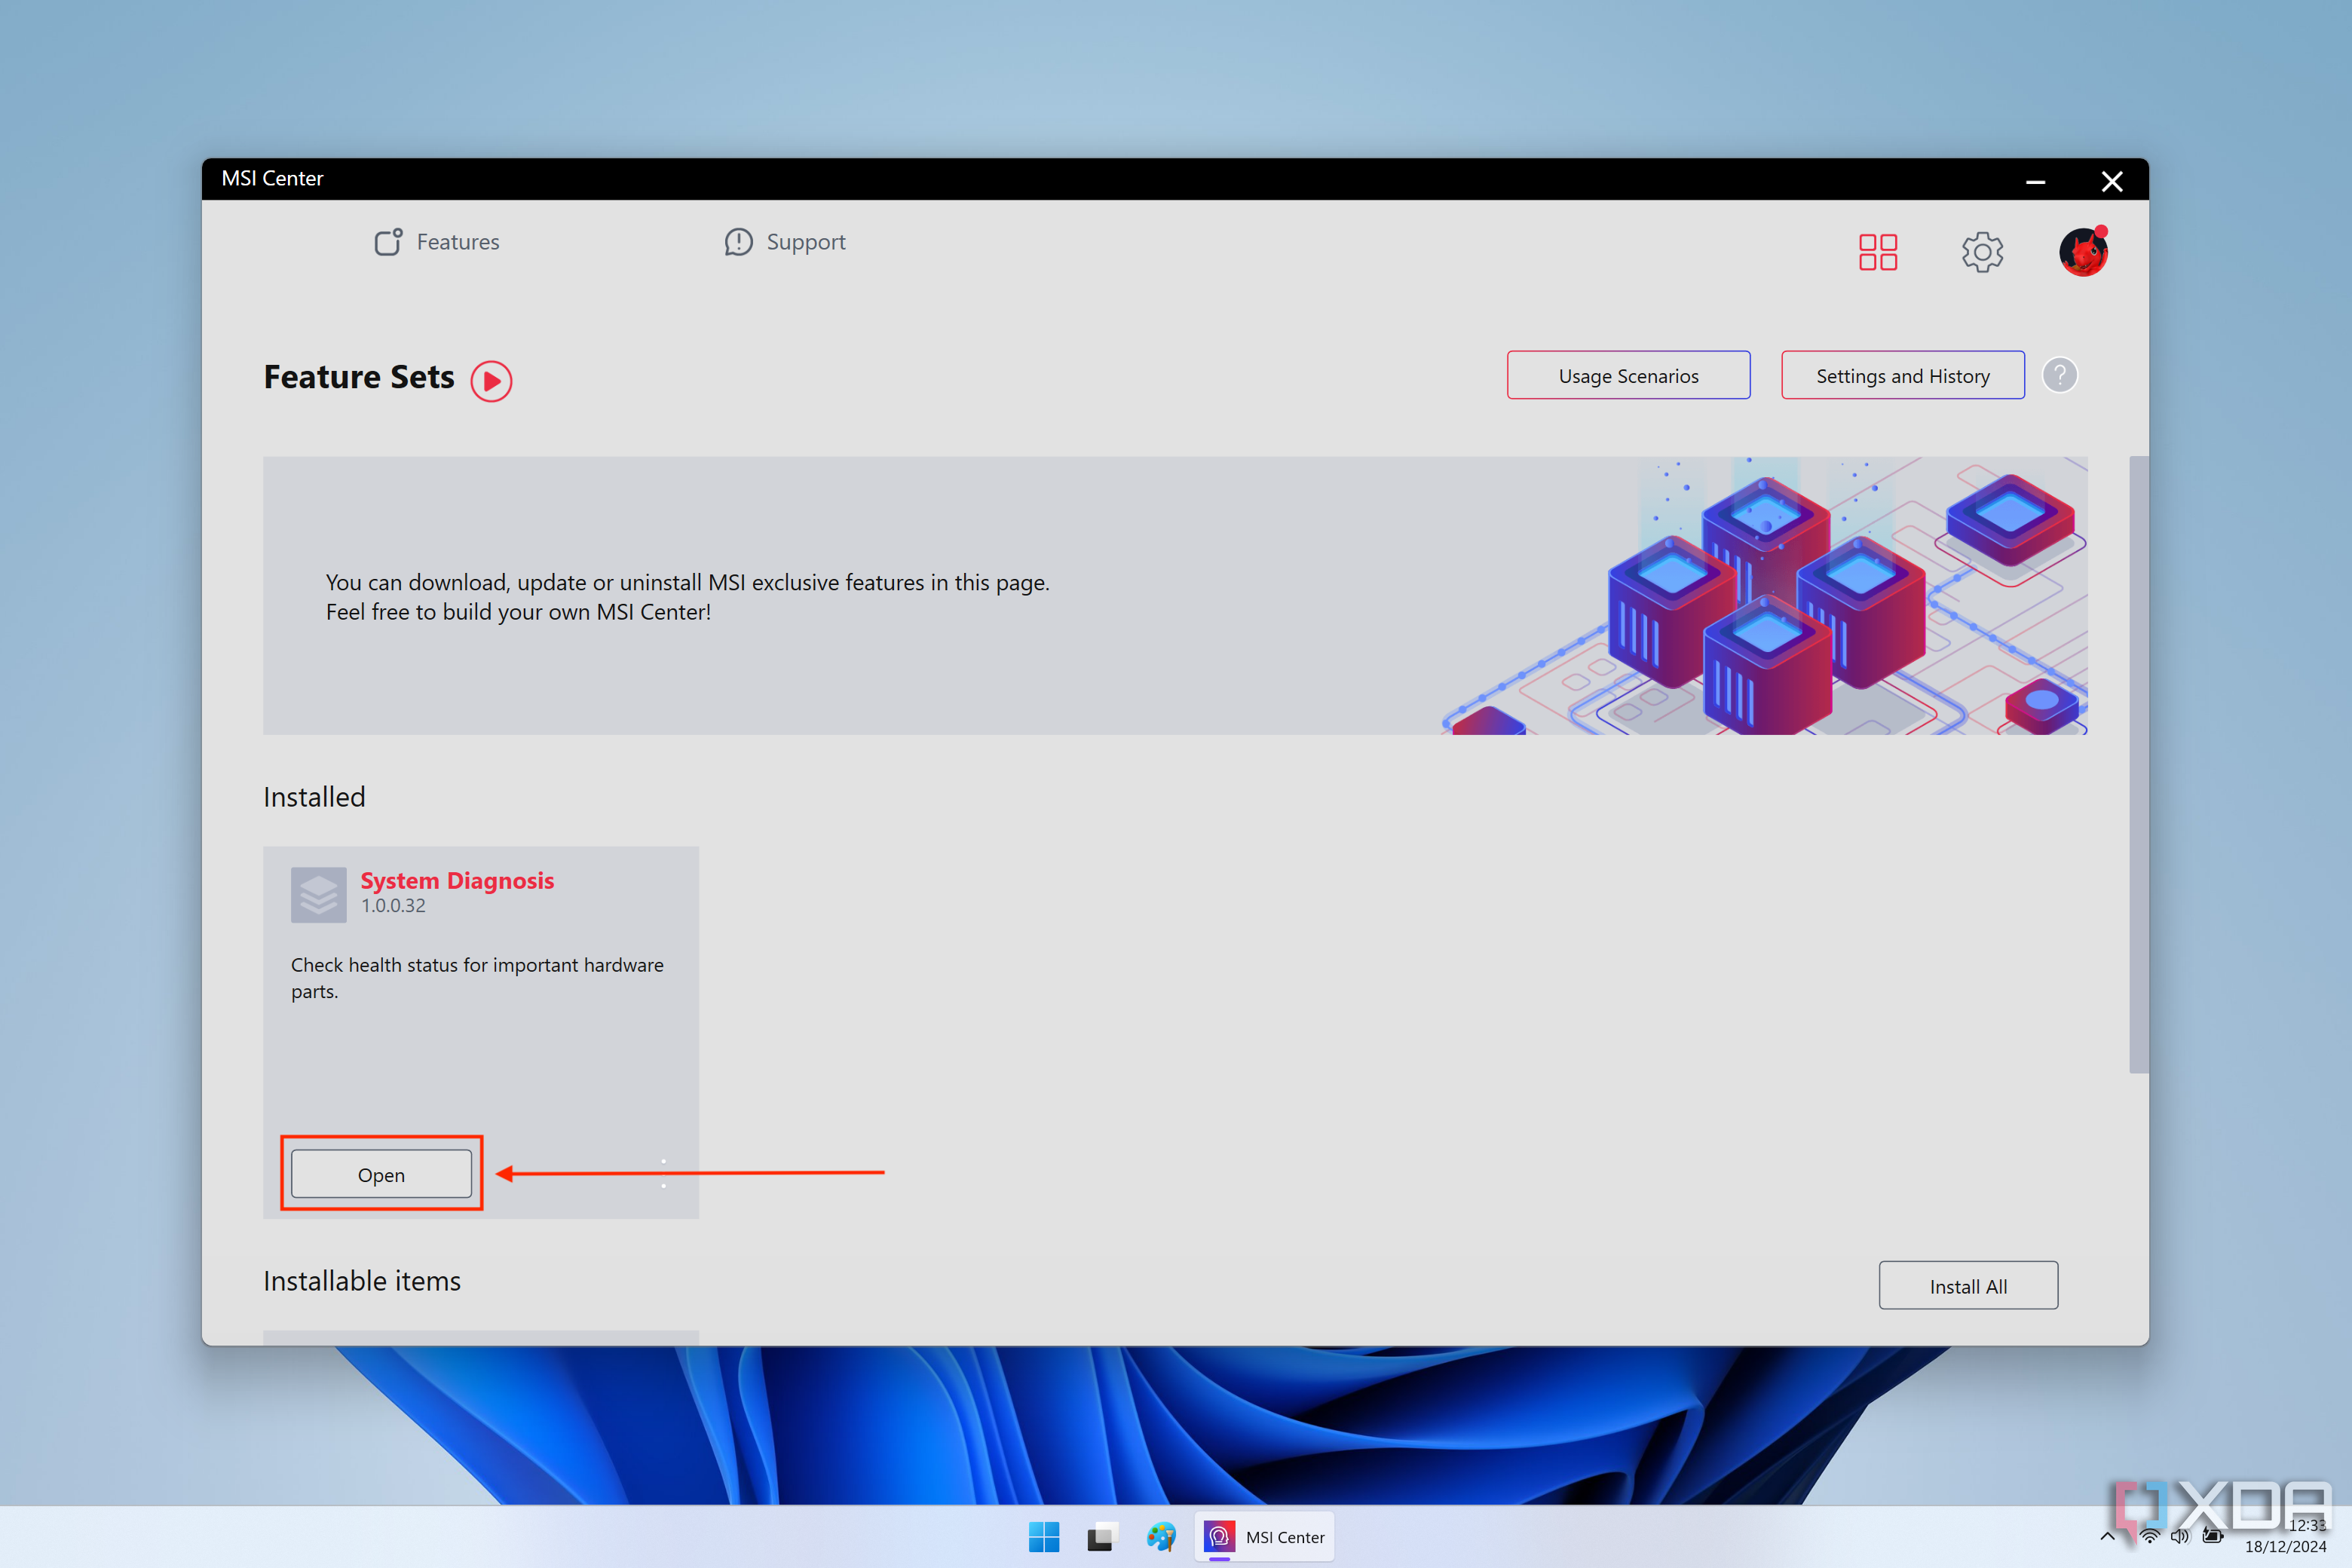
How to limit the battery charge on MSI laptops
MSI laptops let you limit the battery charge as well. Older laptops may still use the classic MSI Dragon Center app, but newer models have the new MSI Center app. If you have one of the newer MSI laptops, you can follow these steps:
- Open the MSI Center app. If you don’t have it, you can download it from the Microsoft Store.
- Click the four squares button at the top of the window (labeled feature sets).
-
Check that the System Diagnosis feature is installed. Click Install if it isn’t, and Open if it’s already installed.

- Once in System Diagnosis, you should see a Battery Master option on the left side of the window. Click it.
- Set the toggle to Balanced to stop charging at 80%.
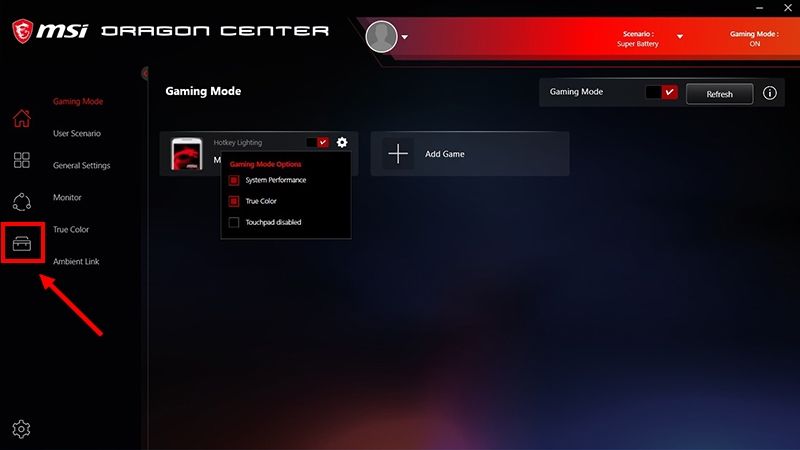
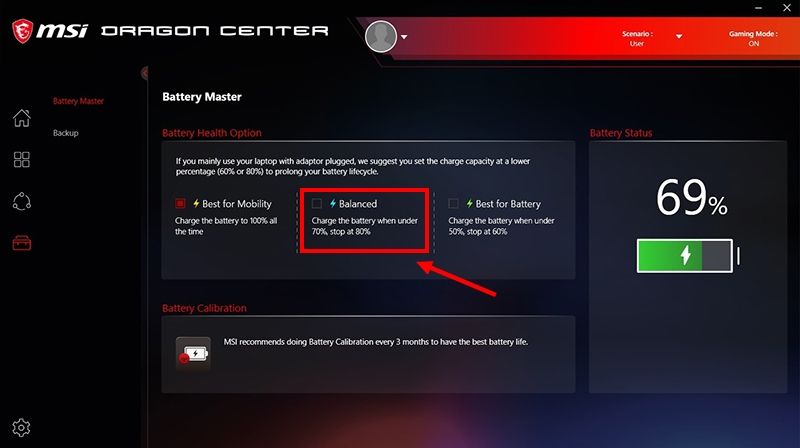
If you have an older laptop, the MSI Dragon Center app works as follows:
- Launch the Dragon Center app. You can download it from MSI’s website.
-
Click the toolbox icon, then choose Battery Master.

Image credit: MSI
-
Set the Battery health option to Balanced. You can also set this option to Best for battery to limit the charge to 60%.

Image credit: MSI
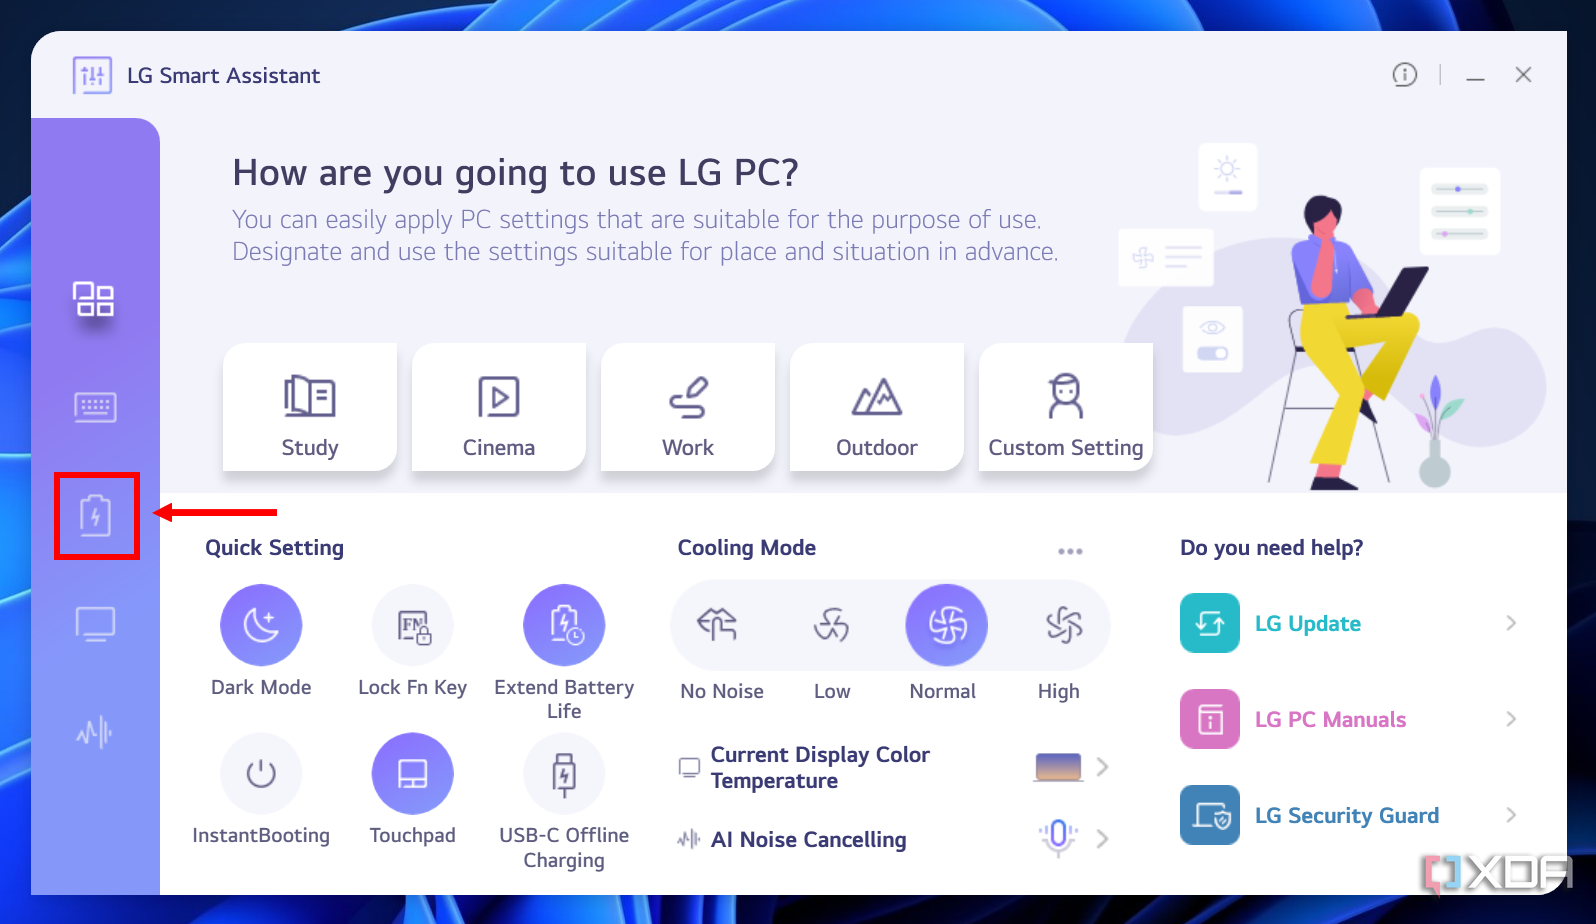
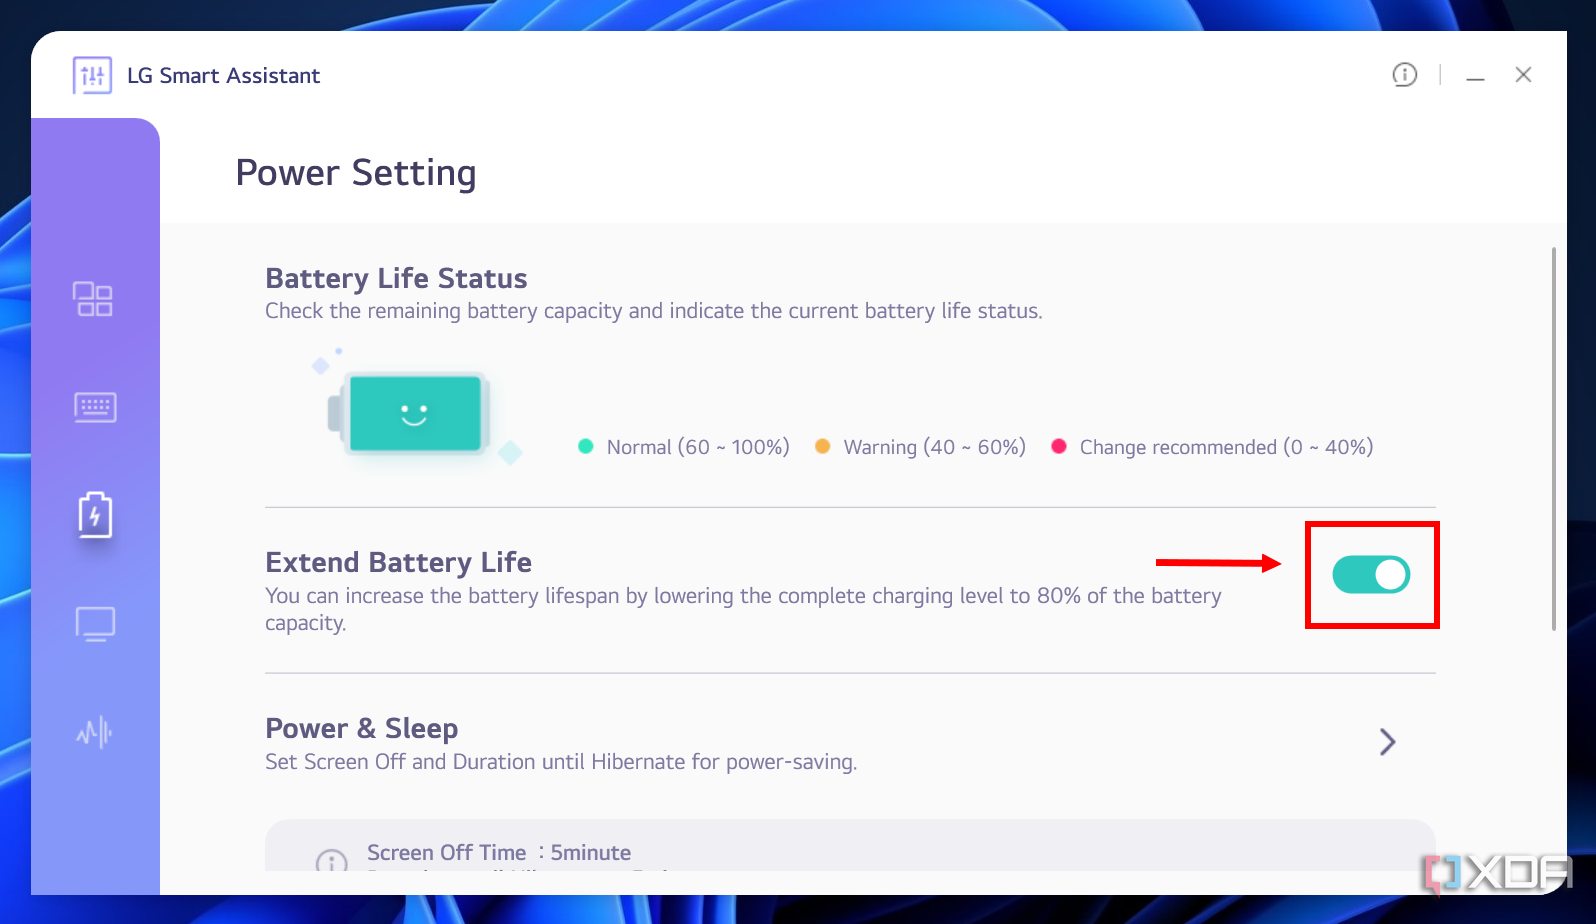
How to limit the battery charge on LG laptops
LG bundles its laptops with the LG Smart Assistant app, which also lets you limit the battery charge to 80%:
-
Launch the LG Smart Assistant app.
- If you’ve removed the app, you can download LG Update from the company’s support website, then use LG Update to install Smart Assistant.
-
Click the Power setting icon on the left side (it looks like a battery).

-
Set the Extend Battery Life toggle to On.
Battery warnings for other laptops
Because the solutions above are exclusive to the respective laptop manufacturers, there’s a chance your laptop isn’t listed here. However, if you’d like to prevent charging beyond a certain battery level, there are apps that can warn you when you reach 80% battery, or any other level, so you can unplug the laptop. They can’t limit the charging capacity per se, but they might be useful if you want to at least be more aware of your battery usage. One great option is Battery Limiter.
Once you’ve installed the app, simply drag the slider to set the maximum battery charge so you’ll hear an alarm when that number is reached.
Keep your battery healthy
Hopefully, in the near future, Windows 11 will add a feature like this that works natively on all laptops so you don’t have to navigate all kinds of different settings. Regardless, all these methods work and cover most of the laptop brands you can find, so whatever your laptop is, you can help extend its lifespan by preserving its battery capacity. Laptops are powerful enough to last you many years these days, so preserving the battery is a great way to ensure you don’t need a new one anytime soon.
how to limit battery charge to 80 windows 11
Limiting your laptop battery charge to 80% can significantly extend its lifespan by reducing the wear and tear on the battery cells. To achieve this in Windows 11, you can use the built-in power settings or third-party software. This guide will help you understand and configure your settings to ensure your battery doesn’t charge beyond 80%.
The following steps will guide you through the process of setting up your Windows 11 laptop to limit the battery charge to 80%. This will help you maintain optimal battery health.
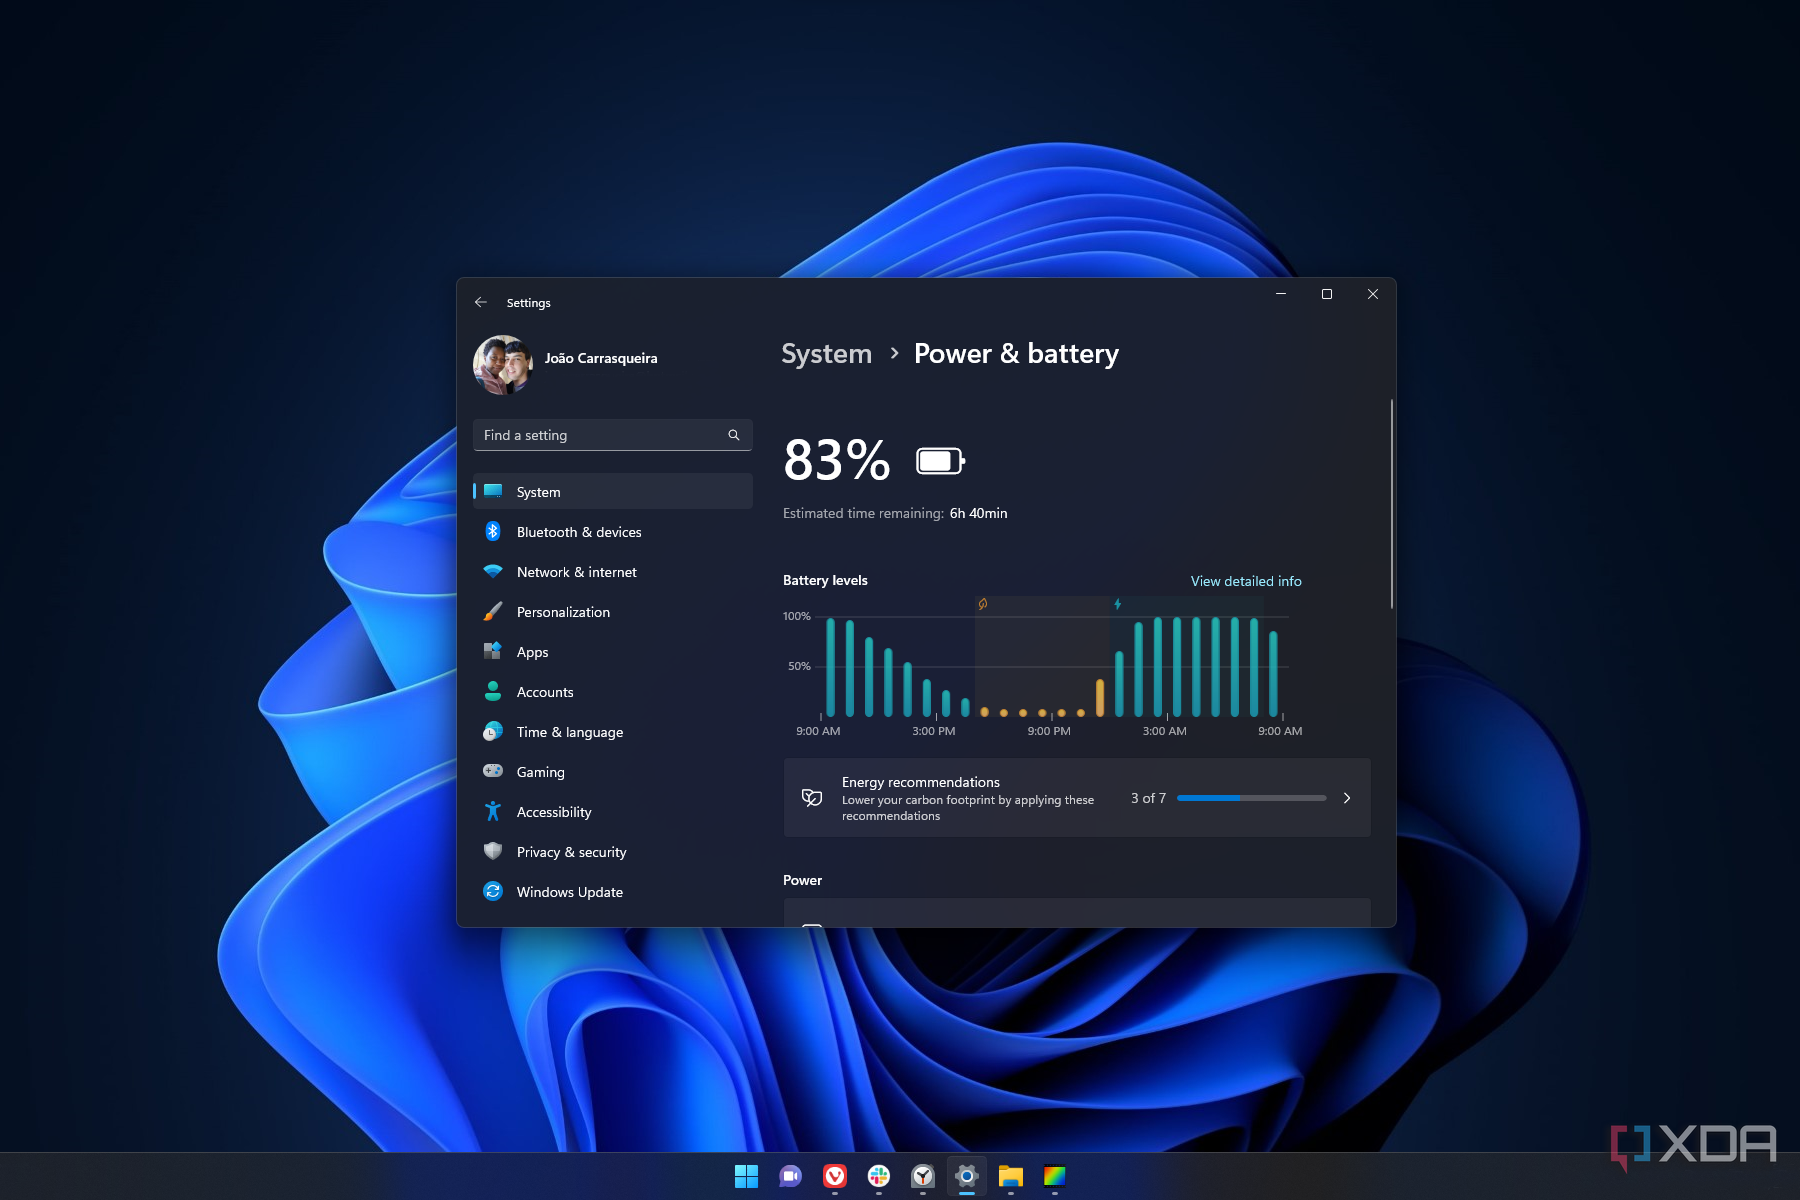
Step 1: Access Power & Battery Settings
Open the Start menu, go to «Settings,» then click on «System,» and finally «Power & Battery.»
This section is where you can see an overview of your battery status and adjust various power settings to optimize your laptop’s performance and battery life.
Step 2: Look for the Battery Health Manager Option
In the «Battery» section, find the «Battery health manager» or a similar option (note: this may vary based on your laptop manufacturer).
If your laptop doesn’t have a built-in battery health manager, you may need to use third-party software or update your BIOS settings to access this feature.
Step 3: Enable Battery Charge Limit Option
Select the option that allows you to limit the battery charge, often labeled as «Maximum Battery Charge Limit» and set it to 80%.
This setting will ensure your battery stops charging once it reaches 80%, thereby reducing the wear on the battery cells and extending its overall lifespan.
Step 4: Save the Settings
Click “Apply” or “Save” to enable these changes.
Make sure to confirm that the settings have been saved correctly. Sometimes, a system restart might be required for the changes to take effect properly.
Step 5: Verify the Setting
Check your battery status to make sure it stops charging at 80%.
You can do this by monitoring the battery icon in your taskbar or using the battery status information available in the «Power & Battery» settings.
After completing these actions, your laptop should consistently charge only up to 80%, which will help prolong the battery’s durability and efficiency.
Tips for Limiting Battery Charge to 80% in Windows 11
- Check if your laptop manufacturer provides a proprietary power management tool, which might offer more precise control over battery settings.
- Regularly update your BIOS and drivers, as manufacturers often release updates that can enhance battery management features.
- Use third-party software with high ratings and good reviews if your laptop lacks built-in options for managing battery charge limits.
- Avoid exposing your laptop to extreme temperatures, as heat can significantly degrade battery health.
- Frequently monitor your battery health through Windows settings or third-party apps to ensure your battery is functioning optimally.
Frequently Asked Questions
How do I know if my laptop supports battery charge limiting?
Check your laptop’s user manual or visit the manufacturer’s website. Some brands, like Lenovo and Dell, have built-in settings for this feature.
What if I can’t find the battery charge limit option in Windows 11 settings?
You may need to install manufacturer-specific software or use third-party tools. Also, updating your BIOS might unlock this feature.
Can I set the battery limit to a percentage other than 80%?
Yes, some systems allow you to customize this setting. It depends on your laptop’s power management options or third-party software capabilities.
Will limiting the battery charge to 80% affect my laptop’s performance?
No, it only affects the maximum charge level. Your laptop’s performance should remain the same, but you might notice a shorter usage time between charges.
Is it safe to use third-party software for battery management?
As long as the software is well-reviewed and from a reputable source, it is generally safe. Always download from official or trusted sites.
Summary of Steps
- Access Power & Battery Settings.
- Look for the Battery Health Manager Option.
- Enable Battery Charge Limit Option.
- Save the Settings.
- Verify the Setting.
Conclusion
Limiting your battery charge to 80% in Windows 11 is a straightforward process that can have a significant impact on your laptop’s battery health. By following the steps outlined above, you can easily configure your system to stop charging once it reaches 80%. Not only does this help in extending the lifespan of your battery, but it also ensures that your device remains in optimal working condition for a longer period.
If your laptop doesn’t have built-in support for this feature, third-party software or manufacturer-specific tools can provide a workaround. Regularly keeping an eye on software updates and battery health can further help in maintaining your battery’s efficiency.
For more detailed instructions or troubleshooting tips, consider checking out forums or the support section of your laptop manufacturer’s website. Implementing these practices will not only save you money in the long run by potentially avoiding the need for a battery replacement, but it will also enhance your overall user experience with your Windows 11 device.
Kermit Matthews is a freelance writer based in Philadelphia, Pennsylvania with more than a decade of experience writing technology guides. He has a Bachelor’s and Master’s degree in Computer Science and has spent much of his professional career in IT management.
He specializes in writing content about iPhones, Android devices, Microsoft Office, and many other popular applications and devices.
Read his full bio here.
How to Stop Your Laptop Battery From Charging Above 80% on Windows 11
In our fast-paced digital world, laptops have become an essential tool for both work and leisure. However, the longevity of a laptop’s battery is a crucial concern for users, especially those who constantly rely on their devices for extended periods. Lithium-ion batteries, the most commonly used types in laptops today, can undergo wear and tear over time, and managing their health is vital for sustained performance. One effective method of prolonging battery life is by limiting the charge to a certain percentage, often recommended to be around 80%. In this article, we’ll explore how to stop your laptop battery from charging above 80% on Windows 11.
Understanding Lithium-ion Battery Health
The Chemistry of Lithium-ion Batteries
Before diving into the steps for limiting your laptop’s battery charge, it’s essential to understand why this is necessary. Lithium-ion batteries operate through chemical reactions, wherein lithium ions move between the anode and cathode. Over time, repeated charging cycles can lead to unnecessary wear and decrease the battery’s capacity. Keeping the battery charged between 20% and 80% can significantly extend its lifespan.
The Risks of Charging to 100%
Charging your laptop battery to 100% isn’t always the best idea. Doing so can cause:
-
Increased Heat: Charging generates heat, which is detrimental to battery longevity.
-
Electrode Stress: Constantly charging to full capacity stresses both electrodes within the battery, increasing the likelihood of degradation.
-
Chemical Complexity: As the battery reaches full charge, the chemical reactions inside can become less efficient, leading to a gradual performance decline.
Features of Windows 11 for Battery Management
Windows 11 comes equipped with various built-in settings and features that enable users to manage their battery life more effectively. One of these features is called Battery Saver, which can help in this regard. However, to limit charging to 80%, we may need to delve into more specific settings and third-party options.
Windows Battery Saver Settings
The Battery Saver feature in Windows 11 helps conserve battery power by limiting background activity and reducing screen brightness. While it doesn’t specifically limit charging to 80%, it can help manage overall battery use, making it a useful feature alongside other methods.
Methods to Stop Charging Above 80%
Here are several methods to limit your laptop battery charge to 80% on Windows 11. Depending on your laptop manufacturer and model, some of these options may be available while others may not.
Method 1: Use Manufacturer’s Battery Management Software
Many laptop manufacturers provide their proprietary battery management utilities, which allow users to set a charging limit.
-
Lenovo Vantage: If you have a Lenovo laptop, you can use the Lenovo Vantage software. Through it, you can enable the «Conservation Mode,» which limits the charge to around 55-80%, depending on your setting.
-
ASUS MyASUS: ASUS laptops may include MyASUS, which offers a feature called “Battery Health Charging.” You can select a mode that charges the battery only to 80%.
-
HP Support Assistant: HP laptops provide similar features through the HP Support Assistant, where you may find an option to limit the battery charge.
-
Dell Power Manager: Dell laptops offer the Dell Power Manager utility, which has settings to adjust charging behavior.
Check your manufacturer’s support website or software to see if there’s a specific application for battery management that includes an option to limit the charge.
Method 2: Using the BIOS/UEFI Settings
Some laptops include options within their BIOS/UEFI firmware that allow you to limit battery charging.
-
Accessing BIOS/UEFI: Restart your laptop and enter the BIOS/UEFI settings by pressing the appropriate key (usually F2, F10, or DEL) during boot-up.
-
Navigate to Battery Settings: Locate the battery settings section (the exact location varies by manufacturer) and look for options related to battery charging limits.
-
Set the Charge Limit: If available, configure the settings to limit the charging to 80%. Save your changes and exit.
Note that not all BIOS/UEFI interfaces will have this capability.
Method 3: Third-Party Software
If your laptop doesn’t come with manufacturer-specific battery management software, you can consider third-party applications. One popular option is BatteryCare.
-
Download and Install BatteryCare: Visit the BatteryCare website and download the software. Follow the installation prompts.
-
Configure Battery Limits: Once installed, navigate to the settings menu, where you can set notifications for when your battery reaches a specified percentage. While it may not directly prevent charging, it will alert you when to unplug the laptop.
Other third-party software options include Battery Limiter and Smarter Battery. Always ensure that you download software from trusted sources as third-party applications can pose security risks.
Method 4: Power Command Line
For more advanced users, leveraging the Command Prompt can lead to custom battery settings; however, this typically does not directly limit charging but can help in managing power settings.
-
Open Command Prompt: Type «cmd» in the Windows search bar and run it as an administrator.
-
Use Power Configuration Commands: While there are specific commands to manage power settings, keep in mind that not all capabilities to limit charging exist at this level for Windows.
Regularly Maintaining Your Battery
To further enhance battery longevity, consider these general battery maintenance tips:
-
Avoid Extreme Temperatures: Keep your laptop in environments with moderate temperatures. Extreme heat or cold can damage battery cells.
-
Regularly Unplug: If your laptop supports a recommended charging limit, routinely unplug the device once it reaches 80%.
-
Optimize Power Settings: Adjust your power plans within Windows to favor battery life over performance when on battery.
-
Calibrate Your Battery: Occasionally calibrating your battery ensures that the operating system correctly recognizes its capacity.
Conclusion
Limiting your laptop battery charge to 80% is a simple yet effective strategy to enhance its longevity and efficiency. By utilizing the built-in features in Windows 11, relying on manufacturer-specific software, or exploring third-party solutions, you can manage your laptop battery’s health over time.
Maintaining a good battery health routine not only leads to better performance during daily tasks but also delays the need for costly battery replacements. By following the methods outlined above, you can protect your laptop’s battery and get the most out of your investment.
As technology continues to evolve, it’s essential to stay informed about battery management practices to adapt your usage patterns accordingly, ensuring a seamless and efficient computing experience. Remember, a little preventative care goes a long way in extending the life of your laptop’s most crucial component: its battery.
Как ограничить заряд аккумулятора на ноутбуке
Если вы постоянно пользуетесь ноутбуком, подключенным к сети, обычно заряд батареи всегда держится на уровне 100%, что не очень хорошо для поддержания здоровья аккумулятора. Это лучше, чем постоянные циклы заряд-разряд, но более предпочтительным будет ограничение заряда на уровне 60–80%.
В этой инструкции подробно о возможных способах ограничить заряд аккумулятора ноутбука так, чтобы при достижении указанного уровня заряда в процентах, он переставал заряжаться и тем самым продлить срок его службы. Также может быть полезным: Простое переключение схем электропитания на ноутбуке, Что делать, если быстро разряжается ноутбук.
Настройки лимита заряда батареи в БИОС (UEFI)
Прежде чем искать какие-то дополнительные утилиты для установки уровня заряда аккумулятора, рекомендую заглянуть в БИОС/UEFI ноутбука (как зайти в БИОС на компьютере или ноутбуке). Некоторые производители для отдельных моделей своих ноутбуков делают соответствующие опции доступными там.

Например, на одном из моих ноутбуков Dell можно настроить «Primary Battery Charge Configuration» в разделе «Power Management»: выбрать один из предустановленных профилей, либо указать собственные параметры начала и окончания зарядки.
Аналогичные настройки есть у устройств Dell Alienware, отдельных ноутбуков HP, Microsoft Surface и, не исключаю, что у некоторых других — тоже.
Фирменные утилиты от производителей ноутбуков для ограничения заряда аккумулятора
Многие производители ноутбуков предлагают собственные инструменты управления ноутбуком, которые можно использовать в том числе для ограничения заряда батареи. Где-то заряд можно указать вручную, а где-то есть предустановленные профили для продления срока жизни батареи, ограничивающие заряд на уровне ниже 100%. Учитывайте, что иногда функция доступна лишь для отдельных ноутбуков производителя.
Среди таких приложений:
Возможно, у вас есть собственные решения для настройки уровня заряда батареи или известны приложения и подходы, реализованные на неуказанных здесь марках ноутбуков? Если так — ваш комментарий к статье может оказаться полезным.
Sometimes you need to use your laptop computer on battery power, but if it is not lasting long enough, here is how to reduce battery drain in Windows 11. Make these changes to last longer.
You may need to work out of the office, such as at cafes, airports and on trains. Sometimes it’s just nice to sit on the sofa at home and not be tied to a wall power socket. Whatever the reason for using a laptop on battery power, you want to make sure it lasts as long as possible.
There are many tweaks and changes that help to reduce power consumption in Windows 11 and there are some obvious tweaks and settings, but also some not so obvious ones. The difference between using battery-saving techniques and not using them can amount to quite a significant difference. You might even get a couple of hours more use on a full battery charge.
Windows energy recommendations
A quick and easy way to optimize a Windows computer for longer battery life is to go to Settings > System > Power & battery > Energy recommendations. Click Apply all at the top. When everything is set as Windows prefers, the button is grey and says Applied.

The settings are good, but they might not suit everyone and there is more you can do to extend battery running time on your Windows laptop, but it is a good place to start. Let’s see what else you can do.
Enable battery saver mode
The Battery Saver mode makes a huge difference to the amount of time a Windows laptop will run on battery power. For example, my laptop lasts two or even three times longer when it is enabled. The other tweaks covered below all help, but this is the main one.

Click the battery icon in the taskbar to display a quick settings panel and then click the Battery saver button to enable it. Performance is reduced slightly and the screen is dimmed a bit, but you will not notice the performance difference with email, web browsing and other lightweight tasks.
Manual and automatic battery saver
Go to Windows Settings > System > Power & battery and expand the Battery saver section. There is an option to Turn battery saver on automatically at and you can choose from a list, like 50%, 40%, 30% and so on. It cannot be set above 50%, but there is an Always option on the menu. That means always on when on battery power, not always on even when plugged in.

Set battery saver to at least 50% and better still, set it to Always, because it makes a big difference to the length of time the battery will last.
Choose a power mode
Go to Settings > System > Power & battery. When battery saver is turned off, a power mode can be selected and there is Best performance, Balanced and Best power efficiency on the menu. When the laptop is on mains power, select Balanced or Best performance, but when you are using it on battery power, select Best power efficiency.

When battery saver is enabled, power mode selection is disabled. If you always set the power mode to Best power efficiency, even if you forget to enable battery saver mode, you will at least get some power savings.
Windows settings are a confusing mess because the Control Panel still exists and it has power options. Click the Start button and type ‘control‘, then click Open when Control Panel is suggested. Click Power options and one or more power plans is displayed.

You can create power plans with the menu on the left and plan settings can be edited with the Change plan settings link on the right of each one. Create a Power Saving plan if there isn’t one already. Click Change plan settings and then Change advanced power settings.
There are a some settings that you can customize, like setting PCI Express to maximum power savings, and setting Processor power management > Maximum processor state to 80% or some other reduced value.

It is not clear how the Control Panel power plan and Windows Settings power mode work with each other. Selecting a power mode in one does not seem to change the other.
I would select the default power plan in Control Panel, which is usually Balanced, and then use Windows Settings > System > Power & battery > Power mode and Battery saver.
Dim the screen
One of the easiest and most effective things you can do to reduce battery drain is to turn down the screen brightness. The amount of power a screen uses depends on the brightness setting. Lower it and you lower the power requirement, which means the battery lasts longer.
Also go to Windows Settings > System > Power & battery and expand the Screen and sleep section. Set a short time for turning off the screen when on battery power, like three or four minutes. This ensures that if you aren’t actually using the computer, it isn’t wasting power.
Show power-draining apps
Which apps use the most battery power on your Windows laptop? Go to Settings > System > Power & battery and expand the Battery usage section. At the top, choose Last 24 hours or Last 7 days and just above the list on the right, choose from Overall usage, In use, Background, and Name.

Overall usage is useful, but the apps at the top of the list are usually the ones you use most anyway. Select Background and you can see if apps in the background have been using significant battery. How is this list sorted? My guess is that it is sorted by background use, but the percentage figure shown on the right still seems to be total usage, foreground and background.
If it is possible, and sometimes it isn’t, stop the worst apps running and stop them starting in the first place by checking for apps that run on startup.
Stop apps running in the background
One way to reduce battery drain in Windows and enable a laptop to last longer is to stop apps running in the background. If they are not running, they are not using battery power.
Go to Settings > Apps > Installed apps to see what software is on the computer. At the right side of each app is three dots. Click it and select Advanced options on the menu. (It is disabled for some apps.)
The next screen has a Background apps permissions section and there are three options, Always, Power optimized (recommended), and Never. If the app does not need to run in the background, set it to Never. (The menu is disabled for some apps.)

It can be hard deciding whether or not an app should be allowed in the background. If there is any doubt, set it to Power optimized, but if you know you don’t use something, like Phone Link for example, then set it to Never.
Just below Background apps permissions may be a Runs at log-in section with an on/off switch. Not all apps have this, but if it is there, and if you don’t use the app, turn it off.
With all these changes, are you getting any more life out of your laptop’s battery. Let me know in the comments below.