
Allocating your computer resources is necessary; sometimes, certain applications can use more resources than you would like.
As a result, your performance will be negatively impacted, and you’ll experience slowdowns, stuttering, freezes, and other issues.
To prevent this, you need to set limits or resource usage, and in today’s guide, we will show you how to limit CPU usage on your Windows PC.
How do I check my CPU usage?
Windows 10
- Press Ctrl + Shift + Esc.
- In the Processes tab, look for the CPU column and you’ll see CPU usage for each process.

- To see overall CPU usage on a graph, go to the Performance tab.


Windows 11
- Start Task Manager by pressing Ctrl + Shift + Esc.
- The Processes tab should automatically open. Look for the CPU column to see the CPU usage for each application.

- Navigate to the Performance tab to see overall CPU usage on a graph.


How can I improve my CPU performance?
Use faster RAM
To get the maximum performance out of your CPU, it’s essential to use RAM with a higher clock rate. Using a faster RAM, your PC and memory will exchange data faster.
This might not be a noticeable change while performing everyday tasks, but there will be a performance boost when performing more intensive hardware tasks, such as gaming.
To find out the maximum RAM speed your CPU can handle, be sure to check your processor’s hardware specs page.

It’s also advised to check your motherboard manual and see what are the maximum RAM speeds that it can handle, so ensure that it can handle it at maximum frequency.
For more information regarding this subject, read our guide on what happens if your RAM is faster than a CPU.
Overclock your CPU
You might have to overclock it if you want to get the maximum performance out of your CPU. By doing so, you’ll be raising its speed and improving your performance.

Do keep in mind that overclocking is not without its risks, and by overclocking you’ll increase the temperature output which can reduce the life expectancy if you’re not careful and you don’t have sufficient cooling.
In the worst-case scenario, you can overheat and damage your hardware, so be cautious. For more information, visit our best software for Intel and AMD CPU overclocking article.
Check your temperature
You need to check your PC’s temperature to ensure it’s running smoothly. We wrote a helpful guide on how to check CPU temperature on Windows 11, so you can check it out for more information.
Alternatively, you can use one of many CPU monitoring software to check the temperature of your processor.
If the temperature exceeds normal, you might have to change the fan speed or invest in additional cooling.
How to limit the CPU usage of a program?
1. Use Task Manager
- Press Ctrl + Shift + Esc. The Task Manager window will now appear.
- Navigate to the Details tab.

- Locate the application whose resource usage you want to limit and right-click it.
- Navigate to Set priority and set it to Below normal or Low.


Keep in mind that these settings apply only until you turn off your PC. Once you turn it off, the settings will revert to the default values.
You can also adjust the processor affinity to limit the CPU usage by doing the following:
- Start Task Manager and go to the Details tab.
- Locate the desired application, right-click and choose Set affinity.

- Uncheck processors threads that you don’t want to use with that software and click on OK.


Keep in mind that the fewer processor cores the application uses, the less CPU power it will require, but by disabling available cores, you might affect the performance and the stability of that software.
2. Use BES
- Visit the BES download page.
- Download the software.

- Once the application is downloaded, run it.
- Click on Target.

- Now select the application that you would want to limit and click on Limit This.

- When the confirmation dialog appears, click on Yes.

- Move the slider to select how much would you like to limit CPU usage for that process.

- Repeat this for all programs that you want to limit.


3. Use Process Tamer
- Visit the Process Tamer website and download it.

- Run the application.
- The software will run in your system tray and automatically limit the CPU usage of any application that exceeds a certain threshold.
- To configure the software, right-click the system tray icon and choose Configure.
- Now you can set the threshold, affinity, and other settings.


4. Use ProcessLasso
- Navigate to the ProcessLasso page and download the latest version.
- Install the software and run it.
- Right-click the application you want to limit.
- From there you can adjust both CPU affinity and priority with a few clicks.

- You can also use the CPU limiter feature to reduce the number of available cores to an app if the CPU usage exceeds certain values.


How to limit CPU usage in Windows 11?
Disable background apps
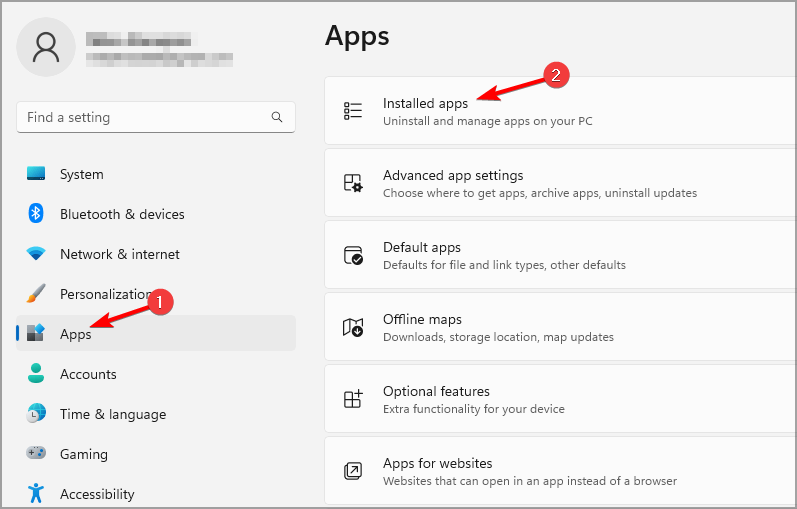
- Press Windows key + I to open the Settings app.
- Navigate to Apps and select Installed apps.

- Click three dots next to the app’s name and choose Advanced options.

- Set Background app permissions to Never.


Keep in mind that this method only works for Windows Store apps, and it will prevent them from running silently in the background.
By managing the background app power usage, you can also enable Power throttling, thereby limiting power usage.
Disable Superfetch
- Press Windows key + R and enter services.msc. Press Enter.

- Locate SysMain on the list and double-click it.

- Click on Stop to stop the service.

- Set the Startup type to Disabled and click Apply and OK.


The methods mentioned in this guide will affect all apps on your PC and lower the CPU usage in general.
If you want to limit CPU usage for individual apps, the process is almost identical on Windows 11, and you can use all the solutions from the previous section, and they should work without any problems.
Regarding CPU usage problems, here are a few common ones that these solutions should address:
- High CPU usage and low GPU usage
- High CPU usage in Windows 11
- Windows Defender’s max CPU usage
- MsMpEng.exe high CPU usage
- Discord causes high CPU usage
- CPU at 100% when nothing is running
- Windows Update process (wuauserv) high CPU usage
- Xagt.exe high CPU usage
- OneDrive setup triggers high CPU usage
- High CPU Usage Caused by Windows Shell Experience Host
How to limit CPU usage in games?
- How to limit Minecraft CPU usage?
1. Change the render distance
- Navigate to Settings.
- Now go to Video and locate Render distance.

- Lower the value and save changes.

2. Use mods to optimize the game
According to users, you can reduce the CPU usage in Minecraft by using mods that will optimize the game or replace the rendering engine.
The two most popular mods for this purpose are Lithium (Fabric) and Sodium, so feel free to download and try them both.
- How to limit Apex Legends CPU usage?
1. Change the client affinity
- Start the game on Steam or Origin.
- Minimize the game.
- Press Ctrl + Shift + Esc to open the Task Manager.
- Now go to the Details tab. Right-click Steam or Origin client and choose Set affinity.

- Make sure that only the first and the last CPUs are selected. Click OK.

If this method doesn’t work, do the same for the Apex game client and check if that works.
2. Change V-Sync settings
- Navigate to Settings.
- Now go to Video.

- Set the V-Sync to Disabled or Dynamic.

- Save changes.


- How to limit Battlefield CPU usage?
1. Make sure the game is up to date
If the game is having any CPU usage problems, it’s rather likely that bad optimization is the cause. You can fix this by installing the latest updates.
Once the game is up to date, check if the CPU utilization is still high.
2. Update your graphics card drivers
- Navigate to your graphic card manufacturer’s website.
- Select your model on the list.

- Download the latest driver and install it.


After your GPU drivers are updated, check if the issue is still there.
Ensure your system performs smoothly and avoids all GPU driver errors by using a complete driver update assistant, namely Outbyte Driver Updater, that will do the job for you.
Here’s how to safely update your drivers:
- Download and install the Outbyte Driver Updater app.
- Launch the software and wait for the app to detect all incompatible drivers.
- Now, it will show you a list of all faulty drivers to select the ones to Update or Ignore.

- Click on Update & Apply Selected to download and install the newest versions.
- Restart your PC to ensure the applied changes.

OutByte
Keep your GPU in a flawless state without worrying about possible driver issues.
Disclaimer: You may need to upgrade the app from the free version to perform specific actions.
3. Adjust your power settings
- Press Windows key + S and enter power plan. Select Choose a power plan from the list of results.

- Locate your select power plan and choose Change plan settings.

- Now navigate to Change advanced power settings.

- Go to Processor power management and locate the Minimum processor state. Set it to around 20% and save changes.


- How to limit Dota CPU usage?
1. Change affinity
- Start the game.
- Once the game starts, minimize it.
- Now press Ctrl + Shift + Esc to open Task Manager.
- Navigate to the Details tab. Right-click dota process and choose Set affinity.
- Try disabling one or more CPU cores and check if that solves the problem.


Users reported that disabling CPU 0 fixed the issue for them, but you might have to experiment with different settings to fix the problem.
2. Remove MSI drivers and software
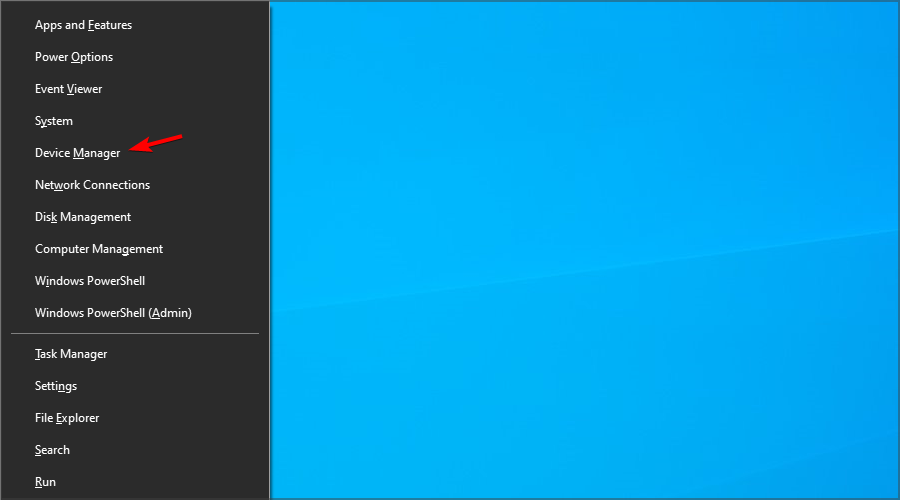
- Press Windows key + X and select Device Manager.

- Now locate any MSI drivers that you have, right-click, and choose Uninstall device.

- Check Delete the driver software for this device and click on Uninstall.
- Do this for MSI drivers that you have installed.

Now you need to remove the MSI software by doing the following:
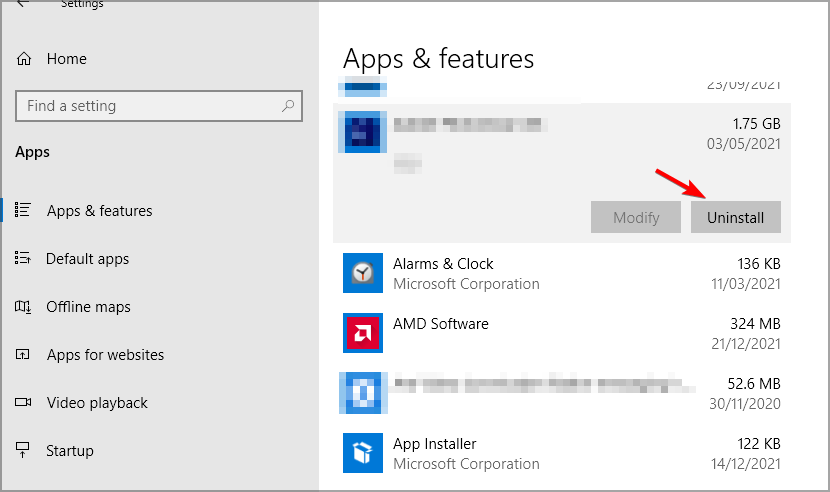
- Press Windows key + X and select Apps and Features.
- Locate the MSI software that you have installed.
- Select it and click on Uninstall.

- Follow the instructions on the screen.

After you’re done, restart your PC. Once your PC restarts, the default drivers will be installed for your motherboard. Do not update them and check if that solves the problem.
Keep in mind that this solution can be applied to other motherboard brands and not just MSI.
- How to limit Fortnite CPU usage?
1. Change the video settings
- Navigate to the menu in the top right corner and select Settings.
- Go to the Video.
- Set Window mode to Fullscreen and set the resolution so it matches your screen resolution. Lastly, set the Frame rate limit above your monitor’s refresh rate.


2. Add Fortnite to your antivirus whitelist
- Press Windows key + S and type windows security. Select Windows Security from the list.

- Navigate to the Virus & threat protection and select Manage settings.
- Select Add or remove exclusions.

- Select Add an exclusion and then choose Folder.

- Add Epic Games, BattlEye, and EasyAntiCheat directories to the list of exclusions.


- How to fix widgets’ high CPU usage in Windows 11
- Fix: Windows 11 Shell Infrastructure Host high CPU usage
- May 2025 Patch Tuesday finally brings Recall & other AI features to Copilot+ PCs
- Microsoft releases Windows 10 (KB5058379/ KB5058392 / KB5058383/ KB5058387) May 2025 Patch Tuesday
- How to limit New World CPU usage?
1. Adjust graphics settings
- Start the game and open Settings.
- Navigate to Visuals and set Max FPS to 60 or even 30.
- Now locate Video Quality and set it to a lower value.

- Save changes.

2. Use high-performance mode
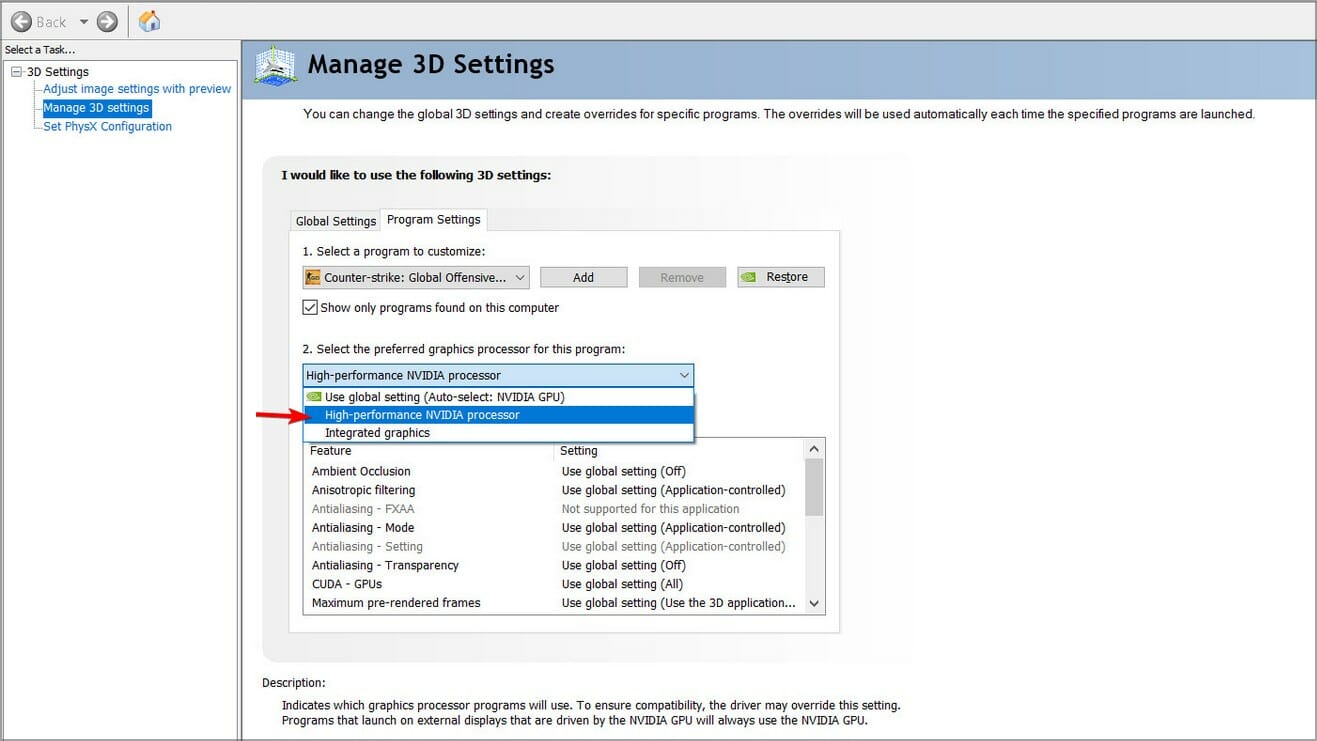
- Open Nvidia Control Panel.
- Navigate to Manage 3D settings and then choose Global Settings.
- Now make sure that the Preferred graphics processor is set to a High-performance NVIDIA processor.

- Save changes.
- How to limit Rainbow 6 Siege CPU usage?
1. Modify the game files
- Navigate to the following directory:
C:\Users\Documents\My Games\Rainbow Six - Siege\ - Open GameSettings.ini with Notepad.
- Locate FPSLimit and set it to FPSLimit=60. You can also use any value higher than 30.
- Save changes.
2. Change the game priority
- Start the game.
- Once the game is running, minimize it by pressing Alt + Tab.
- Now press Ctrl + Shift + Esc.
- Go to the Details tab.
- Locate Rainbow Six Siege on the list, right-click it and expand Set priority. Set it to Low.
Now, check if the problem is resolved.
What are the best tools to monitor CPU usage?
By closely monitoring CPU usage, you can easily detect if any process is using more resources than it should and stop it to ensure there aren’t any slowdowns on your PC.
Using such software, you can ensure that your PC is working at peak performance by finding and stopping any apps with high CPU utilization.
Speaking of which, here are some of the best applications you can use for CPU monitoring.
PRTG Network Monitor
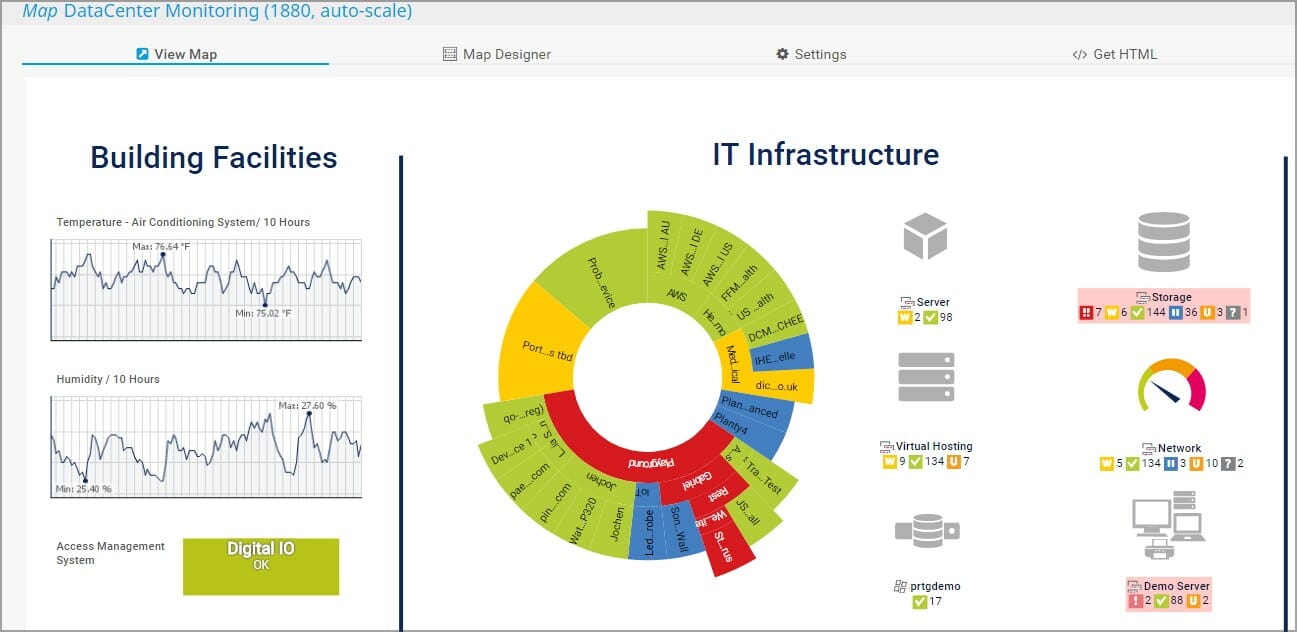
If you’re a system administrator and want to manage your server or a PC, PRTG Network Monitor is one of the best tools you can use.
The software can monitor all your available applications and files, and thanks to advanced logging, you can see problems on your PC or server as soon as they appear.
This software is for professional users, but you can also use it on your home PC to have a full overview of your system’s performance.
ManageEngine OpManager
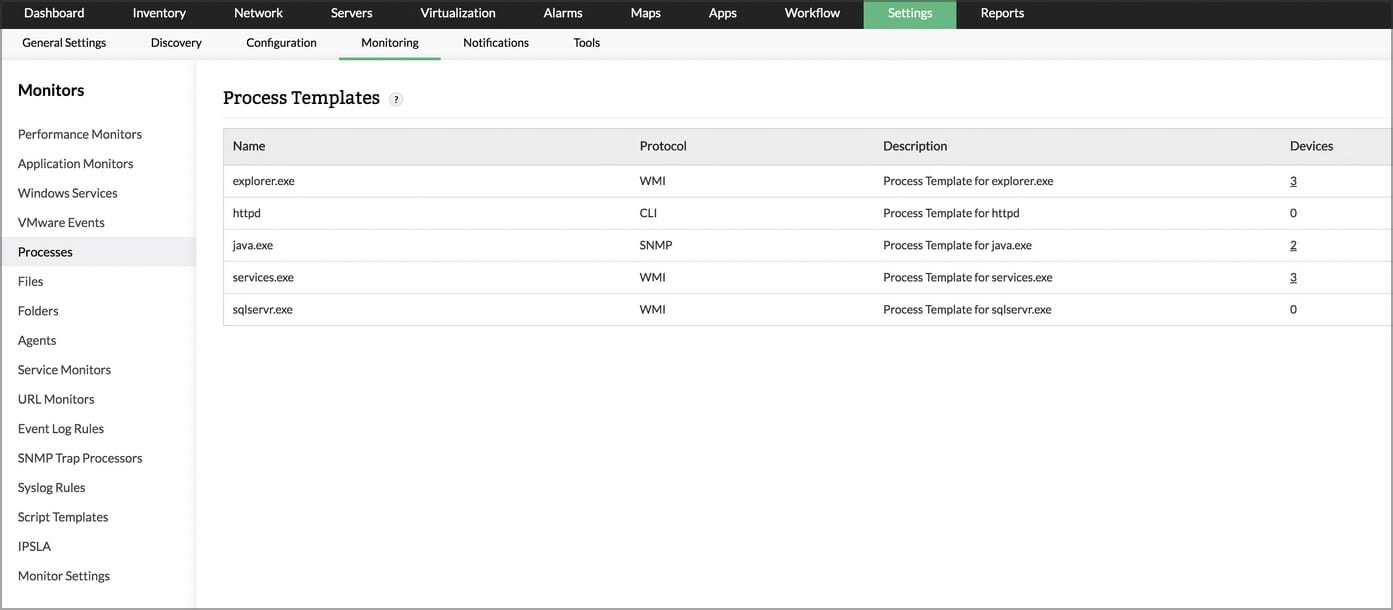
Another professional tool for resource monitoring is ManageEngine OpManager, and this software can be used for real-time network monitoring, allowing you to easily measure packet loss, latency, speed, and more.
The ability to monitor CPU, memory, and disk usage is also there, and you can use this software to monitor both Windows and Linux servers or even virtual machines.
It’s also important to mention that this software can monitor processes locally and remotely, so you can rest assured that no apps are using more resources than they should.
SysGauge
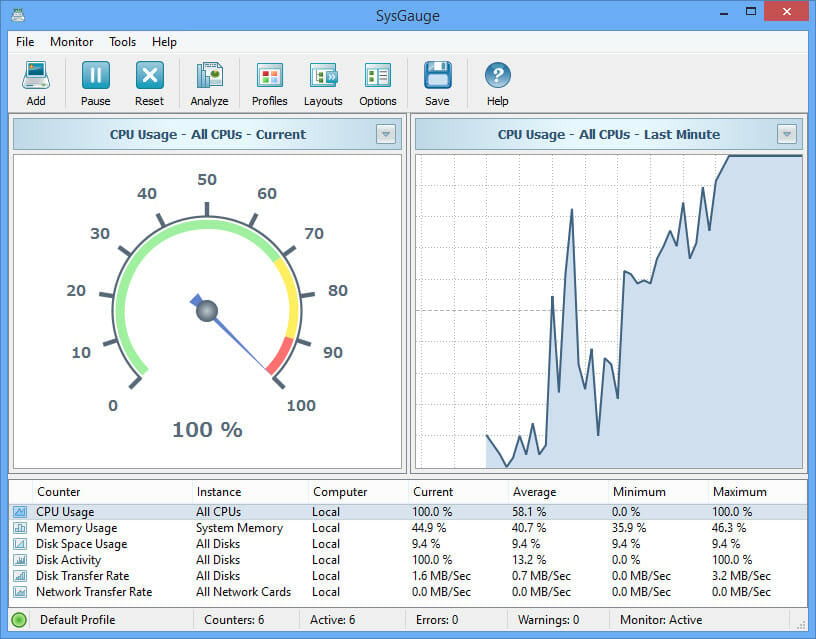
If you need dedicated CPU monitoring software, SYSGauge might just be what you need. The software can provide you with information such as CPU usage and kernel CPU usage.
You can also view additional information, including CPU interrupt time, interrupt rate, frequency, and C1-C3 power states.
The software is incredibly simple to use in its GUI version, but there’s also a command-line version available for more advanced users.
HWiNFO
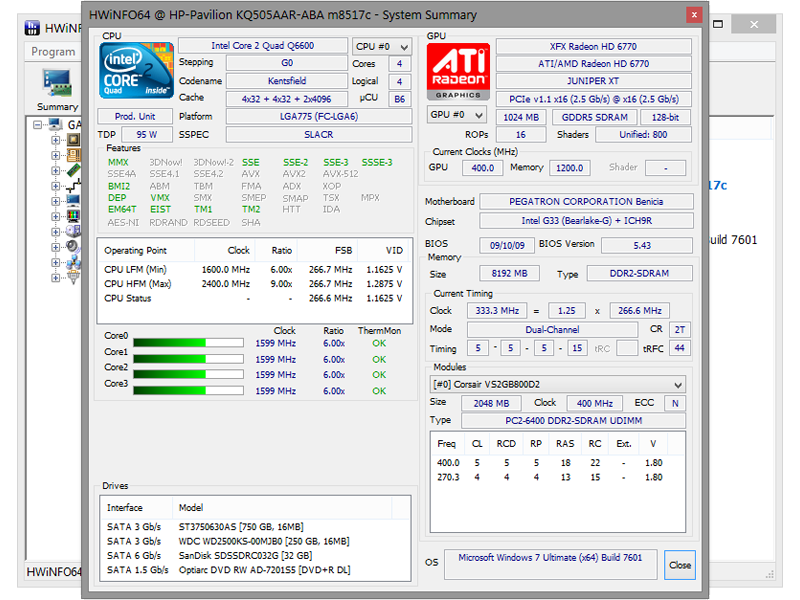
This software is designed to give you in-depth hardware information, and at the same time, it allows you to monitor all your components.
Using this software, you can see your CPU information, including its speed, utilization, voltage and other information.
Thanks to the real-time monitoring, you can also keep a close eye on your system temperature, so you can easily detect any overheating and performance issues.
Wise System Monitor
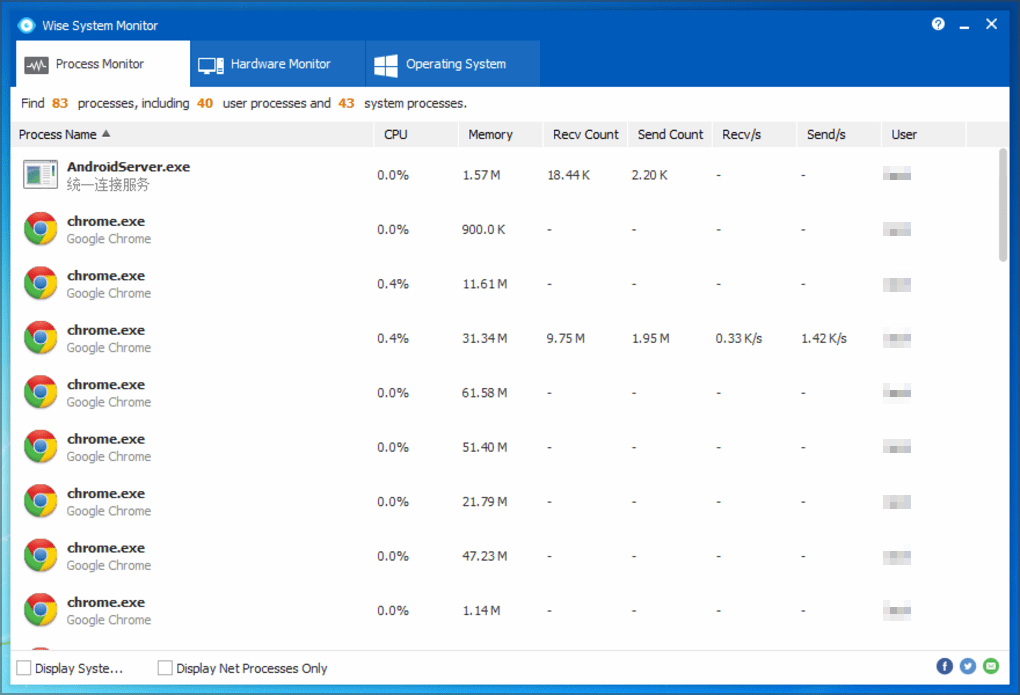
If you need software to monitor CPU usage, then Wise System Monitor might be the perfect choice for you. Using this application, you can view the list of all active processes, as well as their CPU and memory usage.
To ensure that your PC is running smoothly, you can quickly close any applications that are using more resources than they should with a single click.
The app also has a floating window that shows you all the important information, such as your network speed, memory, and CPU usage, as well as your PC temperature.
What is the most power-efficient CPU?
When it comes to power efficiency, the Ryzen 5000 and 4000 mobile series has an incredible performance at 15W TDP.
If you’re looking for a desktop CPU, then you should consider models from the Ryzen series since their TDP ranges from 65W to 95W.
Regarding the APUs, the power consumption is even less, and you can get 35W-65W consumption depending on your model.
If you’re looking for a new power-efficient CPU, check our CPU guides for more information.
As you can see, limiting the CPU usage on your Windows PC is pretty simple. It comes in handy for processes like WbemCons.exe, and it can be done with the Task Manager or with specialized software.
If you’re still having issues with high CPU usage, you might want to check our list of software to fix high CPU usage for more ways to deal with this problem.
How do you limit CPU usage on your PC? Let us know in the comments section below.
There are times when one or more processes start taking 100% CPU usage in Windows 10. This may lead to a slow system. One solution to this issue is to limit CPU usage for specific applications in Windows 10. We will discuss these in this article.
Table of Contents
Adjust program affinity
We can also customize each process within Windows 10 to utilize only specific CPU cores while leaving the others for the other processes to execute simultaneously. This can be used to optimize CPU utilization, but only if handled carefully.
Note that customizing process affinity is not always useful. Before messing around with them, you need to consider whether you have CPU cores that are mostly idle, or are you running an application which executes independent threads?
In a situation where one thread needs to be executed before the other, process affinity can be set for both to utilize the same core. However, software having independent threads can be split across multiple cores to increase its performance.
Another consideration to make is whether the threads are cache-intensive. Meaning, do they all rely on extensive cached data? If they do, then the execution of each thread is very much dependent on the availability of the cached data. Hence, it would be better to run each thread on a separate core to maximize cached data resources.
- Launch the Task Manager and go to the Details tab.
- Look for the process you wish to modify the affinity, and right-click it. Click on Set affinity in the Context Menu.
- From the Process affinity window, you can select the cores you wish the process to limit to, and uncheck the boxes next to the rest. By default, all processes utilize all cores.
As my computer only had 4 cores, it is displaying them as CPU 0, 1, 2, and 3.
But how will you know what cores are available? This can be checked through the Task Manager’s graphical representation of CPU resources.
Open the Task Manager and go to the Performance tab.
Click on CPU in the left pane, and then right-click the real-time graph on the right side. Expand Change graph to and select Logical processors.

The Task Manager will now display graphs for utilization of each core individually, which can be used to identify the less-used cores and assign them to specific threads.

Limit overall CPU utilization
Too many threads and processes often take up the processing cores within the CPU. Over-performance of the CPU can also be a cause for it to overheat, especially in an old and dusty environment.
To check how much CPU is being consumed at any given time, head over to the Task Manager.
Launch the Task Manager by right-clicking the Taskbar, and click Task Manager.
Switch to the Performance tab.
This tab gives a graphical as well as percentage representation of how much each compartment is being used up, including the CPU, memory, network, and disk. From here, you can determine whether the CPU is being overused.

Anything over 90% can be considered dangerous for the CPU and the hardware.
If you think that it is too much for the computer to take, you can set a cap on CPU utilization through the Settings, which essentially means that it will not allow CPU utilization above that threshold. This will not resolve system slowness but will address CPU overheating and indirectly affect its performance.
- Navigate to the following location:
Control Panel -> Hardware & Sound -> Power options -> Change plan settings -> Change advanced power settings - In the Power Options window, expand Processor power management, and then expand Maximum processor state.
- Now click on On battery and set the maximum threshold value for CPU utilization. Do the same for Plugged in to allow different maximum CPU utilization percentages for when the computer is running on battery (in case of laptops) and when it is running on direct power.

- Click on Apply and Ok when done.

You will now notice that the CPU utilization percentage will not go over the set value in Task Manager.
Useful tasks for further CPU optimization
End/Kill all non-essential applications, processes, and files
Any applications or services running in the background which are not required also take up space in the CPU while the user is performing time-critical tasks. This often causes delays in the tasks on high priority.
Let’s see how we can eliminate the unimportant tasks and processes.
End process utilizing maximum CPU
Processes such as system scans and antiviruses often take up a significant portion of the CPU when searching through the entire computer. They make performing other tasks simultaneously almost impossible.
The perfect solution to this would be to schedule such applications to run scans at times other than the active hours. However, if the process has already been executed, it can be eliminated through the Task Manager.
- Open Task Manager (Ctrl + Shift + Esc)
- Under the Processes tab, click on the CPU bar to arrange the tasks in descending order. This means the processes taking maximum CPU percentage would come on top.
- From there, right-click on any task you do not need at the moment and click on End task.


This will free up space in the CPU for other important tasks.
Automatically adjust your Windows for maximum performance
Windows 10 comes with a built-in feature to disable all non-essential visual features instantaneously. This can be used to switch off all animations, window shadows, etc. Although small, these features take up some space in the CPU.
- Navigate to the following:
Start Menu -> Settings -> System -> About -> Advanced system settings - In the System Properties window, under the Advanced tab, click on Settings under Performance.

- In the Performance Options window, under the Visual Effects tab, select Adjust for best performance. Then click on Apply and Ok.

You may now notice that windows change instantaneously when switching between them, and no animations take place.
Disable auto-starting applications
Often there are some applications that start and popup as soon as you turn your computer on. Such applications significantly slow down the system boot-up process as they try to run during the start-up process and hold back other critical threads.
You can disable these applications from automatically starting, and can run them later if required.
Run the Task Manager and switch to the Startup tab.
You can see the applications that support automatic startup, and their current status in this tab. Click the applications that you want to disable and then click Disable at the bottom of the window.

Any non-essential application will now make room for other more-important processes to execute and utilize the processor.
Delete Pagefile
This step is not so much for the CPU, but rather for optimizing the system in general.
PageFiles are instantly-accessible cache files stored on the hard drive. Processes that execute on the RAM can now execute in the hard drive, saving time as well as RAM resources. These are dynamic files that can expand up to the size of the RAM itself. You can configure these to delete themselves from the hard drive each time you restart or shut down your computer.
Configuring these to auto-delete will make room for new files on the hard drive, and the old processes won’t execute anymore.
Since the process involves making changes to the System Registries, it is recommended to create a system restore point.
- Open the Registry Editor by typing in regedit in Run.
- Navigate to the following in the left pane:
HKEY_Local_Machine -> System -> CurrentControlSet -> Control -> Session Manager -> Memory Management - In the right pane, double-click ClearPageFileAtShutdown and set the Value Data to 1.

- Click Ok and then restart the computer for the changes to take effect.

Perform a general service of the hardware
Starting small, ensure that your computer’s hardware is clean. A buildup of dust and debris can cause improper air circulation through the hardware, which is important for it to function properly. It is true that the load on the CPU and other hardware causes the system to respond slowly, but so does the dust on the fans and heat sinks.
Dust is also sometimes the primary reason why systems often shut down completely without warning.
How have you used these tips to customize your operating system?
Sign in to your MUO account

CPU utilization refers to the current percentage of CPU resources consumed by all programs. Some programs are judicial with their resource usage while some crave as much as they can get. CPU-hungry programs create a problem for the user because they cause the CPU utilization to shoot up.
If you notice that some programs are devouring your CPU cores, you can try setting a limit on their CPU usage. This guide will discuss all the ways you can limit the CPU usage of a program in Windows OS, so, you can give your CPU a break.
Should Your CPU Be Running at 100 Percent All the Time?
CPU is an important component of any system. It works in tandem with other components like the RAM to execute instructions. If your CPU usage is 100 percent at all times, you’ll start setting issues with your system performance.
Unless you are running heavy programs on a fairly older processor, your CPU usage should remain under 80 percent. Even if it shoots up to 100 percent, it should be only for a short amount of time for a single application. Otherwise, it will slow down your system, and you’ll notice that all of your apps will feel slower than usual.
How to Limit the CPU Usage of a Program in Windows OS
If a program is taking up a little too much of your CPU, here are a few methods using which you can limit the CPU usage of a program on a Windows PC.
1. Change the Process Priority
Windows has a process priority system to allocate resources to each process based on its requirements. It is pre-determined by the OS and you don’t have much say in the matter. Process priority helps Windows allocate and de-allocate resources required by all the active processes.
But you can alter the process priority of any process/sub-process in the task manager. This is a tricky endeavor that should be only done for non-system processes. You should leave the process priority settings of the core system processes unaltered.
To change the process priority, do as follows:
- Press Ctrl + Shift + Esc key to launch the task manager. Now identify the process whose priority you want to alter.
- You can also click on the CPU column to arrange the processes in descending order of their consumption.
- Now, right-click on the process and select the Go to details option from the context menu.
-
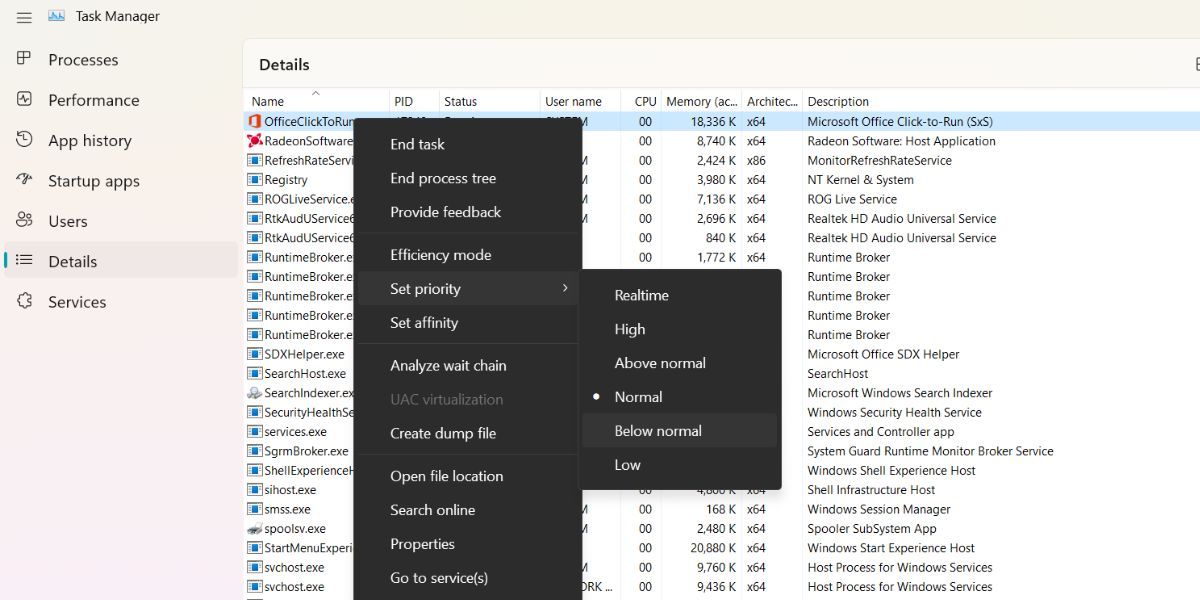
Under the details section, right-click on the process again and select the Set priority from the context menu.

- Then, select Below Normal or Low. Below Normal option will allocate slightly fewer resources when they are available. The Low option will allocate the least amount of system resources when they become available.
- A warning window will pop up informing you about the effects of changing the process priority.
- Click on the Change Priority button to apply changes. Now, the process will not consume high system resources including the CPU time.
2. Change the CPU Affinity
Another method to curb the CPU usage of a program is by adjusting the CPU Affinity. It is simply restricting the processes to use fewer CPU cores of your system. By changing CPU affinity, you can free up CPU cores which will become available to other processes.
To change the CPU affinity of a program, repeat the following steps:
- Press Ctrl + Shift + Esc key to launch the task manager. Now identify the process whose priority you want to alter.
- Now, right-click on the process and select the Go to details option from the context menu.
-
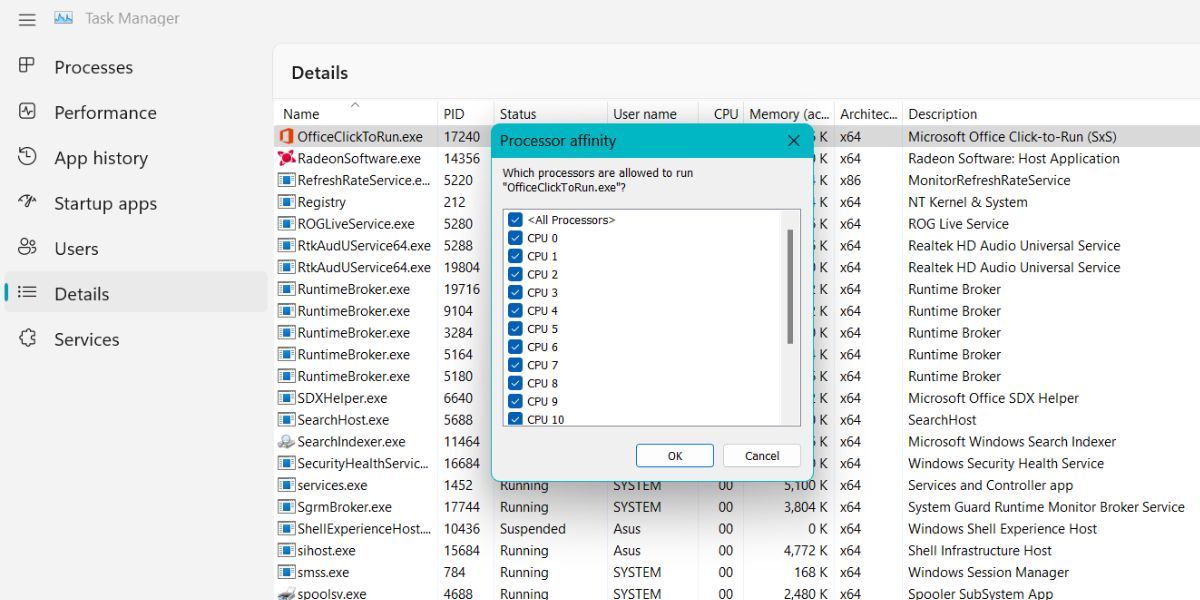
Task Manager will highlight the process. Right-click on it and select the Set affinity option from the context menu.
- You will notice that the process is set to use all the system core. Simply uncheck the boxes of CPU cores that you don’t want the process to use.
- Click on the OK button. Now, the process will use a limited number of CPU cores. Remember that Windows will reset the configuration after you close the program.
3. Use a Third Party Utility
If you want a more comprehensive solution to manage the resource usage on a program, you can try Process Lasso. While the Task Manager can solve a high CPU usage problem, it resets your preferences after the program restarts. This is where a tool like Process Lasso comes in handy.
You can set attributes like priority and affinity for a specific program permanently. Even if the program restarts, your preferred priority, and affinity settings won’t be reset. Moreover, you can create rules to limit the CPU usage percentage of a program.
To limit the CPU usage of a program using Process Lasso, do as follows:
- Open any browser on your system and go to the official Process Lasso download page.
- Download the appropriate version and install it on your system.
- Launch the Process Lasso application with elevated permissions.
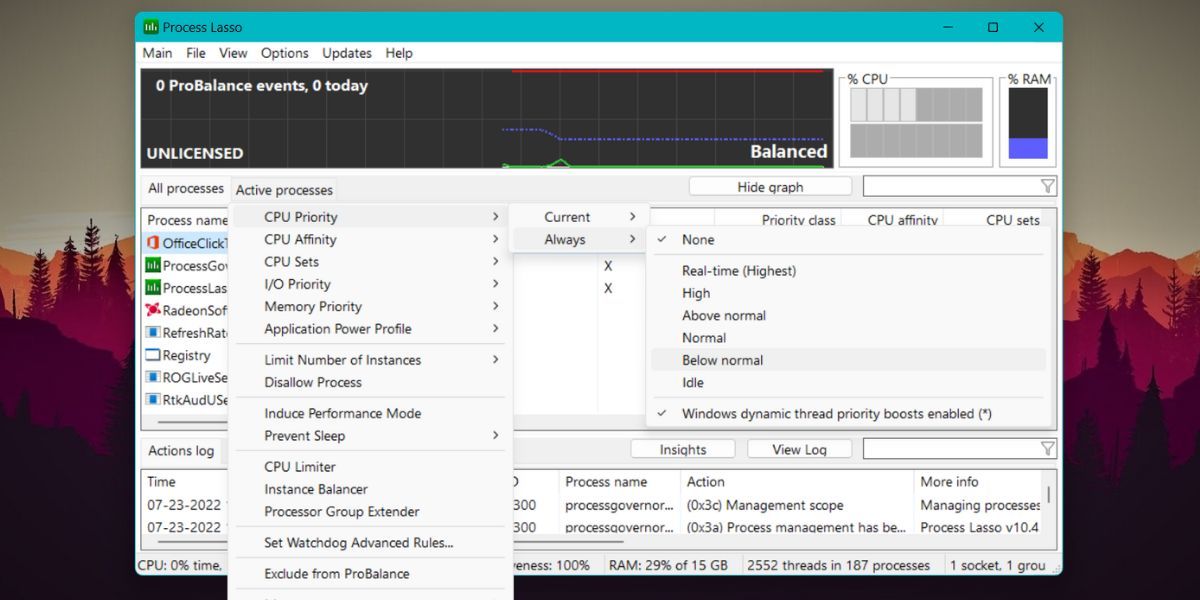
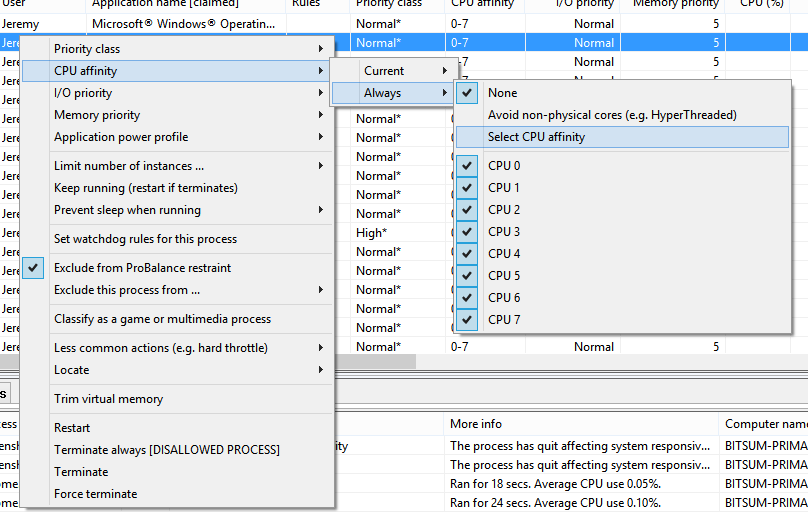
-
Right-click on the desired process and change its priority and affinity as per your preference.
- Make changes by selecting the Always option from the context menu. If you choose the Current option, it will only be applicable until the program restarts.
There is a lot more to tweak including process priority and affinity in Process Lasso. However, we suggest you keep things simple and make a restore point before trying any big tweaks.
4. Change the Maximum Processor State
Reducing the maximum power state of your processor can limit the overall usage. This setting allows you to limit the maximum speed your CPU can attain. Tweaking this setting will lower the stress on your processor and prevent overheating.
To reduce the maximum power state of your processor, repeat the following steps:
- Press Win + R to launch the Run command box. Type Control Panel in the text input area and hit the enter key.
- Control Panel will launch. Find and click on the Power Options feature.
- Click on the Change plan settings option located next to the active power plan of your system.
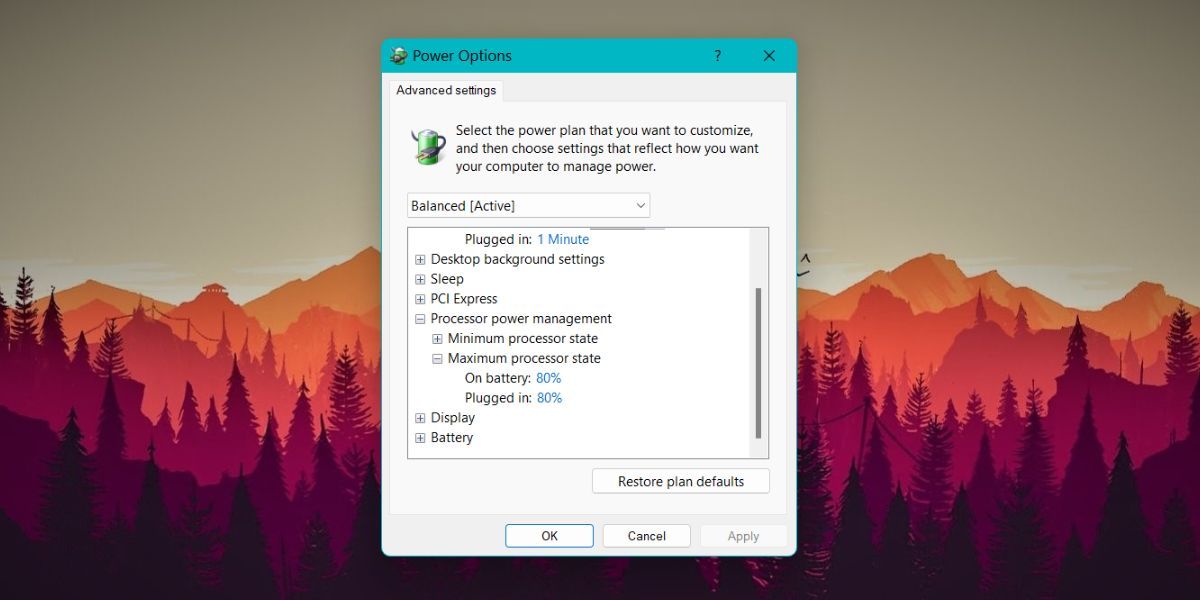
- Then click on the Change advanced power settings. A new Power Options window will launch.
-
Find and expand the Processor Power Management option. Click on the Maximum processor state option and edit the values. It will be 100 percent by default.
- Change it to 80 percent for both the On Battery and Plugged in options.
- Click on the Apply button. Then click the OK button and exit the window. Now, your CPU will run at 80 percent of its capacity during peak loads.
Stop Programs From Devouring Your CPU
We have covered all the methods to limit the CPU usage of the program in Windows OS. Task Manager does offer options to tweak the program, but it is temporary. Third-party tools like Processor Lasso offer a plethora of tweaks that you can make to a program. In addition, you can even apply those tweaks permanently for a specific program.
Комплексного готового решения не нашёл. Есть несколько утилит, которые могут ограничивать ЦПУ (приоритет, привязка к ядру) и память.
Process Lasso
Process Lasso is NOT yet another task manager. It is a process priority optimization and system automation utility. Priority optimization, affinity optimization, core optimization, automated rules, automated power profiles; you name it, and Process Lasso does it!
Process Tamer

Process Tamer is a tiny (140k) and super efficient utility for Microsoft Windows XP/2K/NT/Vista/Win7 that runs in your system tray and constantly monitors the cpu usage of other processes. When it sees a process that is overloading your cpu, it reduces the priority of that process temporarily, until its cpu usage returns to a reasonable level.
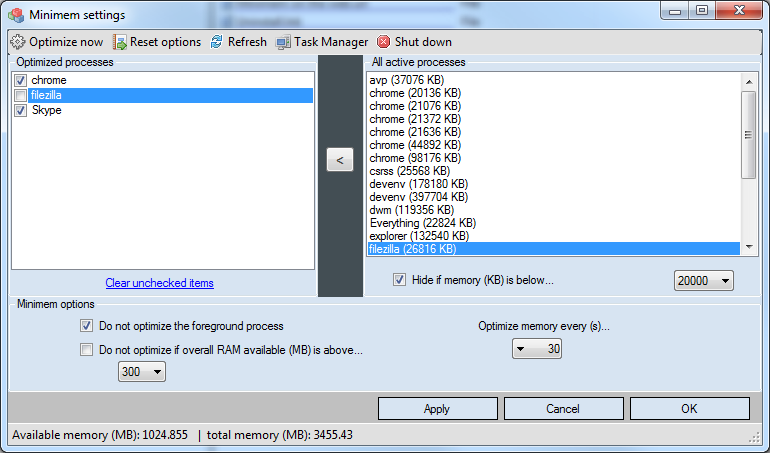
Minimem
Minimem now can reduce the memory footprint of any application. It runs in the background and can be set up to optimize as many proceses as you’d like, using a very intuitive graphical interface. Unlike other memory optimization products, it gives you full control over what applications you want to optimize, when and how often, as well as the possibility to only optimize memory when required and relevant.
Quick Links
-
Option One: Use Options Built Into the Programs You Use
-
Option Two: Buy NetLimiter
-
Option Three: Download TMeter Free
You can restrict Windows Update’s download speed on Windows 10. Some applications also let you limit their bandwidth. But, for applications that don’t have that built in, you’ll need third-party software.
Limiting bandwidth can be useful in different circumstances. For example, if you’re downloading (or uploading) a huge file, limiting your browser’s available bandwidth might be useful for making sure other apps don’t get slowed down too much. could be useful when uploading files or downloading files in a web browser. If you have other bandwidth-hungry apps, putting a limit on those can keep your browsing and video watching unhampered. Join us as we look at how these options work when they’re built-in to an app, as well as at a couple of third-party tools you can use for apps without that support.
Option One: Use Options Built Into the Programs You Use
Look for options integrated into the programs you already use before you install any third-party software. For example, if you want to manage the amount of bandwidth Steam uses to download games, you can head to Steam > Settings > Downloads, and then use the «Limit bandwidth to» box to restrict its bandwidth. Many other applications, including tools like Dropbox, Google Drive, and Microsoft OneDrive, have similar built-in options. Putting restrictions on those (particularly if you’re uploading lots of files at once) can be really helpful.
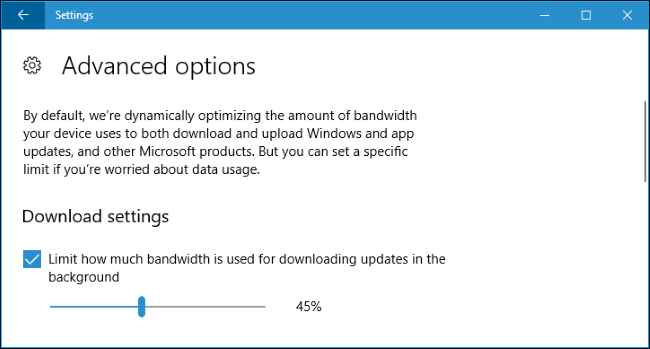
Even Windows 10 now lets you restrict how much bandwidth Windows Update uses in the background. To configure this, head to Settings > Update & Security > Windows Update > Advanced Options > Delivery Optimization > Advanced Options. Toggle the «Limit how much bandwidth is used for downloading updates in the background» option here. There’s also a «Limit how much bandwidth is used for uploading updates to other PCs on the Internet» option here, but you can disable the uploading feature entirely if you’re concerned about its bandwidth usage.
If you have a router with Quality of Service (QoS) features, you also can use your router to prioritize traffic. You usually can’t set a precise bandwidth limit, but your router will automatically prioritize traffic based on the rules you set up to keep everything performing quickly.
Option Two: Buy NetLimiter
We only found a single free tool for setting per-application bandwidth limits on Windows. We’ll cover that free option in the next section, but NetLimiter is worth a purchase if you really need this feature.
Unlike the free option we’ll be covering in the next section, NetLimiter has an easy-to-use interface and lets you limit the bandwidth of an unlimited amount of applications. It’s cheaper than other paid options too. You don’t need NetLimiter Pro if you just want to set bandwidth limits, so the basic NetLimiter Lite program is fine. You can purchase a single home user license of NetLimiter Lite for $16. If you want to use it for work, you need to spend $20 instead.
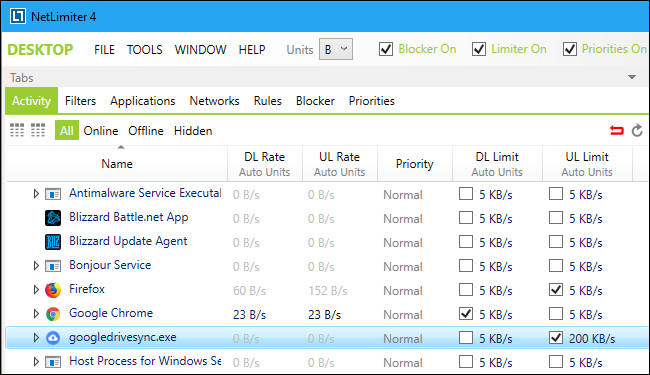
NetLimiter provides a free 28-day trial, so you can test it and see if it works for you before buying it. Launch the application after installing it and you’ll see a list of applications using your network connection along with their current download speed («DL Rate») and upload speed («UL Rate»).
To limit an application’s download or upload speed, just check the appropriate box under DL Limit or UL Limit. To set a custom speed, click the «5 KB/s» in the DL Limit or UL Limit column and type in your desired speed. When you want to remove the limit, just uncheck the box.
Option Three: Download TMeter Free
If you want to restrict an application’s bandwidth without spending any money, you’ll need to download TMeter Freeware Edition. It’s the only free option now that NetBalancer no longer offers a free version. TMeter Freeware Edition has a rather complicated interface and can only limit the bandwidth of four applications at a time, but it is free and, within those limits, works well.
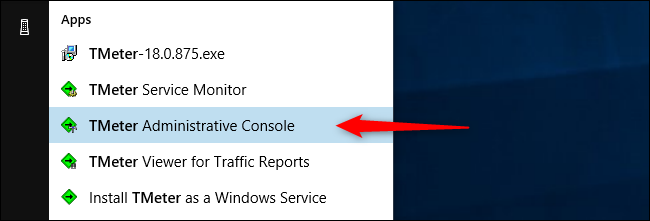
First, download and install TMeter. After installation, open your Start menu, search for «TMeter,» and then launch the «TMeter Administrative Console» application.
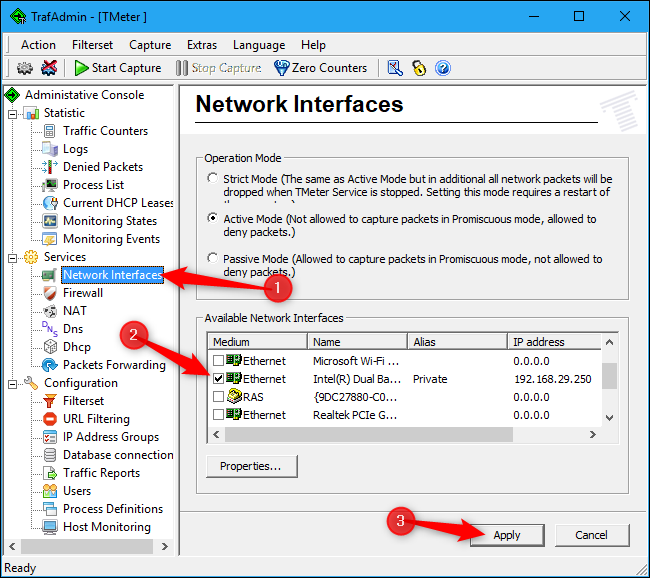
The first time you launch it, you’ll need to select your network interface by clicking «Network Interfaces» in the sidebar, and then checking the box next to the network interface you’re using. For example, if you want to limit applications using your Wi-Fi connection, select the Wi-Fi interface. Ignore any interfaces with an IP address of 0.0.0.0, as they aren’t currently being used.
A this point, you’ll be prompted to select a network type. If you’re behind a router on your personal network, choose the «Private» option. If you’re directly connected to the Internet or on a public Wi-Fi network, choose the «Public» option.
When you’ve got all that set up, click the «Apply» button.
Next, you need to define the processes you want to limit.
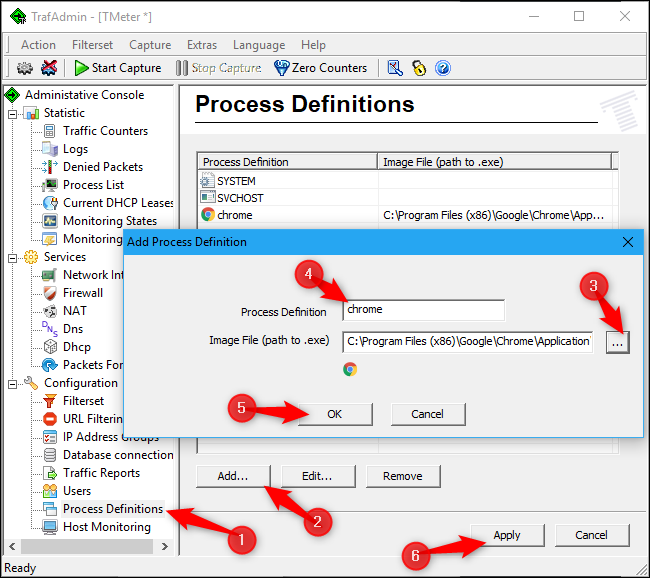
In the main window, select «Process Definitions» in the sidebar, and then click the «Add» button.
In the Add Process Definition window that opens, click the «…» button to browse and locate the process’s .exe file. You’ll find most applications under the Program Files folder. For example, Chrome is located at C:\Program Files (x86)\Google\Chrome\Application\chrome.exe, Firefox is located at C:\Program Files\Mozilla Firefox\firefox.exe, and Microsoft Edge is located at C:\Windows\SystemApps\Microsoft.MicrosoftEdge_8wekyb3d8bbwe\MicrosoftEdgeCP.exe.
Type anything you want in the «Process Definition» box. This name just helps you keep track of which program is which. By default, it just copies the name of the .exe file you select.
Click «OK» to close the Add Process Definition window, and then click «Apply» back in the main window. You’ll need to create additional process definition rules if you want to limit more than one process.
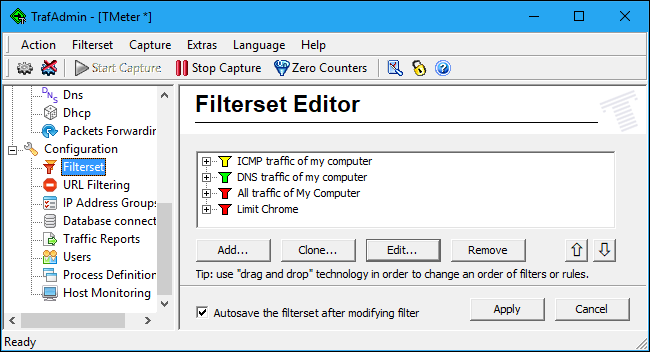
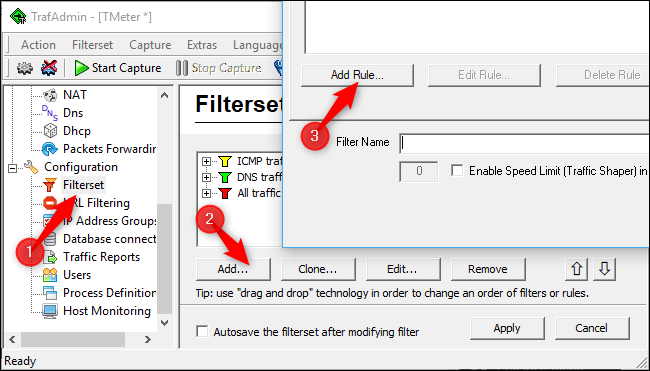
You can now create a filter that limits an application’s bandwidth. Click «Filterset» in the sidebar, and then click Add > Filter. In the window that appears, click the «Add Rule» button.
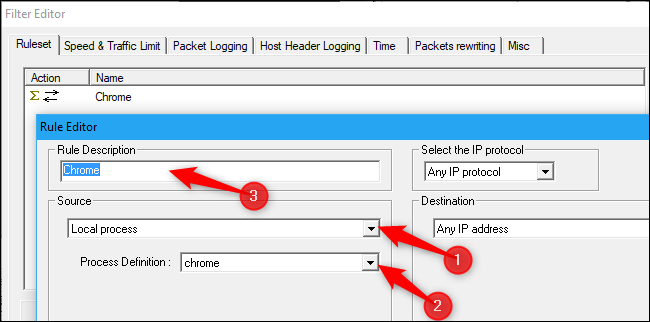
In the Rule Editor window, choose the «Local Process» option from the «Source» dropdown menu. Next, click to open the «Process Definition» dropdown menu. There, you should see the process definitions you created earlier. Select the one you want, and then click «OK» to continue.
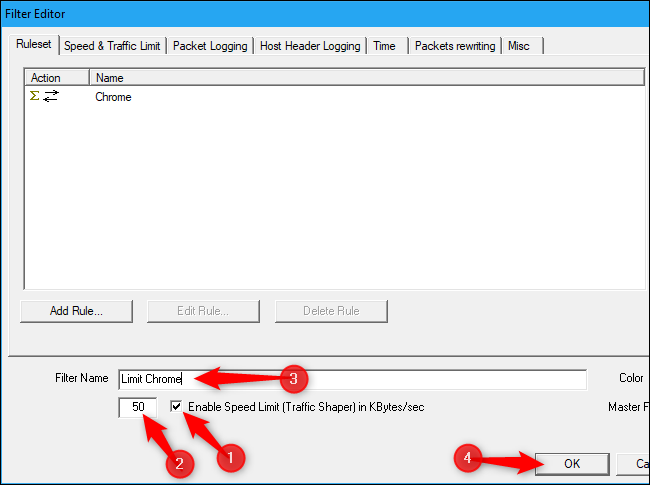
Now, check the «Enable Speed Limit (Traffic Shaper) in KBytes/sec» option, and then enter the number of KB/s to which you want to restrict the application in the box to that option’s left. Type a name for the filter in the Filter Name box, and then click the «OK» button.
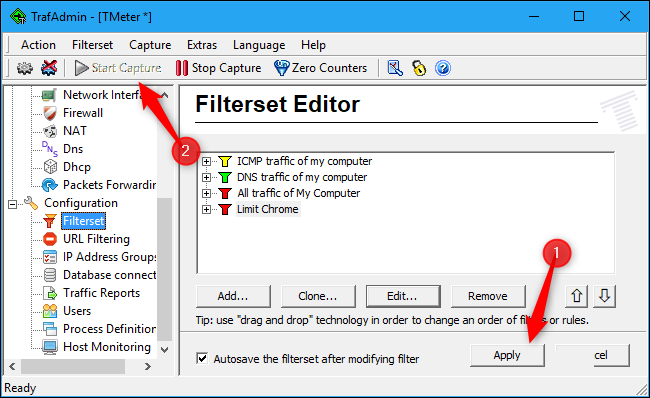
Back in the main window (with the Filterset option still selected on the left), click the «Apply» button. You’ll also have to click the «Start Capture» button to enforce your changes. The limits you apply will only be enforced while TMeter is capturing traffic, so they’ll be lifted if you stop the capture.
To change an application’s bandwidth limit later on, click a filter in the Filterset Editor list, click the «Edit» button, and then change what you typed in the «Enable Speed Limit» box.
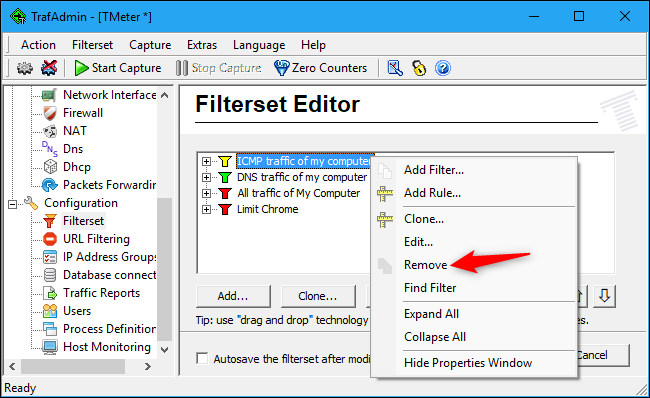
If you want to limit additional applications, you can add additional filters to the Filterset screen. However, the free version of TMeter limits you to four filters in total. You’ll have to remove the three default filters to add more. Once you do that, you can limit up to four applications at a time with this method.
The TMeter interface will actually let you add more than four filters, but don’t be deceived. If you have more than four filters, the additional ones will be erased when you click the «Apply» button.
Like we said, it’s not friendliest interface if you’re just looking to limit the bandwidth for some apps, especially when compared to how easy things are in NetLimiter. But, it does work.
Image Credit: Gts/Shutterstock.com.