
First published on TechNet on May 13, 2014
It’s finally here! After pages and pages of comments from you requesting the ability to clean up the WinSxS directory and component store on Windows Server 2008 R2, an update is available.
http://support.microsoft.com/kb/2852386
As a refresher, the Windows Server 2008 R2 update is directly related to my previous blog post announcing a similar fix for Windows 7 client .
The Windows 7 version of this fix introduced an additional option to the Disk Cleanup wizard that would cleanup previous versions of Windows Update files. KB2852386 adds a Disk Cleanup option on Windows Server 2008 R2, similar to the Windows 7 update.
What does this mean for Windows Server 2008 R2? After installing this update and prior to being able to perform the cleanup, the Desktop Experience feature must be installed. Why you ask? Disk Cleanup is not installed by default on Windows Server 2008 R2. It is instead a component installed with the Desktop Experience feature.
Why was the update not included as a DISM switch like Windows Server 2012 R2?
This was evaluated, however, due to the amount of changes required and the rigorous change approval process, it was not feasible to back port the functionality this way. Knowing that it would be some time before everyone could upgrade to Windows Server 2012 R2 and based on feedback from an internal survey taken of a subset of enterprise customers, it was determined that this update would still be useful in its Disk Cleanup form, even with the Desktop Experience prerequisite. We hope you agree. However, we are aware that for some of you, the Desktop Experience requirement will be a deal breaker, but decided to release it anyway hoping it will help in some instances.
How can I get the update?
The update is available on Windows Update. It can also be manually downloaded from the Microsoft Update Catalog . The KB article listed above will also direct you to a download link in the Microsoft Download Center.
Let’s Cleanup those Old Windows Update Files!
First, let’s take a look at our starting point. Looking at my Windows 2008 R2 Server with SP1 installed, according to Windows Explorer, the size of my Windows/WinSxS directory is as follows:
The size of the WinSxS directory will vary by server. Some of you will have smaller WinSxS directories, some larger.
Installing the update is just like installing any other update. Just download and double-click on the .msu file:
Installing the update does not require Desktop Experience to be installed beforehand, but if you check your WinSxS directory again, you’ll see there has been no change to the size. This is expected as we need to run Disk Cleanup in order for this to take effect. It also does not require a reboot to install the hotfix.
But…we can’t do anything with what we just installed until we get Disk Cleanup which is installed with the Desktop Experience feature.
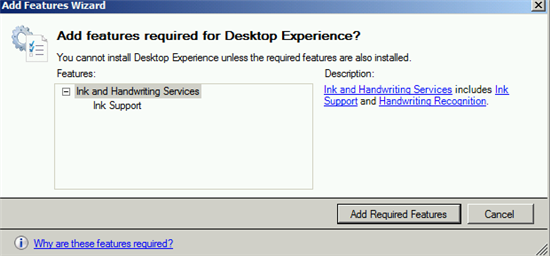
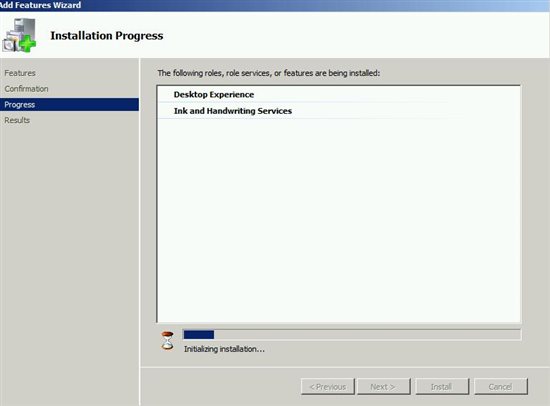
When installing Desktop Experience, it does require additional features. Select the button to Add Required Features and click Next and then Install:
A reboot is required to finalize the install.
Click Close and Reboot when prompted.
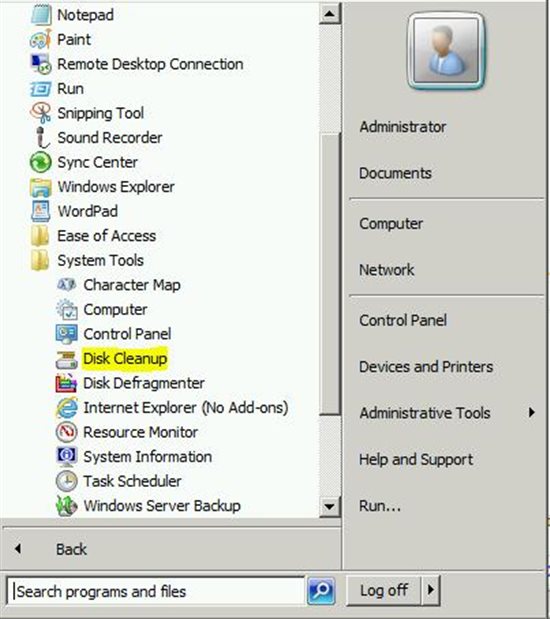
After we reboot, a Disk Cleanup option can be found under Start —> All Programs —> Accessories —> System Tools:
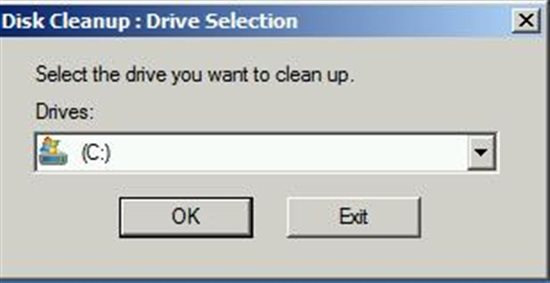
On launch, Disk Cleanup prompts for the drive you want to clean up:
After clicking Ok, a scan is performed:
Several options are provided for cleanup, including a new option for Windows Update Cleanup:
Just like the Windows 7 cleanup, mileage will vary. Also like Windows 7, the actual cleanup occurs during the next reboot. After the reboot, taking a look at the WinSxS directory, it has shrunk to the following:
Automation
My super knowledgeable scripting cohort Tom Moser wrote a PowerShell script that automates THE ENTIRE PROCESS. Can I get a cheer? Ok. So maybe it is a bit much to expect IT admins to cheer, but can I get an appreciative grunt? The script certainly beats the alternative of doing this all manually.
You can find the script on the TechNet Script Center here:
http://gallery.technet.microsoft.com/scriptcenter/CleanMgrexeKB2852386-83d7a1ae
What does the script do?
In short, the script does the following:
1) Installs Desktop Experience, if not previously installed, and performs a reboot.
2) Sets the appropriate registry keys to automate the cleanup. The script will cleanup not only previous Windows Update files as well as Service Pack files.
3) The script then initiates the cleanup.
4) If Desktop Experience was not previously installed, the script uninstalls it.
5) Performs final reboot.
For more details, read below.
The script can be run from any directory on the server. It has two parameters: LogPath and a switch called NoReboot. LogPath will allow the user to specify a log location or if none is specified, by default, the script will create a log in the same directory from which the script was executed. NoReboot allows the user to suppress reboots, but will require manual reboots by an administrator.
Note : Make sure to check the log file to verify the process completed successfully and to verify there is no manual interaction required. If the script has completed successfully, the log will end with CleanMgr complete .
The script has several phases, using a registry key to keep track of progress. After initial run, it inserts itself as a scheduled task, which runs as local system. The final phase removes the task.
Depending on pending reboots, etc, we have found that this phase may generate a few reboots. Do not be concerned if the server reboots a few times.
Other Options
Aside from the cleanup mechanism included with this fix, if you have applied SP1 and have not cleaned up afterwards, I’d highly recommend doing so by running the following command from an administrative command prompt:
dism /online /cleanup-image /spsuperseded
or
If you have installed the Desktop Experience feature and thus have the Disk Cleanup utility, you can select the following option to do the same thing:
Specifying the /spsuperceded switch or choosing to remove service pack backup files will remove the ability to uninstall the service pack. If you haven’t done it before, it is certain to free up some space.
The Origins of this Update (Hint: Windows Server 2012 R2)
I’ve mentioned a couple of times that this is a back port. What does that mean? Well, it means that this functionality is already built into a later operating system. In this case, that operating system is Windows Server 2012 R2. Not only do we have several mechanisms to automatically cleanup previous versions of Windows Update files like this update does, we even have the ability to more accurately determine the size of the component store (aka the WinSxS directory).
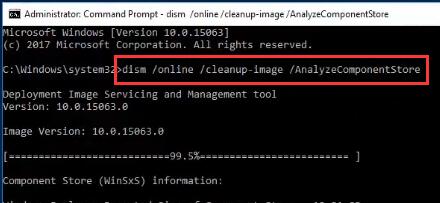
The command to accurately determine the size of the component store on Windows Server 2012 R2 is as follows:
Dism.exe /Online /Cleanup-Image /AnalyzeComponentStore
Running this command analyzes the component store to determine the size and whether cleanup is recommended. Notice in the screen shot that it provides you with the Windows Explorer reported size and the actual size:
Notice that the component store is much smaller than Windows Server 2008 R2 right out of the gate? This isn’t because I’ve used Features on Demand to remove roles and features. It’s because by default in Windows Server 2012 R2, we compress all unused binaries. Another win for Windows Server 2012 R2!
Looking at the breakdown of the 5.12GB. We see that Shared with Windows accounts for 3.83GB of the 5.12GB. Shared with Windows refers to the size of the files that are hardlinked between the WinSxS directory and the Windows location of the file. Because these hardlinks appear to take up space, but don’t really, we can subtract them from our component store size. Therefore, the actual size of the component store is the total of Backups and Disabled Features plus Cache and Temporary Data or 1.28GB.
But back to our cleanup.
In the above screen shot, it’s stated that component store cleanup is recommended. We can manually cleanup the component store on Windows Server 2012 R2 by running the following command:
Dism.exe /online /Cleanup-Image /StartComponentCleanup
What does this do? When this runs, Windows cleans up the previous versions of the component that was updated. In other words, it is doing exactly what our update does for Windows Server 2008 R2 SP1. It removes previous versions of the files updated by Windows Updates.
After running /StartCompomentCleanup, upon analyzing the size again, we see it is as follows:
So no notable difference really. Largely because we’ve been running this cleanup all along. This same command is run every 30 days as a scheduled task with a time limit of 1 hour.
With the scheduled task however, the task will wait at least 30 days after an updated component has been installed before uninstalling the previous versions of the component. This scheduled task can be found in Task Scheduler under the Task Scheduler Library\Microsoft\Windows\Servicing\StartComponentCleanup directory:
More information on this can be found here: http://technet.microsoft.com/en-us/library/dn251565.aspx
If you’re in all out spring cleaning mode and want to perform super deep cleanup, you can use the /resetbase command with the /startcomponentcleanup to remove all superseded versions of every component in the component store:
Dism.exe /online /Cleanup-Image /StartComponentCleanup /ResetBase
This removes the ability to uninstall any updates applied until this point in time.
And don’t forget the ability to completely remove any role or feature which also reduces the size. Take a look at one of my earlier blogs for more details on Features on Demand: http://blogs.technet.com/b/askpfeplat/archive/2013/02/24/how-to-reduce-the-size-of-the-winsxs-directory-and-free-up-disk-space-on-windows-server-2012-using-features-on-demand.aspx
Here’s a handy table showing when we introduced the various different cleanup and WinSxS size reductions by operating system:
| Operating System | Compress Unused WinSxS Binaries | Cleanup Previous Windows Update Files | Automatically Clean Up Previous Windows Update Files | Cleanup All Components | Features on Demand |
| Windows Server 2008 R2 | With KB2852386 | ||||
| Windows Server 2012 | With KB2821895 | x | x | x | |
| Windows Server 2012 R2 | x | x | x | x | x |
Want more information on how all this works under the covers?
Check out the following series on the AskCore team blog for an in-depth look at servicing improvements on Windows Server 2012 R2:
What’s New in Windows Servicing: Part 1
What’s New in Windows Servicing: Reduction of Windows Footprint : Part 2
What’s New in Windows Servicing: Service Stack Improvements: Part 3
More on the Desktop Experience Feature
The Desktop Experience feature includes the following components and features:
* Windows Media Player
* Desktop themes
* Video for Windows (AVI support)
* Windows SideShow
* Windows Defender
* Disk Cleanup
* Sync Center
* Sound Recorder
* Character Map
* Snipping Tool
* Ink Support
Most of these are not automatically turned on with the exception of Windows Defender whose service is started after reboot. You’ll likely want to stop the service and disable it after reboot. Not all 3rd party anti-viruses conflict with Windows Defender, but there have been reports that some do.
~ Charity Shelbourne and Tom Moser, Spring cleaning servers since 1998
Update May 15th, 2014
We are aware of a method of copying in the appropriate Disk Cleanup/CleanMgr files into the appropriate location to avoid installing the Desktop Experience. If this were a tested and supported option, we certainly would have included these details in this post and definitely would have used this method to automate the cleanup. However, it was determined early on that this method would not be supported. If you decide to do this, do so at your own risk.
Summary
This page is about how to cleanup Winsxs directory and free up hard disk space on Windows server 2008/2012/2016/2019/2022 sbs 2011.
Table of Contents
- What is Winsxs — what does it do
- Winsxs Cleanup for 2008/2012/2016/2019/2022 SBS 2003/2008/2011
- Third-party Disk Management Software: IM-Magic Partition Resizer Server Edition
Winsxs folder — what does it do
The windows server 2008 SBS and its latest versions i.e. 2012 and 2016 features an operating system with a WinSxS file to deal with the core functions of OS. The system files contained in the WinSxS are linked as per the default windows directory structure. These files in the windows directory can be further linked from different locations. Gradually, the WinSxS folder starts to consume more and more space in the system partition and c-drive becomes full .
Is it safe to delete Winsxs folder?
Well, here I present different ways for cleaning the winsxs folder that may help in extending the c-drive space. Note that it is not recommended to delete the WinSxS folder itself, and don’t ever think about doing it manually. Deleting so may cause the operating system crash or BSOD (Blue screen of death) error.
Winsxs Cleanup for 2008/2012/2016 SBS 2003/2008/2011
Disk cleanup is not enabled in Windows Server, you need to get it activated at first with the following steps.
Video — how to enable disk cleanup on Windows Server OS.
This above video also includes a tutorial for winsxs cleanup server 2008/2012 without desktop experience.
Follow the steps to start the WinSxS Cleanup Wizard
#1, First, add the Desktop Experience Feature to the server
For this, go to the Server Manager and click on “Add Features”
#2, Select the Desktop Experience Feature and install it.
#3, Then search for the Disk Cleanup utility in Windows search column
#4, Click on the Disk Cleanup Utility and select the WinSxS drive(C drive)
#5, Run the Disk Cleanup and re-scan the drive by selecting “Select System Files”
After the rescan, you will see the two options Windows Update Cleanup and Serve Pack Backup Files.
Clean these files and the Disk Cleanup will safely remove the WinSxS files from the computer
Video — how to clean up winsxs using disk cleanup or cmd
You may use Disk cleanup to remove winsxs folder or temp files or Windows update files on Server 2008/2012/2016, or you may also use the following cmd to clean winsxs folder.
Dism /Online /Cleanup-Image /AnalyzeComponentStore
Dism /Online /Cleanup-Image /StartComponentCleanup
Note that after cleaning the WinSxS using the Disk Cleanup, you will not be able to turn back to an older server version. Moreover, this method also includes a risk of data loss. Cleaning winsxs may save up to 10GB disk space at most, if you want to add more disk space to c drive, Partition Resizer is able to help add as much space as the disk has from another volume.
For example, you may add 100GB from another volume to c drive with Partition Resizer without losing data or reinstalling OS.
Better Solution: To combat these problems, try using a third-party software Partition Resizer to defrag disk or resize partition Windows server such as 2008.
Safe Disk Management Software: IM-Magic Partition Resizer Server Edition
Why should you use a third-party disk management software? Well, the answer to this question is because these dedicate software provides high-grade data security and are easier to use – IM-Magic Partition Resizer being one of them.
IM-Magic Partition Server Edition is one of the best disk management utilities that help to manage, shrink, extend, create, copy, delete, and most of all clean up the WinSxS folder C drive by defragment.
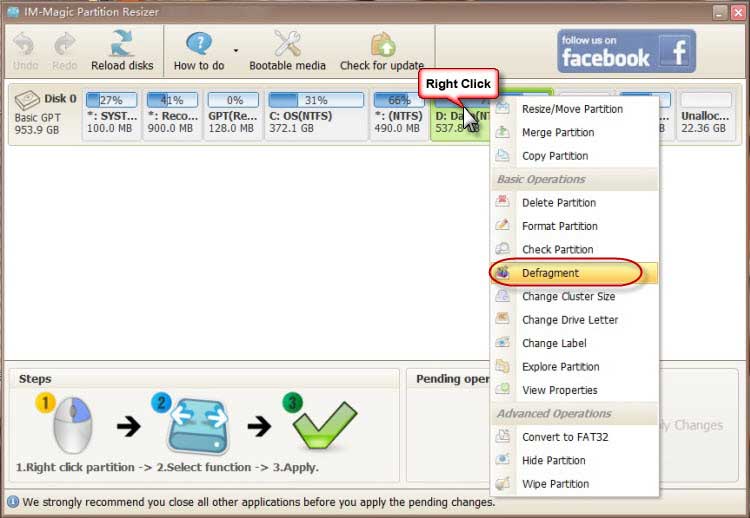
Defragment on C drive would with Partition Resizer would help remove temp files and winsxs files if you right click c drive -> Defragment
There is no need to take hours of backup because IM-Magic has got you covered in every possible way. It is a Windows Server 2008/2012/2016/2019/2022 supported disk management software ensuing 100% data security during all disk operations. Make sure to use the Server Edition of IM-Magic to avail advanced options to manage your partitions effectively.
Video: How to Allocate Disk Space with Partition Resizer
[Guide] Steps to extend volume without data loss
This step by step guide will show you the right way to extend any volume using IM-Magic Partition Resizer Unlimited edition.
Step-1 Download install, and launch the program.
Step-2 Right click the large volume to produce unallocated free space.
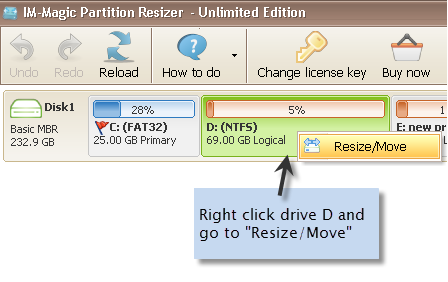

Steps to resize your disk partition
Step-3 Then right click c and drag the border to acquire the free space.
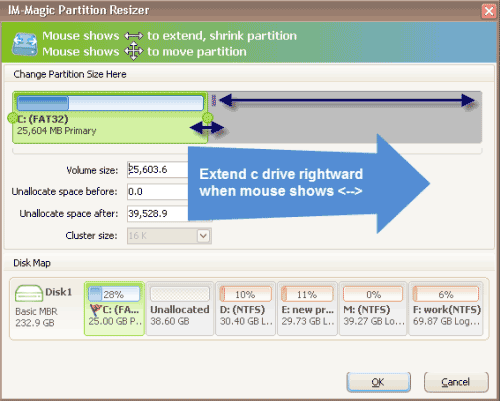
Resize partitions with IM-Magic Partition Resizer
Steps to resize your disk partition
Step-4 Apply the changes.
Also read: how to clean up disk Windows server 2012; or how to extend c drive for server 2012
FAQs
Q: Server 2008 r2 cleanup windows update files
A: Winsxs cleanup server 2008/2012/2016 may count on Disk Cleanup utility if you enable it in service manager that could remove Windows update files at the same time if you click c drive to clean up.
Q: dism /online /cleanup-image /spsuperseded server 2008 r2
A: When cmd reported errors, you may need to enable Disk Cleanup in service manager. Or if powershell cmd could not help cleanup disk for Server 2008, you may use IM-Magic Partition Resizer to defrag disk with its right click option «Defragment».
I finally found some good information for cleaning up the WinSXS folder on new instances of Windows. I found the following site extremely helpful:
http://blogs.technet.com/b/askpfeplat/archive/2014/05/13/how-to-clean-up-the-winsxs-directory-and-free-up-disk-space-on-windows-server-2008-r2-with-new-update.aspx.
Consequently, I was able to get 7GB of data cleaned up from the WinSXS folder on the first Server 2008R2 machine I followed this process on.
Here are the basic steps:
1. Make sure the server has Server 2008R2 SP1 or newer.
2. Download and install the Disk Cleanup Wizard Add-on (http://support.microsoft.com/kb/2852386) for your version of Windows 7 or Server 2008 R2. I believe it is now built into newer versions of the OS, but haven’t had a chance to verify yet. If you are using Server 2008, you will also need to add the Desktop Experience Feature and all required components (this WILL require a reboot to take effect).
3. After the add-on and features have been fully installed (and the system rebooted if necessary), search for Disk Cleanup under System Tools.
4. Open the Disk Cleanup and select the drive with the WinSXS folder (typically the C drive or system drive).
5. Let the Disk Cleanup run. I’ve seen some images where Windows Update Cleanup is right on the main Disk Cleanup tab. Others have you click on the Clean Up System Files button on the bottom-left of the Disk Cleanup window and have it re-scan.
6. Once either option is selected, you should see the options to cleanup Service Pack Backup Files and Windows Update Cleanup like listed below. These two options will “safely” remove items from the WinSXS folder and free up space. Remember that once these items have been removed, you will be unable to revert back to an older service pack state and/or possibly remove updates from the system that are causing problems. Also, make sure you have a good backup. If you are unsure how this will affect your system, skip this as a possible cleanup option.
- IT
- Cancel
Не прошло и 5 лет, и у нас появился официально поддерживаемый способ очистки каталога %windir%\winsxs в Windows Server 2008 R2, портированный из 2012. Для серверов с дисками на 74Гб это может быть очень актуально, т.к. каталог легко может занимать 15-20Гб.
Для очистки надо:
1) Установить обновление KB2852386 (приходит через WSUS);
2) Установить фичу Desktop Experience (требует перезагрузки) — мастер очистки входит в неё;
3) Запустить мастер очистки (system Tools — Disk Cleanup), там выбрать Windows Update Cleanup и, если надо, Service Pack Backup Files.
Как не очень поддерживаемый способ, если нет возможности перезагрузки или места для установки, можно скопировать
cleanmgr.exe из C:\Windows\winsxs\amd64_microsoft-windows-cleanmgr_31bf3856ad364e35_6.1.7600.16385_none_c9392808773cd7da в %systemroot%\System32, и cleanmgr.exe.mui из C:\Windows\winsxs\amd64_microsoft-windows-cleanmgr.resources_31bf3856ad364e35_6.1.7600.16385_en-us_b9cb6194b257cc63 в %systemroot%\System32\en-US (для английской версии).
Информация отсюда, обходное решение с копированием от Tom_Floor:
http://blogs.technet.com/b/askpfeplat/archive/2014/05/13/how-to-clean-up-the-winsxs-directory-and-free-up-disk-space-on-windows-server-2008-r2-with-new-update.aspx
PS Первая же перезагрузка сервера после очистки может оказаться очень, очень долгой, при этом будет выполняться часть работ по очистке.
Specialist
I’m Jinish KG, Total 13 years of experience in IT field.
Published:
Browse All Articles > Procedures to cleanup WINSXS folder in Windows Server 2008 R2
A safe way to clean winsxs folder from your windows server 2008 R2 editions
Applied operating systems
Windows Server 2008 R2
Prerequisites
It is not recommended to delete the winsxs folder directly. Deleting this folder may cause BSOD error and OS may crash permanently.
- Download and install the windows update pack Windows6.1-KB2852386-v2-x6
4.msu from the below link
http://download.microsoft.
- Disk cleanup utility
The disk cleanup utility will be added by installing the Desktop Experience feature from windows server manager
Procedures
Please follow the below procedures to install the desktop Experience feature
Step1: Go to server manager and select add features.
Step2: Select desktop Experience feature from the list and follow the installation.
Step3: When installing Desktop Experience, it does require additional features. Select the button to Add Required Features and click next and then install.

Step 4: A reboot is required to finalize the install.

After reboot, a Disk Cleanup option can be found under Start —> All Programs —> Accessories —> System Tools:
On launch, Disk Cleanup prompts for the drive you want to clean up
Select the C drive and click OK.
\
Several options are provided for cleanup, including a new option for Windows Update Cleanup:

After preceding the cleanup a reboot is required to complete the cleanup process.
Here we will show one of the examples from the server USCHCVMP365AD08.us.na.ey.n
We faced a disk space issue on this server which is showing only 19.1 MB free space on it C drive.
While checking the Winsxs folder, it consumes around 12 GB of size as shown in the below image
While using the disk cleanup it showing around 4.71 GB of Windows update cleanup data.
After rebooting the server the winsxs folder consumed space reduced to 7.32 GB from 12 GB