
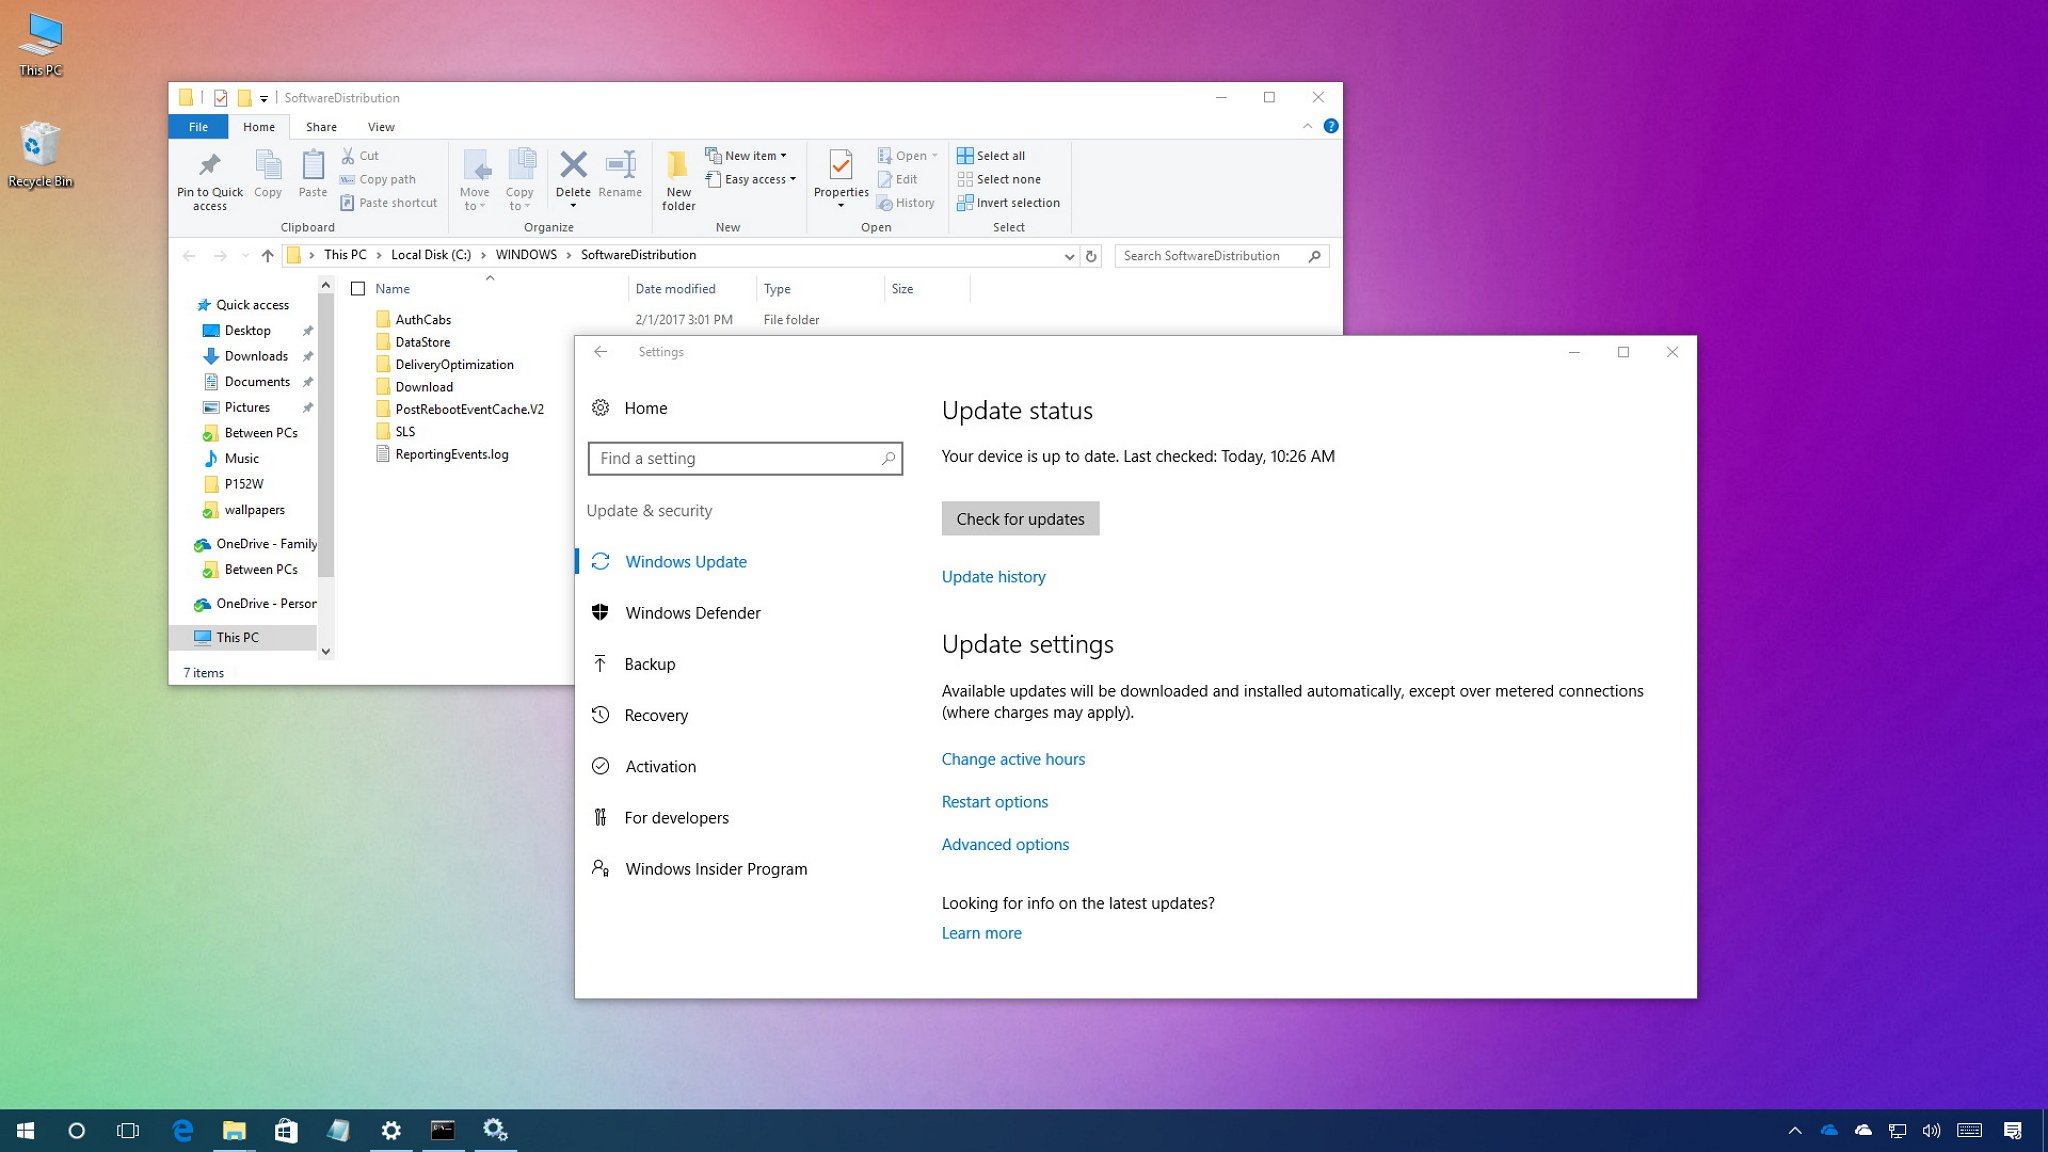
On Windows 10, the «SoftwareDistribution» folder is an essential component for Windows Update, which temporarily stores files needed to install new updates to keep your device secure and with the latest fixes and improvements.
This folder is maintained by the WUAgent (Windows Update Agent), and typically, it should be left alone, but there will be times when you may need to clear its content manually in the case the Datastore and Download folders aren’t synchronized, and it’s preventing Windows Update from applying new updates to your PC.
Usually, if you’re having trouble with Windows Update, or after updates have been applied, it’s safe to empty the content of the SoftwareDistribution folder. Windows 10 will always re-download all the necessary files, or re-create the folder and re-download all the components, if removed.
In this Windows 10 guide, we’ll walk you through the steps to delete the content inside the SoftwareDistribution folder. As an alternative option, we’ll also show you the steps to rename the folder, in case you only want to test if the folder’s content is the one causing problems.
- How to clear the ‘SoftwareDistribution’ folder
- How to rename the ‘SoftwareDistribution’ folder
How to clear the ‘SoftwareDistribution’ folder
To delete the content inside the SoftwareDistribution folder, do the following:
- Open Start.
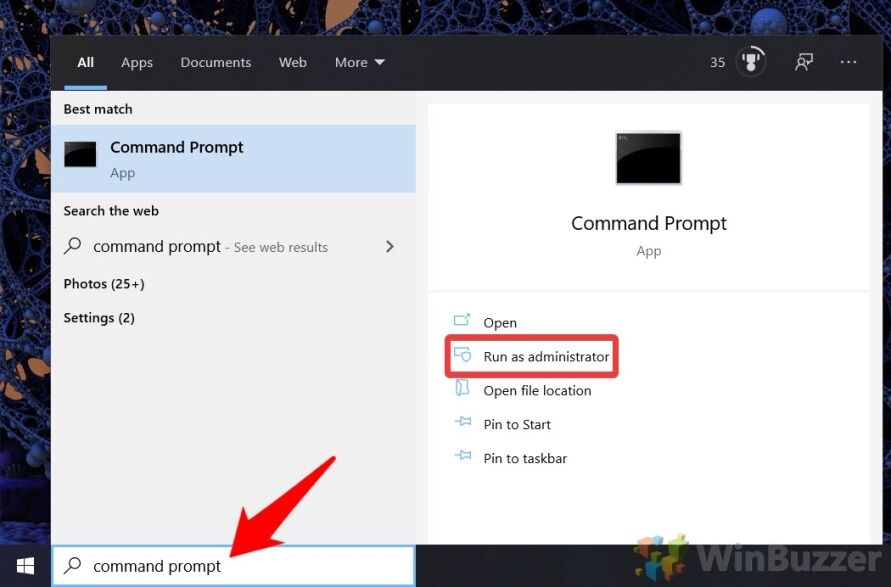
- Search for Command Prompt, right-click the result, and select Run as administrator.
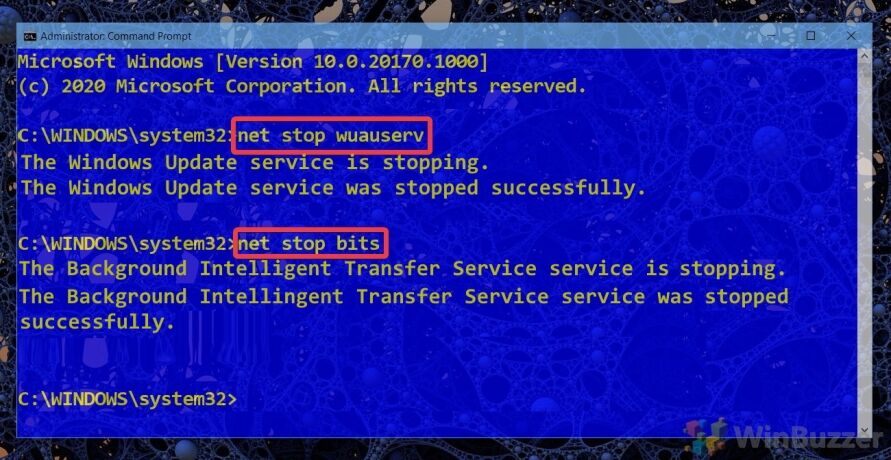
- Type the following command to stop the Windows Update Service and press Enter:
net stop wuauserv - Type the following command to stop the Background Intelligent Transfer Service and press Enter:
net stop bits

- Use the Windows key + R keyboard shortcut to open the Run command.
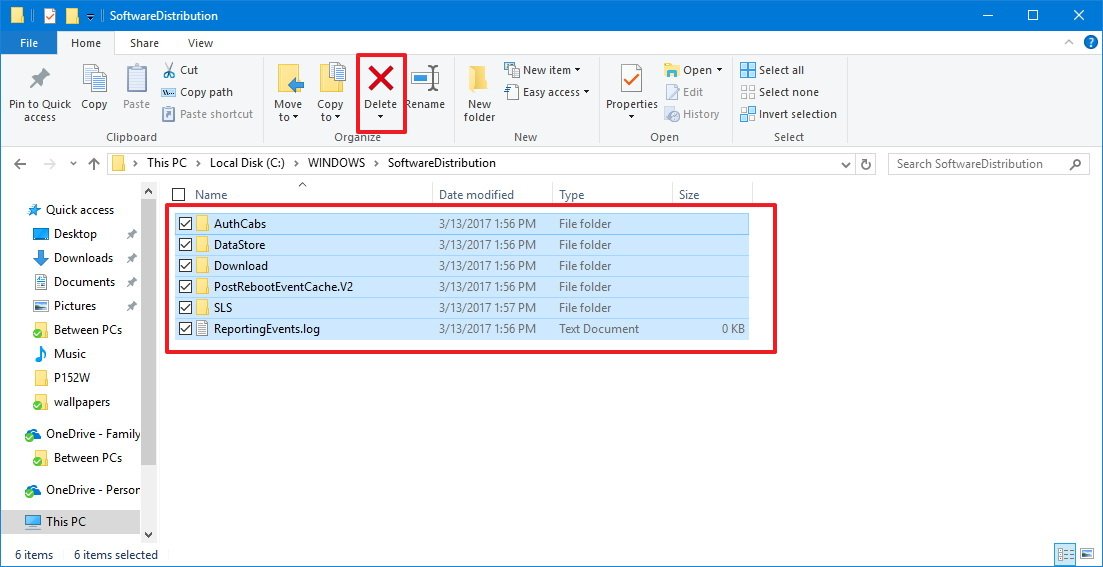
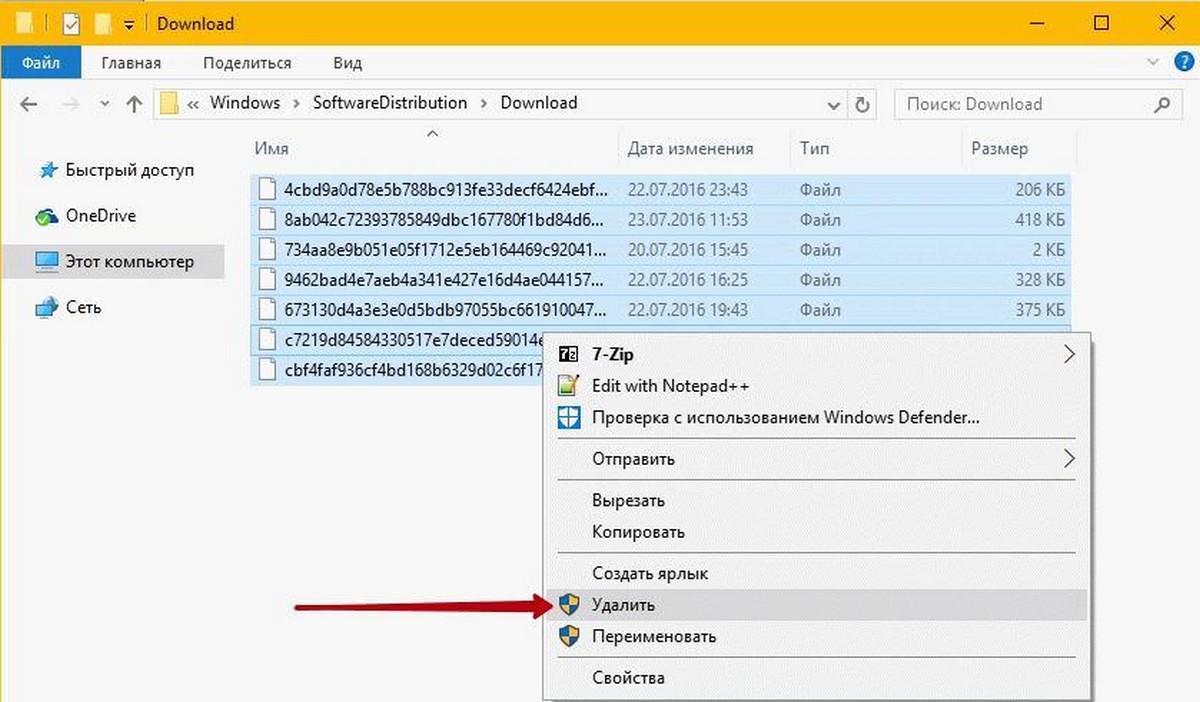
- Open File Explorer and browse the following path:
C:\Windows\SoftwareDistribution - Select all its content and click the Delete button to clear the content.Quick Tip: In the case, you’re having trouble deleting all the files, simply restart your computer, and try again.
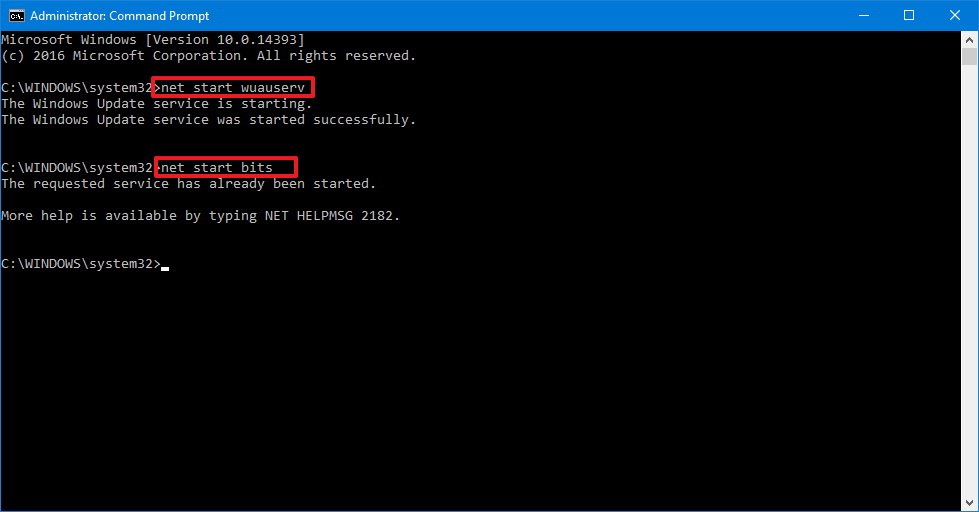
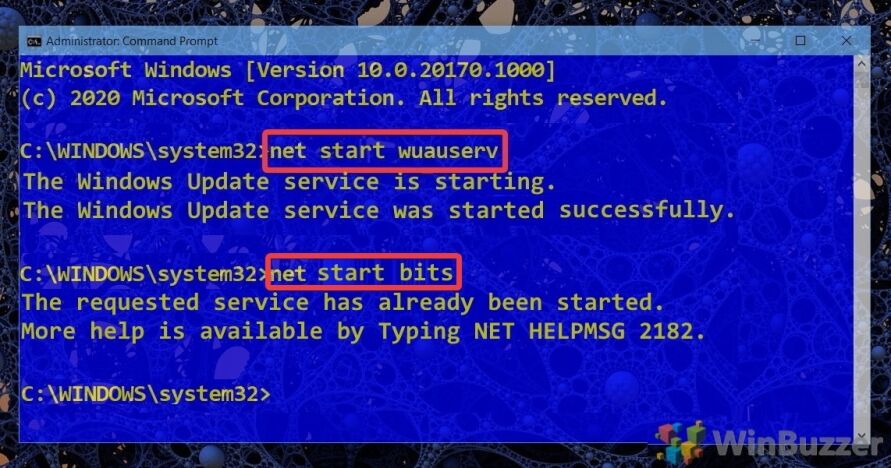
- On Command Prompt, type the following command to start the Windows Update Service and press Enter:
net start wuauserv - Type the following command to start the Background Intelligent Transfer Service and press Enter:
net start bits
Once you completed the steps, Windows 10 will reconfigure the folder and re-download all the necessary components.
How to rename the ‘SoftwareDistribution’ folder
If you don’t want to delete the content inside of the folder, you can alternatively, rename the folder to troubleshoot Windows Update problems.
All the latest news, reviews, and guides for Windows and Xbox diehards.
To rename the SoftwareDistribution folder, do the following:
- Open Start.
- Search for Command Prompt, right-click the result, and select Run as administrator.
- Type the following command to stop the Windows Update Service and press Enter:
net stop wuauserv - Type the following command to stop the Background Intelligent Transfer Service and press Enter:
net stop bits
- Use the Windows key + R keyboard shortcut to open the Run command.
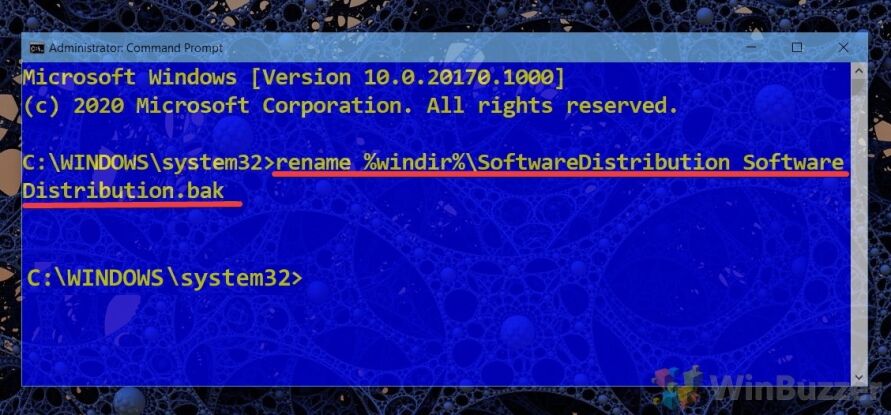
- Type the following command to rename the folder and press Enter:
rename %windir%\SoftwareDistribution SoftwareDistribution.bakQuick Tip: If the command isn’t letting you rename the folder, try steps No. 3 and 4 one more time, and then try to rename the folder.

- Type the following command to start the Windows Update Service and press Enter:
net start wuauserv - Type the following command to start the Background Intelligent Transfer Service and press Enter:
net start bits
After you’ve completed the steps, Windows 10 will re-create the folder and re-download all the necessary components.
The only caveat with this process is that the SoftwareDistribution folder also includes the Windows Update history information, which means that emptying up the folder will result in loss of this data. In addition, you’ll notice that Windows Update will take longer than usual to detect and update your computer because the WUAgent must check and re-create the Datastore information. However, it’s a small price to pay to get your device to update again.
While sometimes the folder may grow, it’s only recommended to use these instructions only when necessary. You shouldn’t mess with the SoftwareDistribution folder to free up storage space on your computer.
More Windows 10 resources
For more help articles, coverage, and answers to common questions about Windows 10, visit the following resources:
- Windows 10 on Windows Central – All you need to know
- Windows 10 help, tips, and tricks
- Windows 10 forums on Windows Central
Mauro Huculak has been a Windows How-To Expert contributor for WindowsCentral.com for nearly a decade and has over 15 years of experience writing comprehensive guides. He also has an IT background and has achieved different professional certifications from Microsoft, Cisco, VMware, and CompTIA. He has been recognized as a Microsoft MVP for many years.
What is the SoftwareDistribution folder and what is it used for? Although many users are not aware of this folder, so let’s shed some light on the importance of the SoftwareDistribution folder. This folder is used by Windows to temporarily stores files needed to install the latest Windows Updates on your device.
Windows updates are important as it provides security updates & patches, fixes a lot of bugs and improves your system performance. SoftwareDistribution folder is located in the Windows directory and is managed by WUAgent (Windows Update Agent).
Do you think that deleting this folder is ever required? On what circumstances, you would delete this folder? Is it safe to delete this folder? These are some questions that we all come across while discussing this folder. On my system, it is consuming more than 1 GB space of C drive.
Why would you ever delete this folder?
SoftwareDistribution folder should be left alone but there comes a time when you may need to clear the contents of this folder. One such case is when you’re unable to update Windows or when Windows updates which are downloaded & stored in the SoftwareDistribution folder are corrupt or incomplete.
In most of the cases, when Windows Update stops working properly on your device and you are getting an error message, you need to flush out this folder to solve the problem. Moreover, if you find that this folder is accumulating a large chunk of data taking more space of the drive, you can manually clear out the folder to free up some space on your drive. However, if you face Windows Update issues such as Windows Update not working, Windows Updates fails, Windows Update stuck while downloading the latest updates, etc. then you need to delete SoftwareDistribution folder on Windows 10.

Is it safe to delete SoftwareDistribution folder?
You don’t need to touch this folder under any normal circumstances, but if the content of the folder is corrupted or not synchronized causing issues with Windows updates then you need to delete this folder. It is completely safe to delete this folder. However, you need to first make sure that you are experiencing a problem with your Windows Update. Next time when Windows Update files are ready, Windows will automatically create this folder and download the update files from the scratch.
How to Delete SoftwareDistribution Folder on Windows 10
Make sure to create a restore point just in case something goes wrong.
To delete SoftwareDistribution folder from your device, you need to either open the Command Prompt or Windows PowerShell
1.Open Command Prompt or Windows PowerShell with Administrator access. Press Windows key + X and select the Command Prompt or PowerShell option.
2.Once PowerShell opens, you need to type below-mentioned commands to stop the Windows Update Service and the Background Intelligent Transfer Service.
net stop wuauserv
net stop bits

3.Now you need to navigate to SoftwareDistribution folder in C drive to delete all its components:
C:\Windows\SoftwareDistribution

If you are not able to delete all files because some files are in use, you just need to restart your device. Upon rebooting, you need to again run the above commands again and follow the steps. Now, again try to delete all the content of the SoftwareDistribution folder.
4.Once you have deleted the content of the SoftwareDistribution folder, you need to type the following command to activate the services related to Windows Update:
net start wuauserv
net start bits

An alternate way to Delete SoftwareDistribution Folder
1.Press Windows Key + R then type services.msc and hit Enter.
2.Right-click on Windows Update service and select Stop.

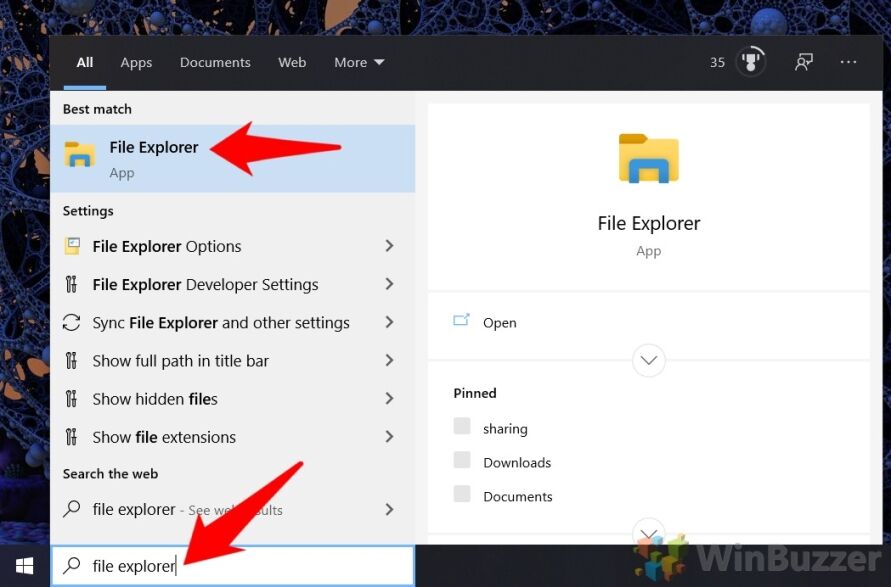
3.Open File Explorer then navigate to the following location:
C:\Windows\SoftwareDistribution
4.Delete all the files and folders under SoftwareDistribution folder.
5.Again right-click on Windows Update service then select Start.

6.Now to try to download the Windows updates and this time it will without any issues.
How to Rename SoftwareDistribution folder
If you’re worried about deleting the SoftwareDistribution folder then you can simply rename it and Windows will automatically create a new SoftwareDistribution folder to download the Windows updates.
1.Press Windows Key + X then select Command Prompt (Admin).
2.Now type the following commands to stop Windows Update Services and then hit Enter after each one:
net stop wuauserv
net stop cryptSvc
net stop bits
net stop msiserver

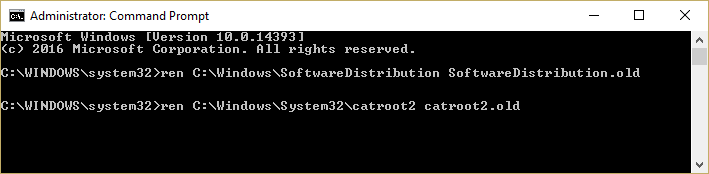
3.Next, type the following command to rename SoftwareDistribution Folder and then hit Enter:
ren C:\Windows\SoftwareDistribution SoftwareDistribution.old
ren C:\Windows\System32\catroot2 catroot2.old
4.Finally, type the folowing command to start Windows Update Services and hit Enter after each one:
net start wuauserv
net start cryptSvc
net start bits
net start msiserver

Once you have completed these steps, Windows 10 will automatically create a folder and download the necessary elements for running Windows Update services.
If the above step is not working then you can boot Windows 10 into Safe Mode, and rename SoftwareDistribution folder to SoftwareDistribution.old.
Note: The only thing which you may lose in the process of deleting this folder is the historical information. This folder also stores the Windows Update history information. Thus, deleting the folder will delete the Windows Update history data from your device. Moreover, the Windows Update process will take more time than it used to take earlier because WUAgent will check and create the Datastore information.
Overall, there is no problem associated with the process. It is a small price to pay for getting your device updated with the latest Windows Updates. Whenever you notice Windows Update problems such as Windows Updates files missing, not updating properly, you can opt for this method to restore the Windows Update process.
Recommended:
- Remove Activate Windows Watermark from Windows 10
- How to Fix Bluetooth problems in Windows 10
- Enable Flash for Specific Websites in Chrome
- How to Sideload Apps on Windows 10
I hope the above steps were helpful and now you can easily Delete SoftwareDistribution folder on Windows 10, but if you still have any questions regarding this tutorial then feel free to ask them in the comment’s section.
В Windows 10 процесс установки накопительных обновлений иногда может вызывать проблемы. Например, обновления не могут быть установлены в результате повреждения файлов, совместимости или неизвестных ошибок.
Независимо от причины, если у вас возникли проблемы с установкой обновления, или проблема с конкретным патчем, вы можете просто удалить обновления ожидающие установки, чтобы повторно загрузить файлы или пропустить обновление. Проблема может быть исправлена путем очистки кэша обновления Windows. После чего, Центр обновления Windows 10 загружает новую копию обновления и устанавливает ее.
Если вы не отключили службу обновления Windows, вручную или с помощью инструмента стороннего разработчика, то обновление системы, работает без проблем для большинства пользователей. Тем не менее, есть пользователи, сталкивающиеся с проблемой во время загрузки или установки обновления в Windows 10.
Если Центр обновления Windows не работает должным образом, хорошая мысль запустить Средство устранения неполадок Центра обновления Windows. Перейдите в приложение «Параметры» → «Обновление и безопасность» → «Устранение неполадок» → кликните один раз на «Центр обновления Windows» и нажмите кнопку «Запустить средство устранения неполадок».
Иногда запустив средство устранения неполадок Центра обновления Windows не может помочь устранить проблемы обновления Windows.
Очистка кэша обновлений Windows может исправить проблемы. В этом руководстве, мы увидим, как очистить кэш обновления Windows (удалить файлы обновлений ожидающих установки) в операционной системе Windows 10.
Как очистить кэш обновления Windows в Windows 10
Это можно сделать, удалив содержимое папки SoftwareDistribution, содержащей файлы, которые Windows Update использует для применения новых обновлений.
Прежде чем мы сможем удалить кэш обновлений, нам необходимо остановить службу Центра обновления Windows.
Шаг 1: В меню «Пуск» или в диалоговом окне «Выполнить» введите services.msc, а затем нажмите Enter, чтобы открыть окно Служб.
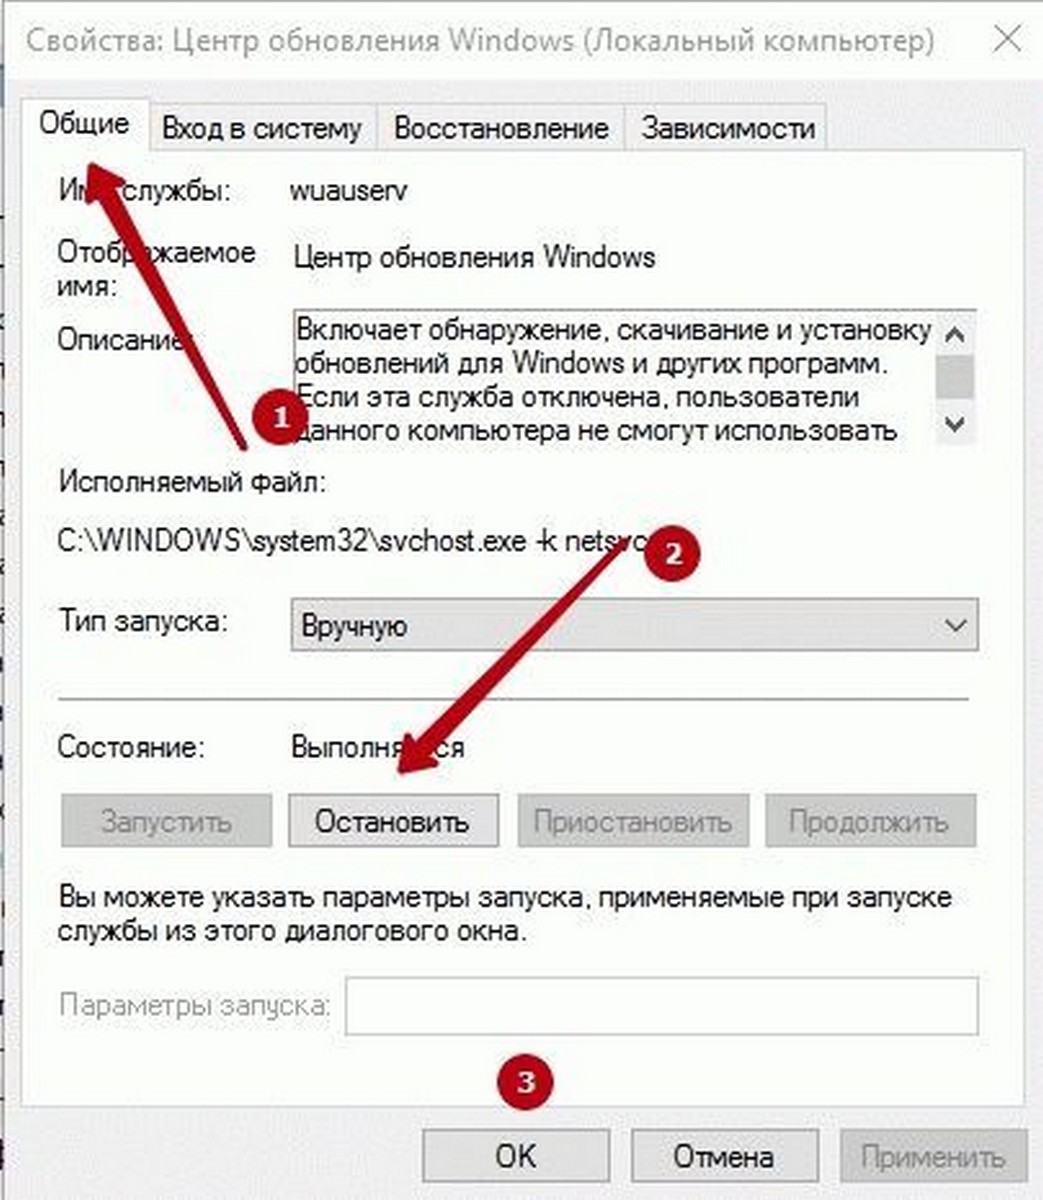
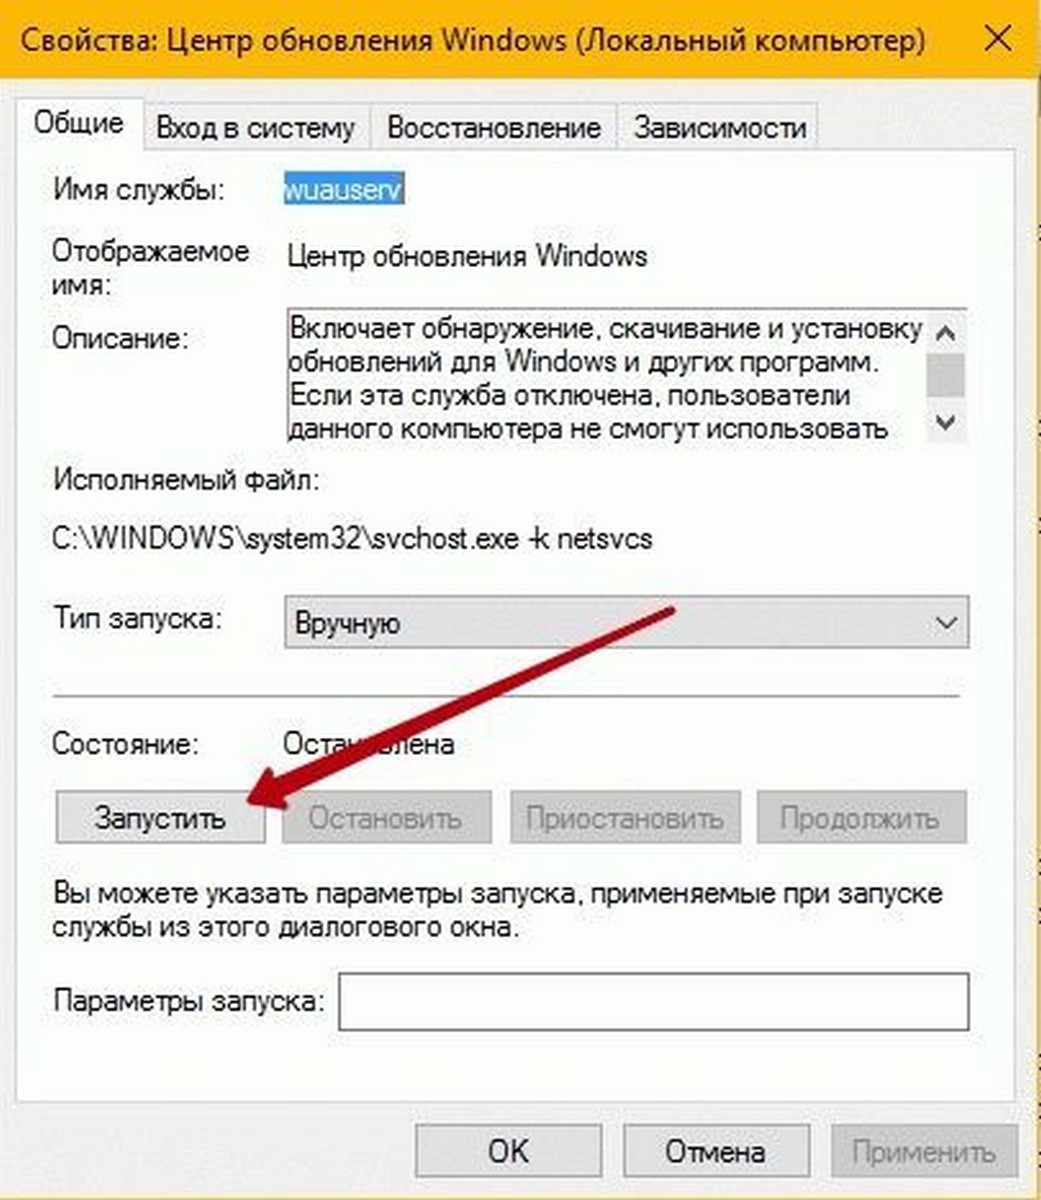
Шаг 2: Найдите запись службы «Центр обновления Windows» и дважды кликните на ней, чтобы открыть диалоговое окно свойств.
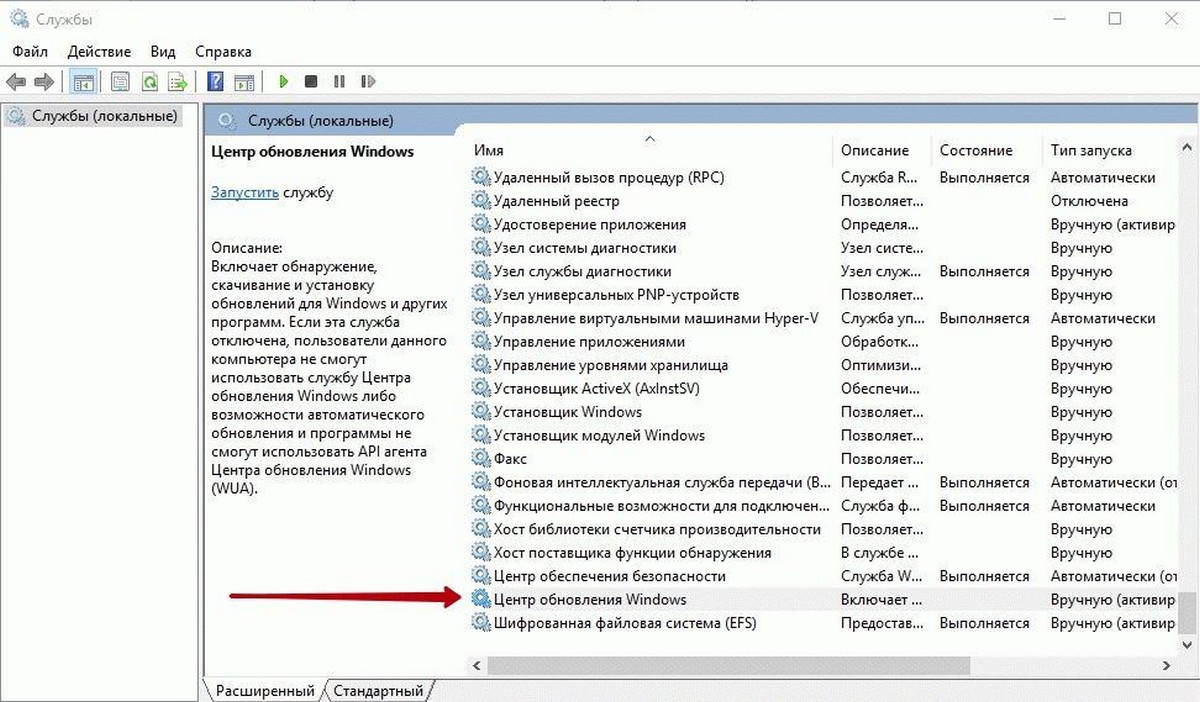
Шаг 3: Во вкладке «Общие», нажмите кнопку «Остановить», и нажмите кнопку «Ок», для остановки службы обновления Windows.
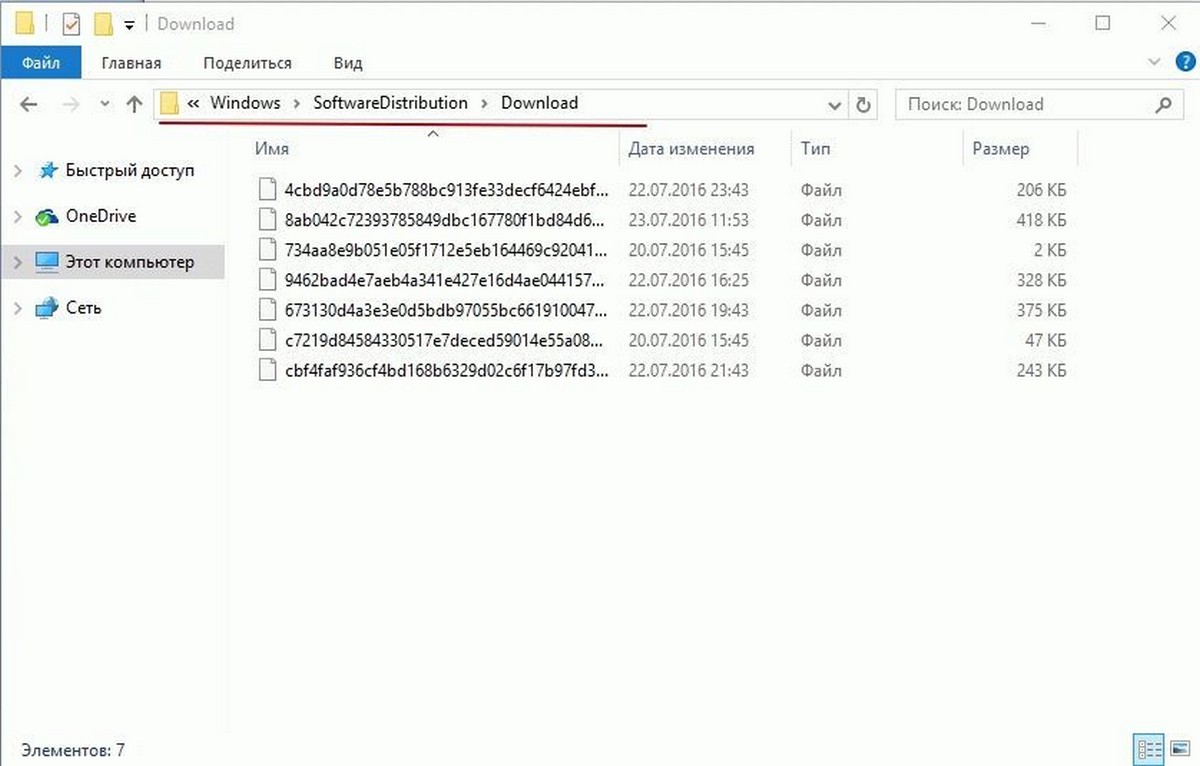
Шаг 4: Откройте диск, на котором установлена ОС Windows 10.
Например, если Windows 10 установлена на диске «C«, откройте его. Перейдите к папке Windows\SoftwareDistribution\Download.
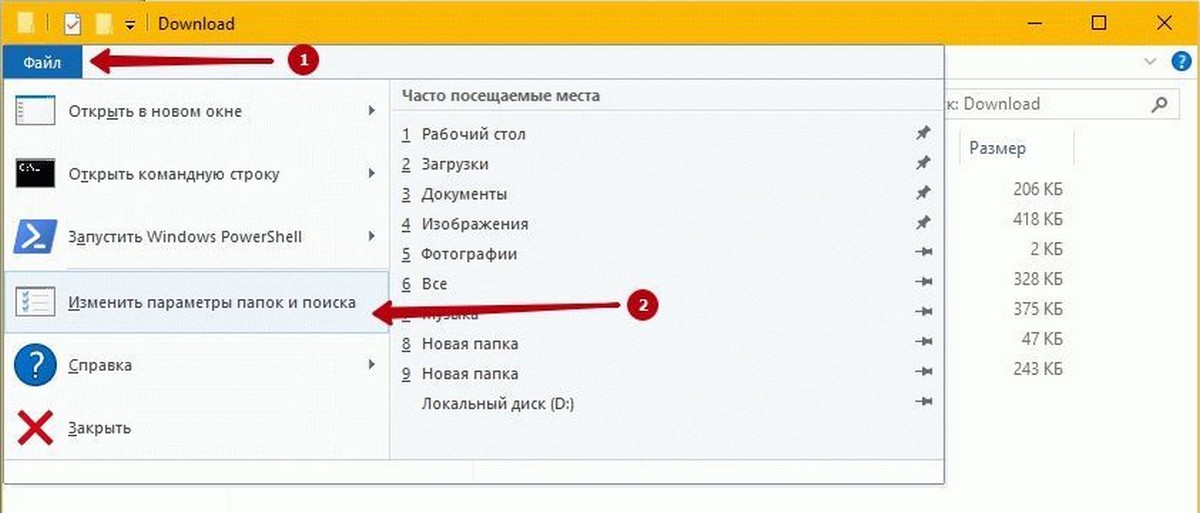
Шаг 5: В папке «Download», кликните меню «Файл» и нажмите кнопку «Изменить параметры папок и поиска». На вкладке «Вид», установите чекбокс напротив надписи «Показывать скрытые файлы и папки и диски». Затем снимите флажок перед опцией «Скрывать защищенные системные файлы» и нажмите кнопку «Применить» (см. картинки ниже).
Шаг 6: Теперь в директории C:\Windows\SoftwareDistribution\Download — Выберите все файлы и папки, а затем Удалите их..
Вы только что очистили кэш обновления Windows. Выполните следующие два шага, для запуска службы Центра обновления Windows (Windows Update), которая была остановлена в первые три этапа.
Шаг 7: Введите Services.msc в меню «Пуск» или в «Поиск» на панели задач и нажмите клавишу Enter.
Шаг 8: Дважды кликните на службу «Центр обновления Windows», а затем нажмите кнопку «Запуск», чтобы запустить службу и нажмите «OK».
Вы успешно очистили кэш обновления Windows в ОС Windows 10. Надеемся, что это позволит вам решить проблему обновления Windows.
What is the Software Distribution folder?
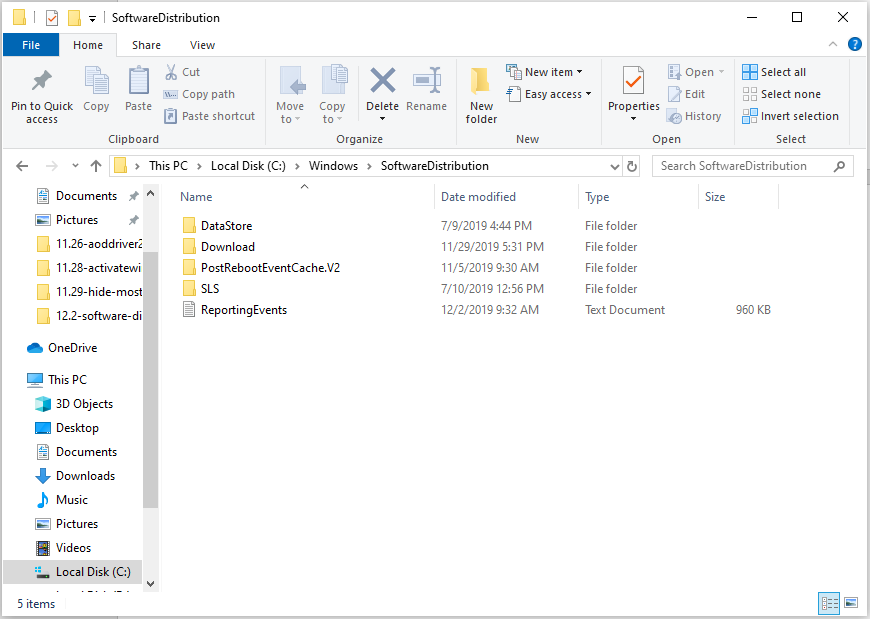
The SoftwareDistribution folder usually located in C:\Windows\SoftwareDistribution is used by Windows Update to preload downloaded updates and hotfixes before installing them. On Windows 10 you usually find the following folder-structure but there might exist other sub-folders as well:
- C:\Windows\SoftwareDistribution
- C:\Windows\SoftwareDistribution\Datastore
- C:\Windows\SoftwareDistribution\Download
- C:\Windows\SoftwareDistribution\EventCachte.v2
- C:\Windows\SoftwareDistribution\PostRebootEventCache.V2
- C:\Windows\SoftwareDistribution\SLS
While the SoftwareDistribution folder is managed completely by the Windows Update Agent (WUAgent) problems might occur that require a manual cleanup of its contents.
Automatically delete win download files in Windows 10
If you are facing issues with Windows Update you might try to use Windows Disk Cleanup in extended mode before moving forward with our tutorial. This might already fix incomplete or corrupted Windows Update files in the SoftwareDistribution folder by deleting them.
Is it safe to delete Windows\SoftwareDistribution-subfolders?
The method shown below to delete the SoftwareDistribution folder manually is generally safe as Windows Update will download all update files again when needed. To be sure that the issue you try to fix is related to the Windows SoftwareDistribution folder, you might want to temporarily rename it beforehand as shown below. This will preserve the files inside.
If you decide deleting the SoftwareDistribution folder, you will lose the Windows Update history which might be usuful to trace down problematic updates. Also Windows Update will need a bit longer afterwards until available updates are shown and downloaded because the WUAgent must check and re-create the Datastore information.
How to Cleanup the SoftwareDistribution folder?
Before you can clear the SoftwareDistribution folder, you will have to stop both the Windows Update Service (wuauserv) and the Background Intelligent Transfer Service (bits).
- Open an elevated Command Prompt

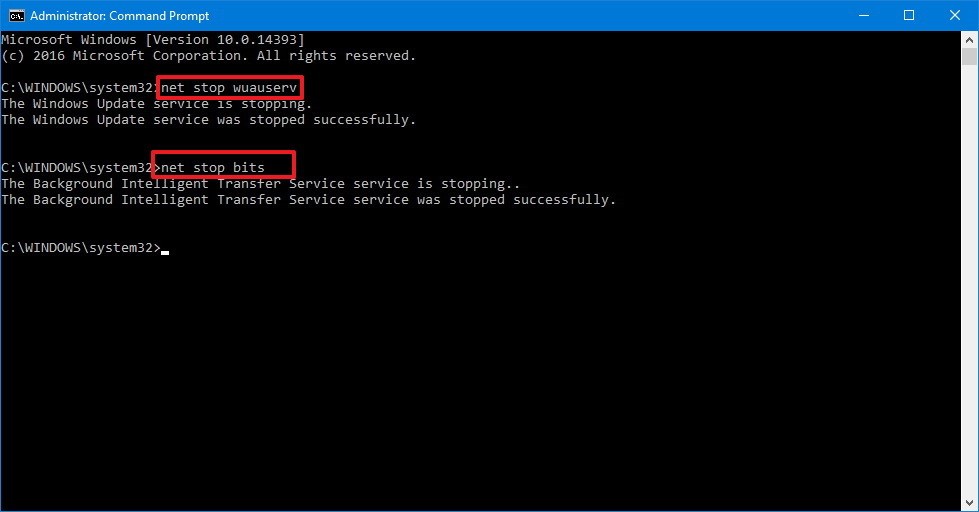
- Use the net stop command to terminate services
Run the command
net stop wuauservto stop the Windows Update Service andnet stop bitsfor the Background Intelligent Transfer Service.
- Open file Explorer

- Delete contents/subfolders of C:\Windows\SoftwareDistribution

- Use the net stop command to restart services
Run the command
net start wuauservto re-launch the Windows Update Service andnet start bitsfor the Background Intelligent Transfer Service.


How to Rename the SoftwareDistribution folder
Renaming the SoftwareDistribution folder allows to quickly check if Windows Update files there are really causing the issue you are trying to resolve.
- Open Command Prompt
- Use the net stop command to terminate services
Run the command
net stop wuauservto stop the Windows Update Service andnet stop bitsfor the Background Intelligent Transfer Service.
- Rename the SoftwareDistribution folder with one command
Run the following command to rename SoftwareDistribution folder into SoftwareDistribution.bat:
rename %windir%\SoftwareDistribution SoftwareDistribution.bak
To revert this, you can apply the same procedure afterwards using this command:
rename %windir%\SoftwareDistribution.bak SoftwareDistribution

- Use the net stop command to restart services
Run the command
net start wuauservto re-launch the Windows Update Service andnet start bitsfor the Background Intelligent Transfer Service.
How to Pause, Defer, or Delay Quality and Feature Updates
If you deleted the SoftwareDistribution Folder´s contents to free up space you might also want to delete the $SysReset folder to gain even more. If necessary you can also tell Windows Update to Pause, Defer, or Delay Quality and Feature Updates if you don´t want to download new Windows Updates immediately again after clearing SoftwareDistribution.
Last Updated on August 27, 2021 3:53 pm CEST
-
Home
-
News
- How to Rename or Delete Software Distribution Folder on Windows
By Daisy | Follow |
Last Updated
If your Windows Update isn’t working, it could be caused by a problem with the Software Distribution folder. If you need to delete or rename this folder, this post offered by MiniTool Solution will tell you how to that.
Is It Safe to Delete Software Distribution Folder?
The Software Distribution folder in the Windows operating system is a folder in the Windows directory. It is used to temporarily store files that may be needed to install Windows Update on your computer. The Software Distribution folder in Windows 10/8/7 is located in the following location in File Explorer: C:\Windows\SoftwareDistribution.
Sometimes you need to empty its contents when your system’s Datastore and the Download folder have got de-synchronized because it results in your Windows Updates not working properly. Generally, once all the files it needs have been used to install Windows Update, you can delete the contents of the Software Distribution folder.
Even if you delete files in other ways, they will download automatically. If you delete the folder itself, the folder will be automatically recreated and the required WU components will be downloaded automatically.
However, your Windows Update History files are also contained in this data store. If you delete them, you will lose your Update history. In addition, the next time you run Windows Update, this will result in longer detection times.
You can consider deleting the Software Distribution folder on Windows 10/8/7 if your Windows Update is not working properly or not working at all or if you find that the size of this folder has really grown large.
How to Delete Software Distribution Folder?
To delete the contents of Windows SoftwareDistribution folder, you can follow the steps.
Step 1: Type Command Prompt in the Search menu. Then right-click it to choose Run as administrator:
Step 2: Run the following commands one by one:
net stop wuauserv
net stop bits
Step 3: Now go to the C:\Windows\SoftwareDistribution folder and delete all the files and folders inside by pressing the Ctrl+A keys to select all and then right-click to choose Delete.
If files are in use and you cannot delete some files, then you should restart your device. Run the above command again after restarting. Now you will be able to delete files from Software Distribution folder on Windows 10.
After emptying this folder, you can either restart your computer or type the following command one by one in Command Prompt and press Enter to restart Windows Update related services:
net start wuauserv
net start bits
How to Rename Software Distribution Folder?
If you want to rename the Software Distribution folder, let’s see how to do that:
Open an elevated command prompt and type the following commands one after the other, and press Enter:
net stop wuauserv
net stop bits
rename c:\windows\SoftwareDistribution SoftwareDistribution.bak
net start wuauserv
net start bits
Alternatively, you can also try to boot Windows 10 into Safe Mode, and rename SoftwareDistribution to SoftwareDistribution.bak or SoftwareDistribution.old.
Bottom Lines
In conclusion, you can know how to delete Software Distribution Folder and how to rename it. In addition, I analyze the risk of deleting it and you don’t need to worry about doing that. I hope this post can be useful to you.
About The Author
Position: Columnist
Having been an editor at MiniTool since graduating college as an English major, Daisy specializes in writing about data backups, disk cloning, and file syncing as well as general computer knowledge and issues. In her free time, Daisy enjoys running and going with friends to the amusement park.