
Все способы:
- Очищаем очередь печати в Windows 10
- Способ 1: Свойства принтера
- Способ 2: Ручная очистка очереди печати
- Вопросы и ответы: 2
Сейчас у многих пользователей имеется дома принтер. С его помощью можно без каких-либо трудностей распечатать необходимые цветные или черно-белые документы. Запуск и настройка этого процесса обычно осуществляется через операционную систему. Встроенный инструмент выстраивает очередь, которая регулирует поступление файлов в печать. Иногда происходят сбои либо случайная отправка документов, поэтому возникает надобность очистить эту очередь. Выполняется такая задача двумя методами.
Очищаем очередь печати в Windows 10
В рамках данной статьи будет рассмотрено два метода очистки очереди печати. Первый является универсальным и позволяет удалить все документы или только выбранный. Второй же полезен тогда, когда произошел системный сбой и файлы не удаляются, соответственно, и подключенное оборудование не может начать нормально функционировать. Давайте разберемся с этими вариантами более детально.
Способ 1: Свойства принтера
Взаимодействие с печатающим устройством в операционной системе Windows 10 происходит с помощью стандартного приложения «Устройства и принтеры». В него встроено множество полезных утилит и инструментов. Один из них и отвечает за формирование и работу с очередью элементов. Удалить их оттуда не составит труда:
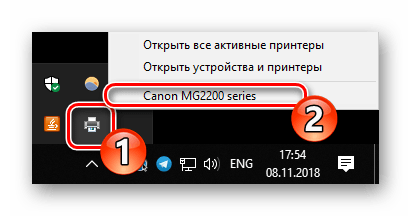
- Найдите значок принтера на панели задач, кликните на нем правой кнопкой мыши и выберите в списке используемое устройство.
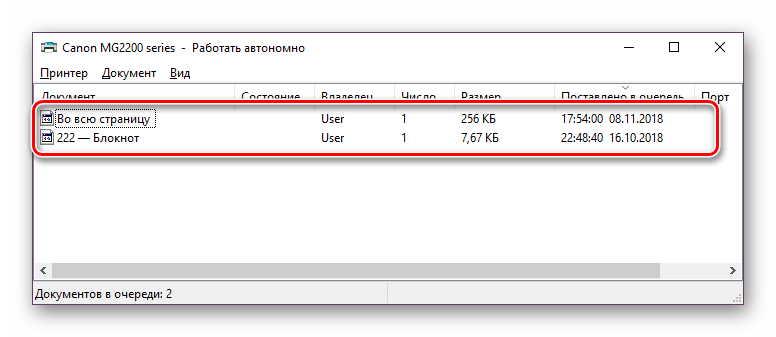
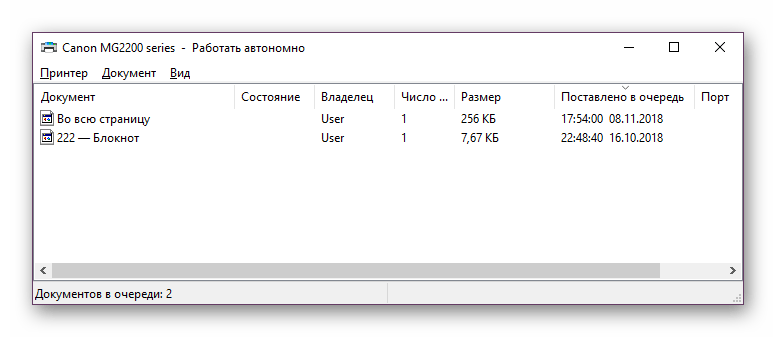
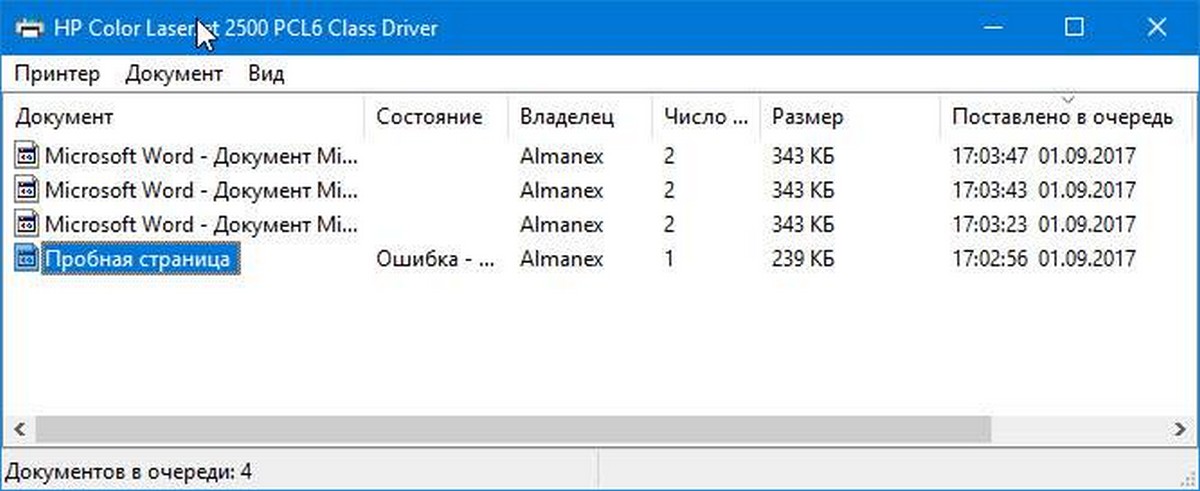
- Откроется окно параметров. Здесь вы сразу увидите перечень всех документов. Если требуется удалить только один, нажмите на нем ПКМ и выберите «Отменить».
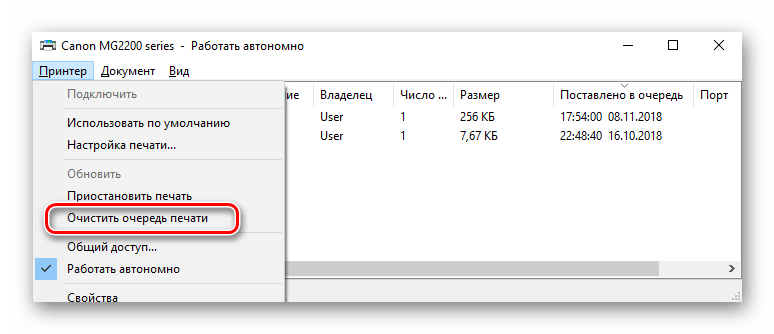
- В случае когда файлов много и по отдельности очищать их не совсем удобно, разверните вкладку «Принтер» и активируйте команду «Очистить очередь печати».
К сожалению, не всегда упомянутый выше значок отображается на панели задач. В этой ситуации открыть меню управления периферией и очистить очередь через нее можно так:
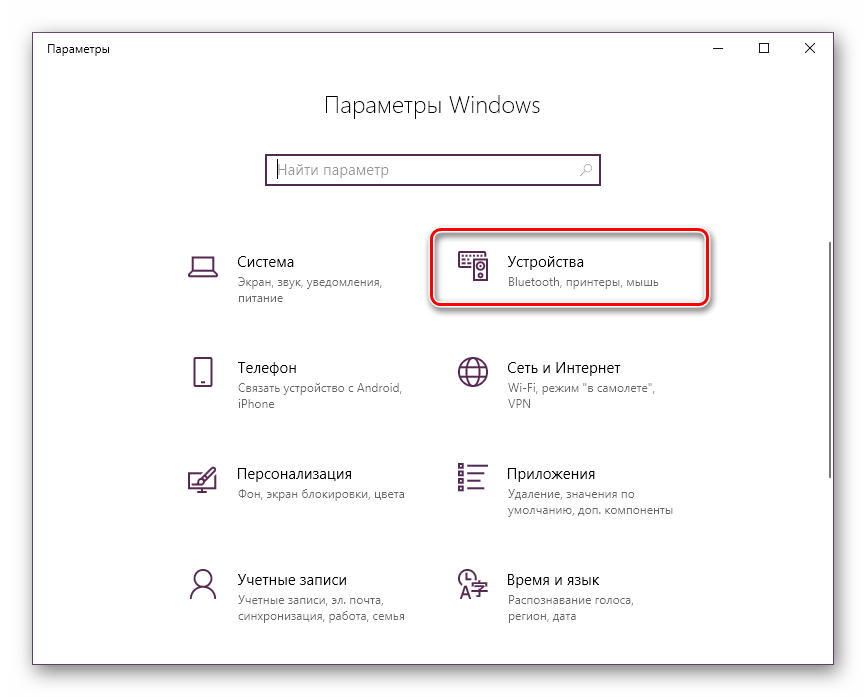
- Перейдите в «Пуск» и откройте «Параметры», нажав на кнопку в виде шестеренки.
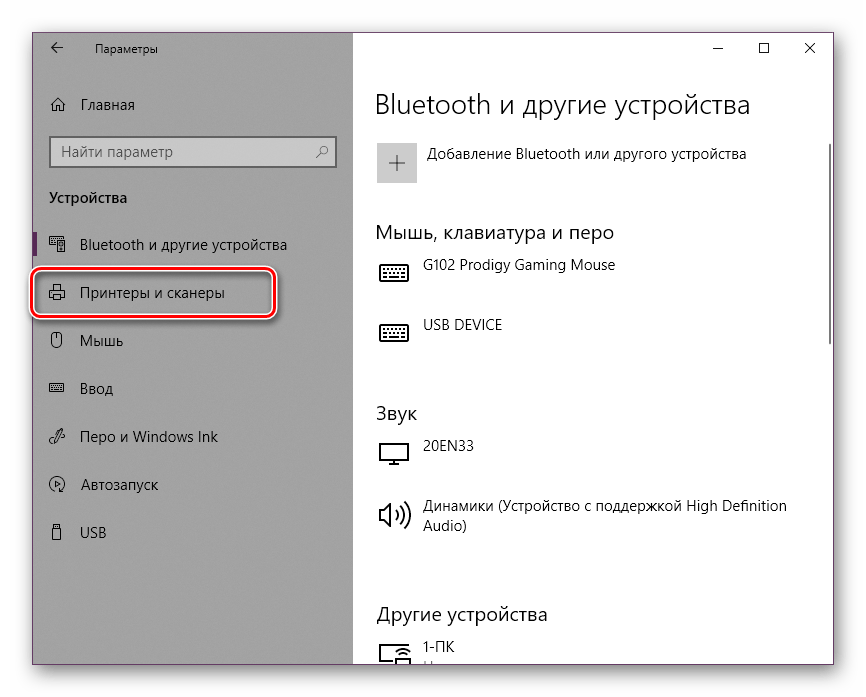
- Отобразится перечень параметров Windows. Здесь вас интересует раздел «Устройства».
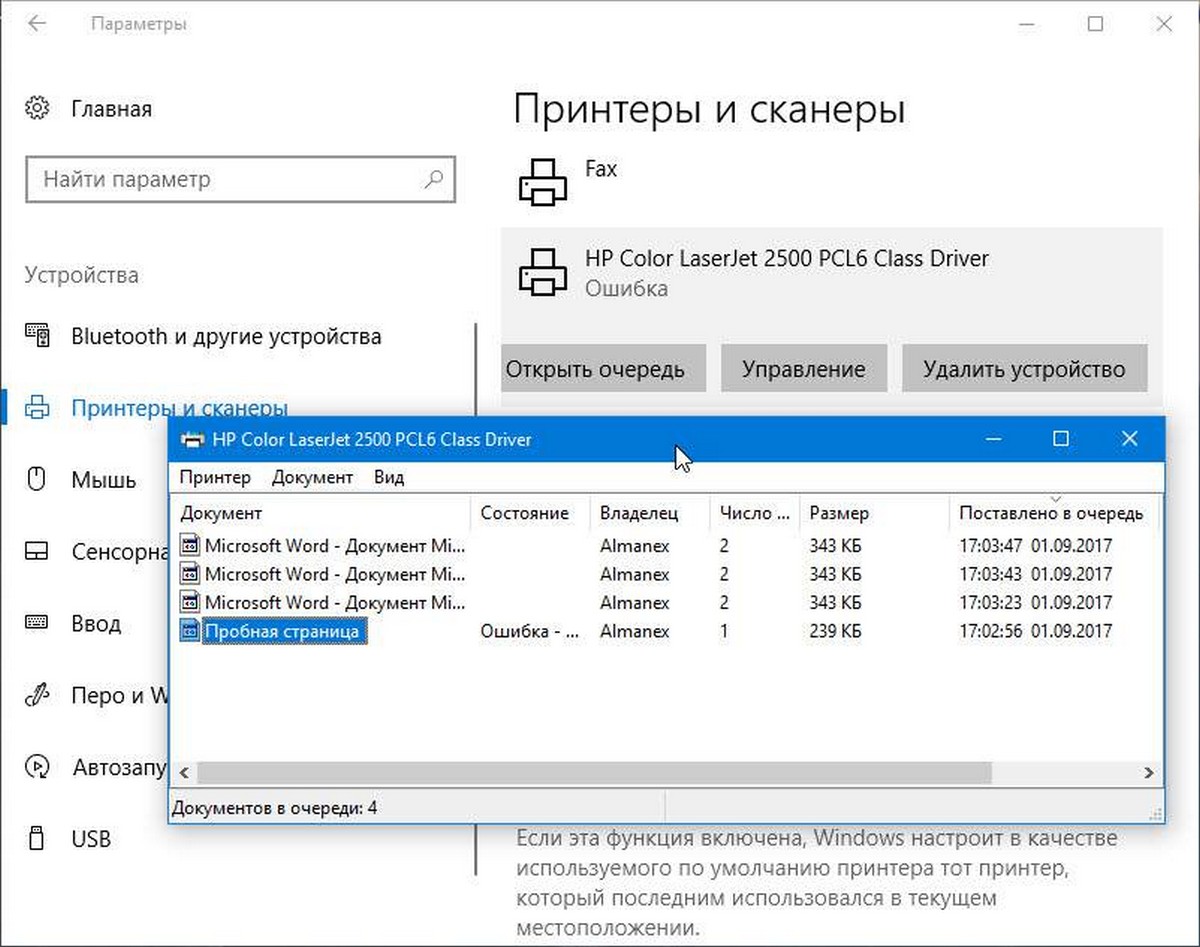
- На панели слева перейдите в категорию «Принтеры и сканеры».
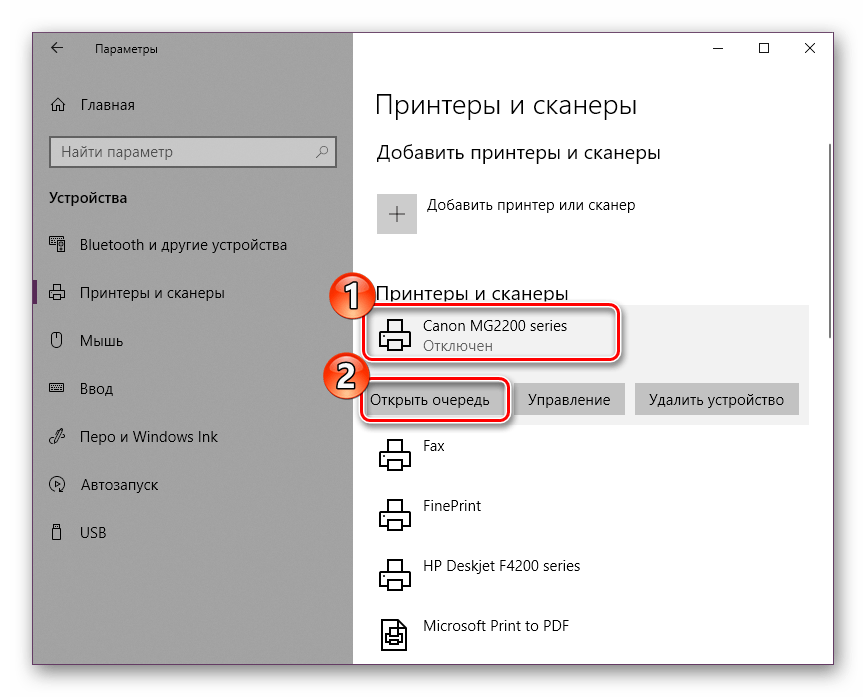
- В меню найдите оборудование, для которого и необходимо очистить очередь. Кликните на его названии ЛКМ и выберите «Открыть очередь».
- Теперь вы попадаете в окно с параметрами. Работа в нем происходит точно так же, как это было показано в предыдущей инструкции.
Читайте также: Добавление принтера в Windows
Как видите, первый способ достаточно прост в исполнении и не требует много времени, очищение происходит буквально за несколько действий. Однако иногда случается так, что записи просто не удаляются. Тогда рекомендуем обратить внимание на следующее руководство.
Способ 2: Ручная очистка очереди печати
За корректную работу принтера отвечает служба «Диспетчер печати». Благодаря ей создается очередь, документы отправляются в распечатку, а также происходят дополнительные операции. Различные системные либо программные сбои в самом устройстве провоцируют зависание всего алгоритма, из-за чего временные файлы никуда не деваются и только мешают дальнейшему функционированию оборудования. При возникновении подобных проблем вам нужно вручную заняться их удалением, а сделать это можно следующим образом:
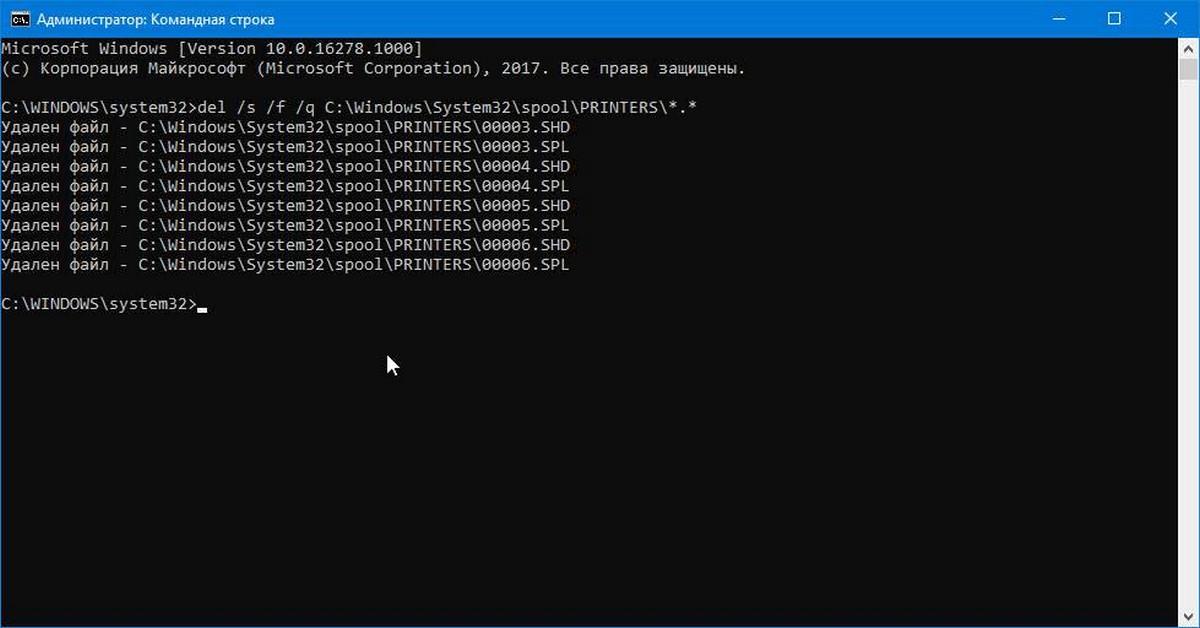
- Откройте «Пуск» в строке поиска напечатайте «Командная строка», кликните на появившемся результате правой кнопкой мыши и запустите приложение от имени администратора.
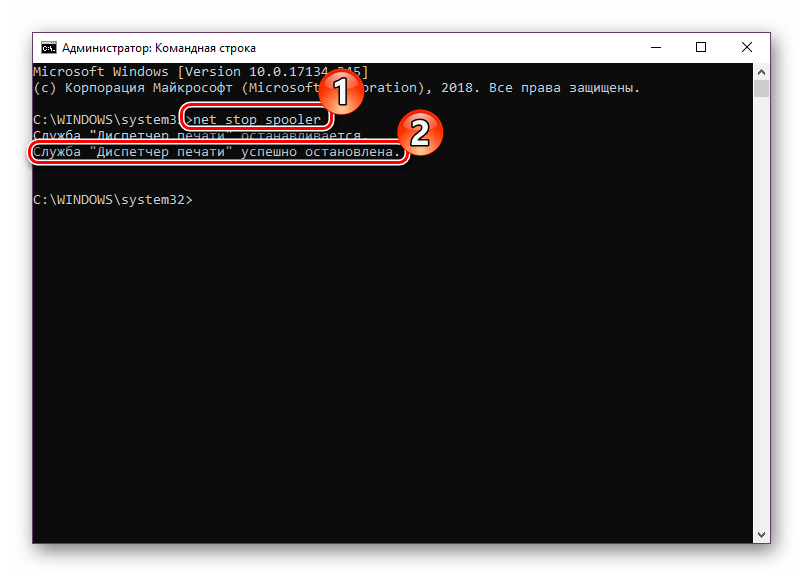
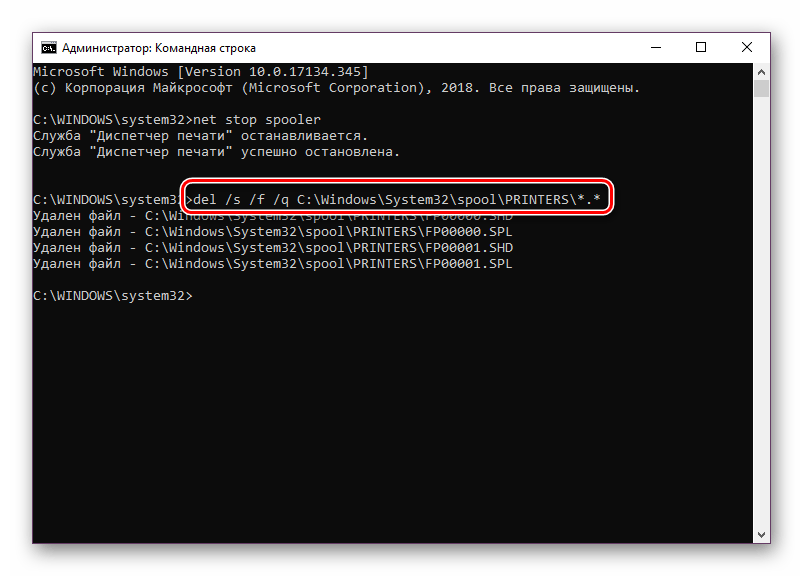
- В первую очередь останавливаем саму службу «Диспетчер печати». За это отвечает команда
net stop spooler. Введите ее и нажмите на клавишу Enter. - После успешной остановки вам пригодится команда
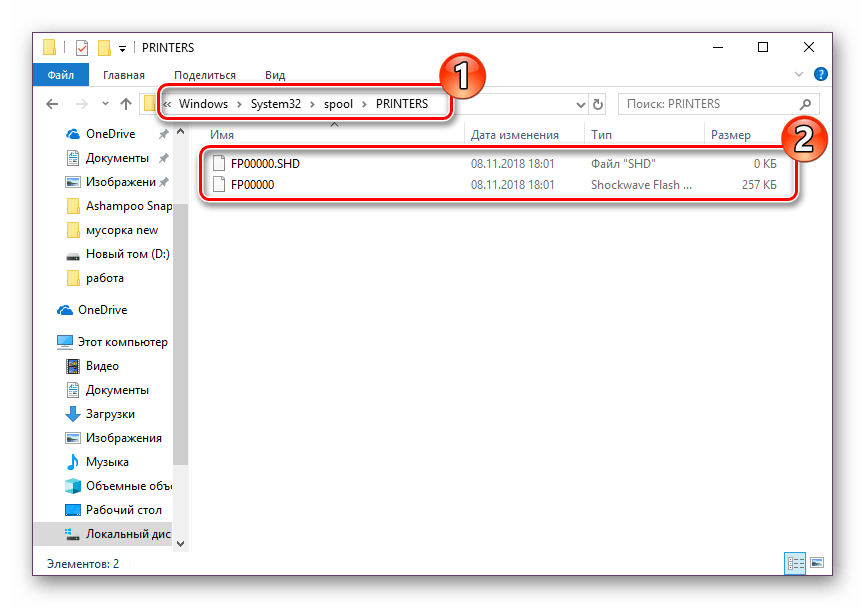
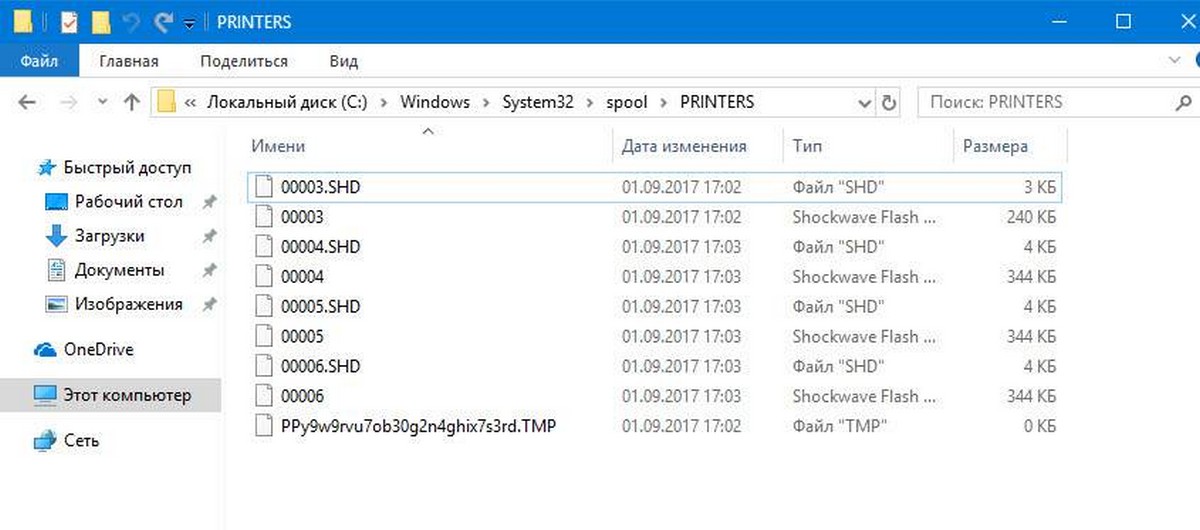
del /s /f /q C:\Windows\System32\spool\PRINTERS\*.*— она отвечает за удаление всех временных файлов. - По завершении процесса деинсталляции требуется вручную проверить папку хранения этих данных. Не закрывайте «Командную строку», откройте Проводник и найдите все временные элементы по пути
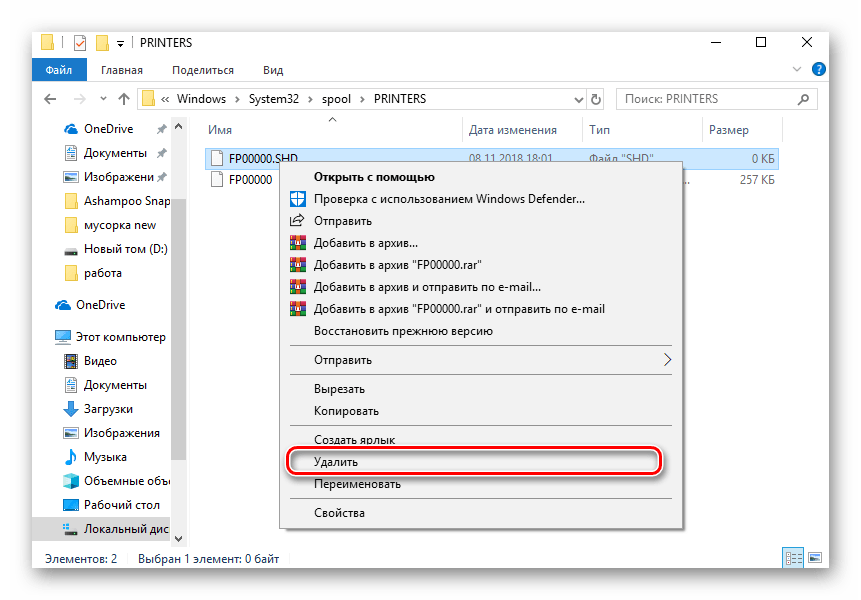
C:\Windows\System32\spool\PRINTERS - Выделите все их, кликните правой кнопкой мыши и выберите пункт «Удалить».
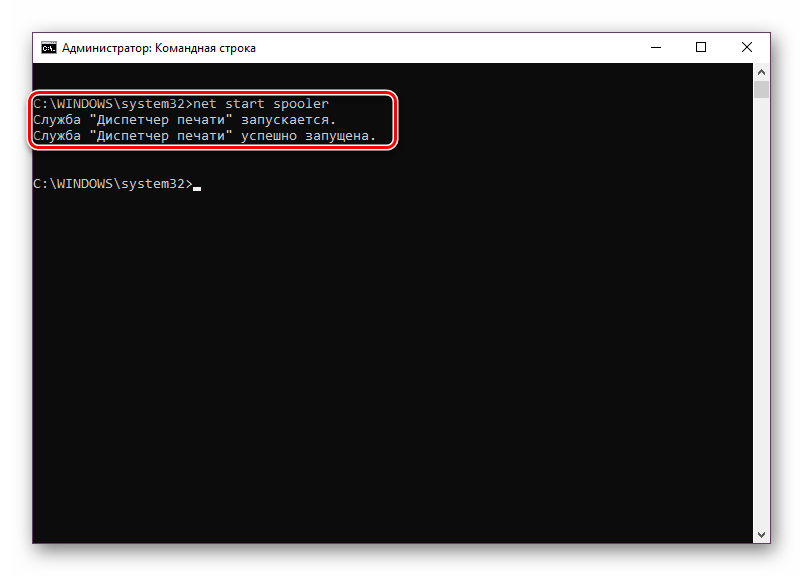
- После этого вернитесь в «Командную строку» и запустите службу печати командой
net start spooler

Такая процедура позволяет очистить очередь печати даже в тех случаях, когда элементы, находящиеся в ней, зависли. Переподключите устройство и заново приступайте к работе с документами.
Читайте также:
Как распечатать документ с компьютера на принтере
Как распечатать страницу из интернета на принтере
Печать книги на принтере
Печать фото 3×4 на принтере
С необходимостью очистки очереди печати сталкивается практически каждый обладатель принтеров или многофункциональных устройств. Как вы могли заметить, выполнить эту задачу не составит труда даже неопытному юзеру, а второй альтернативный метод поможет справиться с зависанием элементов буквально за несколько действий.
Читайте также:
Правильная калибровка принтера
Подключение и настройка принтера для локальной сети
Наша группа в TelegramПолезные советы и помощь
Если у вас есть локальный или сетевой принтер, подключенный к вашему ПК с Windows 10, вам может потребоваться приостановить печать или удалить зависшие задания на печать, которые застряли в очереди. Иногда Windows игнорирует команду «очистка очереди печати», доступную в пользовательском интерфейсе управления принтером.
Если вы не можете очистить или удалить один или несколько документов / страниц с помощью окна очереди печати, вам помогут следующие решения.
Как очистить очередь на печать от зависших в ней документов
Windows использует специальная служба с именем «Print Spooler». Она хранит ваши задания печати в папке C:\Windows\System32\spool\PRINTERS. Подключенный принтер извлекает эти задания из буфера и печатает ваши документы.
Если документ застрял или завис в очереди, он постоянно отображается в пользовательском интерфейсе. Чтобы убрать такой документ из очереди на печать, иногда, помогает выключить принтер и включить его снова. Как правило это зависит от драйвера принтера и не всегда работает.
В Windows 10 вы можете управлять очередью печати принтера с помощью Классической панели управления или перейдя в приложение «Параметры» → «Устройства» → «Принтеры и сканеры». Если вы не можете удалить задание на печать, попробуйте выполнить следующее.
Чтобы очистить файлы из очереди на печать вашего принтера в Windows 10, выполните следующие действия.
Способ 1 — Остановите и запустите службу Диспетчер печати.
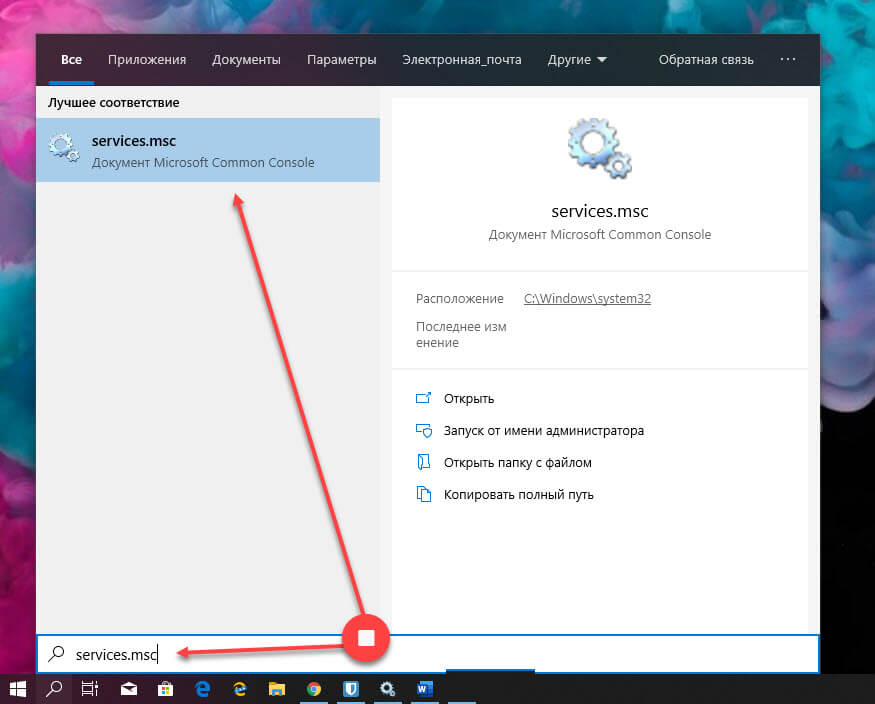
Шаг 1: Введите services.msc в поле поиска Пуск / панель задач, а затем нажмите клавишу Enter.
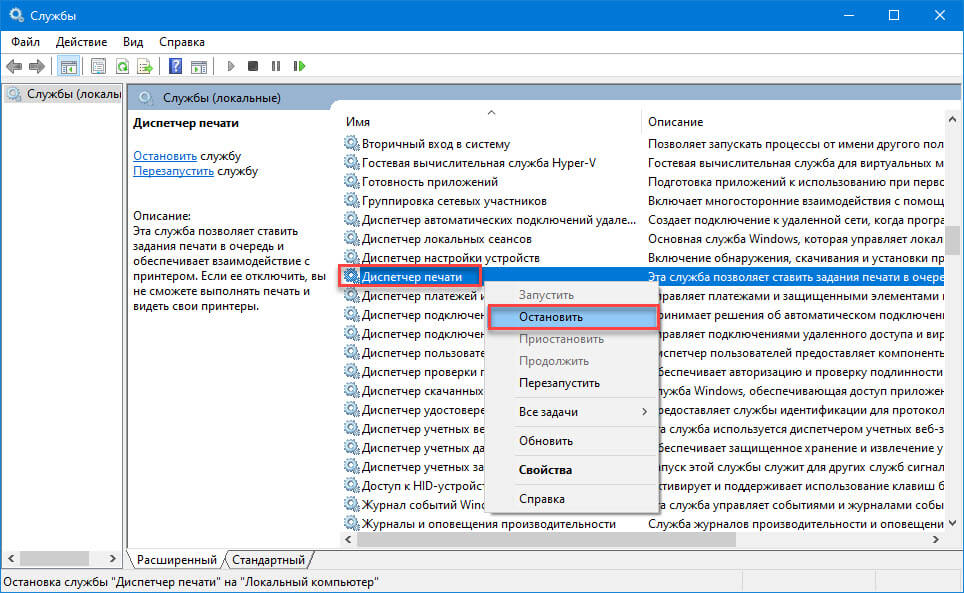
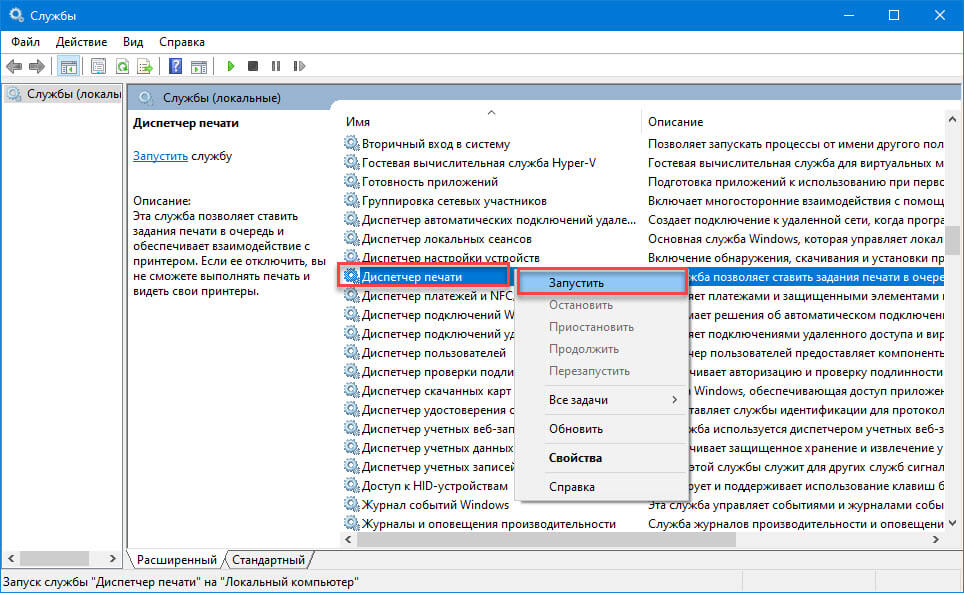
Шаг 2: Найдите службу «Диспетчер печати». Кликните на ней правой кнопкой мыши и выберите опцию «Остановить», чтобы остановить службу.
Шаг 3: Наконец, кликните правой кнопкой мыши на службе диспетчер печати, а затем запустите службу выбрав опцию «Запустить».
Это должно полностью очистить очередь печати. Если это не поможет, попробуйте выполнить действия, описанные в способе 2 (прокрутите вниз, чтобы увидеть).
Способ 2 — Удалите файлы очереди печати вручную.
Шаг 1: Введите services.msc в поле поиска Пуск / панель задач, а затем нажмите клавишу Enter.
Шаг 2: Найдите службу «Диспетчер печати». Кликните на ней правой кнопкой мыши и выберите опцию «Остановить», чтобы остановить службу.
Шаг 3: Откройте проводник и перейдите в следующую папку:
C:\Windows\System32\spool\PRINTERS
В указанном выше пути замените букву «C» на имя диска, на котором установлена Windows 10.
Примечание: Если появится диалоговое окно с сообщением «У вас нет прав доступа к этой папке», нажмите кнопку «Продолжить», чтобы получить постоянный доступ к папке PRINTERS.
Шаг 4: Выберите все файлы в папке PRINTERS и затем удалите их.
Шаг 5: В окне «Службы» снова, кликните правой кнопкой мыши на службе Диспетчер печати, а затем запустите службу выбрав опцию «Запустить».
Способ 3 — Очистить очередь на печать с помощью Командной строки.
Шаг 1: Откройте Командную строку от имени Администратора.
Шаг 2: Введите следующую команду:
net stop spoolerЭта команда остановит службу «Print Spooler».
Шаг 3: Теперь введите или скопируйте и вставьте следующую команду:
del %systemroot%\System32\spool\printers\* /Q
Это приведет к удалению всех файлов, ждущих свою очередь на печать в папке PRINTERS
Шаг 4: Кроме того, откройте Проводник. Не закрывайте пока окно командной строки. Перейдите в папку:
C:\Windows\System32\spool\PRINTERS
Шаг 5: Вернитесь в окно командной строки и введите следующую команду:
net start spooler Все, Все задания на печать были удалены!
Вам может быть интересно прочитать следующие статьи:
Windows 10, устранение неполадок принтера.
Как исправить- Принтер по умолчанию не может быть установлен
Как запретить Windows 10 автоматически менять Мой принтер по умолчанию.
When you print a document or picture, Windows places the document/picture in a queue, and it’s called the print queue. In short, a print queue is nothing but a list of document(s) waiting to print.
Windows 10 automatically clears the print queue when the printer completes all pending jobs.
At times, you might need to manually clear the print queue to resolve a stuck print job. Clearing a print queue is relatively easy in Windows 10. Use one of the given below methods to clear the print queue in Windows 10.
Method 1 of 5
The easiest way to clear the print queue in Windows 10
Step 1: Look for the printer icon in the system tray area of the taskbar and then double-click on it to view pending printer jobs.

Step 2: Click the Printer menu and then click Clear All Documents to clear the print queue.

Method 2 of 5
Clear print queue via Devices & Printers
Step 1: Type Devices and Printers in the Start menu or taskbar search field and then press Enter key to open Devices and Printers window.

Step 2: Right-click on your printer’s icon, click See what’s printing option to view all print jobs that are currently in the queue.

Step 3: Right-click on a print queue, and then click Cancel option to clear the particular print job from the queue.

To clear all print jobs from the queue, click the Printer menu and then click Cancel All Documents option.

Method 3 of 5
Clear the print queue via the Settings app
Step 1: Open the Settings app and then navigate to Devices > Printers & scanners.
Step 2: Click on your printer to see the Open queue button. Click on the Open queue button to view all print queue jobs.

Step 3: Right-click on a print job and then click Cancel to clear it from the print queue. To clear all documents from the print queue at once, click the Printer menu and then click Cancel All Documents option.


Method 4 of 5
Manually clear the print queue in Windows 10
Use this method if the print job got stuck in the queue, and you are unable to clear the queue by following the methods mentioned above.
Step 1: In the Start menu or taskbar search box, type services.msc and then press Enter key to open Services window.

Step 2: Here, look for Print Spooler service. Right-click on Print Spooler service and then click Stop option. Minimize the Services window.

Step 3: Open File Explorer and navigate to the following folder:
C:\Windows\System32\spool\PRINTERS
Where “C” is the driver letter of Windows 10 install drive. If you see a dialog with “You don’t currently have permission to access this folder” message, click the continue button to open up the PRINTERS folder. If you are not the admin, you might need to enter the password.
Step 4: Under the PRINTERS directory, you will see many files. Select all files and press the delete key to delete all files. This will clear the print queue. Click the Yes button if you see the confirmation dialog.

Step 5: Maximize the Services window, right-click on Print Spooler service, and click Start to start the service.
Method 5 of 5
Use third-party tools to clear the print queue
Plenty of free tools out there to help you clear the print queue in Windows 10. Print Queue Cleaner, Print Service Manager, and PrintFlush are two free tools that you can use to clear the print queue in Windows 10.

And if you have issues with the printer, use the official printer troubleshooter in Windows 10.
Table of contents
- Why Does This Happen?
- How to Clear Printer Queue in Windows 10
- Fix 1: Cancel the Current Document
- Fix 2: Restart Your Devices
- Fix 3: Clear the Print Queue Manually
- Fix 4: Use the Command Prompt to Clear the Print Queue
- Fix 5: Set up a Batch File to Clear the Print Queue
- Fix 6: Restart the Printer or Reinstall its Driver
- Use the Windows Troubleshooter
- What if My Printer Queue Won’t Clear?
It can be frustrating when you want to use your printer but a previous document is in the queue.
You try to print several other files to see if printing would start, but they all get lined up. No error message is received, and yet the status remains “Printing” indefinitely.
If you’re experiencing this issue, follow the steps in this article to learn how to clear your printer queue.
Why Does This Happen?
In Windows, the print files are not directly sent to the printer. They arrive first in the spooler, which is a program that manages all print jobs. The spooler is useful as it enables you to change the order of pending print jobs or delete them.
When there’s a problem, the files just remain in the queue. And once the first file in can’t be printed, neither will those behind it.
A print job may also get stuck if there are background app conflicts.
In addition, the printer’s driver might be problematic and cause issues with the spooler.
How to Clear Printer Queue in Windows 10
There are different solutions to this problem, depending on its cause. We’ll be going over the different fixes one after the other, from simple to complex.
Fix 1: Cancel the Current Document
Sometimes, the solution would be to cancel the file that is not printing correctly.
To delete a print job in Windows 10, just follow these steps:
- Go to Settings and select Printers.
- Click on Open Queue and select the problematic file.
- Cancel the print job.
If the printer still doesn’t respond, go to the Printer Menu and cancel all documents.
Fix 2: Restart Your Devices
If there’s still no result, the next step would be to restart your computer and the printer.
Sometimes, your operating system or system memory gets stuck and halts some processes. It’s also possible that your printer is no longer responding due to some system glitches.
A simple reboot can fix the problem in this case.
Shut down your system and unplug it from its power source. You should also unplug your printer from the power source.
Wait for a minute or two and plug both devices in again. Turn them on and try printing the file again.
You have tried the simple fixes outlined above to no avail. Have no fear. This is a common issue. And there are easy ways to fix a print queue that isn’t clearing in Windows 10.
There are three solutions you can use:
- Clear the print queue in Windows manually.
- Clear the print queue using the command prompt.
- Set up a batch file to clear the print queue.
- Restart the printer and reinstall the driver.
- Use Windows Troubleshooter.
Fix 3: Clear the Print Queue Manually
You have to manually disable the Print Spooler service and delete the files in the queue. The process is easy. Here’s how to do it:
- Switch the printer off.
- Click the Windows 10 search button in the taskbar.
- Type Services in the search box.
- In the Services window, navigate to Print Spooler.
- Double-click Print Spooler.
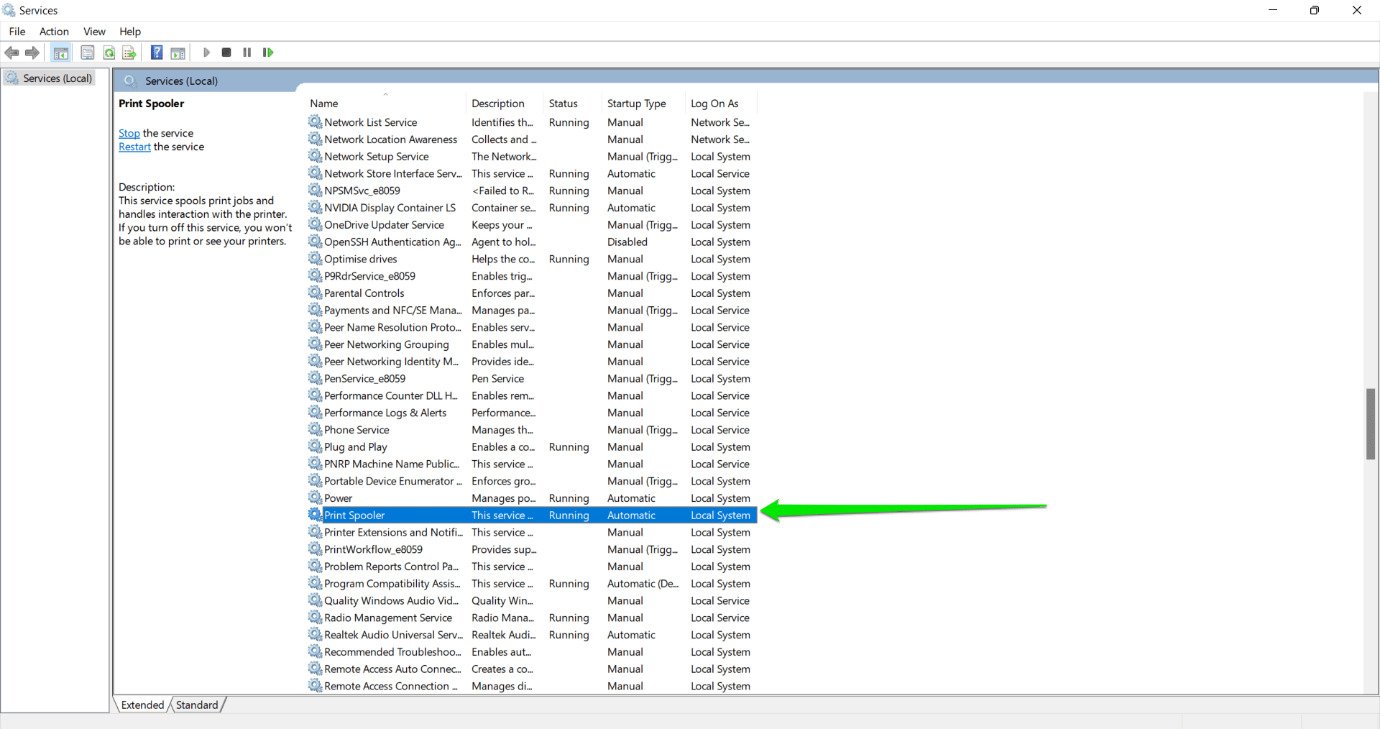
- In the window, click on the Stop button to disable Print Spooler.
- Open File Explorer on Windows 10 task bar.
- Go to C:\Windows\System32\spool\PRINTERS. You’ll find the folder that contains a log of documents on the print queue.
- Press
Ctrl + Aon your keyboard to select all the files in the folder. Delete them. - Open the Printer Spooler dialogue box again.
- Go to the Startup Type drop-down menu and select Automatic.
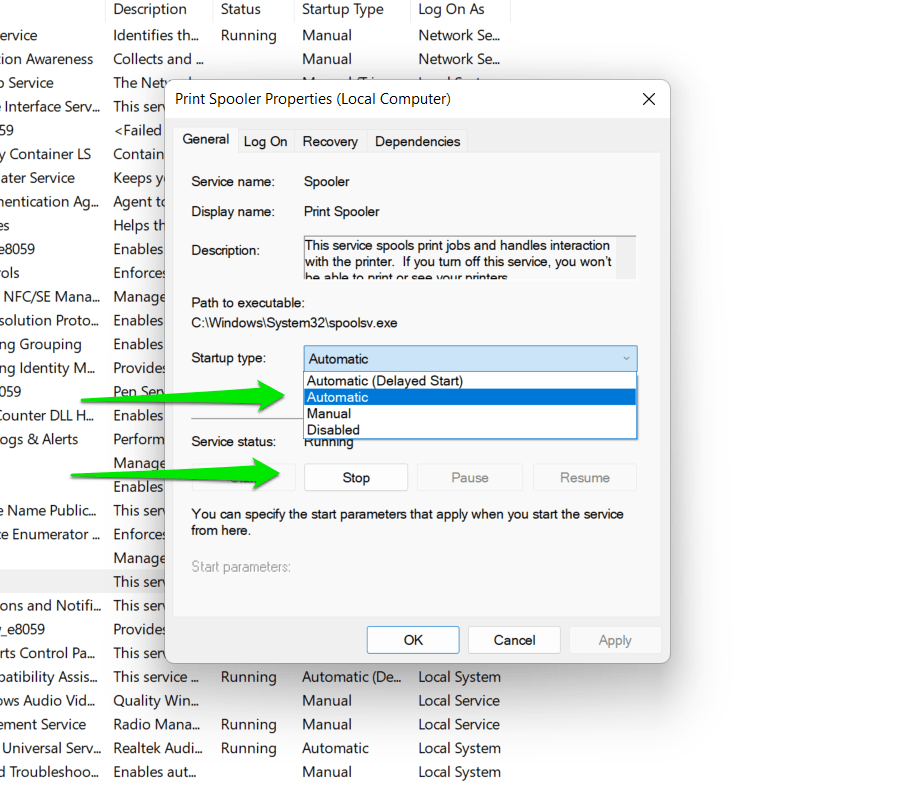
- Click on the Start button to turn the Printer Spooler on.
- Turn your printer on and try to print a file.
Fix 4: Use the Command Prompt to Clear the Print Queue
The fastest way to clear the print queue is through the command prompt. All you have to do is enter and run a few commands:
- Turn off your printer.
- Press
Windows key + X. - In the Command Prompt (Admin) window, type net stop spooler and hit enter on your keyboard. This will switch off the print spooler.
- Type
del C:\Windows\System32\spool\PRINTERS* /Qand press the Return key. The printer job queue will now be erased. - Type
net start spoolerand press Enter on your keyboard. This will switch the print spooler back on. - Turn on your printer and print a file.
Related: CMD Navigation: How to Change Directory in CMD (Command Prompt)
Fix 5: Set up a Batch File to Clear the Print Queue
To clear the held-up print queue with a batch file, follow these steps:
- Turn off your printer.
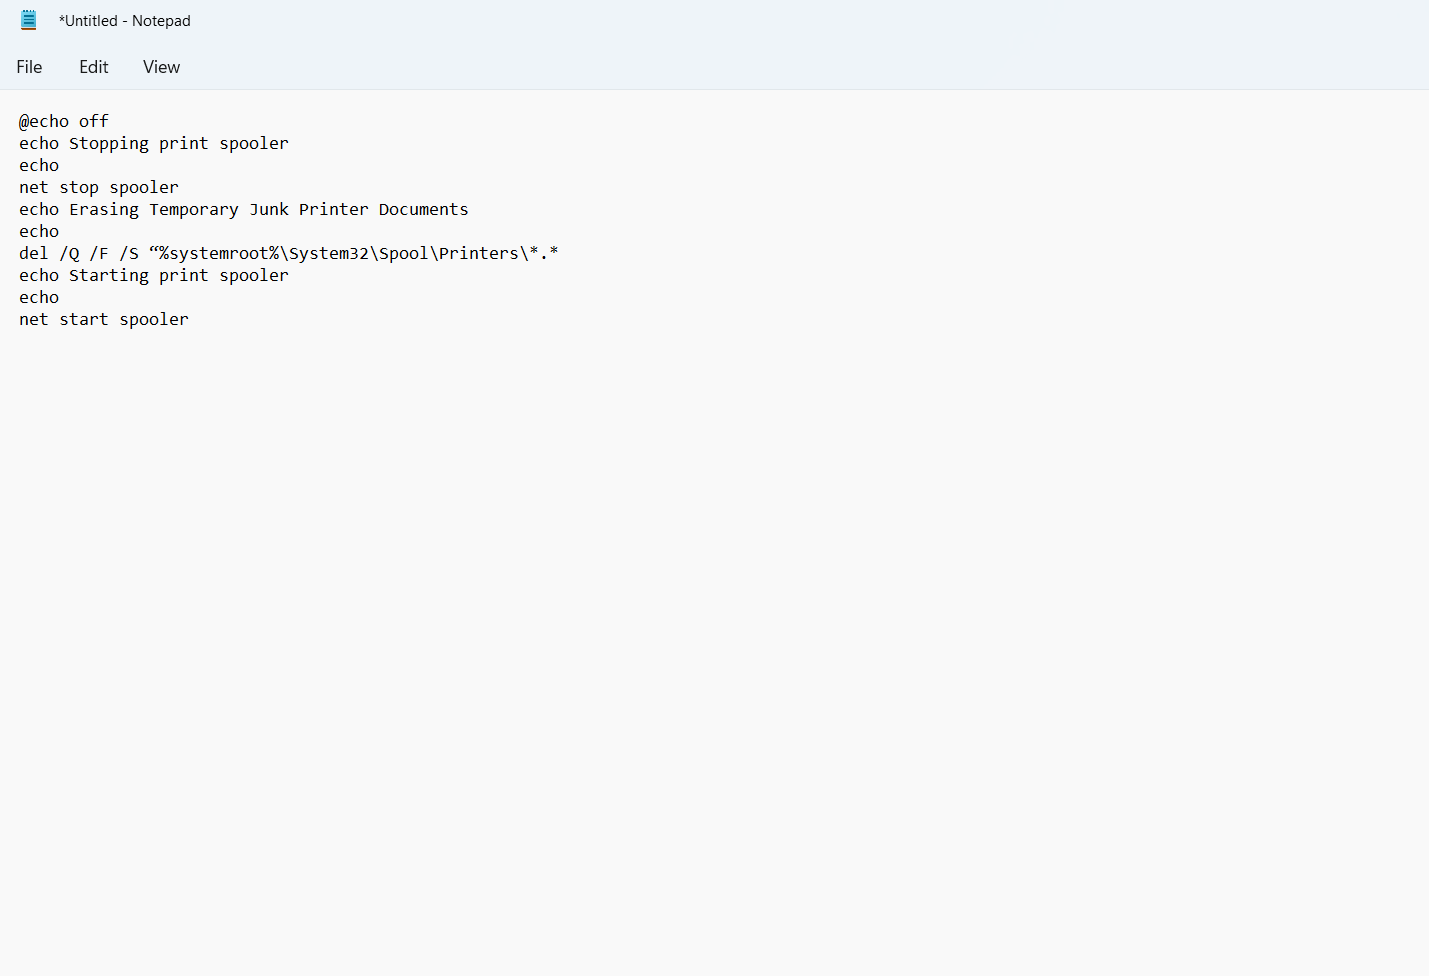
- Open the search box, type Notepad and hit enter on your keyboard.
- Copy the text below and paste in Notepad:
@echo off
echo Stopping print spooler
echo
net stop spooler
echo Erasing Temporary Junk Printer Documents
echo
del /Q /F /S “%systemroot%\System32\Spool\Printers\*.*
echo Starting print spooler
echo
net start spooler
- Go to File > Save as. In the window, under the Save as type drop-down menu, select All Files.
- In the File name box, delete *.txt and type Printer Queue.bat (You can save the file with any name. But whatever it is, .bat should be at the end).
- Click on Save. Note the folder the file is saved in.
- Open the folder that contains the batch file. To run it, click the Printer Queue batch.
- Turn your printer on. Try printing a document.
Also Read: Why Is My Printer Offline? Quick Fixes to Get It Back Online
Fix 6: Restart the Printer or Reinstall its Driver
As we mentioned, the printer’s driver may be acting up. The driver is the piece of software that facilitates communication between the printer and the operating system.
It could become corrupt, outdated, or missing and start causing problems.
To troubleshoot the driver, disable and enable the printer. If that doesn’t work, you can reinstall the driver. Follow these steps:
- Right-click the Windows start button or press the
Win + Xshortcut. - Click on Device Manager when you see the Power User menu.
- Once the Device Manager window opens, locate your printer, right-click it, and select Disable.
- After disabling the device, right-click the printer again and click on Enable.
- Try printing the file again to check if the issue has been resolved.
If the print queue is still stuck, try reinstalling the driver. Follow these steps:
- Open the Device Manager, right-click on the printer and click on Uninstall Device.
- Select Uninstall in the confirmation dialog and restart your computer.
- Windows will attempt to reinstall the driver automatically after your system restarts.
- Try printing the file.
You should also consider downloading and installing the printer’s updated driver. This solution should work if your current driver is broken or outdated.
Head to the printer’s manufacturer’s website and search for your operating system’s driver.
You can also get rid of driver issues automatically using a dedicated tool such as Auslogics Driver Updater.
When you install and run the program, it automatically checks for outdated, corrupt, and missing drivers and installs their latest versions.
Using Auslogics Driver Updater means you won’t have to bother about downloading and installing drivers yourself.
If your printer’s driver is the problem, the tool will let you know and ensure you install the correct update for your operating system.
Related: Auslogics Driver Updater: Update Your Drivers in One Click!
Use the Windows Troubleshooter
Windows has a built-in troubleshooter that can help you find and fix problems with devices like your printer. Follow these steps:
- Launch the Settings application using the
Windows + Ishortcut. - Click on Update & Security when you see the Settings application.
- Go to the left side of the Update & Security window and click on Troubleshoot.
- Click on Additional Troubleshooters on the Troubleshoot page and select Printer.
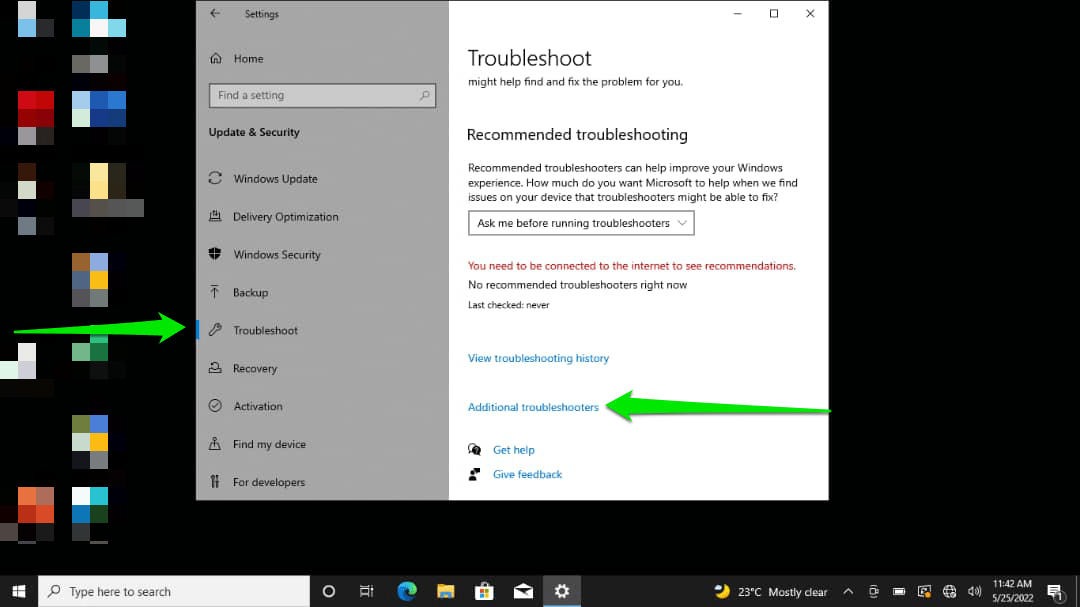
- Run the troubleshooter.
- If the program finds issues, allow it to fix them.
Fix this issue quickly
You can try using a safe and totally free tool developed by the Auslogics team of experts.
A few simple steps to troubleshoot the issue:
Download the tiny Auslogics TroubleShooter tool.
Run the application (no installation is needed).
The app will check for the issue mentioned in the article. When the scan is done, check that this is the issue you were looking to solve and click ‘Apply now’ to apply the recommended fix.
You can use the app to troubleshoot other malfunctions for free by simply typing in a brief description of the issue your PC is experiencing. Or you can scan your PC for performance issues using the My Scanner tab.
What if My Printer Queue Won’t Clear?
If you often get files in the printer queue that won’t print or clear, it may be a compatibility issue with the data to be printed.
This is common when you try to print a web page with fonts or styles that your printer cannot identify or convert to printed text. The fixes outlined above should resolve the issue.
Configuration issues can also cause a glitch in the print job queue – for example, when you try to network print to a missing IP address.
Uninstall and reinstall the printer software to fix it. You should also carry out some troubleshooting on your network or reach out to your technician for assistance.
We hope you find these solutions useful…
Do leave a comment in the section below.
Download Article
Remove print jobs stuck in the queue with these simple steps
Download Article
- Clear the Print Queue (Windows 10)
- Clear the Print Queue (Windows 11)
- Restart the Printer Spooler (Services)
- Restart the Printer Spooler (CMD)
- Video
- Q&A
|
|
|
|
|
This wikiHow teaches you how to clear pending documents from your printer’s queue when you’re using Windows 10 or 11. If you are having trouble with documents sitting in the queue without ever printing, or you can’t clear the printer queue, we’ll show you how to fix the problem by restarting the printer spooler.
Quickly Clear the Print Queue on Windows 10
Open your Windows Settings, go to Devices > Printers & scanners, and select your printer. Click Open Queue, click the Printer menu at the top of the queue, and then select Cancel All Documents.
-

Press the Windows key on your keyboard, then click the gear icon in your Start menu. You can also get to Settings by pressing Windows key + i.
-
It’s the second icon at the top of the window.
Advertisement
-
It’s in the left column.
-
Connected printers appear in the right panel under “Printers & scanners.” Two buttons will appear beneath the printer’s name.
-
A list of pending print jobs will appear.
-
A context menu will appear.
-
This removes the document from the queue.
-
- To cancel all documents at once, click the Printer menu at the top-left corner of the window, then select Cancel All Documents.
- If the files stay in the queue even after you’ve canceled them, try restarting the computer.
- If you can’t clear the print queue, or clearing the queue doesn’t fix your printer issues, see Restarting the Printer Spooler Service in Services.msc or at the command prompt for a fix.


Advertisement
-
Press the Windows key on your keyboard, then click the gear icon in your Start menu. You can also get to Settings by pressing Windows key + i.
-
This option is near the top of the left panel.
-
You’ll find this option in the right panel. A list of connected printers will appear.
-
This displays some printer settings, as well as the option to open the print queue.
-
This is near the top of the right panel. All print jobs in the queue will appear.
-
The three horizontal dots are near the top-right corner. All jobs will be removed from the print queue.
- If the files stay in the queue even after you’ve canceled them, try restarting the computer.
- If you can’t clear the print queue, or clearing the queue doesn’t fix your printer issues, see Restarting the Printer Spooler Service in Services.msc or at the command prompt for a fix.


Advertisement
-
1
Turn off your printer. If you can’t clear the print queue, or print jobs keep getting stuck in the queue, you can use this method to fix problems with the printer spooler.
-
This opens the “Services” window.
-
It’s in the right panel. A context menu will appear.
-
Now that the queue is stopped, you can clear the documents.
-
Don’t close the Services window, as you’ll need it again in a few moments. Just click the search icon (or the search bar, if it’s permanently in your taskbar), or press the Windows key.
-
A folder will appear.
-
To do this, click a blank area inside the folder, then press Ctrl+A. You can also highlight all the files with your mouse.
-
This clears the print queue, and you can close this folder window.
-
The menu will expand.
- If you can’t find the Services window, click the overlapping gear icons in the taskbar, or press Alt + Tab until it appears.
-

The print queue should now be completely clear.


Advertisement
-
If you can’t clear the printer queue in Windows, try this method to stop the print spooler and clear the queue in the command prompt. It will work best if your printer is turned off.
-
Another way to clear the printer queue on any version of Windows is to use some simple commands at the command prompt. To open the prompt as an admin, follow these steps:
- Press the Windows key.
- Type cmd.
- Right-click Command Prompt.
- Click Run as administrator.
- Click Yes to confirm.
-
This command stops the printer spooler.
-
This command will clear the Windows print queue.
-
The printer spooler will now restart.
-
Try printing again. Now that you’ve stopped and restarted the print spooler and cleared the queue, you should be able to print.


Advertisement
Add New Question
-
Question
How do I clear out 1688 on an inkjet printer?
Lain Yensoon
Community Answer
On the right hand side of your taskbar there should be a printer icon. If you can’t see it, it may be hidden behind the arrow; click the arrow to see it. Right click the printer icon and click open printer queue. A new window should open with all current print jobs. Delete the files in queue that you don’t want by either right clicking and then selecting delete or left clicking and pressing the delete button on your keyboard.
Ask a Question
200 characters left
Include your email address to get a message when this question is answered.
Submit
Advertisement
Video
Thanks for submitting a tip for review!
Video
Thanks for submitting a tip for review!
About This Article
Thanks to all authors for creating a page that has been read 138,716 times.