
Все способы:
- Вариант 1: Очистка через «Параметры»
- Стандартная очистка
- Удаление точек восстановления системы
- Удаление кеша у встроенного приложения
- Альтернатива: Функция «Очистка диска»
- Вариант 2: Очистка кеша в браузерах
- Вариант 3: Очистка системных папок
- Вариант 4: Очистка кеша Microsoft Store
- Вариант 5: Очистка кеша DNS
- Вариант 6: Очистка журнала о местоположении
- Вариант 7: Очистка журнала действий
- Вариант 8: Очистка журнала «Проводника»
- Вариант 9: Очистка журнала буфера обмена
- Вариант 10: Сторонний софт
- Вопросы и ответы: 0
В Windows нет единого места, куда сохраняется весь кеш, поэтому пользователю, желающему очистить операционную систему от лишних файлов и исправить какие-либо ошибки, следует либо воспользоваться сторонними программами, которые все сделают за него, либо вручную открыть несколько мест хранения временных данных и удалить их.
Вариант 1: Очистка через «Параметры»
Штатное приложение «Параметры» позволяет очистить основные папки с кешем, куда часто попадают разные временные файлы, а затем остаются до ручного удаления пользователем.
Стандартная очистка
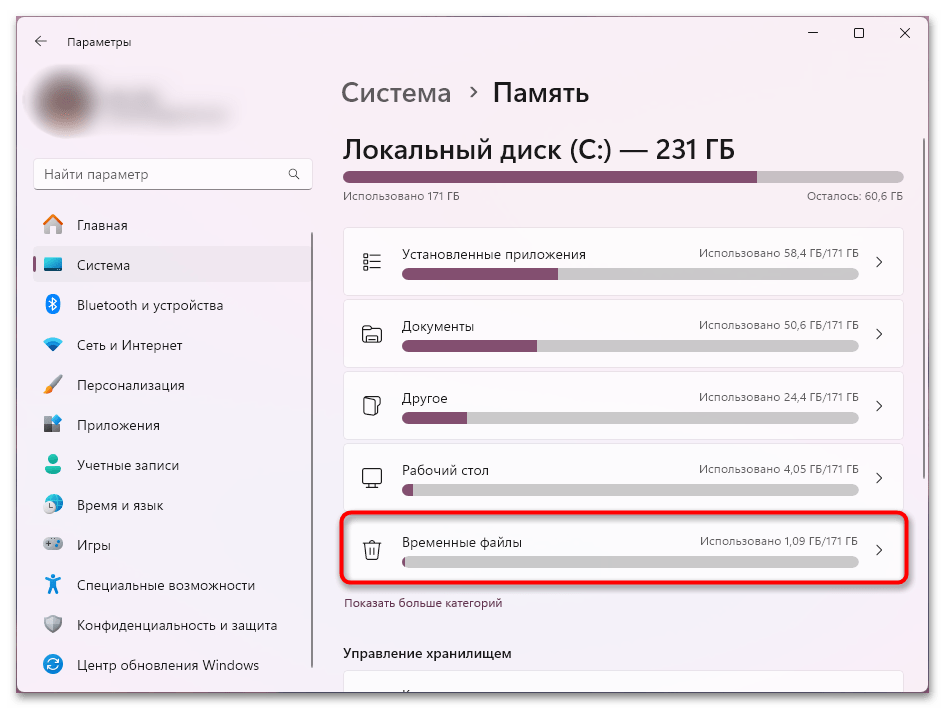
- Откройте «Параметры», перейдите в раздел «Система», а оттуда — в «Память».
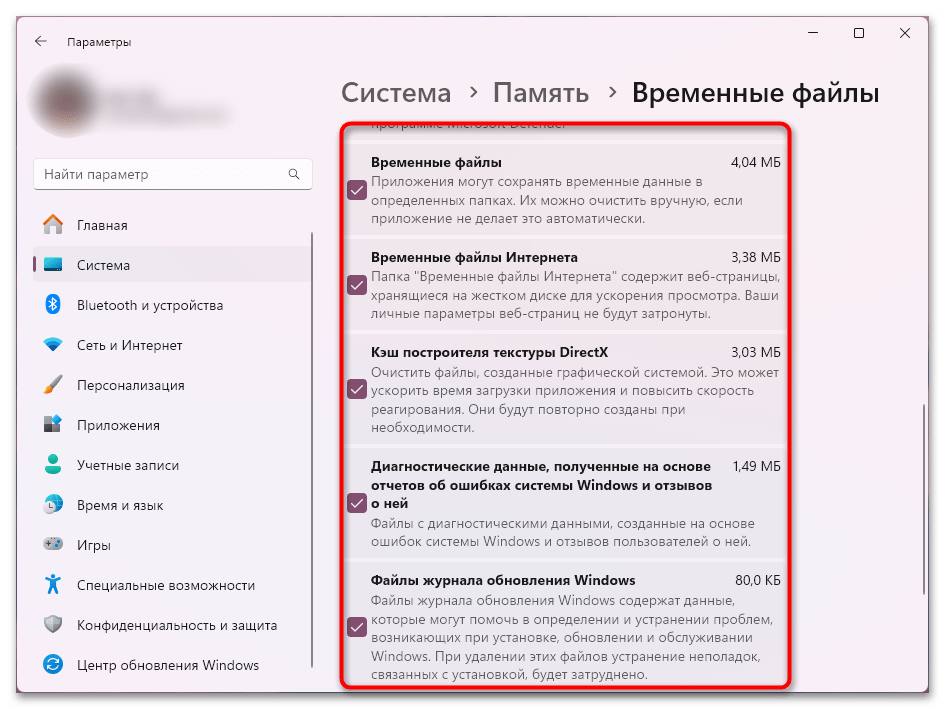
- Найдите категорию «Временные файлы» и кликните по ней.
- Просмотрите все варианты, которые предлагается стереть, и выставьте галочки на свое усмотрение. Все это может быть удалено без опасений и никак не повлияет на стабильность работы операционной системы.
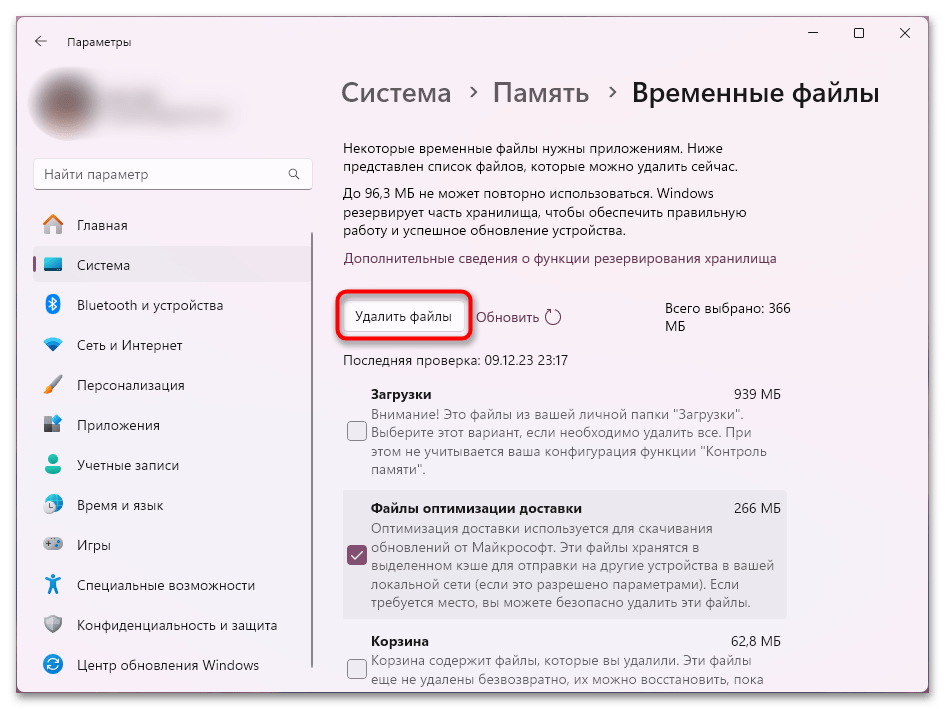
- Вверху страницы кликните по «Удалить файлы» и дождитесь окончания этой процедуры.

Удаление точек восстановления системы
Чтобы удалить только точки восстановления, которые могут занимать довольно много пространства на диске, выполните следующее:
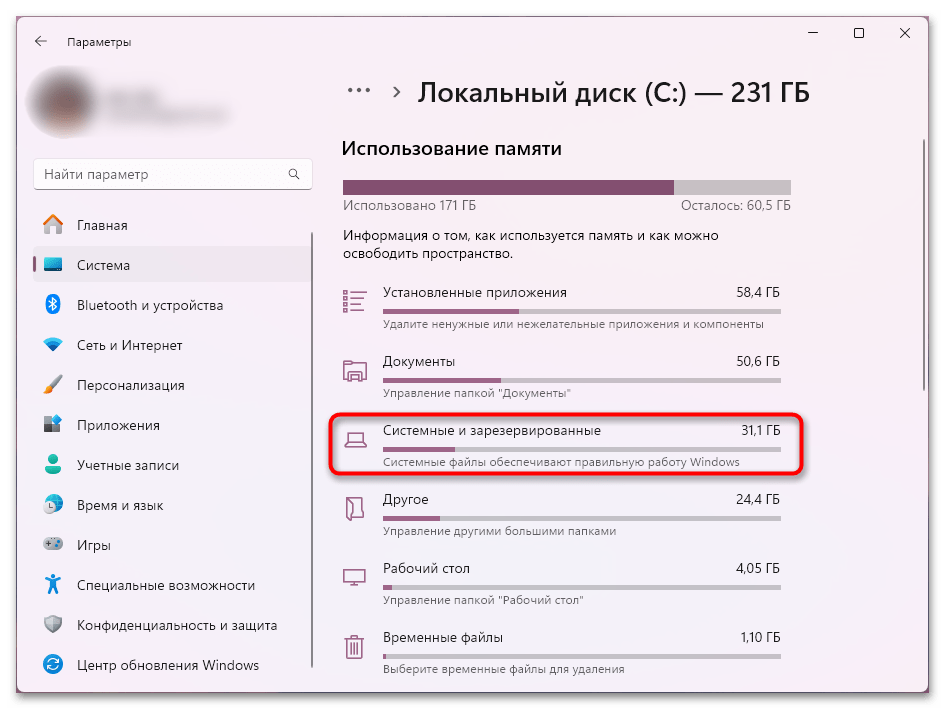
- Кликните по ссылке «Показать больше категорий».
- Из них вам нужна «Системные и зарезервированные».
- Найдите блок «Восстановление системы» и щелкните по кнопке «Управление восстановлением системы».
- Откроется стандартное окно «Свойства системы» на нужной нам вкладке. Если у вас подключено несколько дисков, сперва выделите нужный (как правило, это С:), затем нажмите кнопку «Настроить».
- Нажмите по «Удалить».
- В окне с подтверждением используйте ответ «Продолжить».

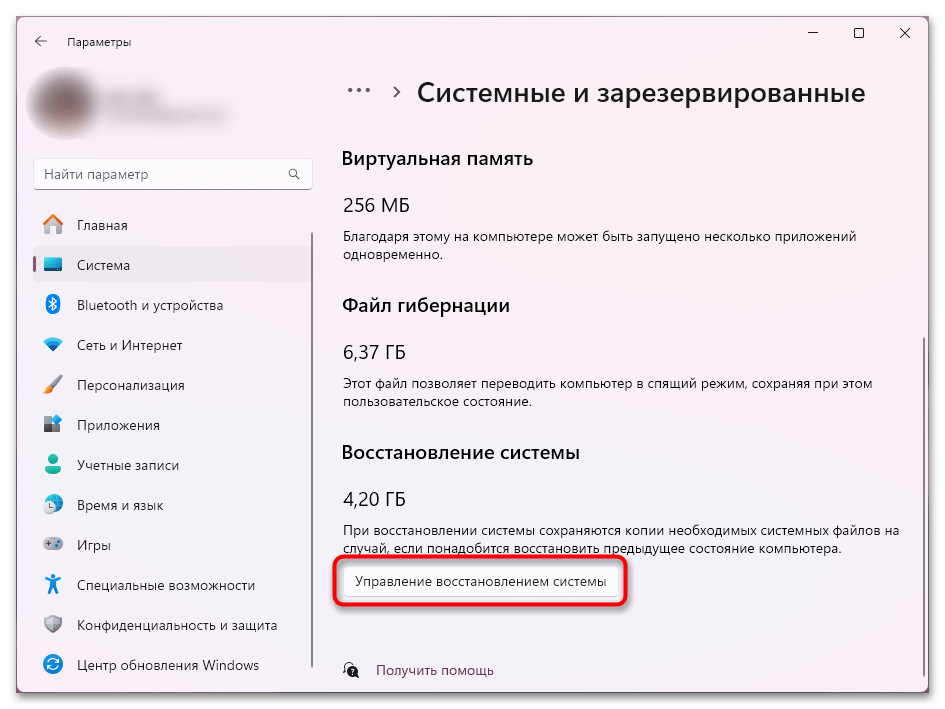

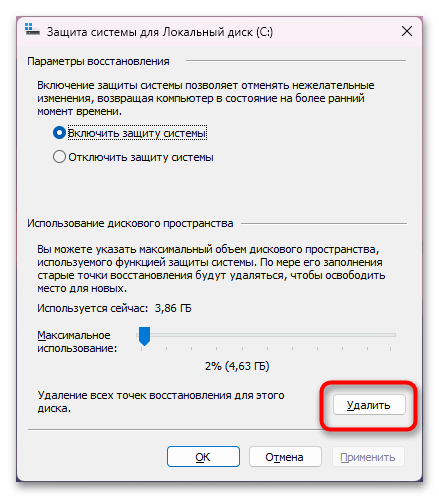

После этого можете изменить процент максимального использования (сколько ГБ смогут занимать точки восстановления) и лучше всего создать новую взамен стертых.
Удаление кеша у встроенного приложения
Порой пользователь сталкивается с тем, что какое-то встроенное в Windows 11 приложение перестает нормально работать. И если любую стороннюю программу можно переустановить, то с системным ПО так сделать проблематичнее. Однако можно очистить кеш проблемного софта и посмотреть, помогло ли это исправить неполадку.
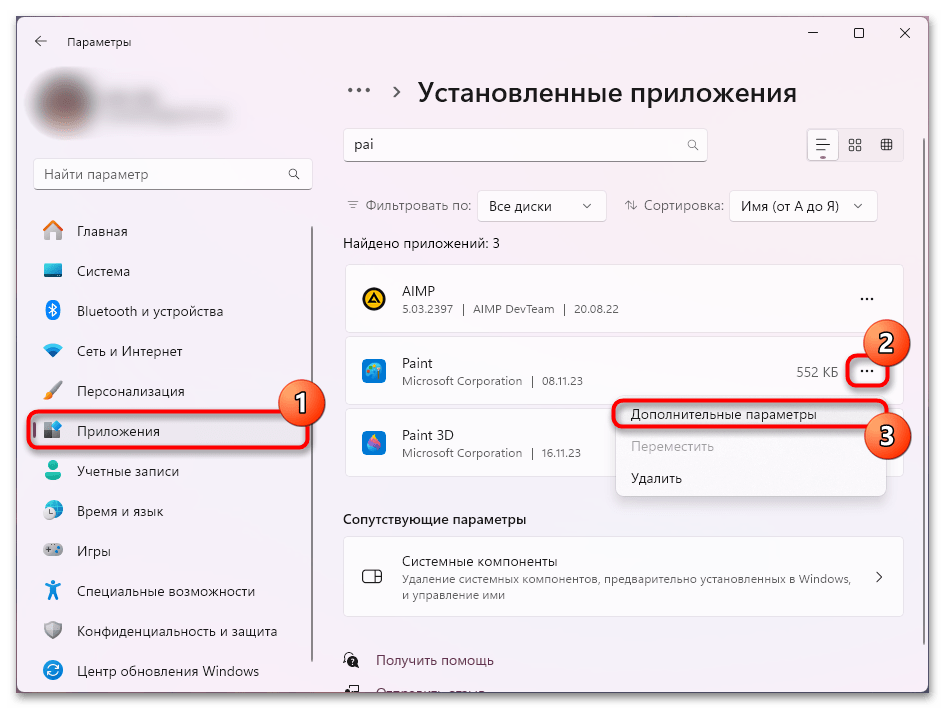
- Откройте «Параметры», через левую панель переключитесь в «Приложения», найдите проблемное стандартное приложение Windows. Справа от его названия кликните по трем точкам и перейдите либо в «Дополнительные параметры», либо в «Изменить».
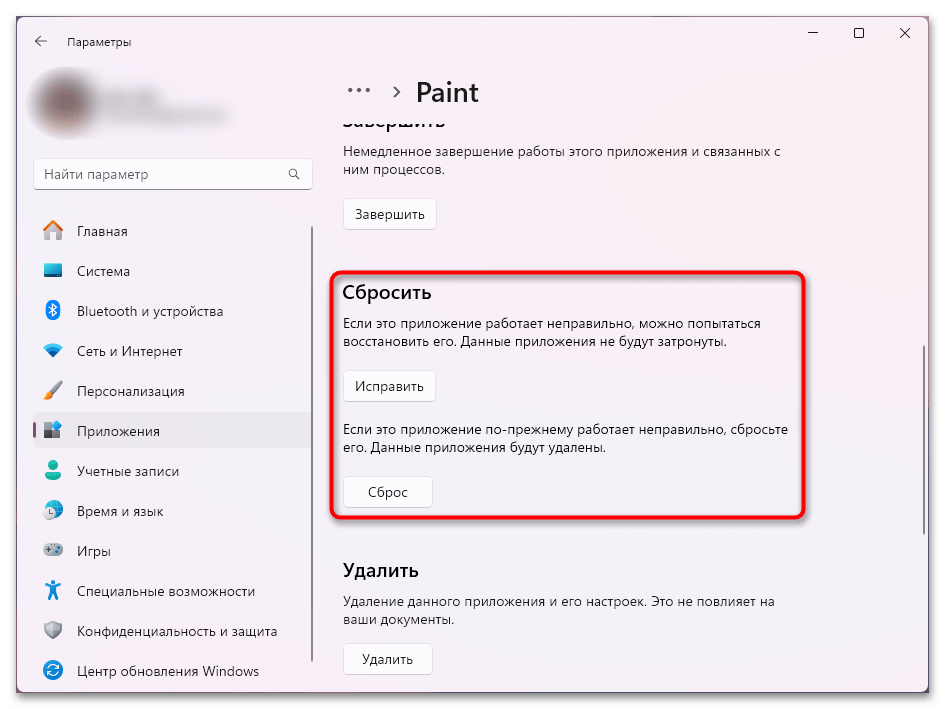
- Пролистайте до блока «Сбросить» и воспользуйтесь сначала первой кнопкой. Если это не принесло результата, тогда второй.
Альтернатива: Функция «Очистка диска»
Похожим инструментом является «Очистка диска», доступный еще с прошлых выпусков Виндовс. У него не так много отличий от очистки через «Параметры», поэтому выбирайте между ними наиболее удобный для вас.
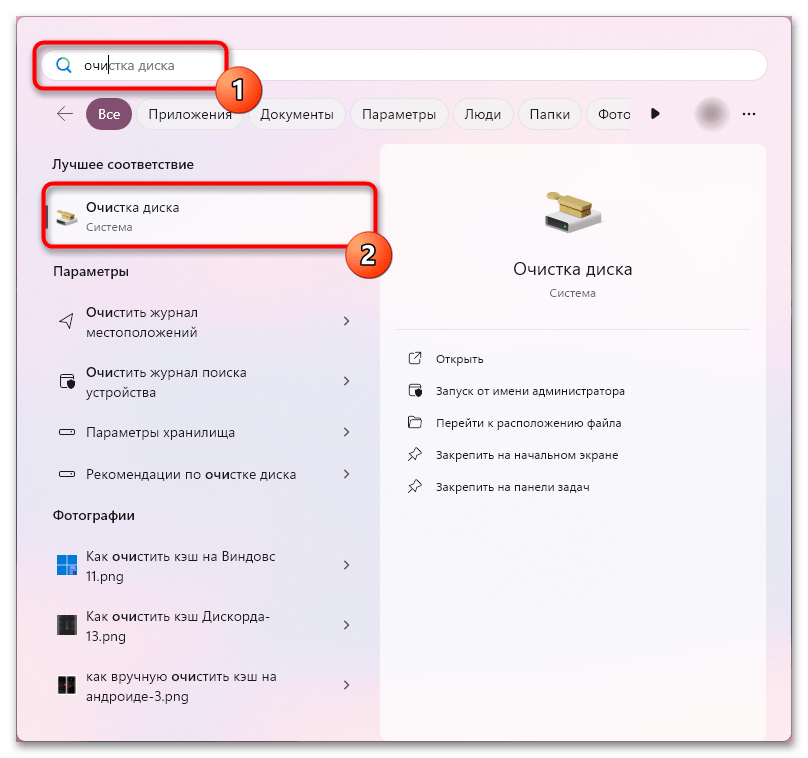
- Через «Пуск» отыщите приложение «Очистка диска» по его названию и запустите его.
- Сперва укажите диск, с которым планируете работать дальше. В большинстве случаев это системный том.
- Изначально доступно не так много вариантов с удалением, но если вам их достаточно, воспользуйтесь ими.
- Для отображения большего количества доступных для очистки мест нажмите по «Очистить системные файлы».
- Снова укажите диск.
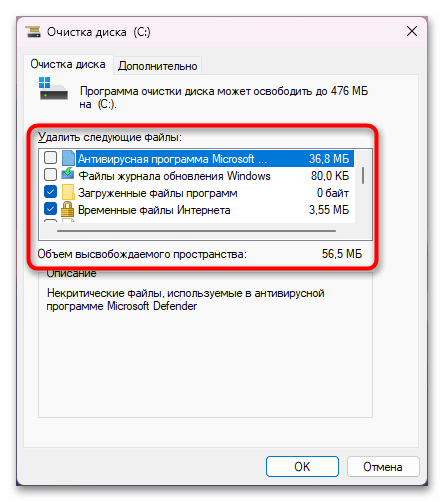
- Просмотрите, какие позиции были добавлены, отметьте галочками то, что хотите стереть, и нажмите на «ОК».
- Кроме того, тут же есть возможность удалить все точки восстановления кроме последней. Это удобно, в отличие от стандартного метода, рассмотренного выше и удаляющего вообще все точки. Переключитесь на вкладку «Дополнительно» и в блоке «Восстановление системы и теневое копирование» кликните на «Очистить».
- Подтвердите свое решение.


Вариант 2: Очистка кеша в браузерах
Веб-обозреватели активно накапливают кеш и никогда не удаляют его самостоятельно. Вообще он, как и любой другой кеш, нужен для ускорения работы конкретной программы или операционной системы (зависит от типа кеша). Однако из-за того, что со временем его становится слишком много, свободное место на накопителе уменьшается, а также могут возникнуть ошибки при попытке сохранения новой версии файла поверх старого. Особенно часто с этим сталкиваются активные пользователи интернета, выходя туда через один и тот же браузер.
Вариант 3: Очистка системных папок
Метод с удалением кеша из системных папок самый затратный по времени, но дает возможность освободить довольно много дискового пространства, если ранее такие процедуры не производились ни вручную, ни с помощью программ, а компьютером пользуются уже долгое время. Кроме того, это может исправить какие-то мелкие ошибки, связанные со стабильностью работы Windows, в частности с «Центром обновления».
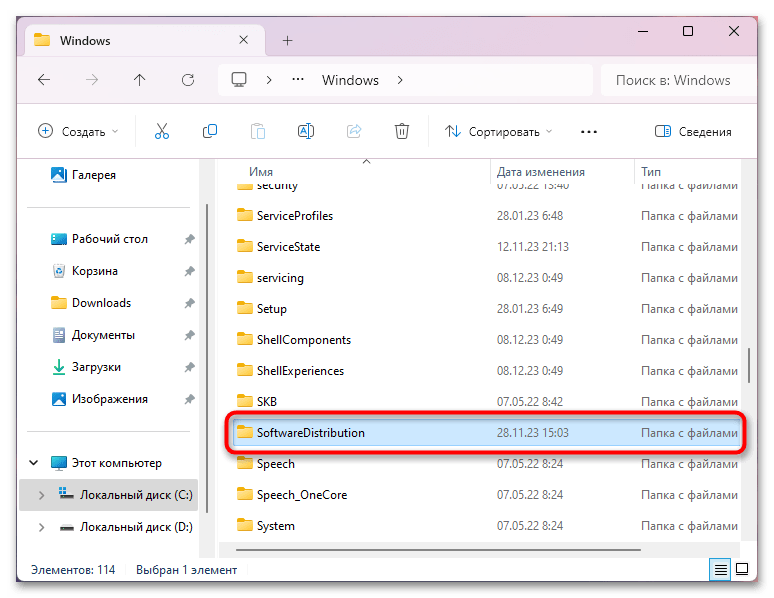
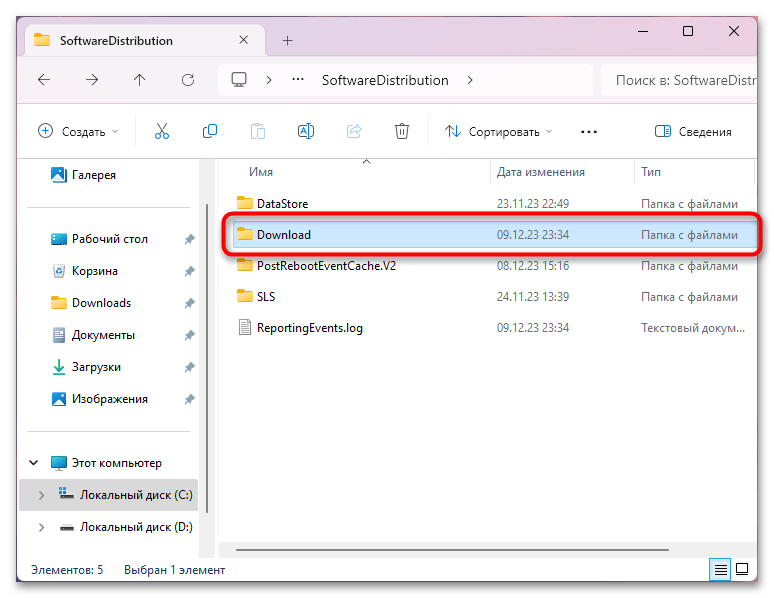
- Запустите «Проводник» и зайдите в «Локальный диск (С:)», оттуда — в «Windows» > «SoftwareDistribution».
- Внутри вы найдете папку «Download», в которую и перейдите.
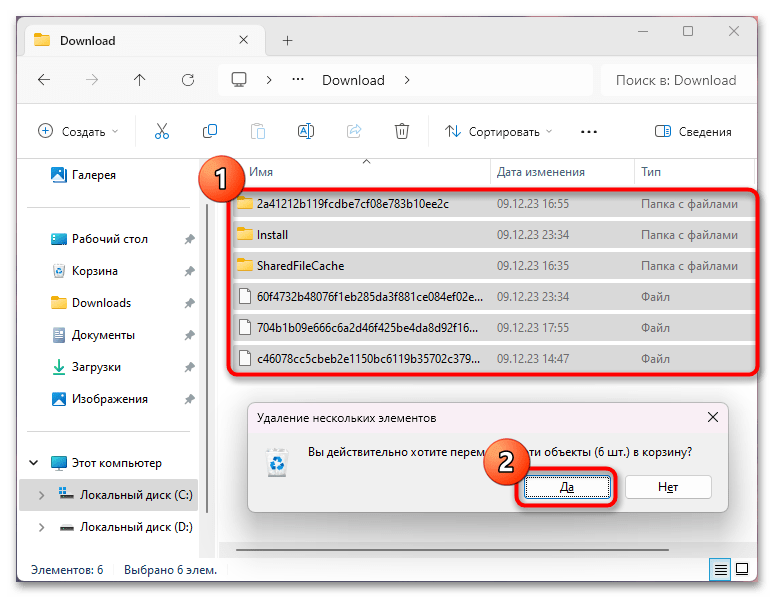
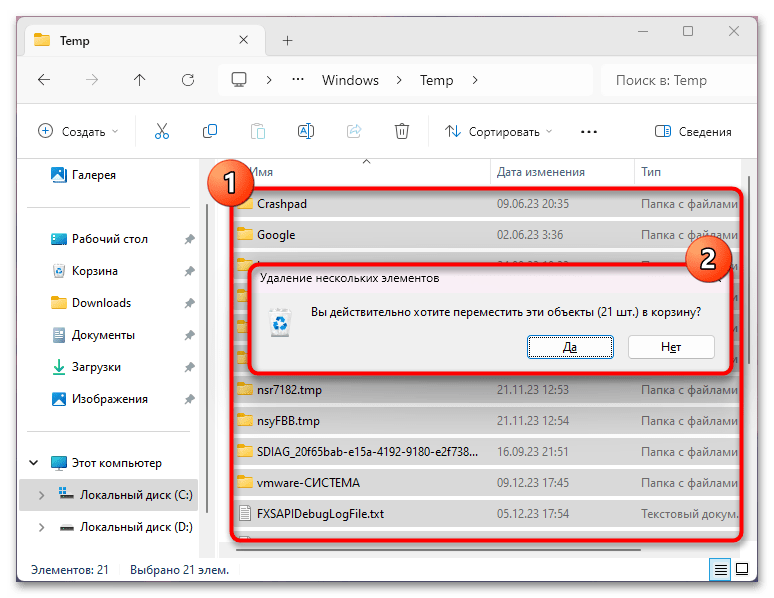
- Выделите все файлы мышкой или клавишами Ctrl + A и удалите их. Это сотрет все файлы, отвечающие за обновление Windows. На саму функцию обновления это никак не повлияет (разве что только может исправить ее, если новые версии не хотят устанавливаться), лишь только удалит скачанные апдейты, которые не были установлены, или следы от них.
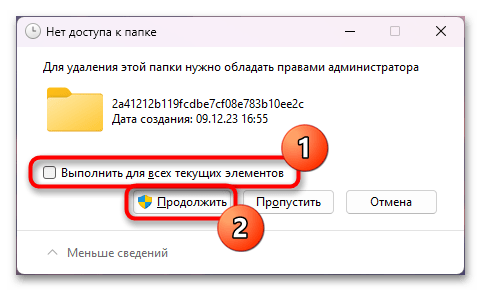
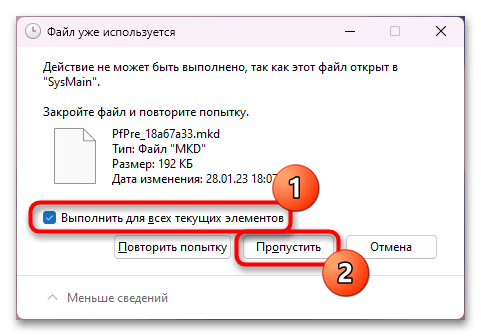
- При отображении уведомления о необходимости наличия прав администратора отметьте пункт «Выполнить для всех текущих элементов» и нажмите «Продолжить».
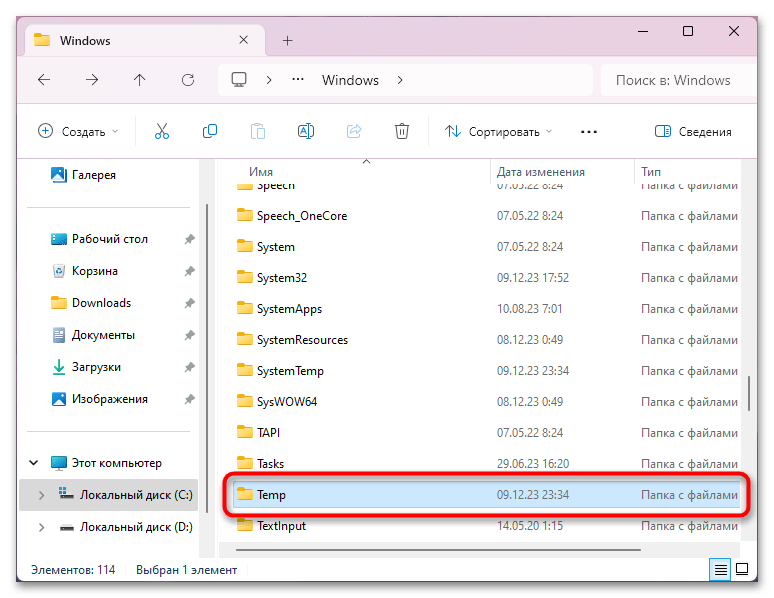
- Вернитесь в директорию «Windows» и найдите там папку «Temp».
- Зайдите в нее и удалите все, что скопилось.
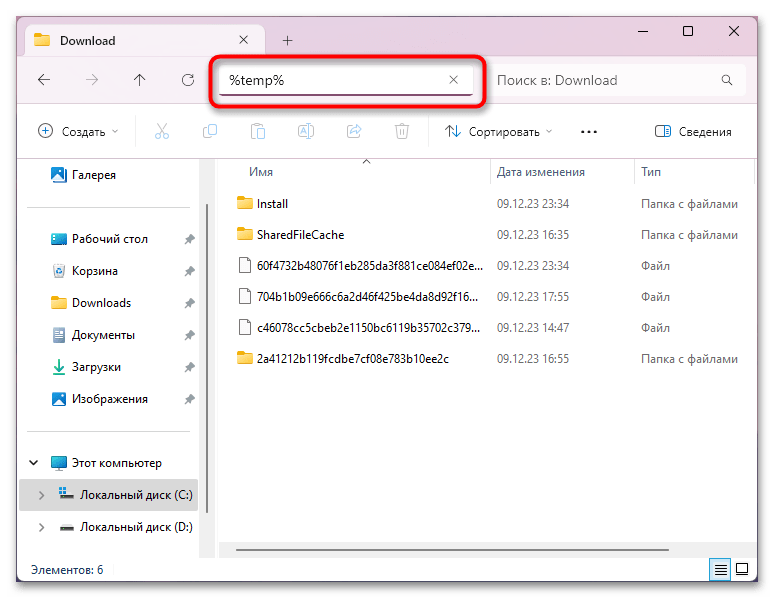
- В адресную строку вставьте команду
%temp%и нажмите Enter для быстрого перехода к одноименной папке внутри каталога с вашей учетной записью. - Сделайте то же самое — выделите все файлы и удалите их.
- Выдайте права администратора для удаления всех файлов.
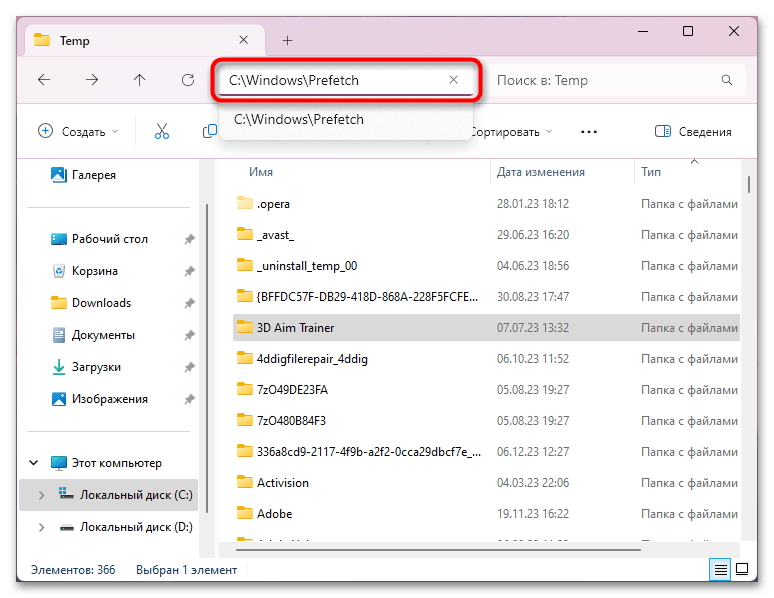
- Вставьте в адресную строку путь
C:\Windows\Prefetchи нажмите клавишу Enter. Когда вы заходите туда впервые, система напишет, что у вас нет доступа, в отдельном уведомлении. Нажмите «ОК», чтобы получить этот самый доступ. - В принципе очищать эту папку нет необходимости, поэтому мы рекомендуем удалять из нее файлы только тогда, когда их общий объем довольно большой. Узнать это можно, выделив все файлы внутри папки, нажав по ним правой кнопкой мыши и выбрав из контекстного меню пункт «Свойства».
Если окажется так, что их объем довольно велик, удалите их таким же образом, как и в предыдущие разы.

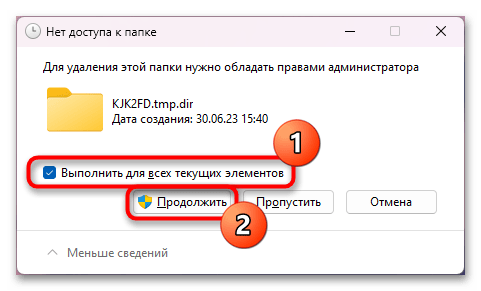
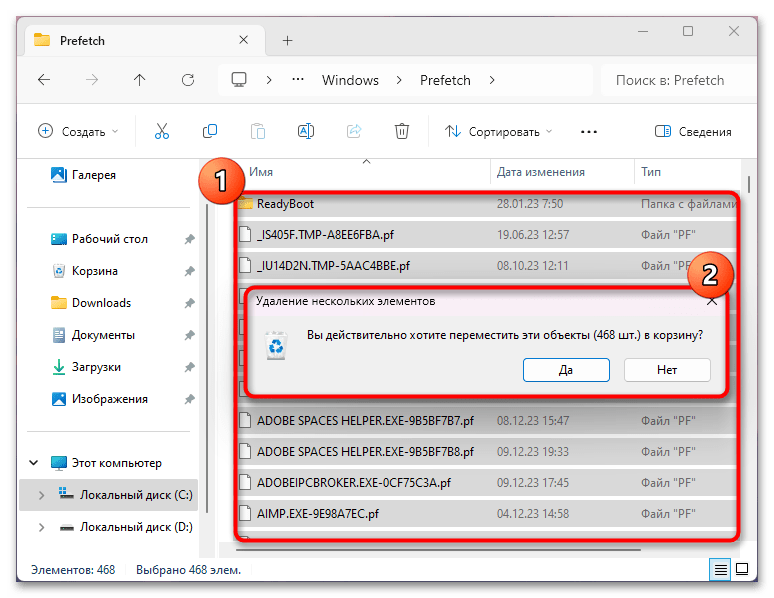
Скорее всего, в результате удаления вы где-нибудь да столкнетесь с тем, что файл или папка открыты в другом месте, из-за чего их удаление недоступно. В этой ситуации достаточно «Пропустить» действие.
Вариант 4: Очистка кеша Microsoft Store
Когда не работает встроенное в Windows приложение Microsoft Store, его кеш можно очистить отдельно.
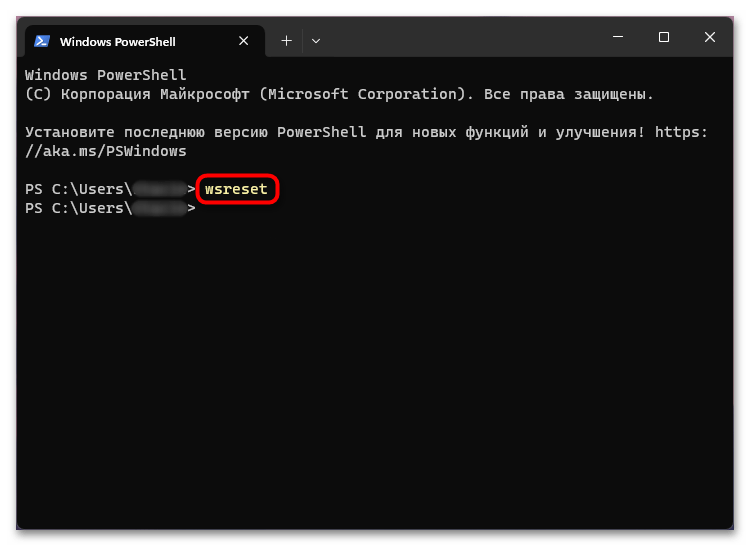
- Кликните правой кнопкой мыши по «Пуску» и запустите «Терминал».
- Здесь достаточно написать команду
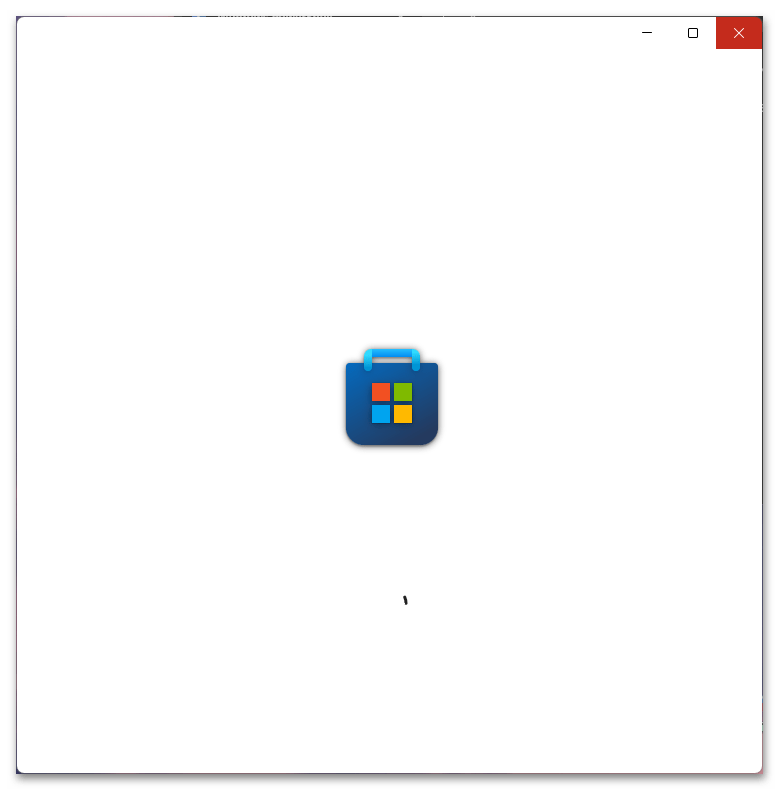
wsresetи выполнить ее, нажав Enter. - После этого сразу же запустится MS Store, и вы сможете узнать, помогло это ему или нет. Если нет, обратитесь к Варианту 1 и его подразделу «Удаление кеша у встроенного приложения».
Вариант 5: Очистка кеша DNS
При проблемах с открытием каких-либо веб-сайтов (причем неважно, через браузер или другими методами) есть возможность очистить кеш DNS. В нем хранятся записи о последних посещениях (и попытках) сайтов и их IP-адреса. Благодаря этому страницы, которые вы уже посещали ранее, грузятся быстрее, чем в первый раз. Однако в некоторых ситуациях в нем могут возникнуть ошибки, из-за чего прежде доступный сайт перестанет открываться. Очистка кеша DNS поможет это исправить. Для этого:
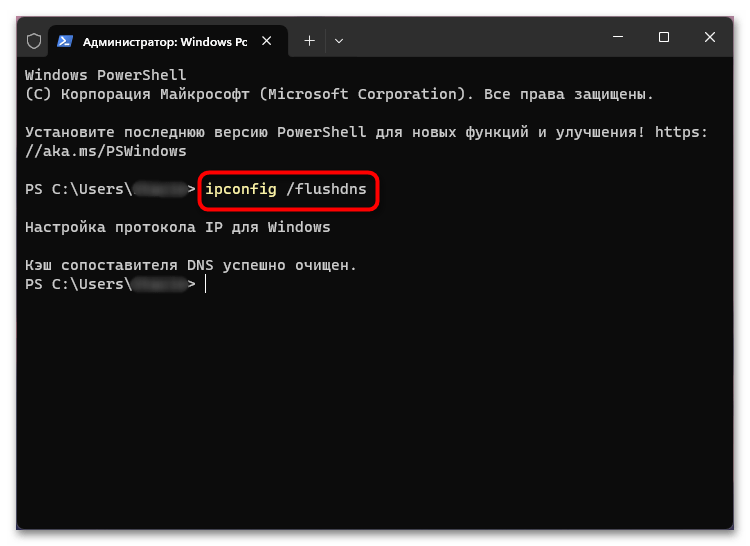
- Кликните ПКМ по «Пуску» и запустите «Терминал» с правами администратора.
- В консоли напишите
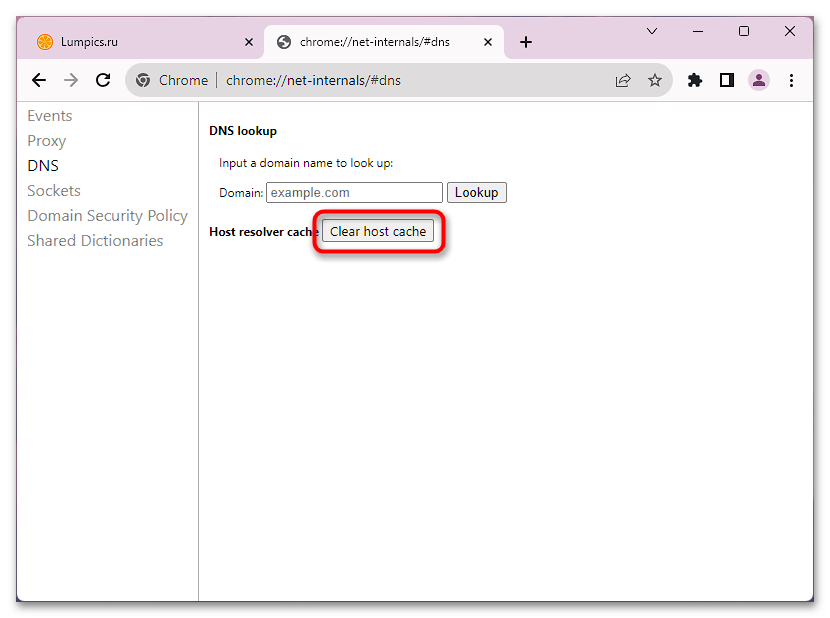
ipconfig /flushdnsи подтвердите ввод клавишей Enter. Вы должны получить уведомление «Кэш сопоставителя DNS успешно очищен». - Кстати, вы также можете удалить кеш и внутри браузера. Поможет, когда наблюдаются проблемы только внутри одного веб-обозревателя. Для этого вставьте в адресную строку одну из следующих команд и жмите Enter.
chrome://net-internals/#dns(для Google Chrome)
browser://net-internals/#dns(для Яндекс.Браузера)
opera://net-internals/#dns(для Opera)В открывшейся вкладке кликните по кнопке «Clear host cache», и можете закрывать ее.
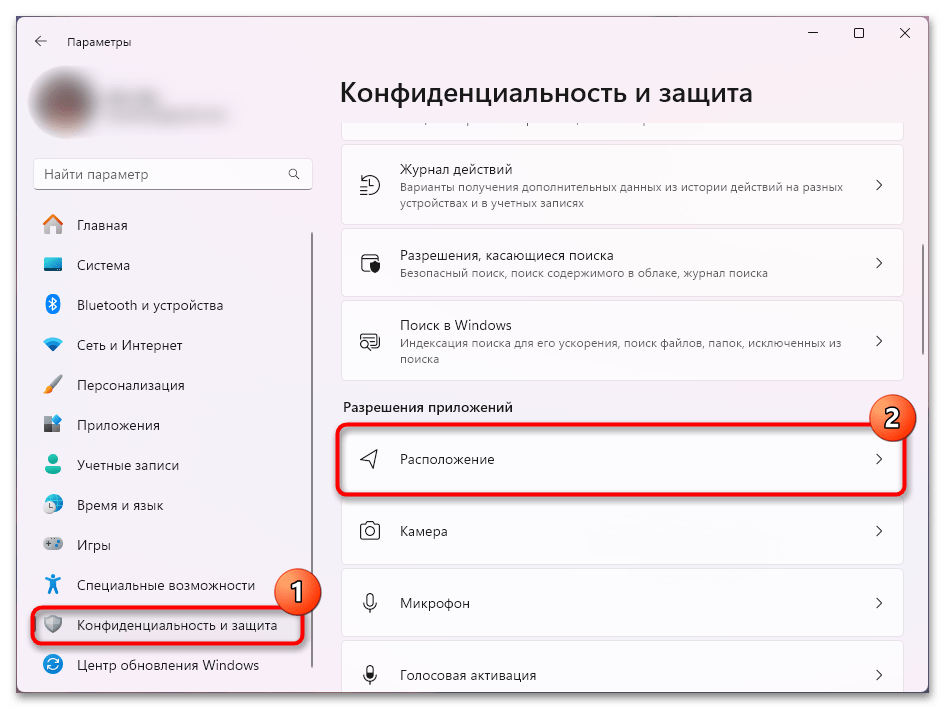
Вариант 6: Очистка журнала о местоположении
Чтобы стереть информацию о расположении устройства (актуально для ноутбука, который владелец использует в разных точках), используйте приложение «Параметры».
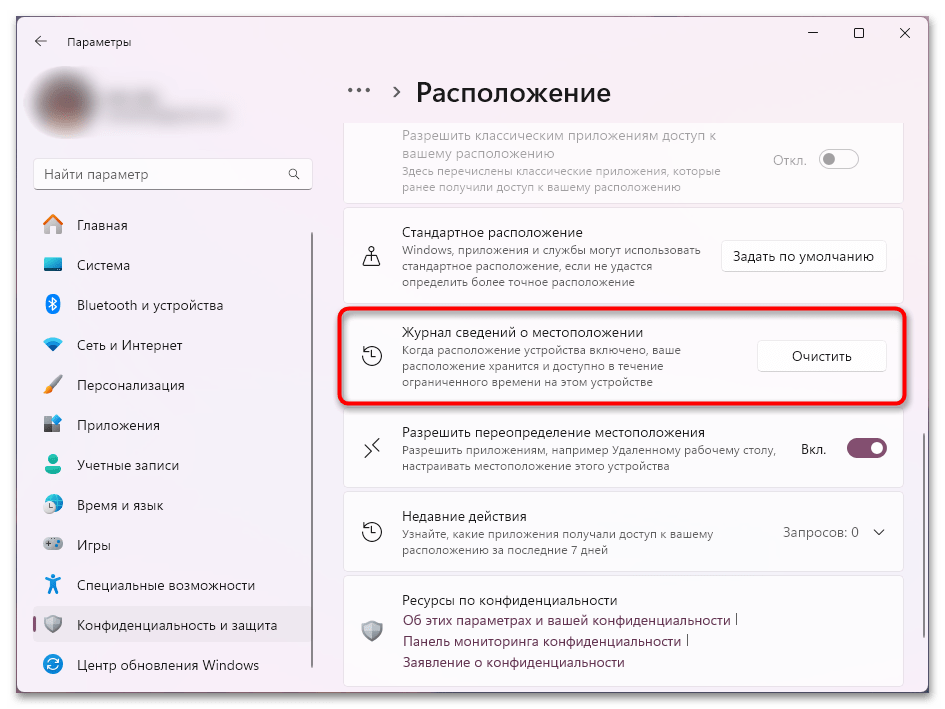
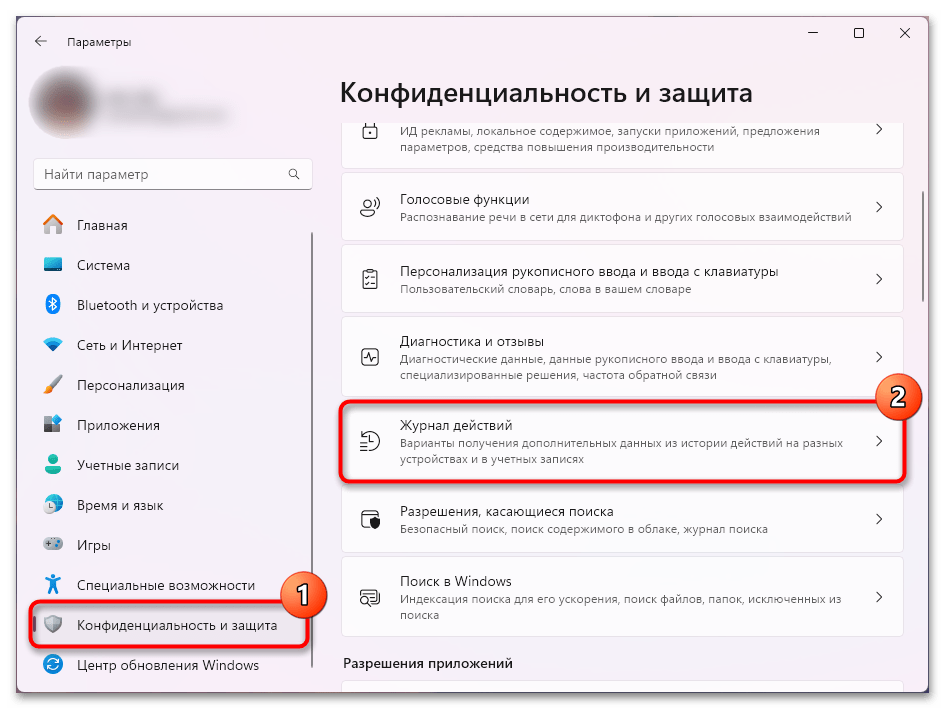
- Зайдите в раздел «Конфиденциальность и защита» и через блок «Разрешения приложений» перейдите в «Расположение».
- Нажмите кнопку «Очистить» в строке «Журнал сведений о местоположении».
Вариант 7: Очистка журнала действий
Журнал действий хранит на компьютере некоторые совершенные вами действия на устройстве, такие как посещенные сайты, используемые приложения и службы. Это надо для того, чтобы Майкрософт предоставляла персонализированные возможности и предложения.
- Удалить его можно тоже через категорию «Конфиденциальность и защита», но на этот раз через подраздел «Журнал действий».
- Очистите или вовсе отключите его при желании.

Вариант 8: Очистка журнала «Проводника»
«Проводник» также хранит информацию о последних открытых файлах и папках, что при желании можно удалить. Однако в большинстве случаев делать это бессмысленно, поскольку, если не отключить саму функцию, история снова начнет копиться. А сам кеш не занимает практически нисколько места на диске.
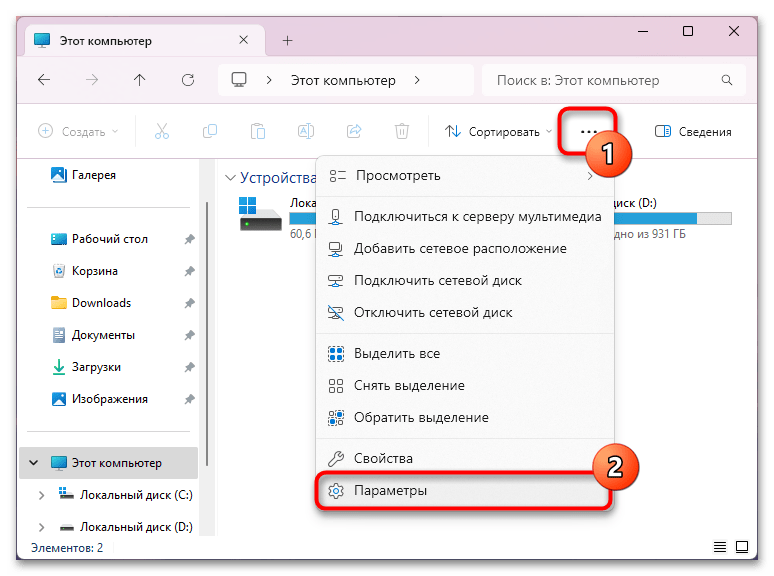
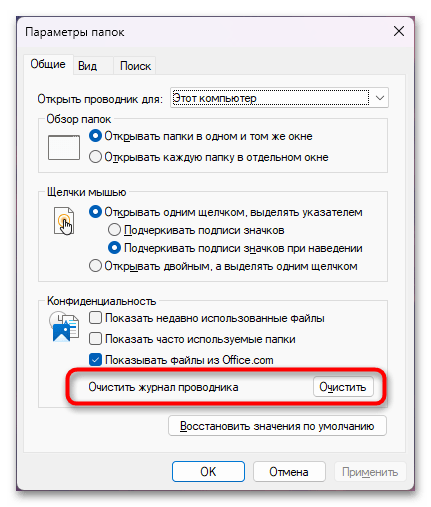
- Запустите «Проводник» и нажмите по трем горизонтально расположенным точкам на панели инструментов. Из выпадающего меню выберите «Параметры».
- В окне «Параметры папок» найдите строку «Очистить журнал проводника» и кликните по кнопке «Очистить».
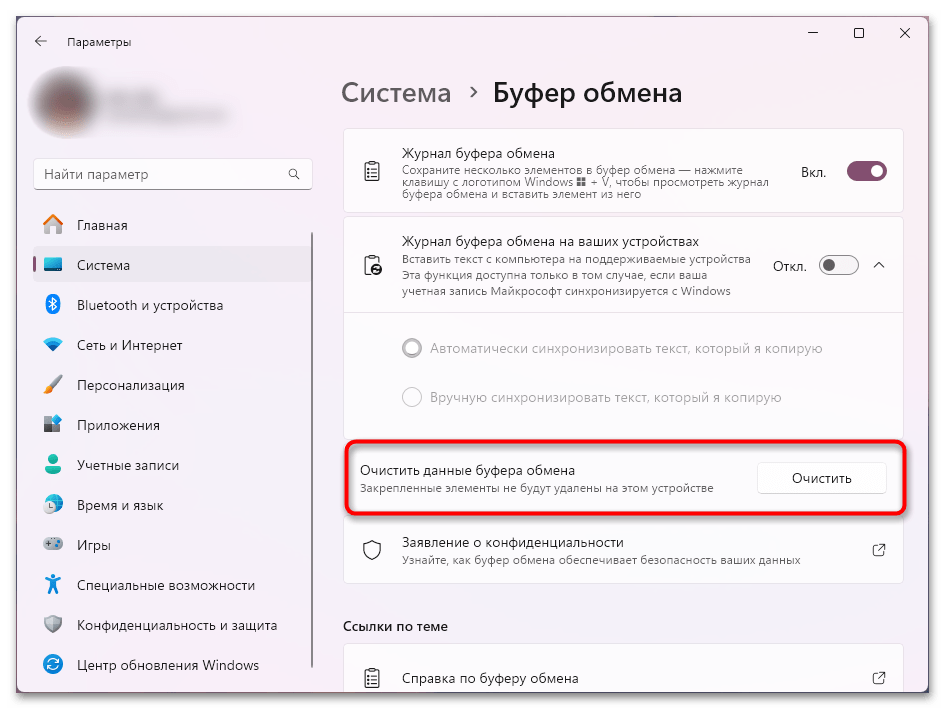
Вариант 9: Очистка журнала буфера обмена
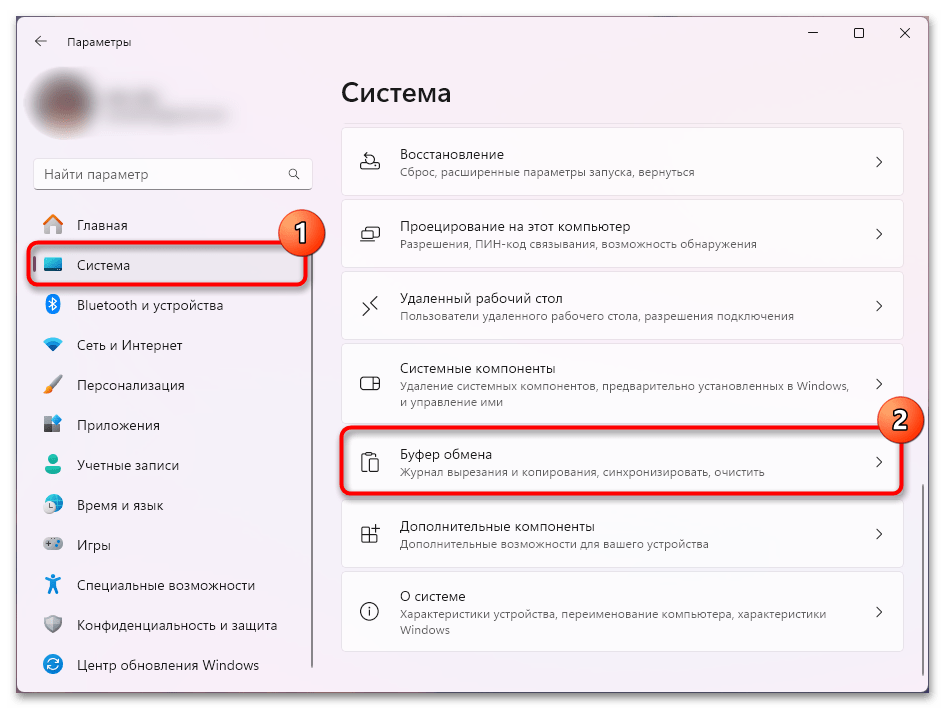
В Windows 11 по умолчанию работает буфер обмена, куда попадают весь скопированный вами текст и картинки. Через утилиту показываются последние 25 сохранений, и если вы хотите удалить их все, быстрее это будет сделать через «Параметры», а не вручную.
- Перейдите в упомянутое приложение и на вкладке «Система» найдите «Буфер обмена».
- Удалите все, кроме закрепленных записей, через кнопку «Очистить».
Вариант 10: Сторонний софт
В качестве альтернативы ручному удалению можете использовать и любую из программ для очистки ПК. В целом мы не рекомендуем пользоваться подобным софтом, если у вас нет представления и понимания того, что вы делаете.
Возможность очистить многие места операционной системы в один клик создает иллюзию необходимости и простоты поддерживать «чистоту», однако в большинстве случаев это бессмысленная затея. Кеш на компьютере и нужен для того, чтобы он копился, тем самым ускоряя доступ к тем или иным функциям, элементам, сайтам. Он начинает это делать сразу после удаления, а вы столкнетесь с тем, что Виндовс или сайты в браузере начнут загружаться медленнее, потому что они это делают с нуля и кешируются.
Кроме того, такие программы-оптимизаторы часто ухудшают работу ОС при бездумном нажатии кнопок со стороны пользователя. Однако если вы готовы потратить свое время на то, чтобы разобраться с тем, как правильно пользоваться подобным софтом, с какой периодичностью это делать, обдумывать действия и нести ответственность за возможные риски, можете подобрать одно из таких приложений по следующей ссылке.
Подробнее: Программы для очистки кеша на компьютере
Наша группа в TelegramПолезные советы и помощь
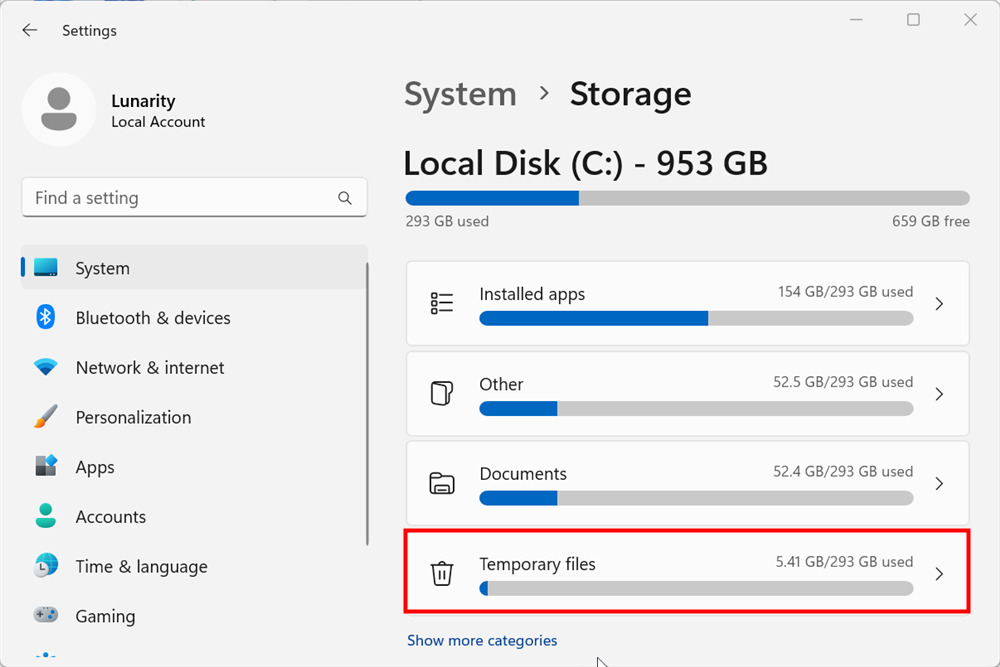
Многим пользователям знакомо ощущение, как работает ПК сразу после установки Windows — быстро загружается, быстро запускает программы и сразу реагирует на действия пользователя. А сама система Windows и папки пользователя занимают совсем немного места на накопителе. Постепенно это ощущение быстрой работы уходит, а системный диск начинает забиваться программным мусором. О том, насколько эти данные могут замедлять работу, можно понять, открыв, к примеру, «Просмотр событий Windows», когда перегруженный журнал будет с трудом поддаваться сортировке.

Особенно эта проблема заметна, если у вас небольшой системный SSD-накопитель, например, как у меня — всего на 120 ГБ. Моя Windows 10 была установлена всего год назад, на диске C:\ нет ни одной игры, но занято уже целых 56 ГБ, что никуда не годится. Я решил разобраться с проблемой, проанализировать, чем забивается системный накопитель и написать гайд, о том, как быстро его очистить простыми способами.
Удаляем ненужные программы и игры
Первым делом стоит заглянуть в Программы и компоненты и посмотреть, нет ли ненужных утилит или игр, которые давно занимают место на диске и могут быть спокойно удалены. Наверняка найдется парочка игр, в которые вы уже давно не заходили и вряд ли будете продолжать играть в них. Но я для чистоты эксперимента трогать их не буду.

Удаляем точки восстановления

Далее стоит запустить стандартное средство очистки диска, запускаемое из свойств диска, у меня оно нашло 4.8 ГБ файлов, которые можно смело удалить, большая часть из которых — файлы обновлений. Использование накопителя можно посмотреть и в приложении «Параметры» — «Система» — «Память». Там я увидел, что еще 1.7 ГБ заняла точка восстановления системы, которой я не пользуюсь, и которую, скорее всего, создала одна из утилит. Польза от точек восстановления сомнительна, в случае серьезного сбоя они обычно не помогают, поэтому лучше делать полный образ системы перед вмешательством в нее, например, с помощью утилиты Acronis True Image.

Очистка папки WinSxS
Теперь можно заняться очисткой папки Windows, которая у меня распухла до 23 ГБ. Главный пожиратель места здесь будет папка WinSxS, которую категорически нельзя чистить вручную. Но с помощью нескольких команд в командной строке, запущенной от администратора, можно очистить эту папку. Для начала запускаем команду анализа:
Dism.exe /Online /Cleanup-Image /AnalyzeComponentStore
В моем случае она не нашла компонентов для очистки. А для удаления запускаем команду
Dism.exe /Online /Cleanup-Image /StartComponentCleanup

Очистка папки C:\Windows\Installer
Еще одна подпапка в C:\Windows, в которой хранятся все установочные файлы, постепенно распухает, но ее содержимое не всегда является нужным для системы. Очистить ее, как и папку WinSxS, можно не вручную, а только с помощью специальной утилиты PatchCleaner. Папка
C:\Windows\Installer весит у меня 4.4 ГБ, но утилита сообщила, что удалить из нее ничего нельзя.

Кеш браузера и системных программ
Теперь можно заняться удалением кеша браузера и программ, которые обязательно присутствуют на системном диске. Нужен ли кеш при наличии быстрого интернета — хороший вопрос, и в блоге, посвященном экономии ресурса SSD мы учились его отключать. Проще всего удалить эти данные с помощью специальной утилиты очистки. Популярную много лет CCleaner на этом поприще заменила утилита Wise Disk Cleaner, более безопасная и быстрая. Утилита нашла на моем ПК 2.89 ГБ файлов, которые можно смело удалить.

Кэш видеокарты
Кэш видеокарты хранит в себе предыдущие версии драйверов, копии установочных файлов и прочий мусор, который нам уже не понадобится. В случае с видеокартой NVIDIA нам надо будет перейти в папку c:\Users\Имя_пользователя\AppData\Local\NVIDIA. Легко найти ее можно, нажав Win+R и введя %appdata%. Далее переходим в папку Local, потом — NVIDIA. И очищаем папку GLCache.

Ручная очистка папки пользователя
После всех вышеописанных процедур удалось очистить около 5 ГБ, что не так уж и много и пора переходить к ручной чистке папки пользователя, которая обычно приносит гораздо больше пользы.

Такую очистку очень удобно совместить с бэкапом ваших данных, отсеивая зерна от плевел и сохраняя ценное в отдельную папку. Это могут быть сохранения игр, скриншоты, документы и многое-многое другое, что легко потерять при переустановке Windows.
Заглянув в папки пользователя, а особенно — в папку AppData, вы поймете, что ручной поиск в этих залежах займет очень много времени. Проще воспользоваться утилитой для наглядного представления веса папок и файлов, например, WinDirStat. Утилита сканирует папки и показывает их содержимое в виде прямоугольников и квадратов разного цвета.

Утилита сразу наглядно показала «жирные» файлы, которые можно смело удалить, например, ненужные записи геймплея с помощью GeForce Experience. Жмем на прямоугольнике файла правую кнопку мыши, выбираем «открыть в Проводнике» и удаляем ненужное. Еще нашлась куча файлов в папке C:\Users\ZSTX\AppData\Local\Downloaded Installations, которые можно смело удалить.
Некоторые мессенджеры хранят в папках пользователя присланные фото, видео и документы, например, Viber в папке ViberDownloads. Эта папка может распухать до нескольких гигабайт и не помешает сохранить оттуда все нужно, а ненужное — удалить. Ручная очистка дала еще около 1.5 ГБ свободного места.
Использование программы для очистки Windows — JWIZARD Cleaner
Если вы ищете способ для быстрой очистки и оптимизации Windows, обратите внимание на программу JWIZARD Cleaner. Она у меня не раз была на слуху и зарекомендовала себя как надежный инструмент для очистки компьютера от мусора.

Теперь о функциях. Здесь все стандартно: удаление временных файлов, системных журналов, очистка истории и кэша в браузере, а также ошибки реестра. Кроме того, есть быстрая деинсталляция вместе с очисткой остатков от удаленных программ. Smart Scan — это то, с чего стоит начать. Запустив его, вы получите список всего, что можно удалить. Интуитивно понятно выбираете категории — и вперед.
Что касается деинсталляции, JWIZARD Cleaner справляется с этим на ура. За счет полного удаления программ и связанных с ними данных на диске появляется много свободного пространства. Занимаясь этим регулярно, например раз в неделю, можно поддерживать систему в оптимальном состоянии.

Преимущества? Прежде всего, безопасность — ничего важного удаляться не будет, все под контролем. Кроме того, приложение разработано в России, что гарантирует его доступность и отсутствие блокировок из-за санкций. Простота — интерфейс доступен даже новичкам. Эффективность? Без сомнений. Ну и обновления не заставят себя ждать, разработчики не дремлют.
Полезный совет: не забывайте о регулярной чистке, она дает лучший результат. И если вы заметили замедление работы браузера, пробуйте очистку кэша.
Так что, если ваш компьютер нуждается в очистке, JWIZARD Cleaner может вам пригодиться.
Очистка с помощью утилиты Dism++
Еще один способ очистить ненужные системные файлы — мощная утилита Dism++, про которую я уже не раз писал в своих блогах. Давайте пройдемся ею по уже очищенной системе и посмотрим, сколько места она освободит. С помощью Dism++, кстати, можно легко очистить папку WinSxS, не вводя команды вручную. Как видно на скриншоте, Dism++ нашла, что удалить в папке WinSxS, хотя командами выше мы не могли очистить ее.

А суммарно утилита освободила еще почти гигабайт.

С помощью утилиты Dism++ можно легко удалить и ненужные предустановленные системные компоненты, например, Кортану или Распознавание речи.

Итоги

Под конец чистки файлы на системном диске занимают 49.5 ГБ, а значит удалось удалить почти 7 ГБ мусора. Это не особо впечатляет, но, если учесть, что я не трогал установленные программы — это совсем немало. Перегруженный мусором системный диск будет мешать гораздо меньше, если выбрать для него SSD объемом 500-512 ГБ. Стоят они сейчас совсем недорого, например, в Ситилинке популярны вот эти три бюджетные модели: Digma Run S9 DGSR2512GS93T, Kingston NV2 SNV2S/500G и KINGSPEC NX-512.

Пишите в комментарии, а как вы чистите системный диск от мусора?
Более 550 блогов автора Zystax обо всем, что связано с компьютерами и играми.
Telegram-канал @overclockers_news — теперь в новом формате. Подписывайся, чтобы быть в курсе всех новостей!
Cache memory can consume a lot of memory on your drive partitions which are also usually irretraceable to delete while attempting to do it manually. Accumulation of cache memory consists mostly of temp files from websites and applications especially, when you use internet browsing and ads cookies with all the cookies accepted. Cache memory folders are also hidden in our system partition drives amongst the non-clearable memory. Today we’ll be talking about all the possible ways through which cache memory deletion will be possible and easy to repeat in the future too. Read on to know more about clear cache in Windows 11.

Table of Contents
Before we escalate to the methods, let’s understand what is cache and cache memory in the first place.
- A cache is a high-speed hardware or software component that caches frequently requested data and instructions. It allows websites, apps, services, and other aspects of your system to load faster. Cache makes the data that is used the most easily accessible. PNGs, icons, logos, shaders, and other files that are often used in various programs are known as cache files. These files are normally hidden and are saved on your hard drive space.
- Cache memory is a memory that is faster than main memory and/or RAM. Because it is placed closer to your CPU than your RAM and is faster, it greatly reduces data access time. It assists your CPU in speeding up calculations, resulting in a quicker PC.
The method to clear cache on Windows 11 depends on the type of cache that needs to be cleared. For example, browser cache can be deleted from the web browser while local cache through Temp folders saved in C drive. Implement all the given methods to clear all kinds of cache to clear memory space & increase system speed.
Method 1: Clear Local Cache from Temp Folder
All the temporary/cache files can be cleared with this simple old school method which can also help you with other Windows versions like 7, 8, and 10. Here’s how to perform this cache memory deletion process:
1. Press the Windows + R key combination to open the Run dialog box.
2. Type %temp% and press Enter key to open App Data Local Temp folder.

3. Press Ctrl + A key combination to select all the files, and click the Delete option from the top pane to delete the selected files.

4. A popup titled Folder Access Denied will appear. Click on Continue to proceed forward.

Note: There may be another prompt for certain files which can’t be deleted. Tick mark the option Do this for all current items and click on Skip to move forward. Do the same if you find any more such prompts in the process.

The app cache files will be deleted from your Windows 11 PC.
Also Read: How to Move a Window that is Off-Screen in Windows 11
Method 2: Remove Cache from Storage Settings
It is also a very suitable method that Windows 11 interface provides for cache memory deletion.
1. Open the Windows Settings application through the Start menu as shown.

2. Click on the Storage option from the Settings window.

3. The storage statistics will appear. Click on the Temporary files option shown highlighted.

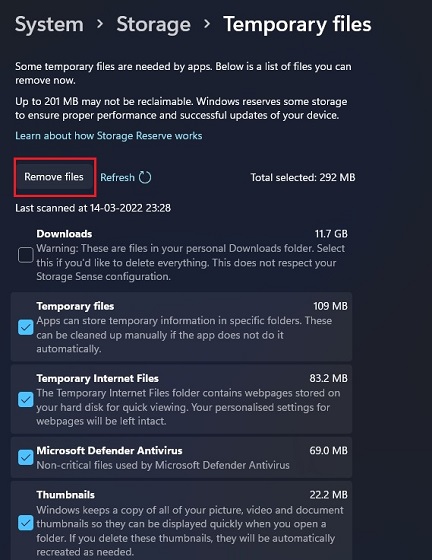
4. Under the Temporary files section, you will see a list of all the folders and files stored on the system with a brief description. Scroll down to choose the files to be deleted according to your choice and click on the Remove files option to delete the cache files.

5. Confirm the deletion process by clicking on Continue. The temporary cache will be cleaned from your system.

Also Read: C:\windows\system32\config\systemprofile\Desktop is Unavailable: Fixed
Method 3: Use Disk Cleanup Utility
Disk cleanup is another way to easily clean the cache memory in Windows 11. To use Disk Cleanup cache memory deletion process,
1. Type Disk Cleanup in the Start menu search bar and click on Run as administrator to open it.

2. A Disk Cleanup: Drive Selection window will pop up. Select C: drive from the Drives dropdown menu and click OK.

3. Disk cleanup will calculate and open a list of possibly deletable files stored along with the temporary cache files. Scroll down and select the required files according to your choice and click on OK as depicted below.

4. In the following pop-up, click on the Delete Files button to confirm the deletion.

Also Read: How to Force Quit a Program on Windows 11
Method 4: Delete DNS Cache
The Domain Name System (DNS) functions as a directory for the websites you browse on your computer. DNS converts domain names (such as www.google.com) to IP addresses (8.8.8.8). While the DNS cache assists your computer in quickly loading websites, it’s conceivable that the amount of cache files has expanded over time. In the worst-case scenario, you may experience DNS cache poisoning when a malicious attack occurs and modifies the recorded IP addresses. In order to prevent that, follow the given steps to clear DNS cache in Windows 11:
1. Type Command Prompt in the Windows search bar and click Open.

2. Type ipconfig /flushdns in the Command Prompt window as shown below, and press Enter key.

Upon execution of the command, all DNS cache will be cleaned from your PC.
Also Read: How to Change DNS Server on Windows 11
Method 5: Clear Microsoft Store Cache
Microsoft Store, like other applications, stores cached data on your system. Its cache deletion can help sort problems with purchases, downloads, or Store apps that simply won’t load. To clear your Microsoft Store cache, follow the steps below:
1. Press Windows + R key combination from the keyboard to open the Run dialog box.
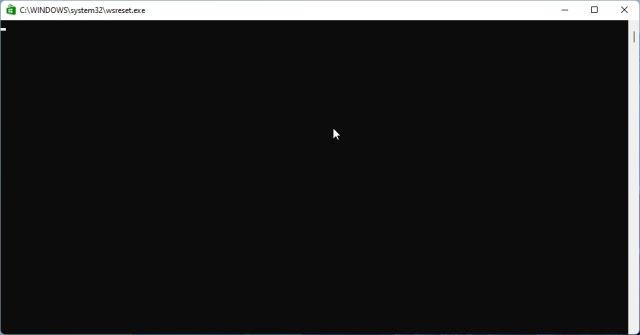
2. Type wsreset.exe and press Enter key to execute the command.

3. An empty Command Prompt window will appear on the screen. Wait for a few seconds until this window gets automatically closed. Soon after, Microsoft Store will open after clearing all the cache.

Also Read: Where Does Microsoft Store Install Games?
Method 6: Erase Browser Cache
Web browsers save static assets of frequently visited web pages on your computer so you can access them faster on subsequent visits. Static assets, to put it another way, are website assets that are more or less the same on each visit. However, the cached data of a website kept on your computer may be out of date. It can cause problems every time you try to access this particular website. Clearing your browser cache may be the best solution in this scenario.
Note: For illustration purposes, we’ve considered Google Chrome browser. Verify with your browser before making any changes.
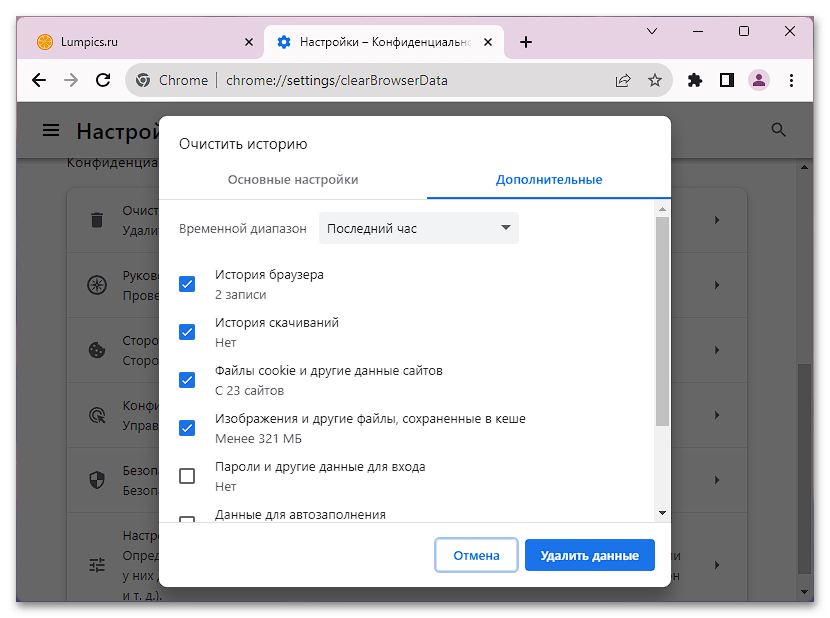
1. Open Chrome browser and press the button combination Ctrl + Shift + Delete to open Clear browsing data settings pop up.

2. Click on the Time range dropdown menu and choose the All time option.

3. Untick all the options except the Cached images and files and click on Clear data.

Method 7: Clear Location History
Using the PC location service brings a lot of cache to the PC, if frequently used. Clearing the location history can help clear cache in Windows 11 as follows:
1. Open the Windows Settings application through the Start menu.
2. Click Privacy & security tile.

3. Click on the Location option as shown below.

4. Here, find the Location history option and click Clear button as depicted below.

Also Read: How To Download Google Maps for Windows 11
Method 8: Clear Activity History
Just like the location service, active hours on the system gather up some cache as you perform various tasks on the PC. You can clear this cache by implementing given steps:
1. Follow Steps 1-2 of Method 7 to open the Privacy & security menu.
2. Click on the Activity history option under Windows permissions.

3. Check or uncheck the option marked Store my activity history on this device, as suited. Then, click on Clear under the Clear activity history title as shown highlighted.

Method 9: Delete Prefetch Files
Prefetch files, first introduced with Windows XP, are used to speed up the startup of your Windows PC. If your system is infected with malicious software and you’re experiencing problems on start-up, it’s completely conceivable that you’ll want to remove the prefetch files.
Note: Prefetch files are used for reducing the boot time of the system. Deleting them can affect the booting of your PC, so consider this before making any changes to your system.
1. Open Run dialog box as before. Type prefetch and hit Enter.

2. In the Windows Prefetch folder, press Ctrl + A keys to select all the files and press the button combination Shift + Delete to permanently delete the selected files.

3. Confirm the deletion process by clicking on Yes in the Delete Multiple Items prompt.

Also Read: How to Create Desktop Shortcuts on Windows 11
Method 10: Clean File Explorer Cache
The Quick Access option is a good example of how File Explorer remembers the files and locations you frequently use on your system. Windows lets you erase the File Explorer cache files that contain this information. Here’s how to do the same:
1. Open File Explorer through the Start menu as shown.

2. In the File Explorer window, click on the Three dotted icon > Options as depicted.

3. From the Folder Options window, click on Clear under the Privacy section.

4. The File Explorer cache memory will get cleared and you can exit by clicking on OK.
Method 11: Delete System Restore Cache
When you remove system restore points in Windows 11, the cache files connected with them will get deleted, and it would free up some memory on your system.
Note: This method includes removing restore points stored on your system, which will prohibit you from restoring Windows in the future if you get a blue screen of death (BSOD) error. So, be very careful while implementing this cache memory deletion process.
1. Open Windows Settings and click the About option, as illustrated below.

2. Click on the Advanced system settings from the Related links section as shown.

3. Switch to the System Protection tab in the System Properties window. Then click Configure option from the Protection Settings section.

4. In the System Protection for Local Disk (C:) window, click on Delete beside the message Delete all restore points for this drive as shown highlighted.

5. A System Protection popup will appear for the confirmation, click on Continue.

The restore points will be deleted along with the cache memory associated with them.
Also Read: 28 Best Free Photo Editing Software for PC
Method 12: Delete Display Cache
On Windows 11, the display cache stores information about your system display. This information might include everything from the previous resolution you utilized to the color mode you chose, among other things. Display cache is not immune to the problems that plague other cache types. If you’re having problems with your system’s display, you may wish to clear the cache and reset your display settings as follows:
1. Open the Run dialog box, type regedit command and press Enter to launch Registry Editor.

2. Paste HKEY_LOCAL_MACHINE\SYSTEM\CurrentControlSet\Control\GraphicsDrivers in the address pane on the top as shown.

3. In the left pane, right-click on the Configuration folder and click on Delete as depicted below.

4. Delete the folders Configuration and ScaleFactors in the same way.

5. Restart your PC and the cache will be cleared.
Also Read: How to Fix Audio Buzzing in Windows 11
Method 13: Clear Clipboard Cache
Windows clipboard also stores some amount of cache, and it can be cleared easily by following the steps mentioned below:
1. Open Windows Settings and scroll down to click on the Clipboard option.

2. Here, click on the Clear option from the Clear clipboard data section as shown below.

Also Read: How to Delete Folders and Subfolders in PowerShell
Method 14: Set-up Deletion of Unused Content via Storage Sense
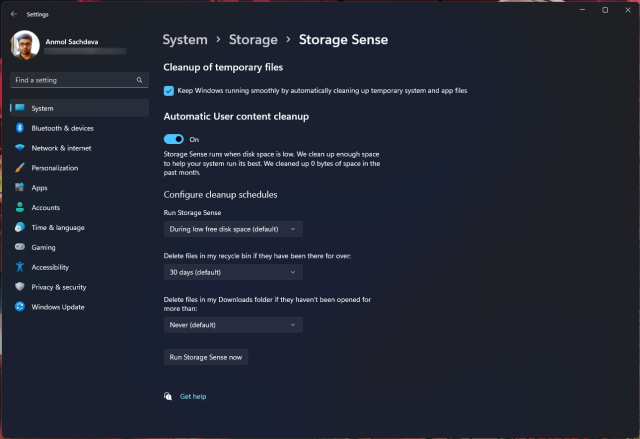
If you don’t want to perform the cache memory deletion process manually on your computer, Windows 11 includes a built-in tool that will do it for you. Storage Sense is a feature that may be used to remove cache at a predetermined frequency regularly. To use storage sense to clear cache in Windows 11, follow the steps below:
1. Open Windows Settings and click on the Storage option from the list as shown.

2. Click on the Storage Sense option under Storage management section as illustrated below.

3. Check the box under Cleanup of temporary files and make sure the slider under Automatic User content cleanup is turned on.

4. Also, check and set the time durations from three drop-down menus under Configure cleanup schedules according to your convenience:
- Run Storage Sense
- Delete files in my recycle bin if they have been there for over
- Delete files in my Downloads folder if they haven’t been opened for more than

Recommended:
- How to Add Music to Kodi
- How to Install Software Without Admin Rights
- How to Print Large Images on Multiple Pages in Windows 11
- How to Reset Windows 11
We hope this article helped you clear cache in Windows 11 PC. Do mention your experience in the comment section below about how much maximum cache you have deleted in one go using cache memory deletion processes listed here.
Windows 11 is surely feature-rich, but you have to maintain Microsoft’s latest desktop OS every once in a while, so it runs without any fuss. We already have a guide in place on how to speed up Windows 11, but we bring you a dedicated tutorial on how to clear cache in Windows 11. This guide will allow you to free up precious storage on your Windows PC and fix app-related, network, and Microsoft Store issues. So let’s not waste any more time and learn how to clear cache in Windows 11.
In this tutorial, we have included seven ways to clear the cache in Windows 11. Apart from freeing up space, these methods will also help you fix most of the issues (if you’re facing any) on your PC. Expand the table below and move to any section of your liking.
Table of Contents
Clear Cache in Windows 11 from Settings
The easiest way to clear cache in Windows 11 is through the Settings app. Microsoft has included an all-in-one menu, where you can find all the cache files and temporary storage files eating up your computer’s space. From here, you can seamlessly clear cache and free up space on your Windows 11 computer. Here is how to do that.
1. First, press the “Win + I” keyboard shortcut on Windows 11 to open the Settings app. Then, navigate to “System -> Storage“.
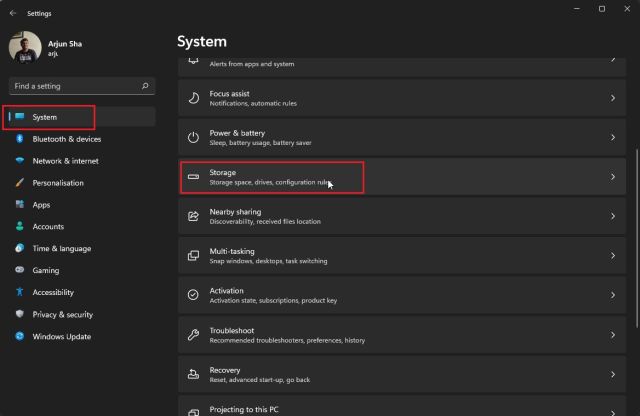
2. Next, click on “Temporary files“.
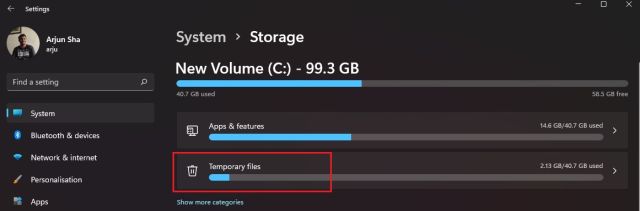
3. Your Windows 11 computer will now take some time to process all the files, and within a minute, it will display all the cached files stored on your computer. Along with that, it will also show the Downloads folder, Windows Update Cleanup, etc. Here, untick “Downloads” and click the “Remove files” button. That’s it. All the cached files, be it related to a program or Windows Update, everything will be deleted.
Note: Keep in mind that after removing Windows Update files, you can’t go back to Windows 10 seamlessly. So to learn more about how to roll back to Windows 10 from Windows 11, follow our linked tutorial.
Clear Cache in Windows 11 using Disk Cleanup
If you are an old-school user like me and want to clear cache in Windows 11 via the legacy Disk Cleanup (or Clean Manager) tool, you can do that effortlessly. The tool is similar to what we get through the Windows 11 Settings app but offers a more familiar interface to veteran Windows users. To learn how to quickly access the Disk Cleanup tool to clear cached items on Windows 11, follow the steps below.
1. Press the “Windows + R” keyboard shortcut to open the Run window. Here, type in cleanmgr and hit Enter.
2. You will now see a pop-up window asking you to select a drive. Select “C” drive and click “OK”.
3. Next, click on “Clean up system files” on the next window that appears. You may get the same pop-up as the above step again. Select the “C” drive and hit Enter once again.
4. Now, scroll down and select all cached items, including temporary files, thumbnails, indexed logs, and more. You can also remove cached files related to Windows Update using this tool on your Windows 11 PC. Finally, click “OK,” and you are done.
Clear App Cache in Windows 11
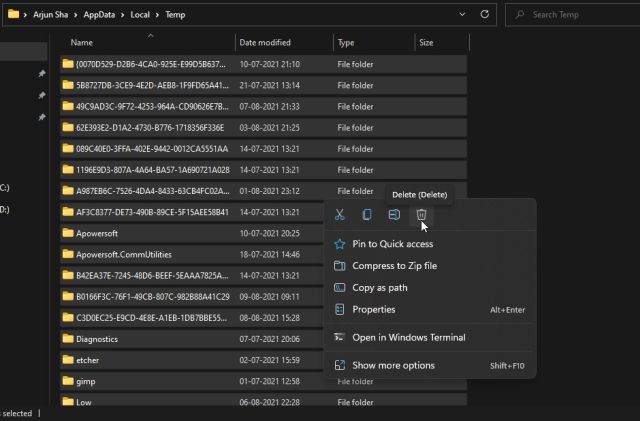
When you use an app on your Windows 11 PC, it stores its cached files in the temporary folder, also known as the Temp folder, on Windows 11 computers. Sometimes, the apps don’t clean up these files, and they take up a significant amount of storage. So to manually clear the app cache in Windows 11, delete the files inside the Temp folder. Here’s how it works:
1. Open the Run window using the “Win + R” keyboard shortcut. Now, type %tmp% and press Enter.
2. Under the “Temp” folder, select everything and delete it. You won’t be able to delete some of these files as they might be in use by some active apps, so you can leave them out. This method will clear most of the app cache on your Windows 11 PC.
Flush DNS Cache in Windows 11
Apart from app cache, Windows Update cache, thumbnail cache, etc., there is a DNS cache that Windows 11 stores to quickly retrieve the domain name from the IP address. If a website is not opening for you, you should try clearing the DNS cache to fix network issues on your Windows 11 PC. In this section, we will learn how to flush DNS cache on Windows 11, and it will rebuild the DNS hereafter.
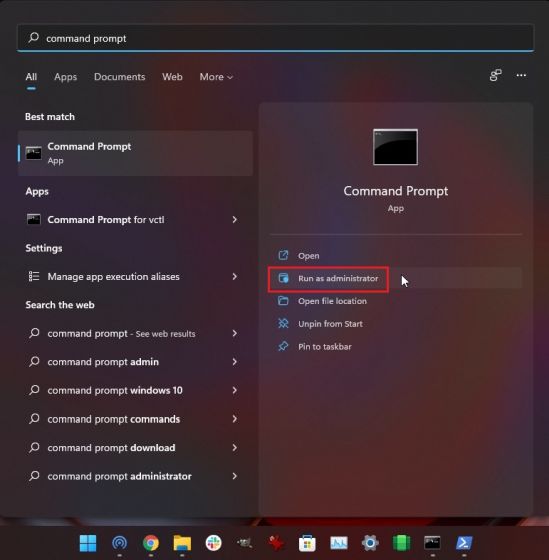
1. Press the Windows key once and type “command prompt”. Now, click on “Run as administrator” in the right pane to open command prompt with Admin privileges.
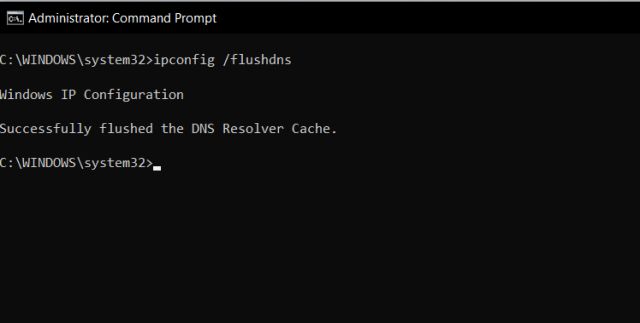
2. Once the Command Prompt window opens up, execute the below command, and it will flush the DNS cache on your Windows 11 computer. Now, restart your PC, and that’s it.
ipconfig /flushdns
Clear Microsoft Store Cache in Windows 11
Microsoft Store also keeps a healthy amount of cache on Windows 11 to quickly show search results and deliver a superior user experience. However, if you are facing issues with Microsoft Store not working or not downloading apps on Windows 11, clear its cache and check if the problem persists. Here is how you can go about it.
1. Press “Windows + R” to open the Run window. Here, type wsreset and hit Enter.
2. This will instantly flush the Microsoft Store cache on Windows 11, and you can try downloading your favorite apps once again.
Automatically Clear Cache on Windows 11 with Storage Sense
If you don’t want to manually delete all the cached and temporary files on Windows 11, you can automate this process with Storage Sense. It will periodically look for redundant files and remove them, freeing up space on your PC without much effort. Here is how you can set it up.
1. Open the Settings app by pressing the “Windows + I” shortcut. Now, move to System -> Storage.
2. Here, enable the toggle for “Storage Sense,” and that’s it. Windows 11 will now take care of clearing the cache in the background.

3. The Storage Sense feature offers you customization options to choose how long you wish to keep the cache and temporary files on your PC. Click on “Storage Sense” to configure cleanup schedules on the next settings page. You can choose to run this tool when storage space is low, every day, every week, or month. This tool also lets you enable the option to periodically delete Recycle Bin and Downloads folder contents.
Clear Cache in Windows 11 Using a Third-party Program
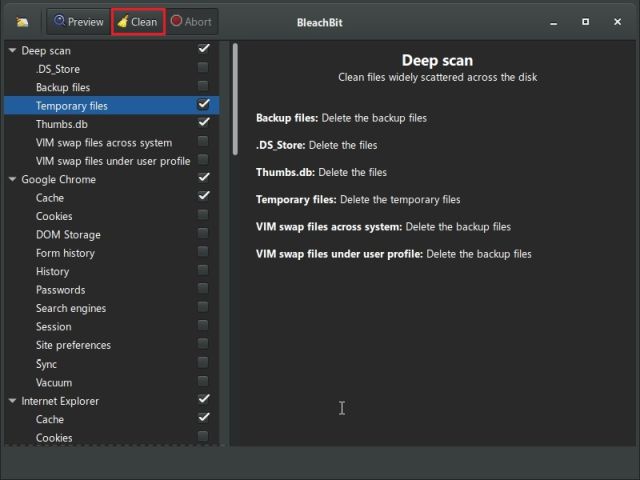
Many users prefer CCleaner to clear cache in Windows 11. However, I would not recommend it as the CCleaner app has become adware at this point. In fact, Microsoft recently added CCleaner to the list of “Potentially Unwanted Application (PUA).” As an alternative, I suggest using BleachBit, which is a free and open-source program. It lets you clear cache from the system and apps like Google Chrome, VLC, and more. Here is how to use it.
1. Go ahead and download BleachBit from its website using the link right here. After that, install the application using the downloaded EXE file.
2. Now, open the app and select the cached items mentioned under various apps. You can also choose to remove temporary files and other kinds of junk items from your Windows 11 PC. After that, click the “Clean” button at the top, and you are done.
Remove Cache Files From Windows 11 and Free Up Space
So these are the seven different methods you can use to clear the cache on Windows 11 PCs. From OS-level cache to apps data, DNS, and Microsoft Store cache, we have included all the ways you can remove temporary cache files from your computer. Anyway, that is all from us. If you want to enable tabs in File Explorer on Windows 11, we have a nifty guide linked here for you. And if you wish to set Windows 11 Taskbar icons to never combine, follow our tutorial. Finally, if you have any questions, let us know in the comments section below.
Quick Links
-
How to Clear Cache in Settings
-
How to Use Disk Cleanup to Clear Cache
-
How to Clear the Microsoft Store Cache
-
How to Delete Your Location Cache
-
How to Flush the DNS Cache
-
How to Automatically Clear Cache Using Storage Sense
Summary
Open the Windows 11 settings menu and go to System > Storage > Temporary Files. Check the boxes for the temporary cache files you want deleted, then click «Remove Files.» When you’re prompted to confirm, select «Continue» and your cache will be cleared.
To improve your PC’s performance and to keep it decluttered, you should regularly clear various caches on your PC. We’ll show you how to do that in Windows 11.
Cache files are the temporary files created by various apps and services. Clearing these files usually doesn’t cause any issues with your apps, as your apps will recreate them whenever they need. You can also set Windows to automatically clear cache files for you, as we’ll explain below.
How to Clear Cache in Settings
The settings menu in Windows 11 has a built-in tool for clearing the cache. It lets you delete the same files that the older Disk Cleanup tool does, but with a modern look.
To begin, open Settings and go to System > Storage > Temporary Files.
In the Temporary Files menu, you’ll see several types of files you can delete. Check the boxes for the categories you want cleared, then click the «Remove Files» button.
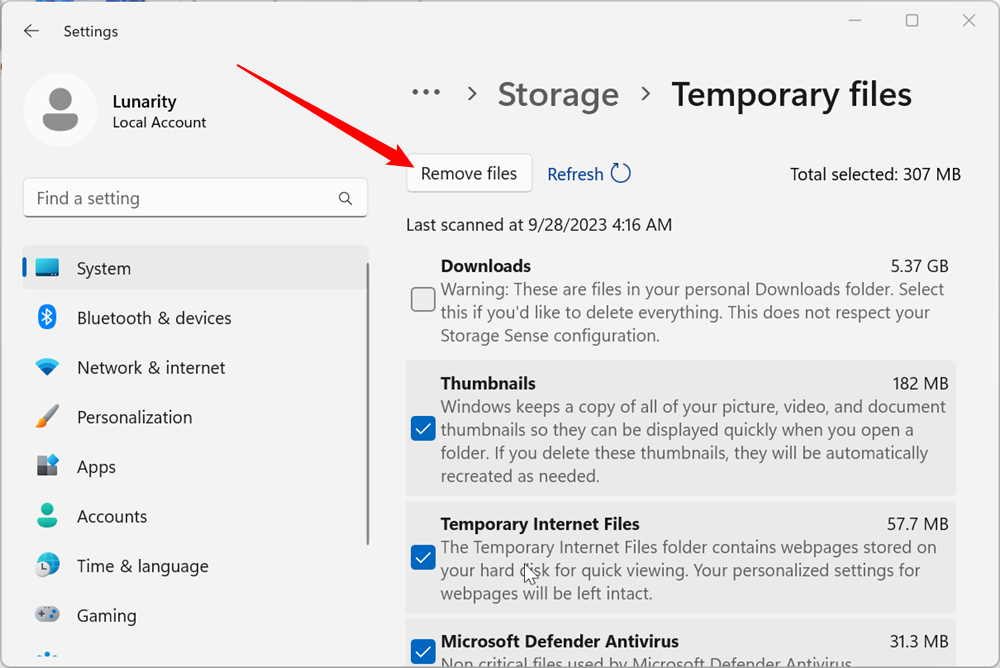
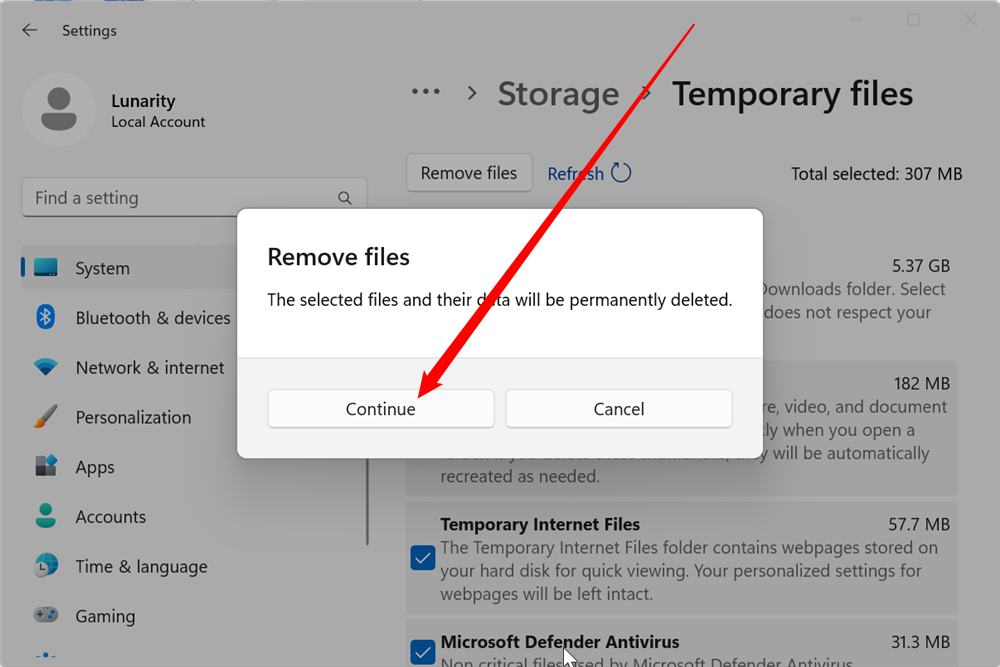
Windows will ask if you’re sure you want to delete those files. If you are sure, click «Continue,» and your cache will be cleared.
How to Use Disk Cleanup to Clear Cache
If you’re more comfortable with the classic Disk Cleanup tool from earlier version of Windows, you can still use it in Windows 11. This tool automatically finds and clears cache files for you.
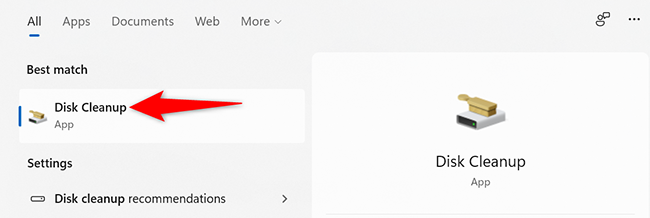
To use the tool, open the «Start» menu and search for «Disk Cleanup». Click the tool in the search results.
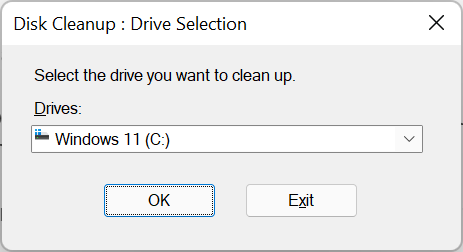
In the small «Disk Cleanup» window that opens, click the «Drives» drop-down menu and select the drive where you have installed Windows 11. Then click «OK.»
You will see a «Disk Cleanup» window. Here, in the «Files to Delete» section, enable all boxes so all your cache files are removed. Then, at the bottom, click «OK.»
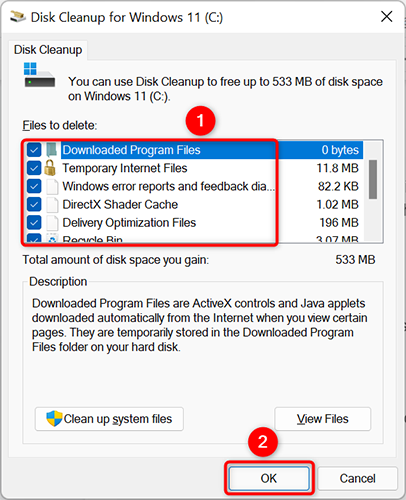
In the prompt that appears, click «Delete Files» to confirm deleting your cache.
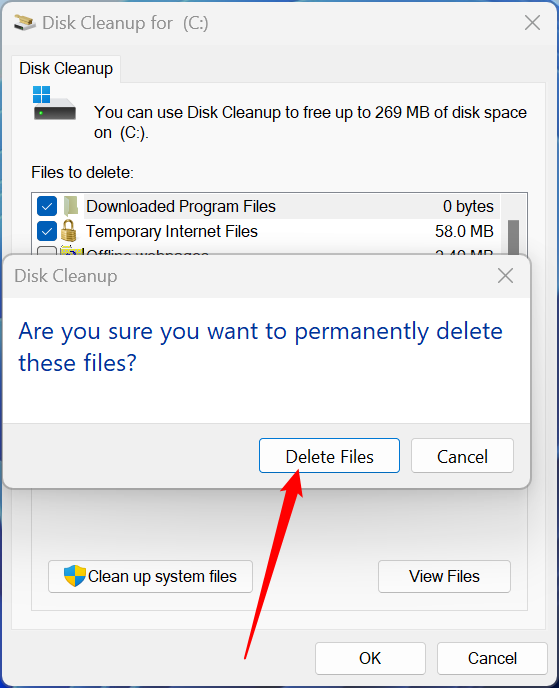
And that’s it. The selected cache files are now removed from your PC.
How to Clear the Microsoft Store Cache
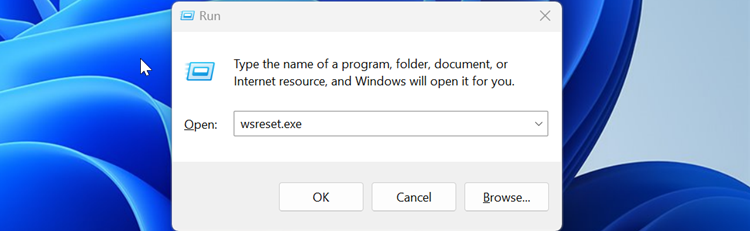
Like other apps, Microsoft Store also stores cache files on your PC. To remove these files, you will have to run a utility from the Run box.
To do so, first, open the Run box by pressing Windows+R keys together.
In the Run box, type the following and press Enter:
WSReset.exe
A blank black window will appear on your screen. Wait for this window to automatically close.
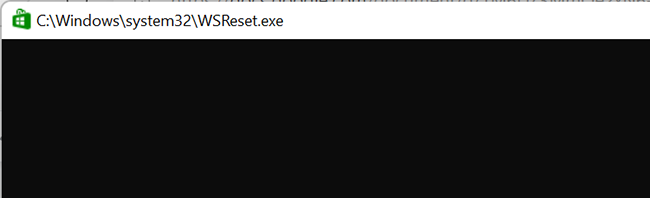
When the window closes, your Microsoft Store cache is removed.
If you have an Android phone too, clearing an app’s cache can help you avoid issues with the app.
How to Delete Your Location Cache
Clearing your location data cache is as important as clearing other cache files.
To clear location history on your PC, open the Settings app by pressing Windows+i keys together.
In Settings, from the left sidebar, select «Privacy & Security.»
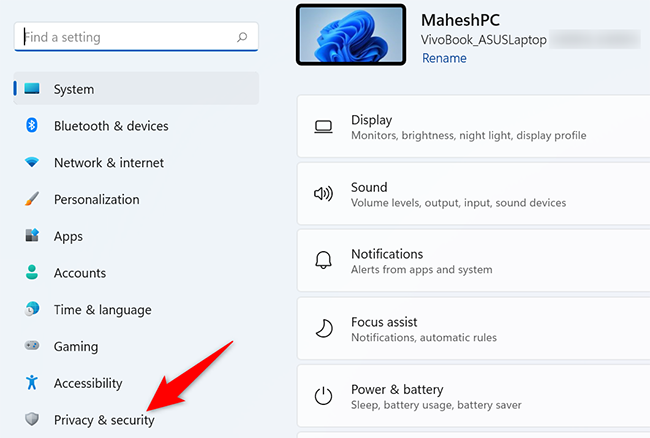
On the «Privacy & Security» page, in the «App Permissions» section, click «Location.»
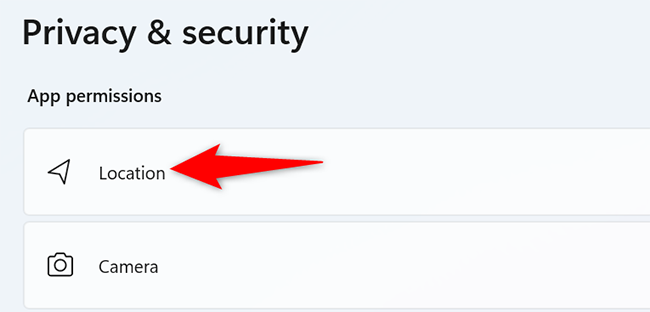
On the «Location» page, next to «Location History,» click «Clear.»
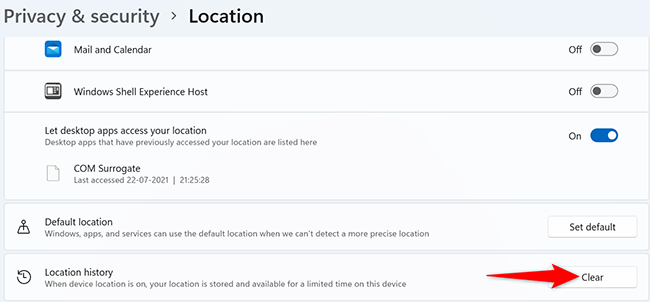
And that’s it. Windows 11 will delete your location cache.
If you’re also an Apple user, you may want to learn how to free up storage space on an iPhone or iPad.
How to Flush the DNS Cache
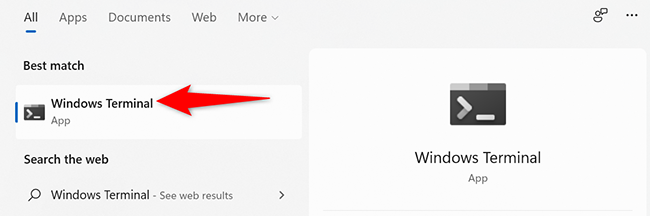
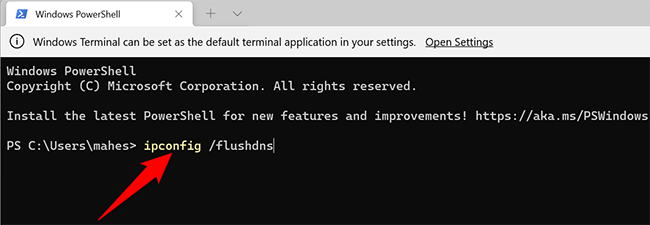
To remove the DNS cache, use your PC’s Windows Terminal app.
Start by opening the «Start» menu, searching for «Windows Terminal», and clicking the app in the search results.
In Windows Terminal, type the following command and press Enter. You can use this command in both PowerShell and Command Prompt shells.
ipconfig /flushdns
You will see a success message when the DNS cache is deleted.
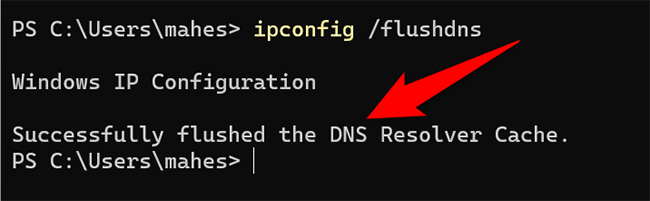
You’re all set.
How to Automatically Clear Cache Using Storage Sense
With the built-in Storage Sense feature in Windows 11, you can automatically clear your PC’s cache at a regular interval. You get to specify what cache types you’d like to clear, and the feature will only delete those cache files.
To use the feature, launch the Settings app by pressing Windows+i keys at the same time.
In Settings, from the left sidebar, select «System.»

On the «System» page, click «Storage.»
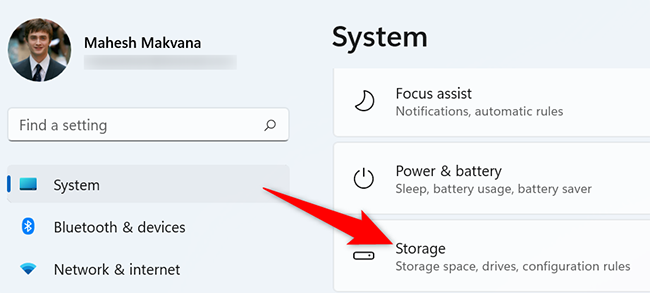
In the «Storage» menu, click «Storage Sense.»
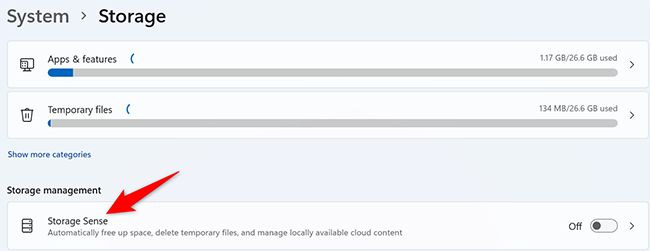
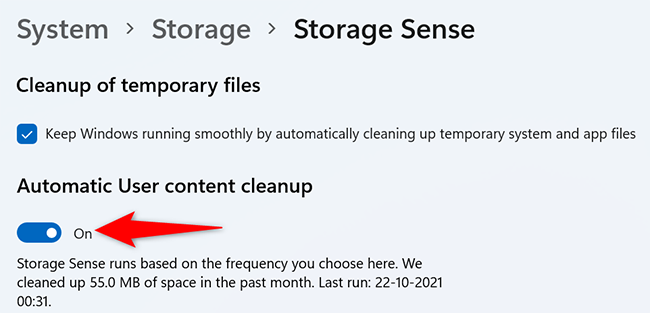
At the top of the «Storage Sense» page, turn on the «Automatic User Content Cleanup» option. This enables the Storage Sense feature.
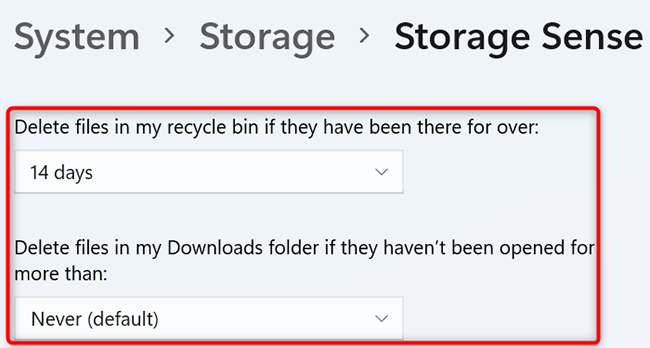
On the same page, configure the options for what cache files you’d like to be deleted. This includes automatically emptying the Recycle Bin, clearing the Downloads folder, and so on.
Storage Sense runs at the specified interval. If you’d like to run it right away, then scroll the current page to the bottom. There, click the «Run Storage Sense Now» button.
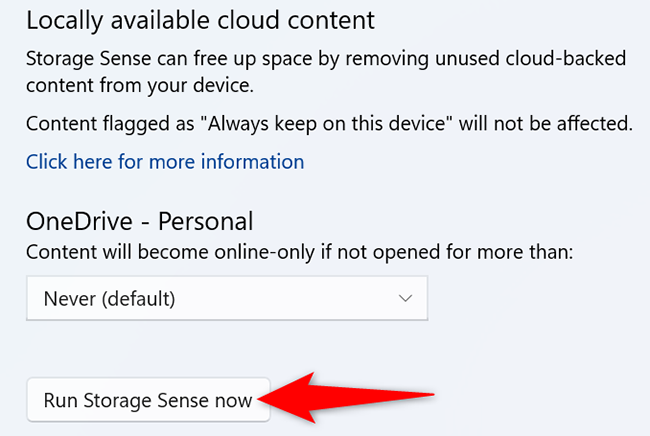
Storage Sense will declutter your PC using your specified options.
And that’s how you go about clearing various caches on your Windows 11-based PC!
While you’re at it, consider clearing the cache in Chrome and Firefox web browsers, too.