
Accumulation of Cache files with time can cause the Windows 11 or 10 systems to slow down and also consume costly storage space, especially if you are using M.2 drives. Therefore, clearing Cache files perhaps improves the system’s efficiency if done often, and with that many times small problems could also be solved. Now, coming to the main topic of this article is “how we can use the command prompt in Windows 11 or 10 to delete cache files quickly“; so, let’s see the steps we can follow to achieve this.
Steps to clear different Cache on Windows using CMDOpen Command Prompt as Administrator1: Clear DNS Cache2: Clear Windows System Cache3: Reset Windows Microsoft Store to clear its Cache4: Clear Temporary Files5. Clearing Thumbnail CacheConclusionFAQs
What is the role of Cache files?
The cache files on our system whether it is a PC or smartphone, the role of them is to store the data temporarily that accessed repeatedly by the user so that the app or system can perform better and serve the required data quickly. For example, a browser stores a cache of websites we visit often so that it can load them quickly.
Steps to clear different Cache on Windows using CMD
There are multiple types of cache files generated by different applications on our Windows system. Here we show the commands to clear the most common cache files such as the ones created by applications, DNS cache, Microsoft Windows store cache, and Thumbnail Cache.
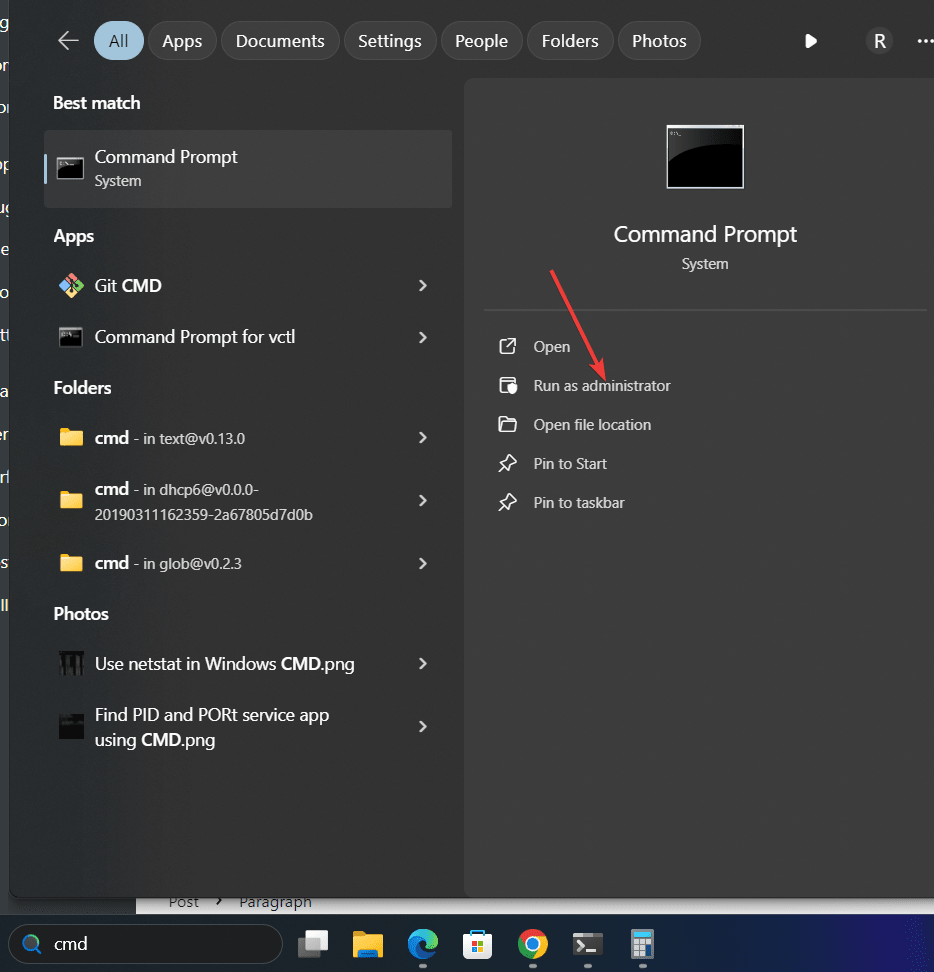
Open Command Prompt as Administrator
The first step is ofcourse we need to access the command line interface and that can be done by using the CMD. To open that, click on the Windows Start button and then search for “Command Prompt“, as it appears click on “Run as Administrator“.
1: Clear DNS Cache
DNS cache’s main task like any other cache file is to speed up the process, but instead of Windows system, DNS cache helps in loading websites fast by storing the address of websites to improve our browsing experience. But sometimes this great feature can also cause issues if the information it has cached becomes corrupted or outdated. Let’s take an example, what if a website’s IP address has been changed but still not updated in the DNS cache and it keeps using the old IP address to resolve the website?
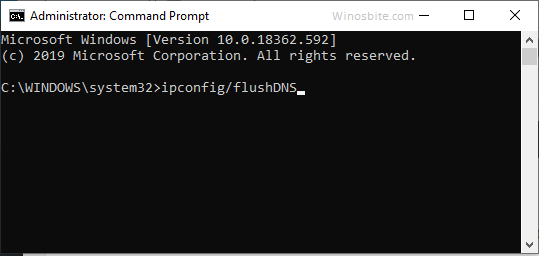
In such as scenario, the browser would through an error. But such meager problems can be resolved by just clearing the DNS cache on Windows, Here is the command that, we can use in our command prompt to clear the Windows DNS cache.
ipconfig /flushdnsType the above command and hit the Enter key, in return, it will give a message- “Windows IP Configuration Successfully flushed the DNS Resolver Cache.”
2: Clear Windows System Cache
We can use the inbuilt Disk Cleanup utility of Windows to clear the System cache via GUI, however, this can be possible with CMD as well, a single command will invoke the Disk Cleanup utility which will also clear the system cache, here is the command to follow.
In the command prompt, execute the given command that will in return run the Disk cleanup with a predefined set of options instructed in the command using the flag 1.
cleanmgr /sagerun:13: Reset Windows Microsoft Store to clear its Cache
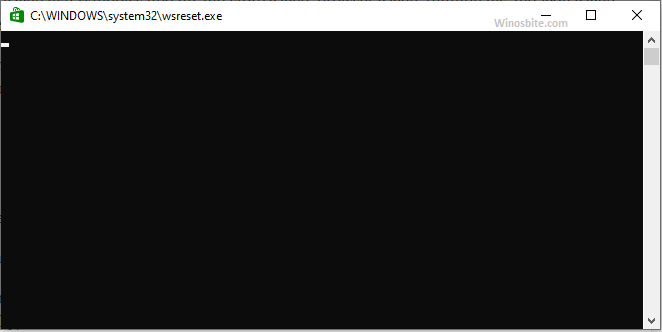
Windows 10 and 11 come with an application store to install various popular software programs, it is known as the Microsoft Store. Many times common issues such as being stuck while updating apps through the store or apps not downloading or installing properly on Windows, can be resolved by cleaning the Microsoft Store cache.
In your command prompt type “WSReset.exe” and hit the Enter key to clear the Microsoft Store cache. The command will reset the Windows apps store without deleting any already installed applications or changing any user settings.
WSReset.exe4: Clear Temporary Files
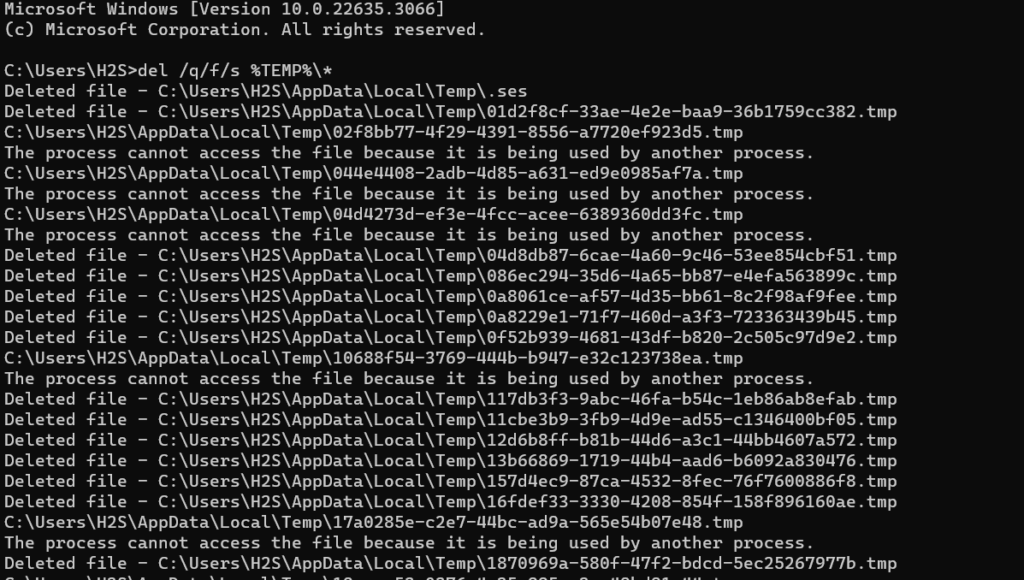
To store the information temporarily for performing various actions properly on the system: running programs, file transfer, or the system itself creates temporary files. Although, most of the time these files get deleted automatically, however, if you need to do that manually then for that the command is given below:
Type the following command to delete all files in your Windows TEMP folder:
del /q/f/s %TEMP%\*
5. Clearing Thumbnail Cache
On Windows, the Thumbnail Cache is generated by the system which helps in loading the images and icons faster. For example, when we open a folder with hundreds of images, it will take a few seconds to show their Thumbnails, however, once the system creates the cache for the images, the next time it will quickly load the Thumbnails, and eventually, this will increase the performance and also speed up the process. However, if for some reason the Thumbnail cache is corrupted then here is the command to delete it, so that our system can generate the same again.
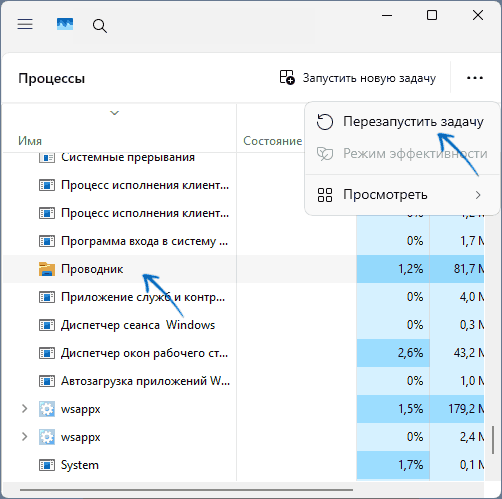
First, stop the Windows Explorer process by typing:
taskkill /f /im explorer.exeRunt the command to clear all Thumbnail cache:
del /f /s /q %LocalAppData%\Microsoft\Windows\Explorer\thumbcache_*.db Restart the Explorer again using the command:
start explorer.exe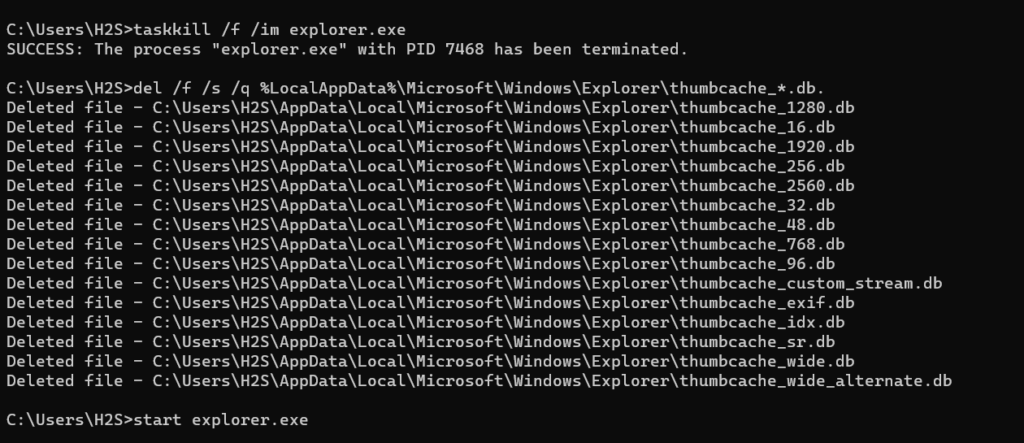
Conclusion
We have listed a few commands that are easy to remember and also help in quickly removing unwanted cache files to resolve various system issues along with freeing up disk space. Apart from that, removing cache files from time to time ensures our system’s smooth performance.
FAQs
Q: Is there any chance that clearing the Windows cache deletes personal files or settings?
A: No, clearing the Windows cache will not affect the user’s settings or files. It will only delete the temporary files that are not essential in the working or operations of the system.
Q: When and how many times a user should clear Cache files?
A: There is no specific time but if you install and uninstall programs often or perform internet browsing a lot then it is a good idea to clear the Cache at least once in a month.
Q: Will deleting the DNS cache increase the internet or web browsing speed?
A: No, clearing the DNS cache could solve some internet connectivity issues if there is a problem in Domain name resolution however, will not directly impact or increase the internet speed.
Windows Cache is a software or hardware component used for storing data to increase the CPU response time and improve user experience. Different sources produce different caches that are stored in different locations. Therefore, the location of a cache is not fixed.
In order to understand how important a cache is, let us look at an example- If you visit a website, the system stores the data from this site as a cache so that the next time when you visit that particular site, it loads faster.
There are various kinds of cache like Windows update and store cache, browser cache, thumbnails and icon cache, temporary files and DNS cache etc.
Quick Overivew
Clearing these caches from time to time not only helps enhance the performance of your computer but also frees up some memory space. Let us look at the ways to delete all such caches from your Windows 10 PC:
Method I: Clearing Windows Store Cache
This is the fastest way to clean the Windows Store Cache using run command, here are the steps:
1) Press Windows + R keys together
2) Type WSReset.exe and press the enter key.
This will open the command box without any text. The cache will be deleted in the background and will close the command box automatically, once it is done.
Method II: Clearing Prefetch files
Prefetch is created and used in the Windows Operating System to store information, this helps the OS to load the files fast. Cleaning these types of the file will help to clear the cache in Windows 10 and older versions:
1) Press Windows + R keys to open the RUN box
2) Type prefetch and press the Enter key
Click on Continue if prompted for access permission
Select all the files in prefetch and delete them.

Method III: Clearing Windows Update Cache
1) Double click on This PC to open File Explorer or use the start menu to open it
2) Go to the View tab
3) Check the box before Hidden items

4) Now, navigate to the folder C:\Windows\SoftwareDistribution\Download
5) Delete all the files and contents in the Download folder.
Method IV: Clearing Thumbnail Cache
1) Open File Explorer or This PC.
2) Go to the View tab.
3) Check the radio-button box beside Hidden items
4) Now, navigate to C:\Users\Username\AppData\Local\Microsoft\Windows\Explorer
Note: Her ‘Username’ will be replaced by your current system id.
5) Select all the files with names beginning with thumb cache.
6) Press Shift + Delete keys together to delete the files permanently.
Method V: Clearing DNS Cache using CMD
Clearing the DNS cache is not a tough task, I have already explained how to use command prompt to clear DNS cache, but if you want to go manual way, there here are the steps:
1) Go to Start and type command prompt.
2) Now select the Run as Administrator located on right-hand-side

3) Select Yes if prompted by the User Account Control dialogue box.
4) In the cmd, type ipconfig/flushDNS and press Enter.
5) Close the command prompt.
Method VI: Clearing Windows Browser Cache
If you use Internet Explorer then many temp files and cache stored on your system. This is important to clear the cache time to time to remove unnecessary files from the system:
1) Click on the start menu and type Internet Options.
2) Click on Tools >> Internet Options
3) Click on Delete button
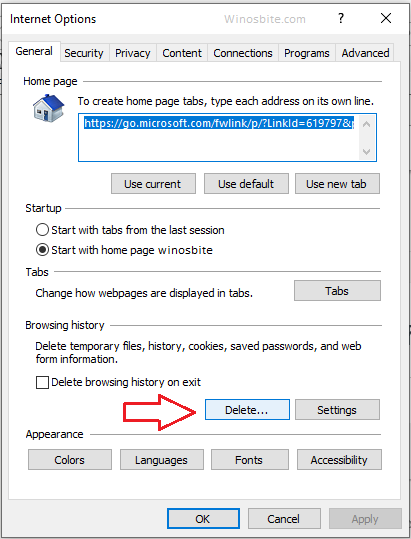
4) Click on Delete button again
5) Now close the tab and restart Internet explorer.
Method VII: Clearing Windows Icon Cache
1) Open File Explorer
2) Go to the View tab.
3) Check the Hidden items box
4) Then, navigate to C:\Users\Username\AppData\Local\Microsoft\Windows\Explorer
5) Select all the files whose name begins with iconcache
6) Press Shift + Delete to delete them permanently.
Method VIII: Clearing Temporary Cache files
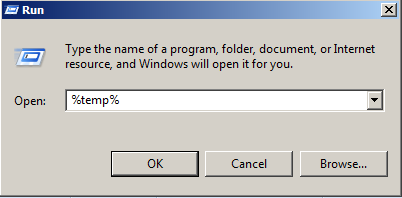
1) Open RUN, type %temp% and hit Enter
2) Press Ctrl + A to select all files. Right-click on them and select Delete
3) Open RUN again, type temp and hit Enter
4) Press Ctrl + A to select all files. Right-click and select Delete.

Method IX: Clearing Windows System Restores Cache
1) Right-click on This PC and select Properties
2) Click on System Protection on the left panel
3) Select the system drive and click on Configure
4) Click on Delete and then on OK.
This will delete all restores point except the latest one.
Learn how to clear recycle bin using command prompt.
Method X: Clearing Windows Unnecessary Files Cache
1) Open the RUN box, type Cleanmgr and press the Enter key
2) In Disk Cleanup, select the hard drive you want to clear the cache from and click on OK
3) Check the boxes beside the files you want to delete or select all to delete all files
4) Click on Clean up system files and then on OK.
DNS-кэш сохраняет IP-адреса посещенных сайтов на локальном компьютере, чтобы в следующий раз загружать их быстрее.
Если у вас регулярно возникает ошибка 404, то вам может помочь очистка DNS-кэша. Например, вы перенесли сайт на другой сервер и у сайта изменился IP-адрес. Чтобы браузер открывал сайт с нового IP-адреса, необходимо удалить закэшированный IP из DNS-кэша.
Как очистить DNS-кэш в операционной системе
Очистить DNS-кэш в операционных системах не трудно — нужно всего лишь ввести одну команду через консоль.
Windows 10, 11
- Откройте меню Пуск и в строке поиска введите cmd. Найдется пункт Командная строка (cmd.exe). Кликните на него правой кнопкой мыши и выберите пункт Запуск от имени администратора.
- В открывшемся окне введите команду ipconfig/flushdns и нажмите Enter. Готово!

Ubuntu
- Найжмите сочетание клавиш ctrl+alt+T. Откроется Терминал. Его также можно найти в списке приложений..
- Введите команду sudo systemd-resolve —flush-caches, а затем укажите пароль администратора. Готово!

macOS 10.14 Mojave
- Нажмите на иконку поиска в правом верхнем углу и найдите в поиске Терминал.
- В Терминале введите команду sudo killall -HUP mDNSResponder; sleep 2; а затем укажите пароль администратора. Готово!

Как очистить DNS-кэш в браузере
У современных браузеров есть свой DNS-клиент, который тоже кэширует IP-адреса. После очистки кэша в системе рекомендуем дополнительно очистить DNS-кэш в браузере.
Google Chrome, Opera, Яндекс.Браузер, Vivaldi
Этот способ подходит для очистки DNS-кэша в браузерах, основанных на Chromium.
- В строке браузера введите адрес chrome://net-internals/#dns. В открывшемся окне нажмите кнопку Clear host cache.
- В том же окне нажмите на пункт Sockets и нажмите Flush socket pools. Готово!

Mozilla Firefox
- Откройте меню и выберите пункт Настройки.
- Откройте раздел Приватность и защита и найдите пункт Куки и данные сайтов.
- Нажмите кнопку Удалить данные. Откроется новое окно, в нем нужно снять галочку напротив пункта Куки и данные сайтов и нажать кнопку Удалить.
- Готово! Можно закрывать окно с настройками.

Если этот метод не сработал, то очистите DNS-кэш через окно тонких настроек браузера.
- Откройте страницу about:config и нажмите кнопку Я принимаю на себя риск.
- В поле поиска введите network.dnsCacheExpiration. Измените найденное значение на 0, нажмите ОК, а затем снова верните его на 60.
- Затем в поле поиска найдите значение network.dnsCacheEntries и после, как и с прошлым пунктом, измените его значение на 0, нажмите ОК и снова верните значение на 60.
- Готово!

Если вам понравилась статья, то подписывайтесь на наш телеграм-канал, чтобы не пропустить другие полезные материалы.
Управляйте DNS и веб-сервером с ispmanager!
Ispmanager — панель управления сайтами, веб-сервером и сервисами на нём. Подходит для хостинга на Linux и делает администрирование проще.
- Управление сервером без консоли, в простом интерфейсе.
- DNS-сервер.
- Автоустановщик CMS и веб-приложений.
- Мощный файловые менеджер.
- Установка различных видов СУБД SQL на один сервер.
- Поддержка мультиверсионности PHP.
Скачайте бесплатную пробную версию и попробуйте сами!
Попробовать ispmanager
Некоторые пользователи могут столкнуться с тем, что иконки (значки) файлов, папок и ярлыков в Проводнике и на рабочем столе Windows отображаются неправильно или с иными проблемами: например, показ одинаковых значков по умолчанию для различных типов файлов. В этом случае может помочь очистка их кэша.
В этой инструкции подробно о том, как очистить кэш иконок в Windows 11 или 10 и дополнительная информация на тему, которая может оказаться полезной.
Ручное удаление файла IconCache.db
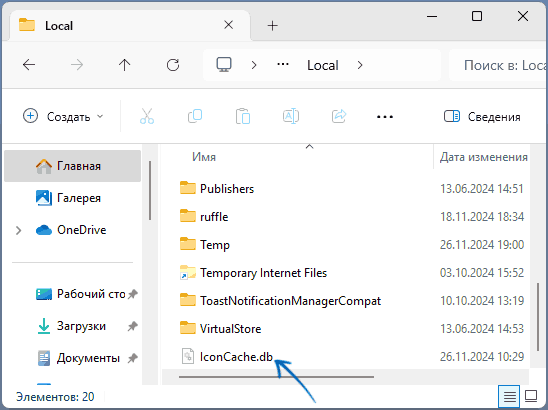
Кэш значков Windows 11/10 и предыдущих версий ОС для текущего пользователя хранится в файле базы данных IconCache.db. Соответственно, для его очистки достаточно удалить этот файл, после чего он будет автоматически создан вновь.
Сделать это можно вручную в Проводнике, используя следующие шаги:
- В Параметрах Проводника на вкладке «Вид» (перейти в параметры можно в меню Проводника или с помощью команды Win+R — control folders) отключите опцию «Скрывать защищенные системные файлы» и включите опцию «Показывать скрытые файлы, папки и диски», примените настройки (подробно про включение показа скрытых и системных файлов).
- Введите
%userprofile%\AppData\Local
в адресную строку Проводника и нажмите Enter.
- В открывшейся папке вы найдёте файл IconCache.db, удалите его.

- Перейдите в папку
%userprofile%\AppData\Local\Microsoft\Windows\Explorer
и удалите все файлы, имена которых начинаются с iconcache в этой папке. Если при этом вы увидите сообщения об ошибках, используйте метод с командной строкой, описанный далее.
- Перезапустите Проводник (explorer.exe) — сделать это можно в диспетчере задач (или перезагрузите компьютер).

Готово, кэш значков будет очищен и создан заново.
Командная строка
Возможно, более простым способом будет использование командной строки или же создание bat-файла для очистки кэша иконок. В случае с командной строкой достаточно запустить её от имени администратора, после чего по порядку ввести команды (после второй команды пропадёт рабочий стол, но последняя его вернёт):
cd /d %userprofile%\AppData\Local
taskkill /f /im explorer.exe
attrib -h iconcache.db
del iconcache.db
cd /d %userprofile%\AppData\Local\Microsoft\Windows\Explorer
attrib -h iconcache_*.db
del iconcache_*.db
start %windir%\explorer.exe
Если эти же команды прописать в командный файл .bat, то очистку кэша значков и перезапуск Проводника будет выполнять простой запуск этого файла, лучше от имени администратора.
Некоторые дополнительные нюансы в контексте темы очистки кэша иконок:
- Если проблемы возникли с отображением миниатюр (эскизов), очистить их можно в утилите «Очистка диска» (Win+R — cleanmgr)
- Очистка эскизов также возможна в командной строке:
cd /d %userprofile%\AppData\Local\Microsoft\Windows\Explorer
taskkill /f /im explorer.exe
attrib -h thumbcache_*.db
del thumbcache_*.db
start %windir%\explorer.exe
- Существуют сторонние программы для очистки кэша иконок, например, IconsRefresh (разработка более не ведётся, но утилита исправно работает и в Windows 11).
В случае, если у вас остаются вопросы, касающиеся кэша значков Windows, вы можете задать их в комментариях ниже, я постараюсь помочь.
This article aims to give a detailed information about Windows 10 cache. Besides, you will also learn about how to clean up your computer by clearing system cache with some effective methods provided by MiniTool Solution.
What Is A Cache
Most Windows users might have heard about cache. But what is a cache exactly?
Windows cache is a special high-speed storage mechanism. It can be either a reserved section of main memory or an independent high-speed storage device. In other words, a cache is a hardware or software component which is used to store data. The cached data can be either the result of an earlier request or a copy of the existing data stored in other places.
With a cache, the future requests for the specific data can be responded faster. For example, when you visit a webpage for the first time, the information of this page will be cached on your computer. Then, you can reach this page faster next time, as the requested data can be found easily and quickly in the cache.
The location for Windows cache is not fixed. The cached data from different resources might be saved in different paths. The best-known storage path of cache in Windows should be C:WindowsTemp, which stores a lot of system temporary files.
Tips:
Discover MiniTool System Booster: Unlock Disk Space and Deep-Clean Your PC.
MiniTool System Booster TrialClick to Download100%Clean & Safe
Why do You Need to Clear System Cache Windows 10
As you can see in the last part, the cached data is a set of temporary files used by apps, programs or the operating system on your computer. It’s true that your Windows could store a significant amount of cache, making your system run faster and be more responsive.
However, the cached data might bring some problems to your computer, and you need to clear system cache from time to time. Here are some reasons why you need to do this:
- The cache brings convenience only when you have enough free storage space and free RAM, or a high-performance CPU on your computer. If your computer cannot meet the requirement, the cache might slow your PC down in a short period of time.
- If you don’t clear cache regularly but let it cumulated overtime, the disk space might run out quickly and your computer might run into dreaded problems like Windows 10 blue screen of death or other unforeseen issues.
- Sometimes, certain cached data used to help your operating system function might get corrupted. If you don’t clear the corrupted cache on time, your PC might crash and the performance will be affected.
Therefore, it should be a routine for Windows users to clear cache regularly to get some fresh and intact data.
How to Clear System Cache on Your Windows 10 Computer
After learning about why we need to clear cache, it’s time to take action if you haven’t managed cache for long time. Do you know how to clear cache on Windows 10 computer?
Actually, there are several types of cache, and they are stored in different place. So, you might use different ways to delete these cached files. Fortunately, this post displays how to delete cache of different type, and you can have a try.
How to Clear System Cache Windows 10
- Clear the Temporary Files in Settings
- Employ Disk Cleanup Utility
- Clear the Windows Store Cache
- Clear Browser Cache
- Clear Cache in File Explorer
- Clear System Restores Cache
- Clear DNS Cache
- Clear System Cache Windows 10 Using MiniTool Partition Wizard
Method 1: Clear the Temporary Files in Settings
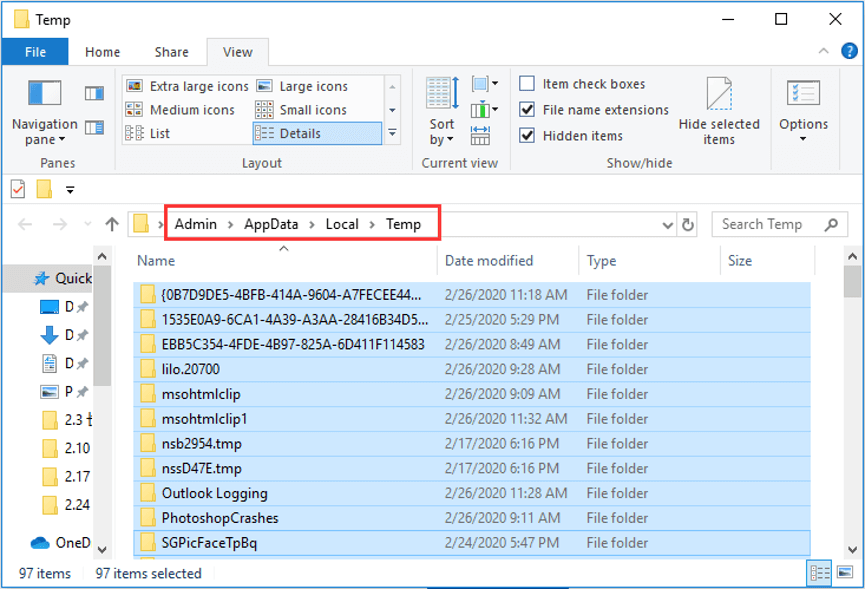
Temporary file is a common type of cache in your computer. By default, temporary files are stored in the path of C:UsersAdminAppDataLocalTemp. To clear them, you can press Windows + R to open Run window, input %temp% and click OK to open the Temp folders. Then, delete all the temporary files and folders in it.
However, if you want to clear other system cache together with temporary files, it should be a better choice to make it in Windows Settings. This is also a commonly-used method to remove cache for Windows users. Here’s how to do it.
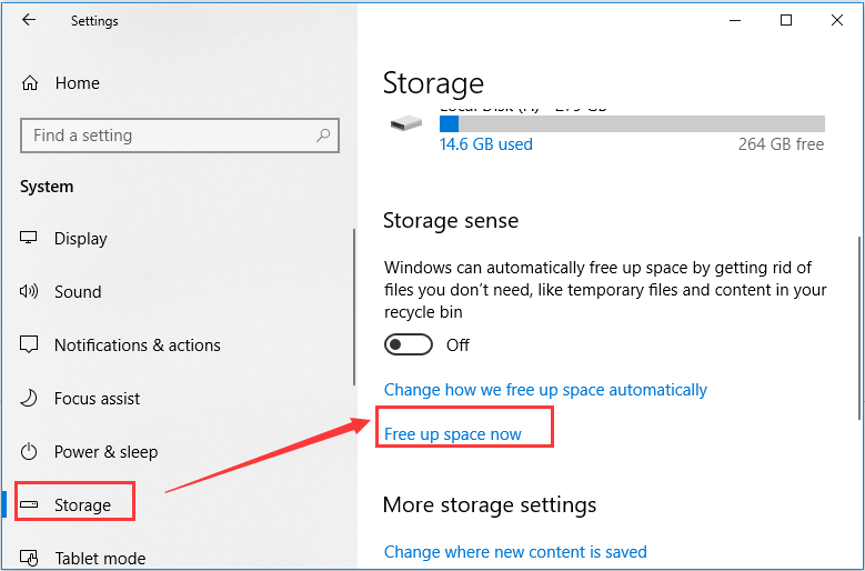
Step 1: Right-click Start button and click Settings to open it.
Step 2: Choose System category.
Step 3: Turn to Storage tab in the left pane and click Free up space now under Storage sense section in the right pane. It will start scanning the data on your hard drive and you need to wait for the process to be completed.
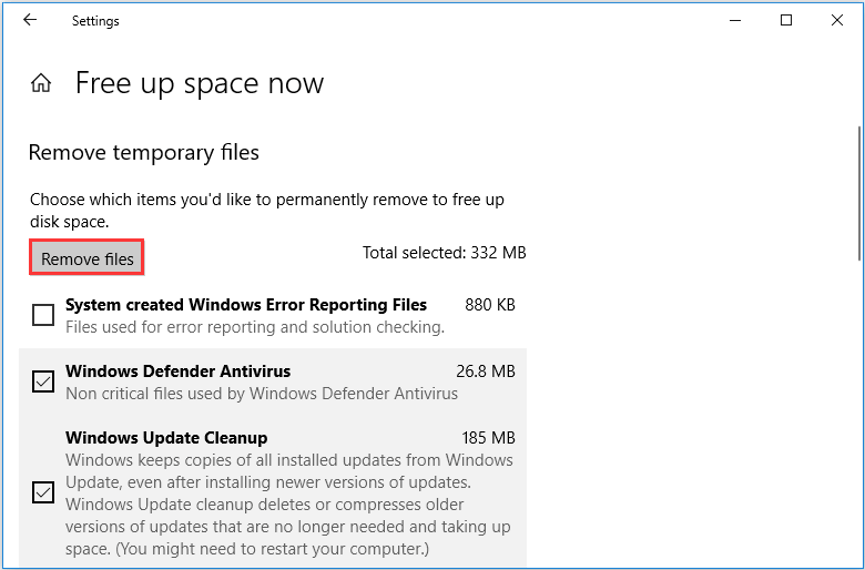
Step 4: Check the items you want to delete and click Remove files button.
Note: Before you select and remove an item, please read carefully its description.
After that, just wait patiently until the cleaning process is finished. This is an effective way to clear various cache and is also a nice method to free up disk space.
Method 2: Employ Disk Cleanup Utility
Disk Cleanup is a built-in feature in your Windows 10. You can also use this tool to clear different types of system cache and other unnecessary files. Here’s a simple guide for you.
Step 1: Press Windows + S, search for Disk Cleanup and double-click the search result to open this tool.
Step 2: In the pop-up window, select the drive you want to clean up from the drop-down menu and click OK.
Step 3: Wait patiently until the tool finishes scanning this drive. Then, in the new window, click Clean up system files to scan for more system cache.
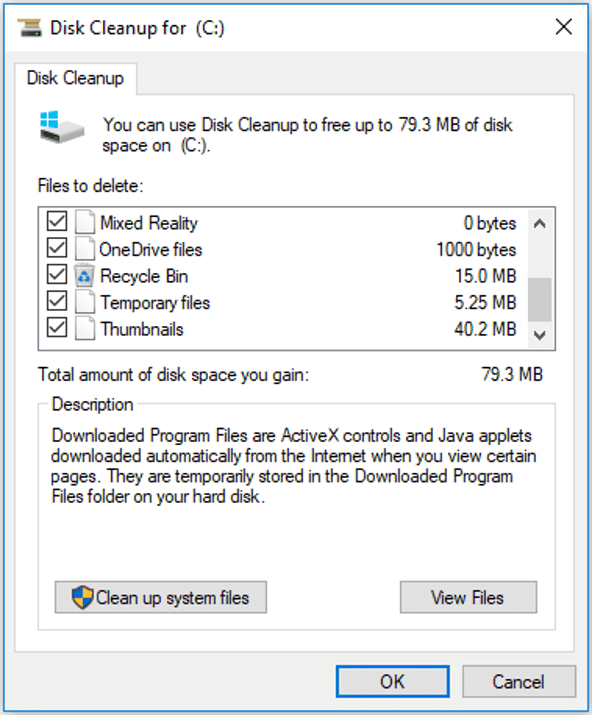
Step 4: Now, the files that can be cleared will be listed here, and you just need to check the items you want to delete. Then, click OK button to clear all the selected files.
Method 3: Clear the Windows Store Cache
Windows Store will create temporary files when you are downloading apps. Sometimes, you might run into certain problems while using your Windows Store. Chances are that the Windows Store cache is corrupted or faulty. Thus, one of the methods to solve issues related Store app is to clear its cache.
To remove your Windows Store cache, just type wsreset.exe in Run dialog and click OK. Then, the Command Prompt will appear without text. You need wait patiently, as it is deleting Store cache in background. Once it’s done, the Store app will launch and the Command Prompt window will disappear automatically.
Note: To open WSReset.exe, you can also go to C:WindowsSystem32 to find WSReset file. Right-click it and click Run as administrator.
Method 4: Clear Browser Cache
When you visit websites on your browser, some cached files will be created. You can delete these cached data within your browser. How to delete cache in browser? Here, I take Google Chrome as an example:
Step 1: Open your Chrome, click the three-dot icon, and choose More tools > Clear browsing data.
Step 2: Set the Time range to All time, check Cached images and files, and click Clear data button to clear all your browser cache. Of course, you can choose other items to clear.
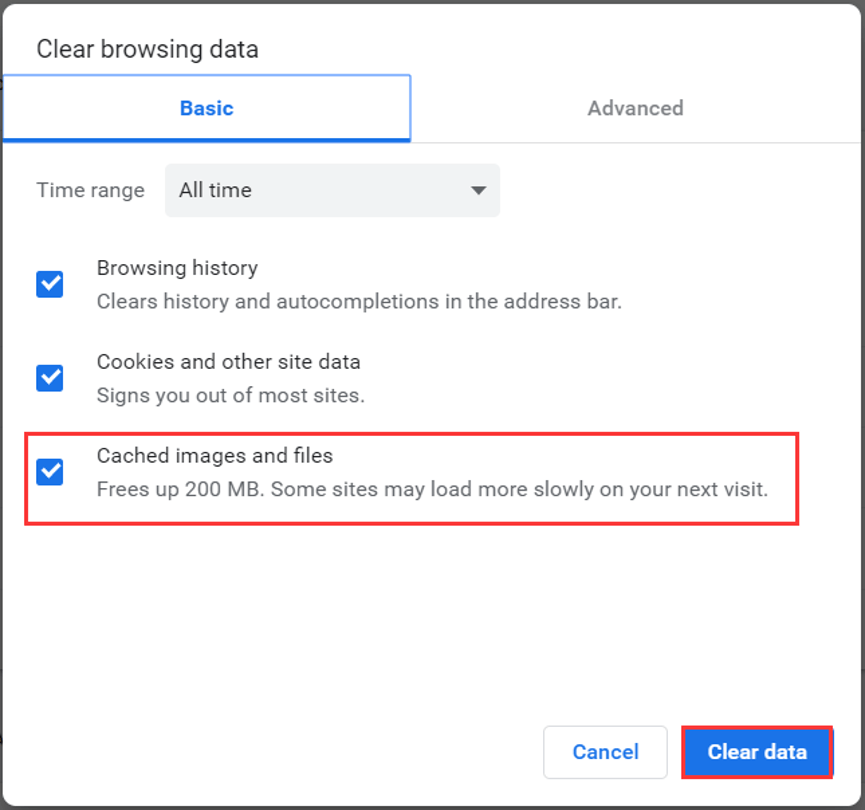
Then, the cached files related to your browser will be removed soon.
Method 5: Clear Cache in File Explorer
As most cached files can be found in File Explorer, you can also go to File Explorer to clear certain types of cache in a targeted way. Except the temporary files mentioned before, some other cache that are commonly managed in File Explorer are listed here.
Note: Some of these system cached files might be hidden in File Explorer. Before clearing cache, you’d better go to View tab in tool bar and check Hidden items to show all the hidden files.
- Windows thumbnail cache: To clear Windows thumbnail cache, you can go to “C:UsersUsernameAppDataLocalMicrosoftWindowsExplorer”. Then, open Explorer folder and delete all the files with the word thumbcache in their names.
- Windows icon cache: This is a hidden file named IconCache.db under the directory of “C:UsersUsernameAppDataLocal”. Besides, you can also find this type of cache in Explorer folder and these files have iconcache in their names.
- Windows update cache: This is also hidden by default. You can go to “C:WindowsSoftwareDistributionDownload” and delete all the content of Download folder to clear Windows update cache.
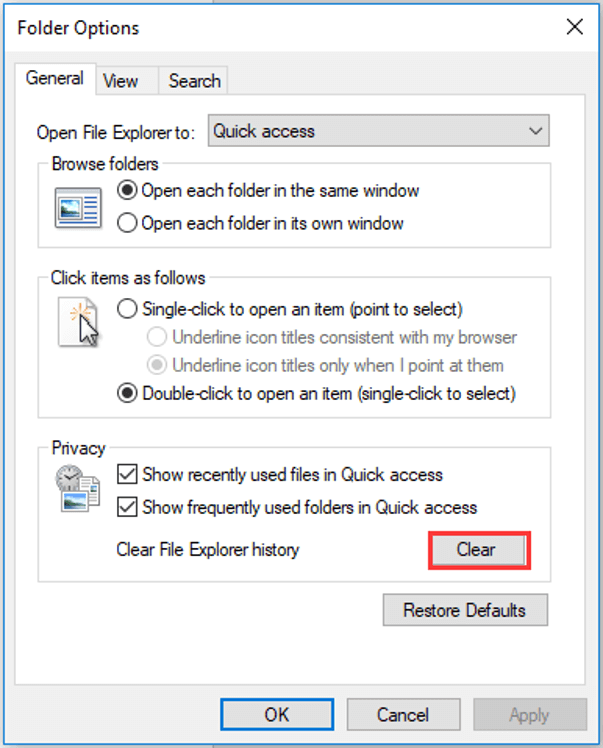
- File Explorer history: Besides the cache created by your system or from other resources, File Explorer also maintains its own cache. You can also clear it to improve performance or free up disk space. Just go to View tab and click Options in the ribbon. In the General tab, click Clear button in Privacy section.
Method 6: Clear System Restores Cache
It is a nice choice to create a system restore point before big events like Windows update for system protection. Because certain operations might be risky and bring some issue to your computer, and even may crash your system down. With the stem restore point, you can restore your computer to earlier date to resolve various problems.
You are allowed to set the maximum disk space used for system protection. When the assigned space is running out, you might need to delete the older restore points to spare room for new one. You can follow the steps below to clear your system restores cache.
Step 1: Type restore in the Search bar and double-click Create a restore point from the search result.
Step 2: Under System Protection tab, choose your system drive and click Configure button.
Step 3: In the new window, click Delete button.
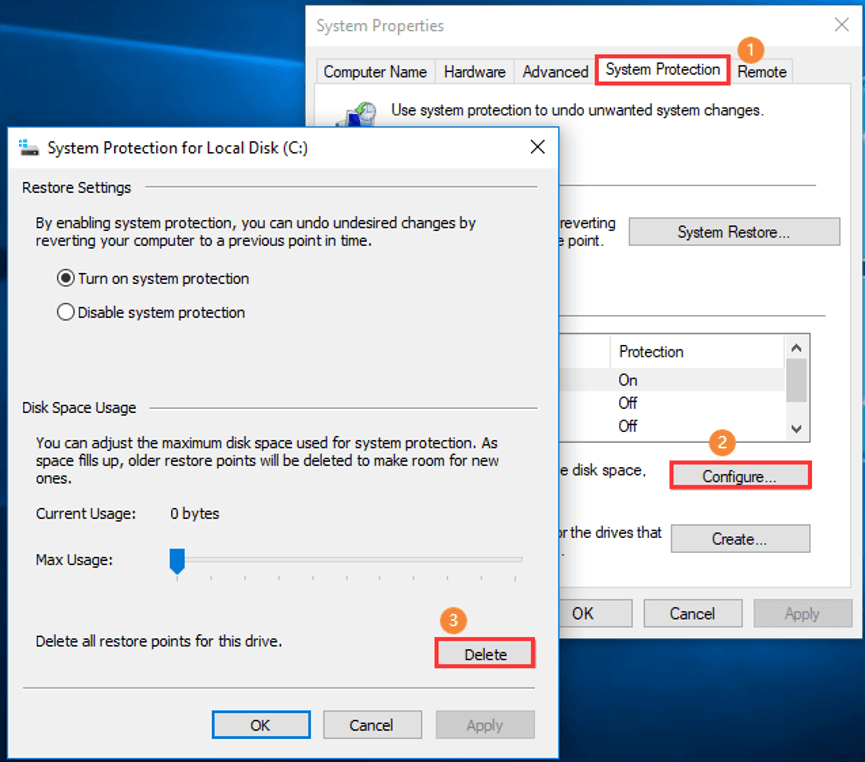
This operation will delete all the restore points for this drive, and then you can create a new restore point.
Method 7: Clear DNS Cache
If you are experiencing certain problems during browsing on the internet, clearing DNS cache is another great solution. This is also a rather simple operation.
You just need to open Command Prompt, type the command ipconfig/flushdns, and press Enter. To get more detailed information on flushing DNS cache, you can read this post: How to Flush DNS Resolver Cache in Windows 10/8.1/7
Method 8: Clear System Cache Windows 10 Using MiniTool Partition Wizard
After learning about some types of cache in Windows 10 and how to clean up your computer by clearing these cached data, you might want to clear cache for your PC immediately. But wait for a moment. I will introduce a useful third-party program – MiniTool Partition Wizard to help you remove cache more conveniently.
This is an all-in-one disk manager designed for Windows users. It offers a feature of Space Analyzer to help you view the hard drive space usage intuitively. You can also use this tool to help you clear system cache. Just download and install it on your computer to have a try.
MiniTool Partition Wizard FreeClick to Download100%Clean & Safe
Step 1: Launch MiniTool Partition Wizard and click Space Analyzer in the tool bar to activate the feature.
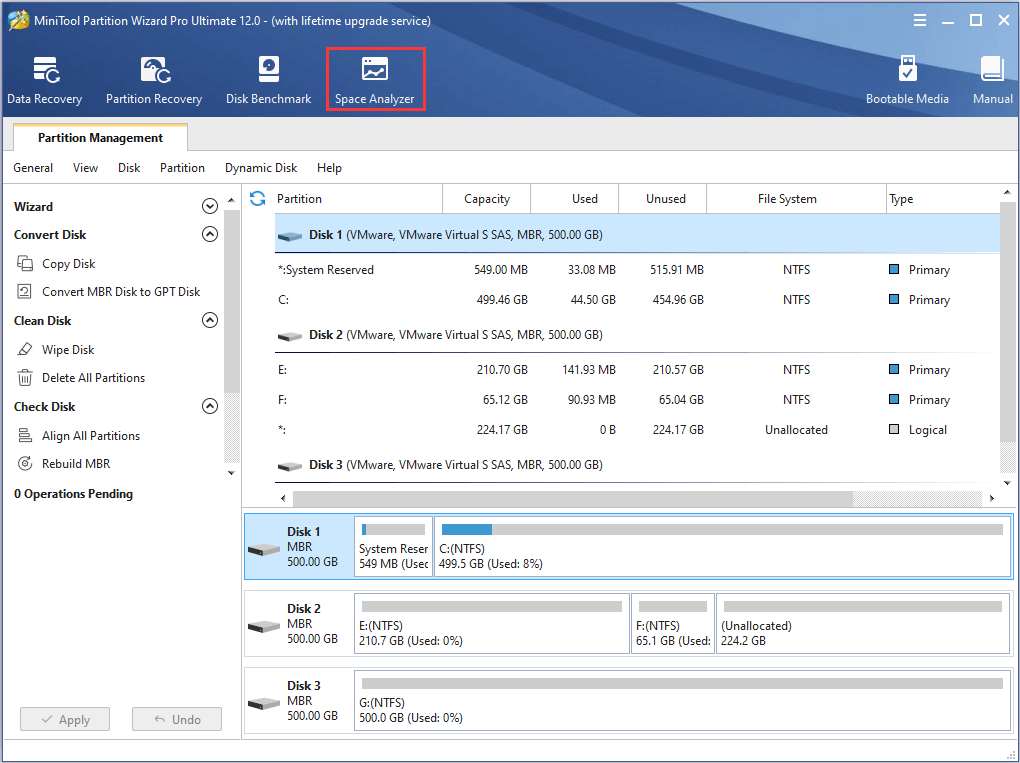
Step 2: Select a hard drive to scan from the drop-down menu and click Scan button.
Step 3: After the scanning process is completed, all the files or folders stored on this drive will be displayed. To clear certain cached files, choose File View and input file name in the empty box. Then, check Match file name only or Match entire path as your needs and click Apply button to filter the files you want.
Note: You can also go to Folder View and locate a certain folder according its path to delete the whole folder if needed.
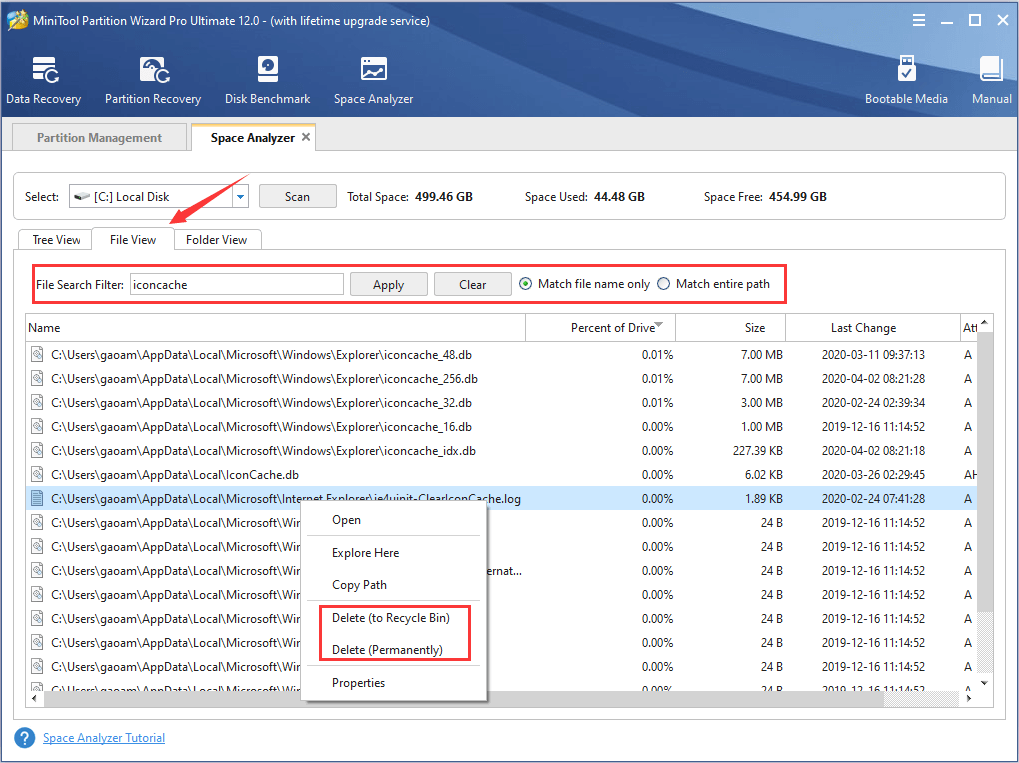
Step 4: Now, right-click the cached files you want to remove and choose either Delete (to Recycle Bin) or Delete (Permanently).
Also watch this video guide to go through all the solutions above.
This post introduces how to clear cache on Windows 10 and recommends a useful assistant. Share it with you all and hope this article could be helpful for you.Click to tweet
Bottom Line
This post has introduced how to clean up your computer by clearing cache. If you are running out of the storage space, or notice some problems on your computer, don’t hesitate to clear the cache. Now, it’s your turn. Just choose one method to clear a specific type of cache as your needs.
If you have any problems with this post, please let us know. You can either leave a message on the comment zone below or send an email to [email protected].
Clear System Cache Windows 10 FAQ
How do I run a disk cleanup from Command Prompt?
To run a disk cleanup from Command Prompt, follow the steps below:
- Press Windows + R to open Run.
- Type cmd and press Enter to open Command Prompt.
- Input the command cleanmgr.exe and press Enter to invoke the tool.
- Choose your desired drive to perform a disk cleanup.
How do I clear my Run history in Windows 10?
You need to delete Run history in Windows 10 in your Registry, as follows:
- Open Run window, type regedit and click OK to open Registry Editor.
- Navigate to the following path: HKEY_CURRENT_USERSoftwareMicrosoftWindowsCurrentVersionExplorerRunMRU
- In the right pane, delete all the strings except the Default string.