
Have you ever encountered trouble accessing a website or service and wondered why it wasn’t loading? This can sometimes be caused by an outdated DNS cache, which stores previously accessed website addresses. Fortunately, flushing the DNS cache is a simple solution to resolve these issues. In this article, we’ll guide you on how to flush DNS cache on Windows 11 and 10.
Before we move forward, it is essential to understand what a DNS cache is. In basic terms, DNS cache is a feature that stores information about your recently accessed websites and acts as a temporary database to speed up the browsing experience.
However, if a website’s IP address changes, your computer may still try to access the old address due to the cached DNS information. You may encounter errors when attempting to access the site. Hence, to fix this, you must flush DNS cache. Let’s show you how.
1. Flush DNS Cache Using Command Prompt
Command Prompt lets you do a wide variety of functions, including program launches, managing network settings, performing system administration tasks, troubleshooting common computer issues, and so on. This also includes clearing the DNS cache on the Windows machine. Follow the steps below.
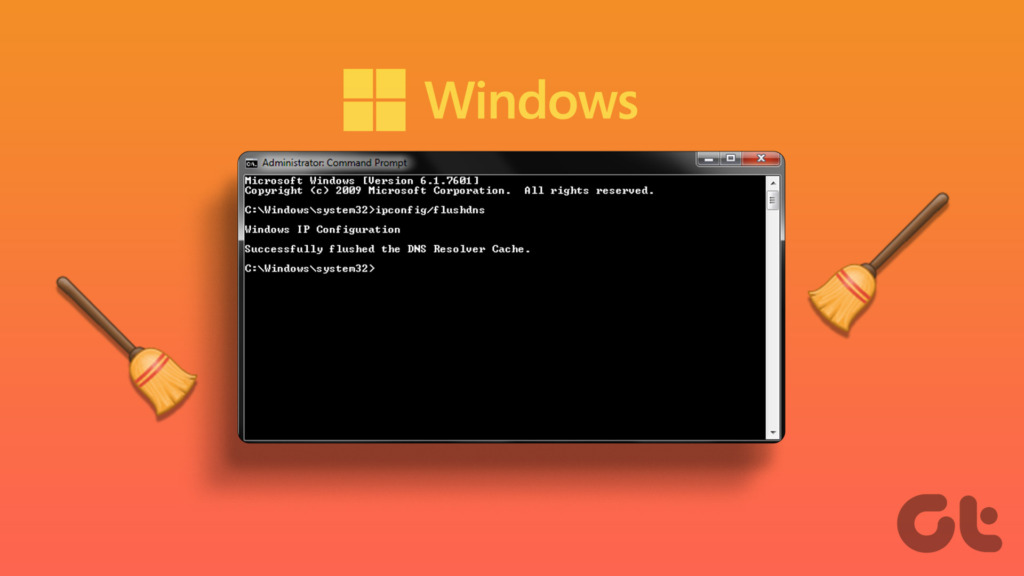
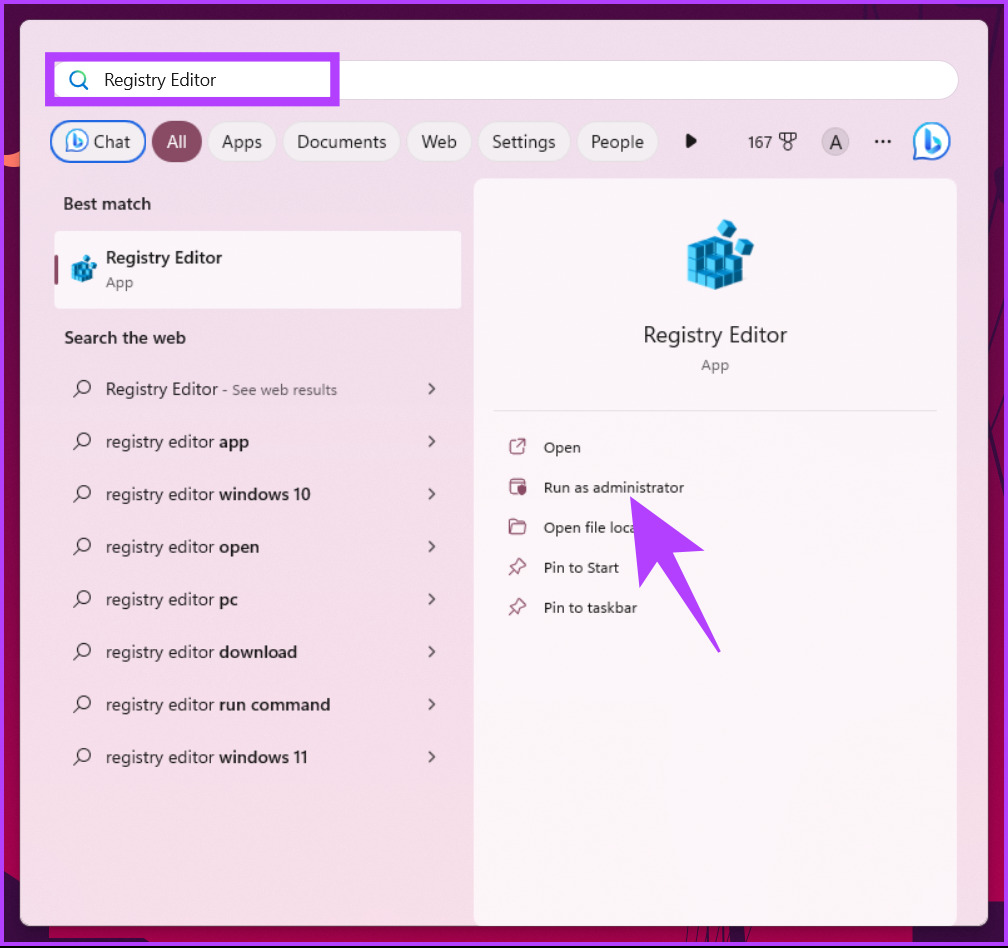
Step 1: Press the Windows key on your keyboard, type Command Prompt, and click ‘Run as administrator.’
In the prompt, select Yes.

Step 2: Type the following command and press Enter.
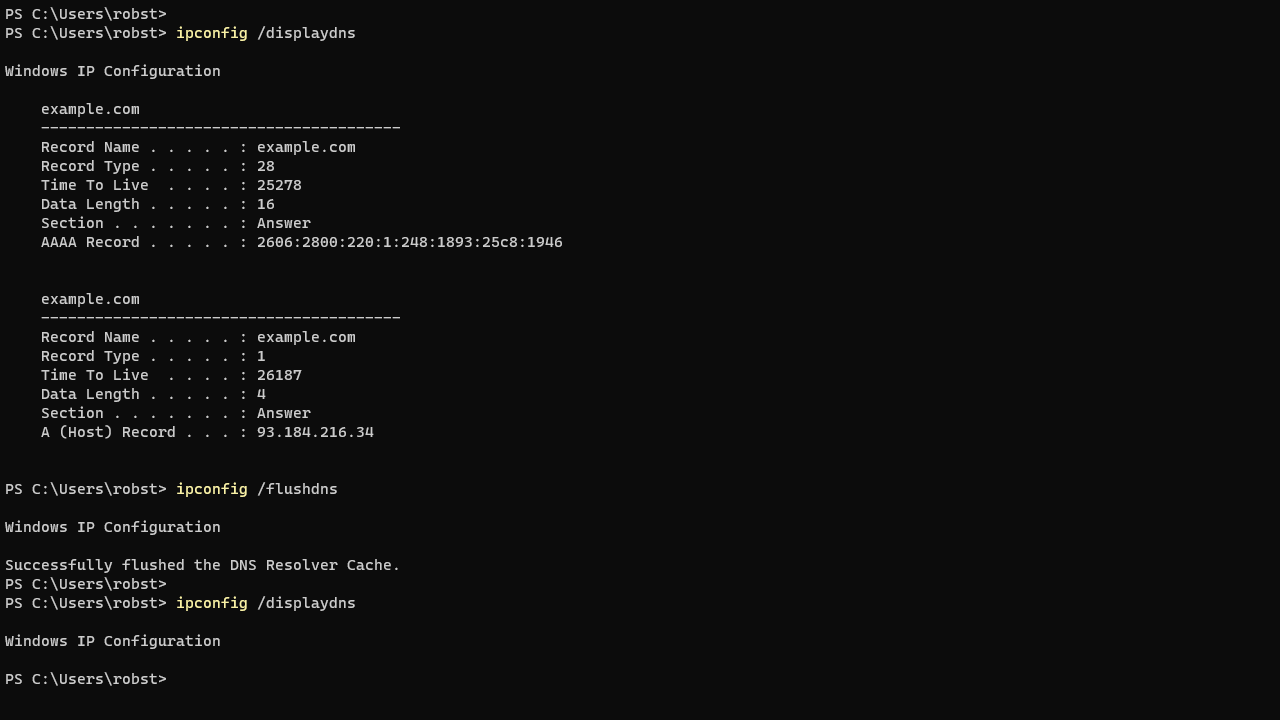
ipconfig /flushdns

Afterward, you will see a message stating that the DNS resolver cache has been flushed. If this method fails, you can check out the following method.
2. Using Windows PowerShell
PowerShell is no different from Command Prompt. Even PowerShell provides a wide range of functionalities, and clearing the DNS cache is one of them. Follow the below-mentioned steps to do so.
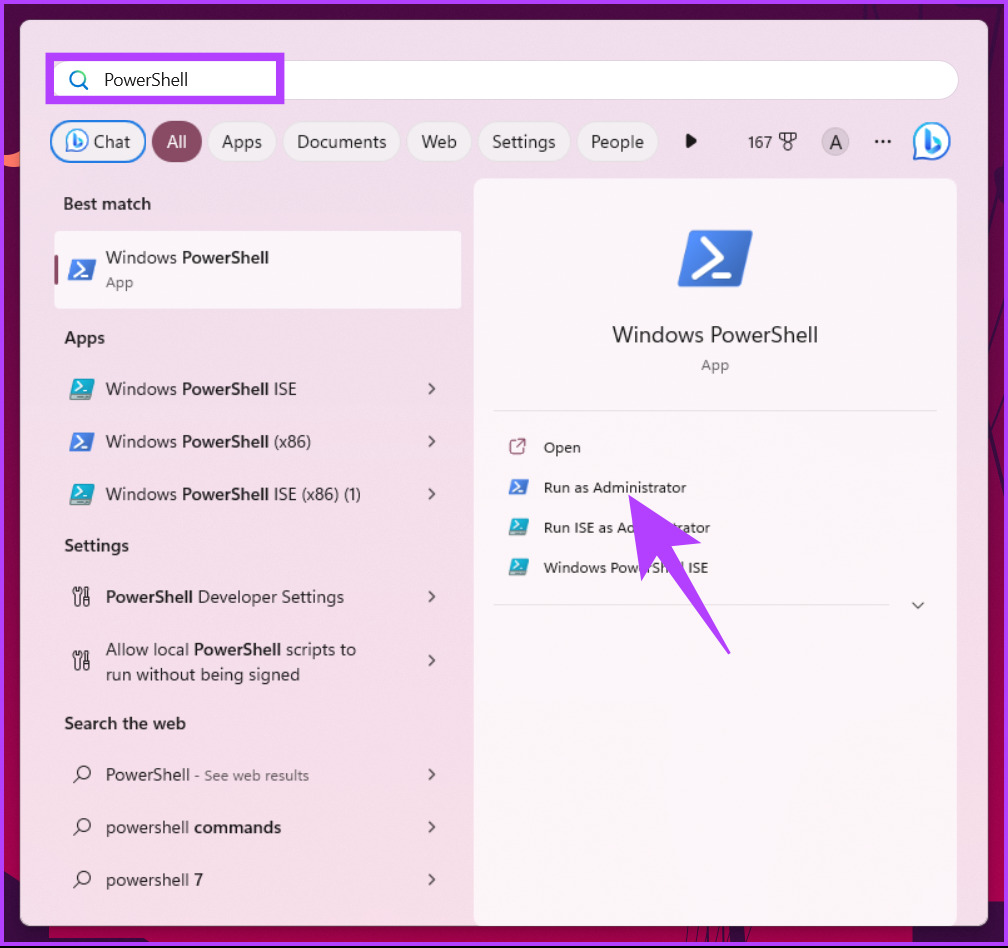
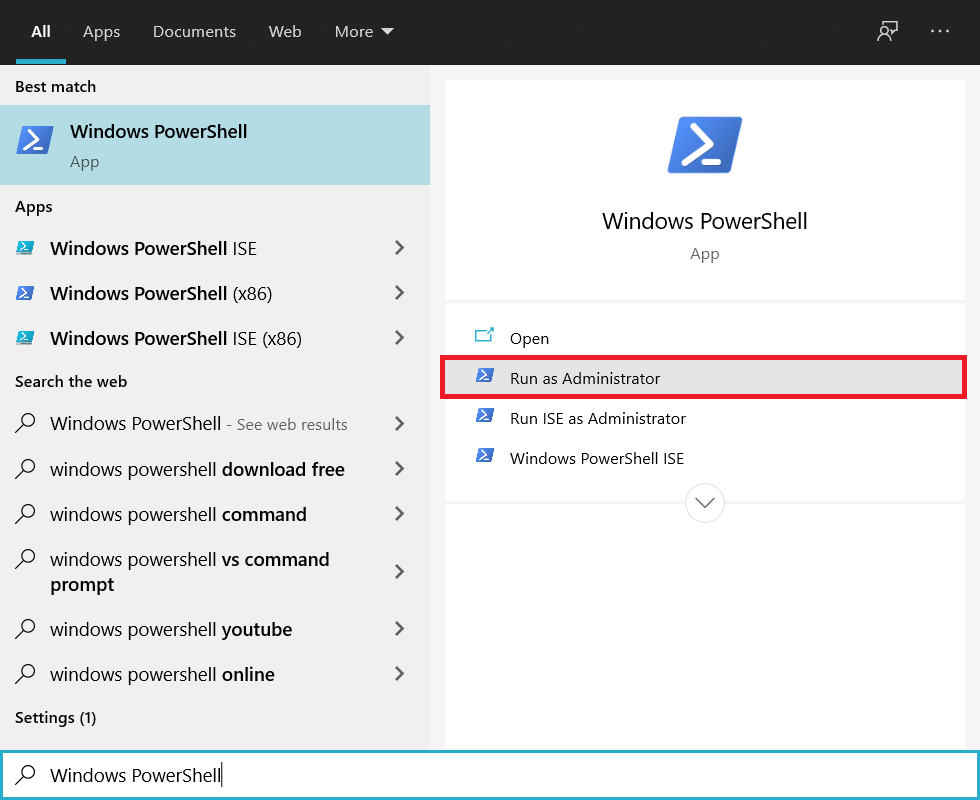
Step 1: Press the Windows key on your keyboard, type PowerShell, and click ‘Run as administrator.’
In the prompt, select Yes.
Step 2: Type the below command and press Enter.
Clear-DnsClientCache
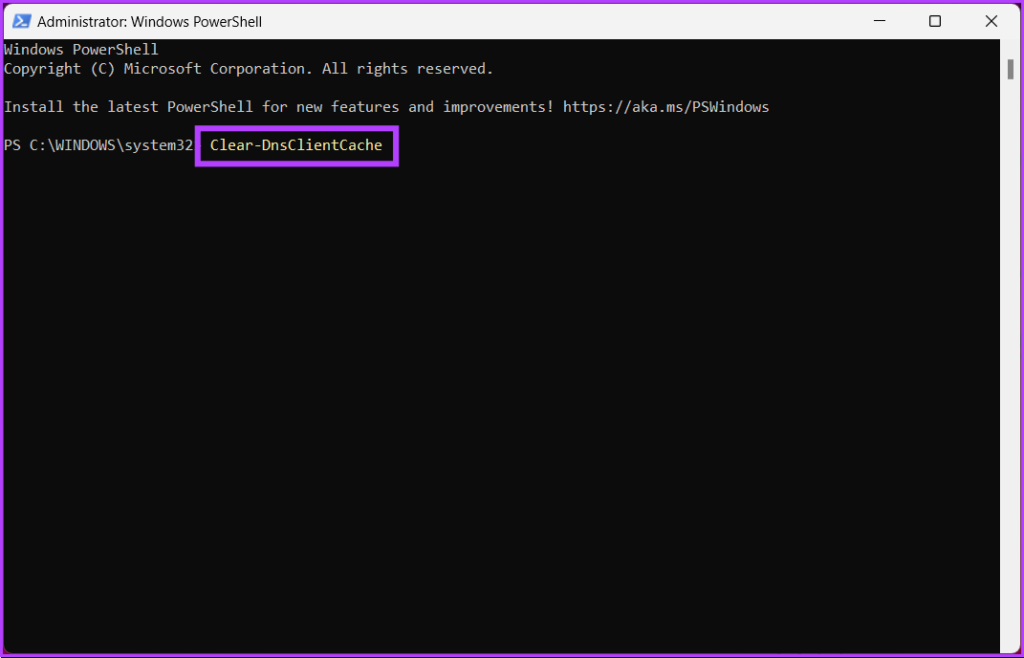
That’s it. With this, the DNS cache gets cleared hassle-free. Check out the next method if you don’t want to access the command-line terminal but want to clear the DNS cache.
3. Using Run
For this method, we will be utilizing the Run window. Considering the above two methods, this may seem easier. Follow the instructions below.
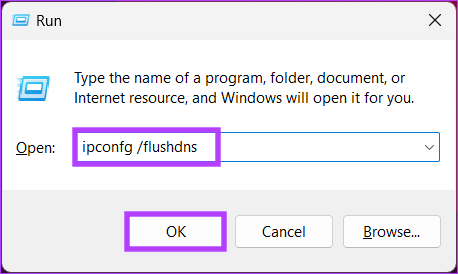
Step 1: Press the ‘Windows key + R’ on your keyboard to open the Run dialog box.
Note: Alternatively, press the Windows key on your keyboard and type Run.
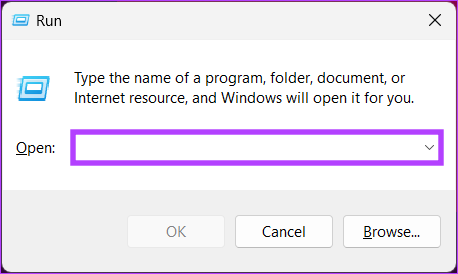
Step 2: Type the below command in the text field and click OK.
ipconfig /flushdns
You will see a command window for a split second, and your DNS cache will be flushed. If you are not looking for a one-time solution but want to access the function whenever you want quickly, jump to the next method.
4. Using a Batch File
Setting up a batch file would be of great help if you want a one-click solution that resets DNS whenever you need to. Follow the below-mentioned instructions.
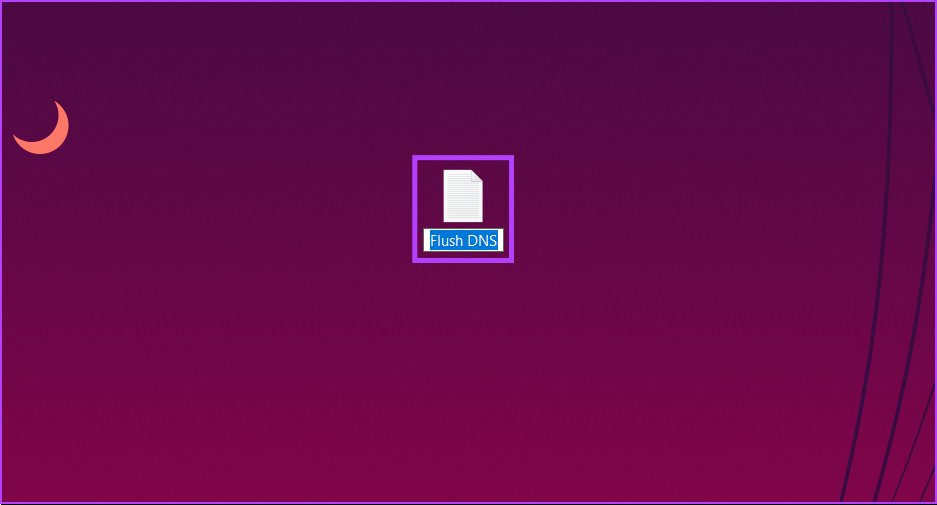
Step 1: Right-click on the desktop, select New from the context menu, and choose Text Document.
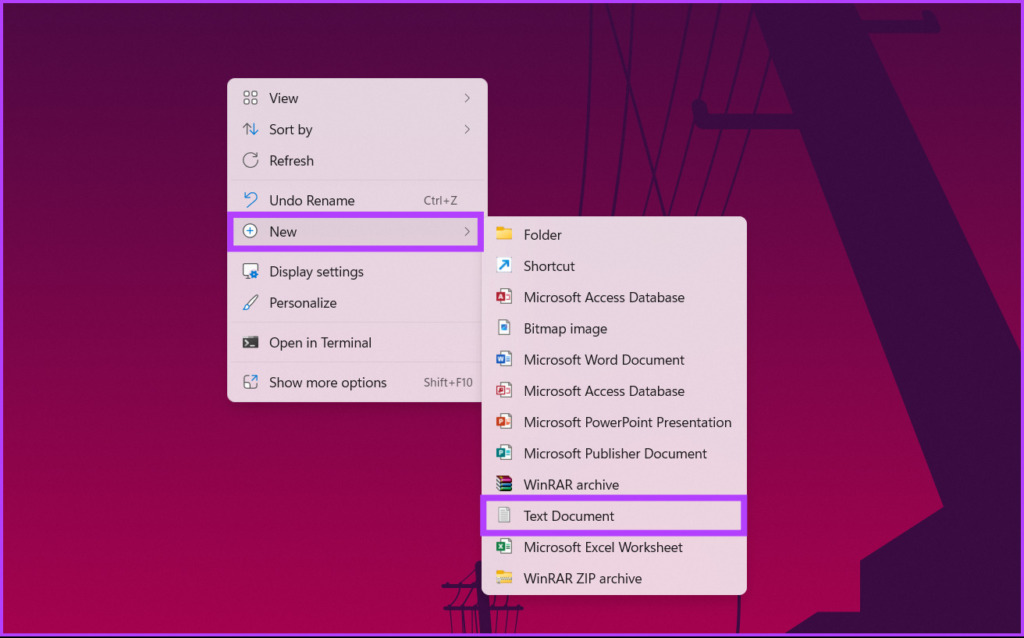
Step 2: Name the file and press Enter key on your keyboard.
Eg: Flush DNS
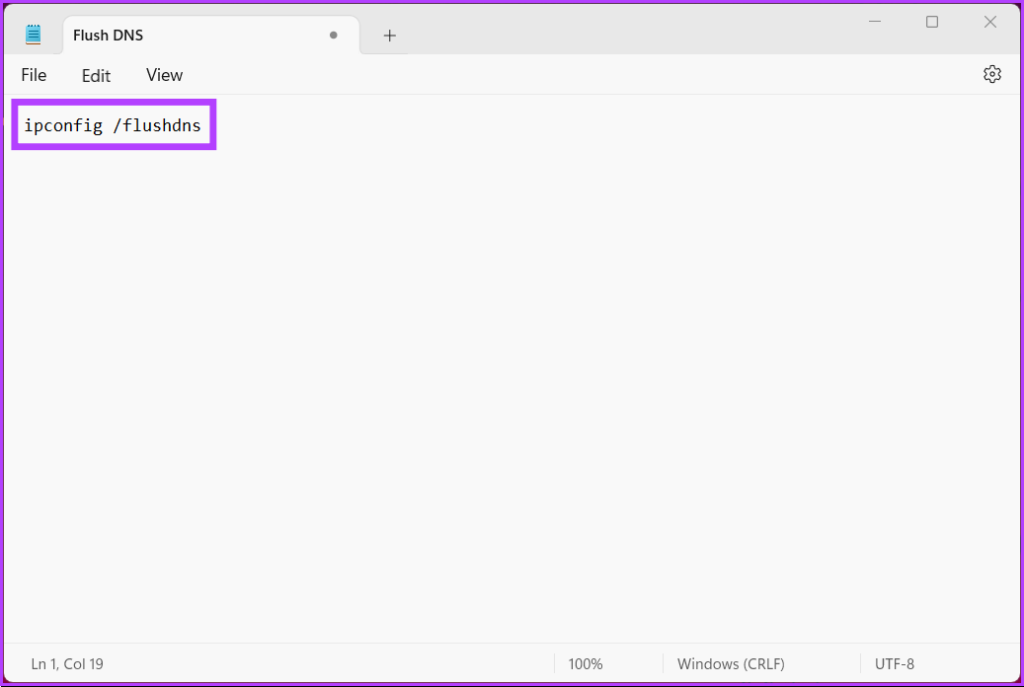
Step 3: Type the below command.
ipconfig /flushdns
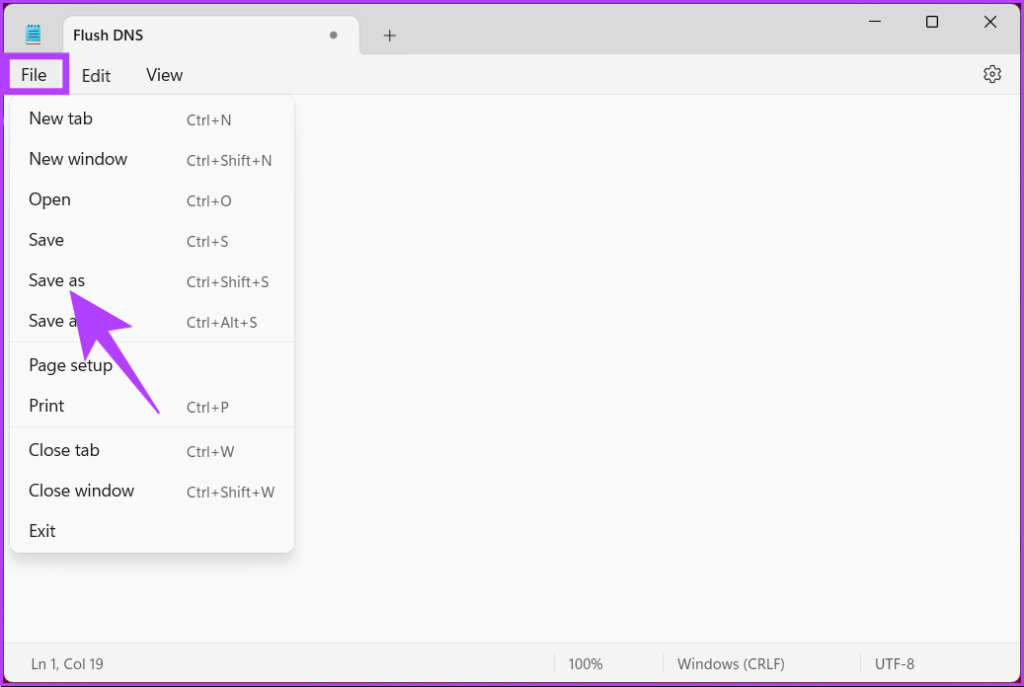
Step 4: Click on the File menu, and from the drop-down menu, click on Save as.
Note: You can also save the file by pressing ‘Ctrl+Shift+S’.
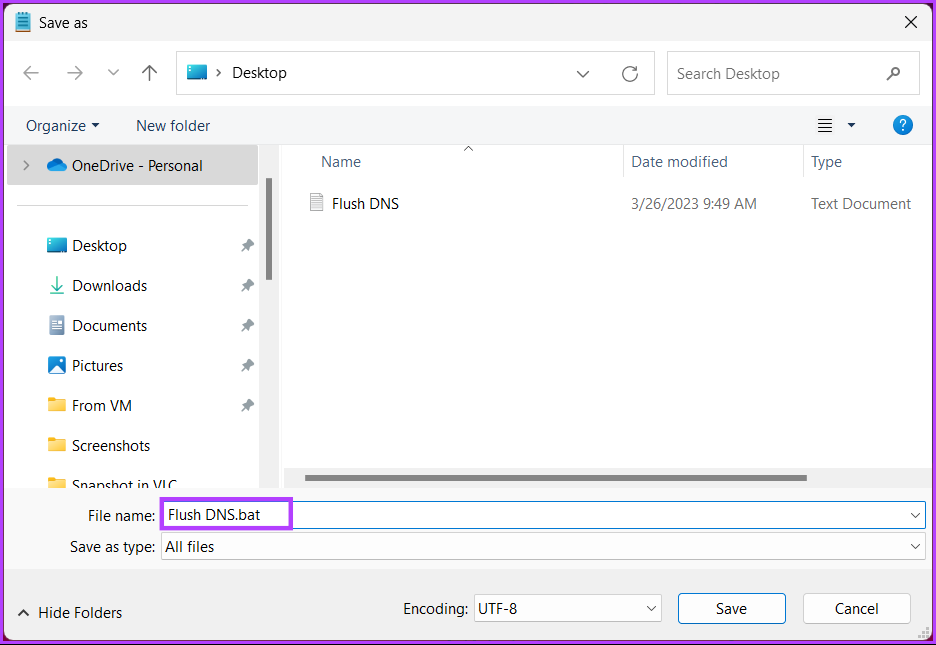
Step 5: Click the ‘Save as type’ drop-down menu and choose All files.

Step 6: Add .bat extension to the file name.
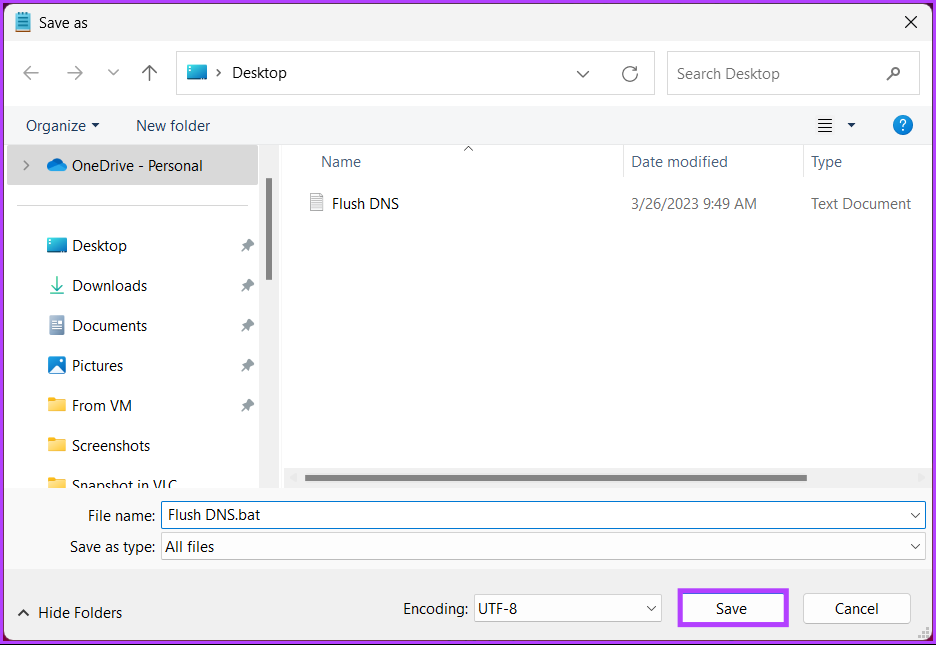
Step 7: Finally, click Save.
From now on, whenever you need to clear the DNS cache, you only need to double-click on this batch file. If none of the abovementioned methods worked for you, the next one will.
5. Reset Winsock Settings
Winsock (Windows Sockets) is a programming interface that handles input/output requests for Internet applications in the Windows operating system. This includes refreshing the DNS cache from your Windows PC. Follow the instructions below.
Step 1: Press the Windows key on your keyboard, type Command Prompt, and click ‘Run as administrator.’
In the prompt, select Yes.
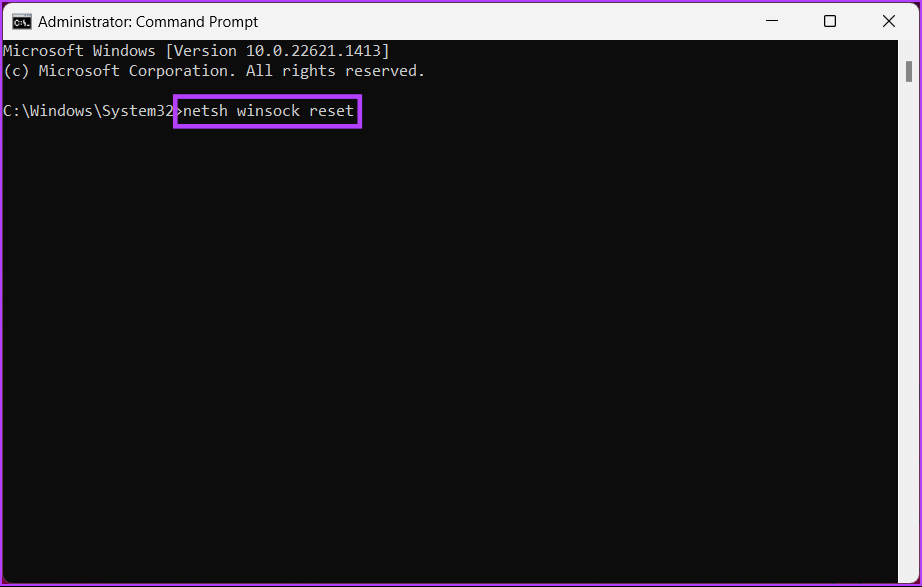
Step 2: Type the below command and hit Enter.
netsh winsock reset
You will get a message saying that Winsock has been successfully reset. Afterward, you must restart your computer for the settings to take effect.
6. Refresh DNS Cache Automatically Using the Registry Editor
This method is more complex than the above one, but the steps are simple to follow and execute. However, because we will be using Registry Editor, we strongly advise you to back up the Windows Registry before proceeding with the steps below.
Step 1: Press the Windows key on your keyboard, type Registry Editor, and click ‘Run as administrator.’
Note: Press ‘Windows key + R’ to open the Run dialog box, type regedit.exe, and click OK to open Registry Editor.
In the prompt, select Yes.
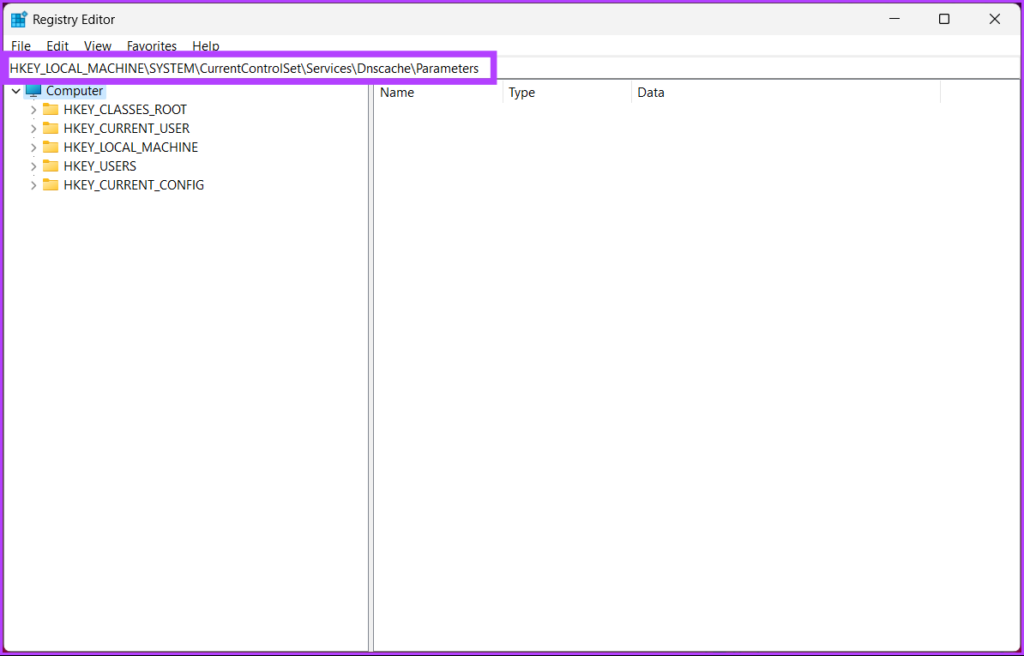
Step 2: In the top address bar, enter the mentioned address.
HKEY_LOCAL_MACHINE\SYSTEM\CurrentControlSet\Services\Dnscache\Parameters
Note: You can manually navigate to the section too.
Step 3: Under the Parameters folder, right-click, select New, and choose ‘DWORD (32-bit) Value.’

Step 4: Type MaxCacheTtl in the name field.

Step 5: Double-click on MaxCacheTtl, type 86400 in the Value Data field, and press OK.

Step 6: Under the Parameters folder, right-click again, select New, and choose ‘DWORD (32-bit) Value.’

Step 7: Type MaxNegativeCacheTtl in the name field.

Step 8: Double-click on MaxNegativeCacheTtl, type 5 in the Value Data field, and press OK.

Finally, restart the system to implement the changes. And that’s it! When the system boots back, your Windows machine will flush the DNS cache automatically after every 86400 seconds or 24 hours.
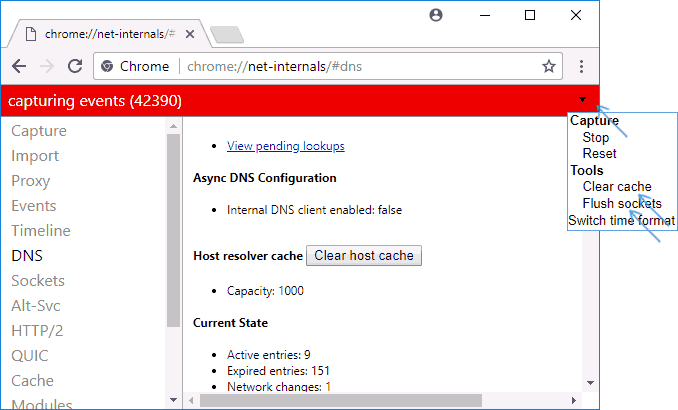
How to Flush Your Browser’s DNS Records
In order to improve the speed of search, browsers store the DNS cache. Since each browser stores the details, it is necessary to clear them separately. Follow the steps below.
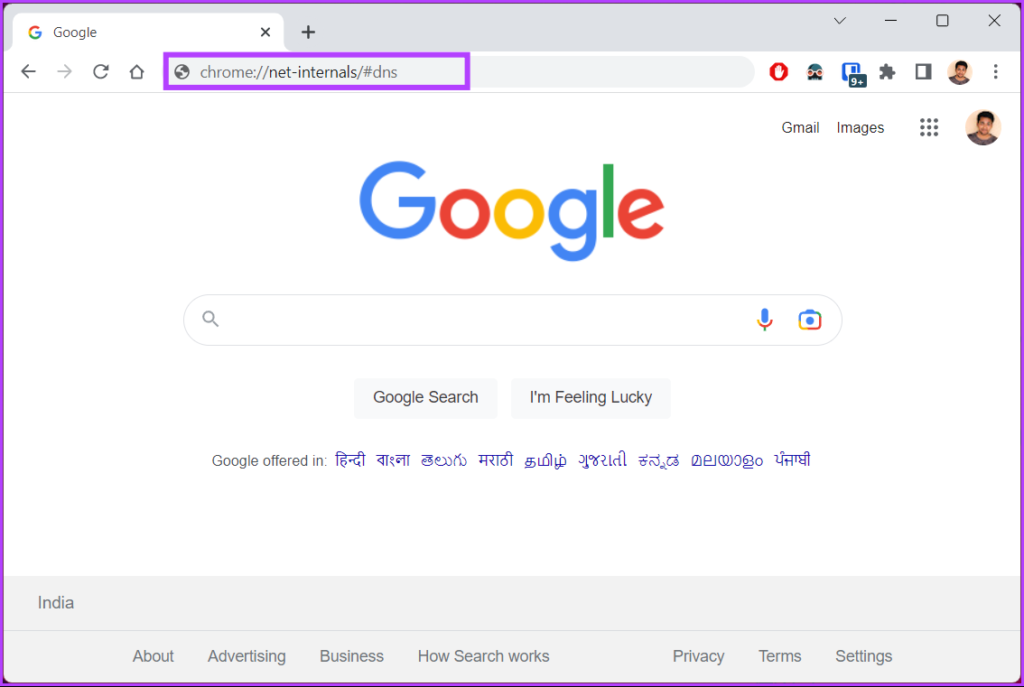
Step 1: Launch Google Chrome or Edge, enter the below address, and press Enter.
chrome://net-internals/#dns
edge://net-internals/#dns
This will take you to Chrome’s or Edge’s net internals page.
Step 2: Click on the ‘Clear host cache’ button.

With that, you have successfully cleared the DNS cache from your preferred browser. Continue reading if you want to reset the DNS cache at a set time on a particular interval.
Now that you have cleared the DNS cache, you may want to view your current DNS cache. Move to the next method.
How to View the Current DNS Cache
Step 1: Press the Windows key on your keyboard, type Command Prompt, and click ‘Run as administrator.’
In the prompt, select Yes.
Step 2: Type the below command and press Enter.
ipconfig /displaydns

There you go. This will display your current DNS cache data. If you have any queries, check out the FAQ section below.
FAQs on Flushing DNS Cache on Windows
1. Is there any risk in flushing DNS cache?
No, flushing the DNS cache is a relatively safe operation commonly used to resolve DNS-related issues. However, there are a few risks, such as slow performance, security risks, website access issues, etc.
2. Do I need to restart after flushing DNS?
For the most part, you do not need to restart your computer after flushing the DNS cache. When you run the flush cache command, the changes should take effect immediately. However, if you need to ensure DNS-related processes are running properly, restart your computer.
Clear DNS Cache
Whether you’re experiencing slow internet speeds or encountering errors while browsing, knowing how to flush DNS cache can help resolve the issue.
With the step-by-step guide in this article, you can quickly refresh the DNS cache on your Windows and get back to browsing the web without any interruptions. You may also want to read how to change the DNS server on Android and iPhone.
Was this helpful?
Thanks for your feedback!
The article above may contain affiliate links which help support Guiding Tech. The content remains unbiased and authentic and will never affect our editorial integrity.
-
Главная
-
Статьи хостинга 1BX.host
-
Общие статьи
Полная очистка DNS Windows 10 (ipconfig /flushdns)
Пара простых действий для очистки всего cache DNS на Вашем компьютере
Быстрый ответ
- Запустите командную строку от имени администратора
- Введите команду
ipconfig /flushdnsи нажмите Enter.
Подробный текст
Чтобы очистить кэш DNS необходимо выполнить следующие действия:
- Запустите командную строку от имени администратора (ПУСК -> набираете на клавиатуре «cmd» -> клик правой клавишей мыши -> запуск от имени Администратора)
- Введите простую команду
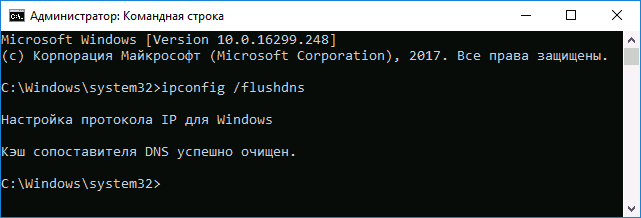
ipconfig /flushdnsи нажмите Enter. - Если всё прошло успешно, в результате вы увидите сообщение о том, что «Кэш сопоставителя DNS успешно очищен»
Помимо этого иногда бывает необходимо чтобы браузеры сбросили свой внутренний кэш DNS (да, так тоже бывает). Далее по списку:
В вашем браузере введите в адресную строку:
- для Google Chrome
chrome://net-internals/#dns - для Яндекс Браузера
browser://net-internals/#dns - для Opera
opera://net-internals/#dns
На открывшейся странице вы можете посмотреть содержимое кэша DNS браузера и очистить его, нажав кнопку «Clear host cache».
Прекарсно, кэш сброшен. Приятной работы!
The Windows operating system holds onto a cache of DNS data called DNS resolver cache, so it does not have to reach out to the DNS server for every single name resolution request.
One can check the current DNS cache using the following CMD command:
ipconfig /displaydnsIf you experience problems with name resolution on your Windows 10 PC, you can flush the DNS cache with the following command:
ipconfig /flushdnsThe flushdns command removes locally cached copies of the DNS resolver and forces Windows to request a new record from the DNS server.
Using PowerShell
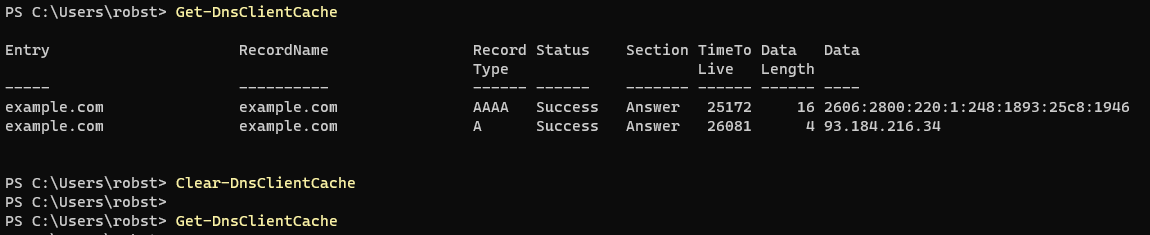
On a PowerShell prompt, you can display and flush DNS with Get-DnsClientCache and Clear-DnsClientCache commands, respectively.
Check the DNS client cache:
Get-DnsClientCacheFlush the DNS client cache:
Clear-DnsClientCacheThe Get-DnsClientCache command is run in the following screenshot, and it shows the DNS cache on a Windows 10/11 computer.
Troubleshooting Name Resolution
A powerful tool for troubleshooting name resolution on Windows is nslookup which allows us to perform manual DNS queries from the command prompt.
The following screenshot shows a simple example of the use of nslookup.
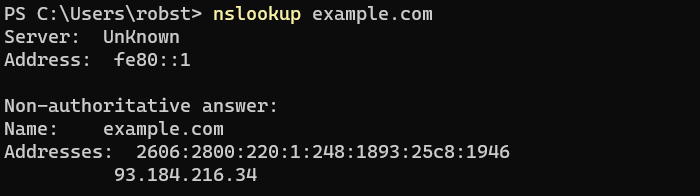
The first two lines show the name and IP address of the DNS server that has responded. The answer section contains the actual response to the lookup, which is IPv4 and IPv6 addresses for the domain name.
Resolve-DnsName is the PowerShell equivalent to the nslookup command.

The Resolve-DnsName command is run in the above screenshot. It shows the IPv4 (A record) and IPv6 (AAAA record) addresses of the domain name.
Одно из частых действий, необходимых при решении проблем с работой Интернета (таких как ошибка ERR_NAME_NOT_RESOLVED и других) или при смене адресов DNS серверов в Windows 10, 8 или Windows 7 — очистка кэша DNS (кэш DNS содержит соответствия между адресами сайтов в «человеческом формате» и их фактическим IP-адресом в интернете).
В этой инструкции подробно о том, как очистить (сбросить) кэш DNS в Windows, а также некоторые дополнительные сведения по очистке данных DNS, которые могут оказаться полезными.
Очистка (сброс) кэша DNS в командной строке
Стандартный и очень простой способ сброса кэша DNS в Windows — использовать соответствующие команды в командной строке.
Шаги, чтобы очистить кэш DNS при этом будут следующими.
- Запустите командную строку от имени администратора (в Windows 10 для этого можно начать набирать «Командная строка» в поиске на панели задач, затем нажать правой кнопкой мыши по найденному результату и выбрать «Запуск от имени администратора» в контекстном меню (см. Как запустить командную строку от имени администратора в Windows).
- Введите простую команду ipconfig /flushdns и нажмите Enter.
- Если всё прошло успешно, в результате вы увидите сообщение о том, что «Кэш сопоставителя DNS успешно очищен».

- В Windows 7 дополнительно можно выполнить перезапуск службы DNS-клиент, для этого там же в командной строке по порядку выполните следующие команды
- net stop dnscache
- net start dnscache
После выполнения описанных действий сброс кэша DNS Windows будет завершена, однако в некоторых случаях могут возникнуть проблемы, вызванные тем, что и у браузеров есть собственная база данных соответствий адресов, которую также можно очистить.
Очистка внутреннего кэша DNS Google Chrome, Яндекс Браузера, Opera
В браузерах на базе Chromium — Google Chrome, Opera, Яндекс Браузер присутствует собственный кэш DNS, который также можно очистить.
Для этого в браузере введите в адресную строку:
- chrome://net-internals/#dns — для Google Chrome
- browser://net-internals/#dns — для Яндекс Браузера
- opera://net-internals/#dns — для Оперы
На открывшейся странице вы можете посмотреть содержимое кэша DNS браузера и очистить его, нажав кнопку «Clear host cache».
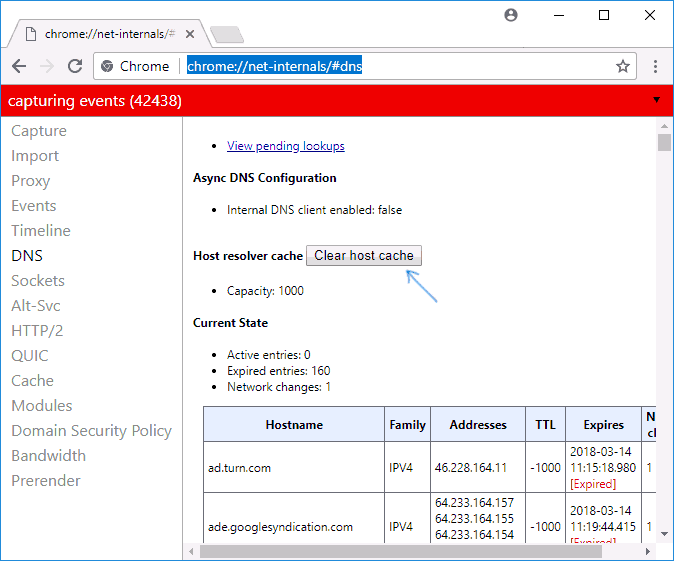
Дополнительно (при проблемах с соединениями в конкретном браузере) может помочь очистка сокетов в разделе Sockets (кнопка Flush socket pools).
Также, оба этих действия — сброс кэша DNS и очистку сокетов можно быстро выполнить, открыв меню действий в правом верхнем углу страницы, как на скриншоте ниже.
Дополнительная информация
Существуют и дополнительные способы сброса кэша DNS в Windows, например,
- В Windows 10 присутствует опция автоматического сброса всех параметров подключений, см. Как сбросить настройки сети и Интернета в Windows 10.
- Многие программы для исправления ошибок Windows имеют встроенные функции для очистки кэша DNS, одна из таких программ, направленная именно на решение проблем с сетевыми подключениями — NetAdapter Repair All In One (в программе присутствует отдельная кнопка Flush DNS Cache для сброса кэша DNS).


Если простая очистка не срабатывает в вашем случае, при этом вы уверены, что сайт, к которому вы пробуете получить доступ работает, попробуйте описать ситуацию в комментариях, возможно, у меня получится вам помочь.
Are you facing issues while surfing the internet? Does the website you are trying to reach doesn’t open? If you’re unable to access the website then the reason behind this issue might be because of the DNS server and its resolving cache.
DNS or Domain Name System is your best friend while you are online. It converts the domain name of the website you visited into IP addresses so that the machine can understand it. Suppose you visited a website, and you used its domain name for doing this. The browser will redirect you to a DNS server and it will store the IP address of the website you are visiting. Locally, inside your device, there is a record of all the IP addresses, meaning the websites you have visited. Whenever you try to re-access the website again, it will help you gather all the information faster than before.
All the IP addresses are present in the form of a cache in DNS Resolver Cache. Sometimes, when you try to access the site, instead of getting faster results, you get no result at all. Therefore, you need to flush the reset DNS resolver cache for getting the positive output. There are some common reasons which cause the DNS cache to fail over time. The website may have changed their IP address and since your records have the old records. And hence, you may have the old IP address, causing problems while you are trying to establish a connection.
Another reason is the storing of bad results in the form of a cache. Sometimes these results get saved due to DNS spoofing and poisoning, ending up in unstable online connections. Maybe the site is fine, and the problem is in the DNS cache on your device. The DNS cache can get corrupt or outdated and you may not be able to access the site. If any of this has happened, then you may need to flush and reset your DNS resolve cache for better results.
Just like DNS resolver cache, there are two other caches present on your device, which you can flush and reset if needed. These are the Memory cache and the Thumbnail cache. Memory cache comprises a cache of data from your system memory. Thumbnail cache contains the thumbnails of the images and videos on your device, it includes the thumbnails of deleted ones also. Clearing the memory cache frees some system memory. While clearing the thumbnail cache can create some free room on your hard disks.
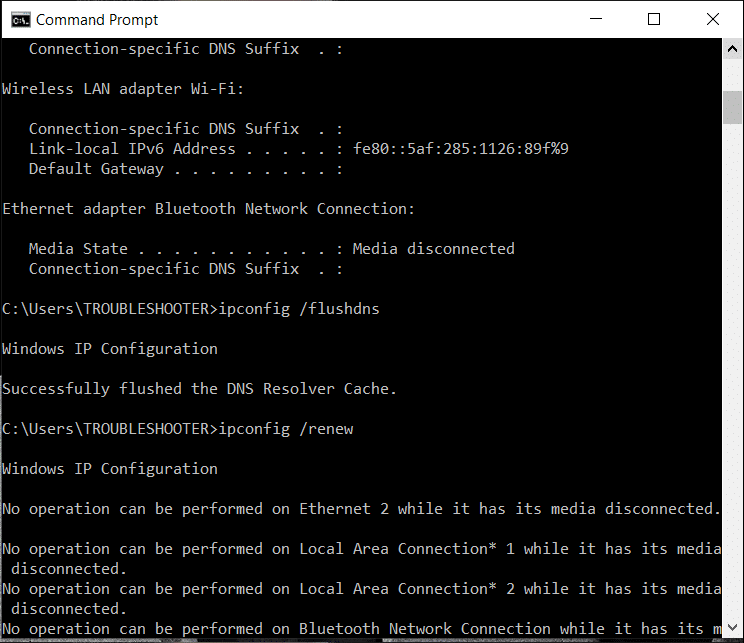
Table of Contents
There are three methods applicable for flushing your DNS resolver cache in Windows 10. These methods will fix your internet problems and help you with a stable and working connection.
Method 1: Use the Run Dialog Box
1. Open the Run dialog box using the shortcut key Windows Key + R.
2. Type ipconfig /flushdns in the box and hit the OK button or the Enter box.

3. A cmd box will appear on the screen for a moment and will confirm that the DNS cache will get successfully cleared.

Method 2: Using Command Prompt
If you don’t use an administrative account to login to the Windows, then make sure you have access to one or you create a new administrative account as you will require admin rights to clear the DNS cache. Else, the command line will show System 5 error and your request will get denied.
Using Command Prompt you can perform various other functions related to DNS cache and your IP address. These include viewing the current DNS cache, registering your DNS cache on host files, releasing the current IP address settings and also requesting & resetting the IP address. You can also enable or disable DNS cache with only one line of code.
1. Type cmd in Windows Search bar then click on “Run as administrator” to open the elevated Command Prompt. Remember to run the command line as an administrator for making these commands work.

2. Once the command screen appears, enter the command ipconfig /flushdns and hit the Enter key. Once you hit Enter, you will see a confirmation window appear, confirming the successful DNS cache flushing.
3. Once done, verify if the DNS cache is cleared or not. Enter the command ipconfig /displaydns and hit the Enter key. If there are any DNS entries left, they will get displayed on the screen. Also, you can use this command anytime to check the DNS entries.

4. If you want to turn off the DNS cache, type in the command net stop dns cache in the command line and press the Enter key.

5. Next, if you want to turn on the DNS cache, type the command net start dnscache in the Command Prompt and press the Enter key.
Note: If you turn off the DNS cache and forget to turn it on again, then it will automatically start after you restart your system.

You can use ipconfig /registerdns for registering the DNS cache present on your Hosts file. Another one is ipconfig /renew which will reset and request a new IP address. For releasing the current IP address settings, use ipconfig /release.
Method 3: Using Windows Powershell
Windows Powershell is the most powerful command line present on the Windows OS. You can do much more with PowerShell than you can do with the Command Prompt. Another advantage of Windows Powershell is you can clear client-side DNS cache while you could only clear local DNS cache in Command Prompt.
1. Open Windows Powershell using the Run dialog box or the Windows search bar.
2. If you want to clear the client-side cache, enter the command Clear-DnsClientCache in Powershell and hit the Enter button.

3. If you want to clear just the DNS cache on your desktop, enter Clear-DnsServerCache and hit the Enter key.

What if the DNS Cache is not getting cleared or flushed?
Sometimes, you may not be able to clear or reset DNS Cache using the Command Prompt, it may happen because the DNS cache is disabled. So, you need to first enable it before clearing the cache again.
1. Open the Run dialog box and enter services.msc and hit Enter.

2. Search for DNS Client Service in the list and right-click on it and select Properties.

4. In the Properties window, switch to the General tab.
5. Set the Startup type option to Automatic, and then click on OK to confirm the changes.

Now, try to clear the DNS cache and you will see that the command is running successfully. Similarly, if you want to disable the DNS cache for some reason, change the startup type to Disable.
Recommended:
- Quickly Clear All Cache in Windows 10 [The Ultimate Guide]
- 10 Best Public DNS Servers in 2021: Comparison & Review
- 3 Ways to change DNS settings on Windows 10
We hope this article was helpful and you were able to flush & reset the DNS cache in Windows 10. If you still have any questions then feel free to ask them in the comment section.