
In this guide, you will learn how to clear the DNS cache on Windows 10. These steps will also work with other Windows versions.
Windows will cache DNS lookups to help speed up name resolution. Over time this cache can become corrupt or contain outdated DNS information. This can impact network performance or result in failed network connection attempts.
Windows provides a command to quickly flush the DNS cache and a command to view the DNS cache. If you have a local Windows DNS server you may need to clear the cache on it as well.
Let’s get started.
This also works on older Windows operating systems.
Step 1: Open the command prompt
Click the Windows start button and type cmd.
Click on Command Prompt to open.
Step 2: Enter the following command
With the command prompt open type:
ipconfig /flushdns
That’s it for flushing the local cache. If you want to check the local cache then move on to step 3.
Step 3: View DNS Resolver cache (Optional)
If you want to view the local DNS cache use the command below. This can be used to check what your local computer has in its DNS cache.
ipconfig /displaydns
This will display all the local cache entries.
Clear DNS Cache on Windows DNS Server
Maybe it’s not a local client issue, maybe your server has a bad cache entry. Follow these steps to clear the cache on your Windows Server.
In this example, I’m using Windows Server 2016.
This is super easy, just open the DNS console, right-click the DNS server, and select clear cache.
Clear DNS Cache Using PowerShell
To clear the client cache using PowerShell use this command:
Clear-DnsClientCache
To clear the local DNS server cache use this command:
Clear-DNsServerCache
To clear the DNS cache on a specific DNS server use this command. Change -ComputerName to the name of the server you want to clear.
Clear-DnsServerCache –ComputerName “DC1” -Force
If you still have DNS issues then check out my guide on how to use nslookup to test and verify DNS records. The guide also includes 8 tips for troubleshooting DNS problems.
Leave a comment below
Например, вместо того, чтобы заходить на сайт www.google.com, ваш браузер может перенаправить вас на IP-адрес вредоносного веб-сайта, который злоумышленник вставил в записи DNS вашего компьютера. Или вы можете получить большое количество ошибок 404.
Очистка кеша DNS удаляет всю сохраненную информацию поиска DNS. Затем ваш компьютер получает обновленные данные с DNS-серверов при следующей отправке запроса на поиск.

Как очистить кэш DNS в Windows
Очистка кеша DNS — это простой и быстрый процесс. Процедура одинакова для почти всех систем Windows. Для примера ниже мы будем использовать Windows 10.
Чтобы очистить DNS на вашем компьютере с Windows:
- Загрузите командную строку от имени администратора. Откройте меню «Пуск» и начните вводить «командная строка» или «cmd», пока не увидите ее в результатах.
-
Введите
ipconfig/flushdns, когда командная строка загрузится, и нажмите Enter на клавиатуре.
-
Процесс должен занять всего несколько секунд. Вы должны увидеть подтверждающее сообщение DNS Resolver Cache, когда это будет сделано:


База данных кэша DNS на вашем компьютере теперь очищена. Вы должны получить правильное и обновленное сопоставление IP-адресов с DNS-серверов в следующий раз, когда ваш компьютер отправит DNS-запрос.
Очистить кэш DNS на Mac
Есть несколько разных команд для очистки кеша DNS в OS X и macOS в зависимости от используемой версии.
Поскольку процедура одинакова для всех версий, в этой статье подробно описано, как очистить DNS в macOS Mojave (10.14), а затем перечислены команды для других версий в таблице.
Сброс DNS на MacOS Mojave (версия 10.14)
Чтобы очистить кэш DNS на MacOS Mojave, используйте приложение Terminal:
- Запустите Terminal.app, используя ваш предпочтительный метод. Вы можете запустить приложение из Приложения -> Утилиты или нажать
Ctrl + Space, чтобы запустить Spotlight и выполнить поиск терминала.
- Введите
sudo killall -HUP mDNSResponderи нажмите Enter на клавиатуре. - Введите пароль администратора для рассматриваемой учетной записи и нажмите Enter.


После окончания процесса не будет никаких оповещений
Команды для очистки DNS-кэша в старых версиях macOS и Mac OS X
В таблице ниже перечислены команды для очистки кэша DNS в большинстве версий MacOS и Mac OS X. Вы можете скопировать и вставить их прямо из таблицы в свой терминал.
| Mac OS X или macOS версия | Команда терминала |
|---|---|
| Mojave (version 10.14) High Sierra (version 10.13) Sierra (version 10.12) Mountain Lion (version 10.8) Lion (version 10.7) |
sudo killall -HUP mDNSResponde |
| El Capitan (version 10.11) Mavericks (version 10.9) |
sudo dscacheutil -flushcache sudo killall -HUP mDNSResponder |
| Yosemite (version 10.10) | sudo discoveryutil mdnsflushcache sudo discoveryutil udnsflushcaches |
| Snow Leopard (version 10.6) Leopard (version 10.5) |
sudo dscacheutil -flushcache |
| Tiger (version 10.4) | lookupd -flushcache |
Как очистить кэш DNS в Linux
Дистрибутивы Linux немного отличаются от компьютеров с Windows и Mac. Каждый дистрибутив Linux может использовать свою службу DNS. Некоторые дистрибутивы, такие как Ubuntu, вообще не имеют службы DNS по умолчанию.
Это зависит от того, какая служба используется в вашем дистрибутиве и включена ли она по умолчанию. Некоторые из них — NCSD (Name Service Caching Daemon), dnsmasq и BIND (Berkely Internet Name Domain).
Для каждого дистрибутива вам нужно запустить окно терминала. Нажмите Ctrl + Alt + T на клавиатуре и используйте соответствующую команду, чтобы очистить кэш DNS для службы, работающей в вашей системе Linux.
Очистить локальный DNS-кэш NCSD
Используйте эту команду для очистки DNS-кэша NCSD на вашем Linux-компьютере:
sudo /etc/init.d/nscd restart
Введите свой пароль, если это необходимо. Процесс останавливается, а затем запускает службу NCSD в течение нескольких секунд.
Очистить локальный DNS-кэш dnsmasq
Используйте эту команду для очистки DNS-кэша dnsmasq на вашем Linux-компьютере:
sudo /etc/init.d/dnsmasq restart
Введите пароль еще раз, если терминал попросит вас. Вы увидите ответ, когда служба останавится и запустится снова.
Очистить локальный DNS-кэш BIND
Если вы используете BIND для службы DNS, есть несколько команд, которые вы можете использовать для очистки его кеша DNS. Вам может потребоваться ввести пароль для завершения процесса.
sudo /etc/init.d/named restart
sudo rndc restart
sudo rndc exec
Примечание: BIND также позволяет указывать конкретные домены при выполнении сброса DNS. Просто добавьте flushname и имя домена в команду sudo rndc. Например:sudo rndc flushname wiki.merionet.ru
DNS cache is crucial in speeding up internet access and improving browsing experiences by storing recent domain name lookups and their corresponding IP addresses.
Clearing this cache periodically can enhance your browsing speed and resolve connectivity issues.
Modern operating systems generally cache DNS lookup results and IP addresses to process requests more quickly. Whenever you write a URL in your browser, it sends a request to the DNS servers to “locate” the site. But instead of sending that request every single time, the browser often caches the information. This way, the next time you type in that address, the browser looks it up through the DNS cache, allowing it to return the results much faster.
However, cached DNS records can become outdated or corrupted over time, potentially leading to browsing issues, including connection errors or the display of outdated website versions. Flushing your DNS cache occasionally is a good practice to ensure you’re accessing up-to-date versions of websites and protecting yourself from security risks like DNS spoofing.
In this article we will explain how to flush the DNS cache on different operating systems, including Windows, macOS, and Linux, as well as detailing the several reasons why it is so important to flush the DNS regularly.
How to Flush DNS on Different Operating Systems
How to Flush DNS on Windows 10 & 11
If you’re using Windows 10 or 11, here are the steps you can follow to flush the DNS cache:
- Click on Start, then search for Command Prompt. Right-click it and select “Run as Administrator.”
- Once the Command Prompt is open, type
ipconfig /flushdnsand press Enter. - A message will appear confirming that the DNS Resolver Cache was flushed.

In addition to flushing the DNS, performing an IP release and renewal can help resolve network connection problems. Here’s how to do it:
How to Perform an IP Release, Renew, and DNS Flush on Windows
- Open Command Prompt with administrative privileges.
- Type
ipconfig /releaseand press Enter to release the current IP address. - Next, type
ipconfig /renewto obtain a new IP address. - Finally, type
ipconfig /flushdnsto clear the DNS cache.
How to Flush DNS on macOS
Flushing the DNS cache on macOS involves using the Terminal app. Follow these steps:
- Press cmd + space to open Spotlight Search.
- Type Terminal and open the application (you can also find it in the Other section in the Launchpad).
- Type the following command:
sudo dscacheutil -flushcache; sudo killall -HUP mDNSResponder. - Enter your administrator password when prompted. Once you do, you will receive confirmation that the DNS cache has been flushed.
Note: The command can vary depending on your macOS version. Here’s how to check your macOS version:
- Click on the Apple menu in the upper-left corner of your screen.
- Select About This Mac.
Depending on your macOS version, use the appropriate command:
- Monterey, Big Sur, Catalina:
sudo dscacheutil -flushcache; sudo killall -HUP mDNSResponder - Mojave, High Sierra, Sierra, El Capitan, Mavericks, Mountain Lion, Lion:
sudo killall -HUP mDNSResponder
How to Flush DNS on Linux
If you’re using a Linux distro such as Ubuntu, here’s how to flush the DNS cache:
- Open the terminal by pressing Ctrl + Alt + T or searching for “Terminal” in the Activities menu.
- Run the following command:
- If you are running Ubuntu 20.04 LTS or older, use:
sudo systemd-resolve --flush-caches. - If you are running Ubuntu 22.04 LTS or newer, use:
sudo resolvectl flush-caches.
- If you are running Ubuntu 20.04 LTS or older, use:
- Enter your administrator password when prompted, and the DNS cache will be flushed.

How to Flush DNS Cache in Google Chrome
If you experience issues accessing websites on Google Chrome, your browser’s DNS cache may also need to be flushed. Here’s how to do it:
- Type
chrome://net-internals/#dnsin the address bar and press Enter. - Click the Clear Host Cache button to flush the browser’s DNS cache.

This action will ensure that Chrome fetches fresh DNS data from the websites you visit.
Why Should You Flush Your DNS Cache?
There are several reasons why flushing the DNS cache periodically is important:
Resolve DNS Errors
If you’re encountering issues such as DNS_PROBE_FINISHED_NXDOMAIN or CONNECTION_TIMED_OUT, flushing the DNS cache may help resolve the problem. These errors often arise due to outdated or incorrect DNS information.
Speed Up DNS Propagation
After making changes to your DNS records, such as transferring a domain to a new hosting provider, DNS propagation can take time to fully update across the internet. Flushing your DNS cache ensures that your device picks up these changes more quickly, allowing you to see the updates sooner.
Prevent DNS Spoofing
DNS spoofing (or poisoning) occurs when an attacker manipulates DNS cache entries to redirect users to fraudulent or malicious websites. Flushing your DNS cache helps mitigate this risk by clearing any potentially corrupted entries.
Avoiding 404 Errors
A 404 error might indicate that your system is pulling up an outdated version of a website. Flushing the DNS cache ensures that your browser accesses the most current version of the site, which can help you avoid such errors.
Remove Old DNS Data
When you change DNS providers, such as switching to Google DNS or OpenDNS, it’s important to flush your DNS cache. This ensures that your system doesn’t use outdated data from the previous provider, helping to prevent connectivity issues.
After Action Report – Flush Your DNS Cache Periodically
Flushing your DNS cache is a simple yet effective way to resolve connectivity issues, speed up website access, and prevent security risks like DNS spoofing. Whether you’re using Windows, macOS, Linux, or even just browsing on Google Chrome, clearing your DNS cache periodically is a good habit to ensure optimal performance.
Do you regularly flush your DNS cache? Let us know if you have any tips or questions! Join the conversation below by leaving a comment! 💬
Wrapping Up
RunCloud is a powerful and easy-to-use platform that helps you manage your websites on any cloud server. With RunCloud, you don’t need to be a Linux expert to set up, secure, and optimize your web applications. You can do everything from a simple and intuitive dashboard, saving you time and hassle.
RunCloud supports various web servers, PHP versions, databases, and frameworks. You can also monitor your server performance, back up your data, and automate your tasks with RunCloud. Whether you are a developer, a freelancer, or a business owner, RunCloud can help you run your websites faster and smoother.
What are you waiting for? Join RunCloud today and enjoy the best web hosting solution for your websites. It’s free for 7 days, no strings attached!
Frequently Asked Questions (FAQ)
Is clearing the DNS cache safe?
Clearing the DNS cache is safe and does not affect your saved passwords, browser history, or other personal data. It removes outdated DNS information, ensuring your computer can fetch up-to-date DNS records.
How often should I flush my DNS cache?
There’s no hard rule on how often you should flush the DNS cache, but it’s a good idea to do it when you experience connection issues or DNS errors or after making changes to your network configuration (such as switching DNS providers).
Does flushing the DNS cache affect my internet speed?
Flushing the DNS cache may temporarily slow down website access on the first visit, as the DNS lookup will need to be performed again. However, once the cache is refreshed, your browser will store the new DNS records, which can speed up access to frequently visited websites.
How do I know if my DNS cache was successfully flushed?
After running the appropriate command to flush the DNS cache (such as ipconfig /flushdns on Windows), your system usually displays a message confirming that the DNS Resolver Cache was successfully flushed.
Will clearing the DNS cache fix DNS errors?
In many cases, yes. If you encounter errors like DNS_PROBE_FINISHED_NXDOMAIN or CONNECTION_TIMED_OUT, flushing the DNS cache can help resolve these problems by removing outdated or corrupted DNS entries.
Загрузить PDF
Загрузить PDF
Из данной статьи вы узнаете, как очистить DNS кэш, который является собранием адресов недавно посещенных сайтов. Очистка DNS кэша зачастую исправляет проблему с ошибкой «Страница не найдена» и прочие неисправности с DNS.
-

Для этого нажмите на логотип Windows в нижнем левом углу экрана или нажмите клавишу ⊞ Win.
-

После этого на компьютере будет запущен поиск программы «Командная строка».
-

Это будет первая иконка вверху меню «Пуск». Нажмите на эту иконку, чтобы открыть программу «Командная строка».
-
-

Теперь у вас получится подключиться к ранее заблокированной странице.
Реклама


- Запустите Spotlight
1

. Иконка программы находится в правом верхнем углу экрана.
2

- Открыть Spotlight также можно комбинацией клавиш ⌘ Command+Space


. Это будет первая опция вверху результатов поиска Spotlight.

sudo killall -HUP mDNSResponder;say DNS cache has been flushed
и нажмите ⏎ Return. После этого будет выполнена команда очистки DNS.


- Terminal не отображает нажатие клавиш во время печати, но записывает их.

Советы
- На Windows можно на некоторое время отключить DNS кэширование. Для этого откройте Командную строку и введите stop dnscache. Это приведет к остановке DNS кэширования до следующей перезагрузки компьютера.
- Если вы захотите очистить DNS кэш мобильного устройства, лучше всего это сделать путем жесткого перезапуска, что включает в себя выключение и включение телефона или планшета кнопкой питания.
Реклама
Предупреждения
- После очистки DNS кэша первая загрузка сайта будет медленнее обычного.
Реклама
Об этой статье
Эту страницу просматривали 116 510 раз.
Была ли эта статья полезной?
Очистка «DNS-кэша» при помощи «CMD»
1. При помощи поиска найдите и запустите приложение «CMD» от имени администратора.
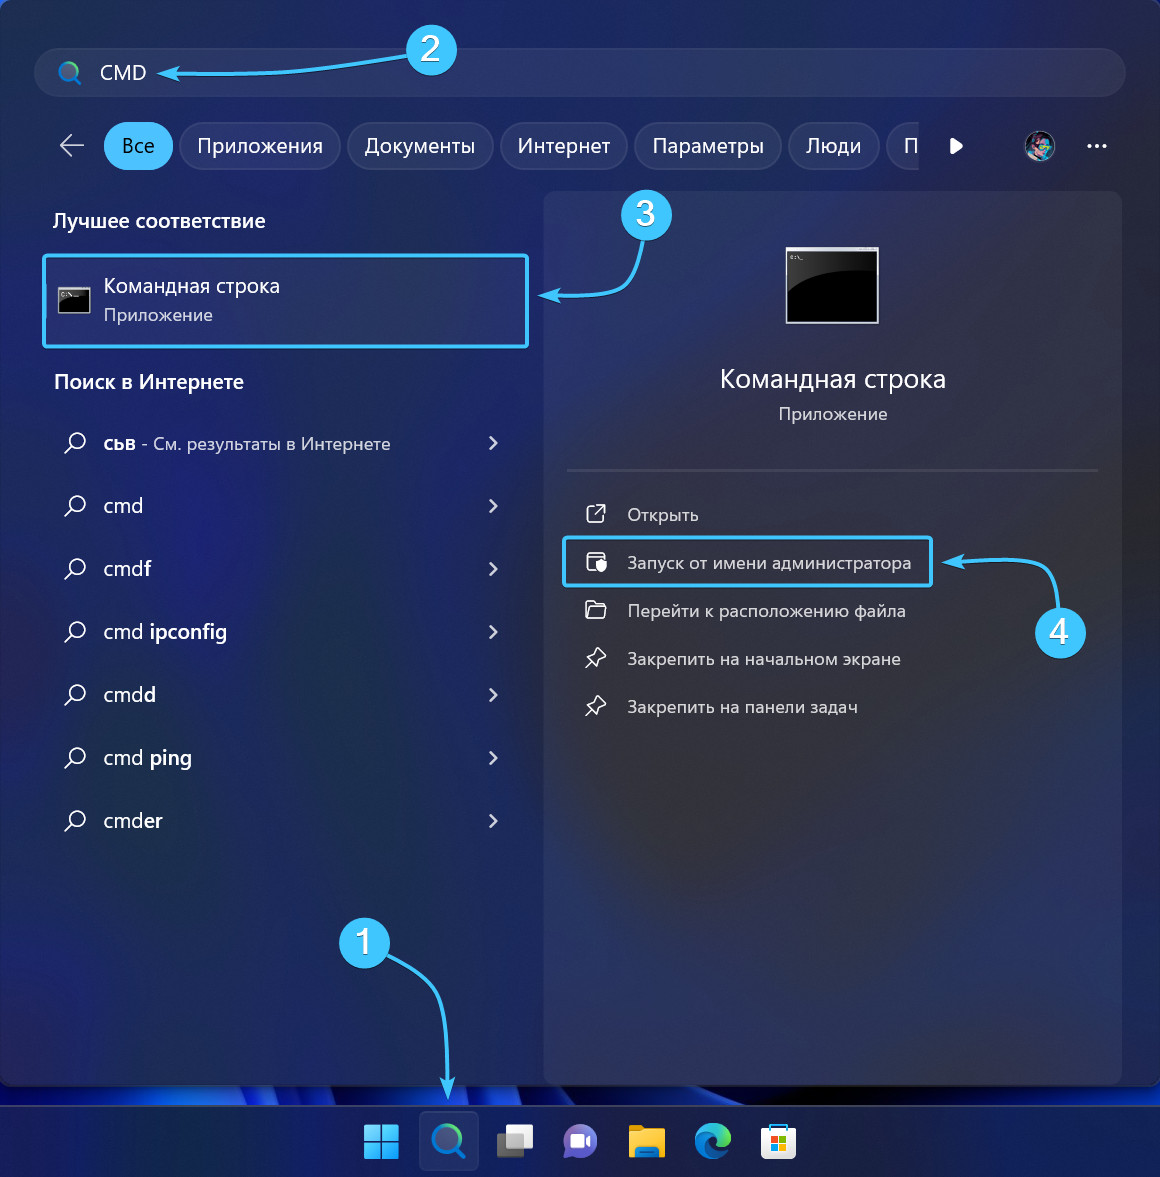
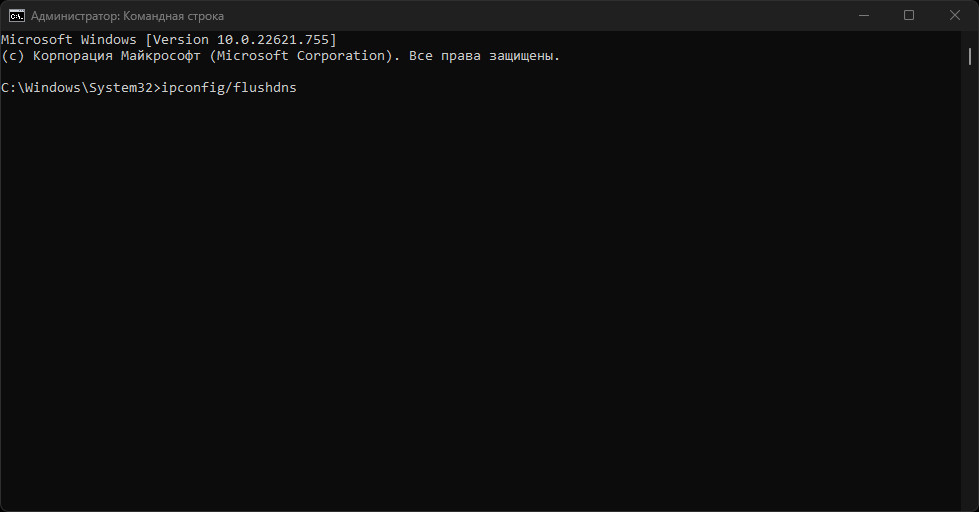
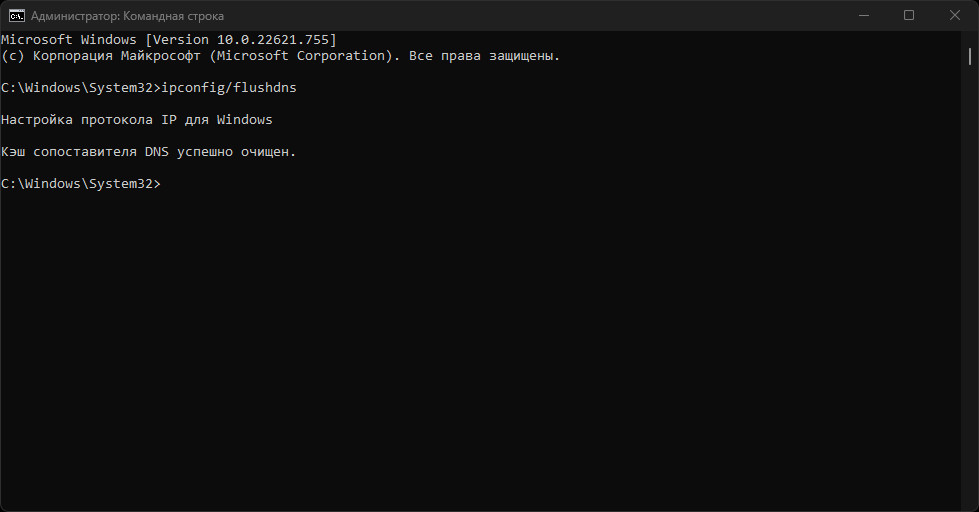
2. В появившемся окне введите команду «ipconfig/flushdns» (без кавычек) и нажмите клавишу «Enter». Дождитесь завершения очистки «DNS-кэша» в операционной системе, она может занять какое-то время.
3. Перезагрузите устройство. После этого очистка «DNS-кэша» в операционной системе будет завершена.
Другие руководства
- Очистка «DNS-кэша» в «Windows»;
- Смена «DNS-сервера» в «Windows»;
- Сброс параметров сети в «Windows»;
- Настройка сервиса «Windscribe»;
- Настройка сервиса «Proton VPN»;
- Настройка сервиса «Cloudflare»;
- Расположение сетевых свойств;
- Отключение брандмауэра системы;
- Отключение сторонних сетей;
- Включение проверки подлинности;
- Настройка сервиса «Planet VPN».