
Applies ToWindows 11 Windows 10
Использование буфера обмена
При копировании содержимого на компьютер оно автоматически копируется в буфер обмена для вставки. Вы можете вставить несколько элементов из журнала буфера обмена, а также закрепить элементы, которые вы, как правило, используете все время, и синхронизировать журнал буфера обмена с облаком.
Ниже приведены ответы на некоторые вопросы, связанные с буфером обмена.
Открытие параметров буфера обмена
Чтобы включить буфер обмена в первый раз, выберите клавиши с логотипом Windows + V, а затем выберите Включить.
Чтобы синхронизировать элементы буфера обмена с компьютером, необходимо убедиться, что функция синхронизации включена.
-
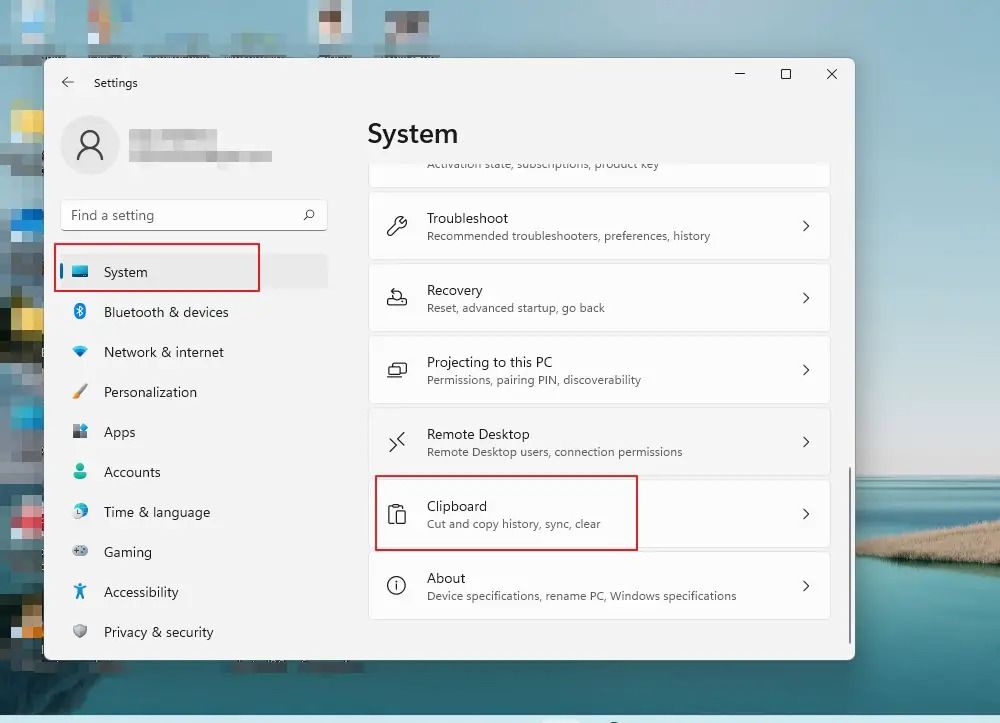
Выберите Пуск > Параметры > системный > буфер обмена .
-
Установите переключатель журнал буфера обмена на всех устройствах в значение Вкл.
Примечание: Функция синхронизации привязана к вашей учетной записи Майкрософт или рабочей учетной записи, поэтому не забудьте использовать одни и те же данные для входа на всех устройствах.
Вы можете быстро очистить все, кроме закрепленных элементов, на устройстве и в облаке.
-
Выберите Пуск > Параметры > системный > буфер обмена .
-
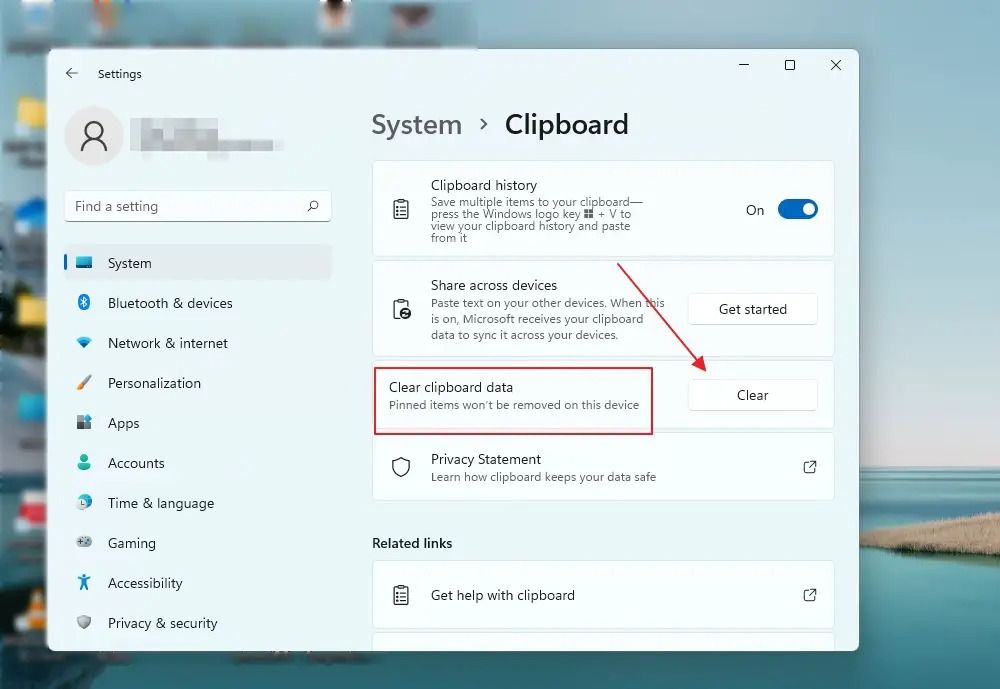
В области Очистить данные буфера обмена выберите Очистить.
Вы также можете очистить журнал буфера обмена устройства, выбрав клавиши с логотипом Windows +V, а затем выбрав параметр Очистить все в верхней части экрана.
Вы можете очистить любой конкретный элемент в буфере обмена.
-
Выберите Клавиша с логотипом Windows + V.
-
Рядом с рассматриваемым элементом выберите Дополнительные сведения (…), а затем — Удалить .
Устранение неполадок с буфером обмена
Убедитесь, что вы включили журнал буфера обмена. Чтобы включить буфер обмена в первый раз, выберите клавиши с логотипом Windows + V и выберите Включить.
Журнал буфера обмена очищается при каждом перезапуске компьютера, за исключением закрепленных элементов.
Вы можете настроить автоматическую синхронизацию скопированных элементов с другими устройствами.
Примечание: Функция синхронизации привязана к вашей учетной записи Майкрософт или рабочей учетной записи, поэтому не забудьте использовать одни и те же данные для входа на всех устройствах.
-
Выберите Пуск > Параметры > системный > буфер обмена .
-
В разделе Журнал буфера обмена на устройствах установите переключатель в значение Вкл.
-
Выберите Автоматически синхронизировать текст, который я копируем.
Примечание: Параметр Вручную синхронизировать текст, который я копируем, означает, что вам нужно открыть журнал буфера обмена (клавиша с логотипом Windows + V) и вручную нажать кнопку синхронизации в элементе буфера обмена. Затем текст будет отправлен в облако и синхронизирован с другими устройствами.
Размеры элементов не должны превышать 4 МБ. Поддерживаются форматы файлов text, HTML и bitmap.
Журнал буфера обмена рассчитан не более чем на 25 скопированных записей. Система автоматически удаляет старые элементы(если они не закреплены), чтобы освободить место для новых.
Нужна дополнительная помощь?
Нужны дополнительные параметры?
Изучите преимущества подписки, просмотрите учебные курсы, узнайте, как защитить свое устройство и т. д.
В этой инструкции пошагово описаны несколько простых способов, позволяющих очистить буфер обмена Windows 10, 8 и Windows 7 (впрочем, актуальных и для XP). Буфер обмена в Windows — область в оперативной памяти RAM, содержащая скопированную информацию (например, вы копируете часть текста в буфер с помощью клавиш Ctrl+C) и доступная во всех программах, запущенных в ОС для текущего пользователя.
Для чего может понадобиться очистка буфера обмена? Например, вы не хотите чтобы кто-то посторонний вставил из буфера что-то, что ему не стоит видеть (например, пароль, хотя для них и не стоит использовать буфер обмена), либо содержимое буфера достаточно объемно (например, это — часть фотографии в очень высоком разрешении) и требуется освободить оперативную память.
Очистка буфера обмена в Windows 10
Начиная с версии 1809 October 2018 Update, в Windows 10 появилась новая функция — журнал буфера обмена, позволяющая, в том числе очищать буфер. Сделать это можно, открыв журнал с помощью клавиш Windows + V.
Второй способ очистить буфер в новой системе — зайти в Пуск — Параметры — Система — Буфер обмена и использовать соответствующую кнопку настроек.
Замена содержимого буфера обмена — самый простой и быстрый способ
Вместо того, чтобы очищать буфер обмена Windows, вы можете просто заменить его содержимое другим контентом. Сделать это можно буквально за один шаг, причем по-разному.
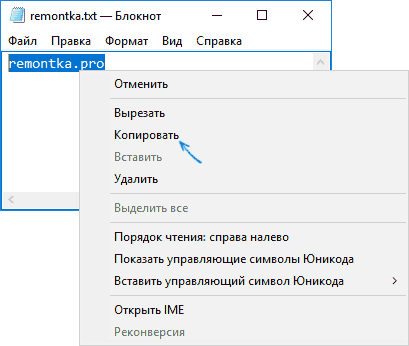
- Выделите любой текст, даже одну букву (можно и на этой странице) и нажмите клавиши Ctrl+C, Ctrl+Insert или кликните по нему правой кнопкой мыши и выберите пункт меню «Копировать». Содержимое буфера обмена будет заменено этим текстом.

- Кликните правой кнопкой мыши по любому ярлыку на рабочем столе и выберите «Копировать», он будет скопирован в буфер обмена вместо предыдущего содержимого (и не займет много места).
- Нажмите клавишу Print Screen (PrtScn) на клавиатуре (на ноутбуке может потребоваться Fn + Print Screen). В буфер обмена будет помещен снимок экрана (займет в памяти несколько мегабайт).
Обычно приведенный способ оказывается приемлемым вариантом, хотя это и не вполне очистка. Но, если такой способ не подходит, можно поступить иначе.
Очистка буфера обмена с помощью командной строки
Если вам требуется именно очистить буфер обмена Windows, вы можете использовать командную строку для этого (при этом права администратора не потребуются)
- Запустите командную строку (в Windows 10 и 8 для этого можно кликнуть правой кнопкой мыши по кнопке Пуск и выбрать нужный пункт меню).
- В командной строке введите echo off | clip и нажмите Enter (клавиша для ввода вертикальной черты — обычно Shift + крайняя справа в верхнем ряду клавиатуры).


Готово, буфер обмена будет очищен после выполнения команды, можно закрыть командную строку.
Так как прибегать всякий раз к запуску командной строки и ручному вводу команды не особо удобно, вы можете создать ярлык с этой командой и закрепить его, например, на панели задач, а затем использовать, когда потребуется очистить буфер обмена.
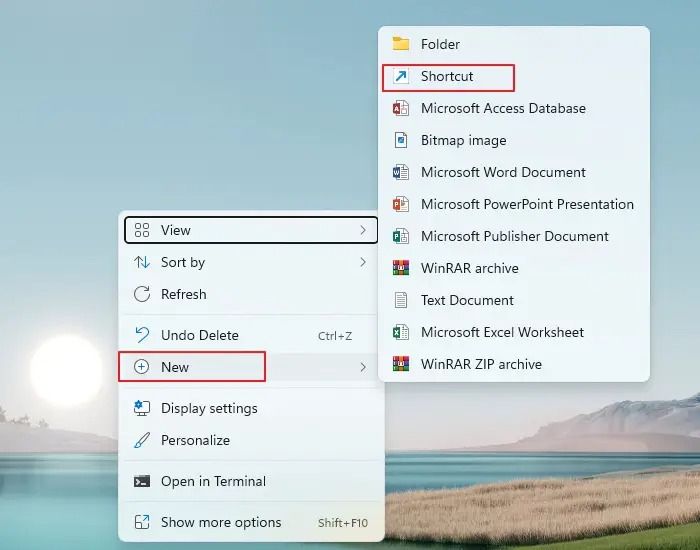
Для того, что создать такой ярлык, кликните в любом месте рабочего стола правой кнопкой мыши, выберите «Создать» — «Ярлык» и в поле «Объект» введите
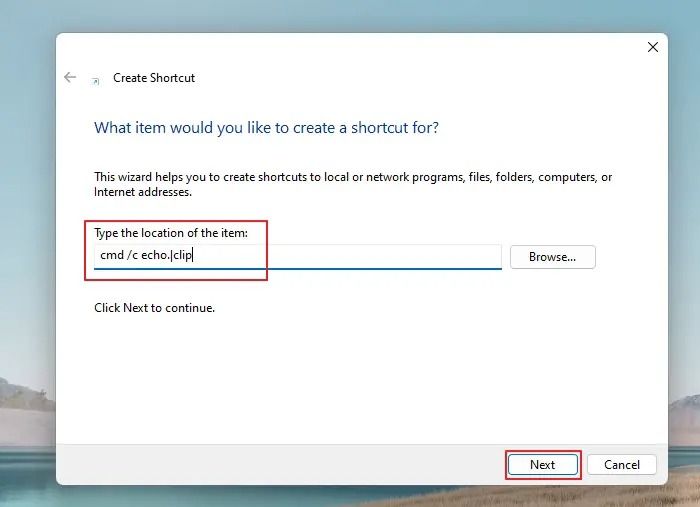
C:\Windows\System32\cmd.exe /c "echo off | clip"
Затем нажмите «Далее», введите имя ярлыка, например «Очистить буфер обмена» и нажмите Ок.

Теперь для очистки достаточно просто открыть этот ярлык.
Программы для очистки буфера обмена
Не уверен, что это оправдано для одной единственной описываемой здесь ситуации, но вы можете использовать и сторонние бесплатные программы для очистки буфера обмена Windows 10, 8 и Windows 7 (впрочем, у большинства из приведенных программ более широкий функционал).
Дополнительно, если кто-то из вас применяет утилиту AutoHotKey для назначения горячих клавиш, вы можете создать и скрипт для очистки буфера обмена Windows с помощью удобного для вас сочетания.
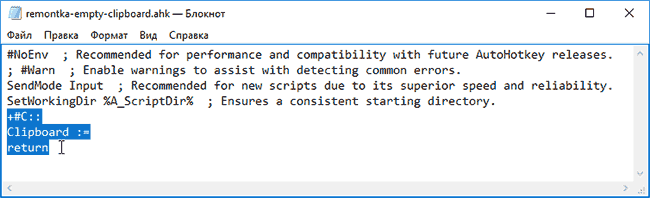
Следующий пример выполняет очистку по Win+Shift+C
+#C::
Clipboard :=
Return
Надеюсь, приведенных вариантов окажется достаточно для вашей задачи. Если же нет, или вдруг есть свои, дополнительные способы — можно поделиться в комментариях.
When you copy (Ctrl+c) or cut (Ctrl+v) any content on your Windows 10 (8.1 or 7) PC, it uses clipboard feature to capture the data temporarily until you capture another one. Whatever captured in clipboard such as texts, images, screenprints, etc.. can be pasted in an appropriate place or program. Here we are going to explain a few simple steps about how to clear clipboard in Windows 10/8.1/7.
Why should I clear clipboard on my Windows 10 PC? It is a good question to ask. It mostly depends on your need. You may need to delete the content on the clipboard so other users will not be able to paste and see your data/content if the computer is used by others. In another case, it can be the best security measure to clear the clipboard on high critical systems. Even sometimes the computer indicates that clipboard is having larger data and need to be cleaned. In this case, these below methods will become handy to clear clipboard in Windows 10, 8.1 or Windows 7 computers.
We will be using a few tricks to clear or replace the existing content on the clipboard and few advanced methods to create shortcuts or add to menu options for this purpose.
1) Since clipboard can hold one time data only, you can simply erase your current clipboard data (or memory) by capturing another simple data to the clipboard.
Let’s say, you copied 10 pages of high confidential MS word document, the data will be on the clipboard even after you pasted somewhere. Now, to clean those 10 pages data from the clipboard, you can simply copy a single text from your notepad or same Word document. So, now your clipboard will have that single text only and we actually cleared the clipboard now!
2) Restart your computer. Clipboard gets cleared once you restart the computer.
3) Pressing ‘Print Screen’ on your keyword of any harmless screen will wipe the data from Clipboard on Windows 10. Technically it captures and keeps the screenshot to the clipboard, so previously captured data got cleared from the clipboard.
Advanced Methods to Clear Clipboard on Windows 10
1) Create a Shortcut
Here is the actual Windows command to clear the clipboard manually. This command can be executed in ‘Run’ field or command prompt. Even you can create a shortcut on the desktop with the same command so that can be used whenever wanted to clear clipboard manually in Windows 10.
Right-click on the empty space in desktop, then select a new Shortcut.

Type below command on the ‘location of the items’ of shortcut as below.
cmd /c "echo off | clip"

On the next screen give a name for the shortcut, let’s say ‘Clipboard Clear’ and save it.

Now you will see the shortcut icon on the desktop to clear the clipboard. This can be double-clicked to clear the clipboard.

To know whether this method is working, simply copy some content to the clipboard and paste it to notepad or MS Word, it should paste. Now double click the shortcut on the desktop we created to clear the clipboard, you could see a DOS (black screen) pops up and disappears (make sure it doesn’t throw any errors). If this works well, the clipboard would have been cleared. To check this, simply paste (Ctrl+V) to the same notepad or MS Word and you should not see any copied content now. This will confirm that the desktop shortcut is working fine.
2) By using command prompt
This method is almost identical to the earlier step, we will be using the same command. But directly using it in Command prompt to clear clipboard history. Open the command prompt and issue below command.
echo off | clip
3) Adding to Context Menu
Adding the clear Clipboard history option to context menu is sometimes handy to clear the history from the desktop by right click button. We will be modifying the registry for this purpose, hence, make sure you have taken the registry backup before proceeding.
Open the registry and navigate to the following location.
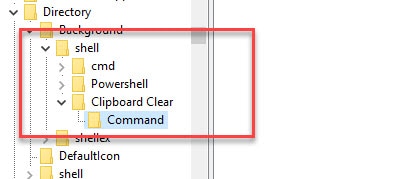
HKEY_CLASSES_ROOT\Directory\Background\
Right-click on Shell at left side pane and select new Key. Name it as ‘Clipboard Clear’
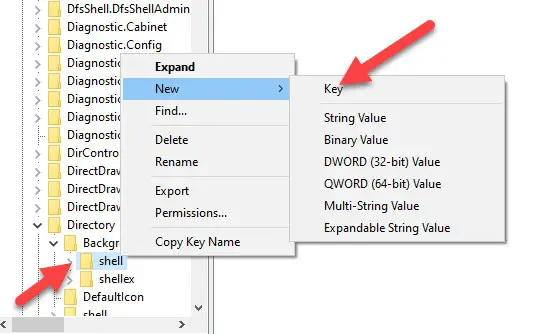
Now Right-click on the newly created key and add new, name it as ‘Command’. Once added, it will look like below.
Now at the right side, double click the ‘Default’ key and modify it. Give the following value.
cmd.exe /c echo off | clip
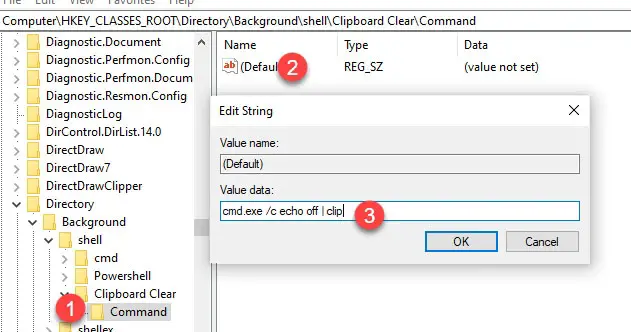
Press OK and save the settings. We are almost done. Press F5 to refresh the registry changes.
You should be able to see this option in the context menu when you right-click from the desktop.
4) From Windows Settings (Latest Windows 10)
Microsoft added Clipboard management options and settings from Windows 10 1809 (October 2018 update). It is one of the cloud-based options which adds the ability to synchronize clipboard content across your Windows 10 devices with the same user account.
Simply search for ‘Clipboard’ in Windows 10 search if your Windows 10 is meeting the update requirement. This will bring up with clipboard related settings since we are concentrating about clearing the clipboard history content, use the below button to Clear the clipboard data.
I hope these above simple and easy methods will be useful on how to clear clipboard on Windows 10, 8.1 and Windows 7 laptop and desktop computers.
Windows Clipboard is hosted on the cloud. It displays the most recent 25 items copied to the Clipboard. These items can include text, HTML, and photos no larger than 4 MB. You can access these items on the same or a different PC, allowing you to copy and paste them into another application or program.
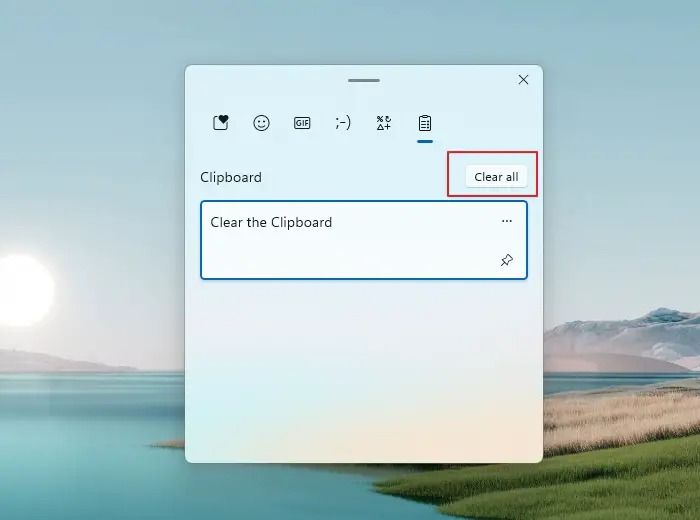
So, how to access Windows clipboard history? Press the Windows key + V. You can paste and pin commonly used items from the clipboard history by selecting an item from your clipboard menu. Note that pinning an item prevents it from getting deleted from the clipboard history to make a place for new ones.
In this passage, we will offer four tutorials on how to clear Clipboard on Windows:
| Workable Solutions | Step-by-step Troubleshooting |
|---|---|
| 1. How to Clear Clipboard with Windows Clipboard Tab | Press the Windows key + V to bring up the clipboard tab, then select the «Clear all» button…Full steps |
| 2. How to Clear Clipboard Windows 11/10 in Settings | Open Settings and click on System from the left pane. Next, scroll down and click on the Clipboard…Full steps |
| 3. How to Clear Clipboard Windows with Shortcuts | Right-click anywhere on your desktop screen and click on New > Shortcut…Full steps |
| 4. How to Clear Clipboard in Command Prompt | Type cmd into the Windows Search bar and click on the Run as Administrator option. Click…Full steps |
Why should you clear Clipboard on Windows 11/10? Since the Clipboard saves whatever you copy, anyone can access it. But the clipboard history list is deleted whenever you restart your device unless an item is pinned to the Clipboard. When you enable Windows’ clipboard history feature, anything you copy appears in your Clipboard. If you allow the sync feature, Windows may also sync your clipboard items between devices. So, here I have listed four reasons why you should clear your Pc’s Clipboard:
| Reasons | Details |
| 🔏Privacy and Security | If you copy and paste sensitive data, such as passwords or financial information, it may remain in the Clipboard long after the file or application is closed. Clearing the Clipboard ensures this information is invisible to anyone accessing your computer. |
| ❌Accidental Leakage | Your Clipboard is one of your computer’s most vulnerable areas. Everything you copy and paste is saved in your clipboard history. And if you are not careful, anyone with access to your computer can access that information, causing data leakage. Cybercriminals are growing more interested in clipboard data. |
| 😰Avoiding Data Confusion | If there are too much data on the Clipboard, it might result in data confusion. |
| ✅Freeing Up Resources | When you have too many objects on your Clipboard, you may see an error message stating that your Clipboard is full. You can erase all clips or a single clip. You can clear the data directly on the Clipboard tab. This will create space for newly copied data. |
We will provide a video for help on how to clear your PC’s Clipboard on Windows 10/11 before the written tutorials:
- 00:30 Open Windows Settings
- 00:37 Select the System option from the left pane.
- 00:44 Scroll down and select Clipboard
- 00:47 Click on the Clear button next to Cleat clipboard data
Solution 1. How to Clear Clipboard with Windows Clipboard Tab
This is the quickest and the easiest method as the Windows clipboard tab makes it easier to remove clipboard history. This is how to clear the Clipboard with Windows Clipboard Tab to remove all copied things from your Clipboard:
Step 1. Press the Windows key + V to bring up the clipboard tab, then select the «Clear all» button.
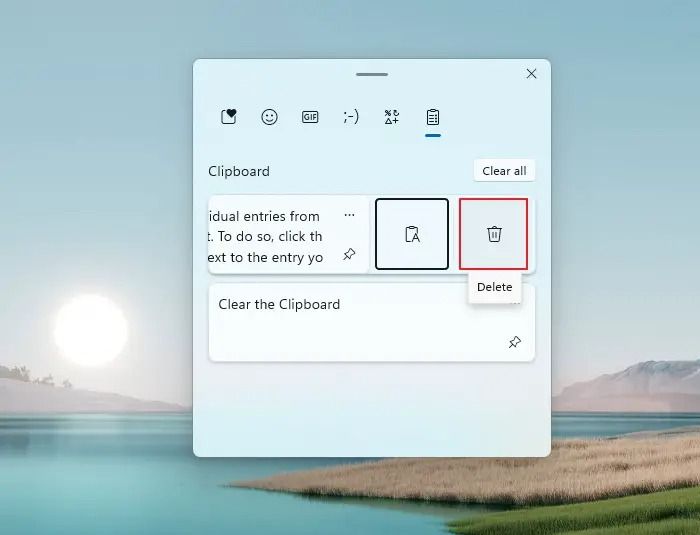
Step 2. To delete individual clipboard entries, click the horizontal three-dot menu symbol next to the entry you want to delete, and then click the trash button.
Now that you know about this and know someone facing the same issue, you can share this page on social media.
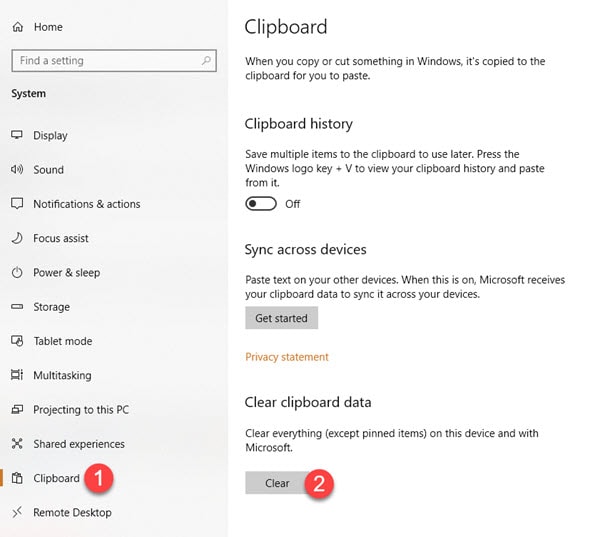
Solution 2. How to Clear Clipboard Windows 11/10 in Settings
Windows Settings app has a built-in feature to delete the clipboard history in Windows. Here Is how you can do it:
Step 1. Open Settings and click on System from the left pane. Next, scroll down and click on the Clipboard option.
Step 2. Click the Clear button next to Clear Clipboard data on the next page. This will erase all the data copied on your PC’s Clipboard.
If you have lost data while using the Clipboard or shortcuts to copy/paste files, you can read the following passage to get help:
How to Recover Files Lost in Cut and Paste
EaseUS Data Recovery Wizard Professional is one of the best software to get your files back. Recovering files lost in cut and paste will not be a question. Read more >>
Solution 3. How to Clear Clipboard Windows with Shortcuts
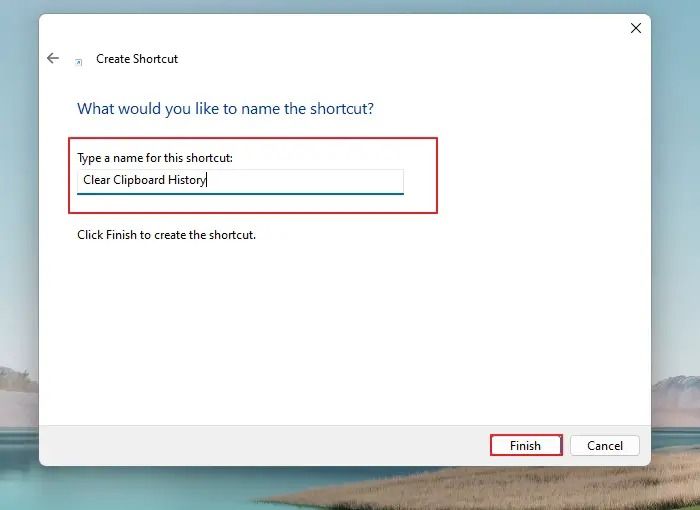
Although the methods for clearing clipboard history described above are simple, doing it repeatedly can be tedious. If you want to quickly clear clipboard history in Windows 11, you can build a desktop shortcut. If you want to learn how to force close an app on Windows, you can create shortcuts to do so. This is how to clear Clipboard Windows with shortcuts:
Step 1. Right-click anywhere on your desktop screen and click on New > Shortcut.
Step 2. In the Type the location of the item text box, copy and paste the following command cmd /c echo.|clip and click Next:
Step 3. Type your preferred name for the shortcut in the text box and click Finish.
- Tip
- You can now clear clipboard history on your Windows PC by double-clicking the desktop shortcut anytime. Note that it will only erase the recent data that you have copied.
Solution 4. How to Clear Clipboard in Command Prompt
If you prefer working with your computer through text commands, Command Prompt is a helpful application. Users can clear the Clipboard with command lines and also repair Windows with Windows 10 repair command. Here is how to clear the Clipboard via Command Prompt:
Step 1. Type cmd into the Windows Search bar and click on the Run as Administrator option. Click Yes on the User Account Control window. If your Windows 10 search bar is not working, you should try other methods.

Step 2. Copy and paste the command given echo in the elevated Command Prompt window echo.|clip and press Enter:

This will erase the content you last copied. If you are interested in opening Command Prompt at boot in Windows with other methods, check the following passage:
Open/Boot Command Prompt at Boot in Windows 10 (4 Ways)
How can you boot to Command Prompt when the BIOS interface appears in Windows 10? This post provides you with two ways. Read more >>
Recover Accidentally Deleted Files While Clear Clipboard on Windows
EaseUS Data Recovery Wizard is an all-in-one, powerful, and reliable data recovery tool that assists users in recovering accidentally deleted files. It is an advanced data recovery tool used by millions of customers worldwide due to including a wide range of functions. It can recover deleted files and any contents, whether images, data, documents, or videos. The software assures users have file, raw, and format recovery and works well on internal and external storage devices.
With the launch of the EaseUS Data Recovery Wizard, NAS data recovery has become extremely simple. You can now effortlessly recover any file from your NAS. It is the best protection you can give to your lost data. The tool also includes different scanning modes to assist you in recovering data efficiently. The best part is that free remote assistance is easily accessible.
So, given below are the download links you can use to download this software and recover files accidentally while clearing Clipboard on Windows:
Step 1: Install and Launch EaseUS Data Recovery Wizard
Download and install the recovery software from the EaseUS official website, then open it on your computer or laptop.
Step 2: Scan and Select Deleted Files
Choose the hard drive or partition where the deleted files located and click «Search for Lost Data». After scanning, preview and select the deleted files you want to recover.
Step 3: Choose Location and Recover Deleted Files
Click «Recover» and choose a location to save the files (preferably on a different drive), and click «OK.» Check the recovered files in the chosen folder.You can choose a cloud storage, such as OneDrive, Google Drive, etc., and click «Save» to save your recovered files.

If you like these methods, please invite your friends to read and share the article, which might help others facing a similar issue.
Summary
Although Windows automatically clears your clipboard data when you shut down or restart your computer, you may want to erase your clipboard history due to security issues manually, accidental leakage of data, to avoid data confusion, free up resources, etc. Thankfully, removing clipboard data in Windows 11 is a simple process that can be accomplished via Windows Settings, Command Prompt, desktop shortcuts, or Clipboard Tab.
Suppose you cannot recover the clipboard history you accidentally deleted. In that case, you can download and use the recovery software EaseUS Data Recovery Wizard to recover the deleted data on the Clipboard.
Clear Clipboard FAQs
Do you have more questions about clearing your Windows PC’s Clipboard? Given below are the most frequently asked questions and their answers:
1. How to find my Clipboard on Windows 10?
Press the Windows logo key + V to access your clipboard history. You can paste and pin commonly used items from the clipboard history by selecting an individual item from your clipboard menu. When an item is pinned, it is not erased from the clipboard history to create a place for new entries.
2. How to clear the clipboard history on Windows 11?
The easiest and quickest method to clear the clipboard history is via the Windows clipboard tab. To remove all copied things from your Clipboard, press the Windows key + V to bring up the Clipboard tab, then select the Clear all button.
You can also erase individual clipboard entries if needed. You can also clear the Clipboard via Windows Settings. Open Settings (Windows key + I), navigate to System > Clipboard, and click the Clear button next to Clear Clipboard data.
3. How to clear the Clipboard in Excel?
To clear the Clipboard in Excel, click on the Home tab and click on the clipboard dialogue box launcher, a small arrow at the bottom corner of the Clipboard group. This will open the clipboard task pane on the left of your Excel spreadsheet. It contains all the clips on the Clipboard. To erase the data on your Clipboard, click the Clear All button.
4. How to clear the Clipboard on Mac?
Using Terminal commands, you can clear the clipboard content on Mac. To access Terminal on your Mac, go to Go> Utilities > Terminal, or use Spotlight to search for Terminal. Then, in the Terminal, enter the command pbcopy < /dev/null and press Enter. This will remove everything from the Clipboard on Mac.
Всё, что нужно знать о полезной функции для более продуктивной работы.
Что такое журнал буфера обмена
Стандартный буфер, который все привыкли использовать через контекстное меню «Скопировать» и «Вставить» или через сочетания Ctrl + C, Ctrl + V, имеет лишь одну «ячейку памяти». Чего бывает очень мало. Начиная с Windows 10 Microsoft внедрила журнал буфера обмена, который умеет запоминать до 25 элементов. Копировать и вставлять при этом можно текст, ссылки, изображения и другой контент.
Как включить журнал буфера обмена Windows 10 и Windows 11
По умолчанию функция неактивна. Её можно активировать следующим образом.

Удерживая клавишу Win (с символом «окошка»), нажмите V на клавиатуре. Вы увидите предложение включить журнал буфера обмена с помощью соответствующей кнопки.

Если при нажатии Win + V ничего не происходит, то активировать функцию можно в настройках. Для этого сделайте правый клик по меню «Пуск» и выберите «Параметры». Далее в разделе «Система» → «Буфер обмена» включите тумблер как на скриншоте выше.
Как просмотреть буферы обмена Windows 10 и Windows 11
После включения система начнёт хранить всё, что вы копируете или вырезаете, в буфере обмена.

Для просмотра журнала нажмите Win + V. На экране отобразится плавающее окошко со списком сохранённых элементов, которое можно переместить в удобное место. Запомнить сочетание легко — как обычная вставка, только вместо Ctrl используется клавиша Win.
Как вставить куда-то скопированный элемент

Для вставки элемента в документ или, например, в строку поиска достаточно кликнуть по нужному тексту, ссылке или изображению в списке, после чего буфер автоматически закроется. Помимо этого можно использовать стрелки клавиатуры для навигации и Enter для вставки.
Как закрепить нужный элемент
Если вам часто приходится вставлять одинаковые данные вроде реквизитов, ссылок или номеров телефонов, можно закрепить их в буфере, чтобы они всегда были под рукой.

Для этого просто кликните по значку иголки напротив нужного элемента.
Как очистить журнал буфера обмена
Как упоминалось выше, в памяти буфера всего 25 ячеек. При их заполнении во время записи новых элементов самые старые стираются.

Каждую из них можно удалить по отдельности, кликнув на троеточие в списке и выбрав значок корзины. Для освобождения места во всём буфере используется кнопка «Очистить всё».
При этом буфер автоматически очищается после перезагрузки и выключения компьютера. Из памяти исчезают все элементы, кроме закреплённых.