
Кэш или таблица (Address Resolution Protocol, протокол определения адреса) хранит соответствия IP-адресов и аппаратных MAC-адресов устройств в локальной сети для быстрой установки соединения без повторного опроса компьютеров в сети.
Обычно, данные, хранящиеся в кэше, проблем не вызывают, но при возникновении ошибок при подключениях в локальной сети можно попробовать выполнить очистку кэша ARP на случай, если в нём хранятся неактуальные данные. Об очистке кэша ARP и пойдет речь далее в инструкции.
Очистка кэша ARP в командной строке

Базовый способ очистки таблицы ARP — использование командной строки. Используйте следующие шаги:
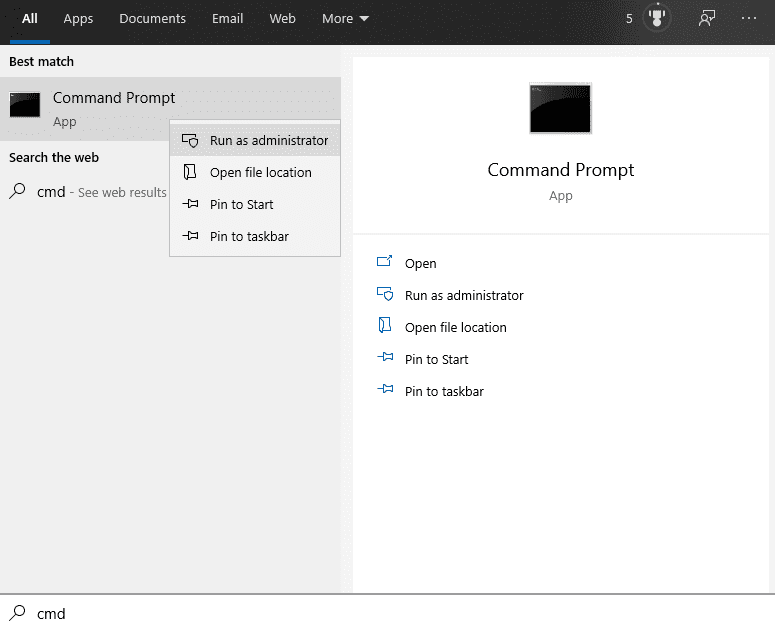
- Запустите командную строку от имени Администратора. В Windows 10 и Windows 11 для этого можно начать набирать «Командная строка» в поиске на панели задач, затем нажать правой кнопкой мыши по найденному результату и выбрать соответствующий пункт контекстного меню.
- Используйте одну из следующих команд для очистки кэша ARP:
netsh interface IP delete arpcache
или
arp -d

- Перезагрузите компьютер.

Кэш ARP очищен.
Просмотреть содержимое кэша ARP можно с помощью команды
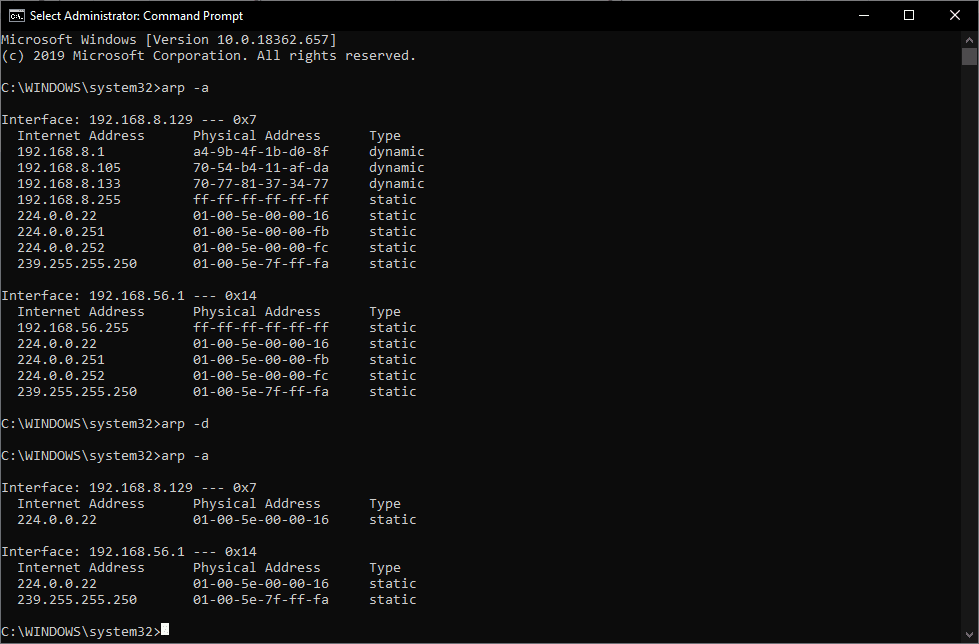
arp -a

Учитывайте, что сразу после очистки в нем начнут появляться новые записи — пустой кэш вы, вероятнее всего, не увидите.
Существует возможность настроить время жизни кэша ARP, изменив значения параметров DWORD (по умолчанию могут отсутствовать):
- ArpCacheLife (120 секунд по умолчанию)
- ArpCacheMinReferencedLife (600 секунд по умолчанию)
в разделе реестра
HKEY_LOCAL_MACHINE\SYSTEM\CurrentControlSet\Services\Tcpip\Parameters
Время задается в секундах в десятичной системе счисления.
The ARP or Address Resolution Protocol cache is an essential component of the Windows Operating System. It links the IP address to MAC address so that your computer can effectively communicate with other computers. An ARP cache is basically a collection of dynamic entries created when the hostname is resolved into an IP address and the IP address is resolved into a MAC address. All the mapped addresses are stored in the computer in the ARP cache until it is cleared.
The ARP cache does not cause any issues in Windows OS; however, an unwanted ARP entry will cause loading problems and connectivity errors. Hence, it is essential to clear the ARP cache periodically. So, if you, too, are looking to do so, you are at the right place. We bring to you a perfect guide that will help you clear the ARP cache in Windows 10.

Let us now discuss steps to flush the ARP cache in Windows 10 PC.
Step 1: Clear ARP Cache Using Command Prompt
1. Type command prompt or cmd in Windows search bar. Then, click on Run as administrator.

2. Type the following command in Command Prompt window and hit Enter after each command:
arp –a to display the ARP cache
arp –d to clear ARP cache
Note: The –a flag displays all the ARP cache, and the –d flag clears the ARP cache from the Windows system.

3. If the above command is not working, you can use this command instead:
netsh interface IP delete arpcache
Also Read: How to Flush and Reset the DNS Cache in Windows 10
Step 2: Verify the Flush using Control Panel
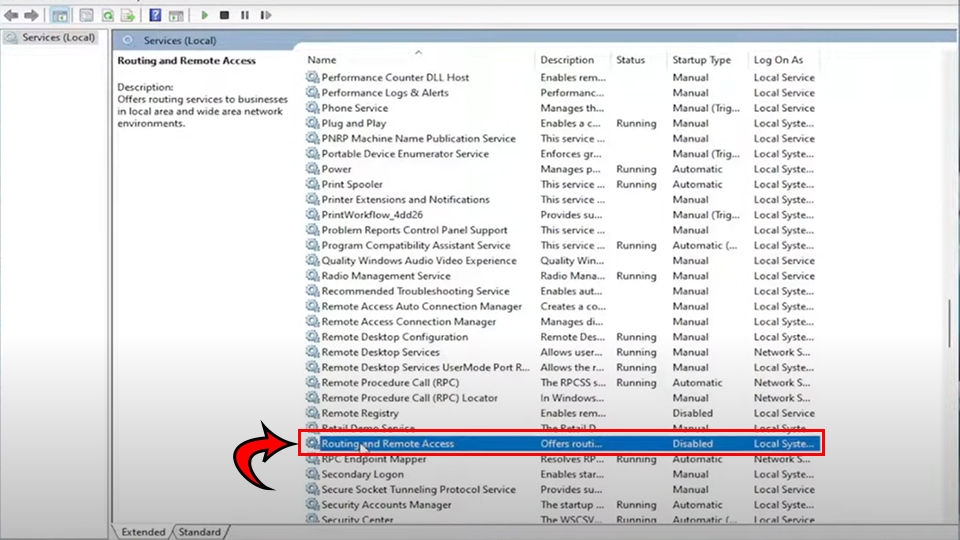
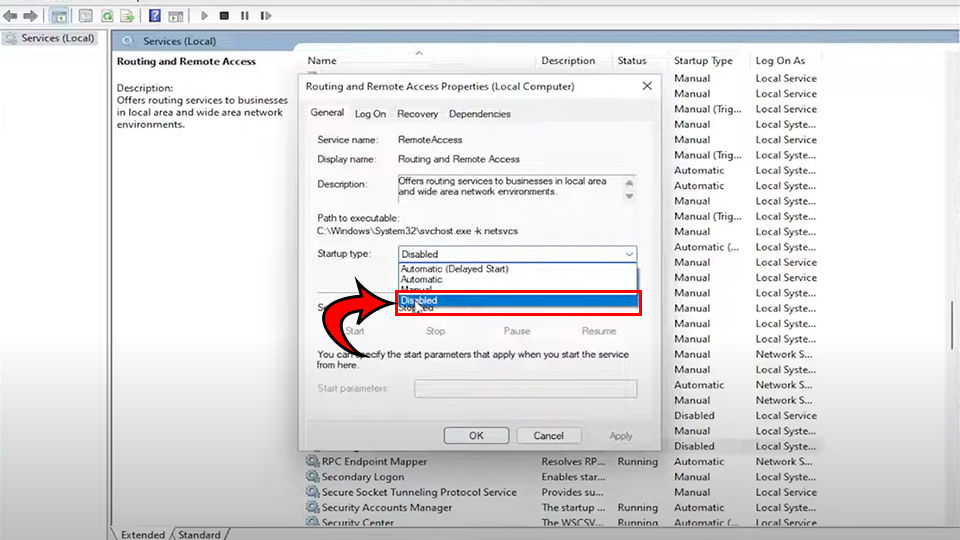
After following the above procedure to clear the ARP cache in Windows 10 system, ensure they are completely flushed from the system. In some cases, if the Routing and Remote Services is enabled in the system, it does not allow you to clear the ARP cache from the computer completely. Here is how to fix that:
1. On the left of the Windows 10 taskbar, click on the search icon.
2. Type Control Panel as your search input to launch it.
3. Type Administrative Tools in the Search Control Panel box provided at the top right corner of the screen.

4. Now, click on Administrative Tools and open Computer Management by double-clicking it, as shown.

5. Here, double-click on Services and Applications as shown.

6. Now, double click on Services and navigate to Routing and Remote Services as shown highlighted.

7. Here, double click on Routing and Remote Services and change the Startup Type to Disabled from the drop-down menu.

8. Ensure that the Service status displays Stopped. If not, then click on the Stop button.
9. Clear the ARP cache again, as discussed earlier.
Recommended:
- Fix Site Can’t Be Reached, Server IP Could Not Be Found
- Using Driver Verifier to fix Blue Screen of Death (BSOD) errors
- Fix Windows Update Error 0x800704c7
- Fix Omegle Error Connecting to Server
We hope that this guide was helpful and you were able to clear the ARP cache on Windows 10 PC. If you have any queries/comments regarding this article, feel free to drop them in the comments section.
When troubleshooting networking issues, a wide range of potential problems need to be investigated. One potential issue is that the ARP cache contains incorrect data. This scenario is extremely unlikely and is most often caused by a user editing their own ARP cache for some purpose. But no matter how the issue was caused, it still needs to be fixed. So, what is the ARP cache and how do you clear it?
What is the ARP cache?
ARP stands for Address Resolution Protocol, it resolves IP addresses to MAC addresses and is used exclusively for communications over a local network. The ARP cache stores routing information for local IP addresses, and then contains a default route to the gateway, for external resources.
The ARP cache can only be modified by a device on the local network. ARP messages are broadcast to the entire local network, any device that can see ARP messages will adjust its ARP cache to match the newest information. Therefore, changes to the cache on a device can be made by a user, or potentially a virus on any device on the network. The ARP cache cannot be directly modified by users outside of the local network.
Tip: Modifying the ARP cache manually should not be done lightly, as it can cause networking issues.
The most likely cause for the ARP cache needing to be cleared, is the user of the device trying to modify their own cache by hardcoding a value in an attempt to fix an issue and making it worse by accident.
How to clear the ARP Cache
The first step to clearing the ARP cache is to open an elevated command prompt, doing this gives it administrative rights which are necessary to perform the deletion. Open the windows start bar and type “CMD”, then right-click on command prompt and select “Run as administrator”.
In the elevated command prompt type the command “arp -a” to view the ARP cache, to wipe the ARP cache run the command “arp -d”. The -a flag instructs the program to display the ARP cache, the -d flag instructs it to delete the cache.
Misconfigured or expired ARP cache entries in the system might be one of the reasons for network connectivity problems.
Are you aware that clearing the ARP cache in your system may fix loading problems and connectivity errors?
This article will look at how to check and clear the ARP cache in the different operating systems.
But before that…
What is ARP cache?
ARP stands for Address Resolution Protocol, which is responsible for discovering MAC addresses and mapping them to IP addresses in order to communicate successfully with other systems on the local network. This protocol works between the data link layer and network layer.

Instead of asking the router every time where the particular device is located and what its mac address is, our system would just connect using the previously resolved IP address.
When our systems find the MAC addresses for the particular IP address using ARP protocol, they will be stored in a table for future use. This table is called ARP cache. It contains a list of known IP addresses and their MAC addresses.
ARP request is a broadcast, and ARP reply is unicast.
When to clear the ARP cache?
If the IP addresses of the network-linked devices change, ARP entries can get corrupted or expired, and new entries may not always overrule the database’s expired entries.
As a result, it may impact network performance and may cause loading or connectivity problems. In this case, you can simply clear the ARP cache to resolve the issue because clearing the ARP cache will cause all of your requests to go through the entire ARP process again. During this process, the new entries will be saved in the ARP table.
In some cases, you might also experience loading issues not directly related to the ARP cache but rather your browser’s cache. For example, if web pages aren’t updating properly or content appears broken in Google Chrome, it might help to clear cache in Chrome to remove outdated files and force the browser to fetch the latest version of a page.
Some errors may occur during the rebuilding of the ARP cache table, so deleting the ARP cache all the time is not recommended. Instead, you can also reboot your router or system to resolve the connectivity problems.
How to clear the ARP cache?
We can easily clear the ARP cache in any operating system by using the command line. Let’s get started.
Windows
Step 1: Open a command prompt and run it as an administrator.
Step 2: To view the ARP cache table, just type the following command.
arp -aThis command displays the IP addresses, and it’s associated mac addresses.
Step 3: Next, to delete the cache table, you can use netsh utility.
netsh interface IP delete arpcacheor you can simply use
arp -dStep 4: If you want to delete any specific entry in the cache, not the whole table.
arp -d <ip-address>Sample Output:
C:\WINDOWS\system32>arp -a

Interface: 192.168.29.64 --- 0xd
  Internet Address      Physical Address      Type
  192.168.29.1          a8-da-0c-e8-0e-e6     dynamic
  224.0.0.22            01-00-5e-00-00-16     static
  224.0.0.251           01-00-5e-00-00-fb     static
  224.0.0.252           01-00-5e-00-00-fc     static

Interface: 192.168.56.1 --- 0x14
  Internet Address      Physical Address      Type
  224.0.0.22            01-00-5e-00-00-16     static
  224.0.0.251           01-00-5e-00-00-fb     static
  239.255.255.250       01-00-5e-7f-ff-fa     static

C:\WINDOWS\system32>netsh interface IP delete arpcache
Ok.
You will get ‘OK’ as a response if you use the netsh utility to clear the cache table.
Linux
Step 1: Open a terminal and use the following IP utility command to clear the whole ARP table.
ip -s -s neigh flush allStep 2: If you want to delete the ARP record for a particular address, use arp utility.
arp -d <ip-address>Step 3: After deleting the entries, you can simply use the following command to view the ARP table in Linux.
arp -nThis command displays the whole arp table.
Sample output:
┌──(root💀kali)-[/home/geekflare]
└─# arp -d 10.0.2.1

┌──(root💀kali)-[/home/geekflare]
└─# arp -n
Address          HWtype         HWaddress           Flags Mask        Interface

10.0.2.1                       (incomplete)

10.0.2.2         ether       01:00:5e:00:00:fc         C                 eth0
10.0.2.3         ether       a8:da:0c:e8:0e:e6         C                 eth0
Here, you can observe the cache entry for the specific address is cleared.
Mac
Step 1: Open a terminal in your mac and use the following commands.
Step 2: To view the existing ARP entries.
sudo arp -aStep 3: To delete the cache for a particular interface
sudo arp -d 192.168.29.1 ifscope en0 Step 4: To clear the whole cache table
sudo arp -a -dSample output:
$ sudo arp -a

? (192.168.29.1) at 01:00:5e:00:00:fc on en0 ifscope [ethernet]
? (192.168.2.13) at a8:da:0c:e8:0e:e6 on en0 ifscope [ethernet]
? (192.168.1.21) at 01:00:5e:00:0e:16 on en0 ifscope permanent [ethernet]

$ sudo arp -a -d

192.168.29.1 (192.168.29.1) deleted
192.168.2.13 (192.168.2.13) deleted
192.168.1.21 (192.168.1.21) deleted
Conclusion
If you can’t ping a particular IP address in the same network even though they’re working correctly, it’s a sign that something is wrong. Your ARP cache table may need to be reconstructed again.
I hope you found this article helpful in learning how to clear the ARP cache in different operating systems.
You may also be interested in knowing how to change DNS servers for faster browsing or how to detect Rootkits in Windows, Linux and Mac.
Are you looking to clear your ARP cache to fix a networking issue? Here’s how to clear ARP Cache in both Windows 10 and 11.
The ARP Cache stands for the Address Resolution Protocol, entries created to connect an IP address to a MAC or Media Access Control address. If you have a duplication of an IP address on your table, you’ll need to clear your ARP cache to resolve the problem in Windows 10 or 11. If you’re having trouble connecting a machine to your local network because of the ARP cache, continue reading for two solutions.
How To Clear ARP Cache In Windows 10 and 11
To clear your ARP Cache, you can stop the Routing and Remote Access service or manually clear the ARP cache in your Command Prompt. Keep reading for step-by-step instructions using both methods.
Method 1: Using Routing and Remote Access to Clear ARP Cache
To use Routing and Remote Access services to clear your ARP cache:
- Type Services in the search menu on the bottom left of your screen.
- Scroll down and double-click Routing and Remote Access.
- Set Service status: to Stopped.
- Next to Startup type: select Disabled.
- Hit Appy and Ok.
- Restart your computer.
If this doesn’t work, continue reading to learn the command prompt to clear your ARP cache manually.
Method 2: Clearing ARP Cache Using Command Prompt
To clear your ARP Cache using the Command Prompt:
- Type cmd in the search menu at the bottom left of your screen.
- Right-click Command Prompt and click Run as Administrator.
- Hit Yes.
- Paste
netsh interface IP delete arpcacheinto the Command Prompt.
- Restart your computer.
And there you have it! This should hopefully resolve any errors on your network. This usually occurs when replacing hardware, but you assign the same static IP to the machine. The refresh is required for the network to recognize the new hardware.
We hope this guide helped you clear your ARP cache in Windows 10 or 11.
Did you know that we cover coding too? See our Coding Section for coding tutorials and guides.