
Здравствуйте админ! После того, как я обновил на своём ноутбуке Windows 8.1 до Windows 10, десятка стала активно обновляться и после каждого выключения ноутбука выходит сообщение «Работа с обновлениями. Завершено 100%. Не выключайте компьютер» и ноутбук не выключается довольно долго, мне это надоело и я отключил обновления Windows по вашей статье. Всё бы хорошо, но в качестве антивирусной программы я использую Защитник Windows (Windows Defender), а его антивирусные базы обновляются через Центр обновления Windows, который я отключил, а это значит, что антивирусные базы встроенного в Win 10 антивируса не получают обновлений. Скажите, как можно вручную обновить Защитник Windows? Можно где-то отдельно скачать файлы обновлений для Защитника Windows для операционных систем Windows 7, Windows 8.1 и Windows 10?
Как вручную (автономно) обновить встроенный в Windows 10 антивирус Windows Defender (Защитник Windows)
Привет друзья! Все мы знаем, что встроенный в Windows 10 бесплатный антивирус Windows Defender защищает нашу операционную систему от различных вредоносных программ и получает обновления вирусных сигнатур каждый день через Центр обновлений Windows.
Если вы отключили обновления в Windows 10, то это значит, что встроенный в операционную систему антивирус Windows Defender также не будет обновляться. Поэтому имеет большое значение, держать Центр обновления Windows включенным, чтобы Защитник Windows получал обновления своевременно.
Если вы по каким-либо причинам отключили обновления Windows, то обновить Windows Defender можно вручную (автономно), в сегодняшней статье я покажу вам, как это можно сделать.
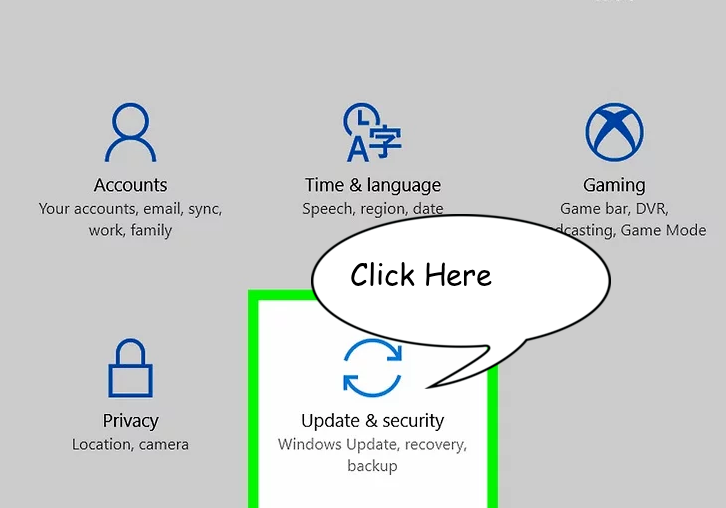
В параметрах Windows выбираем «Обновление и безопасность»,

затем «Защитник Windows» и смотрим версию подсистемы, а также определения антивирусной программы и определения антишпионской программы. После ручного обновления версии должны измениться.

Щёлкаем левой мышью на кнопке «Поиск Windows»

и набираем «Защитник Windows», затем жмём на появившееся приложение «Защитник Windows»,
появляется окно антивируса Windows Defender. Видим, что определения вирусов и программ-шпионов очень старые.
Жмём на кнопку «Обновить».

Жмём на кнопку «Обновление определений».

Происходит обновление антивирусных баз Защитника Windows.

Антивирус обновлён.

Версия подсистемы, а так же определения антивирусной программы и определения антишпионской программы изменились.

В процессе обновления у вас может выйти ошибка — «Не удалось обновить определения вирусов и программ шпионов».
В этом случае перейдите по ссылке на официальный сайт Майкрософт
https://www.microsoft.com/en-us/wdsi/definitions
Обновление защиты от вредоносных программ и программ-шпионов программное обеспечение Microsoft.
Ведём шкалу прокрутки вниз до слов…

Обновления для защиты от вредоносных программ и программ-шпионов.

Выбираем версию установленной на нашем компьютере операционной системы и её разрядность. В моём случае, это Windows 10-64 бит.

Мне на компьютер скачивается файл mpam-fe.exe с обновлениями вирусных сигнатур для Защитника Windows размером 120 Мб. Запускаю данный файл от администратора.
Программа не открывает никакого окна. Windows Defender обновляется за несколько минут. Теперь в параметрах Windows выберите «Обновление и безопасность», затем «Защитник Windows» и смотрите версию подсистемы, а также определения антивирусной программы и определения антишпионской программы. После ручного обновления версии должны измениться.
Это обновление предоставляет последние обновления для платформы Безопасность Windows, которая состоит из приложения Безопасность Windows и его базовой службы.
Чтобы получить текущую версию приложения Безопасность Windows, выполните следующую команду powershell:
Get-AppPackage Microsoft.SecHealthUI
Скачивание обновления вручную
-
Безопасность Windows версия приложения: 1000.27703.0.1006
-
версия платформы Безопасность Windows: 10.0.27703.1006
64-разрядная версия| ARM64
Дополнительные сведения о приложении Безопасность Windows см. здесь.
Нужна дополнительная помощь?
Нужны дополнительные параметры?
Изучите преимущества подписки, просмотрите учебные курсы, узнайте, как защитить свое устройство и т. д.
В этой статье мы разберём, что делать, если встроенный антивирус Microsoft Defender (также известный как Защитник Windows) не обновляется автоматически. Вы узнаете, как диагностировать и устранить типичные проблемы, связанные с обновлением антивирусных баз и движка. Мы рассмотрим как встроенные инструменты Windows, так и ручные методы исправления ошибок.
Приобрести оригинальные ключи активации Windows 11 можно у нас в каталоге от 1690 ₽
Как работает обновление Microsoft Defender?
В Windows 10 и 11 обновления для Microsoft Defender происходят через два основных механизма:
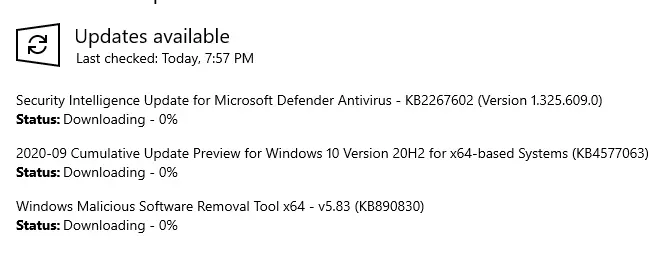
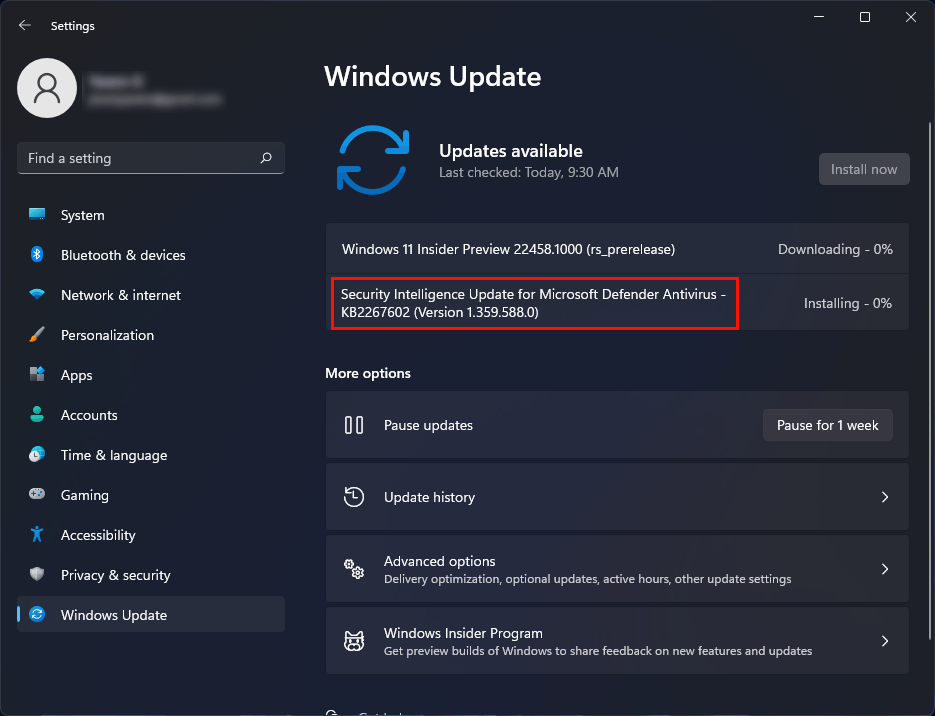
1. Windows Update — автоматически скачивает и устанавливает обновления, включая антивирусные базы и движок. В истории обновлений вы можете найти запись Security Intelligence Update for Microsoft Defender Antivirus — KB2267602 в разделе Definition Updates.
2. Встроенный механизм обновления — Microsoft Defender самостоятельно проверяет наличие новых баз на серверах Microsoft и обновляет их, даже если служба Windows Update отключена.

Если обновление KB2267602 не скачивается (например, зависает на 0%) или возникают ошибки (например, 80072f8f или 0x80072ee2), это может быть связано с проблемами доступа к интернету, настройками Windows Update или повреждением служб. Однако Windows Update — не единственный способ обновления антивируса.
Как проверить состояние обновлений Microsoft Defender?
1. Проверка последнего обновления
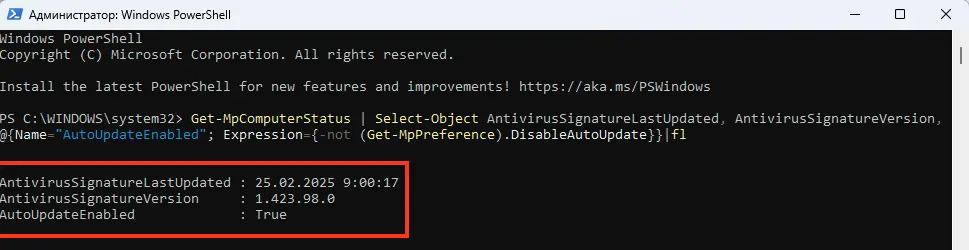
Чтобы узнать, когда последний раз обновлялись антивирусные базы и включено ли автоматическое обновление, выполните команду в PowerShell:
Get-MpComputerStatus | Select-Object AntivirusSignatureLastUpdated, AntivirusSignatureVersion, @{Name="AutoUpdateEnabled"; Expression={-not (Get-MpPreference).DisableAutoUpdate}}|fl
Эта команда покажет дату последнего обновления, версию баз и статус автоматического обновления.
2. Проверка через графический интерфейс
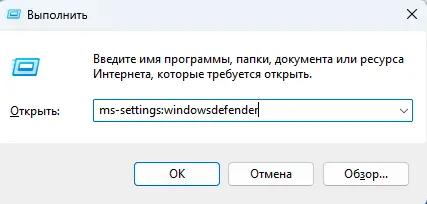
Откройте приложение Безопасность Windows (можно через команду ms-settings:windowsdefender).
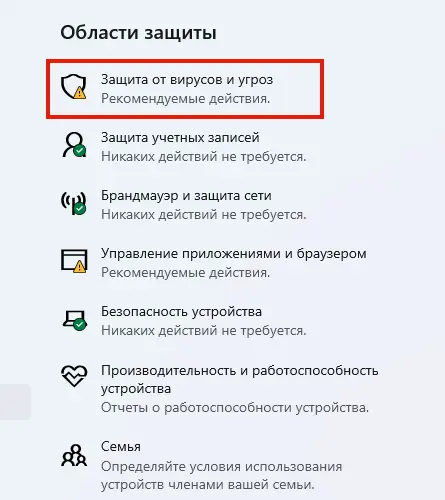
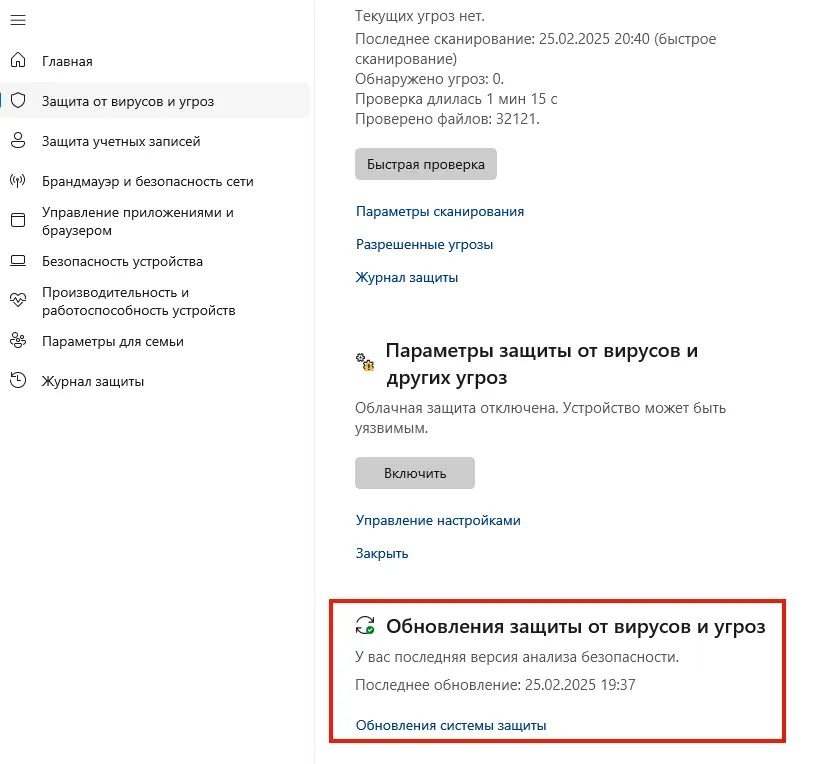
В разделе Защита от вирусов и угроз вы увидите информацию о версии баз и времени последнего обновления.
Типичные проблемы и их решение
1. Ошибка «Не удалось обновить определение системы защиты»
Если вы видите ошибку Не удалось обновить определение системы защиты (800704с6 или 80072f8f), выполните следующие шаги:

1. Проверьте настройки обновления:
Get-MpPreference | Select-Object SignatureScheduleDay, SignatureScheduleTime
Убедитесь, что параметры обновления заданы корректно.
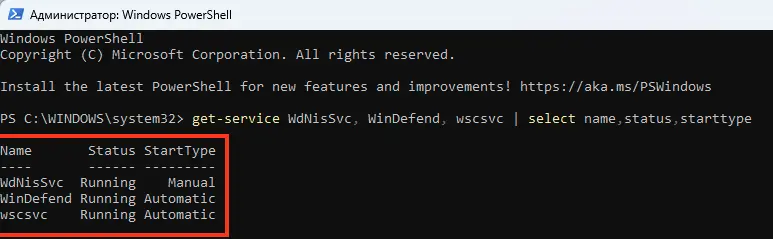
2. Проверьте состояние служб Microsoft Defender:
get-service WdNisSvc, WinDefend, wscsvc | select name,status,starttype
Убедитесь, что службы WinDefend, WdNisSvc и wscsvc запущены.
3. Попробуйте обновить базы вручную:
"%ProgramFiles%\Windows Defender\MpCmdRun.exe" -SignatureUpdate
Если возникнет ошибка, проверьте лог %userprofile%\AppData\Local\Temp\MpCmdRun.log.

2. Ошибка 0x8024401b (невозможно подключиться к серверам обновлений)
Эта ошибка указывает на проблемы с доступом к интернету или настройками прокси.
Выполните следующие действия:
1. Проверьте доступность серверов обновлений:
tnc fe2cr.update.microsoft.com -port 443
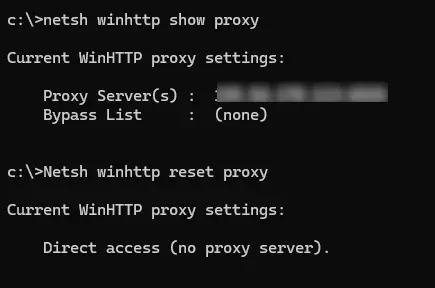
2. Проверьте настройки прокси:
netsh winhttp show proxy
Если прокси настроен некорректно, сбросьте его:
Netsh winhttp reset proxy
3. Повреждение антивирусных баз
Если базы повреждены, выполните сброс и обновление:
"%ProgramFiles%\Windows Defender\MpCmdRun.exe" -removedefinitions -all
Update-MpSignature -Verbose

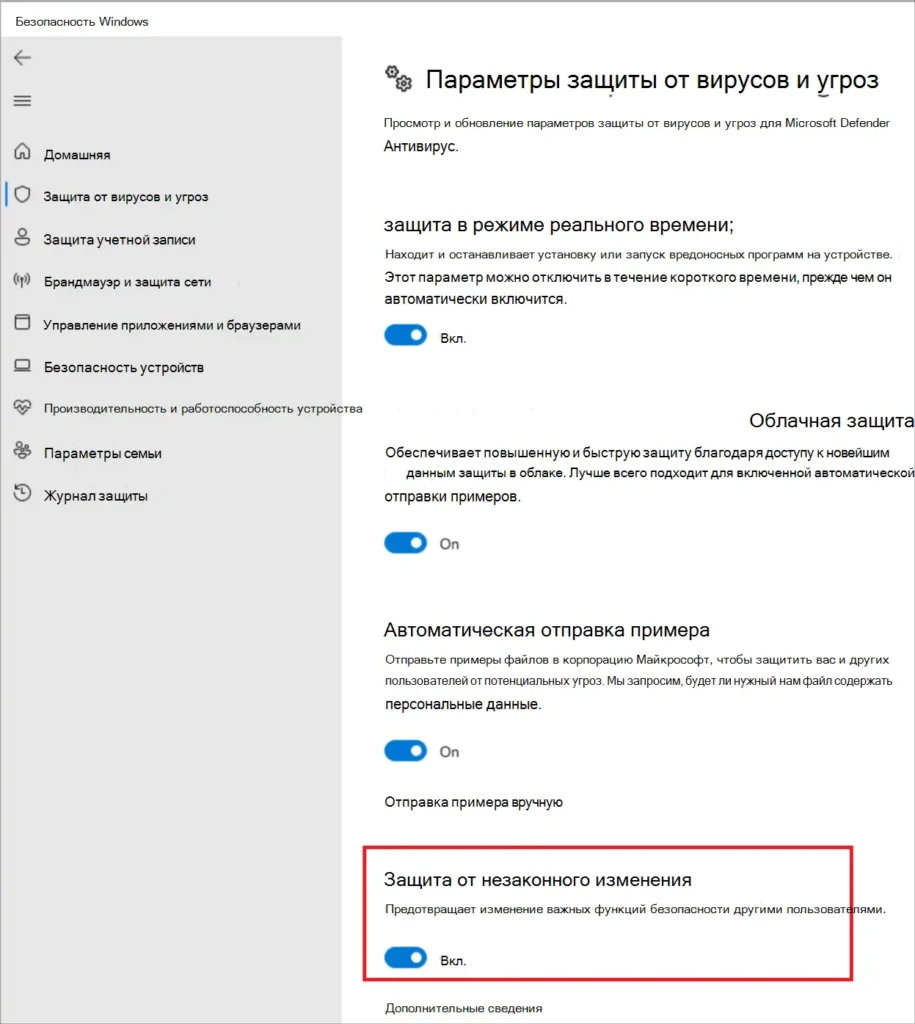
Если возникнет ошибка 0x80070005 (Access Denied), временно отключите Защита от незаконного изменения в приложении Безопасность Windows.
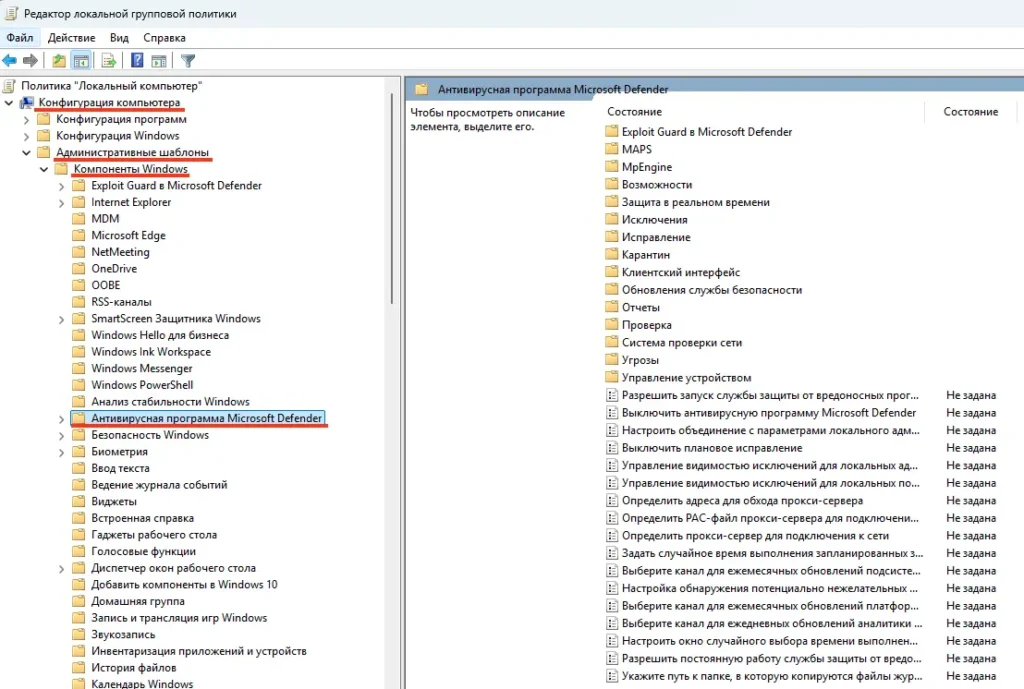
4. Проверка групповых политик
Если настройки Microsoft Defender заданы через групповые политики, выполните команду rsop.msc и проверьте раздел:
Конфигурация компьютера -> Административные шаблоны -> Компоненты Windows -> Антивирусная программа Microsoft Defender. При необходимости сбросьте настройки.
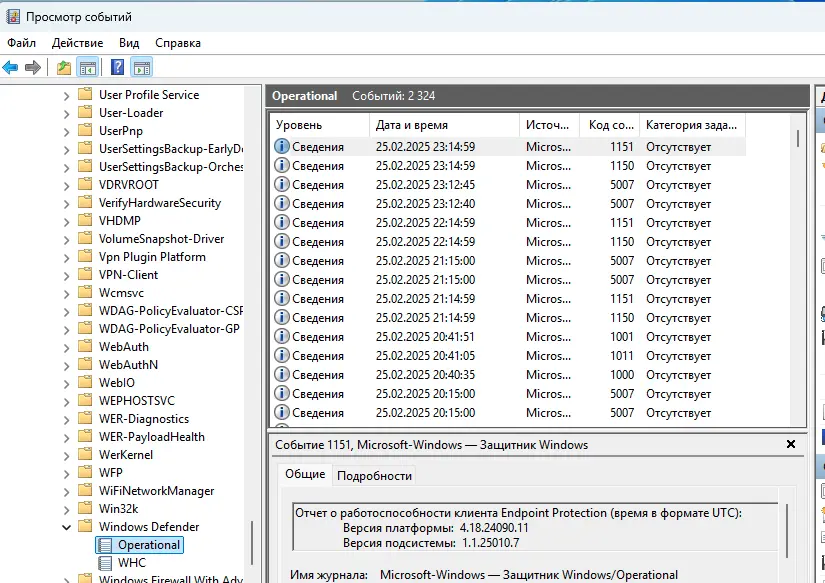
При диагностике ошибок полезно изучить логи событий антивируса в журнале:
— Откройте «Просмотр событий»
Перейдите: Журналы приложений и служб -> Microsoft -> Windows -> Windows Defender -> Operational
5. Ручное обновление баз
Если автоматическое обновление не работает, скачайте обновления вручную:
1. Перейдите на страницу Microsoft Defender Updates и скачайте файл mpam-fe.exe.
2. Сбросьте текущие базы:
cd %ProgramFiles%\Windows Defender
MpCmdRun.exe -removedefinitions -all
3. Запустите файл mpam-fe.exe с правами администратора.
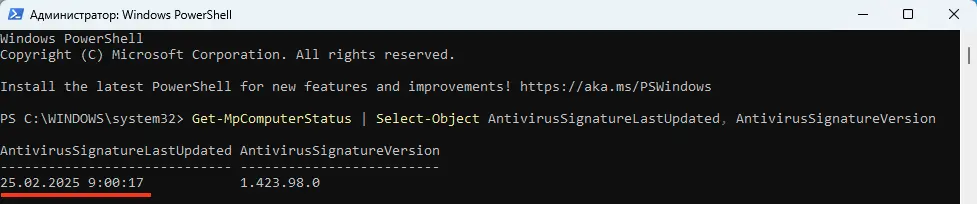
4. Проверьте, что дата последнего антивирусных баз обновлена:
Get-MpComputerStatus | Select-Object AntivirusSignatureLastUpdated, AntivirusSignatureVersion
Если Microsoft Defender не обновляется, это может быть связано с проблемами доступа к интернету, настройками служб или повреждением баз. Следуя инструкциям выше, вы сможете диагностировать и устранить большинство ошибок. Если проблема сохраняется, попробуйте ручное обновление баз или сбросьте настройки антивируса.
-
Home
-
News
- How to Update Windows Defender Antivirus on Windows 10/11?
By Stella | Follow |
Last Updated
If you only use Windows Defender Antivirus as your antivirus software, you’d better keep it up-to-date to make sure it can detect the latest threats. However, do you know how to update Windows Defender Antivirus on your Windows 10/11 computer? You can find some methods in this post.
What Is Windows Defender Antivirus?
Windows Defender Antivirus is a Windows built-in antivirus app, which can help you protect your computer from viruses, malware, spyware, etc. Windows Defender Antivirus is enough to protect your PC. So it is OK if you don’t want to install third-party antivirus software.
To supply better protection for your Windows 10/11 computer, Microsoft keeps releasing updates for Windows Defender to cover the latest threats and to tweak detection logic, enhancing the ability of Microsoft Defender Antivirus. So, you’d better make sure you are using the latest version of Windows Defender Antivirus. Normally, your system can automatically get the updates for Windows Defender. However, you can also perform a Windows Defender manual update.
In this post, MiniTool Software will show you the methods you can use to perform a security intelligence update for Microsoft Defender Antivirus.
How to Update Windows Defender Antivirus?
Way 1: Automatic Windows Defender Update
Microsoft releases updates for Windows Defender via Windows Update. You can go to Windows Update and click Check for updates to see if there is an available Windows Defender update. Usually, the update is titled Security Intelligence Update for Microsoft Defender Antivirus.
If Windows Update doesn’t work, you can run Windows Update troubleshooter to fix it. To make Windows Defender Antivirus work, you need to make sure you have enabled it on your device.
Way 2: Trigger an Update for Windows Defender via CMD
You can also manually trigger an update to download and apply the latest security intelligence. This method can also be your choice if there are problems with the automatic update via Windows Update.
To manually update Windows Defender, you need to first clear the current cache and then trigger an update. Well then, how to do this?
Step 1: Run Command Prompt as administrator.
Step 2: Run the following commands and click Enter after each.
- cd %ProgramFiles%\Windows Defender
- exe -removedefinitions -dynamicsignatures
- exe -SignatureUpdate
Tip: The enterprise administrators can push Windows Defender updates to devices in their network.
Way 3: Manually Download the Update for Windows Defender
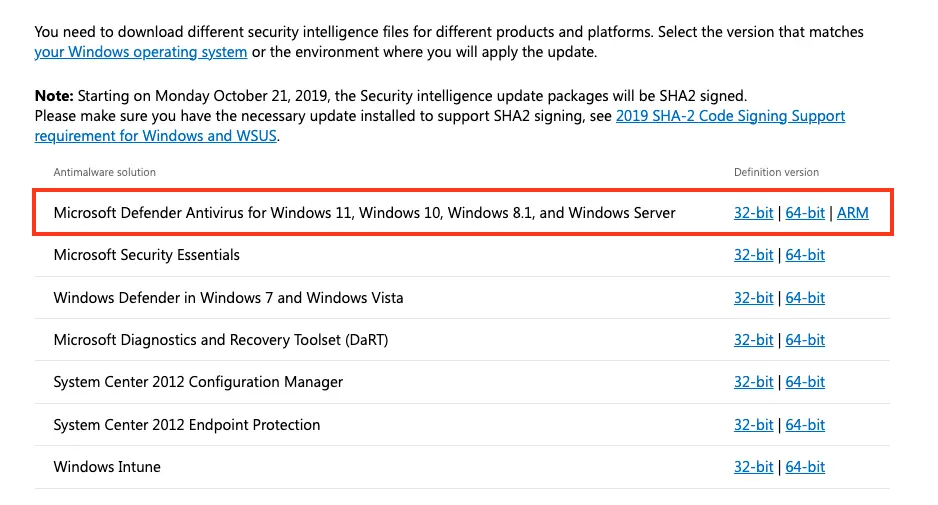
Microsoft offers Windows Defender Antivirus download sources for Windows 10. The security intelligence update packages for Windows Defender are SHA2 signed. So, you need to make sure that you have the necessary update installed to support SHA2 signing, see 2019 SHA-2 Code Signing Support requirement for Windows and WSUS.
Here are the download links from Microsoft. You can feel to download one according to the Windows edition you are using:
Microsoft Defender Antivirus for Windows 10 (and Windows 8.1) 32-bit | 64-bit | ARM
In addition, Microsoft rolls out Windows Defender Preview in Microsoft Store. If you want to experience it, you can download it via Microsoft Store.
How to Update Windows Security Signatures?
Step 1: Click the search icon from the taskbar and search for Windows Security.
Step 2: Select Windows Security to open it.
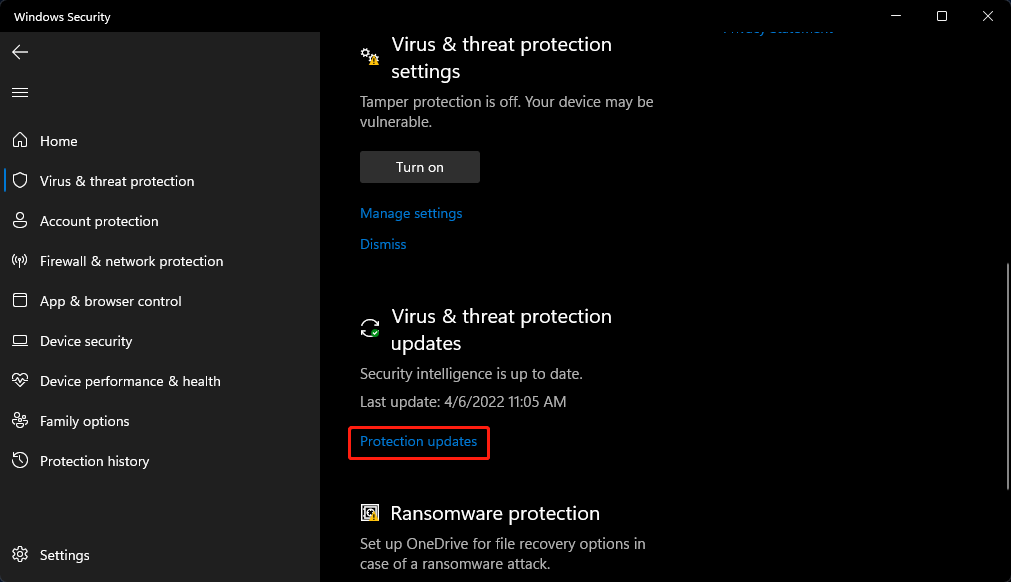
Step 3: Click Virus & threat protection.
Step 4: Click Protection updates under Virus & threat protection updates.
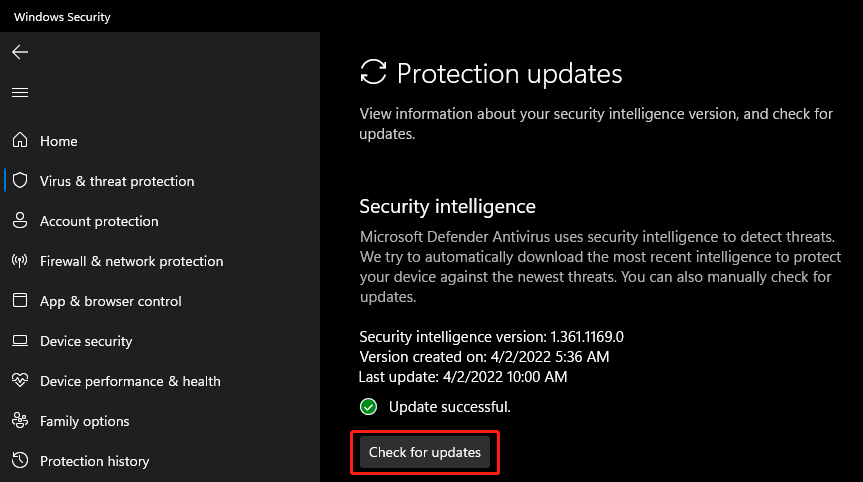
Step 5: Click the Check for updates button.
These are the methods to update Windows Defender on your Windows 10/11 computer. You can just select a suitable method based on your situation.
About The Author
Position: Columnist
Stella has been working in MiniTool Software as an English Editor for more than 8 years. Her articles mainly cover the fields of data recovery including storage media data recovery, phone data recovery, and photo recovery, videos download, partition management, and video & audio format conversions.
Are you concerned about your computer’s security matters? You have to be updated if you want to be secured in these days of increasing security attacks. Many users found it hard to update their Windows security guard of windows defender. But it’s not like that at all! In this article, I will show you how you can update your Windows Defender in different ways. Let’s go to work.
You can update your windows defender automatically when the updates are available if you want. Now there are two cases
- You can make your computer’s settings such that all available windows updates will be installed automatically. If you do so, the windows defender will be automatically updated like other available windows update. And yopu don’t have to open the windows defender window for that.
- You can turn off your computer’s automatic windows update service settings tab, then windows defender won’t update itself anymore. But you can make windows defender to be updated automatically even though you are turning your computer’s automatic windows update settings off.
Now I will show you how to proceed with the above mentioned two processes.
Method-1: Update Windows Defender Automatically
Update Automatically along with all other windows platform version updates available –
For Windows 10 Users
If you are a Windows 10 user, then follow these procedures. Just follow these instructions carefully to get your things done properly. Let’s go.
- At first search settings in your computer’s search bar and click on the first result. Or, You can click on the start menu and then select the settings option.
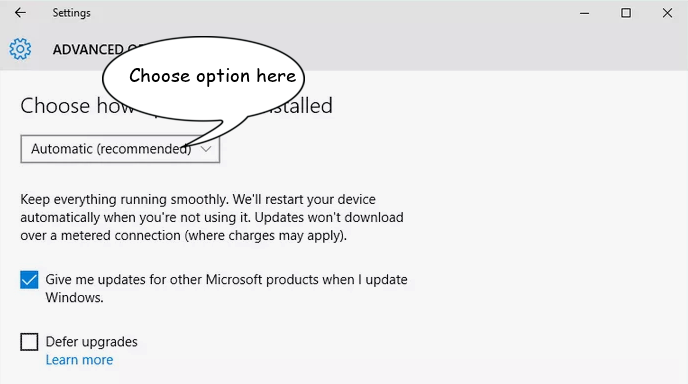
If you want the updates of windows defender to be updated automatically, then select the option ‘Automatic’ or ‘ Install updates automatically’. But in this process, all updates of windows will be installed automatically like windows defender. This is irritating if you want windows defender only to be updated automatically.
You can choose the option ‘Check for updates but let me choose whether to download and install them’. If you choose this option, then you will be notified when any windows update is available. Just approve the updates of windows defender and ignore rest if you want windows defender only to be updated.
Windows Defender Protection Update For Windows 7/ 8
Follow the below procedure if you are a windows 7 or 8 users.
At first, you have to open the control panel. In windows 8, press (Windows+X) button or search control panel in yoursearch bar and then click on the first result.

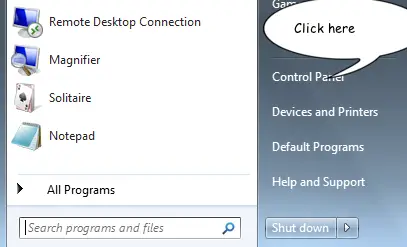
In windows 7, Click on the start menu and then choose the control panel.
Or, You can search the control panel in your search bar and then click on the first result.
Now go to System and Security→ Windows Update.
Click on the option ‘Change Setting’.
Now you will find several options. Choose any of these below two options but I prefer you the second one here.
Install updates automatically (recommended): If you want the updates of windows defender to be updated automatically, then select this option. But in this process, all updates of windows will be installed automatically like windows defender. If you want all updates to be installed automatically, then it’s okay. But if you don’t, then don’t select this option.
Check for updates but let me choose whether to download and install them: If you choose this option, then you will be notified when any windows update is available. Just approve the updates of windows defender and then windows defender will be updated. You can ignore the notifications of other windows updates if you want windows defender only to be updated.

Select your preferred option and then click Ok.
Method-2: Update Automatically when Windows Automatic Update is turned off
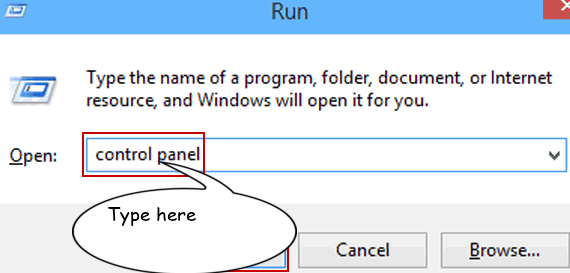
At first, you have to open the control panel. In windows 10, Press (Windows+R) to open the run prompt and then type control panel. Click Ok to open the control panel.
In Windows 7/8, search the control panel in your search bar and then click on the first result.
Now go to System and Security → Administrative Tools → Schedule tasks

Now you will see the windows of Task Scheduler. Click on the option ‘Create Basic Task’ in the right panel.
Now you will see a window asking for Task name and description. This is not anything serious. Give a name and description regarding the windows defender. Click Next.
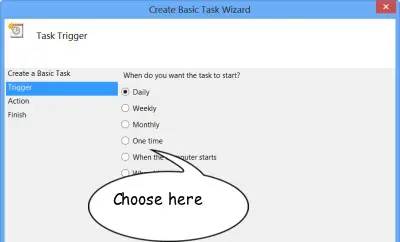
Now you have to set the frequency. It means whether you want to run the task daily or monthly or other options are available. I prefer to select a daily option. Click next.
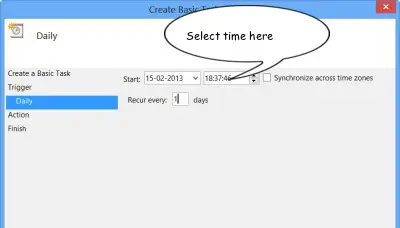
Now set the time you want to run the task. Click Next.
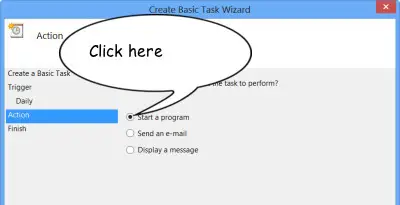
Select the option ‘Start a program’ and click Next.
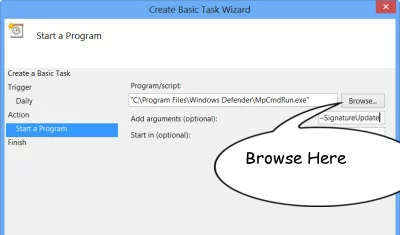
Now type the below path in the Program/script box.C:\Program Files\Windows Defender\MpCmdRun.exe Now type -SignatureUpdate in Add arguments box Click Finish.
When the task will search for a windows defender update, then a blank window will be appeared and closed down after a while. If you don’t want the window to appear, then just do this→type the below path in the Program/script box. C:\Program Files\Windows Defender\MSASCui.exe Now type -Update in Add arguments box. Click Finish. This time you won’t see a blank window while checking for updates.
You are done now. Your created task has been added to the task library. The task will run every day at your given time and search for windows defender update. If the update is available, then the update will be installed on your system.
If you want to run this task more than once a day, then continue with the below steps. If you don’t want, then simply skip the below steps.
Go to the task scheduler and go to the library in the right panel. You will find your created task. Open it. Click on it and open its properties box.
Click on the Trigger tab. Then select the task and click edit.
Now you find an option in the lower part named ‘Repeat Task Every’ and you can choose the option for 1 hour or 6 hours. If you select 1 hour then the task will check for windows defender updates every hour and for 6, hen the task will check for windows defender updates every six hours. Choose your preferred option. Click Ok and you are done.

It will update Windows Defender based on the scheduled task.
How to update Windows Defender Manually
You have seen the process of how you can update windows defender automatically. Now I will show you how you can update windows defender manually. Let’s go to work on manually update windows defender antivirus to force windows defender update.
Method-1: Install Manually
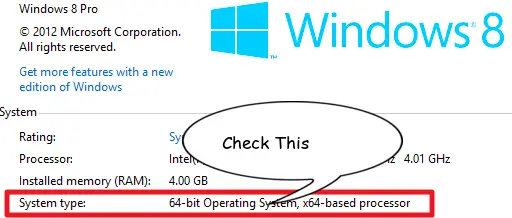
At first, you have to check your computer’s system type means you are a 32-bit version user or 64-bit version user. In windows 10, press the (windows+I) button. Now go to System→ About. Now you will find an option named System type. Check its information and you can see whether you are a 32-bit or 64-bit version user.
In windows 8, search System in your search bar and click on the first result. Check System type value information and you can see whether you are a 32-bit or 64-bit version.
In windows 7, click the Windows Start icon from the lower-left corner. Now right click on the computer option and then choose properties.
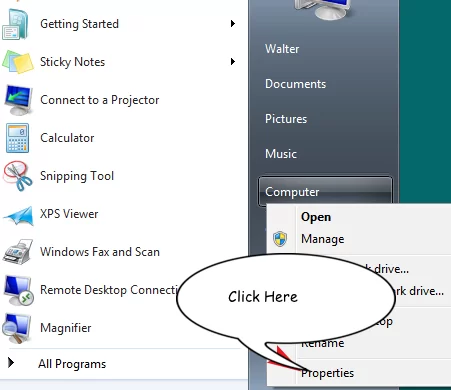
Check System type value information and you can see whether you are a 32-bit or 64-bit version user.
Now you have to download the .exe file of windows defender antivirus definition updates. Click on the below links likewise your system type to download the .exe file→ Click Here to download
After completing your download, double click on the .exe file, and windows defender will be updated. You are done, go sleep!
Are You Facing Trouble on window defender update?
If you are in trouble and cannot get your things done properly with this method, then you can run an offline scan with the windows defender offline tool first and then retry the windows defender manual update.
The method from the top then can help you to fix the problem. If you want to see how you can perform an offline scan with the windows defender offline tool, then click here.
Method-2: Update Windows Defender Manually Using Windows Powershell
At first, you have to open the windows PowerShell as admin mode. Search Windows PowerShell in your computer’s search bar and then right-click on the result ‘Windows PowerShell’ and choose ‘Run as administrator’.
If your computer is password protected, then a window can appear asking for a password. If so, type your password there.
Now you will see the Windows PowerShell window. Now type cd and press enter. Again type cd and hit enter.
Now you can update windows defender two ways. You can tell the system the install source or just tell it to update from the best source available.
If you want to update windows defender from the best source available without giving any specific source, then type the below command and click enter.
Update-MpSignature

If you want to initialize the update source, then they’re available four sources you can use. If you want to download the update from InternalDefinitionUpdateServer, then type the below command and click enter.
Update-MpSignature -UpdateSource InternalDefinitionUpdateServer
If you want to download the update from Microsoft update server, then type the below command and click enter.
Update-MpSignature -UpdateSource Microsoft update server
If you want to download the update from Microsoft Malware Protection Center (MMPC), then type the below command and click enter.
Update-MpSignature -UpdateSource MMPC
If you want to download the update from FileShares, then type the below command and click enter.
Update-MpSignature -UpdateSource FileShares
Select your preferred source and after a while, you will be done with the windows defender latest update!
Conclusion
So, how to update windows defender antivirus in windows 10 and quick scan and protect your PC from malware attacks? Just follow the instructions properly to get your things done smoothly and perfectly us the Microsoft antimalware software. If you face any problem, just start from the top and check whether you miss anything. If you haven’t updated your windows defender yet, go update it now to prevent any major harm to your system.
Draft and Proofreader Literature buff. Working with words is right up my alley. Technology, gadgets and audio devices attract me. Hence I am with Tech Dimension. Books, and a cup of coffee, are the ideal winter night for me.