
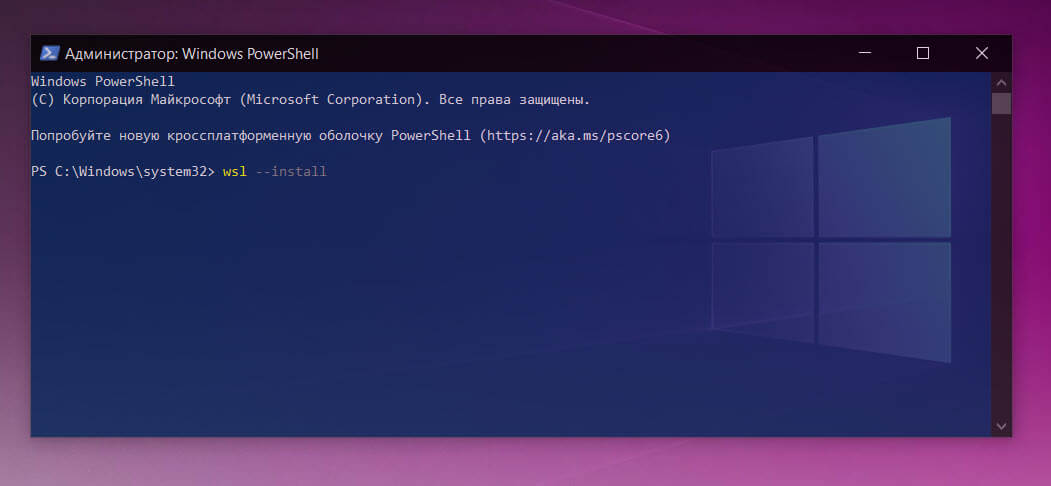
В последних сборках Windows Insider Preview вы можете установить все необходимое для запуска WSL, просто выполнив wsl.exe —install. Мы рады сообщить, что эта функция теперь официально перенесена в Windows 10 версии 2004 и выше, что значительно упростит установку WSL в этих сборках.
Использование wsl —install

Раньше процесс настройки WSL был слишком сложным и требовал включения нескольких параметров и установки нескольких пакетов. Мы упростили процесс до одной команды: просто откройте окно командной строки с правами администратора и запустите wsl.exe —install. После того, как вы нажмете Enter, процесс автоматически включит необходимые дополнительные функции WSL, установит дистрибутив Ubuntu по умолчанию и установит последнюю версию ядра WSL Linux на ваш компьютер. Когда он будет завершен и вы перезагрузите компьютер, ваш дистрибутив запустится после того, как вы снова загрузитесь, завершив установку.
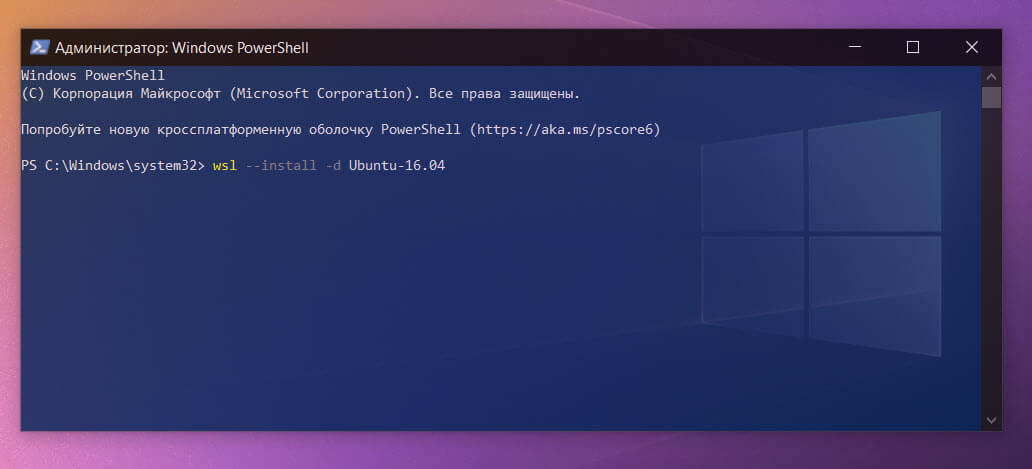
Кроме того, вы можете найти список доступных для установки дистрибутивов Linux, введя команду wsl —list —online в PowerShell или командной строке Windows. Чтобы установить дистрибутив, отличный от стандартного для Ubuntu или в дополнение к нему, используйте эту команду: wsl —install -d <DistroName>
Замените <DistroName> именем дистрибутива Linux, найденным в предыдущей команде list. Эту команду установки можно использовать для первой установки или для добавления дополнительных дистрибутивов после того, как у вас уже установлен WSL с дистрибутивом Ubuntu по умолчанию.
Дополнительные команды
Мы также добавили несколько дополнительных команд, которые помогут вам управлять своими экземплярами WSL.
Вы можете использовать wsl —update, чтобы вручную обновить ядро WSL Linux, и вы можете использовать wsl —update rollback для отката к предыдущей версии ядра WSL Linux.
Наконец, вы можете использовать wsl —status для просмотра общей информации о вашей конфигурации WSL, такой как тип дистрибутива по умолчанию, дистрибутив по умолчанию и версия ядра.
Обновите версию Windows 10 для поддержки этих команд
Вы можете получить все это, просто обновив Windows, как обычно. Чтобы сделать это вручную, откройте настройки Windows, перейдите в «Обновления и безопасность» и нажмите «Проверить наличие обновлений».

Это обновление является частью KB5004296. На момент написания, когда вы нажмете «Проверить наличие обновлений», вы можете увидеть доступное дополнительное обновление, убедитесь, что оно имеет тот же номер, что и KB5004296, установите его, и вы получите доступ к wsl —update.
Table of Contents
Windows Subsystem for Linux WSL1
This post explains how to upgrade from WSL 1 to WSL 2 on Windows 10 and 11. Please note that WSL 2 is only available on:
- Windows 11
- Windows 10, version 1903, build 18362 or later.
The main reasons to upgrade from WSL 1 to WSL 2 include increased file system performance and full system call compatibility.
Get the list of installed distributions:
 NAME      STATE           VERSION
* Ubuntu    Stopped         1
  Debian    Stopped         1
Enable Virtual Machine Platform
1. First, you need enable Virtual Machine Platform in order to run WSL 2. You can enable it using PowerShell or using Turn on Windows Features.
dism.exe /online /enable-feature /featurename:VirtualMachinePlatform /allDeployment Image Servicing and Management tool
Version: 10.0.19041.844
Image Version: 10.0.19043.2075
Enabling feature(s)
[==========================100.0%==========================]
The operation completed successfully.
Restart Windows to complete this operation.
Do you want to restart the computer now? (Y/N)2. Once done, restart your computer to take the changes go into effect.
Install the Linux kernel update package
The Linux kernel in WSL 2 is built by Microsoft from the latest stable branch, based on the source available at kernel.org. This kernel has been specially tuned for WSL 2, optimizing for size and performance to provide an amazing Linux experience on Windows.
Or it can be done using PowerShell:
msiexec /i https://wslstorestorage.blob.core.windows.net/wslblob/wsl_update_x64.msi /qnSet default version
Open PowerShell and run this command to set WSL 2 as the default version when installing a new Linux distribution:
wsl --set-default-version 2For information on key differences with WSL 2 please visit https://aka.ms/wsl2
The operation completed successfully.Now, you can use the command wsl –list –online to obtain a list of available distributions for installation.
The following is a list of valid distributions that can be installed.
Install using 'wsl --install -d <Distro>'.

NAME            FRIENDLY NAME
Ubuntu          Ubuntu
Debian          Debian GNU/Linux
kali-linux      Kali Linux Rolling
openSUSE-42     openSUSE Leap 42
SLES-12         SUSE Linux Enterprise Server v12
Ubuntu-16.04    Ubuntu 16.04 LTS
Ubuntu-18.04    Ubuntu 18.04 LTS
Ubuntu-20.04    Ubuntu 20.04 LTS
PS C:\> wsl --install -d kali-linux
Downloading: Kali Linux Rolling
Installing: Kali Linux Rolling
Kali Linux Rolling has been installed.
Launching Kali Linux Rolling...
PS C:\> wsl -l -v
  NAME          STATE           VERSION
* Ubuntu        Stopped         1
  kali-linux    Installing      2
  Debian        Stopped         1
Then install a distro using wsl –install command.
wsl --install -d kali-linuxDownloading: Kali Linux Rolling
Installing: Kali Linux Rolling
Kali Linux Rolling has been installed.
Launching Kali Linux Rolling...PS C:\> wsl -l -v
NAME STATE VERSION
* Ubuntu Stopped 1
kali-linux Installing 2
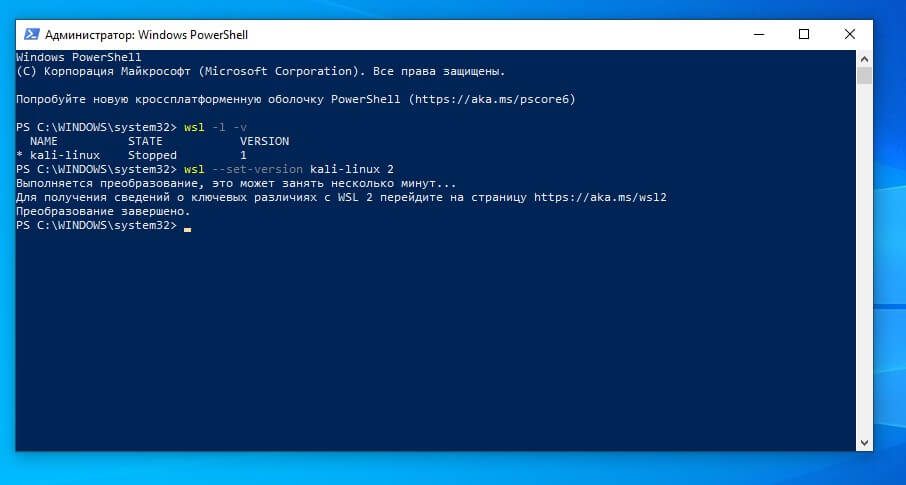
Debian Stopped 1If you’ve version 1 installed distros, you can upgrade them to version 2 using –set-default parameter.
wsl --set-version ubuntu 2PS C:\> wsl --set-version ubuntu 2
Conversion in progress, this may take a few minutes...
For information on key differences with WSL 2 please visit https://aka.ms/wsl2
Conversion complete.
PS C:\> wsl --set-version debian 2
Conversion in progress, this may take a few minutes...
For information on key differences with WSL 2 please visit https://aka.ms/wsl2
Conversion complete.
PS C:\> wsl -l -v
NAME STATE VERSION
* Ubuntu Stopped 2
kali-linux Stopped 2
Debian Stopped 2Alternatively
In some cases, you can simply upgrade WSL 1 to WSL 2 using this command.
PS C:\> wsl --update
Checking for updates...
Downloading updates...
Installing updates...
This change will take effect on the next full restart of WSL.
Kernel version: 5.10.102.1On Windows 10, you can upgrade the Windows Subsystem for Linux platform to version 2, including existing distros, and in this guide, you’ll learn how. The Windows Subsystem for Linux 2 (WSL2) is the new version of the implementation that uses a lightweight virtual machine instead of a direct translation between both operating systems, providing significant improvements on performance and complete call compatibility support.
If you’ve been running the first version of the implementation on Windows 10, you can update to Windows Subsystem for Linux 2 and convert the existing Linux installations with a package download to update the kernel and a few PowerShell commands.
In this guide, you’ll learn the steps to upgrade WSL to WSL2 and convert Linux distros to version 2 on Windows 10.
To upgrade from the first version of WSL to WSL2, use these steps:
-
Download this WSL2 kernel update (required).
-
Double-click the wsl_update_x64.msi file and apply the update.
-
Open Start.
-
Search for PowerShell, right-click the top result, and select the Run as administrator option.
-
Type the following command to set Windows Subsystem for Linux 2 your default architecture for new distros you’ll install and press Enter:
wsl --set-default-version 2

Enable WSL 2 on Windows 10 20H1 -
Type the following command to get a list of all the distros installed on your device and press Enter:
wsl -l -v
-
Type the following command to convert the distro from WSL 1 to WSL 2 and press Enter:
wsl --set-version DISTRO-NAME 2
Convert distro WSL 1 to WSL 2 on Windows 10 20H1 In the command, make sure to replace DISTRO-NAME for the actual name of the Linux distribution.
-
Type the following command to verify the version of the distro and press Enter:
wsl --list --verbose

Check distro using Windows Subsystem for Linux 2 on PowerShell -
Confirm the distros are set to version 2.


Once you complete the steps, you may need to repeat steps 7 through 10 to convert the remaining distros to version 2.
Why You Can Trust Pureinfotech
The author combines expert insights with user-centric guidance, rigorously researching and testing to ensure you receive trustworthy, easy-to-follow tech guides. Review the publishing process.
There are many open source programs (aka code that’s accessible to the public) out there for both Linux and Windows. For programs and tools where that’s not the case, WSL (Windows Subsystem for Linux) is the ideal solution for using Linux programs on Windows computers. This means that you don’t have to start Linux first and can use the Linux program in the currently active Windows.
Programs in WSL run slower than under native Linux, but it’s not always noticeable. Microsoft is also continuing to work on improvements that will be incorporated into the Linux kernel. A newer kernel can therefore speed up WSL.
WSL kernel and virtualization
In WSL 2, the Linux kernel runs on a hypervisor (Hyper-V), similar to its Linux counterpart KVM/Qemu. The kernel offers functions to ensure communication between the guest and host systems. This concerns, for example, the shared use of the main memory and CPU management. The program code for this comes primarily from Microsoft.
For Linux users, newer kernels offer support for newer hardware and performance optimizations. Microsoft also regularly optimizes the Hyper-V code in the kernel, but the hardware drivers hardly play a role in WSL because the virtual hardware always remains the same. However, there are drivers that are required for certain applications such as network block devices (nbd), which can be used to mount virtual hard disks in VHD format, for example.
Install WSL and check the version
Powershell, Command Prompt, and WSL can be used conveniently in the Windows terminal. It’s available by default in Windows 11, but Windows 10 users need to install it via the Microsoft Store.
In Powershell, install WSL with the following code:
wsl --install -d Ubuntu-24.04To call up the available distributions, enter the code below and then restart Windows:
wsl --list --onlineAfter logging in, a Linux terminal will open and notify you when the installation is complete. You will then be asked to enter a user name and password for the Linux account. Update the Ubuntu system with:
sudo apt update && sudo apt upgradeIn the Windows terminal, start Linux via the menu that appears after clicking on the arrow button next to the tabs. In Powershell, determine the WSL version with:
wsl -l -vIf a 1 appears in the Version column for an older installation, update the version with these two lines:
wsl --set-default-version 2wsl --set-default [Distribution]Replace the placeholder [Distribution] with the name of the distribution.
Creating a new kernel for WSL 2
Step 1: Start Linux in WSL and install some developer packages with:
sudo apt install build-essential flex bison dwarves libssl-dev libelf-dev libncurses-dev git
Step 2: Create a working directory and download the source code (four lines):
mkdir kernelcd kernelgit clone https://github.com/microsoft/WSL2-Linux-Kernel.git --depth=1 -b linux-msft-wsl-6.6.ycd WSL2-Linux-KernelAdjust the kernel version if necessary.
Step 3: With the following line of code, you can give the kernel its own name:
scripts/config --file Microsoft/config-wsl --set-str LOCALVERSION "-custom-microsoft-standard-WSL2"If you wish, you can use this line of code to call up the configuration editor and make your own customizations:
make menuconfig KCONFIG_CONFIG=Microsoft/config-wsl
Configuring the WSL kernel: The kernel configuration can be edited via “menuconfig”. The entry for “Local version” helps to differentiate between kernel versions.
IDG
Step 4: Create the kernel with:
echo 'yes' | make -j $(nproc) KCONFIG_CONFIG=Microsoft/config-wslInstall the modules with:
sudo make KCONFIG_CONFIG=Microsoft/config-wsl modules_installStep 5: In Windows Explorer, call up the Linux environment via the entry below Linux in the navigation area. Copy the vmlinux file from your home directory to the Windows user profile in the WSL folder (C:Users[username]WSL).
Step 6: Under Windows, create the .wslconfig file in your profile folder. Enter these two lines into it:
[wsl2]kernel=C:Users[username]WSLvmlinuxReplace the placeholder [username] with your user name.
In Powershell, terminate all running WSL instances with:
wsl --shutdownIf you start Linux in the Windows subsystem for Linux, the following command shows the version of the new kernel:
uname -aThis article originally appeared on our sister publication PC-WELT and was translated and localized from German.
Рекомендуем: Что необходимо знать о WSL2 (подсистема Windows для Linux 2).
Два способа установить WSL 2 в Windows 10
- Установить WSL 2 в Windows 10 версии 21H2
- Установить WSL 2 в Windows 10 версии 20H2
WSL 2 или Windows Subsystem для Linux 2 — это итеративное обновление подсистемы Windows для Linux. Будучи намного лучше, чем WSL 1, очевидно, что стоит обновиться до WSL 2. Опыт установки WSL в новых сборках значительно упростился. Начиная с сборки 20246 Windows 10 Insiders Preview на канале Dev, выпущенной Microsoft сегодня, пользователи могут установить полноценную WSL, одной командой. Как это сделать в Windows 10 версии 20H2 и Windows 10 21H1 сборка 20246, рассмотрим в этом руководстве. Windows Fe (Iron) появилась. Проверьте какая версия Windows 10 установлена у вас?
Установить подсистему Windows для Linux 2 (WSL 2) в Windows 10 версии 21H2
- Больше не нужно копировать и вставлять несколько команд в PowerShell.
- Больше не нужно копаться в функциях Windows.
- Больше никаких походов в Магазин.
Все, что вам нужно сделать для установки подсистемы Windows для Linux, — это:
- Открыть «Командную строку», окно «PowerShell» или «Windows Terminal» от имени Администратора и ввести команду:
wsl --install
и нажать Enter.
Это включит WSL 2, загрузит и установит последнее ядро Linux WSL 2, а затем загрузит и установит самую последнюю версию Ubuntu LTS на WSL.
Если вы хотите установить другой дистрибутив Linux, у вас есть выбор. Просто добавьте немного дополнительной информации к команде перед тем, как нажать Enter:
wsl --install -d <DistroName>
Где <DistroName> — это имя ОС, которую вы хотите установить. Вот список доступных на данный момент:
- Ubuntu
- Debian
- Kali-Linux
- openSUSE-42
- SLES-12
- Ubuntu-16.04
- Ubuntu-18.04
- Ubuntu-20.04
Например: если вы хотите установить Ubuntu 16.04, вы должны ввести:
wsl --install -d Ubuntu-16.04
Чтобы обновить ядро WSL 2 с помощью командной строки, выполните следую команду:
wsl --update
«wsl.exe –install» в конечном итоге будет перенесен в существующие сервисные кольца Windows 10, что упростит установку WSL для всех. На данный момент требуется, чтобы ваше устройство с Windows 10 было на канале Insiders Dev.
Если вам не хочется загружать предварительную версию Windows 10 и на вашем ПК установлена версия 2004 (20H1) или предыдущая, вы можете установить подсистему Windows для Linux по старинке используя способ ниже:
Установить подсистему Windows для Linux 2 (WSL 2) в Windows 10 версии 20H2
Ниже приведены требования, которые должен соответствовать ваш компьютер для правильной работы WSL 2:
- Windows 10 версия 2004 (обновление за май) или новее.
- Поддержка — Hyper — V Виртуализации.
Кроме того, для работы всех функций подсистемы Windows для Linux 2 вам необходимо будет выполнить следующие действия в указанном порядке:
- Включить опциональную функцию WSL.
- Установите дистрибутив Linux.
- Включить Платформу виртуальной машины — необязательная функция.
- Загрузить обновление ядра WSL 2 (обязательно).
- Настроить установленный дистрибутив.
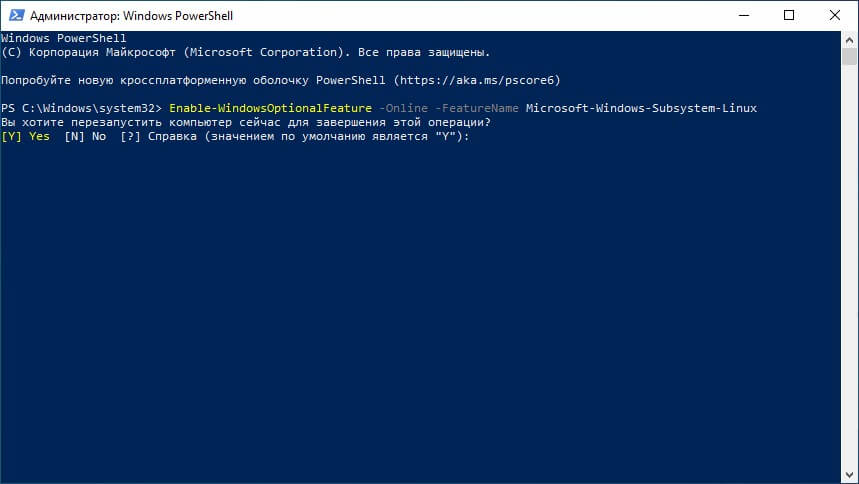
1] Включить опциональную функцию WSL
Чтобы установить WSL, откройте Windows PowerShell с от имени администратора.
Выполните следующую команду:
dism.exe /online /enable-feature /featurename:Microsoft-Windows-Subsystem-Linux /all /norestart
или
Enable-WindowsOptionalFeature -Online -FeatureName Microsoft-Windows-Subsystem-Linux
После того как команда будет выполнена, вы получите запрос, если вы хотите перезагрузить компьютер, нажмите Y, чтобы сделать это сразу, или нажмите N, чтобы перезагрузить его вручную, позже.
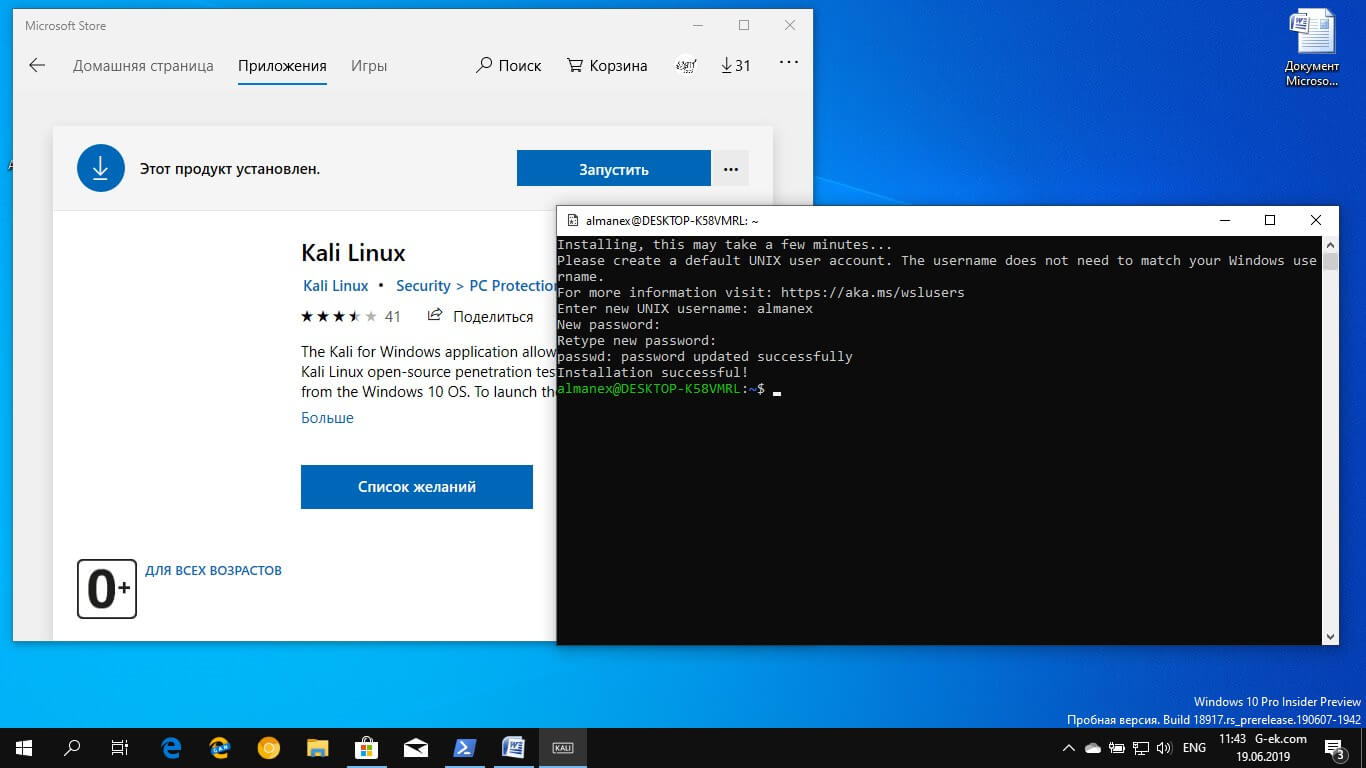
2] Установить дистрибутив
Вы можете загрузить и установить нужный вам дистрибутив Linux из Магазина Microsoft.
Подробнее в нашем руководстве: Загрузить дистрибутив Linux из Microsoft Store
3] Включить дополнительную функцию «Платформа виртуальной машины».
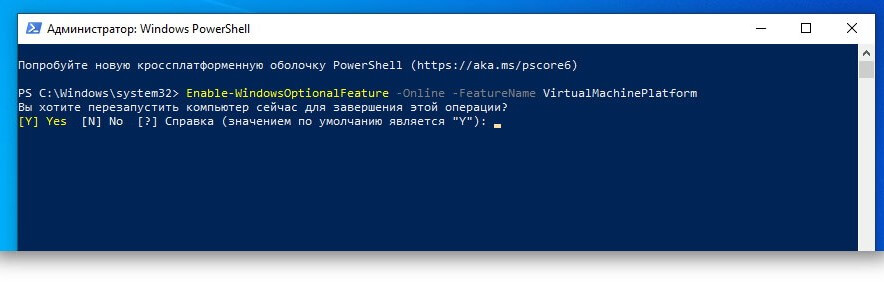
Чтобы включить дополнительную функцию платформы виртуальных машин, откройте Windows PowerShell от имени администратора и выполните следующую команду:
Enable-WindowsOptionalFeature -Online -FeatureName VirtualMachinePlatform
или
dism.exe /online /enable-feature /featurename:VirtualMachinePlatform /all /norestart
Если система запрашивает подтверждение, чтобы перезагрузить компьютер, нажмите Y, чтобы сделать это сразу, или N чтобы сделать это позже.
4] Настройте установленный дистрибутив
Наконец, нам нужно настроить установленный дистрибутив для WSL 2.
- Откройте Windows PowerShell и выполните эту команду, чтобы получить список всех доступных дистрибутивов WSL на вашем компьютере:
wsl -l -v
- Установите желаемый дистрибутив для работы в WSL 2. выполните следующую команду:
wsl --set-version DistroName 2
Где замените DistroName на имя дистрибутива из предыдущей команды.
Примечание: Команда wsl —set-version DistroName 1 позволит вам в любой момент переключится на Wsl 1.
5] WSL 2 обновление компонента ядра
- Обязательно загрузите пакет обновления ядра Linux на странице и установите его: https://aka.ms/wsl2kernel.
-
Дважды кликните файл wsl_update_x64.msi и примените обновление.
-
Запустите PowerShell от имени администратора.
-
Введите следующую команду, чтобы сделать Windows Subsystem for Linux 2 архитектурой по умолчанию для новых устанавливаемых дистрибутивов, и нажмите Enter:
wsl --set-default-version 2
После выполнения этих действий ваше устройство начнет использовать новую версию подсистемы Windows для Linux в качестве архитектуры по умолчанию.
Проверка дистрибутивной платформы
Чтобы убедиться, что ваши дистрибутивы используют подсистему Windows для Linux 2, выполните следующие действия:
-
Откройте Пуск.
-
Запустите PowerShell от имени администратора.
-
Введите следующую команду, чтобы проверить версию дистрибутива, и нажмите Enter :
wsl --list --verbose
- Убедитесь, что версия дистрибутива установлена как 2.

После того, как вы выполните эти шаги, вы узнаете, был ли процесс завершен успешно или вам нужно устранить неполадки на любом из предыдущих шагов.
Вы только что получили новый, плавный и быстрый опыт работы с подсистемой Windows для Linux 2.
WSL 2 значительно улучшит производительность файловой системы и полную совместимость системных вызовов. Это новое обновление основано на виртуализации (которая основана на Hyper-V), и работает на реальном ядре Linux.
Примечание: Некоторые из устаревших дистрибутивов WSL не предназначены для работы под WSL 2. Вот список WSL 2-совместимых дистрибутивов.
- Ubuntu
- Ubuntu 16.04 LTS
- Ubuntu 18.04 LTS
- Ubuntu 20.04 LTS
- openSUSE Leap 15.1
- SUSE Linux Enterprise Server 12 SP5
- SUSE Linux Enterprise Server 15 SP1
- Kali Linux
- Debian GNU/Linux
- Fedora Remix for WSL
- Pengwin
- Pengwin Enterprise
- Alpine WSL
Вам может быть интересно:
- Как установить подсистему Windows для Linux.
- Доступ к файлам WSL Linux с помощью Проводника Windows 10
- Windows 10, Установка локального веб-сервера (Apache, MySQL, PHP) в Wsl 1 и Wsl 2.
- Как запускать приложения Linux GUI в Windows 10.
- Как Выполнить команды Linux из Командной строки Windows 10.
- Проверьте погоду в Windows 10 с помощью Linux Bash
- Как запустить OpenSUSE 42.2 Leap или SUSE Linux Enterprise Server 12 в Windows 10