
In this article, we will teach you how to upgrade Server 2012 to Server 2022. With the new release of Windows Server 2022, lots of people are going to be upgrading to the greatest and latest Microsoft Windows Server 2022 operating system. Some may have relinquished the upgrade to Windows 2019, especially if they were working on Windows Server 2016. Also, what about legacy operating systems dating back to Server 2008 R2? What is the upgrade path from Server 2008 R2 to Server 2022?
Table of Contents
An Overview of Windows Server 2012 in-Place Upgrade to Windows Server 2022
An overview of Windows Server Upgrade
In-Place Upgrade from Server 2012 R2 to Server 2022
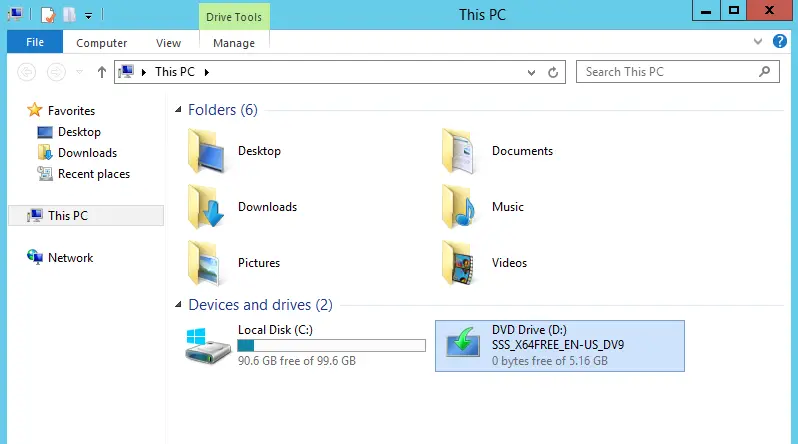
The final leg of the journey is to upgrade the Windows Server 2012 R2 server to Server 2022. Simply mount your Windows Server 2022 media (bootable USB or CD/DVD) and then run the installer to upgrade Server 2012 to Server 2022. Please keep in mind that I am upgrading to Windows Server 2022 using Preview media, and everything worked well.
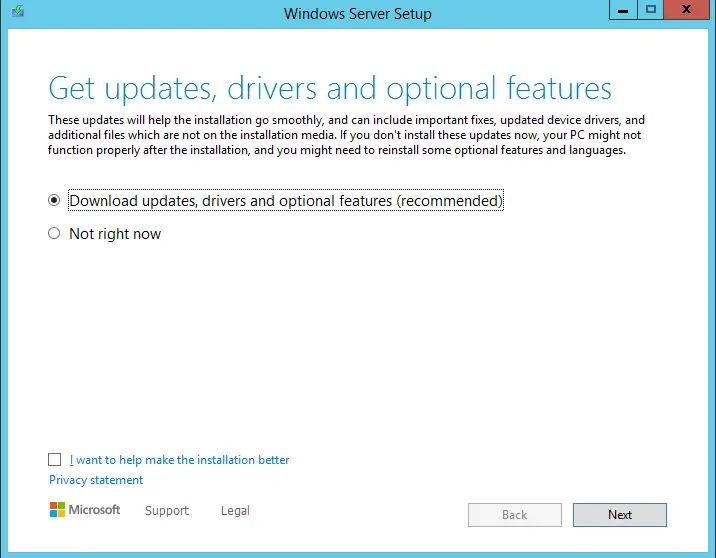
Choose Get updates, drivers, and optional features, and then choose next.
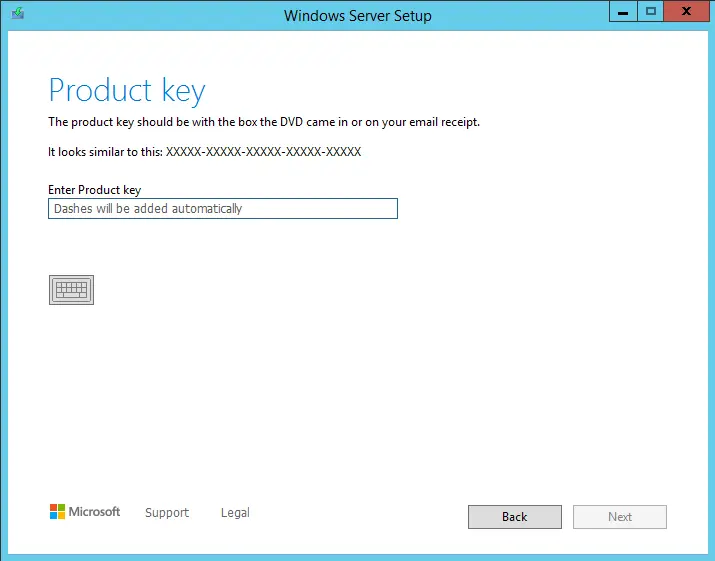
Enter the Windows Server 2022 product key, and then choose Next.
You can select “Desktop Experience,” which equates to GUI, and then choose next.

Accepting the license “EULA” for the Windows Server 2022 upgrade and then choosing next.

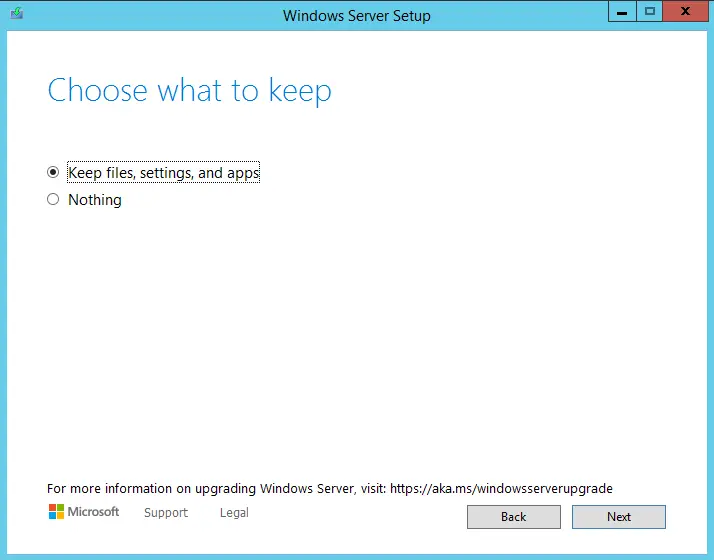
On the Choose What to Keep page, select Keep files, settings, and apps and choose Next.
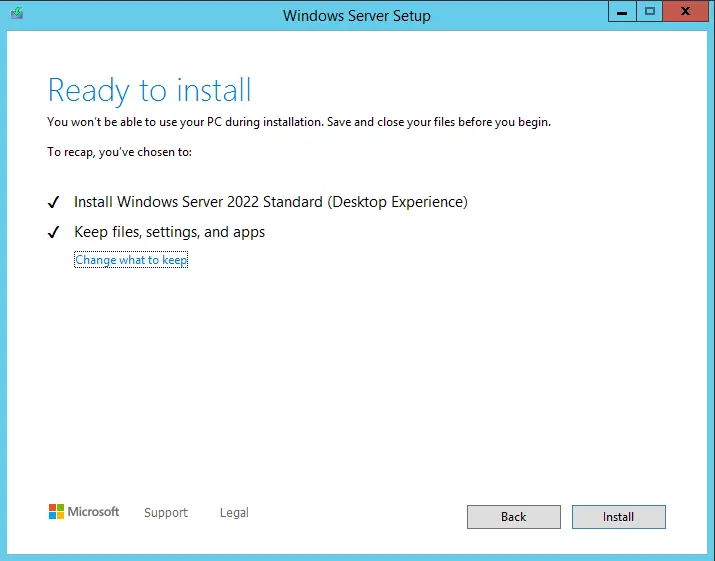
After a moment, Windows Server 2012 is ready to be upgraded. Click Install to upgrade Server 2012 to Server 2022.
You will see the installation of Windows Server progress.
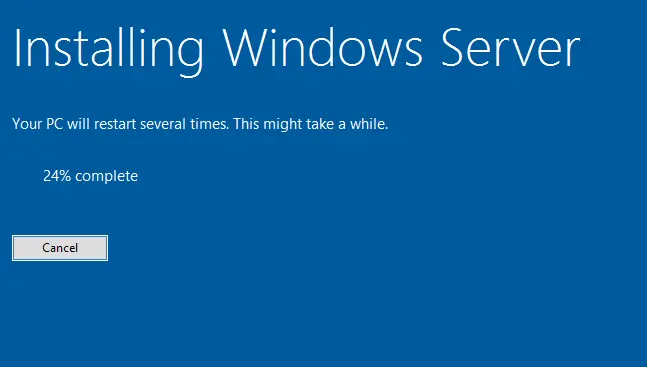
Upgrading Windows Server 2012 to Windows Server 2022 is in progress.
In just a short time, I had the Server 2022 login screen displayed.
Verify In-Place Upgrade Server 2012 to Server 2022
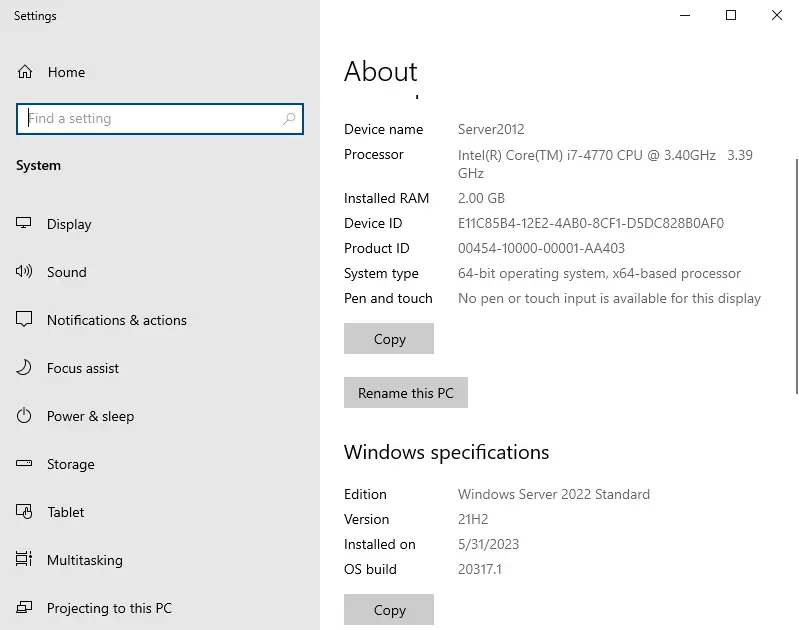
Verify your Windows Server 2022 version by right-clicking on This PC and then Properties.
Also read: How to Upgrade Server 2016 to 2022.
Jamilhttp://jamiltech.com
A Professional Technology Blog Writer | An energetic professional with more than 20+ years of rich experience in Technology, Planning, Designing, Installation, and Networking.
Server Administrator
I have over 30 years in the IT industry. During this time I have worked with a variety of products in a variety of industries.
Published:
Browse All Articles > In-Place Upgrade from Windows Server 2012R2 to 2022
Microsoft has ended support for Windows Server 2012R2. This means not only an end to features and bug fixes, but an end to security patches as well. Rather than building a new server from scratch, there is the option for an in-place upgrade.
With support ending for Windows Server 2012R2, organizations are faced with two choices. Either continue to run the 2012R2 version or upgrade to a new, supported version. There are several options to accomplish this migration. First, would be a new server with a fresh install of Windows Server 2016 – 2022 and reinstall all needed applications and data. This could be expensive and time consuming if the server is physical and not virtualized. Second, would be to backup the data, wipe the existing server, install an updated and supported version of Windows Server, then reinstall all applications and restore data from the backup. Third, would be an in-place upgrade to Windows Server 2016 – 2022.
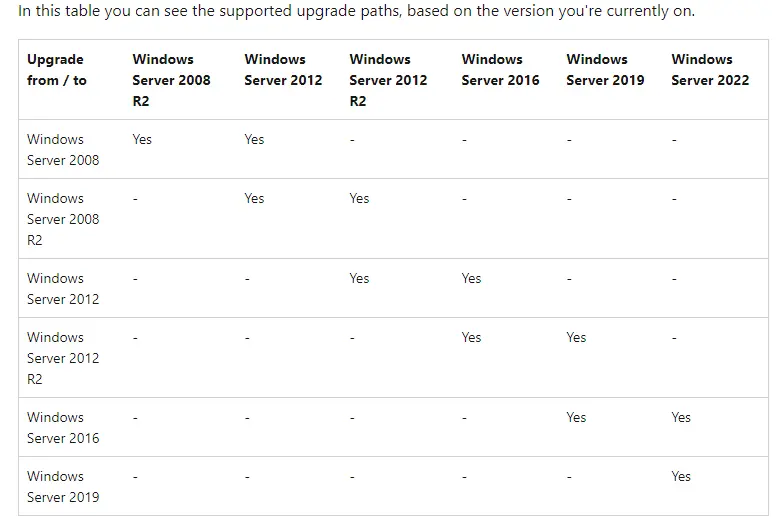
The most current version is Windows Server 2022. So, it makes the most sense to move to this version as it provides the longest period of support. However, in checking the upgrade path from 2012R2, the jump to server 2022 is not listed:
https://learn.microsoft.com/en-us/windows-server/get-started/upgrade-overview
While the option to do an in-place upgrade from 2012R2 to 2022 is not listed as supported, this has been accomplished several times, on both application and database servers without issue. Below are the steps that are needed to perform this in-place upgrade. While they are specifically for a virtual server, most of the same steps apply to a physical server. Keep in mind that there could be applications or certain configuration that may not work properly after the upgrade. This could be due to underlying changes in the move from version 2012R2 to 2022. In addition, there is the option to disjoin the server from the domain before performing the upgrade. The processes below have been done numerous times while the server was still joined. However, some feel disjoining from the domain produces a better outcome.
- The upgrade will create a folder for rollback purposes. Based on testing, this folder will be approximately 35-40G. Verify the appropriate free space exist. If not, then in Disk Management, add additional space before creating a VM snapshot.
- In vCenter, create a snapshot of the VM. Give it an appropriate name, such as “Prior to 2022 Upgrade”.
- In vCenter, edit the hardware settings of the VM by mounting the Windows Server 2022 ISO in the CD drive. Ensure the CD/DVD drive has the “connected” box checked.
- Once mounted, log in to the CONSOLE of the VM, do not use RDP. Go to the CD/DVD drive, right-click and select “Run as Administrator” to launch the setup program.
- On the “Install Windows Server” select “Next”. The system will then check for updates and run some background jobs.
- For the operating system version, ensure you select “Windows Server 2022 Standard (Desktop Experience)», then “Next”.
- Accept the license terms.
- Select “Keep files, settings, and apps”, then “Next”.
- The system will then check and download updates.
- Once the system is ready to proceed, there will be a summary screen. Validate the selected options. If everything looks correct, select “Install”.
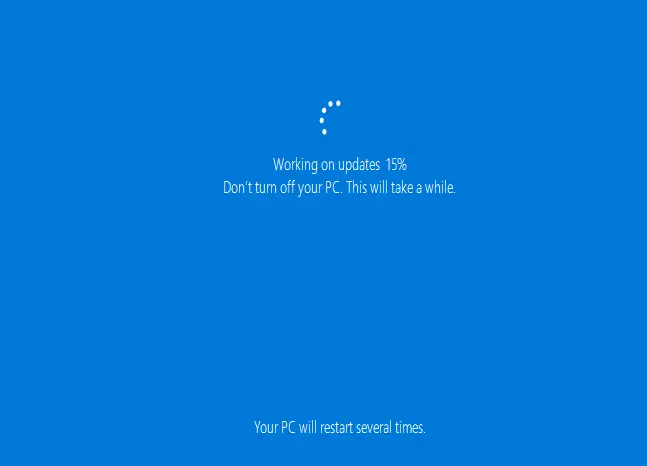
- If install is selected, the system will start the upgrade. It will take about 20-30 minutes to complete. During this time, the system may reboot several times. It is best to not monitor it until the process is complete.
- Once the upgrade is complete, log into the system on the console.
- For the VM to function properly, VMware Tools may need to be upgraded if it has not been upgraded for a long time. There will be a message on the summary page for the VM if this is the case.
- If a message like this is displayed, then click on the “Upgrade VMware Tools” on the right side, then from the console, upgrade the tools and reboot the system.
- Log back in, verify connectivity by successfully pinging another IP on the network such as the gateway.
- If the system appears to be functioning normally, then go to Windows Updates and install updates to bring the system current. If updates are managed by an internal WSUS server, then select “Check for Updates”. The recommendation is to select “Check online for updates from Microsoft Updates”.
- It is a good idea to keep the snapshot of the virtual machine for about a week. If there have been no issues, it should be safe to delete the snapshot.
- Unlike previous version of Windows Server, the upgrade process does not leave behind a “previous version” folder that consumes space on the drive. Therefore, there is no reason to run a post upgrade, disk cleanup procedure.
- The upgrade is now complete. Be sure to dismount the Windows Server 2022 ISO from the virtual machine.
Conclusion
While the option to upgrade directly to from Windows Server 2012R2 to Windows Server 2022 is not listed as a viable option, the upgrade is possible. The upgrade process is simpler and more straightforward than previous versions. This makes it a more viable option over a complete reinstall with a data recovery. Upgraded systems have proven to be very stable with no lingering aftereffects. When evaluating options, an in-place upgrade should be considered as a viable option. In the end, it will save the organization both costs and manhours.
Why Upgrade to Windows Server 2022?
First, it’s important to understand why you should consider upgrading to Windows Server 2022. This new version offers a number of significant improvements in terms of security, performance, and advanced features, such as improved container support, Azure integration, and more. In addition, with the end of support for Windows Server 2012, upgrading ensures that your server continues to receive critical security updates.
In our Licendi shop, you can buy your Windows Server at a good price and with guaranteed activation. Upgrading from Windows Server 2012 to Windows Server 2022 may seem like a daunting task, but with the right guidance, the process is significantly simplified. This article will take you step-by-step through everything you need to know to carry out this upgrade effectively and smoothly.
Prerequisites for Upgrading
Before starting the upgrade, make sure you meet the following requirements:
-
Backup. Make a full backup of your server to prevent data loss.
-
Hardware Compatibility. Verify that your current hardware is compatible with Windows Server 2022.
-
Valid License. Purchase a valid Windows Server 2022 license. At Licendi, we offer licenses with activation guarantee.
Step-by-Step to Upgrade from Windows Server 2012 to Windows Server 2022
1. Initial Assessment
-
Applications and Services Inventory. Perform a complete inventory of all applications and services running on your current server.
-
Compatibility Assessment. Use Microsoft’s compatibility assessment tool to verify that all your applications and services are compatible with Windows Server 2022.
2. Preparation of the Environment
-
Driver Update. Make sure all hardware drivers are up to date.
-
Uninstall Incompatible Software. Identify and uninstall any software that is not compatible with Windows Server 2022.
3. Carrying out the Backup
-
Full Backup. Use trusted backup tools to perform a full backup of all server data and configurations.
4. Installing Windows Server 2022
-
Installation Media. Download or purchase the Windows Server 2022 installation media.
-
Start the Installation. Insert the installation media and reboot the server. Follow the on-screen instructions to begin the installation process.
-
Upgrade Option. Select the upgrade option to keep your current data and settings.
5. Post-Installation
-
Installation Verification. After installation, verify that all services and applications are working properly.
-
Data Restore. Restore data from backup if necessary.
-
Updates and Patches. Make sure your server is fully up to date by installing all available patches and updates.

Conclusion
Upgrading from Windows Server 2012 to Windows Server 2022 is a crucial step in maintaining the security and performance of your IT infrastructure. By following this guide, you will be able to perform the upgrade safely and efficiently. Remember that at Licendi you can purchase your Windows Server 2022 licence with the best prices and activation guarantee, ensuring that your upgrade is a resounding success.
Are you ready to upgrade your server and take advantage of all the benefits that Windows Server 2022 has to offer? Don’t wait any longer and purchase your license today!
Frequently Asked Questions (FAQs)
How long does it take to upgrade from Windows Server 2012 to 2022?
The upgrade time can vary depending on the amount of data and applications on your server. Generally, it can take anywhere from a few hours to a full day.
What happens if something goes wrong during the upgrade?
If something goes wrong, you can use the backup to restore your server to its original state. That’s why it’s crucial to make a full backup before you start.
Do I need a new license for Windows Server 2022?
Yes, you will need a new license for Windows Server 2022. At Licendi, you can purchase your license with guaranteed activation.
Introduction
My Configuration Manager Technical Preview Lab has been running since 2015 and when I installed it, Windows Server 2012R2 was the logical choice for the Domain Controller. Fast forward to 2023 and the imminent news that Windows Server 2012 R2 will reach end of support in October 2023.
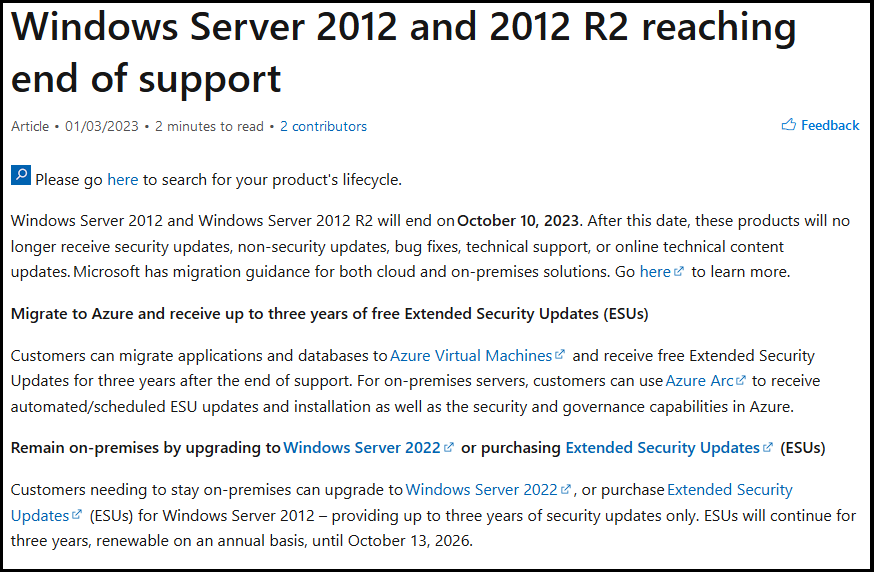
I still use my ConfigMgr labs and update the Technical Preview releases every month since it was first released, so I wanted to keep this on-premises lab going. I decided that it was time to upgrade my Lab’s aging domain controller to a newer more secure operating system. In-place upgrades from Windows Server 2012 R2 to Windows Server 2022 are possible but not recommended for Domain Controllers. Take note of the recommendation from Microsoft below.

Based on that recommendation, that meant deploying a new one side-by-side and migrating things over to the new one before decommissioning the old. As this is an on-premises lab my goal was to upgrade to the latest and greatest Windows Server 2022.
In this blogpost I’ll cover the following:
- Prerequisites
- Install a new Windows Server, rename it, join the domain
- Update the server
- Install Active Directory Domain Services
- Promote to a domain controller
- Move FMSO to the new domain controller
- Verify FMSO roles
- Demote the old domain controller
- Recommended reading
Prerequisites
Before starting make sure to review the list of prerequisites needed. Microsoft has detailed them here. They are also listed here. You should follow these general steps before you promote a server to a DC that runs a newer version of Windows Server:
- Verify the target server meets the system requirements.
- Verify application compatibility.
- Review recommendations for moving to a newer version of Windows Server.
- Verify security settings.
- Check connectivity to the target server from the computer where you plan to run the installation.
- Check for availability of the necessary Flexible Single Master Operation (FSMO) roles in Active Directory.
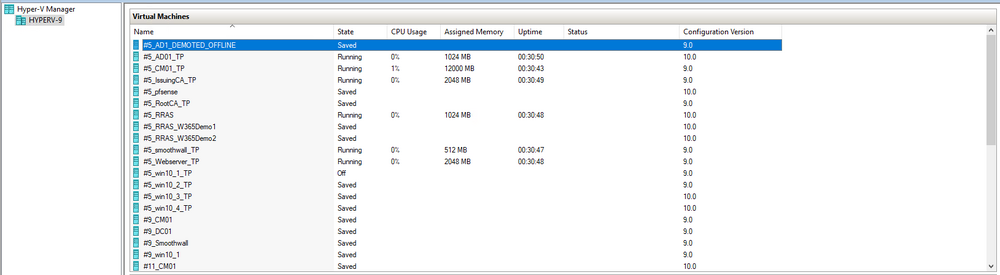
Note: If you are doing this in a LAB and I’d suggest you do for practice, take a backup snapshot of your old domain controller before continuing.
Install a new Windows Server, rename it, join the domain
You can install your new server whichever way that suits you, it’s quick. Once done, rename the server to it’s new name, and join the domain where you other domain controller(s) reside.
Update the server
After you’ve installed the server there will most likely be several updates waiting to be installed, so go ahead and install them, repeat until complete.

Install Active Directory Domain Services
Next we need to install Active Directory Domain Services (ADDS) on the new server and that can be done easily with PowerShell. In an administrative Windows PowerShell prompt enter the following:
Install-WindowsFeature -Name AD-Domain-Services -IncludeManagementTools

Promote to a domain controller
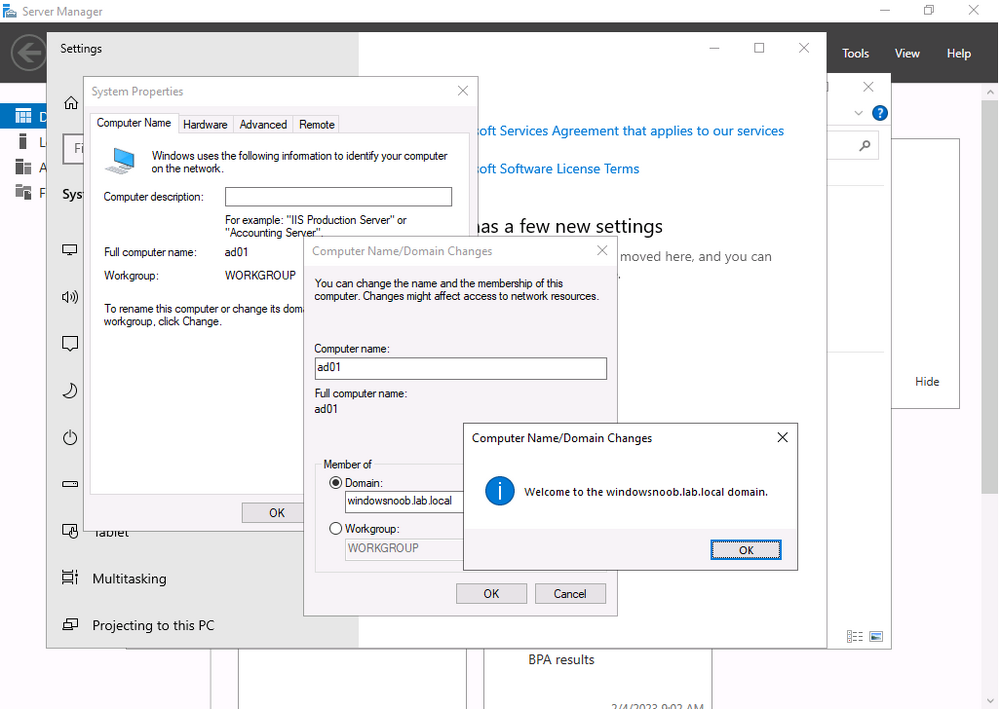
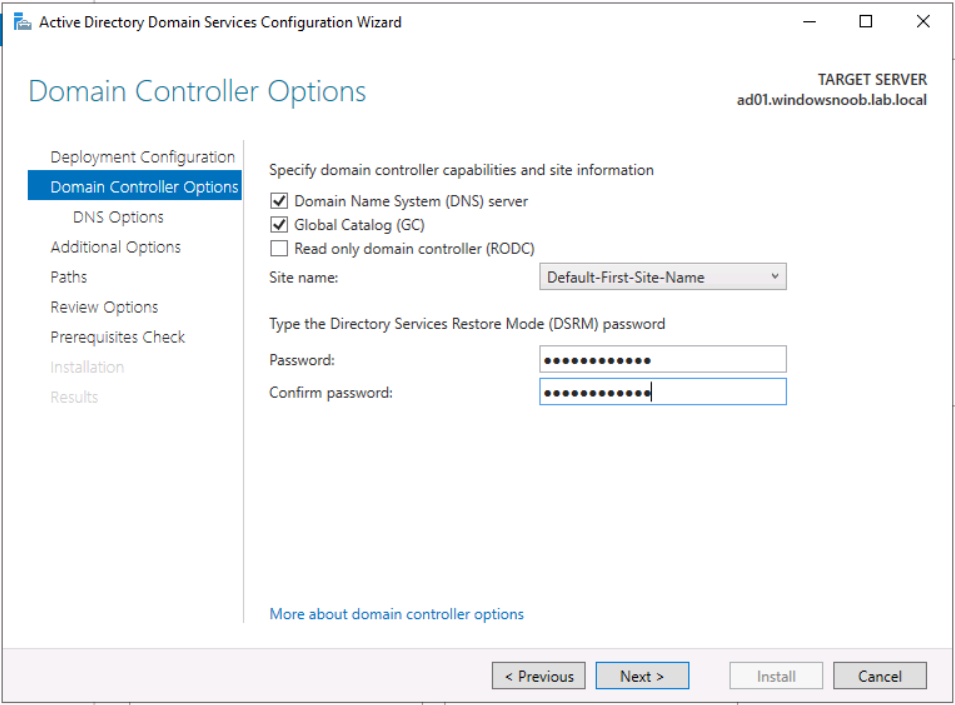
Once ADDS is complete you’ll promote the new server to a domain controller. To do that open Server Manager and you’ll see a yellow exclamation mark highlighting Post-deployment Configuration required for Active Directory Domain Services on the new server.

Click on Promote this server to a domain controller and this will launch the Active Directory Domain Services Configuration Wizard. From the list of available deployment operation options select Add a domain controller to an existing domain.

fill in the Directory Services Restore Mode (DSRM) password
If you are using .local FQDN’s in your lab like me it’s OK to click OK to the warning.

On the Specify Install From Media (IFM) Options screen select the option that suits your scenario best

and decide where you want the NTDS, logs file folder and SYSVOL folder to be located (or accept the defaults)

take note of the Preparation Options

before you see the Review Options screen, at this point you can also click on View Script to get a PowerShell script of your actions which is useful for automating the installation of more Domain Controllers.

Clicking Next will bring you to the Prerequisites Check results.

and clicking Install will start the promotion of this server to a domain controller. As long as you are signed in with a domain admin account, adprep will automatically prepare your existing domain. After it’s completed and restarted, sign in on the new domain controller and there should be no additional configuration tasks waiting in Server Manager.

Move FMSO to the new domain controller
After the server was promoted to a domain controller it’s time to move the Flexible Single Master Operation (FMSO) from the old domain controller to the new domain controller. To do that open an administrative PowerShell window on the old domain controller server. In the PowerShell window, use the
Move-ADDirectoryServerOperationMasterRole
cmdlet to move the FSMO roles. You can enter the name of each Operation Master Role or use numbers to specify the roles. For more information, see Move-ADDirectoryServerOperationMasterRole.

Verify FMSO roles
Now that you’ve moved the FMSO roles you should verify that they are in place correctly on the new domain controller, to do that on the new domain controller open an Administrative PowerShell window and type the following.
Get-ADDomain

Verify that the following match the FQDN of your NEW domain controller.
- InfrastructureMaster
- PDCEmulator
- RIDMaster
Demote the old domain controller
Once everything is verified and complete it’s time to demote the old domain controller. Only start this part when you are sure that everything you need on the new domain controller is in place and working, for example, in my case I had to manually add the DHCP server options/scope etc to my new domain controller as it was not carried over. On the old domain controller open an Administrative PowerShell window and issue the following command.
Uninstall-ADDSDomainController

after answering Y it will do the operations and restart the server.

Verification
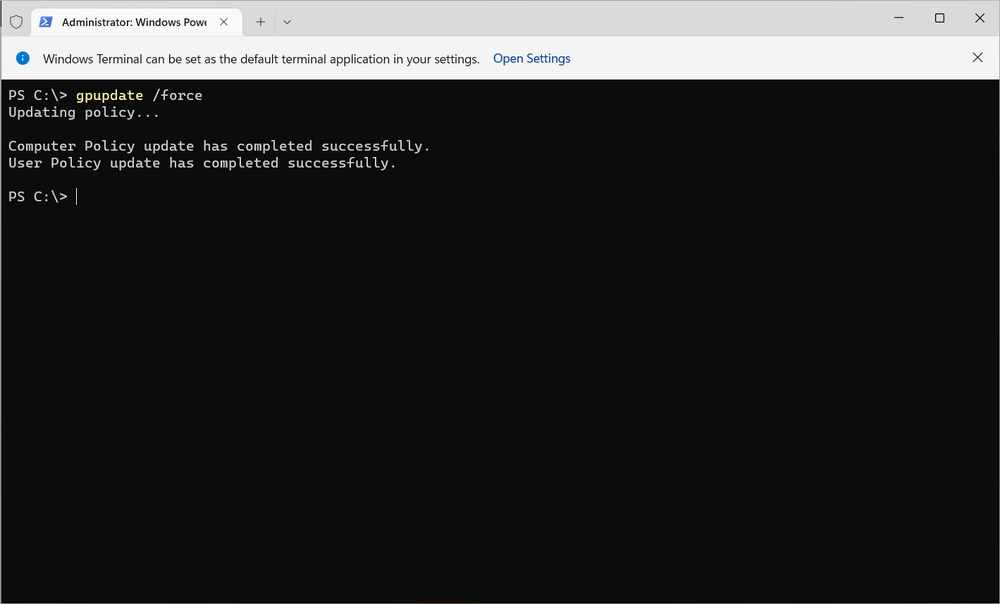
On any domain joined device (for example on my hybrid Azure AD joined Windows 365 Cloud PC) issue a GPUpdate /force. This will pull group policy from the nearest domain controller (your new domain controller in a one DC environment.
You should also verify main services such as
- DNS
- DHCP
- PKI
and any other services that were provided on your old domain controller. Once you are happy with everything, power off the old domain controller and optionally rename it so you know it’s demoted and offline.
Job done !
Recommended reading
- End of Support for Windows Server 2012 R2 – https://learn.microsoft.com/en-us/lifecycle/announcements/windows-server-2012-r2-end-of-support
- Hardware requirements – https://learn.microsoft.com/en-us/windows-server/get-started/hardware-requirements
- Prerequisites before upgrading – https://learn.microsoft.com/en-us/windows-server/identity/ad-ds/deploy/upgrade-domain-controllers#prerequisites
- Recommendations for upgrading Windows Server domain controllers – https://learn.microsoft.com/en-us/windows-server/identity/ad-ds/deploy/upgrade-domain-controllers
- Move-Active Directory Server Operations Master Role – https://learn.microsoft.com/en-us/powershell/module/activedirectory/move-addirectoryserveroperationmasterrole?view=windowsserver2022-ps
Need to upgrade Windows Server 2012 / 2012r2 to Server 2022 / 2019? This tutorial will show you how.
We will cover both in-place upgrade from 2012 to 2022 / 2019, and migration from a 2012 server to a separate 2022 / 2019 server.
Server 2012 is officially at its end of life, and Server 2012 R2 End Of Support is October 23, 2023 – so, naturally, you are not alone: 2012’s should be upgraded ASAP. Of course, you want to minimize the time and effort spent on that, and to automate as much of that upgrade as possible.
In this guide, we’ll cover the options on how to upgrade Server 2012 to 2022 / 2019, while preserving full functionality of server applications, databases, user profiles, shares, data. Note that this same process works for non-2012 servers as well; we are just focusing on 2012 due to its 2023 End of life.
There are two primary approaches to upgrading Server 2012:
- In-place upgrade from 2012 to 2019 / 2022: In this option, you are upgrading the 2012 server to a newer OS, by installing a newer server version “on top” of the original 2012.
- Migration upgrade from Server 2012 to a new Server 2019 / 2022: In this approach, you are transferring the contents of your 2012 server, to a separate server running 2022 / 2019.
Just want to find out how to automate the upgrade from 2012 to 2022 / 2019, and don’t need a general tutorial?
Click here to skip to the part with the actual upgrade process.
Is in-place upgrade from 2012 to 2022 possible for your server?
Here is a chart of Windows Server upgrade paths (credit: Microsoft.com)
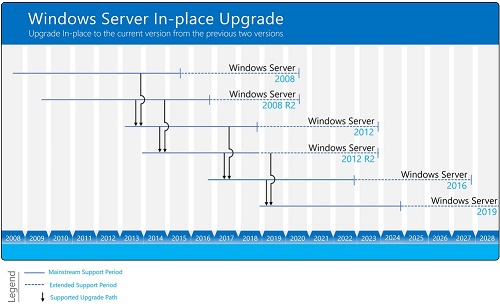
As you can see from the chart above, you cannot perform an in-place upgrade from 2012 to 2022 directly. However, for on-premise servers (physical or virtual), it is possible to do it in 2 “hops”:
- First, upgrade your Server 2012 / 2012r2 to Server 2016
- Then, upgrade the Server 2016 to 2022
Note, however, that it is not possible to in-place upgrade Azure servers or AWS servers – not in the “traditional” way. For Cloud-hosted servers like those, you should use a “migration upgrade” described below.
In-place upgrade vs Migration upgrade: Pros and Cons
The main advantage of an in-place upgrade (when it is actually possible) is that – at least at first glance – it sounds really simple and painless. After all, you just install a new Windows Server OS (twice), and do not have to deal with reinstalling your applications / data. All you need to do is:
- Install Windows 2016 “on top” of your current Server 2012 or Server 2012r2
- Once done, install Server 2022 (or Server 2019) “on top” of the 2016
Both steps can be achieved by downloading an mounting the appropriate ISO.
Unfortunately, the reality is not always that simple. There are 3 main concerns around in-place upgrades:
You are destroying your current, functional server: The main issue with in-place upgrades is that once you start, you no longer have a functional server, and will not have one until the new one is fully operational. This is just how in-place upgrades are designed. Of course, you have a backup of the original 2012 (an absolute must in any in-place upgrade), but it is not always that simple to roll it back. And the upgrade process itself can often take a very long time – during which, again, you do not have an operational server. This is an inherent issue with in-place upgrades, which often makes them a non-started for mission critical servers.
Upgrade process is not always seamless: On paper, “just install a new OS twice” does not sound too bad. Unfortunately, the harsh reality is that in-place OS installs often tend to go less smoothly that expected. If there are OS-related issues on the source server, your installation may not even start until you fix them. Plus, any IT admin who has performed a few in-place upgrades can tell you how it feels to run an upgrade process for 3 hours only to get hit with an error such as “0x800F081E The installation failed in the SAFE_OS phase with an error during INSTALL_UPDATES operation”.
End result has to be thoroughly vetted: Assuming you were able to complete the in-place upgrade process (2012 to 2016, then 2016 to 2022 or 2019), the next step is to thoroughly vet each component and each application on the server. You are bridging a gap of about 10 years, and doing that not as a clean install, but as a series of upgrades. It is important to make sure that all OS components are still functional, and performing as expected.
Bottom line is, in theory – in-place upgrades sound promising. In practice, that is no always the case. It is worth a shot in some cases, usually for non-mission-critical servers – and when it does work, it saves a major amount of time and effort. For most server, however, in-plae is not the best approach overall.
In fact, many vendors state outright that in-place upgrades are to be avoided – such as VMWare here: “In-place upgrade of the guest operating system (between major OS release versions, such as Windows Server 2016 or Windows Server 2019 to Windows Server 2022) is not recommended. The best practice is to install a new major OS release in a new VM”.
Is there a better way to upgrade from 2012 to 2019 / 2022?
With all that in mind, the immediate question is – if in-place upgrade is not a good idea, what can be done instead? The answer is – a migration upgrade from 2012 to 2022 / 2019.
Migration: a different path to upgrade from Server 2012 to Server 2022 or Server 2019
Migration upgrade is the alternative to “old school” in-place upgrades, where you install a new Server 2022 or 2019, and transfer the contents of the 2012 / 2012r2 to that. The end result is that you have everything running on the 2022 / 2019 replacement.
It’s clear that migration upgrade immediately removes 2 of the in-place disadvantages described above:
Non-destructive, little to no downtime: Your original server remains operational at all times, and is not destroyed / affected in any way. You only switch to the target when it is fully operational and ready for use – which minimizes (or even eliminates) downtime and risk.
Clean install, starting with the latest OS: You are not dragging 10 years worth of incremental upgrades and 3 different OS versions with you. Instead, you are running the latest OS directly.
This leaves with the 3rd one, the upgrade process itself.
The thing about migration is that if you do it manually, it can consume a huge amount of time and effort. Reinstalling applications, rebuilding configurations, trying to remember how everything was built in the first place, copying data and permissions, shares, personalization, all the little things that make a server work – the list goes on, and the work on that list can go on for days (not to mention human error).
Fortunately, there is a solution for this: migration can be automated using dedicated server migration software – Zinstall WinServ – and this tutorial will show you how.
This works for any combination of platforms: physical 2012 to a physical 2022, physical to VM / Cloud, on-prem 2012r2 VM to an AWS 2019 server, a Server 2012 Azure VM to Server 2022 Azure VM (yes, you can use this to effectively achieve the “impossible” Azure in-place upgrade!).
This is all native migration, not app virtualziation / lift-and-shift / cloune. Applications are actually installed on the target server, shares are configured, data and settings are transferred, just not the old OS itself.
An automated migration eliminates the final disadvantage, and allows to perform 2012 to 2022 / 2019 upgrades cleanly, efficiently and safely.
Let’s see how it’s done.
Video demo – migration from Server 2012 to 2022 / 2019
Before you begin: Audit your 2012 servers, backup and plan
Audit your servers: In a typical environment, you’ll have quite a few different server types. There will be role-oriented servers, which focus on Windows Server roles such as Domain Controller, Active Directory, IIS, Exchange, DNS, DHCP. Role migration is not automated, and has to be done manually.
The more common group, however, are application and file servers, which run the actual Line of Business applications (LOB) and store the company data. They typically vastly outnumber the role-based group.
Application and file servers can be migrated automatically and on massive scale, using server migration software (as shown below).
In the planning stage, you need to prepare a list of servers in the environment, and figure out what each of them is responsible for. Even just knowing how many role servers and how many application servers is already a big step. Since application server migration can be automated, you will be able to develop a fairly accurate estimate of time and effort that will be required for the migration.
Verify your backups are up to date, and are actually restorable: Any major upgrade may go wrong, and without a valid up-to-date backup, you risk losing everything you’ve had on the server. Make sure to verify that the backup you have is not damaged and ready to be restored if needed!
Decide on replacement type: Once you have decided to replace a server, you have several options regarding what the replacement will be. It may be an on-premise physical Windows 2022 / 2019 server, an on-prem VM server (ESX / Hyper-V, for example), or a Cloud-based server running off premise (such as migration to Azure or migration to Amazon AWS). If you are using WinServ, it supports any of those transfers, so migration difficulty does not vary significantly with your choice.
How to upgrade Server 2012 to Server 2022 / 2019
The process below outlines the steps for upgrading from Server 2012 / 2012 R2, to a new Windows Server 2016 / 2019 / 2022.
We will cover on-prem migration (target server is on the same network as the source), and off-prem migration (target server is off-site, such as server migration to Azure / AWS).
How to upgrade Server 2012 to Server 2022 / 2019 – on-prem migration
- Run Zinstall WinServ on both servers.
- Select the first scenario, “Moving between two machines”, on both servers.
- On the 2012 server, choose the “This is the Source” option, and leave it running. It will be waiting for connection from the new one.
- On the target Server 2022 / 2019, choose the “This is the Target” option.
- WinServ will automatically detect the source server. Alternatively, if the servers are on different subnets, you can manually specify the source server’s IP address.
- If you’d like to select exactly what you want to transfer, use the Advanced menu. If you just want to transfer everything, you don’t need to go to the Advanced menu.
- Click Next and then Go to start the migration.
- The transfer will take a while (depending on how much data you have to transfer), and will report to you when done (it also generates a text log of the process).
That’s it! That’s the entire migration process. Of course, that’s not the whole migration; you did have to spin up the server before running this, and you do need to review the results (see below), but you did just automate most of the busywork out of the upgrade.
How to upgrade Server 2012 to Server 2022 / 2019 – off-prem (Azure, AWS or any indirect upgrade)
- Run Zinstall WinServ on both servers.
- On the source server, select the 3rd option, “Moving from Machine to Container”. This allows to capture the server into a single “migratable image” container file, and later deploy from that to the target.
- Choose where to save the container (network share, NAS, even a USB drive – any type of storage), and press Go to perform a full capture of the source server to that location.
- Once done, make the container accessible on the target server. For example, if the target is a Cloud-hosted server, upload the container to Cloud storage that the target server can access.
- Run WinServ on the new 2022 / 2019 server, and select the 4th option, “Moving from Container to Machine”
- When prompted, browse to where the container is stored.
- If you’d like to select exactly what you want to transfer, press the Advanced menu. If you just want to transfer everything, you don’t need to go to the Advanced menu.
- Click Next and then Go to start the migration.
- The transfer will take a while (depending on how much data you have to transfer), and report to you when done.
That’s it! That’s the entire migration process. Of course, that’s not the whole migration; you did have to spin up the server before running this, and you do need to review the results (see below), but you did just automate most of the busywork out of the upgrade.
Dealing with incompatible applications:
Some legacy 3rd party applications running on Windows Server 2012 may be incompatible with Windows Server 2022 / 2019. This part is the same for “old school” in-place upgrades, and for “migration” upgrades, since the limitation is a property of the application itself.
On 2012, incompatible applications are significantly less common compared to Server 2003 / 2008, but it may still happen – usually for legacy software, which has not been updated for newer OS versions.
Note that “old” does not necessarily mean “won’t work”. Quite a few applications ah
If these applications cannot be eliminated immediately, and are mission-critical for continued operation of the organization, the recommended option to preserve them operation is to perform a virtualized migration of those applications, into a virtual Server 2012 instance running on newer replacement server. Then, continue to take the steps required to phase those applications out and stop running the virtualized 2012 instances.
WinServ itself is application-generic, and can migrate even custom and in-house applications that have not been seen by the outside world – as long as they are capable of running on the new server. Here is a partial list of common applications that our customers have migrated in the past:
- SQL Server
- MS SQL
- MySQL
- SAP (including SAP Business One)
- Oracle
- Sybase
- DB2
- Java Application Server
- Crystal Reports
- Avaya
- PeopleSoft
- JD Edwards Enterprise One (JDE E1)
- Citrix
- Apache (Windows only)
- WebSphere
- Microsoft Dynamics
- …and many, many more
After the migration:
Once the migration process is complete, it is time to verify the results.
- You may need to adjust your domain’s DNS to point to the new server where needed. For example, changing your old CRM Server DNS entry to the new server’s address.
- Same goes for login scripts and GPO policy.
- Launch every application and console you use, and verify they load correctly.
- Using a client workstation, verify that clients can access the migrated server correctly and their applications run without issues.
Congratulations! Your 2012 to 2022 / 2019 upgrade is now complete.
Ready to upgrade Server 2012 to 2022 / 2019?
Get Zinstall WinServ here
Looking for evaluation licenses / volume pricing / more information?
Email us at sales@zinstall.com for assistance.