
Hello fellow sys admins! In the following article, we will walk through an in-place upgrade from Windows Server 2008 R2 to 2012 R2. So let us dive right in.
The first step in any upgrade is to get the Installation Media. If you are using a Virtual Machine, then it’s as simple as adding the ISO to the Virtual CD-R Drive, either using the Hyper-V machine settings or the VMware console. If you are upgrading a physical server, then just unpack the ISO and copy it to either a secondary drive or flash drive, or you can just run it from a network share.
In our scenario, I am running the installation from a network share. In both cases, the upgrade process is the same; there is no difference between the VM OS or physical server OS as we all know so well.
Therefore, as I mentioned before. I have unpacked the ISO using WinRAR.
Afterwards, I just ran the setup.exe from inside the OS. A small tip is to make sure you don’t have any other users logged into the server in any way, RDP or console, since the prerequisite check will fail and you will have to go through the setup again.
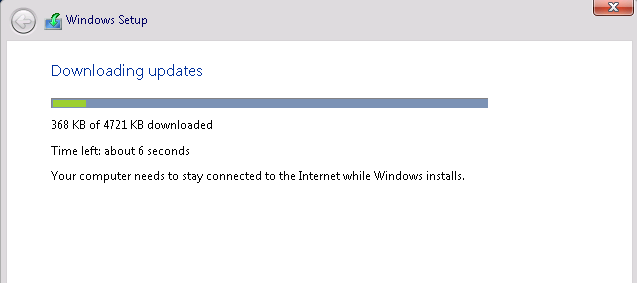
Once in the Setup Wizard, we will download the latest updates, which are required in order to bring the server to the latest compatible state for upgrading to Windows Server 2012 R2. This is a very important step, which most people choose to ignore, but it will save you a lot of hassle after you upgrade.
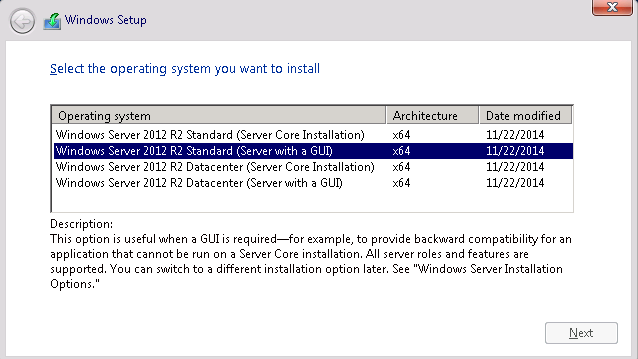
Next, we will choose the version of Windows Server 2012 R2. In our case, we are going from Windows Server 2008 R2 Standard Edition to Windows Server 2012 R2 Standard Edition.
Afterwards, we read the EULA from top to bottom, since it is very important. Hit Next and we then get to the eternal crossroad, where we have to choose whether to upgrade or to format. Since we want to upgrade, we will of course choose Upgrade!

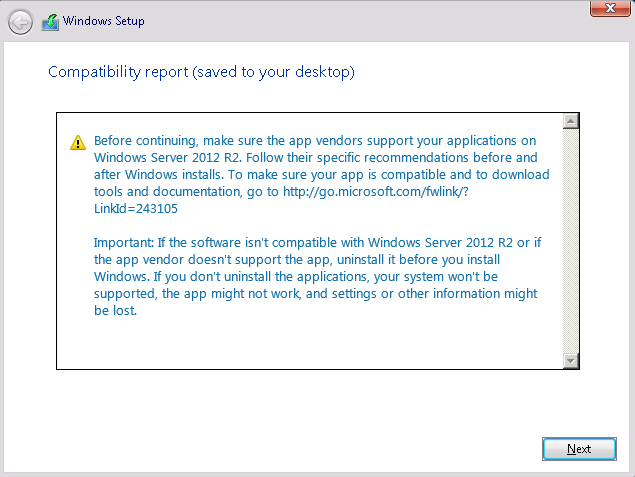
Once Upgrade is selected, there is no going back. The train has left the station. The Upgrade process has commenced. Well, not really. First, it’s going to do the compatibility check, and if all goes well, you will be greeted with the following screen.
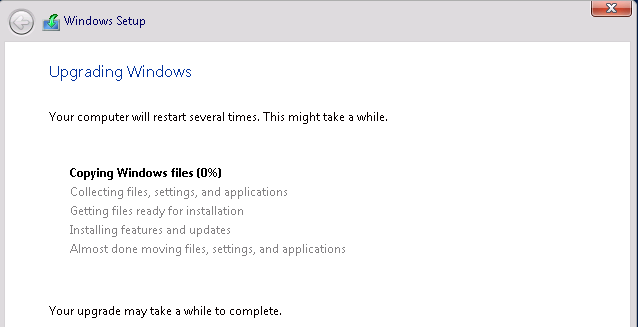
Then we hit Next, take a deep breath and watch and wait as the new version of Windows is being installed on top of our old one.
If everything goes well, we will be greeted with the Windows Server 2012 R2 loading screen and the Finalizing Settings window. This process will take a while, so even if at times it appears to be doing nothing, go take a break, come back later and then login to your new OS.
Thank you for taking this journey with me through the Upgrade of Windows Server 2008 R2 to Windows Server 2012 R2. Until next time! Enjoy!
Windows Server 2008 R2 will reach to end of life on January 14, 2020. It is essential that all users who are using Windows Server 2008 R2 upgrade their server to Windows Server 2012 R2 or migrate to other higher operating system (i.e. Windows Server 2016).
In this knowledgebase article, we will illustrate how can you perform in-place upgrade Windows Server 2008 R2 to Windows Server 2012 R2. Since this is major version upgrade, you have to read and understand the upgrade instructions properly.
Before you start upgrading your server, please ensure that you have necessary license for Windows Server 2012 R2. For more information about license upgrade, you can refer the following URL:
https://docs.microsoft.com/en-us/previous-versions/windows/it-pro/windows-server-2012-R2-and-2012/dn303416(v=ws.11)
It is essential that you have secured full backup of your data and you should be able to perform bare metal restore in case if the upgrade is failed. If upgrade is failed, you will have to restore the server from backup to boot from the old Windows Server 2008 R2. Also, if you have installed third party software or applications, please ensure that they are compatible with Windows Server 2012 R2.
Important Note: We are considering that you do not have any additional server role (i.e. IIS, FTP, DNS, Active Directory etc.) on the server. If you have additional server role, kindly refer their compatibility to perform in-place upgrade.
Upgrade Windows Server 2008 R2 to Windows Server 2012 R2
Before starting upgrade, please ensure that you have installed all pending updates for Windows Server 2008 R2. If there is any pending update, kindly install it first. Once all updates are installed, we are ready to perform this upgrade.
[1] Insert Windows Server 2012 R2 ISO in your server and start the installation. It will ask you to accept license terms. Select “I accept the license terms” and click on Next button as shown in the following image:

[2] On next step, it will ask you which type of installation do you want. You need to select “Upgrade: Install Windows and keep files, settings and applications” option to upgrade the existing operating system as shown in the following image:

[3] Next step will check the compatibility and it will provide you report. Kindly the compatibility report. If it does not report any issue, you can click on Next button as shown in the following image:

If this is Hyper-V virtual machine, you may see the following warning:
Installing Windows will affect these devices:
These devices might not work properly in Windows. We recommend updating the drivers for these devices before you continue. ? System devices: Microsoft Hyper-V S3 Cap
You can ignore this message and continue with upgrade. This will not cause any issue.
[4] Now it will start copying Windows files to upgrade the server’s operating system. During this process your system may restart several times. Please do not interrupt this process.


[5] On last step, you will see a screen with “Finalizing your settings” after reboot. Once again, do no interrupt or reboot your server while it is performing this. It may take some time. Once this step is complete, you should see that login screen.

After login, you should verify your installed software and data to ensure that they are available after upgrade.
Plan the in-place upgrade
Performing an in-place upgrade of a virtual machine (VM) instance that is
running an earlier version of Windows Server can be a pragmatic way to modernize your
infrastructure and to mitigate the risks of approaching the end of the support lifecycle
of Windows Server versions.
Alternatives to consider
Before you decide to use an in-place upgrade to migrate to a newer version of
Windows Server, be aware of the following limitations:
-
Downtime: Depending on the configuration and software installed, the
upgrade might take an hour or longer. During the upgrade, access to the VM
instance is limited because:- Workloads running on the VM instance are unavailable to users
- Remote Desktop Protocol (RDP) is not available
- There are limited ways to check the upgrade progress and the time
remaining in the upgrade
-
Risk: Depending on the configurations of your existing instances and the
installed software:- The upgrade can fail
- Some configuration options can be overridden
- Incompatibilities can cause your workload to malfunction on the upgraded
instance
Depending on the workload running on your Windows Server instance,
you can reduce downtime and risk by pursuing different approaches.
| Workload | Approach |
|---|---|
| Your VM instance is running a workload that supports replication, such as:
|
Consider setting up a new VM instance that is running a more recent version of Windows Server, and then use replication to shift the workload from your existing VM instance to the new VM instance. |
| You have a VM instance that is running a multitude of workloads | Consider migrating these workloads to separate VM instances so that each VM instance runs only a single workload. Even if you can’t migrate all workloads, reducing the number of workloads running on a single VM instance can help reduce risks during an in-place upgrade. |
Product keys
A Windows Server product key is valid for only a specific
version; when you perform an upgrade to a later version of Windows Server, you
must supply a new product key. There are two primary scenarios:
-
You are upgrading a VM instance that is based on a
public operating system image
provided by Google: In this
scenario, you must use the predefined
KMS client setup keys
for the version of Windows Server that you are upgrading to. The upgrade
does not incur additional charges. -
You are upgrading a VM instance for which you
brought an existing license: In
BYOL,
you need to acquire a product key from your license vendor to perform
the upgrade. Check the Microsoft documentation
to determine which edition you can upgrade to
and whether you are eligible for license conversion.
Installation media
To perform the upgrade, you need an installation media. There are two primary
scenarios:
-
You are upgrading a VM instance that is based on a
public operating system image
provided by Google: In this scenario, you can use the volume license
installation media provided by Google. The steps to access this installation
media are provided below. -
You are upgrading a VM instance that is based on an imported disk or image:
In this scenario, you cannot use the installation media provided by Google.
Instead, you have to use an installation media that matches the type of
media that you used to install Windows Server on the imported disk or image.
Other prerequisites
Before you begin your upgrade, review the Microsoft documentation about
prerequisites and potential limitations for the version of Windows Server
you are planning to upgrade to:
2012 R2
-
Verify that your VM instance meets the
system requirements for Windows Server 2012
and has
sufficient free disk space. -
Review recommendations for upgrading server
roles,
known issues,
and the
upgrade process
for Windows Server 2012 R2. -
Review the recommendations for planning an in-place
upgrade. -
Verify that you aren’t affected by features
removed or deprecated
in Windows Server 2012 R2. -
Verify that any of your custom
or third-party software is compatible with Windows Server 2012 R2.
2016
-
Verify that your VM instance meets the
system requirements for Windows Server 2016
and has
sufficient free disk space. -
Review the server role upgrade and migration matrix for Windows Server 2016 and
application compatibility table -
Verify that you aren’t affected by features
removed or planned for replacement
in Windows Server 2016. -
Verify that any of your custom
or third-party software is compatible with Windows Server 2016.
2019
-
Verify that your VM instance meets the
system requirements for Windows Server 2019
and has
sufficient free disk space. -
Review the Windows Server 2019 and Microsoft Server application compatibility list.
-
Verify that you aren’t affected by features
removed or planned for replacement
in Windows Server 2019. -
Verify that any of your custom
or third-party software is compatible with Windows Server 2019.
2022
-
Verify that your VM instance meets the
system requirements for Windows Server 2022
and has
sufficient free disk space. -
Review the Windows Server 2022 and Microsoft Server application compatibility list.
-
Verify that you aren’t affected by features
removed or planned for replacement
in Windows Server 2022. -
Verify that any of your custom
or third-party software is compatible with Windows Server 2022.
Perform the in-place upgrade
The following sections guide you through the process of upgrading your VM
instance.
Create a snapshot
Before you start the upgrade, we recommend that you create a snapshot of your
VM instance,
so that you can revert to a safe state in case anything goes wrong:
-
Create a
regular snapshot
for the boot disk of your VM instance. -
If the VM instance has additional data disks attached, create snapshots for
the data disks by using
the Volume Shadow Copy Service (VSS).
Prepare your Windows Server configuration
Verify the configuration of your Windows Server VM instance:
-
Connect to your VM instance
with an RDP client. -
Verify that Windows Server is up to date
by using Windows Update. -
Disable or uninstall antivirus, antispyware, and other agents that can
interfere with the upgrade or are incompatible with the Windows Server
version that you’re upgrading to.
Attach the install media
Before you can perform the upgrade, attach the necessary installation media to the
VM instance. The right media to use depends on your scenario:
- You are upgrading a VM instance that is based on a public operating system
image provided by Google: In this scenario, you only need to attach the
volume license installation media provided by Google. This media contains
both the necessary scripts to run the upgrade and the files for the new version
of Windows Server. -
You are upgrading a VM instance that is based on an imported disk or image:
In this scenario, you also need to attach the volume license installation media
provided by Google so that you can access the necessary scripts.Additionally, you have to attach a custom installation media that matches the type of media that
you used to install Windows Server on the imported disk or image.
To attach the volume license installation media provided by Google, follow these steps:
-
In the Google Cloud console, open
Cloud Shell
by clicking the
Activate Cloud Shell
button.Go to the Google Cloud console
-
Set the default project ID. Replace
PROJECT_IDwith the name of your
Compute Engine project:gcloud config set project PROJECT_ID
-
Create a disk based on the installation media. Replace
ZONEwith the
name of the zone where the VM is located:gcloud compute disks create win-installers --image-family=windows-install-media --image-project=compute-image-tools --zone=ZONE
This command adds a disk named
win-installersto your project. This disk
is not attached to any VM instance. -
Attach the disk to your VM by using read-only (
ro) mode, so that
you can attach the disk to multiple VMs if necessary:gcloud compute instances attach-disk VM_NAME --disk=win-installers --mode=ro --zone=ZONE
Replace the following:
VM_NAME: the name of the VM instance to upgradeZONE: the name of the zone where the VM is located
You can use the same disk for multiple and parallel VM upgrades
within the same zone, but if you want to upgrade a VM in a
different zone, you must create another disk in that zone.
If you are upgrading a VM that is based on an imported disk or image,
attach the custom installation media as an additional disk:
-
Follow the steps in Creating an image from an ISO file
to create a disk from the ISO image that you want to use as custom
installation media. -
Attach the disk to your VM, by using read-only (
ro) mode so that
you can attach the disk to multiple VMs if necessary:gcloud compute instances attach-disk VM_NAME --disk=CUSTOM_MEDIA_DISK --mode=ro --zone=ZONE
Replace the following:
VM_NAME: the name of the VM to upgradeCUSTOM_MEDIA_DISK: the name of the disk containing your custom installation mediaZONE: the name of the zone where the VM is located
Start the upgrade
By default, Windows Setup prompts you for input at various points during an
upgrade. Because you can’t connect to the VM by using RDP during the
upgrade and therefore can’t provide any input, run the upgrade in
unattended mode.
-
Connect to your VM with an RDP client. For more information, see
Connecting to instances. -
Open an elevated command prompt:
- If you use Server Core, an elevated command prompt should open automatically after login.
- If you use Windows Server with full Desktop Experience,
right-click the Start button and select Command Prompt (Admin).
-
Change the working directory to the installation media. The correct working
directory depends on the Windows Server version that you are upgrading to:2012 R2
cd /d d:\*2012*
2016
cd /d d:\*2016*
2019
cd /d d:\*2019*
2022
cd /d d:\*2022*
-
Start the Windows upgrade. The required steps to start the upgrade
depend on the Windows Server version that you are upgrading to and whether
your VM is based on a public operating system image or on
an imported disk or image:2012 R2
Run
upgrade.ps1to start the Windows upgrade. The script completes the
following steps:- Install the latest
Google driver packages,
which are critical for the Windows Server upgrade to succeed. - Apply Windows settings that are required for Compute Engine.
- Enable access to the Emergency Management Services (EMS) console
during the upgrade. - Launch Windows Setup (
setup.exe) from the install media to perform an upgrade in unattended mode. - Selects the correct edition of Windows Server 2012 R2 to install.
- Provides the Generic Volume License Key (GVLK) for the new version of Windows Server.
powershell -ExecutionPolicy Bypass -File upgrade.ps1
2012 R2 (BYOL)
Run
upgrade.ps1to start the Windows upgrade. The script completes the
following steps:- Install the latest
Google driver packages,
which are critical for the Windows Server upgrade to succeed. - Apply Windows settings that are required for Compute Engine.
- Enable access to the Emergency Management Services (EMS) console
during the upgrade. - Launch Windows Setup (
setup.exe) from the install media to perform an upgrade in unattended mode. - Selects the correct edition of Windows Server 2012 R2 to install.
- Provides the user provided license key for the new version of Windows Server.
powershell -ExecutionPolicy Bypass -File upgrade.ps1 -SetupExePath SETUP_PATH -ProductKey PRODUCT_KEY
Replace the following:
SETUP_PATH: the path tosetup.exeon your custom installation mediaPRODUCT_KEY: a valid product key for Windows Server 2016.
The
-ProductKeyparameter is only required if
you are upgrading a VM instance for which you brought an existing license (BYOL)2016 or later
Run
upgrade.ps1to start the Windows upgrade. The script completes the
following steps:- Install the latest
Google driver packages,
which are critical for the Windows Server upgrade to succeed. - Apply Windows settings that are required for Compute Engine.
- Enable access to the Emergency Management Services (EMS) console
during the upgrade. - Launch Windows Setup (
setup.exe) from the install media to perform an upgrade in silent mode. - Provide a product key for the new version of Windows Server.
powershell -ExecutionPolicy Bypass -File upgrade.ps1
In some cases, Windows Setup might show a Select Image screen. If you
see this screen, select the configuration that matches your
current configuration:- If you currently use Server Core, select
Datacenter. -
If you currently use Windows Server with full desktop experience, select
Datacenter (Desktop Experience). -
Click Next to begin the upgrade.
It might take several minutes for the setup to initialize.
2016 or later (imported)
Run
upgrade.ps1to start the Windows upgrade. The script completes the
following steps:- Install the latest
Google driver packages,
which are critical for the Windows Server upgrade to succeed. - Apply Windows settings that are required for Compute Engine.
- Enable access to the Emergency Management Services (EMS) console
during the upgrade. - Launch Windows Setup (
setup.exe) from the install media to perform an upgrade in silent mode.
powershell -ExecutionPolicy Bypass -File upgrade.ps1 -SetupExePath SETUP-PATH -ProductKey PRODUCT-KEY
Replace the following:
SETUP_PATH: the path tosetup.exeon your
custom installation mediaPRODUCT_KEY: a valid product key for the
version of Windows Server that is being upgraded to. For example, if
upgrading from Windows Server 2016 Datacenter to Windows Server 2019
Datacenter, provide a valid Windows Server 2019 Datacenter key.
The
-ProductKeyparameter is only required if you are upgrading a VM instance
for which you brought an existing license (BYOL).In some cases, Windows Setup might show a Select Image screen. If you
see this screen, select the configuration that matches your
current configuration:- If you currently use Server Core, select
Windows Server Datacenter. -
If you currently use Windows Server with full desktop experience, select
Windows Server Datacenter (Desktop Experience). -
Click Next to begin the upgrade.
It might take several minutes for the setup to initialize.
The upgrade process might issue the following warning. If so, you can
ignore it:[package name] or a newer version is already installed on the system
The system can become temporarily unresponsive while installing the
netkvmdriver. If this happens, don’t close the RDP connection or stop the
VM instance unless the system is unresponsive for more than 5 minutes. If
you do lose RDP connectivity, wait approximately 5 minutes before you
reconnect to the VM instance.The Setup Wizard might require you to restart the system first. In
this case, restart the VM instance and run Windows Setup again, using the
same command.After about 5 minutes, the machine reboots, and RDP disconnects.
- Install the latest
Observe the upgrade process
Depending on the machine type of your VM instance and your Windows Server
configuration, the upgrade might take between 10 and 60 minutes to complete.
During that time, you can observe the status through the
serial port output:
-
In Cloud Shell, observe the boot process by running the following command:
gcloud compute instances tail-serial-port-output VM_NAME --zone=ZONE
Replace the following:
VM_NAME: name of your VM instanceZONE: name of the zone where the VM instance is located
-
Wait until the machine has rebooted four times. Depending on the
configuration of your VM instance, it might take 30 minutes or more
for these reboots to occur. You can recognize a reboot by output that
looks similar to this:SeaBIOS (version 1.8.2-20190620_103534-google) Total RAM Size = 0x00000001e0000000 = 7680 MiB CPUs found: 2 Max CPUs supported: 2
-
After the fourth reboot, wait until the output
GCEMetadataScripts: Finished running startup scriptsor
No startup scripts to runappears.
Perform post-upgrade steps
You can now connect to the VM instance to verify that the upgrade has been
successfully completed.
-
Connect to the VM instance by using an RDP client. For more information,
see
Connecting to instances. -
Log in using a user account with local administrator privileges.
-
Open an elevated command prompt:
- If you use Server Core, an elevated command prompt should open automatically after login.
- If you use Windows Server with full desktop experience,
right-click the Start button and select Command Prompt (Admin).
-
Run the following command to query the version of Windows Server:
Windows Server Core
ver
Windows Server with Desktop Experience
winver
Verify that the version matches the expected version of Windows Server.
-
Change the working directory to the installation media. The correct working
directory depends on the Windows Server version that you are upgrading to:2012 R2
cd /d d:\*2012*
2016
cd /d d:\*2016*
2019
cd /d d:\*2019*
2022
cd /d d:\*2022*
-
Run
upgrade.ps1again to re-apply specific
Compute Engine settings that might have been lost during
the upgrade:powershell -ExecutionPolicy Bypass -File upgrade.ps1
-
Restart the VM instance to ensure all changes take effect. It might take
1 to 2 minutes for the reboot to complete before you can connect to the VM
instance again.
Detach the installation disk
You can now detach the installation disk from the VM instance:
-
In Cloud Shell, detach the installation disk from your VM instance,
replacingVM_NAMEwith the name of your VM instance:gcloud compute instances detach-disk VM_NAME --disk=win-installers
Install updates and restore access
After the upgrade is complete, run Windows Update to download and install any
security updates. To install the security updates, follow these steps:
-
Connect to the machine by using an RDP client. For more information, see
Connecting to instances. -
Use Windows Update to
install the latest Windows updates.
You might have to restart the VM instance multiple times
during this process. -
Re-enable any agents, antivirus, or antimalware software that you disabled
before the upgrade.
Troubleshoot the in-place upgrade
While running Windows Setup, you can’t connect to the VM instance with RDP. If
you suspect that the upgrade failed or is not progressing, use the following
approaches, in order, to diagnose the situation:
Check the serial port output
To check the progress of the upgrade process, view the
serial port output of the VM instance:
- Serial port 1 captures the boot status
- Serial port 3 captures the log output of Windows Setup
During the upgrade, you should observe four reboots. If you don’t observe any
progress for more than 30 minutes after the first reboot, it is likely that the
upgrade failed.
Check CPU and I/O metrics
Running a Windows Server upgrade is a CPU and disk I/O intensive operation. By
checking the CPU and I/O metrics, you can get an indication for whether the
setup is progressing.
View the CPU and I/O metrics in the Google Cloud console:
-
In the Google Cloud console, go to the VM instances page.
Go to VM instances
-
Click the instance that you’re upgrading.
-
Click the Monitoring tab.
Connect to the Emergency Management Services console
Both during and after running Windows Setup, you can connect to the
Emergency Management Services (EMS) console.
Using the EMS console, check the
Windows Setup log files
and the
event log
for indications that the upgrade is still progressing or for information about
any errors that might have occurred.
Connect remotely by using WinRM
If connecting by using RDP or EMS fails, you can try using WinRM to establish a
remote PowerShell session:
-
Connect to a different Windows Server instance in the same
VPC. -
Open PowerShell.
-
Establish a remote PowerShell session, replacing
VM_NAME
with the name of the instance to upgrade:Enter-PSSession -ComputerName VM_NAME -UseSSL -SessionOption (New-PsSessionOption -SkipCACheck) -Credential (Get-Credential)
-
When prompted for credentials, enter the username and password of an
administrative user account. -
Use the remote PowerShell session to check the
Windows Setup log files
and the
event log.
Analyze log files offline
If you can’t connect to the instance by using Windows Remote Management (WinRM),
you can cancel the upgrade and analyze the log files from a different VM
instance. To do this, follow these steps:
-
Stop the VM instance.
This can take several minutes if Windows Server is unresponsive.
-
Detach the boot disk
from the instance. -
Create a new, temporary Windows Server instance, and attach the boot disk of
the original instance as an additional disk. -
Use the temporary Windows Server instance to analyze the
setup log and event log files
of the instance that you were trying to upgrade. -
After you have completed the analysis, detach the disk from the temporary
instance and
reattach it as a boot disk
to the original VM instance.
Troubleshoot RDP
For information about troubleshooting RDP, see
Troubleshooting RDP.
Troubleshoot your Windows Server instances
For information about troubleshooting your Windows Server instances, see
Tips and troubleshooting for Windows instances.
В этой статье мы поговорим о процедуре обновления домена с версии Windows Server 2008 R2 до Windows Server 2012 с последующим понижением роли старого контроллера домена до рядового сервера AD.
Итак, что имеется:
- Домен Active Directory как минимум с одним контроллером домена на Windows Server 2008 R2
- Уровень леса и домена AD должен быть как минимум Windows Server 2003
- Дополнительный рядовой сервер домена с Windows Server 2012 , который в дальнейшем станет контроллером домена (как включить сервер в домен подробно описано в статье Как включить Windows в домен).
- Учетная запись с правами администратора домена, схемы и леса.
Прежде чем добавлять новый контроллер домена на Windows 2012 необходимо обновить схему домена и леса. Классически подготовка и повышение уровня домена осуществлялась вручную с помощью утилиты Adprep.exe. В документации новой серверной платформы от Microsoft указано, что при повышении первого сервера с Windows Server 2012 до уровня контроллера домена, повышение уровня домена происходит автоматически при установке роли AD DS на первый сервер Windows 2012 в домене. Так что, теоретически, для подготовки домена ничего делать не нужно.
Однако, предпочтительнее контролировать результат такого ответственного процесса, как обновление схемы. Выполним процедуру обновления схемы вручную.
Обновление схемы AD до Windows Server 2012 с помощью adprep
Для обновления схемы нам понадобится утилита adprep.exe, взять которую можно в каталоге \support\adprep\ на диске с дистрибутивом Windows Server 2012. Данная утилита бывает только 64-разрадной (утилиты adprep32.exe больше не существует), соответственно, запустить ее можно будет только на 64 разрядном контроллере домена.
Необходимо скопировать утилиту на текущий DC с ролью Schema Master (Хозяин схемы) и в командной строке с правами администратора выполнить команду подготовки леса к установке нового DC на Windows Server 2012:
adprep /forestprep

Версия схемы Active Directory в Windows Server 2012 — 56.
Далее обновим схему домена:
adprep /domainprep
Далее осталось дожидаться окончания репликации изменений в схеме по всему лесу и проверить существующие контроллеры домена на наличие ошибок. Если все прошло хорошо – продолжаем. Пришла пора развернуть контроллер домена на Windows Server 2012.
Установка контроллер домена на Windows Server 2012
Первой интересной новостью является тот факт, что знакомой администраторам утилиты DCPROMO, позволяющей добавить или удалить контроллер домена в AD больше не существует. При ее запуске появляется окно, в котором сообщается, что мастер установки Active Directory Domain Services перемещен в консоль Server Manager.

Что ж, откроем консоль Server Manager и установим роль Active Directory Domain Services (Внимание! Установка роли автоматически не означает тот факт, что сервер стал контроллером домена, роль нужно сначала настроить)
После окончания установки роли появится окно, в котором сообщается, что сервер готов стать контроллером домена, для чего нужно нажать на ссылку “Promote this server to domain controller” (далее мы рассмотрим только значимые шаги мастера создания нового контроллера домена).

Затем нужно указать, что данный контроллер домена будет добавлен в уже существующий домен (Add a domain controller to an existing domain), указать имя домен и учетную запись из-под которой будет проводится операция.

Затем укажите, что данный контроллер домена будет содержать роли GC (Global Catalog) и DNS сервера. Также укажите пароль восстановления DSRM (Directory Services Restore Mode) и, если необходимо имя сайта, к которому будет относиться данный контроллер домена.

В разделе “Paths” указываются пути к базе Active Directory (NTDS), файлам логов и каталогу SYSVOL. Учтите, что данные каталоги должны находиться на разделе с файловой системой NTFS, тома с новой файловой системой Windows Server 2012 — Resilient File System (ReFS) – использовать для этих целей нельзя!

По окончании работы мастера установки роли AD DS, сервер нужно перезагрузить. После перезагрузки вы получаете новый контроллер домена с ОС Windows Server 2012.
Удаление старого контроллера домена на Windows Server 2008 R2
Прежде, чем понизить роль старого контроллера домена с Windows Server 2008 R2 до рядового сервера, нужно перенести все FSMO роли на новый контроллер домена .
Процедура переноса ролей FSMO с одного контролера домена на другой нами уже рассматривалась, подробнее с ней можно познакомится в статье Передача ролей FSMO в Active Directory. Процедуру можно осуществить через графический GUI (проще) или из командной строки с помощью утилиты ntdsutil
После передачи роли FSMO PDC Emulator, необходимо настроить синхронизацию времени на новом контроллере домена с внешним сервером (с которым время синхронизировалось ранее). Подробно процедура настройки синхронизации времени на PDC описана в статье: Синхронизация времени с внешним NTP сервером в Windows 2008 R2 . Формат команды примерно такой (ntp_server_adress – адрес NTP сервера):
w32tm /config /manualpeerlist:ntp_server_adress /syncfromflags:manual /reliable:yes /update
После того, как все роли FSMO перенесены на новый DC Windows Server 2012, убедитесь, что домен работает корректно: проверьте прохождение репликации AD, журналы DNS и AD на наличие ошибки. Не забудьте в настройках сетевой карты на новом сервере в качестве предпочтительного DNS сервера указать собственный адрес.
Если все прошло корректно, можно понизить роль старого контроллера домена 2008 R2 до рядового сервера домена. Это можно сделать, запустив на нем мастер DCPROMO, и указать, что данный сервер более не является контроллером домена. После того, как данный сервер станет рядовым сервером, его можно полностью отключить.
Хочу рассказать о том, как я обновлял главный контроллер домена (PDC) с Windows Server 2008 R2 на Windows Server 2012 R2. Матерым тру админам статья скорее всего не пригодится. Тут будут описаны очевидные им вещи. Однако, для простых эникейщиков эта заметка (слишком мала для статьи) вполне может быть полезна.
В моем распоряжении небольшая сеть. Развернут домен и всего 1 контроллер домена на базе Windows Server 2008 R2. Цель — обновить контроллер домена так, чтобы домен не вышел из стоя. В качестве рабочей машины у меня используется Windows 8.1. Это важно, потому что начиная с Windows 8 в клиентские версии операционных систем стали добавлять Hyper-V.
Общий план моих действий был примерно такой:
- Создаем виртуальную машину и устанавливает на нее Windows Server 2012 R2.
- Добавляем его в домен.
- Добавляем серверу роль AD DS.
- Делаем его масретом инфраструктуры, PDC, мастером RID, мастером схемы и мастером имен.
- Удаляем с обновляемого сервера роль AD DS и все другие роли, которые реплицируются между контроллерами домена.
- Выводим обновляемый сервер из домена вообще.
- Устанавливаем (предварительно отформатировав диски) на нем Windows Server 2012 R2.
- Добавляем новому серверу роль AD DS.
- Делаем его масретом инфраструктуры, PDC, мастером RID, мастером схемы и мастером имен.
- Удаляем с виртуального сервера роль AD DS и все другие роли, которые реплицируются между контроллерами домена.
- Выводим виртуальный сервер из домана.
- Удаляем виртуальную машину.
Т.е. все очень просто. На момент пока реального сервера не будет в живых, его функции будет выполнять виртуальный сревер.
Узнать кто у нас кто в домене можно командой:
netdom query /domain:%userdomain% fsmo
Как переносить роли контроллеров домена:
Делается это с помощью команды ntdsutil. Запускать ее мы будем на %servername%, т.е. сервере, который хотим сделать самым главным.
После запуска утилиты вводим заклинания:
roles— будем управлять владельцами NTDS ролейconnections— будем подключаться к какой AD DSconnect to server %servername%— подключаемся к серверу %servername%.q— выходим из режима подключений?— смотрим что мы можем делатьtransfer infrastructure mastertransfer naming mastertransfer PDCtransfer RID mastertransfer schema master- выходим из утилиты набрав два раза
q.
Разумеется после того, как контроллер домена (уже обновленный) вернулся на свое место, на нем необходимо развернуть все те роли, что были развернуты раньше. Вы ведь не забыли сделать бекап?