
Если ранее вы установили Windows 11 на неподдерживаемый компьютер, обновление системы до новой версии 22H2 может быть затруднено: в центре обновлений оно не появляется, а средства обновления сообщают об ошибке. Но проблема решаема.
В этой инструкции подробно о том, как обновиться до Windows 11 22H2, если компьютер не отвечает требованиям к системе или возникают иные проблемы при обновлении до новой версии.
Обновление до Windows 11 22H2 на неподдерживаемом компьютере или ноутбуке

Выполнить установку новой версии системы на неподдерживаемых устройствах без TPM 2.0, Secure Boot, со старыми процессорами или иными несоответствиями системным требованиям можно с помощью инструментов Universal Media Creation Tool. Если этот метод не подойдёт, есть ещё один подход — Обновление Windows 11 с помощью утилиты WinPass11.
Для установки обновления до Windows 11 22H2 с сохранением всех установленных программ и данных, достаточно выполнить следующие шаги:
- Скачайте архив с Universal Media Creation Tool с GitHub https://github.com/AveYo/MediaCreationTool.bat — нажмите по кнопке «Code» и выберите пункт «Download ZIP». Распакуйте архив в удобное расположение.

- Скачайте официальную утилиту Media Creation Tool последней версии https://go.microsoft.com/fwlink/?linkid=2156295. С недавних пор для загрузки утилиты из РФ требуется VPN. Используйте утилиту, чтобы создать ISO-файл с последней версией Windows 11 (можно создать и загрузочную флешку, если вы предполагаете, что она в будущем вам пригодится).

- Из архива, скачанного на первом шаге, запустите файл
Skip_TPM_Check_on_Dynamic_Update.cmd
находящийся в папке bypass Если вы увидите предупреждение о неизвестном издателе, нажмите «Выполнить в любом случае». После выполнения файла, закройте окно консоли (или оно закроется само через несколько секунд).

- Смонтируйте созданный ISO образ (правый клик — подключить) или подключите флешку с последней версией Windows Запустите файл setup.exe.
- Пройдите все шаги установки (будет выполняться копирование файлов, перезагрузки и другие этапы). Не обращаем внимания на то, что в программе установки указано «Windows Server», по факту будет установлена та же версия Windows 11, которая уже есть на вашем компьютере — Home или Pro.


В результате вы получите исправно работающую Windows 11 22H2 на вашем устройстве. В этот момент может пригодиться инструкция об очистке диска C после обновления Windows 11 до новой версии.
Возможно, существуют и иные простые и быстрые способы обновиться до новой версии при отсутствии модуля TPM 2.0 или других несоответствиях системным требованиям, не прибегая к чистой установке Windows 11. Если вам такие известны, будут рад комментарию к этой статье.
,
This tutorial contains instructions on how to upgrade/update from Windows 11 21H2 to Windows 11 22H2 a PC or Laptop that does not own the minimum hardware requirements for Windows 11 (e.g. TPM chip, Secure Boot, CPU or RAM).
If you’ve already installed Windows 11 on a computer with unsupported hardware, by using one of the «Bypass TPM and Secure Boot to install Windows 11» methods, you may have noticed that the latest version 22H2 of Windows 11 doesn’t show up in Windows Update to install it.
This is because when you run Windows 11 on a computer whose processor is not supported by Windows 11, or does not have TPM 2.0 or Secure Boot, the Windows 11 22H2 update not showing in Windows Update.
In such a case, you also cannot upgrade Windows 11 to version 22h2, even using the Windows 11 22H2 ISO file, or the Windows 11 Installation Assistant, because you will receive the error «Your PC doesn’t currently meet the Windows 11 system requirements».
To bypass TPM, Secure Boot, CPU or RAM requirements to upgrade to Windows 11 22H2, follow the instructions below.

How to Upgrade an Unsupported Windows 11 PC to latest Version/Build of Windows 11 (e.g. to version 22H2, 23H2, etc.).
Notes:
1. Below you’ll find detailed instructions on how to upgrade Windows 11 21H2 to 22H2, by replacing the appraiserres.dll file in the Windows 11 22H2 ISO file. In my opinion, this is the easiest and safest way to install the latest version of Windows 11 on your unsupported system without having to modify the registry or use more complicated methods.
2. The method was last tested in November 2023 and can be used also to update/upgrade to Windows 11 23H2 version any Windows 10/11 PC without TPM, Secure Boot or a Supported CPU for Windows 11.
Step 1. Download Windows 11 ISO file.*
* Note: If you have already downloaded the latest version of Windows 11 in a ISO file, skip to next step.
1. Navigate to Windows 11 download page and download the Windows 11 Media Creation Tool.
2. Run the downloaded file and when prompted Accept the license terms.
3. At Windows 11 edition and language options, click Next.

4. Choose ISO File and click Next.

4. Save the file as Windows11.ISO file to your disk.

Step 2. Extract the Windows 11 ISO file to a folder.
Now proceed and extract the ISO file you downloaded to a folder:
1. Right-click on the Windows11.iso file and extract it file to a folder (e.g. If you own WinRAR or 7Zip, select Extract to «Windows11\») *
* Note: If you haven’t an archiver program installed, then download and install the 7-ZIP.

Step 3. Create an empty «APPRAISERRES.DLL» file.
1. Open Explorer and from the View menu select Show > File name extensions
![image_thumb[9]](https://www.repairwin.com/wp-content/uploads/2023/02/image_thumb9_thumb.png "image_thumb[9]")
2. Then right-click at an empty space on your desktop and select New > Text Document.
![image_thumb[27]](https://www.repairwin.com/wp-content/uploads/2023/02/image_thumb27_thumb.png "image_thumb[27]")
3. Rename the «New Text Document.txt» to «appraiserres.dll» and press Enter.
* Note: Pay attention to the spelling and press Yes when prompted to change the file name extension.

Step 4. Replace APPRAISERRES.DLL in extracted «Windows11» ISO folder.
Now proceed to replace the original «APPRAISERRES.DLL» in «Windows11\sources», with the empty one you created on your desktop.
1. Open the Windows11 folder with the ISO extracted files.
2. Then open the sources folder.
3. Locate and delete the «appraiserres.dll« file.

4. Now copy from your desktop the empty «appraiserres.dll» file you created before, and paste it inside the sources folder.
Step 5. Run Disk Cleanup.
Now proceed and remove all the Windows Update files with Disk Cleanup.
1. Press Windows + R keys to open the run command box.
2. Type cleanmgr & press Enter.
3. In ‘Disk Cleanup for (C:)’ window, click Clean up system files.
4. At the next window check the following boxes and click OK:
- Windows Update Cleanup
- Window upgrade log files
- Delivery Optimization files
- Temporary Internet Files.
- Temporary Windows Installation files.
5. When the cleanup is complete, proceed to next step.
Step 6. Disconnect from Internet. (IMPORTANT)
Disable your Network connection or Disconnect from the Network until the installation ends.
Step 7. Update to Windows 11 22H2 from Windows11 folder.
After doing the above steps, you’re ready to install the latest version of Windows 11 on your system from the ‘Windows11’ folder.*
* Suggestion: Before proceeding with the installation of Windows 11, proceed to back up your personal files to an external USB drive, so that you have a copy of your important files in case something goes wrong and you need to do a clean install of Windows 11.
1. Navigate to Windows11 folder and run the setup.exe application.

2. Click Next to Install Windows 11.
3. Wait until Windows 11 setup checking your PC and for Updates.
4. When prompted Accept the License terms.
5. Finally click Install to install Windows 11 while keeping your personal files and apps.

5. The Windows 11 installation will start. Wait it to complete. (During the process your computer will restart several times)

6. If all goes well, after 20-30 minutes you should have successfully updated your PC to Windows 11 22H2.

That’s all folks! Please leave a comment in the comment section below or even better: like and share this blog post in the social networks to help spread the word about this solution.
If this article was useful for you, please consider supporting us by making a donation. Even $1 can a make a huge difference for us.
- Author
- Recent Posts
Konstantinos is the founder and administrator of Repairwin.com. Since 1995 he works and provides IT support as a computer and network expert to individuals and large companies. He is specialized in solving problems related to Windows or other Microsoft products (Windows Server, Office, Microsoft 365, etc.).
,
This guide step-by-step instructions on how to update to Windows 11 22H2 on unsupported hardware (with no TPM, Secure Boot or a supported CPU for Windows 11).
If you have already installed Windows 11 version 21H2 on a system that does not support TPM, Secure Boot, or the processor doesn’t supported for Windows 11, you may have noticed that the latest version of Windows 11 22H2 does not appear for installation in Windows Update.
This is because on computers that do not meet the Windows 11 system requirements, Microsoft does not allow the latest version 22H2 to be installed automatically via Windows Update or to manually upgrade via the Windows 11 Installation Assistant (aka «Windows 11 Update Assistant»), with error «This PC doesn’t meet the minimum system requirements to install Windows 11».

To resolve these issues and to upgrade your unsupported for Windows 11 PC to Windows 11 22H2 version, follow the instructions on this guide.
How to Upgrade/Update to Windows 11 22H2 a PC that doesn’t meet the system requirements for Windows 11.
To bypass TPM, Secure Boot & CPU requirements to update your system to Windows 11 22H2, follow the steps below:*
* Notes:
1. The below instructions can be used either to update Windows 11 21H2 to Windows 11 22H2, or to upgrade Windows 10 to Windows 11 22H2.
2. The instructions on Method-2 can also be used to update Windows 11 22H2 to Windows 11 23H2.
Step 1. Download Windows 11 ISO file.
1. Proceed and download the Windows 11 Media Creation Tool from from Microsoft.

2. Run the Media Creation Tool and press Accept at License terms.
3. At ‘Language and edition’ screen click Next.

4. At next screen choose ISO file and click Next.

5. Save the Windows.iso file to «Downloads» folder.

6. Now, wait for the Windows 11 ISO file to finish downloading and when it does click Finish to close the wizard, and continue to step-2.

Step 2. Run the PC Health Check tool.
Now, find out exactly which Windows 11 requirements your PC doesn’t meet using the PC Health Check tool from Microsoft.
1. Download and run Microsoft’s PC Health Check utility.
2. At PC Health Check, click Check now.

3. Now according the result, proceed to the corresponding method below.
- If only the processor isn’t currently supported for Windows 11 (as in screenshot below), follow the instructions in Method-1 below.

-
If your computer does not support either TPM, Secure Boot or supported processor for Windows 11 (as in screenshot below), follow the instructions in Method-2 below.

Method 1. Upgrade to Windows 11 22H2 with an unsupported processor.
If you own an unsupported processor for Windows 11, but your PC supports TPM or Secure Boot, then modify the registry as instructed below to update to Windows 11 22H2.
1. Open Registry Editor. To do that:
1. Simultaneously press the Win + R keys to open the run command box.
2. Type regedit and press Enter to open Registry Editor.
2. At the left pane, navigate to this key:
- HKEY_LOCAL_MACHINE\SYSTEM\Setup\MoSetup
3. At the right pane, right-click at an empty space and choose New > DWORD (32-bit) Value.

4. Name the new value as: AllowUpgradesWithUnsupportedTPMOrCPU
5. Double-click at the newly created value and type 1 at Value Data.

6. Close Registry Editor and restart the PC.
7. After restarting the PC, double-click at the downloaded Windows.iso file on the ‘Downloads’ folder.
8. Finally, from the mounted ISO image in Explorer, double-click at setup.exe application and follow the onscreen instructions to install Windows 11.

Method 2. Upgrade to Windows 11 22H2 without TPM, Secure Boot or supported CPU.
If your PC doesn’t meet all the necessary hardware requirements to install Windows 11, in order to be able to update/upgrade it to Windows 11 22H2, do the following:*
* Note: The below instructions can also be used to update your system to Windows 11 23H2.
1. Extract the Windows.iso you downloaded to a folder (eg. «Windows»), using an archiver utility (e.g. 7-ZIP, WinRAR, WinZip, etc.).

2. When done, proceed and replace the «appraiserres.dll» file on the «sources» folder of the extracted ISO file (e.g. «Windows»), with a new empty «appraiserres.dll» file, as instructed below:
2a. Open the extracted ‘Windows.iso’ folder (e.g. «Windows»), and then open the «sources» folder.
2b. From Explorer’s toolbar select View > Show > File Name Extensions.

3a. Now locate the «appraiserres.dll» file, highlight both its name and extension and press CTRL + C to copy them on the clipboard.

3b. Now press the ESC key once and the delete the «appraiserres.dll» file.

3c. When done, right-click at an empty space and choose New > Text Document

3d. Press CTRL + V to rename the «New Text Document.txt» to «appraiserres.dll» and press Enter.

3e. At the confirmation prompt, click Yes.

4. Finally, from the extracted Windows.iso folder («Windows») folder, run the setup.exe application and follow the onscreen instructions to upgrade your pc to the latest version of Windows 11.

That’s it! Which method worked for you?
Let me know if this guide has helped you by leaving your comment about your experience. Please like and share this guide to help others.
If this article was useful for you, please consider supporting us by making a donation. Even $1 can a make a huge difference for us in our effort to continue to help others while keeping this site free:
- Author
- Recent Posts
Konstantinos is the founder and administrator of Wintips.org. Since 1995 he works and provides IT support as a computer and network expert to individuals and large companies. He is specialized in solving problems related to Windows or other Microsoft products (Windows Server, Office, Microsoft 365, etc.).
В этой статье мы рассмотрим особенности обновления билдов Windows 10 до Windows 11 23H2 на несовместимых компьютерах (без TPM чипа и со старыми моделями процессоров). В качестве минимальных требований для установки Windows 11, Microsoft указывает наличие чипа TPM, Secure boot и нового процессора (выпущенного после 2017 года). Если компьютер не соответствует минимальным требованиям, он считается несовместимым и не будет получать предложение обновления до Windows 11 через Windows Update.
Microsoft анонсировала, что не будет выпускать билд 23H2 для Windows 10. Это означает, что срок окончания поддержки Windows 10 будет завершен 14 октября 2025 г. После этой даты компьютеры с Windows 10 (кроме LTSC) перестанут получать обновления безопасности и патчи. Таким образом, 22H2 будет финальной версией Windows 10.
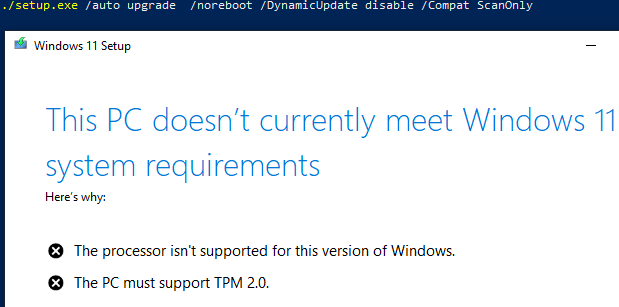
Если попробовать выполнить ручное обновление Windows 10 22H2 на старом компьютере до Windows 11 с помощью ISO образа с билдом 23H2, появится сообщение:
Этот компьютер не соответствует минимальным требованиям к системе для установки Windows 11:
- Процессор не поддерживается для данной версии Windows
- Компьютер должен поддерживать доверенный платформенный модуль 2.0
Вы можете проверить совместимость оборудования вашего компьютера с Windows 11 с помощью программы
setup.exe
на установочном ISO образе Windows (для генерации ISO образа Windows 11 воспользуйтесь официальной утилитой Media Creation Tool — https://www.microsoft.com/software-download/windows11). Смонтируйте ISO образ, откройте командную строку и перейдите на виртуальный CD/DVD привод:
cd d:\
Выполните команду:
./setup.exe /auto upgrade /noreboot /DynamicUpdate disable /Compat ScanOnly
В этом режиме установщик Windows выполнит проверку совместимости, без выполнения обновления.
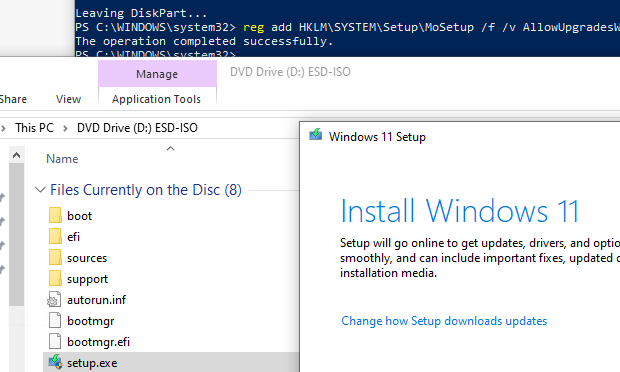
Есть официальный способ обойти это ограничение с помощью параметра реестра AllowUpgradesWithUnsupportedTPMOrCPU (линк). Чтобы создать параметр реестра, выполните команду:
reg add HKLM\SYSTEM\Setup\MoSetup /f /v AllowUpgradesWithUnsupportedTPMorCPU /d 1 /t reg_dword
После этого вы можете выполнить обновление Windows 10 до Windows 11 23H2 с сохранением данных с помощью программы setup.exe на установочном образе.
Этот и другие рассмотренные ниже способы обновления до Windows 11 на неподдерживаемом железе являются основанием для отсутствия поддержки вендора.
Параметр реестра AllowUpgradesWithUnsupportedTPMOrCPU позволит игнорировать старые CPU и наличие чипа TPM 2.0, но чип TPM 1.2 все еще требуется. Если он отсутствует, вы не сможете выполнить обновление. Проверить наличие чипа TPM на компьютере можно с помощью PowerShell команды:
Get-TPM
Если чип TPM отсутствует (
TpmPresent=False
), есть обходные способы выполнения обновления до Windows 11 без проверки совместимости.
Откройте командную строку и запустите мастер обновления Windows 11 в специальном режиме:
./setup.exe /product server
Или
D:\sourcs\setupprep.exe /product server
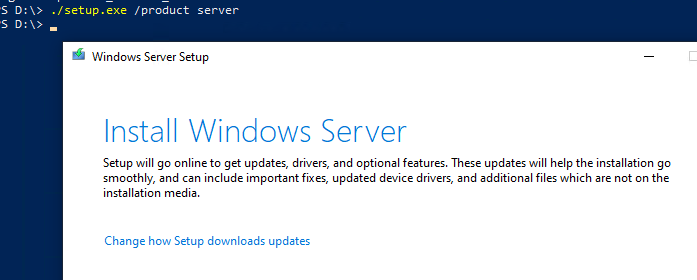
В этом режиме установщик Windows 11 считает, что устанавливается редакций Windows Server, в которой отсутствует проверка CPU и чипа TPM.
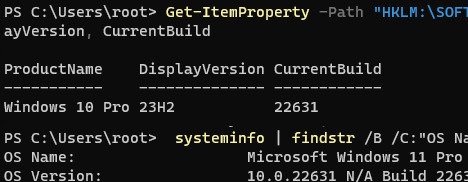
После выполнения обновления в таком режиме фактически на компьютере будет установлена обычная Pro редакция Windows 11. Проверьте версию и билд Windows 11 с помощью команды:
Get-ItemProperty -Path «HKLM:\SOFTWARE\Microsoft\Windows NT\CurrentVersion»| select ProductName, DisplayVersion, CurrentBuild
Есть еще один забавный способ выполнить апгрейд до Windows 11 с помощью подмены файла appraiserres.dll:
- Скопируйте файлы установочного образа Windows 11 на локальный диск;
- Очистите содержимое файла appraiserres.dll в папке sources:
Clear-Content C:\Win11_ISO\sources\appraiserres.dll -Force - После этого запустите файл
setup.exe
и продолжите обновление до Windows 11.
Для автоматического обновления до Windows 11 в тихом режиме на компьютере можно использовать параметры командной строки setup.exe:
start /wait d:\setup.exe /Auto Upgrade /Quiet /DynamicUpdate disable /showoobe None /Telemetry Disable /compat IgnoreWarning /NoReboot
Перед выполнением обновления проверьте, что в настройках Windows отключен запрет на обновление редакции. Подробнее в статье Как запретить автоматическое обновление до Windows 11?
Также нужно отключить новый параметр защиты от обновления компонентов, который блокирует доставку новых версий Windows:
reg add HKLM\SOFTWARE\Policies\Microsoft\Windows\WindowsUpdate /f /v DisableWUfBSafeguards /d 1 /t reg_dword
С учетом того, что в корпоративном секторе продолжает трудиться большое количество старых компьютеров, формально не совместимых с Windows 11, вероятно ближе к дате окончания поддержки Windows 10, Microsoft предложит дополнительные варианты апгрейда до W11 на неподдерживаемом железе.
Нужно обновить Windows 11 до версии22H2. Сейчас установлена версия 21H2.
Не получается это сделать т.к. обновления в России заблокированы.
Через центр обновлений Windows с использованием VPN обновление скачивается, устанавливается, но после перезагрузке выдается сообщение что обновление не удалось.
Через Windows 11 Installation Assistant в конце установки тоже выдется ошибка что обновление не удалось.
Так же пробовал создать ISO образ с помощью Media Creation Tool. Далее распаковал этот образ и запустил setup.exe. Установка прошла, но после перезагрузки опять выдается сообщение что обновление не удалось и компьютер возвращен в исходное состояние.
Это у меня проблема с Windows или это из за того что обновления в России заблокированы?
-
Вопрос задан
-
5273 просмотра
Пригласить эксперта
В РФ вроде работают обновления…
Похоже на проблему с виндой, свободным местом или центром обновления.
Попробуй пересоздать ISO и загрузится в установщик, с этой флешки, и уже там вместо установки винды выбрать обновление
Войдите, чтобы написать ответ
-
Показать ещё
Загружается…