
Если вы обновляетесь с 32-битной Windows 7 или 8 (8.1) до Windows 10, то в процессе устанавливается 32-бит версия системы. Также, некоторые устройства имеют предустановленную 32-разрядную систему, однако процессор поддерживает 64-бит Windows 10 и имеется возможность поменять ОС на неё (и иногда это может быть полезно, особенно если вы увеличили объем оперативной памяти на вашем компьютере или ноутбуке).
В этой инструкции о том, как поменять 32-битную Windows 10 на 64-битную. Если вы не знаете, как узнать разрядность вашей текущей системы, подробно об этом в статье Как узнать разрядность Windows 10 (как узнать сколько бит 32 или 64).
Установка Windows 10 x64 вместо 32-битной системы
При обновлении ОС до Windows 10 (или покупке устройства с Windows 10 32-бит) вы получили лицензию, которая подходит и к 64-разрядной системе (в обоих случаях она зарегистрирована на сайте Майкрософт за вашим оборудованием и ключ вам знать не нужно).
К сожалению, без переустановки системы изменить 32-бит на 64-бит не получится: единственный путь поменять разрядность Windows 10 — выполнить чистую установку x64 версии системы в той же редакции на компьютер, ноутбук или планшет (при этом вы можете не удалять уже имеющиеся данные на устройстве, но драйверы и программы придется переустановить).
Примечание: если на диске есть несколько разделов (т.е. есть условный диск D), будет хорошим решением перенести свои пользовательские данные (в том числе с рабочего стола и системных папок документов) на него.
Порядок действий будет следующим:
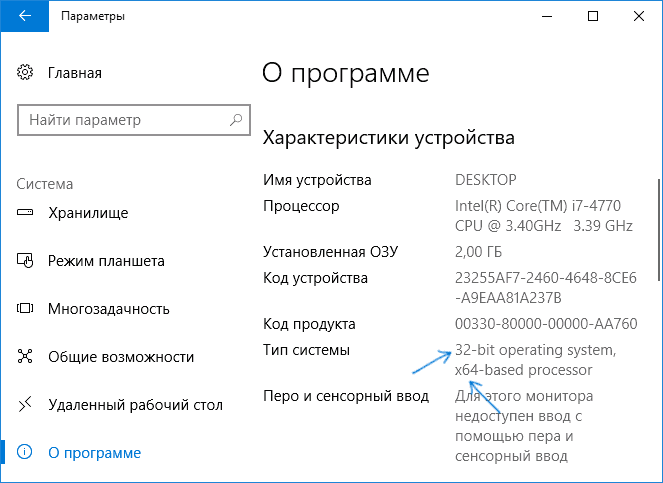
- Зайдите в Параметры — Система — О программе (О системе) и обратите внимание на параметр «Тип системы». Если там указано, что у вас 32-bit operating system, x64-based processor, это означает, что ваш процессор поддерживает системы 64-бит (Если процессор x86 — то не поддерживает и дальнейшие шаги не следует выполнять). Также обратите внимание на выпуск (редакцию) вашей системы в разделе «Характеристики Windows».

- Важный шаг: если у вас ноутбук или планшет, убедитесь, что на официальном сайте производителя есть драйверы для 64-бит Windows для вашего устройства (если разрядность не указано, как правило поддерживается оба варианты системы). Желательно сразу скачать их.
- Скачайте оригинальный ISO образ Windows 10 x64 с сайта Майкрософт (на настоящий момент в одном образе содержатся сразу все редакции системы) и создайте загрузочную флешку (диск) или сделайте загрузочную флешку Windows 10 x64 официальным способом (с помощью Media Creation Tool).
- Запустите установку системы с флешки (см. Как установить Windows 10 с флешки). При этом, если вы получите запрос о том, какую редакцию системы установить — выберите ту, которая отображалась в сведениях о системе (на шаге 1). Ключ продукта при установке вводить не нужно.
- Если на «диске C» были важные данные, то для того, чтобы они не удалились, не форматируйте диск C при установке, просто выберите этот раздел в режиме «полная установка» и нажмите «Далее» (файлы предыдущей Windows 10 32-бит будут помещены в папку Windows.old, которую в дальнейшем можно будет удалить).
- Завершите процесс установки, после неё установите оригинальные драйверы системы.
На этом процесс перехода с 32-бит Windows 10 на 64-бит будет завершен. Т.е. основная задача — правильно пройти этапы с установкой системы с USB-накопителя и последующей установкой драйверов, чтобы получить ОС в нужной разрядности.
- Опубликовано: Июль 25, 2018
- Обновлено: Март 21, 2022
Windows ОС самостоятельно определяет разрядность системы. Поэтому, если вы обновите 32-битную версию Windows 7 или 8 (8.1) до Windows 10, в результате получите 32-битную версию новой ОС. В некоторых случаях имеет смысл перейти на 64-битную Windows, особенно если вы установили на свой компьютер больший объем оперативной памяти. Некоторые устройства предоставляются пользователю с предустановленной 32-битной операционной системой, хотя их процессоры уже имеют 64-битную разрядность. Если ваш процессор имеет архитектуру х64, вы можете обновить 32-разрядную версию Windows 10 на 64-разрядную. В этой статье мы расскажем вам как это сделать.

Почему вам следует перейти с 32-битной на 64-битную версию Windows
Начнем с преимуществ, которые дает 64-битная версия Windows. Программное обеспечение, оптимизированное для 64-битных операционных систем, работает быстрее, чем аналогичные приложения для процессоров, которые имеют дело только с 32 битами (т.е. 4 байта) за цикл. Более того, 32-разрядные версии Windows могут использовать не более 4 ГБ системной памяти, и даже в этом случае не весь этот объем памяти доступен для программ, которые вы, возможно, будете использовать. В то же время, 64-битная версия Windows поддерживает любой объём памяти, который доступен на сегодняшний день. А повышенная производительность этой системы является еще одним большим бонусом. Компьютер с 64-битной Windows будет обрабатывать вдвое больше данных одновременно по сравнению с его аналогом с 32-битной версией ОС.
Итак, каковы требования к вашему устройству, чтобы переход с 32-битной версии Windows на 64-битную был возможен? Единственная особенность, которую стоит учесть, – это разрядность вашего процессора. Вы сможете изменить 32-битную Windows на 64-битную, только если ваш компьютер оснащен процессором на базе x64.
Установка Windows 10 x64 вместо 32-битной системы
Если на вашем компьютере установлена 32-битная версия Windows 7 или 8.1, и вы обновляете операционную систему до Windows 10, Microsoft автоматически предоставит вам 32-битную версию новой ОС. Однако, если ваш процессор имеет разрядность x64, вы имеете возможность перейти на 64-битную версию Windows.
Для определения параметров процессора в плане поддержки 64 битной разрядности выполните следующие действия: Нажмите кнопку «Пуск». Далее кликните на «Параметры». Затем выберите пункт «Система» (Экран, уведомления, приложения). В правой части окна найдите «Тип системы».
Там вы можете увидеть одну из следующих строк:
1. 64-разрядная операционная система, процессор x64.
Ваш процессор поддерживает 64-разрядную версию, и у вас уже установлена 64-разрядная версия Windows.
2. 32-разрядная операционная система, процессор x86.
Ваш процессор не поддерживает 64-разрядную версию, и у вас установлена 32-разрядная версия Windows.
3. 32-разрядная операционная система, процессор x64.
Ваш процессор поддерживает 64-битную систему.
6 шагов для обновления с 32-битной версии Windows до 64-битной
Magic Data Recovery Pack
Нужна программа для восстановления удаленных данных? Этот пакет поможет вернуть любые файлы всего несколькими нажатиями!
Шаг 1. Проверьте параметры вашего процессора
Первый шаг, который вам следует сделать для обновления с 32-разрядной до 64-разрядной версии в Windows 10, – убедиться, что это действительно возможно для вашего устройства. Если вы видите строку «32-битная операционная система, процессор на базе x64» – вам повезло. Это означает, что вы используете 32-разрядную Windows 10, но ваш процессор также может обрабатывать 64-разрядную версию.
Внимание: если у вас ноутбук или планшет, убедитесь, что на сайте производителя есть драйверы для 64-битной Windows (если разрядность драйвера не указана, это обычно означает, что поддерживаются обе версии).
Шаг 2. Резервное копирование данных
Если вы хотите перейти с 32-битной Windows 10 до 64-битной без потери данных, вы должны убедиться, что любая важная информация, которая есть на вашем диске (а именно, раздел, на который вы собираетесь установить систему), в безопасности.
Есть несколько способов защитить свои данные. Например, сохранить всю информацию в облаке, скопировать на внешний жесткий диск или USB флеш-накопитель. Для этого вы также можете использовать инструмент Windows Disk Management.
Шаг 3. Подготовьте установочный диск
Следующим шагом в процессе перехода с 32-разрядной на 64-разрядную Windows 10 является загрузка исходного ISO-образа Windows 10 x64 с веб-сайта Microsoft и создание загрузочного USB-накопителя (диска). Вы также можете создать такой загрузочный диск Windows 10 x64, следуя официальной процедуре, а именно с помощью Media Creation Tool.

Шаг 4. Начало установки
Теперь мы подошли непосредственно к тому, как обновить Windows 10 с 32-разрядной до 64-разрядной версии. Начните установку, вставив загрузочный USB-накопитель. Затем перезагрузите компьютер. Во время экрана загрузки нажмите Del или F12 (в зависимости от вашего устройства), чтобы войти в BIOS. В меню BIOS настройте приоритет загрузки так, чтобы загрузка с USB осуществлялась в первую очередь. Сохраните и перезагрузите, чтобы начать процесс установки.
Шаг 5. Следуйте инструкциям по установке
В процессе обновления 32-битной версии Windows на 64-битную это достаточно легкий этап. Просто следуйте инструкциям на экране и выберите характеристики, которые должна иметь ваша операционная система.
Вам не нужно вводить ключ продукта во время установки. Если на диске C (или любом другом разделе, на котором вы устанавливаете систему) есть какие-либо важные данные и достаточно места для системных файлов, вы можете не форматировать его, чтобы сохранить информацию.
Шаг 6. Завершите процесс установки
Последним этапом перехода с 32-битной версии Windows на 64-битную является установка драйверов после завершения установки системы. Хотя некоторые из них будут установлены системой автоматически, некоторые необходимо будет загрузить с официального сайта соответствующего поставщика оборудования.
Magic Partition Recovery
Восстанавливает логическую структуру диска, благодаря чему возможно восстановление файлов даже при отсутствующей или сильно поврежденной файловой таблице.
Воспользуйтесь программным обеспечением для восстановления любых типов файлов
Если в процессе перехода с 32-битной версии Windows на 64-битную вы утратили важные файлы, не стоит волноваться. Вы можете с легкостью вернуть всю утерянную информацию с помощью программы для восстановления данных. Magic Partition Recovery – это универсальный инструмент, который достаточно прост в использовании. Утилита восстановит любые типы файлов за считанные минуты. Программа имеет удобный интерфейс, который похож на стандартный проводник Windows. Пользователь может использовать функцию «Пошаговый мастер», который сделает процесс восстановления еще проще. В режиме быстрого анализа инструмент моментально находит удаленные файлы, предоставляя возможность сохранить все данные на диск.
Кроме того, если в процессе преобразования разрядности системы структура вашего диска была повреждена или стала недоступной, вы можете проверить другой продукт нашей компании. Magic Partition Recovery – это инструмент для восстановления поврежденных разделов и удаленных файлов, который поможет восстановить данные и поврежденные, недоступные структуры диска.
- Марьяна Ермолова
- Технический писатель
- Июль 25, 2018
Марьяна занимается технической поддержкой клиентов в компании East Imperial Soft. Ее задача – принимать обращения клиентов, у которых возникают проблемы и вопросы в процессе восстановления данных. Пользователи получают развёрнутое объяснение и пошаговую инструкцию по использованию программы.
| Quick Navigation | Detailed Steps |
|---|---|
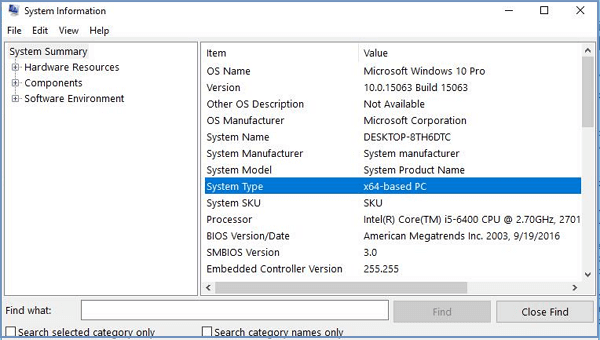
| 1. Check if the Processor is 64-bit capable | Open the «Start menu», Search for «System Information»…Full steps |
| 2. Backup files before upgrade | Download EaseUS Todo Backup and follow the steps to back up…Full steps |
| 3. Upgrade to Windows 10 64-bit | Create the Windows installation media…Full steps |
Microsoft gives you the 32-bit version of Windows 10 if you upgrade from the 32-bit version of Windows 7 or 8.1. But you can switch to the 64-bit version. Why upgrade windows 10 32 bit to 64 bit?
The reason is that the 32-bit version is limited to 4GB of RAM, which is a small amount. Especially when these days PCs usually have 8GB or more. If you upgrade your computer to 64 bit, you’ll be able to run more applications simultaneously. Other applications like Google Chrome will be able to handle more open tabs, and you will be able to run more memory-intensive applications, such as AutoCAD, Photoshop, and video editing programs, etc.
However, during the period of changing to 64 bit, most people complain that their files got lost. Follow the three steps below to change Windows from 32 bit to 64 bit without losing data!
1. Make Sure 64-Bit is Compatible with Your Processor
You can only install the Windows 64-bit on compatible hardware, that is to say, you have to make sure if your computer has a 64-bit processor. Here we only provide the easiest way for you to check your system type:
- Open the «Start menu».
- Search for «System Information».
- Press «Enter».
- Look for «System Type».
Then, you will see one of the following system types:
- 1. 64-bit operating system, x64-based processor: Your CPU supports 64-bit and you have already installed the 64-bit version of Windows 10. So you don’t need to upgrade.
- 2. 32-bit operating system, x64-based processor: Your CPU supports 64-bit, but you have installed the 32-bit version of Windows.
- 3. 32-bit operating system, x86-based processor: Your CPU supports 32-bit and you have installed the 32-bit version of Windows.
If you see the second type, then your computer can run a 64-bit version of Windows. If you see the third one, it means you can’t install another architecture of the operating system because your CPU doesn’t support it.
2. Back Up Important Files Before Windows 10 64-Bit Upgrade
To avoid data loss, you’d better make a full backup of your PC. While making a full backup of the computer can be time-consuming, we recommend you try a data backup utility — EaseUS Todo Backup, to finish this job quickly and effectively. This software enables you to make a full backup of your computer in one click. It also helps you make backup schedules.
Download EaseUS Todo Backup and quickly make a backup of your important files.
Step 1. Click «Select backup contents» to initiate a backup.

Step 2. There are four data backup categories, File, Disk, OS, and Mail, click File.

Step 3. Local and network files will be displayed on the left side. You may extend the directory to choose which files to back up.

Step 4. Select the location where you want to store the backup by following the on-screen instructions.

Click «Options» to encrypt the backup with a password in «Backup Options,» and to setup a backup schedule and choose to initiate a backup at a certain event in «Backup Scheme.» There are a variety of other customization options available for the backup process.

Step 5. You may save the backup to a local disk, EaseUS’ online service, or a NAS.

Step 6. EaseUS Todo Backup enables customers to back up data to a third-party cloud drive and its own cloud drive.
If you want to back up data to a third-party cloud drive, choose Local Drive, scroll down to add Cloud Device, add your account, and then log in.

You can also save backups to EaseUS’s cloud storage service. Sign up for an EaseUS Account and log in after clicking EaseUS Cloud.

Step 7. To begin backup, click «Backup Now» Once the backup process has been finished, it will be shown as a card on the panel’s left side. To further manage a backup job, right-click it.

- Notice:
- If you want to keep all the apps or programs, it is a good idea to move/transfer programs to an external hard drive with EaseUS Todo PCTrans. This PC transfer software moves data, applications, and accounts from one computer to another in Windows 10/8.1/8/7/Vista/XP. You can directly run programs from the external device without any difficulty. If you don’t have an external hard drive, you can also use a USB with enough free space.
3. Upgrade Windows 10 32 bit to 64 bit
You’ll need to perform a clean install to get to the 64-bit version of Windows 10 from the 32-bit one, for there’s no direct upgrade path.
First, be sure to check that your current 32-bit version of Windows 10 is activated under Settings > Update & security > Activation.
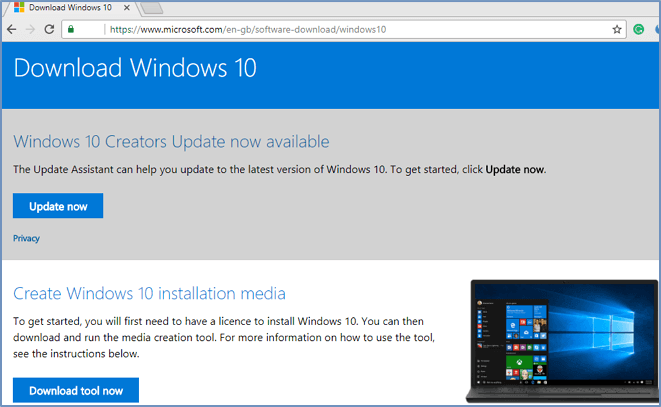
Step 1. Create the installation media
1. Go to Microsoft’s Windows 10 download page. Click the Download tool now button and save the Media Creation Tool on your desktop.
2. Connect a USB drive with at least 4GB of available space.
3. Double-click the MediaCrationTool.exe file.
4. Click the «Accept» to agree on the terms.
5. Select the Create installation media (USB flash drive, DVD, or ISO file) for another PC option. Click Next.
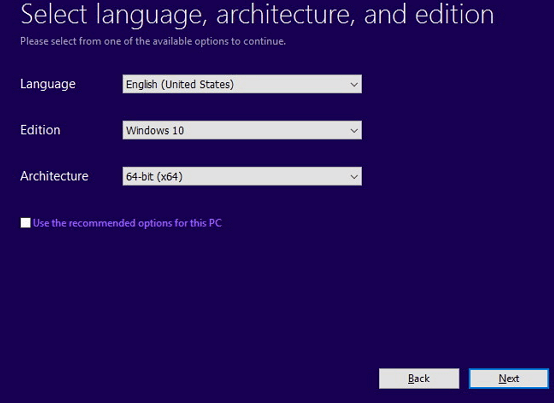
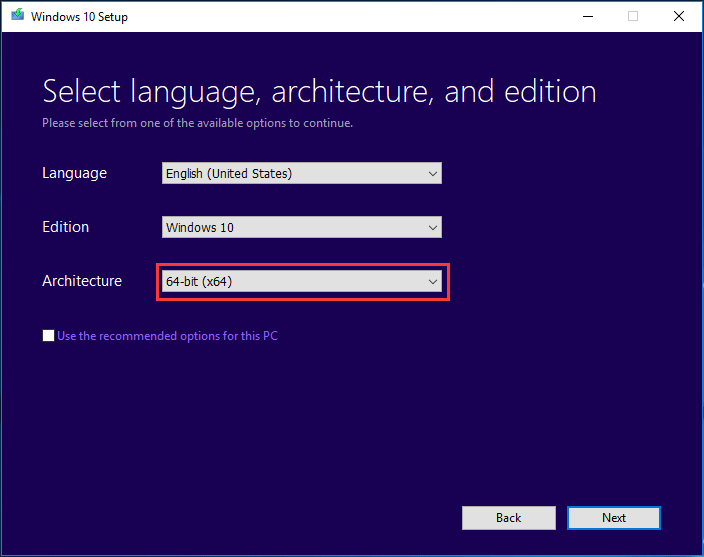
6. Uncheck the «Use the recommended options for this PC» option.
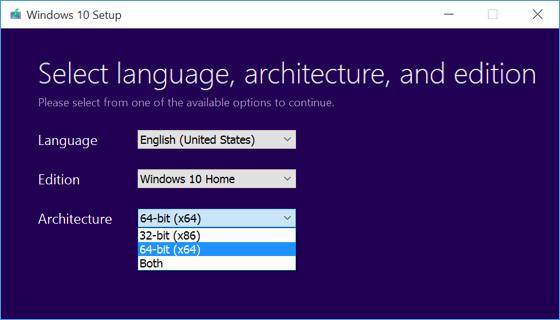
7. Make sure to select your language, edition, and, more importantly, the architecture, which in this case is 64-bit (x64). Click Next.
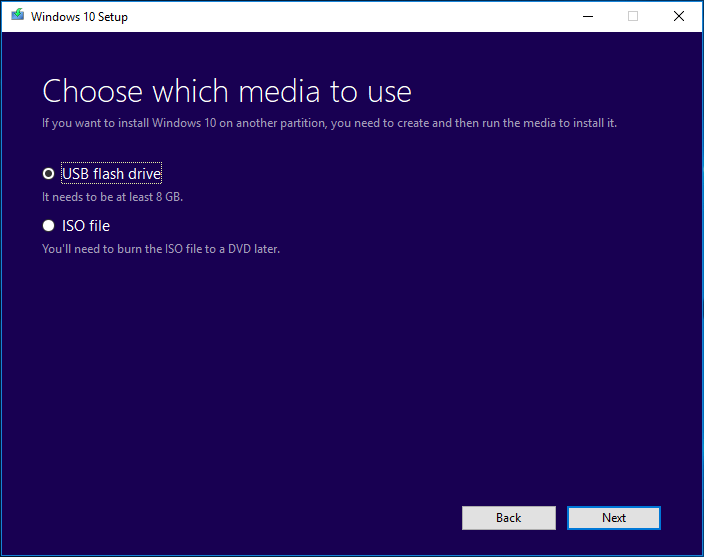
8. Select the USB flash drive option. Click Next.
9. Select the removable drive from the list. Click Next.
Step 2. Windows 10 32 bit to 64-bit install
1. Restart your computer and boot from the installation media ( press f2 when you restart > select boot > boot from USB).
2. On «Windows Setup,» click the Next button.
3. Click «Install Now», and click the «I don’t have a product key» link to continue.
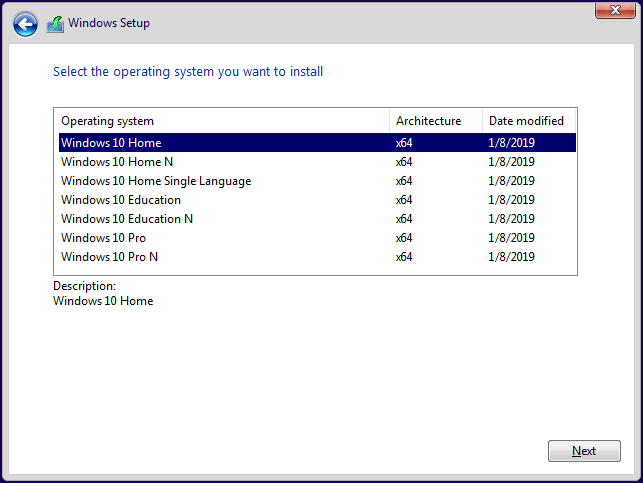
4. Select the edition of Windows 10 (if applicable). This selection must match the edition of the license activates.
5. Accept the license terms and continue.
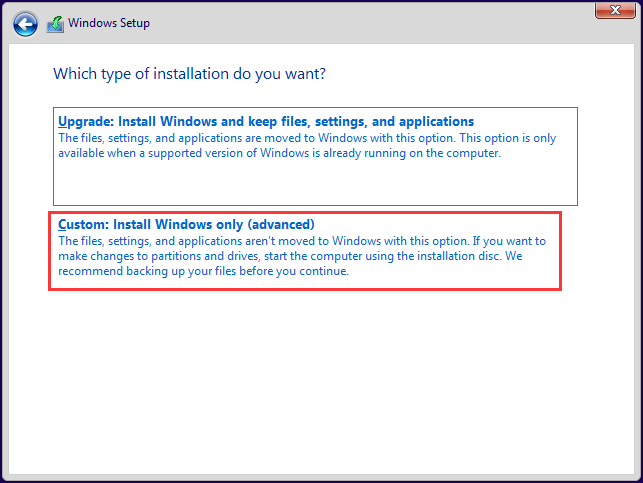
6. Click the Custom: Install Windows only (Advanced) option.
7. Select and delete system partitions — usually: Drive 0 Partition 1 and Drive 0 Partition 2.
8. Click Next and follow the instructions to install Windows 10.
When you finished the installation, Windows 10 will automatically check in with Microsoft and activate itself. You’ll now be running the 64-bit edition of Windows on your PC. And you need to continue with the on-screen directions to finish the out-of-box experience (OOBE) to create a new account, set your preferences, and choose your preferred privacy settings.
Have a need to upgrade Windows to 64 bit from 32 bit in Windows 10/8/7 since your memory is not used? How to upgrade 32 bit to 64 bit? This post shows you some things that you should check out, as well as the way to perform Windows 64 bit upgrade.
Why Upgrade 32 Bit to 64 Bit in Windows 10/8/7
Microsoft offers both 32-bit and 64-bit versions of Windows 10/8/7. The 32-bit version is also known as the x86 version while the 64-bit version is known as the x64 version.
When installing Windows 7, 8 or Windows 10, you can choose to install 32-bit or 64-bit version of Windows. But most of you may choose to install the 64-bit version instead of the 32-bit version. If you have installed a 32-bit operating system, you may change it to a 64-bit system.
Why change 32 bit to 64 bit of Windows OS? This is because the 32-bit version is limited to 4GB of RAM (Ramdon Access Memory), which is a small amount these days when PCs usually have 8GB or more. If you installed many applications at the same time, “your computer is low on memory” error message may appear.
If you want to actually use more than 4GB of RAM resources, probably you need a 64-bit version of Windows. With the additional access to memory, you can run more apps simultaneously and improve performance. And the system improves productivity with memory-intensive tasks, such as virtual machines, video editing, Office-working, and web browsing when dealing with a lot of open tabs.
What’s more, 64-CPU may have backward compatibility, allowing it to run 32-bit programs and may also support running 32-bit operating systems. In this aspects, 64-bit version of Windows may have more benefits than 32-bit.
Besides, it’s not surprising that many applications now require a 64-bit operating system due to that limitation. Moreover, you can run x64 and x86 applications on a 64-bit OS, but that is not possible on a 32-bit OS.
Related article: Is My Computer 64 Bit or 32 Bit? Try the 5 Ways to Judge out
How to Convert 32 Bit to 64 Bit Windows 7/8/10 without Data Loss
In the following paragraphs, we will walk you through four steps to upgrade Windows to 64 bit.
- Make Sure Your Processor Is 64-Bit Capable
- Ensure Your PC Hardware Has 64-Bit Drivers Available
- Back up Your PC
- Upgrade 32 Bit to 64 Bit
Tip: The ways to upgrade Windows 7 32 bit to 64 bit free, change 32 bit to 64 bit in Windows 8 and update Windows 10 32 bit to 64 bit are similar. So here we take Windows 10 64 bit upgrade process as an example. Besides, if you have a need to downgrade Windows 10 64 bit to 32 bit, the steps are similar.
Move 1: Make Sure Your Processor Is 64-Bit Capable
Note: You can only install the 64-bit (x64) version of Windows 10/8/7 on compatible hardware, that is to say, you have to determine if your computer has a 64-bit processor. This is the first step you must note.
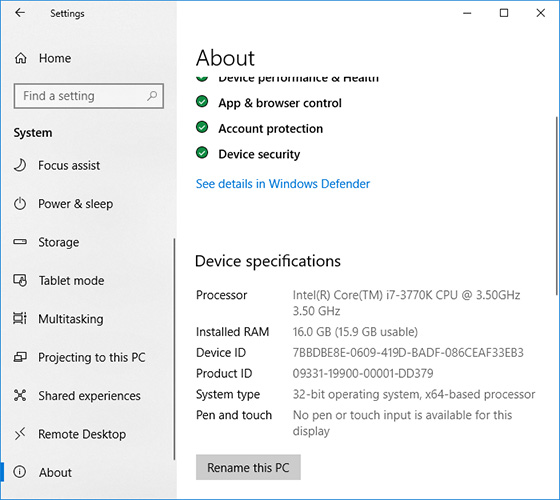
To do this work, go to Settings > Systems > About. On the right-hand side of the interface, navigate to the System type entry.
Then, you will see one of the following system type:
- 64-bit operating system, x64-based processor: Your CPU support 64-bit and you have already installed the 64-bit edition of Windows 10. So, you don’t need to upgrade to 64 bit.
- 32-bit operating system, x64-based processor: Your CPU supports 64-bit, but you have installed the 32-bit version of Windows.
- 32-bit operating system, x86-based processor: Your CPU supports 32-bit and you have installed the 32-bit version of Windows.
To be specific, if you see the second entry, you are in luck and you can move on to the next section to continue Windows 10 64 bit upgrade since your 64-bit Central Processing Unit can run a 64-bit version. But if you see the third entry, you cannot install a 64-bit OS since your CPU doesn’t support 64-bit.
Move 2: Ensure Your PC Hardware Has 64-Bit Drivers Available
In addition, you should check whether other components, for example, video and sound cards, can work properly with a 64-bit version of Windows 10. Simply speaking, 64-bit OS requires 64-bit hardware drivers and the 32-bit drivers won’t work.
Modern hardware should certainly offer 64-bit drivers but some old hardware may no longer support and manufacturers may haven’t offered 64-bit drivers. To check for this, please go to your manufacturer support website to see if 64-bit drivers are available for download.
Move 3: Back up Your PC
Tip: Unlike upgrading from Home Edition to Pro Edition of Windows, there is no need for purchasing a new license when switching 32-bit to 64-bit. But, the in-place upgrade path to switch also doesn’t exist. This means that you must perform a clean install of the Windows OS if you are planning to change the architecture.
Since you are making major changes to your operating system, it is indispensable to make a full backup of Windows 10. When you upgrade 32 bit to 64 bit in Windows 10/8/7, your personal files, settings, and applications will be deleted. And the best thing is to back up all the affected files to your external storage devices or USB drive to avoid data loss.
To back up your important files, you need a free backup program to help you. Which one is worth recommending? MiniTool ShadowMaker, a piece of professional file backup software, will be a good option, coming with many powerful features.
With the help of this freeware, you can create an image file for files & folders, Windows operating system, disk or partition. Besides, it can help you to sync files to other locations for backup. Above all, automatic file backup, differential & incremental backup can be created.
Right now, before you free change 32 bit to 64 bit of Windows 10/8/7, get MiniTool ShadowMaker Trial Edition from the following button to back up your crucial files. Note that this edition only allows you to free use for 30 days. If you want to keep this software all the time, get its Pro Edition.
MiniTool ShadowMaker TrialClick to Download100%Clean & Safe
Step 1: Double-click on this program to open it.
Step 2: Which feature should you use to back up files, Backup or Sync? Both are available. And here, you take the first feature as an example.
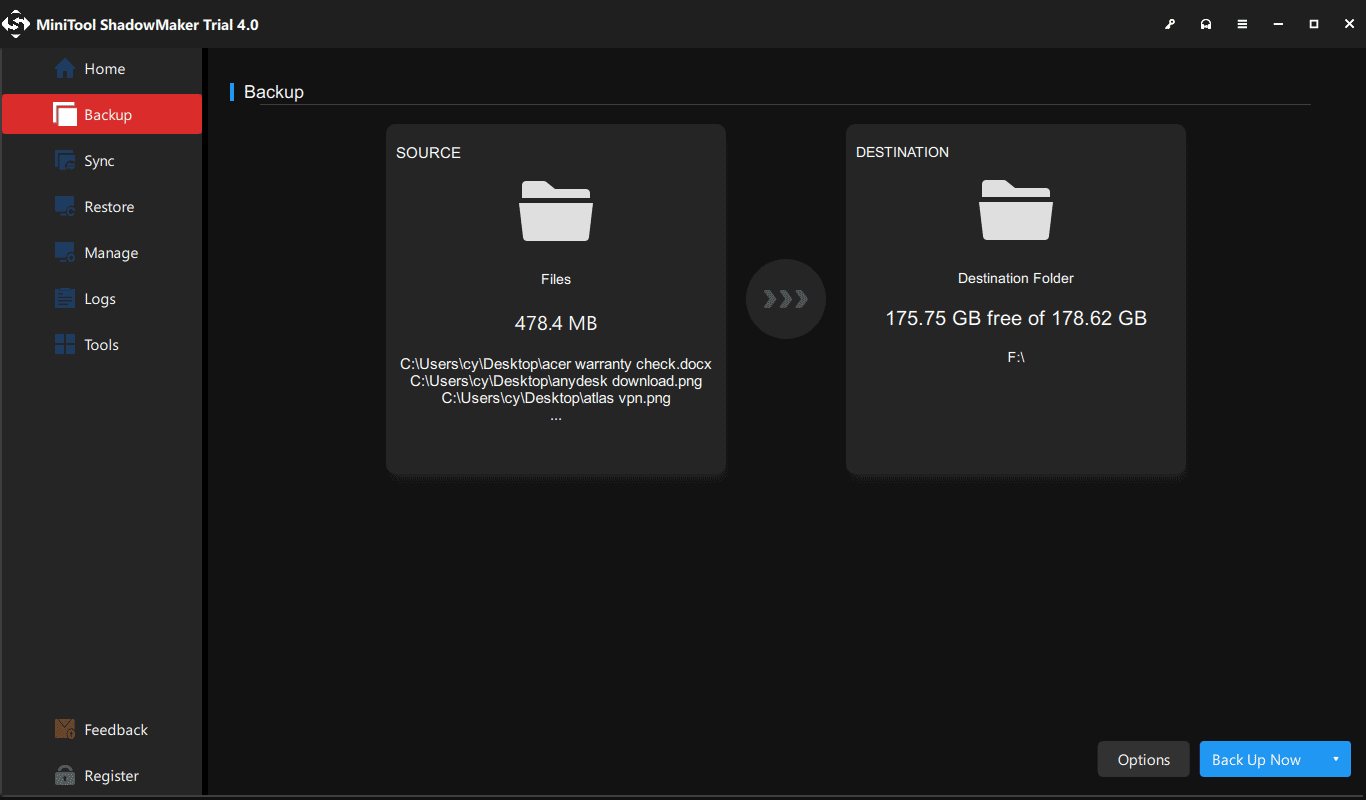
In the Backup window, you need to decide which files to back up and where to save the backup image file. Just go to the Source section and choose personal files you want to back up.
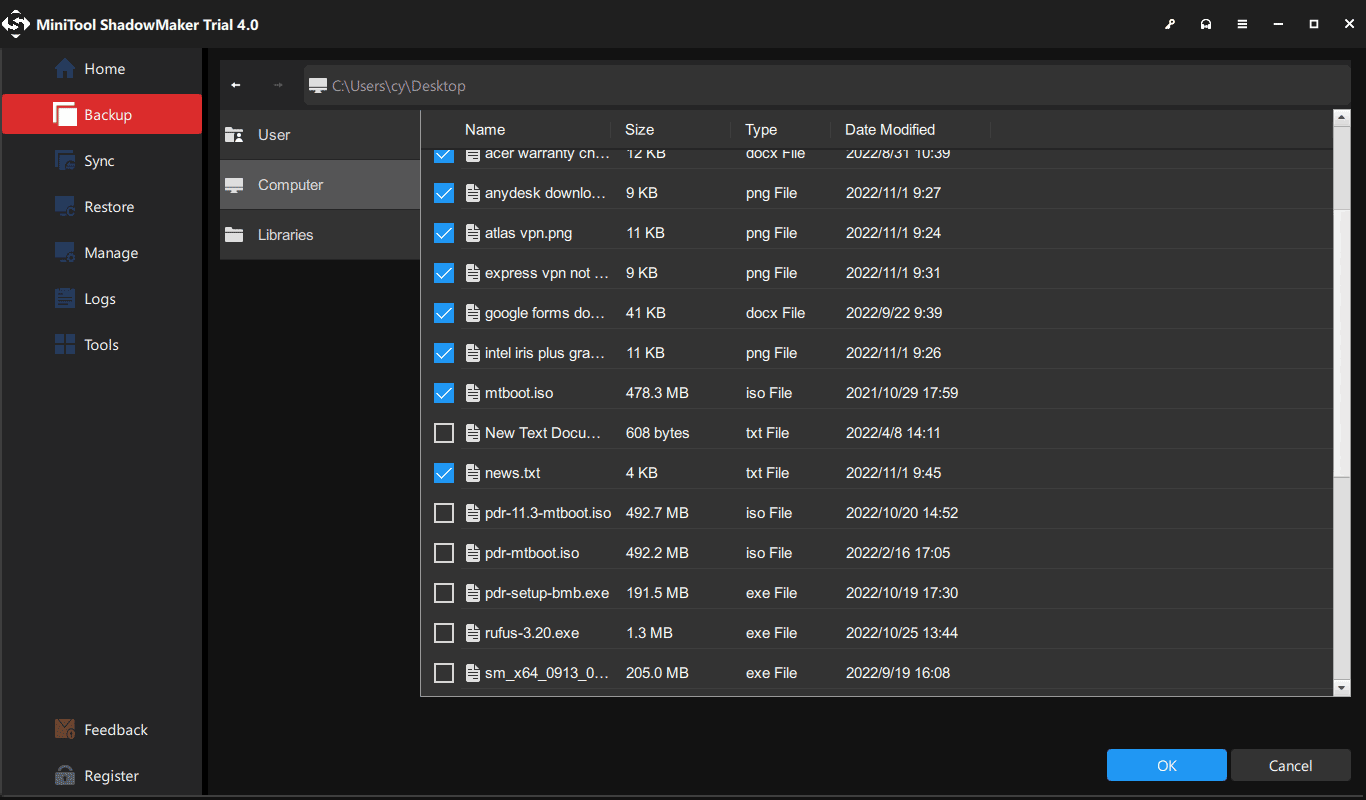
Then, go to the Destination section and choose an external hard drive, USB flash drive, or NAS as the storage path.
Step 3: Finally, start the full backup process of your important files by hitting the Back Up Now button.
Tip: Of course, in addition to file backup via imaging, there is another choice. You can choose to sync files for backup. This post – The Best File Synchronization Software – MiniTool ShadowMaker shows you many details.
Now, all operations to back up files are told to you. If you are planning to convert 32 bit to 64 bit of Windows 10/8/7 operating system, don’t hesitate to free download this backup software to prevent your data from losing after upgrading to the 64-bit version of Windows.
MiniTool ShadowMaker TrialClick to Download100%Clean & Safe
“I want to upgrade Windows 7 32 bit to 64 bit. After checking my CPU and drivers, I decide to back up files. Thankfully, MiniTool ShadowMaker helps a lot before the upgrade.” Click to tweet
Right now, the previous three steps are told to you. Reading here, it is time for you to take action to upgrade Windows 10 32 bit to 64 bit. Just go to the next move to follow the corresponding steps for Windows 10 64-bit version upgrade.
Move 4: Upgrade Windows to 64 Bit
How to convert 32 bit to 64 bit Windows 7/8/10? As mentioned above, performing an upgrade from 32-bit to 64-bit version of Windows is actually clean install. Now, follow the steps below to make a reinstallation.
Create a Bootable USB Drive
Tip: To upgrade Windows 7 32 bit to 64 bit or upgrade Windows 10 32 bit to 64 bit, you need to create a 64-bit installation media. But the tools that you need are different in various systems. For Windows 7, you can get an ISO file by following the guide – Windows 7 ISO File Safe Download: All Editions (32 & 64 Bit). For Windows 10, Media Creation Tool is useful.
Here, take Windows 10 64 bit upgrade as an example and we will show you the step-by-step instructions. Right now, insert your USB flash drive with at least 4GB of storage space to your device and to create the 64-bit Windows 10 installation media.
Step 1: Open the official web page to download Windows 10 Media CreationTool.
Step 2: Click Download tool now under Create Windows 10 installation media.
Step 3: Double-click on the MediaCreationTool.exe to run this utility and then accept the Microsoft terms.
Step 4: There are two options. Check the option Create installation media (USB flash drive, DVD or ISO file) for another PC.
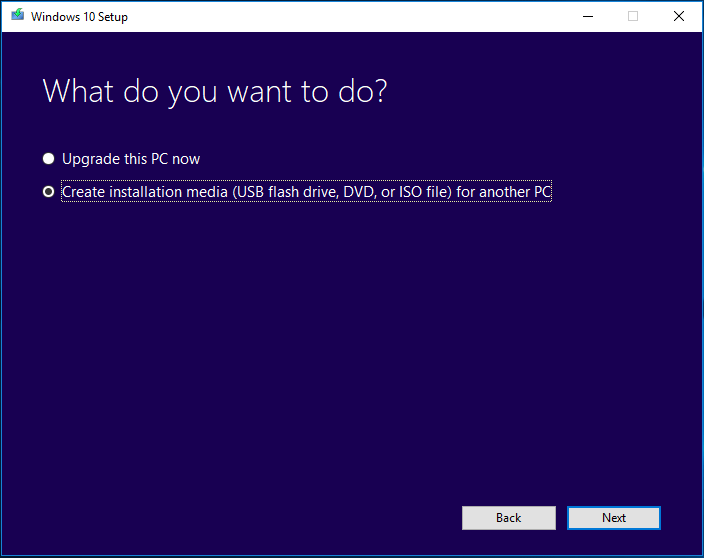
Tip: According to users, if you choose Upgrade this PC now, choosing the same partition as on previous Windows while installing 64-bit version, you will have the Windows.old folder after upgrade where your old data is located. This method do not wipe your hard drive.
Step 5: Please choose language and edition. To upgrade Windows 10 to 64 bit, here please specify the 64-bit (x64) option for 64-bit Architecture.
Step 6: Choose the USB flash drive option so as to create a bootable USB drive. Additionally, you can also check the option ISO file but you need to burn the file to a USB drive or CD/DVD. Here, we recommend the first one.
Step 7: Next, all your drives on your computer will be listed. Just choose the USB flash drive from the list to continue.
Step 8: Then, this tool will start downloading needed files and creating a bootable drive from ISO file that is compatible with Windows 10 64 bit. Wait for the process to be finished.
Install Windows 10 64 Bit from Scratch
How to upgrade Windows 7 32 bit to 64 bit without CD or upgrade Windows 8/10 to 64 bit without disk? Now, restart your computer with the bootable USB drive and then follow these steps:
Tip: To upgrade Windows 7 32 bit to 64 bit or change 32 bit to 64 bit in Windows 8, you also need to get the 64-bit installation file and create a bootable USB drive, as mentioned above. Then, boot the 32-bit Windows from the created bootable drive, and start a clean install.
Step 1: After booting your PC from the USB drive, choose language, time and currency format and keyboard.
Step 2: Click Install now to continue.

Step 3: Your purpose is to upgrade 32 bit to 64 bit for Windows 10, so you should click the I don’t have a product key link (assuming your PC has been already properly activated).
Step 4: Choose the edition of Windows 10 to go on.
Tip: The operating system that you choose must match the edition your license activates.
Step 5: Accept the license terms. To upgrade Windows 10 32 bit to 64 bit, please choose Custom: Install Windows only (advanced).
Step 6: You may ask: how to upgrade 32 bit to 64 bit Windows 7/8/10 without formatting? Actually, it is easy. In the following drive list option page, choose the partition(s) with the current installation of Windows, and click the Delete button instead of formatting operation to remove it from the hard drive.
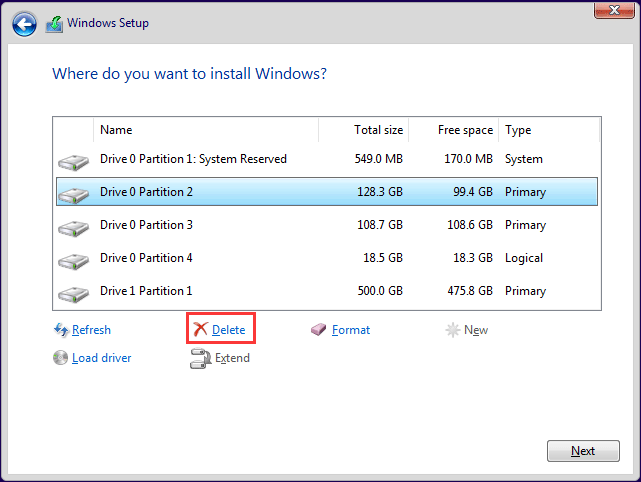
Tip: In addition to system partitions, you can also choose to delete all the data partitions on Drive 0 based on your needs.
Step 7: Then, click the unallocated space to continue. Then, the setup will install the 64-bit version of Windows 10 on your computer. Later, you need to complete the Out-of-box experience (OOBE) setup the OS with your preferences by following the on-screen directions.
More information feel free to watch this video guide:
“It is quite easy to upgrade 32-bit to 64-bit version of Windows 10/8/7. Just share the way with your friends on Twitter.” Click to tweet
Bottom Line
Want to upgrade 32 bit to 64 bit? Here is the overview that you should do before the upgrade and how to convert 32 bit to 64 bit Windows 7/8/10. Just follow the above guides to start the upgrade operation. Remember to leave a comment below or contact [email protected] if you have any different idea or question when you change 32 bit to 64 bit.
Upgrade Windows 10 32 Bit to 64 Bit FAQ
Can I change from 32 bit to 64 bit?
If you are running the 32-bit version of Windows 10/8/7, you can upgrade to the 64-bit version and no new license is required. But you should ensure the processor is compatible and memory is enough. To do this upgrade, a clean install should be performed and there is no direct upgrade path.
Is there a 32-bit version of Windows 10?
If you upgrade to Windows 10 from the 32-bit version of Windows 7 or 8.1, Microsoft automatically gives you the 32-bit version of Windows 10.
Is 32 bit obsolete?
The 32-bit versions of the Windows operating system are already out-of-date in the field of traditional desktops and laptops. New computers almost always come with a 64-bit processor, even with a 64-bit Intel’s Core M processors. But for smartphones or tablets, 32-bit systems have held out longer.
Which is better 32 bit or 64 bit?
In short, 64-bit is better than 32-bit since it can handle more data at once while the 32-bit version is limited to 4GB of RAM.