
Are you still worried about the Windows Defender blocked by Group Policy error? You don’t need to worry about it after reading this article because you can find several efficient solutions to fix the Windows Defender blocked by Group Policy error. In addition, you can find a piece of powerful software to back up your operating system – MiniTool software.
The Windows Defender is the built-in antivirus software of Microsoft, which is designed to help you to protect your computers and data. However, there might be some errors with the Windows Defender so that your PCs may be in danger.
And the Windows Defender is turned off by Group Policy error is one of the most common Windows Defender errors. This error often occurs when you install malware by chance or other antivirus software. Coincidentally, if you turn off the Windows Defender by chance, then the error will occur.
So how to fix the Windows Defender blocked by Group Policy error? Keep reading, then the following paragraphs will tell you 6 efficient and convenient solutions to solve this problem. And all the operations are done on Windows 10 PC.
Tip: If you are looking for the methods to fix the error code 0x800704ec when running Windows Defender, then you can click here to find the answer.
Quick Video Guide:
Method 1: Turn on the Windows Defender from the Settings
The first method you should try to fix the Windows Defender turned off by Group Policy error is to turn on Windows Defender.
This method is really easy and you can follow the steps below to enable it from the Settings app.
Step 1: Open Settings to choose Update & Security to continue.
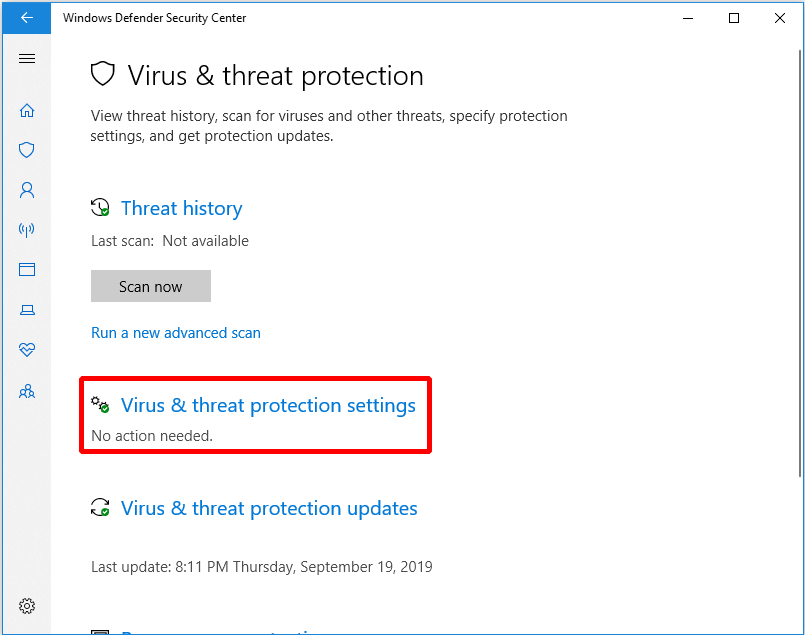
Step 2: Select Windows Security and then click Virus & threat protection under Protection areas option to continue.
Step 3: In the pop-out window, click Virus & threat protection settings to continue.
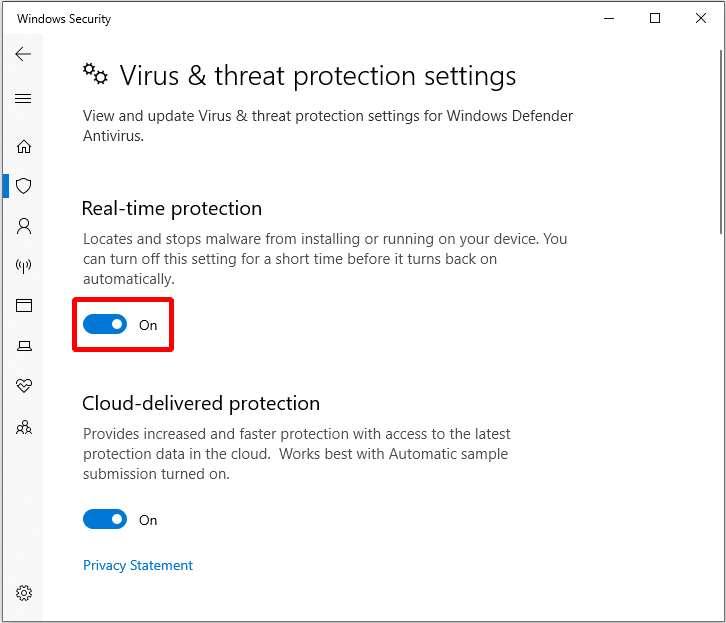
Step 4: Find Real-time protection and then turn on it, then click Yes.
After you have finished these steps, you have turned on the Windows Defender and your computer will be protected. Then you can reboot your computer to check whether the Windows Defender turned off by Group Policy error still exits.
Method 2: Use Registry Editor
You can also use Registry Editor to fix the Windows Defender blocked by Group Policy error.
Now I will introduce the method to you step by step.
Step 1: Press Win key and R key at the same time to open the Run box to continue.
Step 2: Enter regedit in the box, then click OK and then click Yes to continue.
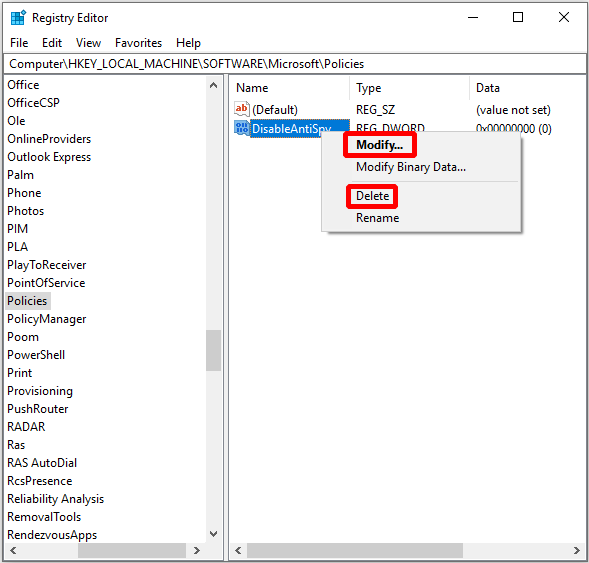
Step 3: In the newly pop-out window, find Windows Defender folder based on the path: Computer\HKEY_LOCAL_MACHINE\SOFTWARE\Policies\Microsoft\Windows Defender to continue.
Step 4: Right-click DisableAntiSpy (the type shows REG_DWORD) to choose Delete.
After finishing these steps, restart your PC to see if the Windows Defender blocked by Group Policy error is fixed.
Method 3: Change Group Policy Settings
Is Windows Defender blocked by Group Policy Windows 10? You can try this method to fix this error, but you are supposed to log in as an administrator.
Now follow the instructions to change the Settings of Group Policy to fix the Windows Defender blocked by Group Policy error.
Step 1: Press Win key and R key at the same time to open the Run dialogue to continue.
Step 2: Enter gpedit.msc in the box and click OK to continue.
Step 3: In the Local Group Policy Editor, go to Local Computer Policy > Administrative Templates > Windows Components > Windows Defender Antivirus to continue.
Step 4: Double click Turn off Windows Defender Antivirus in the right panel to open a new window.
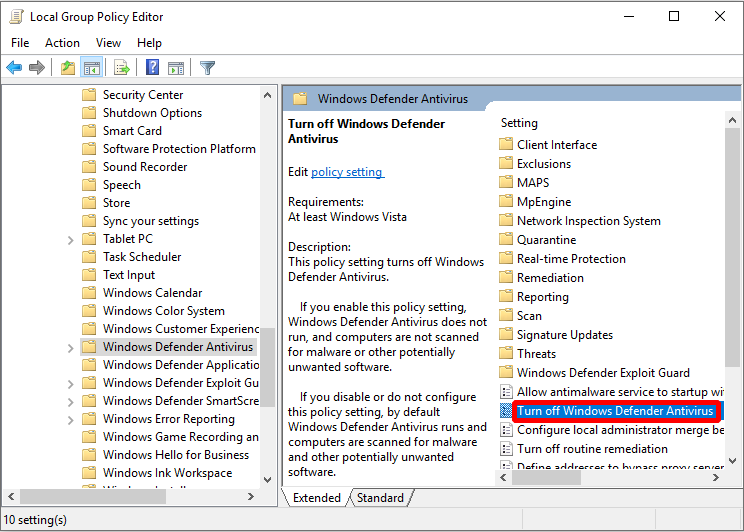
Step 5: Choose Disabled and click Apply and OK to save the changes.
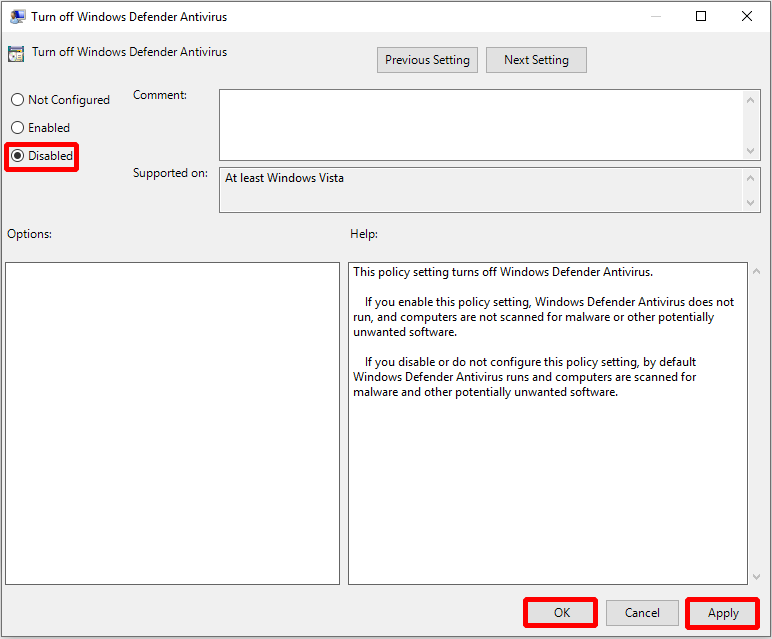
When all steps have been finished, reboot your PC to check whether the Windows Defender blocked by Group Policy error is solved.
Method 4: Enable Windows Defender Service
Only when certain services are enabled, Windows can work properly. Thus, if there is an error with Windows Defender service, then you may get an error message saying that the Windows Defender is turned off by Group Policy.
In this case, you can easily fix the problem by enabling Windows Defender service. Here is the tutorial:
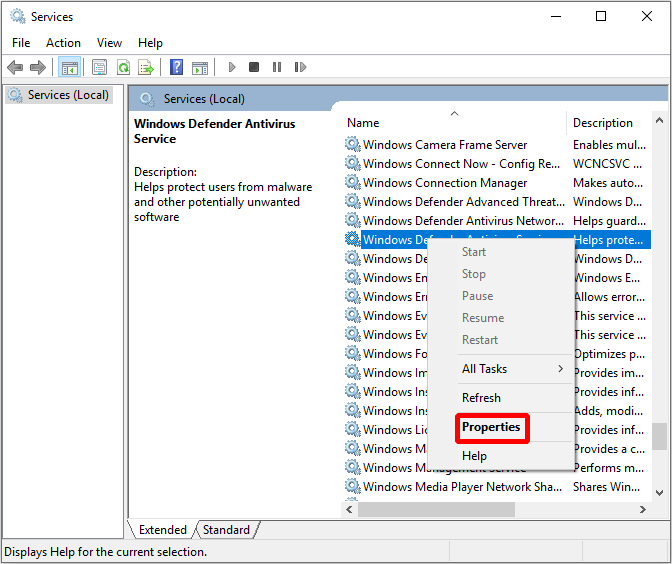
Step 1: Press Win key and R key at the same time to open Run box to continue.
Step 2: Enter services.msc and then click OK to continue.
Step 3: In the pop-out window, find the Windows Defender Antivirus Service and then double click it to choose Properties to continue.
Step 4: In the newly pop-out window, choose the General tab, set the Startup type to Automatic and then click Start button under Service status section. Then click Apply and OK to save the settings.
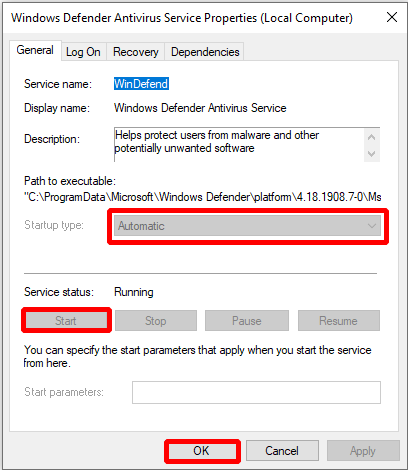
When you enable the Windows Defender service, the error should be fixed and you can run Windows Defender normally.
Method 5: Uninstall Malware and Third-Party Antivirus Software
Sometimes, the Windows Defender blocked by Group Policy error may appear because of malware infection or third-party antivirus software.
Some malware has the capabilities to get the administrative privileges on your computer and it will disable the Windows Defender from Group Policy. Therefore, in order to fix the Windows Defender blocker by Group Policy error, just run an anti-malware to scan your computer. If there is any malware, the anti-malware tool will find it out and delete automatically.
If you have installed any other third-party antivirus software, the Windows Defender may be turned off by itself. So if you want to fix the Windows Defender blocked by Group Policy error, you need to remove the third-party antivirus.
Tip: If there are some leftover files or registry entries of the antivirus, then the Windows Defender can still be interfered with them and the error will happen again. So you’d better download a dedicated uninstaller for your antivirus to clear them completely.
You can go to Control Panel > Programs > Programs and Features, then find the antivirus and then right-click it to choose Uninstall.
After you have uninstalled malware and third-party antivirus, you may be able to boot the Windows Defender normally.
Method 6: Switch to Third-party Antivirus
Although Windows Defender is a piece of powerful and secure antivirus, if you cannot fix the Windows Defender blocked by Group Policy error, you can switch to third-party antivirus. And this method can also protect your computer and data.
Besides, there are some advanced features of some third-party antivirus, which may be more useful than the Windows Defender. So if the Windows Defender blocked by Group Policy error cannot be fixed, you should try to use third-party antivirus.
Click to Tweet
Useful Suggestion
Windows Defender is an anti-virus software that can help your computer avoid virus attacks or malware. But as this article says, sometimes Windows Defender is blocked by Group Policy for some reason. So in order to better ensure computer security, you had better back up your computer.
Tip: If you want to recover lost data due to system crashes, then you can read this post – How To Recover Data From Hard Disk Without OS – Analysis & Tips.
Backing up the system allows you to use the system image to restore the system in the event of a system crash or other errors, eliminating the need to reinstall the system. But how to back up the operating system quickly and safely?
Speaking of backing up the system, I have to introduce a piece of super practical and professional backup and restore software to you – MiniTool ShadowMaker. Using this piece of software to back up the system will save you many troubles.
There are lots of useful features of the software. I will list some features.
- Backup feature: You can use it to back up files and folders, disks and partitions, the operating system.
- Restore feature: You can use it to restore everything you have backed up before.
- Sync feature: You can use it to sync files and folders to more than one place.
- Disk Clone feature: You can use it to make an external hard drive bootable and even clone simple volumes in the dynamic disks.
In addition to the efficient features mentioned above, there is another advantage that you should try to use the software – you can use the software for free within 30 days, so just download it and have a try.
MiniTool ShadowMaker TrialClick to Download100%Clean & Safe
Here is the way to back up the operating system using MiniTool ShadowMaker.
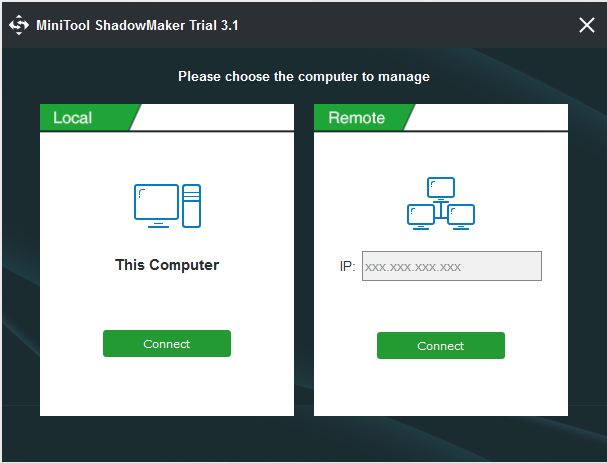
Step 1: Launch MiniTool ShadowMaker and click Keep Trial to continue.
Step 2: Choose whether to manage a local or remote computer to get the main interface by clicking Connect.
Note: If you want to manage a remote computer, then computers need to be on the same LAN and the IP address of the remote computer is needed.
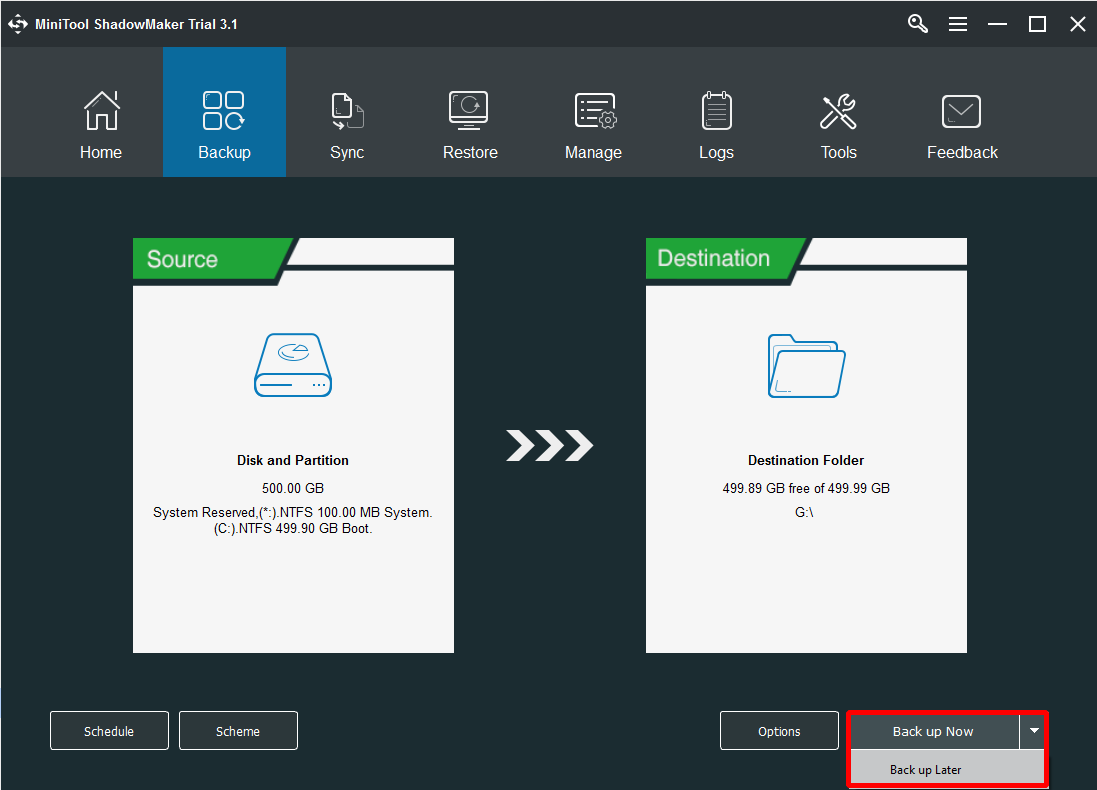
Step 3: Go to the Backup page. In default, MiniTool ShadowMaker backs up the operating system and selects the destination automatically. But if you want to change the source and destination, you can click Source and Destination.
Tip: There are five different locations for you to back up data: Administrative, Libraries, Computer, Network and Shared.
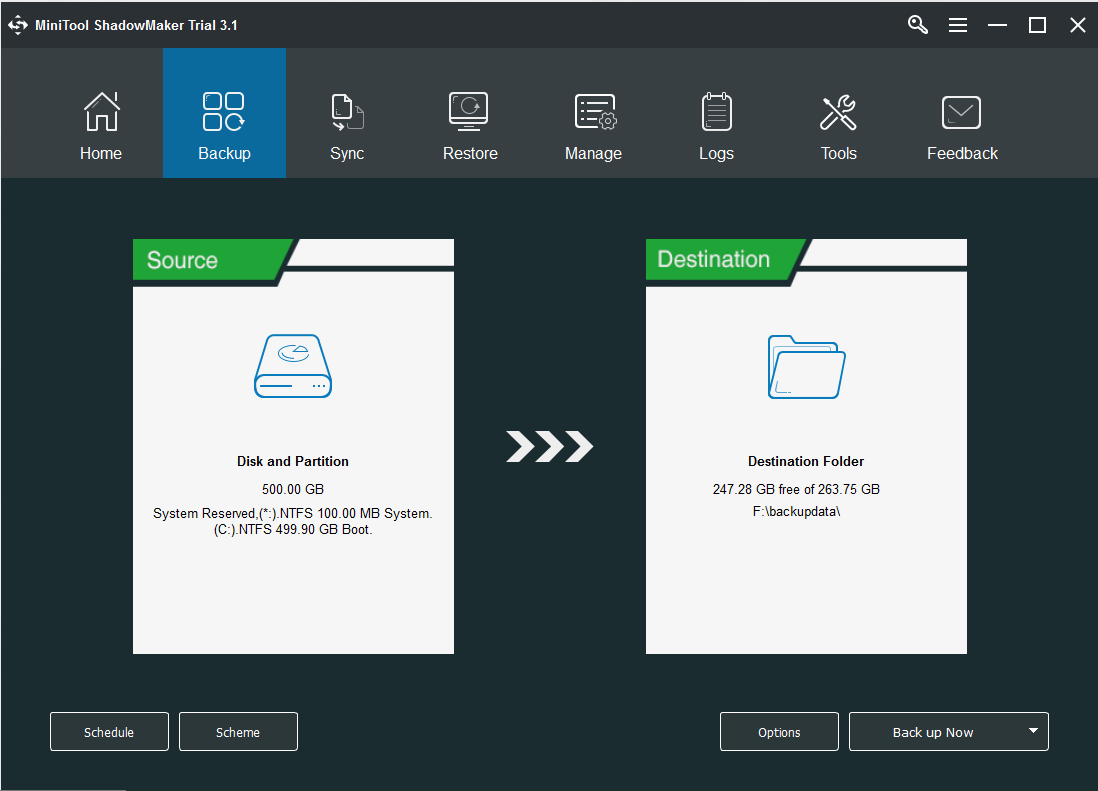
Under the Backup page, you can notice that there are three buttons, each of them is pretty useful for you to protect your computer and data better.
- Schedule is aimed at setting automatic backup.
- Scheme is aimed at setting different backup schemes: Full backup, Incremental backup and Differential backup.
- Options is aimed at setting some advanced parameters, such as adding comments to backups, setting encryption mode, shutting down after successful backup, etc.
Step 3: After you have confirmed the backup source and backup destination, click Back up Now to begin the backup.
Tip: If you click Back up Later, then you need to click Back up Now to restart the backup task on the Manage page.
Then just wait for MiniTool ShadowMaker to finish the operating system backup.
And there is another necessary thing you need to do to avoid failing to start your PC – create bootable media, you can use the Media Builder feature under Tools page to do it.
Final Words
Once you encounter the Windows Defender blocked by Group Policy error, you should try the methods mentioned from this article to fix it. And in order to keep your computer safer, you’d better try to back up the operating system. MiniTool ShadowMaker is really a good choice for you to back up the system.
If you have any better advice to solve the Windows Defender turned off by Group Policy error or have any confusion about the methods, leave a comment below or send an email to [email protected].
Время на прочтение3 мин
Количество просмотров1.4M
В Windows 10 имеется встроенный антивирус Windows Defender («Защитник Windows»), защищающий компьютер и данные от нежелательных программ: вирусов, шпионских программ, программ-вымогателей и многих других типов вредоносных программ и действий хакеров.
И хотя встроенного решения для защиты достаточно для большинства пользователей, бывают ситуации, в которых вы можете не захотеть пользоваться этой программой. К примеру, если вы настраиваете устройство, которое не будет выходить в сеть; если вам необходимо выполнить задачу, блокируемую этой программой; если вам нужно уложиться в требования политики безопасности вашей организации.
Единственная проблема связана с тем, что полностью удалить или отключить Windows Defender у вас не выйдет – эта система глубоко интегрирована в Windows 10. Однако есть несколько обходных путей, при помощи которых вы можете отключить антивирус – это использование локальной групповой политики, реестра или настроек Windows в разделе «Безопасность» (временно).
Как отключить Защитник Windows через настройки безопасности Windows
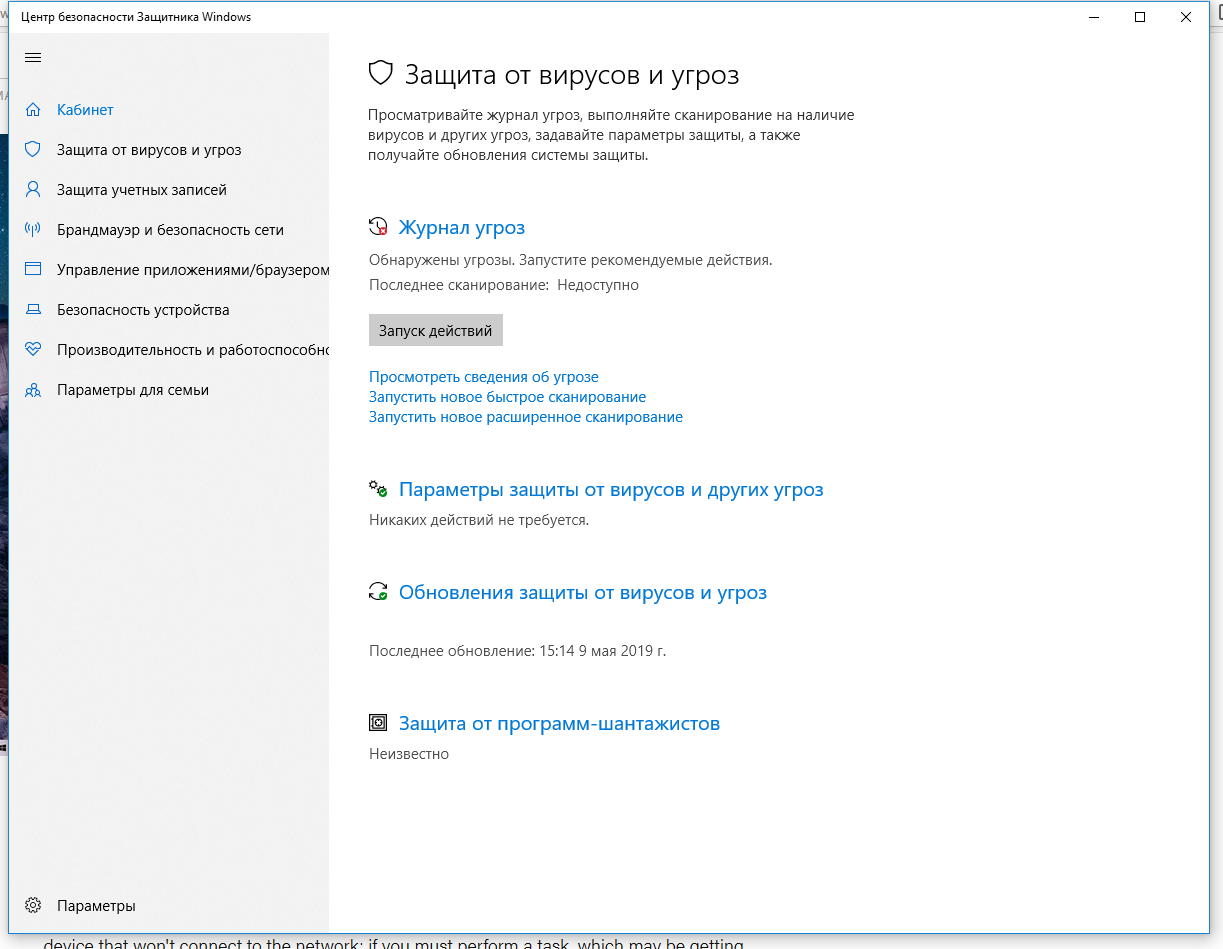
Если вам нужно выполнить определённую задачу, и не нужно отключать Защитника полностью, вы можете сделать это временно. Для этого при помощи поиска в кнопке «Пуск» найдите раздел «Центр безопасности Защитника Windows», и выберите в нём пункт «Защита от вирусов и угроз».
Там перейдите в раздел «Параметры защиты от вирусов и других угроз» и кликните по переключателю «Защита в режиме реального времени».
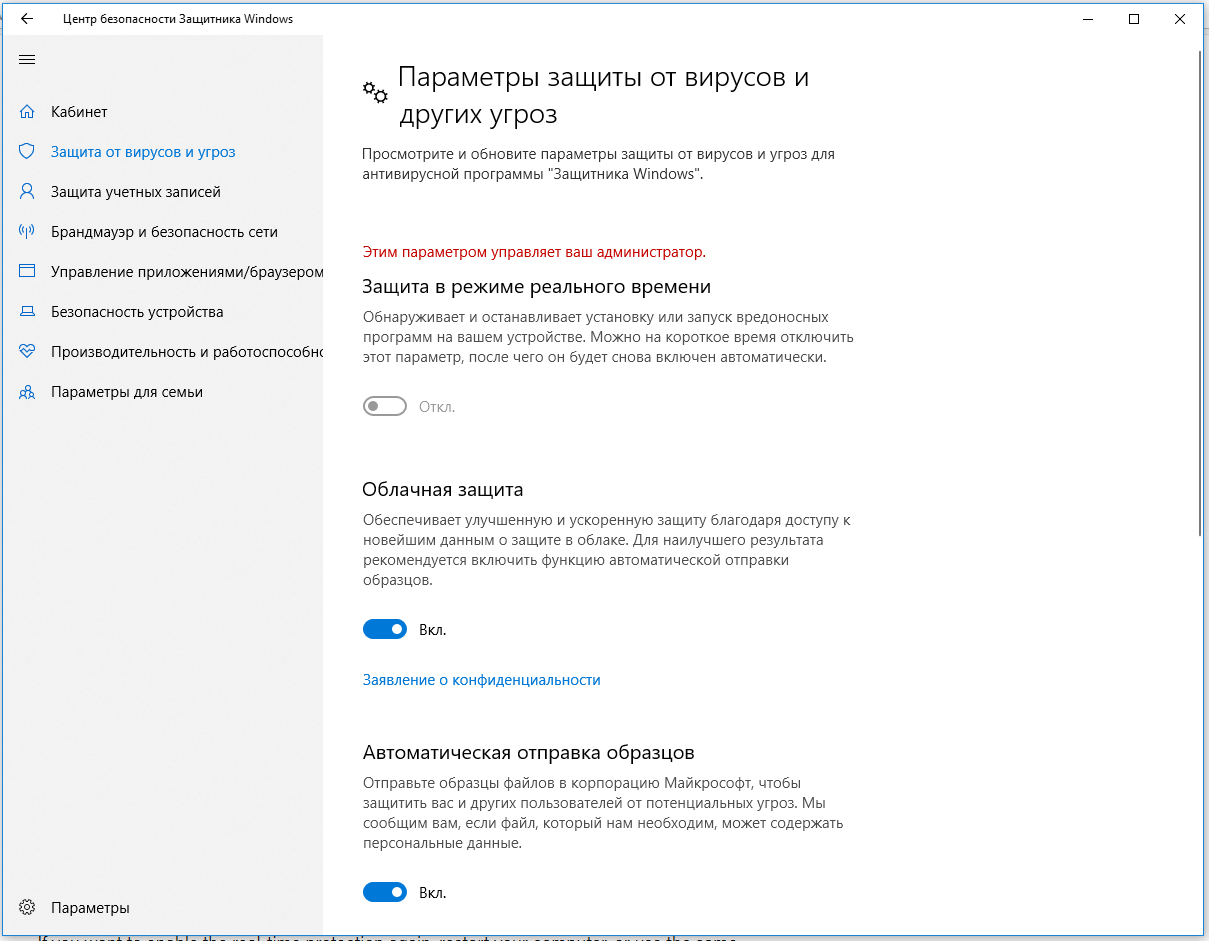
После этого антивирус отключит защиту компьютера в реальном времени, что позволит вам устанавливать приложения или выполнять определённую задачу, которая была недоступна вам из-за того, что антивирус блокировал необходимое действие.
Чтобы снова включить защиту в реальном времени, перезапустите компьютер или заново пройдите все этапы настроек, но на последнем шаге включите переключатель.
Это решение не является постоянным, но лучше всего подходит для отключения антивируса Windows 10 для выполнения определённой задачи.
Как отключить Защитник Windows через групповые политики
В версиях Windows 10 Pro и Enterprise вам доступен редактор локальных групповых политик, где можно навсегда отключить Защитника следующим образом:
Через кнопку «Пуск» запустите исполняемый скрипт gpedit.msc. Откроется редактор политик. Перейдите по следующему пути: Конфигурация компьютера > Административные шаблоны > Компоненты Windows > Антивирусная программа «Защитник Windows».

Двойным нажатием откройте пункт «Выключить антивирусную программу „Защитник Windows“». Выберите настройку «Включено» для включения этой опции, и, соответственно, отключения Защитника.
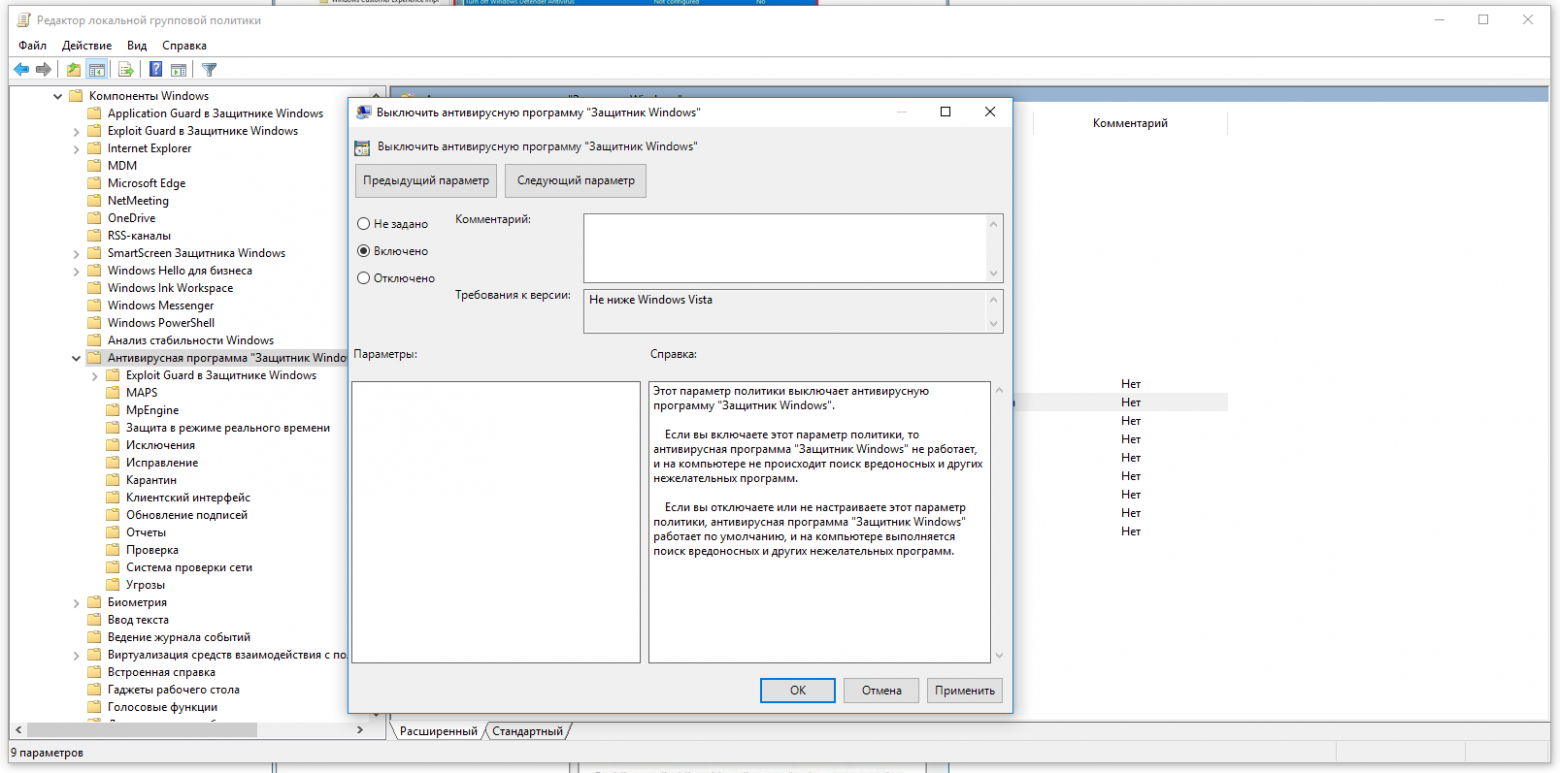
Нажмите «ОК» и перезапустите компьютер.
После этого антивирус будет навсегда отключён на вашем устройстве. Но вы заметите, что иконка со щитом останется в панели задач – так и должно быть, поскольку эта иконка принадлежит к приложению «Безопасность Windows», а не самому антивирусу.
Если вы передумаете, вы всегда можете заново включить Защитника, повторив эти шаги, и на последнем шаге выбрав вариант «Не задано», после чего снова нужно будет перезагрузить компьютер.
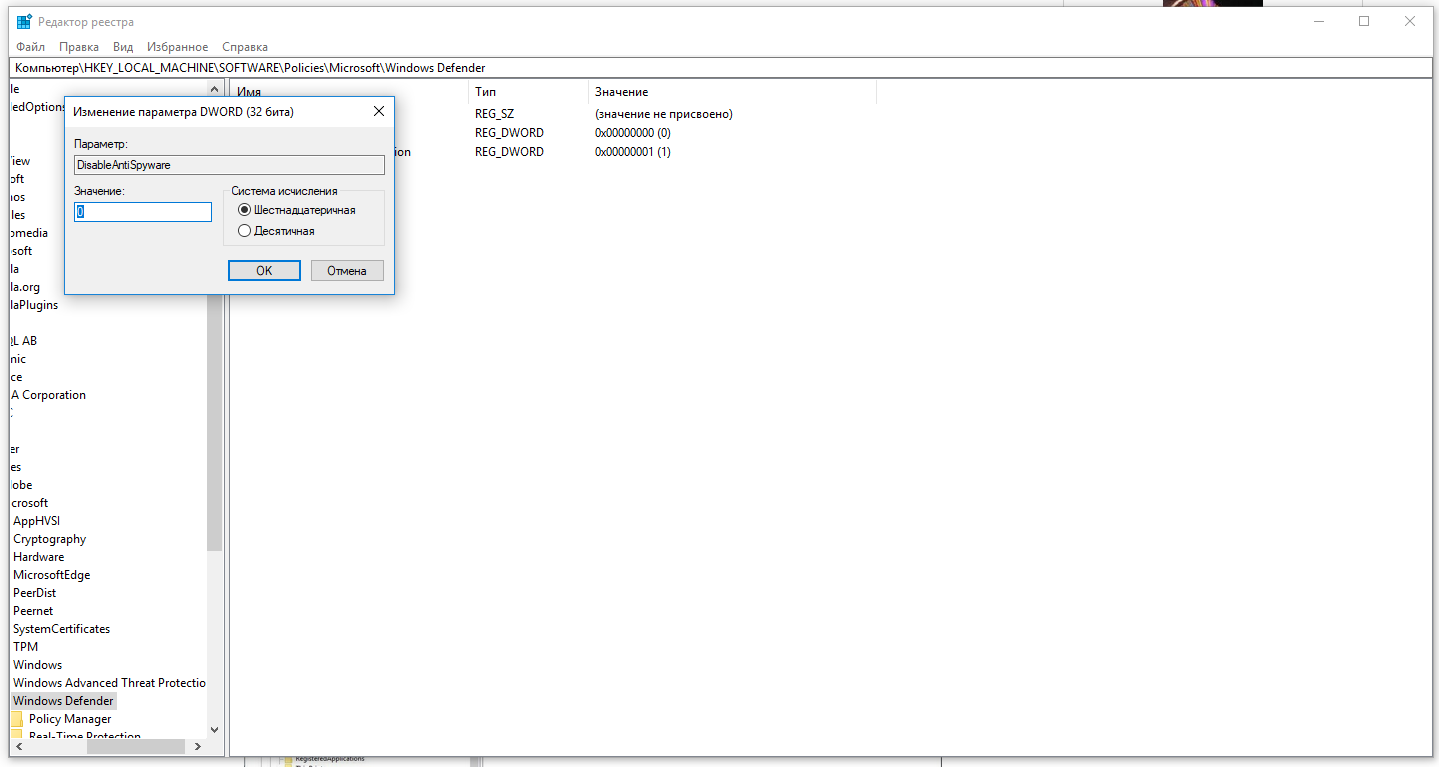
Как отключить Защитник Windows через реестр
Если у вас нет доступа к редактору политик, или у вас установлена Windows 10 Home, вы можете отредактировать реестр Windows, отключив тем самым Защитника.
Напоминаю, что редактировать реестр рискованно, и ошибки в этом деле могут нанести непоправимый ущерб текущей установленной копии Windows. Лучше сделать резервную копию системы перед тем, как начинать редактирование.
Чтобы полностью отключить Защитиника через реестр, запустите через кнопку «Пуск» программу regedit, и перейдите в ней по следующему пути:
HKEY_LOCAL_MACHINE\SOFTWARE\Policies\Microsoft\Windows Defender
Совет: этот путь можно скопировать и вставить в адресную строку редактора реестра.
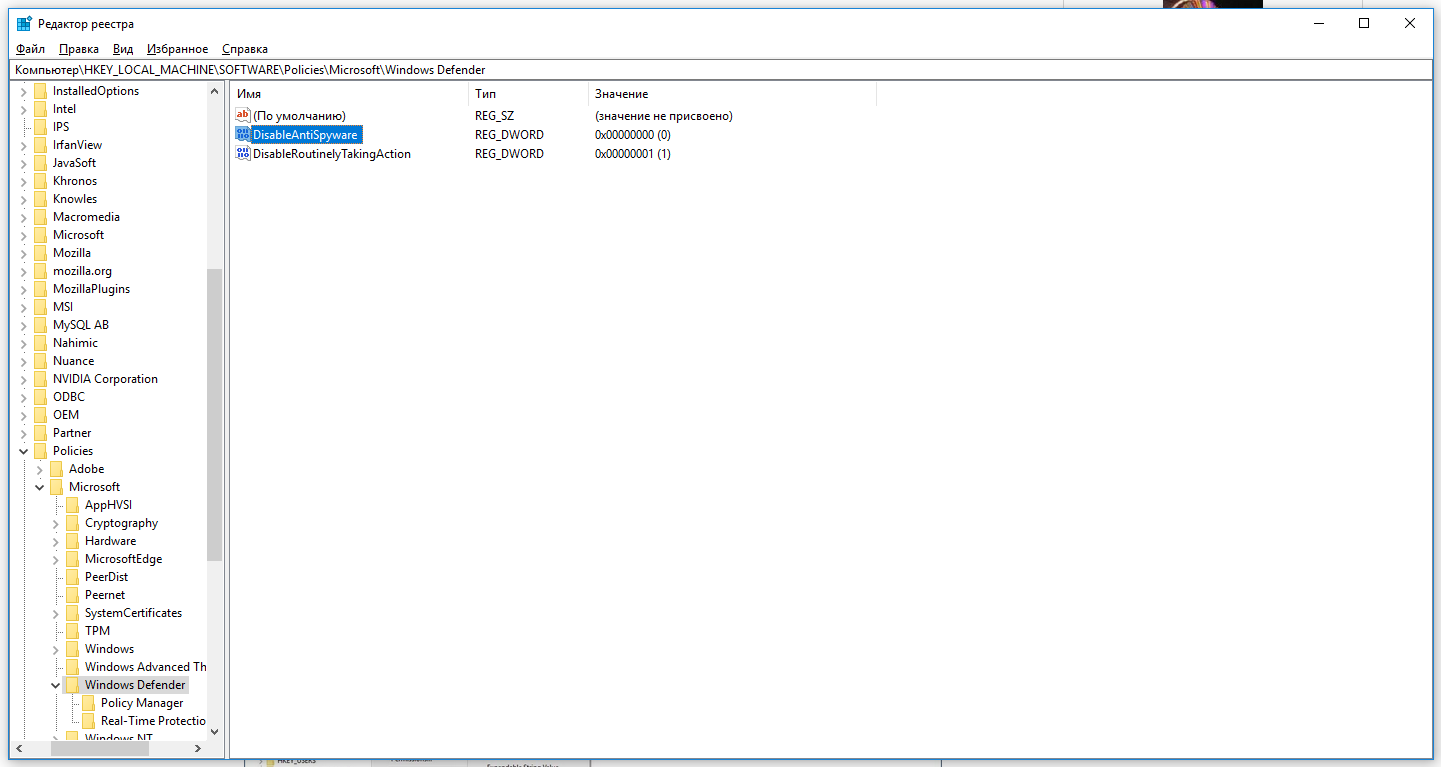
Затем правой клавишей нажмите на ключ (каталог) Windows Defender, выберите «Новый» и DWORD (32-bit) Value. Назовите новый ключ DisableAntiSpyware и нажмите «Ввод». Затем двойным щелчком откройте редактор ключа и задайте ему значение 1.
Нажмите ОК, и перезапустите компьютер.
После этого Защитник Windows уже не будет защищать вашу систему. Если вы захотите отменить эти изменения, повторите все шаги, но в конце удалите этот ключ или назначьте ему значение 0.
Рекомендации
Несмотря на наличие нескольких методов отключения Защитника Windows, мы не рекомендуем использовать компьютер вообще без антивирусных программ. Однако вы можете столкнуться с ситуациями, в которых отключение этой функции будет лучшим вариантом. А если вы устанавливаете стороннюю программу-антивирус, вам не нужно отключать Защитника вручную, поскольку во время установки он отключится автоматически.
Если эта публикация вас вдохновила и вы хотите поддержать автора — не стесняйтесь нажать на кнопку
Если встроенный антивирус Microsoft Defender (Защитник Windows) не обновляется автоматически, рекомендуем воспользоваться методикой диагностики и исправления типовых ошибок, предложенная в этой статье.
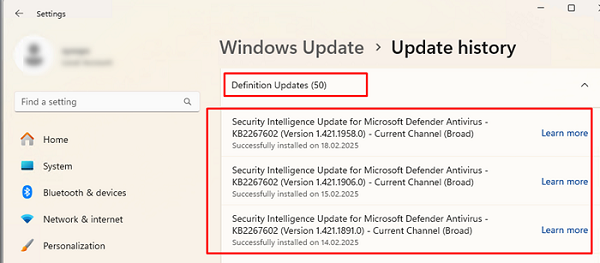
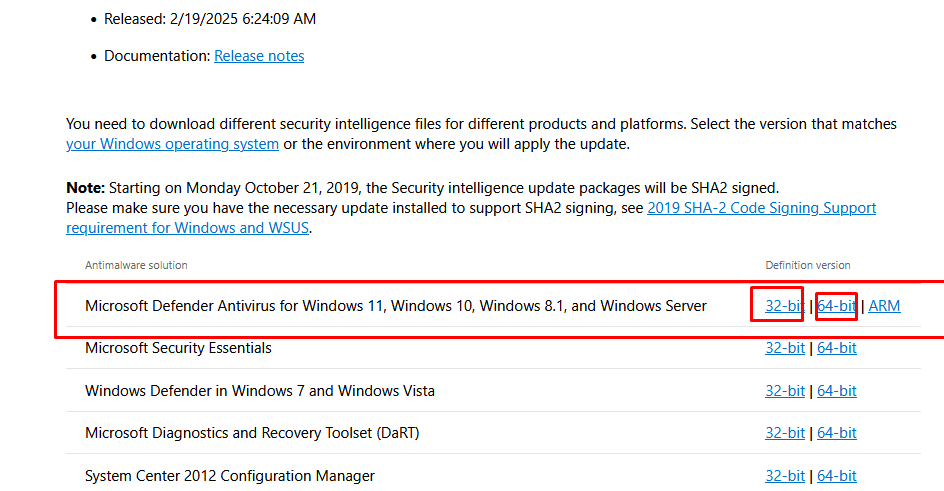
Прежде чем приступить, нужно отметить, что в Windows 10 и 11 по умолчанию работают два механизма обновления файлов движка Microsoft Defender и обновлений антивирусных баз:
- Обновления Windows Defender скачиваются и устанавливаются компьютером автоматически через механизм Windows Update. Откройте историю установки обновлений в панели управления Windows (
ms-settings:windowsupdate-history
). Обратите внимание на периодически устанавливаемое обновление Security Intelligence Update for Microsoft Defender Antivirus — KB2267602 (Version xxxxxx) — Current Channel (Broad) в разделе Definition Updates, которое компьютер получает через Windows Update или сервер обновлений WSUS. Обновление KB2267602 включает в себя как обновление антивирусных базы, так и движка антивируса. Если служба Windows Update на компьютере отключена, то антивирус все равно будет обновляться с помощью встроенного механизма.
- Движок Windows Defender регулярно проверяет наличие новых антивирусных баз на серверах Microsoft и обновляет их самостоятельно.
Если при обновлении антивируса через Windows Updateв, вы обнаружили что обновление KB2267602 не скачивается (загрузка зависает на
0%
), или при установке обновления появляются ошибки (
80072f8f
, или
0x80072ee2
), рекомендуем проверить доступ в интернет, настройки политик Windows Update на компьютере, или при необходимости сбросить настройки службы Windows Update. Но на самом деле Windows Update это не основной способ обновления баз антивируса.
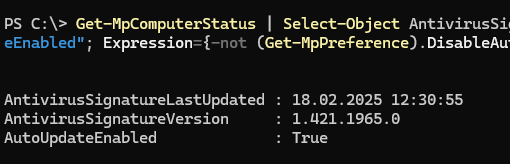
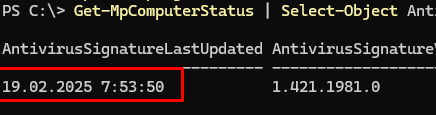
Чтобы проверить время последнего обновления антивирусных баз Defender, и включено ли автоматическое обновление, выполните команду:
Get-MpComputerStatus | Select-Object AntivirusSignatureLastUpdated, AntivirusSignatureVersion, @{Name="AutoUpdateEnabled"; Expression={-not (Get-MpPreference).DisableAutoUpdate}}|fl
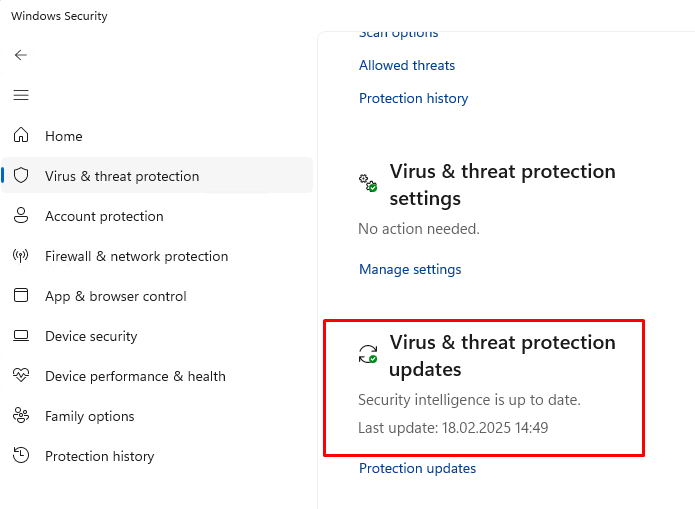
В Windows 10/11 и Windows Server 2025/2022, для управления встроенным антивирусом используется UWP приложение Windows Security. Открыть его можно из панели Settings или с помощью команды
ms-settings:windowsdefender
.
Информация о версии антивирусных баз и времени последнего обновления указана в разделе Virus and threat protection updates.
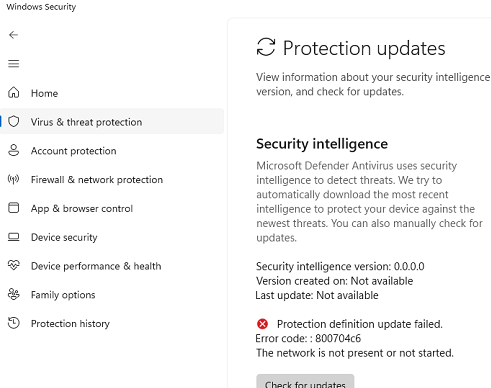
Если встроенный механизм обновления Microsoft Defender не работает, здесь будет ошибка:
Не удалось обновить определение системы защиты
Protection definition update failed (800704с6)
Рассмотрим, как продиагностировать и исправить типовые проблемы с обновлением антивирусных баз.
В настройках Защитника Windows настроена частота запуска задания обновления. Проверьте, что оба эти параметра заданы:
Get-MpPreference | Select-Object SignatureScheduleDay, SignatureScheduleTime
Проверьте, что Защитник Windows не отключен, и его службы запущены:
get-service WdNisSvc, WinDefend, wscsvc | select name,status,starttype
Попробуйте обновить определения антивирусных баз вручную с помощью команды:
"%ProgramFiles%\Windows Defender\MpCmdRun.exe" -SignatureUpdate
Если при обновлении базы появится ошибка, подробнее о ней можно прочитать в логе
%userprofile%\AppData\Local\Temp\MpCmdRun.log
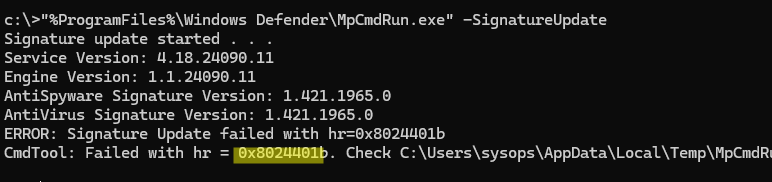
Например, ошибка 0x8024401b указывает, что компьютер не может подключиться к серверам обновлений Microsoft.
Search Started (MU/WU update) (Path: https://fe2cr.update.microsoft.com/v6/ )...
Update failed with hr: 0x8024401b
Это указывает на то, что компьютер находится в изолированной среде (без подключения к интернету), или доступ в интернет ограничен настройками прокси-сервера или файрвола.
Проврёте доступность сервера обновления Microsoft с компьютера с помощью команды Test-NetConnection:
tnc fe2cr.update.microsoft.com -port 443
В моем случае в настройках WinHTTP прокси оказался задан некорректный адрес. Вывести настройки прокси:
netsh winhttp show proxy
Сбросить настройки системного прокси (будет использоваться прямой доступ):
Netsh winhttp reset proxy
В некоторых случаях, Defender может перестать получать обновления, если текущие базы повреждены. Попробуйте сбросить текущую базу определений и выполнить онлдайн обновление:
"%ProgramFiles%\Windows Defender\MpCmdRun.exe" -removedefinitions -all
Выполните обновление баз:
Update-MpSignature -Verbose
VERBOSE: Virus and spyware definitions update was completed successfully.

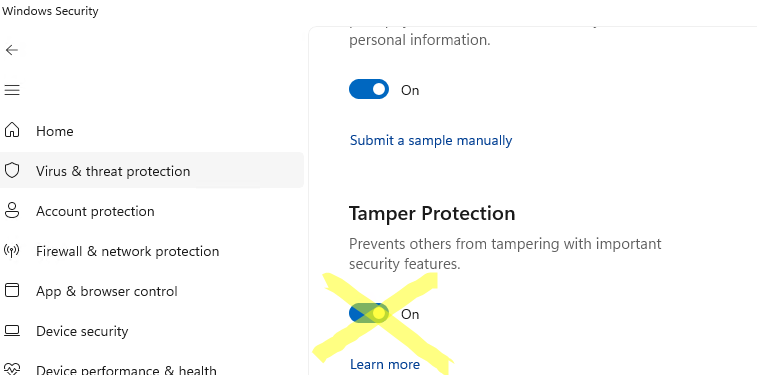
Если при сбросе появилась ошибка 0x80070005 (Access Denied), значит нужно временно отключить параметр Tamper Protection из графического интерфейса Windows Security.
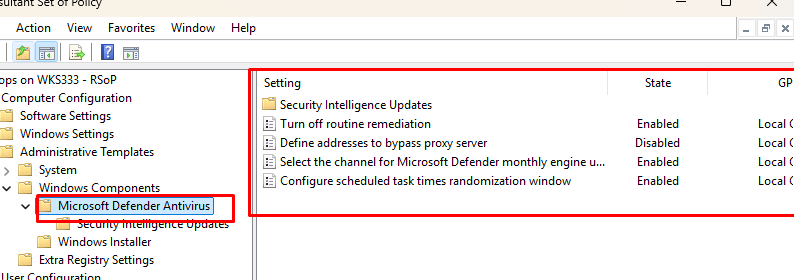
Проверьте, есть ли на компьютере какие-либо настройки антивируса Windows Defender, заданные через групповые политики. Чтобы получить отчет с результирующими настройками GPO, выполните команду
rsop.msc
.
Если на компьютере какие-то настройки применяются через GPO, они будут отображены в секции Computer Configuration -> Administrative Templates -> Windows Components -> Microsoft Defender Antivirus. Проанализируйте какие параметры включены и для чего (по умолчанию ничего не должно быть задано). Если нужно, отредактируйте локальную GPO с помощью редактора gpedit.msc или сбросьте настройки локальных политик.
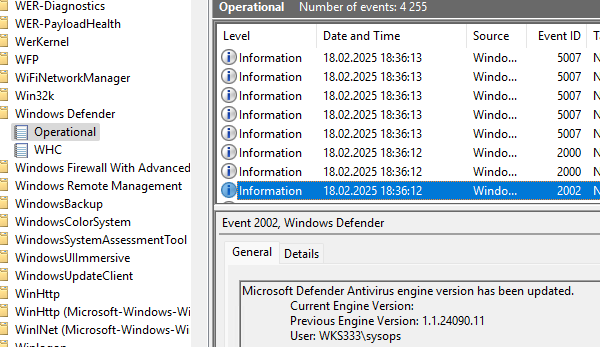
При диагностике ошибок полезно изучить логи событий антивируса в журнале Event Viewer: Applications and Services Logs -> Microsoft -> Windows -> Windows Defender -> Operational. Например, событие с Event ID 2002 указывает на успешное обновление антивируса.
В некоторых случаях исправить проблему с обновлением может ручная установка антивирусных баз Microsoft Defender.
- Перейдите по ссылке https://www.microsoft.com/en-us/wdsi/defenderupdates и скачайте файл mpam-fe.exe с обновлениями Microsoft Defender Antivirus для вашей версии ОС.

- Сбросьте настройки:
cd %ProgramFiles%\Windows Defender
MpCmdRun.exe -removedefinitions -all - Запустите файл mpam-fe.exe с правами администратора.
- Проверьте, что дата последнего антивирусных баз обновлена:
Get-MpComputerStatus | Select-Object AntivirusSignatureLastUpdated, AntivirusSignatureVersion
Application updates are always provided to help in patching security flaws and improving stability. The Windows Media Player has a feature that periodically checks for the latest updates. Even if you are not using the Windows Media Player, some components that run Windows Media Player are used by other programs on the system. However, not every user would want this feature enabled for their Windows Media Player. In this article, we will provide you with the methods that can help you in enabling or disabling the automatic updates for Windows Media Player.
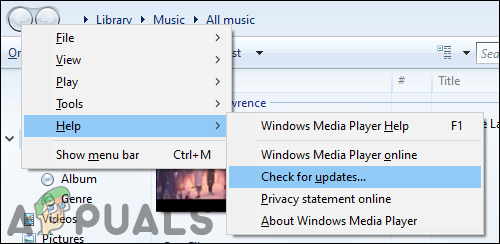
Stopping Windows Media Player from Periodically Checking for Updates
By default, this feature will be enabled on your system and that is why we will be focusing on disabling it in this article. There are several different reasons for stopping the automatic updates for the Windows Media Player. Some users have limited internet and others want to update the applications manually. The automatic updates for Windows Media Player can be stopped by using the Group Policy setting.
However, the Group Policy Editor isn’t available for Windows Home editions. That is why we are also including the Registry Editor method for the Windows Home users. Both do the same job of enabling and disabling the automatic updates for Windows Media Player.
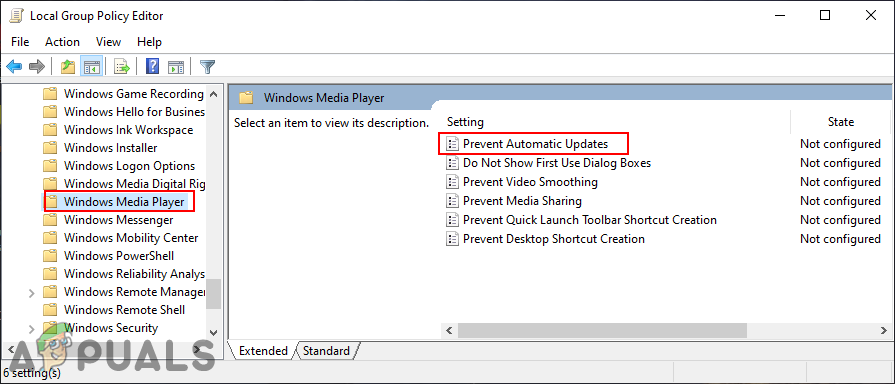
Method 1: Using the Local Group Policy Editor
The Group Policy Editor is an administration tool that helps in configuring many important settings of the operating system. There is a specific policy setting through which you can enable or disable the automatic updates for Windows Media Player. This setting can only be found in the Computer Configuration category of the Group Policy. Follow the below steps to enable or disable this setting:
- First, open a Run dialog by pressing the Windows + R keys combination on your keyboard. Now type “gpedit.msc” in the box and press the Enter key to open the Local Group Policy Editor.
Opening the Local Group Policy Editor - In the Computer Configuration category, navigate to the following setting:
Computer Configuration\ Administrative Templates\ Windows Components\ Windows Media Player\

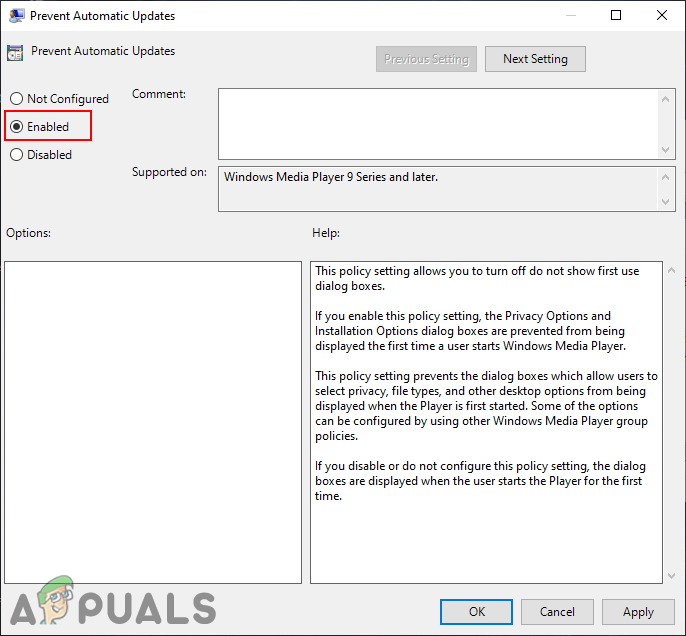
Navigating to the setting - Open a setting named “Prevent Automatic Updates” by double-clicking on it. This will open the setting in another window and then change the toggle option to Enabled.

Enabling the setting - Now click on the Apply/Ok button to save the changes. This will disable the automatic checking for updates in Windows Media Player.
- You can always revert this back by navigating to the same setting and changing the toggle option back to Not Configured.
Method 2: Using the Registry Editor
The Windows Registry Editor is another tool that administrators can use to modify the low-level settings for their operating system. It contains all the information that Windows continually references during operations. However, incorrect modification in the Registry can cause serious problems. Therefore, we always recommend users to follow the steps carefully and create a backup of their Registry before making any new changes.
- First, open up a Run dialog box by pressing the Windows and R keys together. Then type “regedit” and press the Enter key to open the Registry Editor. Click on the Yes button for the UAC (User Account Control) prompt.
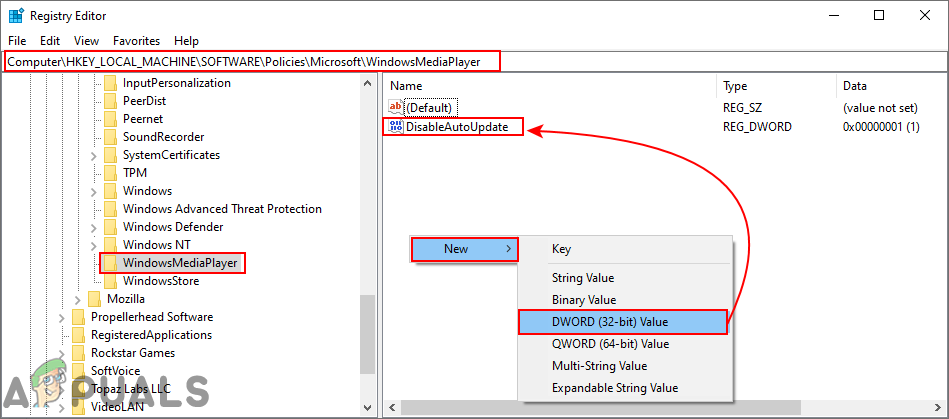
Opening the Registry Editor - In the Local Machine hive, navigate to the following key:
HKEY_LOCAL_MACHINE\Software\Policies\Microsoft\WindowsMediaPlayer
- In the WindowsMediaPlayer key right-click on the right pane and choose the New > DWORD (32-bit) Value option. Name this value as “DisableAutoUpdate“.

Creating a new value - Open this value by double-clicking on it and change the value data to 1 to enable it.
Changing the value data - Finally, you need to restart your system to apply these changes. This will disable the auto-update for Windows Media Player.
- You can always revert back these changes by simply changing the value data to 0 or removing the value from the Registry.
Kevin Arrows
Kevin Arrows is a highly experienced and knowledgeable technology specialist with over a decade of industry experience. He holds a Microsoft Certified Technology Specialist (MCTS) certification and has a deep passion for staying up-to-date on the latest tech developments. Kevin has written extensively on a wide range of tech-related topics, showcasing his expertise and knowledge in areas such as software development, cybersecurity, and cloud computing. His contributions to the tech field have been widely recognized and respected by his peers, and he is highly regarded for his ability to explain complex technical concepts in a clear and concise manner.
In the ever-evolving landscape of cybersecurity, staying ahead of threats means regularly updating security intelligence. For Windows environments, this is particularly true for Windows Defender, Microsoft’s integrated antivirus and anti-malware solution. As a system administrator, one of your key responsibilities is ensuring that these updates occur frequently and consistently across all systems. This can be efficiently managed through Group Policy. This detailed guide will walk you through creating a Group Policy Object (GPO) to define how often security intelligence updates should be checked and applied for Windows Defender.
Understanding the Importance of Regular Security Intelligence Updates
Security intelligence updates are crucial for antivirus software like Windows Defender. They contain the latest information about malware and other threats, ensuring that the software can detect and protect against them effectively. Regular updates are vital to maintain an effective defense against emerging threats.
Prerequisites
- Administrative Access: You need administrative privileges in your Active Directory (AD) environment.
- Group Policy Management Console (GPMC): A tool for managing Group Policies, which must be installed and accessible.
Step-by-Step Instructions
Step 1: Accessing Group Policy Management Console
Launch GPMC by typing “Group Policy Management” in the Start menu search or by running gpmc.msc.
Step 2: Create or Edit a Group Policy Object
- To create a new GPO, right-click on the domain or an Organizational Unit (OU) and select “Create a GPO in this domain, and Link it here…”.
- To modify an existing GPO, find it under the appropriate domain or OU, right-click on it, and choose “Edit”.
Step 3: Navigate to Windows Defender Antivirus Settings
In the Group Policy Management Editor, go to: Computer Configuration → Policies → Administrative Templates → Windows Components → Microsoft Defender Antivirus → Signature Updates.
Step 4: Configure Update Frequency
- Look for the policy named “Specify the interval to check for Security Intelligence updates”.
- Set the policy to “Enabled”.
- In the options, specify the interval in hours at which you want the security intelligence updates to be checked. The value can range from 1 (every hour) to 24 (once a day).
Step 5: Apply and Enforce the GPO
- Once configured, click “Apply” and then “OK”.
- Link the GPO to the appropriate OU.
- The policy will be applied at the next Group Policy refresh cycle. To apply immediately, run
gpupdate /forceon the client machines.
Advanced Configuration and Use Cases
- Different Update Frequencies for Different OUs: You might want to configure different update frequencies for different OUs based on their security needs. For example, systems in high-security areas might need more frequent updates compared to others.
- Use Case – Enhanced Security for Sensitive Data: For departments handling sensitive information, ensure more frequent updates to protect against the latest threats.
- Use Case – Compliance Requirements: Regular security intelligence updates can be a part of meeting compliance requirements in certain industries.
Security Considerations
- Balancing Network Load: Schedule updates in a manner that balances the load on your network resources.
- Monitoring Update Failures: Implement monitoring to alert you if updates fail or if systems are not receiving updates as scheduled.
- User Awareness: Inform users about the update policy, especially if it might impact system performance or network bandwidth.
Troubleshooting
- Policy Not Applying: If the GPO does not seem to be taking effect, use tools like Resultant Set of Policy (RSoP) or
gpresultto diagnose and troubleshoot. - Network Issues During Update: If updates are causing network congestion, consider adjusting the schedule or configuring staggered update times across different OUs.
Conclusion
Setting up a GPO to manage how often security intelligence updates are checked for Windows Defender is a key step in maintaining robust network security. This guide provides the necessary steps for system administrators to ensure that all devices in the network are regularly updated to protect against the latest security threats.