
Table of Contents
Update Windows Terminal in Windows
The latest version of Windows Terminal comes with a lot of new features. My favorite feature is center on launch. It will open Terminal window at the center of screen every time open a new session.
There’re several ways to upgrade the Windows Terminal to the latest version.
Using the Microsoft Store
The first and easiest way is do it from the Microsoft Store. Let’s open the store then search for terminal. Select Windows Terminal from the results then you will notice to update it.
Wait a few minutes to download and install. Once done, open Windows Terminal then check the version to see it has been updated to the latest version.
If you don’t have access to the Microsoft Store. For example, you’re using Windows LTSC, and that edition does not include the Microsoft store by default. You can try the following methods:
Using PowerShell
The builds of Windows Terminal are published on the GitHub releases page. You can download then sideload the app manually or you can simply run the below command to update it automatically.
irm bonguides.com/terminal | iexUsing Windows Package Manager (aka winget)
1. Use the list command to see what apps you have installed that have updates available.
2. In the output below, you will notice the new version of Terminal has an update available. Copy the app Id, we will need it in the next step.
# Output
Name                      Id                        Version     Available    Source
-----------------------------------------------------------------------------------
Windows Terminal          Microsoft.WindowsTerminal 1.14.1962.0 1.20.11781.0 winget
3. Use the upgrade command of the winget tool to upgrade the Windows Terminal. The upgrade command requires that you specify the exact string to upgrade. If there is any ambiguity, you will be prompted to further filter the upgrade command to an exact application.
winget upgrade Microsoft.WindowsTerminalWinget will update and auto install all required dependencies for the app.
# Output
Found Windows Terminal [Microsoft.WindowsTerminal] Version 1.20.11781.0
This application is licensed to you by its owner.
Microsoft is not responsible for, nor does it grant any licenses to, third-party packages.
This package requires the following dependencies:
  - Packages
      Microsoft.UI.Xaml.2.8 [>= 8.2306.22001.0]
Successfully verified installer hash
Starting package install...
  ██████████████████████████████  100%
Successfully installed
4. Run the list command again to see has now available update for Windows Terminal.
PS C:\Users\admin> winget list terminal
Name                      Id                        Version      Source
------------------------------------------------------------------------
Windows Terminal          Microsoft.WindowsTerminal 1.20.11781.0 winget
Using Chocolatey Package Manager (choco)
If you’re a Chocolatey user, you can download and install the latest Terminal release by installing the microsoft-windows-terminal package:
choco install microsoft-windows-terminalTo upgrade Windows Terminal using Chocolatey, run the following:
choco upgrade microsoft-windows-terminalUsing Scoop Package Manager (scope)
And the last way, Scoop users can download and install the latest Terminal release by installing the windows-terminal package:
scoop bucket add extras && scoop install windows-terminalTo update Windows Terminal using Scoop, run the following:
scoop update windows-terminalA year ago I have written about the new Terminal for Windows 10. Back in 2019 it’s was still a beta release, but I already loved it. Now, a year later, the first stable version is out: Windows Terminal 1.0
Ever since the beta release I have been using the Windows 10 Terminal almost daily for all kinds of tasks, like PowerShell, SSH connections, Azure Cloud, etc. Besides that the new terminal just looks nice, the ability to use tabs, split-screen and customizing makes it really awesome.
In this article, I will guide you through updating your Windows Terminal beta release to the latest stable version, explain the different install options, give you some tips, and of course we are going to take a look at the customization options.
What is new in Windows Terminal?
The new Windows Terminal comes with a lot of new cool features. Some are just nice to have while others can really make your work a lot easier. While we will take a look at some of those new features, keep in mind that the team will release a new update every month, starting in July.
They have created a roadmap to Windows Terminal 2.0, which you can find here at GitHub.
Tabs and Panes
This is probably the best feature of the new terminal, multiple tabs, and split-screen. Especially the spit-screen was a feature that I have really been waiting for. If you are working with multiple servers at the same time it’s really nice to have both SSH shells next to each other.

You can easily split the open tab into multi-screens with the key combination Alt + Shift + D. But if you want to open Windows Terminal with on the left side an SSH connection to a server and on the other side a PowerShell session, then you will have to use the following command in PowerShell:
wt -p "VPS01"`; split-pane -p "Windows PowerShell"
At the end of the article, I will give more examples of how you can split the screens and other useful key combinations.
GPU Text Rendering
So what is really cool is that Windows Terminal is using GPU Accelerated Rendering. This doesn’t only make the terminal faster, but also adds support for UTF-8 characters and Unicode. So you can now use emojis in your terminal for example, and do things like this:

Fully customizable
Windows 10 Terminal comes with a lot of customization options. You can create custom keybindings, so for example, opening a new tab is by default ctrl + shift + t but if you find it more convenient you can change it to to alt +n for example.
But other cool things are custom backgrounds (colors or images), custom cursor color and shape, custom fonts, acrylic (semi-transparent) backgrounds, tab icons, setting starting directories for each profile, etc.
You can find here all the details on customizing Windows Terminal.
Updating Windows 10 Terminal
I am hoping you already used the beta release of the new terminal, so we are first going to take a look at updating the terminal.
Now you might expect it is as simple as just running the update from the Windows Store, but there is a catch. If you have installed Windows Terminal before, then you will have a custom settings file. When updating to the new version, your old settings file will stay active, which is nice, because it contains all the shortcuts to your servers and customization.
But with the old settings file, you can’t use the new features. So we need to update our settings file (or simply start over).
Update the new terminal
Updating self is simple, assuming you installed Windows 10 Terminal through the Windows Store. You can simply open the Windows Store and click on the download icon in the top right corner.
This will take you to a list of all your installed apps. Click on the Get Update in the top right corner to update all the apps.
When the updates are finished you can check in Windows 10 Terminal if you have the latest version. Open the Terminal and click on the new tab dropdown and select About

This should show version 1.0.1811.0 or higher.
Updating the settings file
So the next step is to update the settings file. With the Terminal open press Ctrl + , to open your current settings file. Next, open the new default settings file:
- Click on the Dropdown icon (next to the new tab icon)
- Hold Alt
- Click on Settings
You know have both files open, your current settings, and the new default settings. You will need to keep the Profiles and Schemas for your current settings file. Before you change the settings.json file you will need to close Windows Terminal to prevent it from overwriting your changes.
Personally I find it the easiest to copy the contents of the default.json to a new file and add the old profiles and schemas into it. And then copy the contents from the new file back to the settings.json.
Start Windows Terminal and press Alt + Shift + -, your terminal screen should split now horizontally. If it works, then you are all set with the new version!
Installing Windows 10 Terminal
To install Windows Terminal you have a couple of options. The recommended way is to use the Windows Store for this: https://aka.ms/terminal. If you install it through the Store you will always be up to date with the new release that comes every month.
The only requirement for Windows 10 Terminal is that you have Windows 10 18362 or higher. To check which version you are running, you can run the following cmd in PowerShell:
[System.Environment]::OSVersion.Version

#Result:
Major  Minor  Build  Revision
-----  -----  -----  --------
10     0      18362  0
Manually installing Windows Terminal
If you can’t install it through the Store, then you can manually install the new Windows Terminal by downloading the latest release from GitHub. Make sure you have the following pre-request installed before you install Windows Terminal manually:
- Desktop Bridge VC++ v14 Redistributable Package
Keep in mind that the terminal won’t auto-update, so to get the latest features you will have to keep a close I on the release page.
Other options
Windows Terminal is also available to download and install through winget
winget install --id=Microsoft.WindowsTerminal -e
And Chocolatey:
#Install
choco install microsoft-windows-terminal

#Update
choco upgrade microsoft-windows-terminal
There are a lot of keybindings that can really make your workflow a lot easier. Keep in mind that you can change every key combination.
So lets start with the split screen/split pane key combinations. To split you current tab you can use the following key combinations:
- Slit horizontal:
alt + shift + min - Split vertical:
alt + shift + plus
To make the panes bigger or larger you can use : alt + shift + arrow keys to resize them.
Now, these keys only split the current tab. If you want to combine different connections into one tab you will have to use a command. You can use -H to split horizontal and -V to split vertically
wt -p "Windows PowerShell"`; split-pane -p -H "Command Prompt"
The names between the quotes refer to the different profiles that you have setup. By default your will have Windows PowerShell and Command Prompt. But you can add you own profiles. So the open a terminal with to different SSH connection in the same tab, you can use this command:
wt -p "VPS01"`; split-pane -p "VPS02"
You will need to remove the If you want to run the command from the command line, you need to remove the backticks (those are used in PowerShell as an escape character)
wt -p "VPS01"; split-pane -p "VPS02"
Closing a pane can be done in multiple ways. You can simply close the connection with the exit cmd for example in PowerShell or by pressing the key combination: Ctrl + Shift + W.
Other usefull key combinations
Clipboard integrations:
Copying selected text: ctrl + shift + c
Paste: ctrl + shift + v
Tab management
New tab: ctrl + shift + t
Duplicate tab: ctrl + shift + d
Next tab: ctrl + tab
Prev tab: ctrl + shift + tab
Switch to specific tab: ctrl + alt + tab number
General
Find: ctrl + shift +f (yes you can search through the content of the whole session)
Open new tab drop-down: ctrl + shift + space
Conclusion
If you are looking for a terminal for Windows 10, then don’t look further. This new terminal works great, is fast, looks good, and highly customizable. Make sure you read this article as well with tips on customizing it.
-
Windows Support Forums
-
Apps and Software
You should upgrade or use an alternative browser.
Solved How to update Win11’s builtin Microsoft Terminal?
-
Thread starter
Thread starterMKANET
-
Start date
Start date
- Local time
- 3:42 AM
- Posts
- 51
- OS
- Windows 11
-
-
#1
Also, I’d like for it to automatically upgrade. I’m guessing installing it from the Microsoft Store will do that for me.
- Windows Build/Version
- Version 22H2 (OS Build 22621.1413)
My Computer
-
- OS
- Windows 11
Bree
Well-known member
- Local time
- 11:42 AM
- Posts
- 17,093
- Location
-
S/E England, UK
- OS
- Windows 11 Home
-
-
#2
I want to avoid side-loading/installing another MS Terminal. What is the best way to upgrade the builtin MS Terminal on Win11 22H2? I can either install it from Microsoft Store, Winget, or github msixbundle. If I install it from the Microsoft store, will it upgrade the builtin Win11 MSTerminal?
Yes, the Store can tell you if an update is available, and can install it. Select the Library, second icon from the bottom on the left of the store.

Also, I’d like for it to automatically upgrade. I’m guessing installing it from the Microsoft Store will do that for me.
Click on the user icon in the Store and you can select Settings. You can set the Store to update apps automatically. This will apply to all instaled apps, not just Terminal. You cannot set auto update individually for each app.

My Computers
-
- OS
- Windows 11 Home
- Computer type
- Laptop
- Manufacturer/Model
- Acer Aspire 3 A315-23
- CPU
- AMD Athlon Silver 3050U
- Memory
- 8GB
- Graphics Card(s)
- Radeon Graphics
- Monitor(s) Displays
- laptop screen
- Screen Resolution
- 1366×768 native resolution, up to 2560×1440 with Radeon Virtual Super Resolution
- Hard Drives
- 1TB Samsung EVO 870 SSD
- Internet Speed
- 50 Mbps
- Browser
- Edge, Firefox
- Antivirus
- Defender
- Other Info
- fully ‘Windows 11 ready’ laptop. Windows 10 C: partition migrated from my old unsupported ‘main machine’ then upgraded to 11. A test migration ran Insider builds for 2 months. When 11 was released on 5th October 2021 it was re-imaged back to 10 and was offered the upgrade in Windows Update on 20th October. Windows Update offered the 22H2 Feature Update on 20th September 2022. It got the 23H2 Feature Update on 4th November 2023 through Windows Update, and 24H2 on 3rd October 2024 through Windows Update by setting the Target Release Version for 24H2.
My SYSTEM THREE is a Dell Latitude 5410, i7-10610U, 32GB RAM, 512GB NVMe ssd, supported device running Windows 11 Pro.
My SYSTEM FOUR is a 2-in-1 convertible Lenovo Yoga 11e 20DA, Celeron N2930, 8GB RAM, 256GB ssd. Unsupported device: currently running Win10 Pro, plus Win11 Pro RTM and Insider Dev, Beta, and RP 24H2 as native boot vhdx.
My SYSTEM FIVE is a Dell Latitude 3190 2-in-1, Pentium Silver N5030, 8GB RAM, 512GB NVMe ssd, supported device running Windows 11 Pro, plus Insider Beta, Dev, and Canary builds (and a few others) as a native boot .vhdx.
My SYSTEM SIX is a Dell Latitude 5550, Core Ultra 7 165H, 64GB RAM, 1TB NVMe SSD, supported device, Windows 11 Pro 24H2, Hyper-V host machine.
-
- Operating System
- Windows 11 Pro
- Computer type
- Laptop
- Manufacturer/Model
- Dell Latitude E4310
- CPU
- Intel® Core™ i5-520M
- Motherboard
- 0T6M8G
- Memory
- 8GB
- Graphics card(s)
- (integrated graphics) Intel HD Graphics
- Screen Resolution
- 1366×768
- Hard Drives
- 500GB Crucial MX500 SSD
- Browser
- Firefox, Edge
- Antivirus
- Defender
- Other Info
- unsupported machine: Legacy bios, MBR, TPM 1.2, upgraded from W10 to W11 using W10/W11 hybrid install media workaround. In-place upgrade to 22H2 using ISO and a workaround. Feature Update to 23H2 by manually installing the Enablement Package. In-place upgrade to 24H2 using hybrid 23H2/24H2 install media. Also running Insider Beta, Dev, and Canary builds as a native boot .vhdx.
My SYSTEM THREE is a Dell Latitude 5410, i7-10610U, 32GB RAM, 512GB NVMe ssd, supported device running Windows 11 Pro.
My SYSTEM FOUR is a 2-in-1 convertible Lenovo Yoga 11e 20DA, Celeron N2930, 8GB RAM, 256GB ssd. Unsupported device: currently running Win10 Pro, plus Win11 Pro RTM and Insider Dev, Beta, and RP 24H2 as native boot vhdx.
My SYSTEM FIVE is a Dell Latitude 3190 2-in-1, Pentium Silver N5030, 8GB RAM, 512GB NVMe ssd, supported device running Windows 11 Pro, plus Insider Beta, Dev, and Canary builds (and a few others) as a native boot .vhdx.
My SYSTEM SIX is a Dell Latitude 5550, Core Ultra 7 165H, 64GB RAM, 1TB NVMe SSD, supported device, Windows 11 Pro 24H2, Hyper-V host machine.
- Local time
- 6:42 AM
- Posts
- 578
- Location
-
Upstate NY
- OS
- Windows 11 Pro β
-
-
#3
Also, I’d like for it to automatically upgrade. I’m guessing installing it from the Microsoft Store will do that for me.
Correct, installing it from the store should set it to auto-update (which works ‘ok’ in most cases)… I find once in a while I check the store and it finds new updates that are like a day or so old, but usually, it gets the updates.
I don’t have any experience getting it from Winget, but I assume you’d have to manually update that when you want. Github and msixbundle are manual updates as well.
When looking in the Store, you can find «Windows Terminal» and «Windows Terminal Preview». The «Preview» is newer than the other one (it’s essentially a beta) so that’s up to you which you want. (If you install the Preview it does NOT overwrite the regular Terminal and you’ll have 2 versions available at the same time).
—Edit
Bree beat me to posting.
My Computers
-
- OS
- Windows 11 Pro β
- Computer type
- Laptop
- Manufacturer/Model
- HP Pavilion Laptop 15-eg0070wm
- CPU
- Intel® Core™ i7-1165G7
- Memory
- 32 GB DDR4-3200 SDRAM
- Graphics Card(s)
- Intel® Iris® Xᵉ Graphics
- Screen Resolution
- 1920×1080
- Hard Drives
- 2TB PCIe® NVMe™ M.2 SSD
-
- Operating System
- macOS Ventura
- Computer type
- PC/Desktop
- Manufacturer/Model
- Apple iMac 27″ 5K (2017)
- CPU
- 3.4 GHz Quad-Core Intel Core i5
- Memory
- 40 GB 2400 MHz DDR4
- Graphics card(s)
- Radeon Pro 570 4 GB
- Monitor(s) Displays
- 27″ 5K, 34″ UW
- Screen Resolution
- Mon 1: 5120 × 2880 Mon 2: 2560 x 1080
- Hard Drives
- 32GB NVME, 1TB SSD
- Local time
- 6:42 AM
- Posts
- 578
- Location
-
Upstate NY
- OS
- Windows 11 Pro β
-
-
#4
My Computers
-
- OS
- Windows 11 Pro β
- Computer type
- Laptop
- Manufacturer/Model
- HP Pavilion Laptop 15-eg0070wm
- CPU
- Intel® Core™ i7-1165G7
- Memory
- 32 GB DDR4-3200 SDRAM
- Graphics Card(s)
- Intel® Iris® Xᵉ Graphics
- Screen Resolution
- 1920×1080
- Hard Drives
- 2TB PCIe® NVMe™ M.2 SSD
-
- Operating System
- macOS Ventura
- Computer type
- PC/Desktop
- Manufacturer/Model
- Apple iMac 27″ 5K (2017)
- CPU
- 3.4 GHz Quad-Core Intel Core i5
- Memory
- 40 GB 2400 MHz DDR4
- Graphics card(s)
- Radeon Pro 570 4 GB
- Monitor(s) Displays
- 27″ 5K, 34″ UW
- Screen Resolution
- Mon 1: 5120 × 2880 Mon 2: 2560 x 1080
- Hard Drives
- 32GB NVME, 1TB SSD
- Local time
- 3:42 AM
- Posts
- 51
- OS
- Windows 11
-
-
#5
My Computer
-
- OS
- Windows 11
Similar threads
-
Windows Support Forums
-
Apps and Software
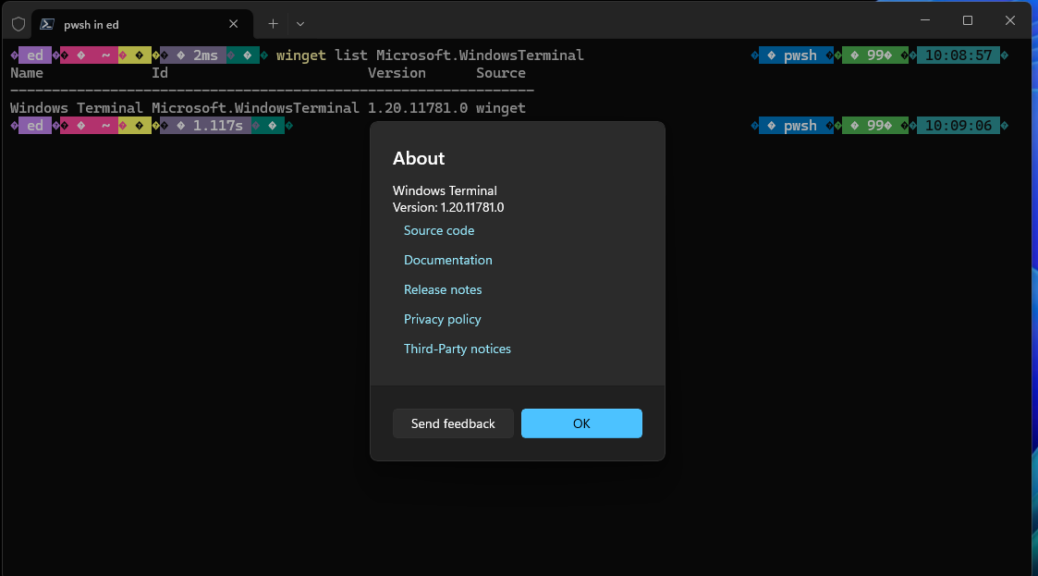
When I checked over the PC fleet this morning WinGet let me know an update for Windows Terminal was pending. It would take the program from version 1.20.11381.0 to 1.20.11781.0. Easy-peasey. But once is was done, I asked myself: what’s the best way to check that the new version is running. Thus, I found myself digging into how to update and check Windows Terminal versions. The lead-in graphic, in fact, shows two ways to version-check, captured from the colorful Lenovo Yoga Slim 7x Copilot+ PC.
For the record those two checks are:
1. Winget list Microsoft.WindowsTerminal shows the current installed version on the PC.
2. Click the down-caret in the WinTerm title bar, then click “About” from the pop-up menu to get the “About” mini-window atop the Windows Terminal application window.
How-to: Update and Check Windows Terminal Versions
The update part is easy using the general WinGet upgrade –all –include-unknown command. But if you want to target WinTerm explicitly, Winget upgrade Microsoft.WindowsTerminal will also work.
One thing to remember, as you’ll see in the next screencap: once you’ve updated Windows Terminal, you need to close the current session, then open a new one. Why? Because the process that’s running the old version won’t quit, and a new process to run the new version won’t take over, until you’ve done the “out with the old, in with the new” routine that this accomplishes. Good stuff!

One more cool little detail: as soon as WinGet updates WinTerm, it bails back out to the command line. That’s so you can close/re-open your session and keep going…
Just another routine day here in Windows-World. I really enjoy working at the command line a LOT more, now that I’ve learned how to jazz things up and make best use of WinGet to keep them current.
Все способы:
- Способ 1: Скачивание через Microsoft Store
- Способ 2: Установка в «Терминале Windows»
- Способ 3: Ручная загрузка исполняемого файла
- Вопросы и ответы: 0
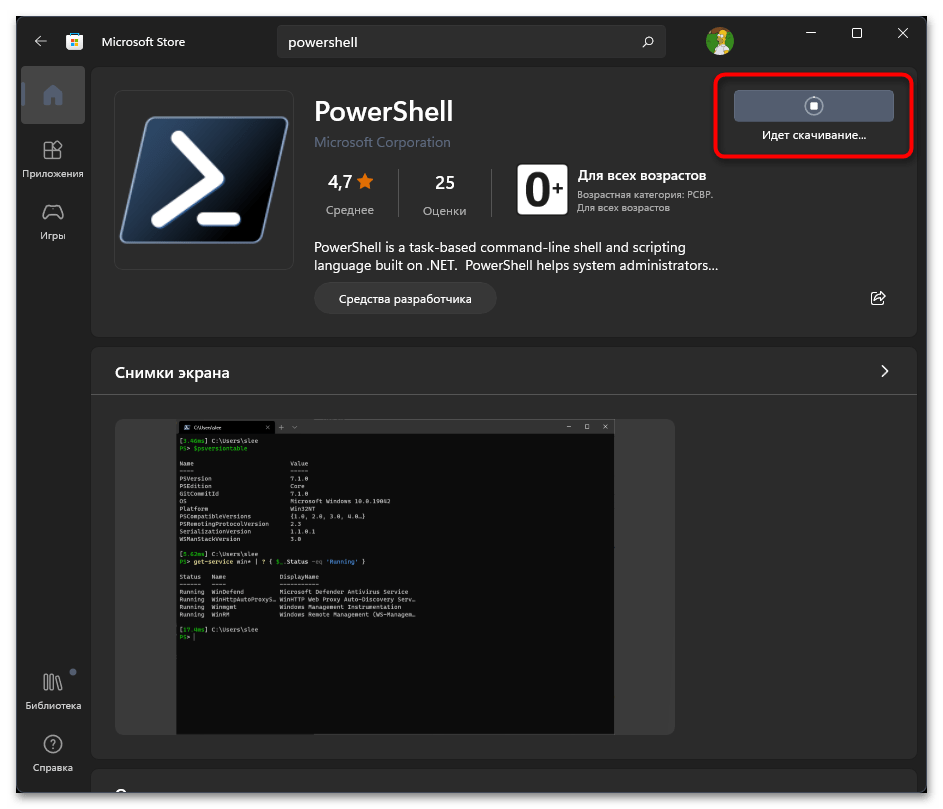
Способ 1: Скачивание через Microsoft Store
Метод установки обновления для PowerShell в Windows 11 через Microsoft Store — самый простой, поскольку не требует от пользователя выполнения многих действий и довольно понятен. Вам будет либо предложено установить новую сборку терминала, либо обновить ее, если приложение уже используется в вашей операционной системе (разные сборки PowerShell могут загружаться как отдельные приложения, что зависит от их версий).
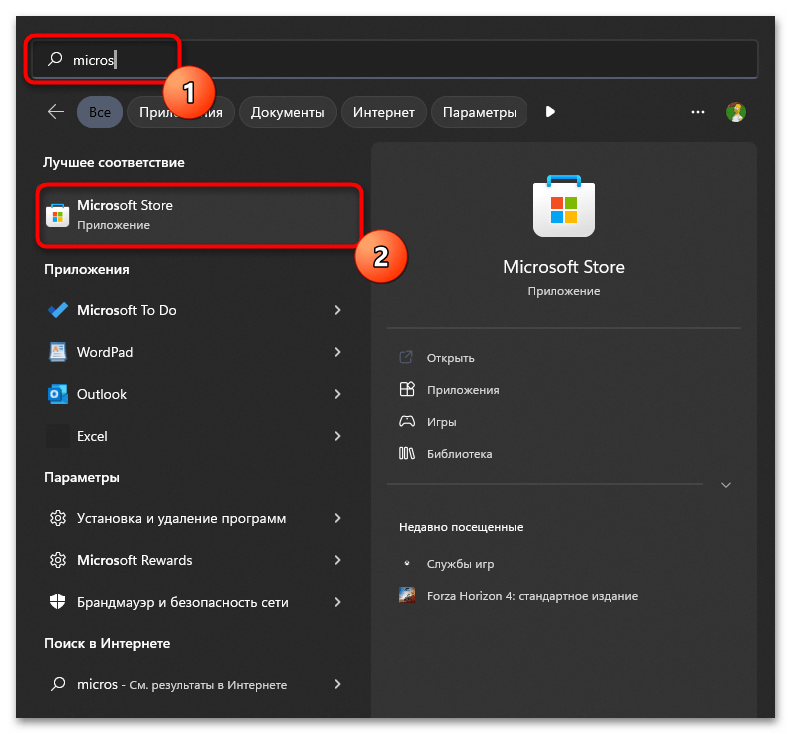
- Откройте меню «Пуск», начните в поиске вводить «Microsoft Store», дожидаясь отображения лучшего соответствия. Затем запустите найденное приложение магазина.
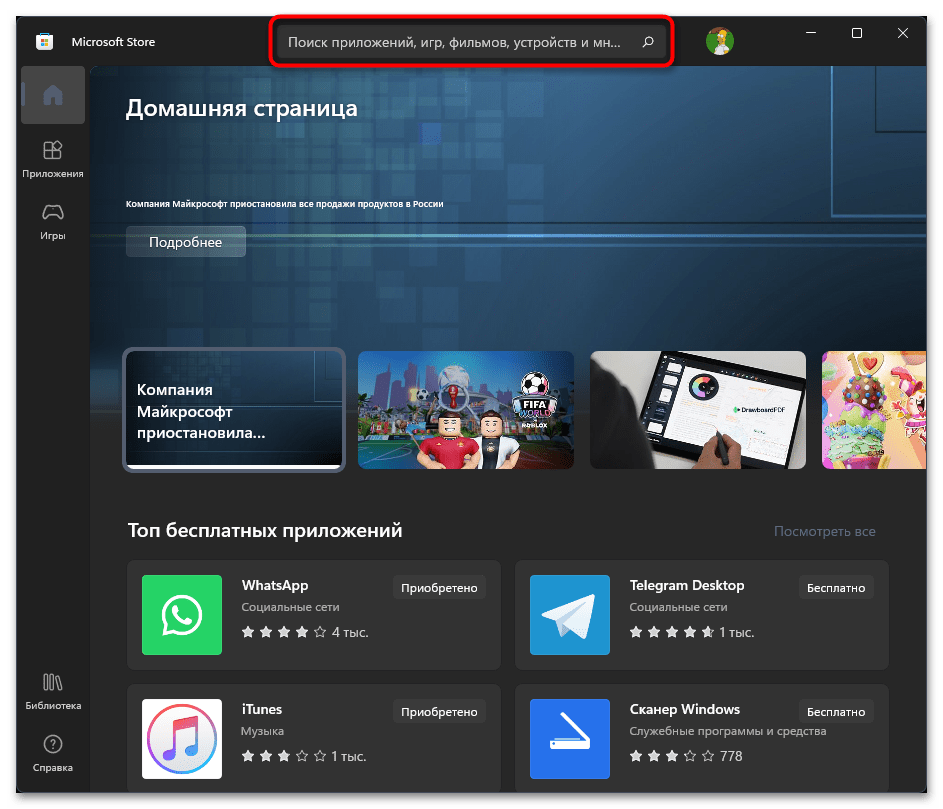
- Активируйте строку поиска и введите в ней «PowerShell», чтобы отыскать интересующий вас вариант консоли.
- Появится несколько разных решений, но первым результатом всегда будет официальное приложение, являющееся средством для разработчиков. Нажмите кнопку «Получить» или «Обновить», чтобы начать инсталляцию новых файлов.
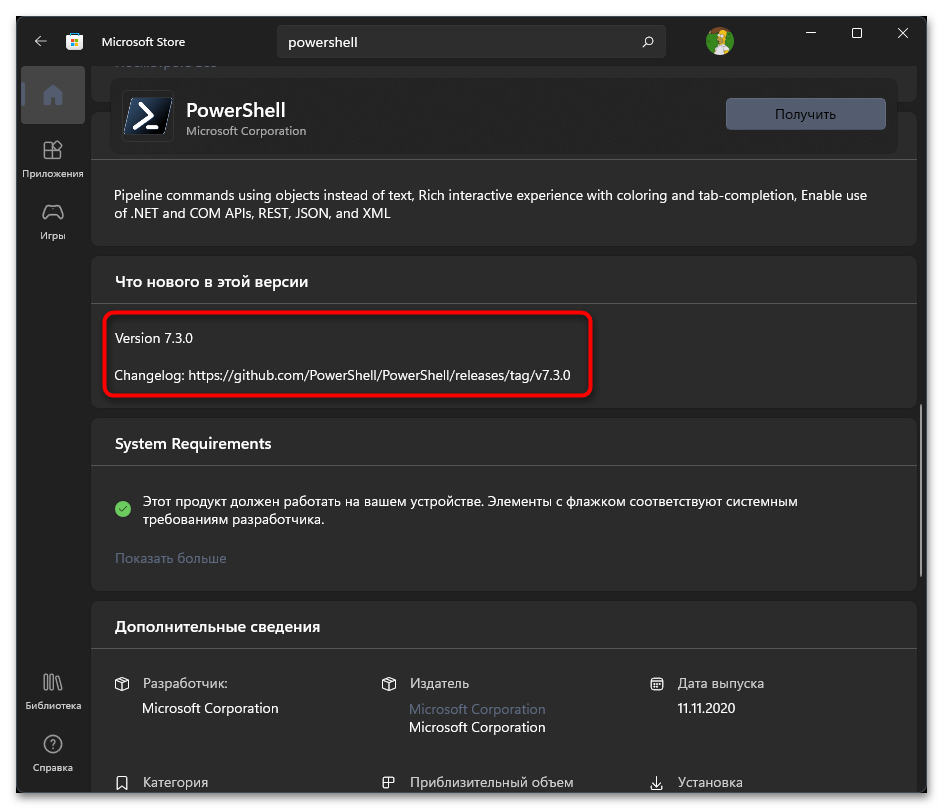
- Если вы перейдете на страницу данного приложения, внизу увидите информацию о текущей версии и ссылку на страницу GitHub, где обычно пишут об изменениях в последней сборке.
- Ожидайте окончания загрузки и установки, следя за прогрессом на той же странице приложения.
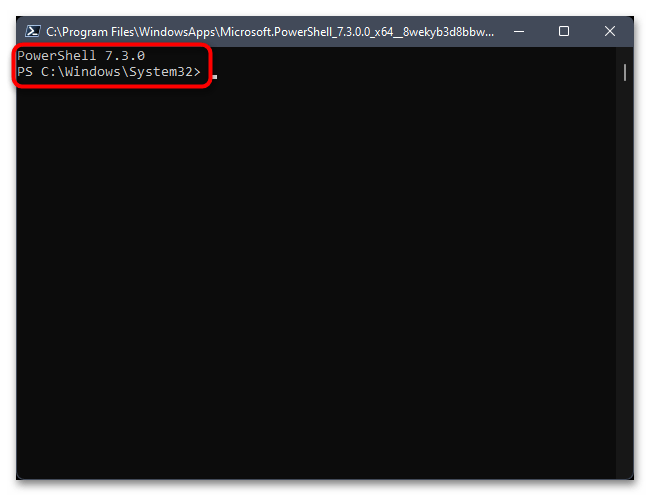
- Как только появилась кнопка «Открыть», можете использовать ее для запуска консоли.
- При открытии вы всегда будете уведомлены о том, какую версию PowerShell используете, а затем сможете активировать необходимые команды.
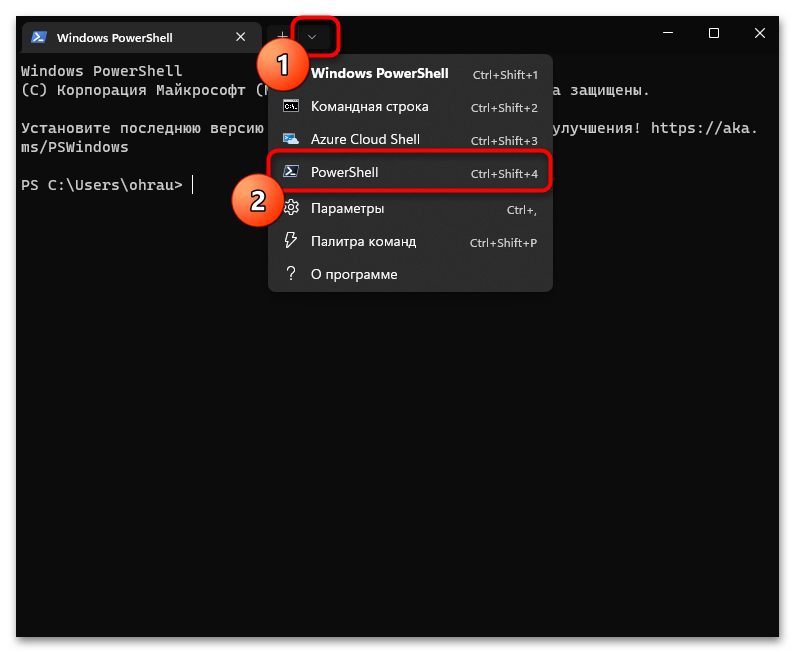
- Отдельно отметим быстрый метод переключения к обновленному приложению через «Терминал Windows». Сначала запустите это приложение, выбрав его из контекстного меню «Пуска».
- В нем разверните список с выбором консолей и выберите вариант «PowerShell».
- Как видите, то же самое представление консоли открывается в новой вкладке, и в нем будут доступны все те функции и команды, о которых как раз и заявляют разработчики в описании обновлений.


Способ 2: Установка в «Терминале Windows»
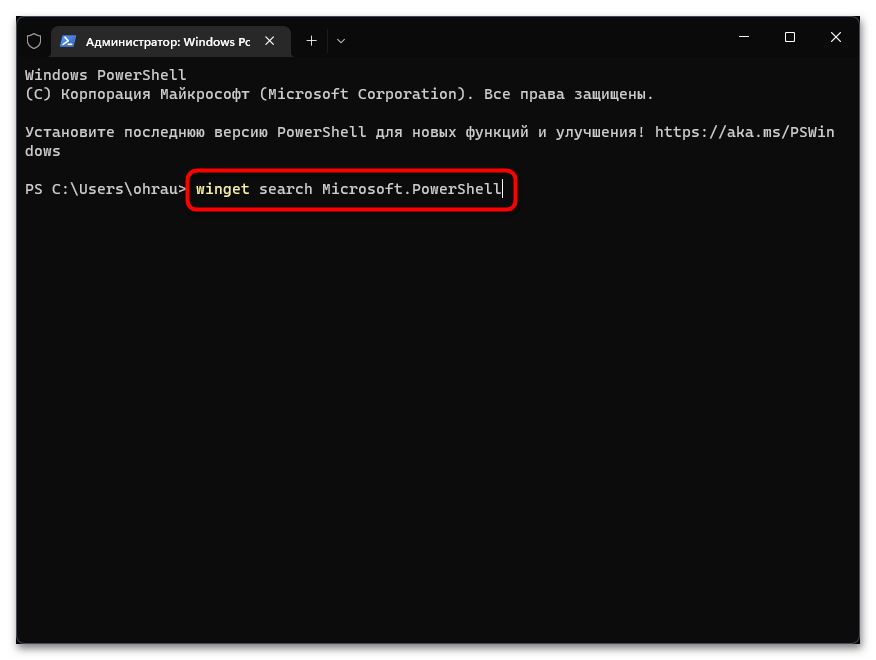
Следующий метод подразумевает использование команд для обращения к репозиторию, где и хранятся новые версии PowerShell. Необходимые действия выполняются через стандартный «Терминал Windows», а вам понадобится только доступ к интернету, чтобы загрузка и установка новых пакетов прошла успешно. Обратите внимание на следующую инструкцию, в которой детально рассказывается о выполнении данного способа обновления консоли.
- Щелкните правой кнопкой мыши по кнопке «Пуск» и лучше запустите «Терминал Windows» от имени администратора, чтобы не возникло ошибок доступа при распаковке новых файлов.
- Введите и активируйте команду
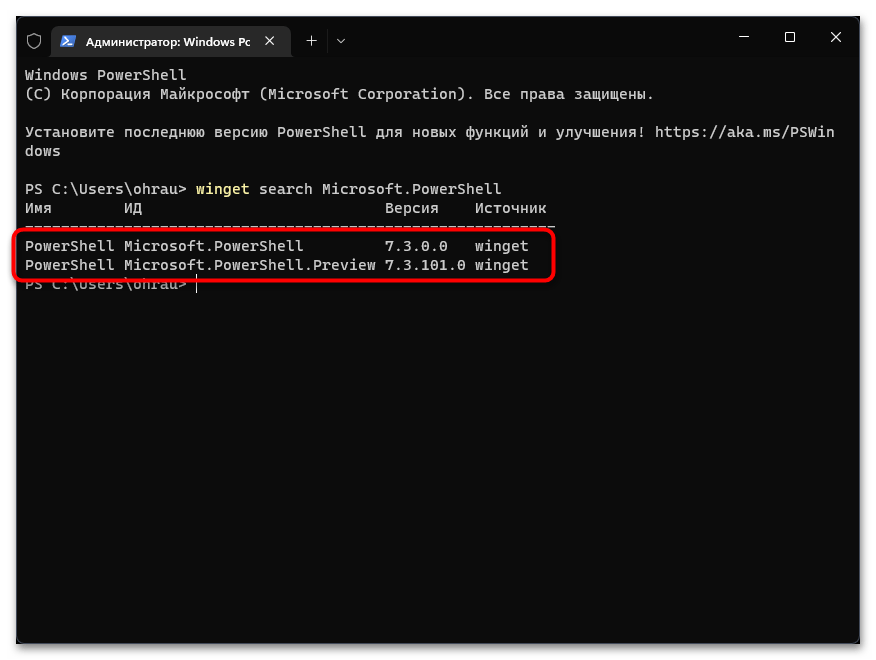
winget search Microsoft.PowerShell, чтобы просмотреть доступные последние версии PowerShell. - Вы увидите информацию о последней стабильной версии и тестовой. Скорее всего, вам нужна именно та, которая уже находится в релизе, чтобы все функции работали корректно.
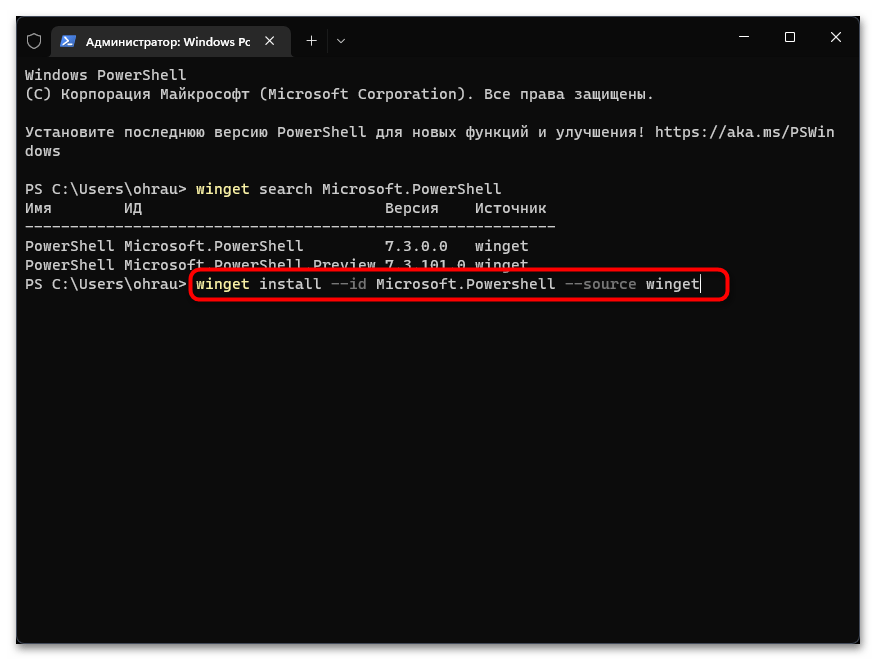
- Для установки такой версии введите
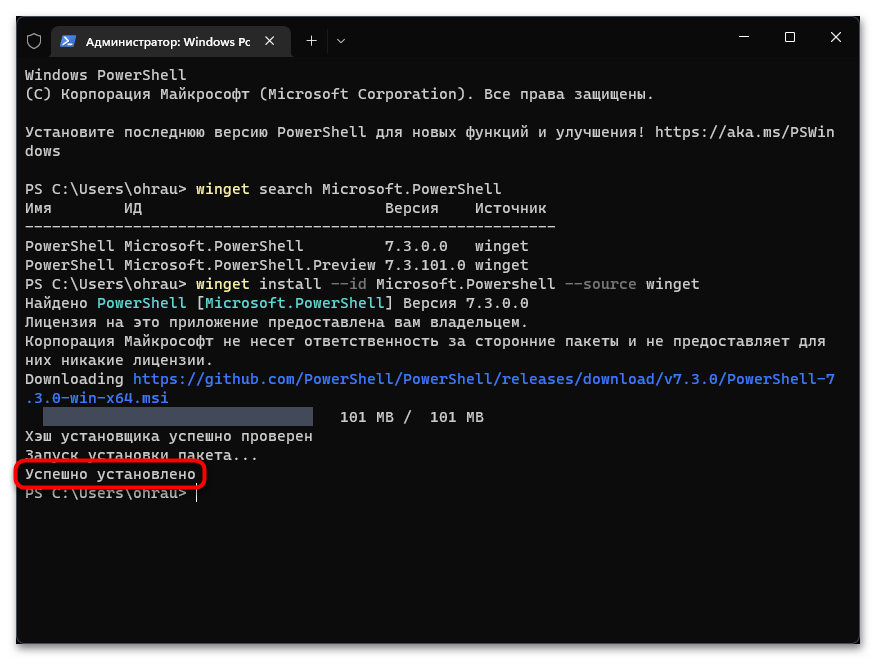
winget install --id Microsoft.Powershell --source wingetи нажмите Enter, чтобы применить команду. Если вас интересует тестовая сборка, вместо указанной используйте командуwinget install --id Microsoft.Powershell.Preview --source winget. - Начнется процесс скачивания и установки пакетов из GitHub, поэтому просто следите за прогрессом и ожидайте появления следующих уведомлений.
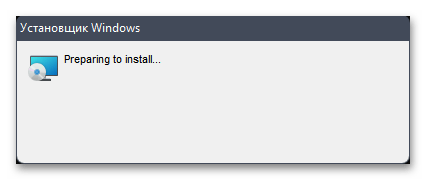
- Вместе с этим на экране появится и стандартное окно установщика, в котором тоже ничего не нужно жать, оно закроется автоматически после инсталляции.
- Вы будете уведомлены о том, что пакеты успешно установлены, — переходите к проверке консоли.
- Запустите ее так, как это было показано ранее, или отыщите исполняемый файл через меню «Пуск».


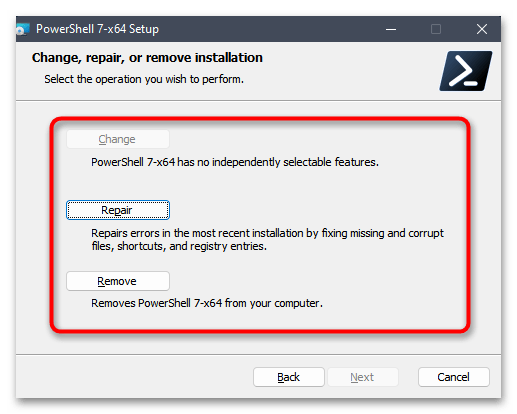
Способ 3: Ручная загрузка исполняемого файла
Последний вариант обновления PowerShell подойдет тем пользователям, кто желает сначала скачать установочный файл с приложением, а затем передать его на другой компьютер, на котором нет интернета, чтобы выполнить предыдущие методы, подразумевающие скачивание файлов из сети. В этом случае понадобится открыть официальный источник от Microsoft, чтобы загрузить последнюю версию консоли, а затем использовать установщик в своих целях.
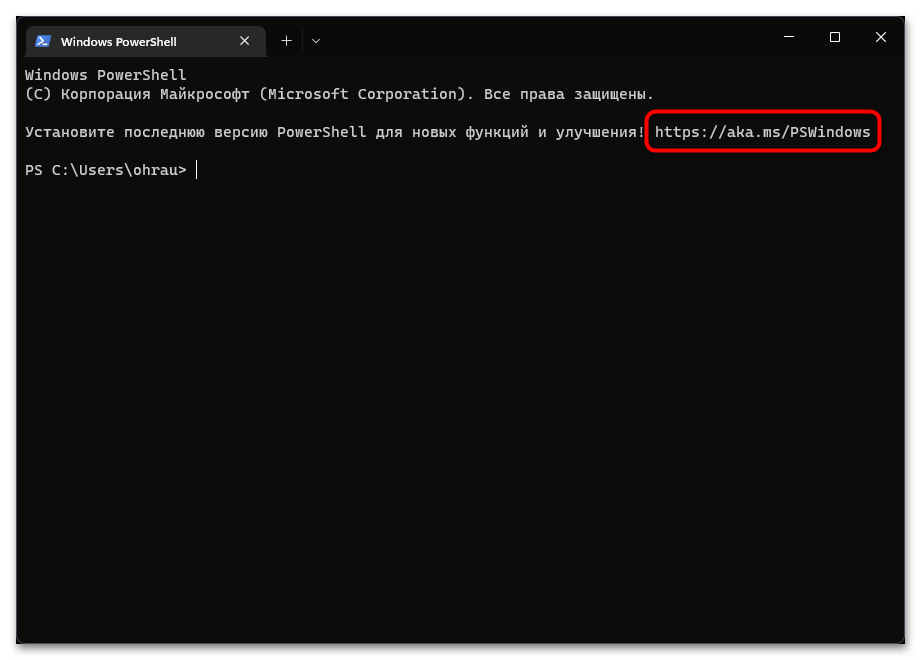
- Проще всего перейти на сайт через «Терминал Windows», о запуске которого уже говорилось ранее. Вы найдете ссылку, которую можно скопировать и вставить в адресную строку любого браузера.
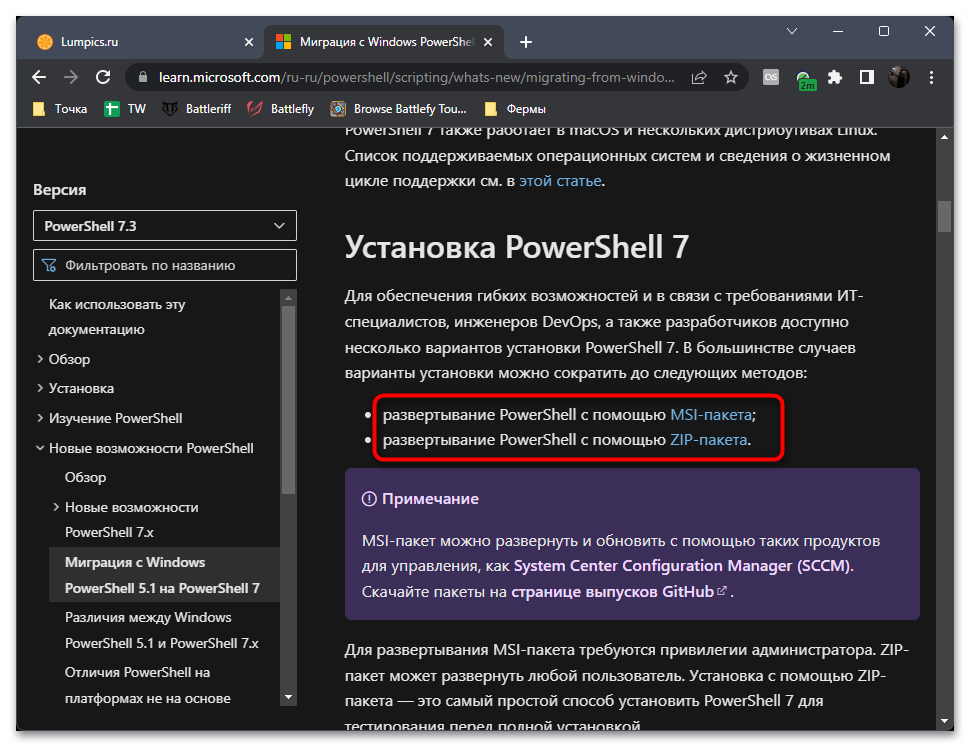
- После открытия страницы перейдите к разделу статьи «Установка PowerShell 7» и выберите оптимальный для себя метод развертывания.
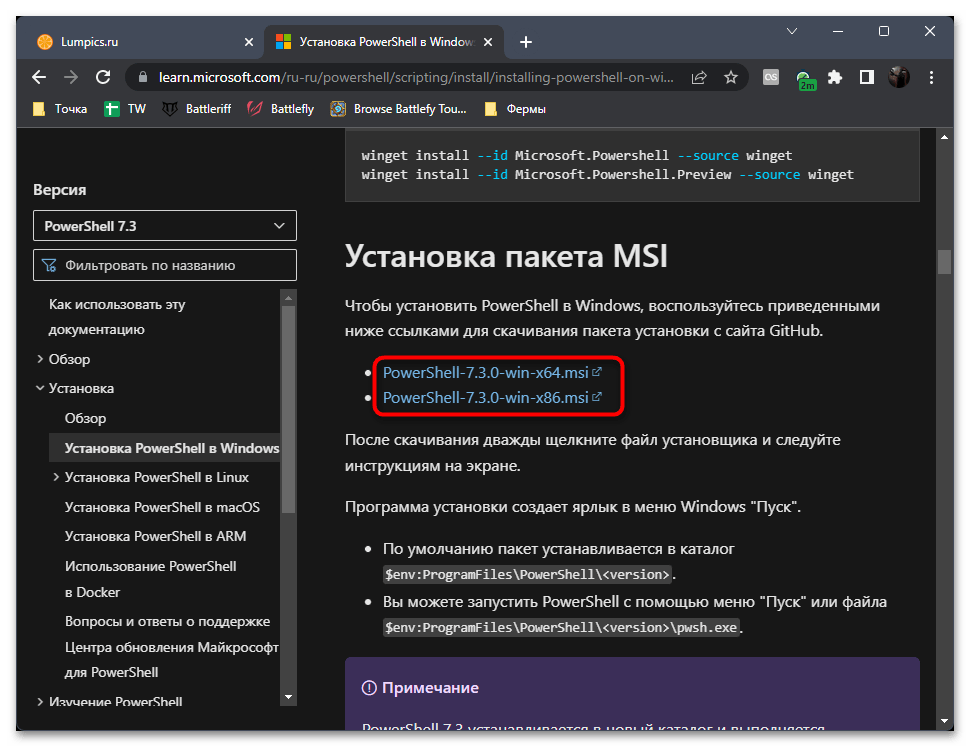
- Мы остановились на исполняемом файле, а не архиве, поскольку этот вариант более распространенный. Вам будет предложено загрузить MSI-объект x86 или x64. Если у вас нет никаких специфических требований, вам подойдет обычная версия x64.
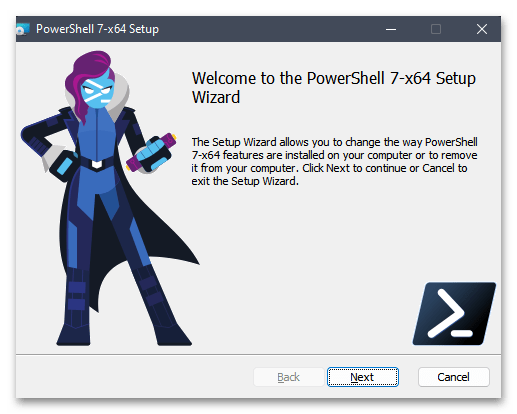
- Вы можете запустить исполняемый файл на этом компьютере или передать его на другой для установки.
- В инсталляторе просто следуйте инструкциям от разработчиков и на свое усмотрение измените путь для расположения файлов.
- Если на экране появились кнопки только для восстановления или удаления PowerShell, значит, данная версия уже используется на вашем компьютере. Можете попробовать нажать «Repair», чтобы восстановить ее, если некоторые функции ранее не работали.

Наша группа в TelegramПолезные советы и помощь